technical data SKODA FABIA 2004 1.G / 6Y Workshop Manual
[x] Cancel search | Manufacturer: SKODA, Model Year: 2004, Model line: FABIA, Model: SKODA FABIA 2004 1.G / 6YPages: 247
Page 106 of 247
Starting-off and Driving105
Using the systemSafetyDriving TipsGeneral MaintenanceBreakdown assistanceTechnical Data
•Depress the clutch pedal fully when changing gears, in order to avoid
unnecessary wear and damage.
Handbrake
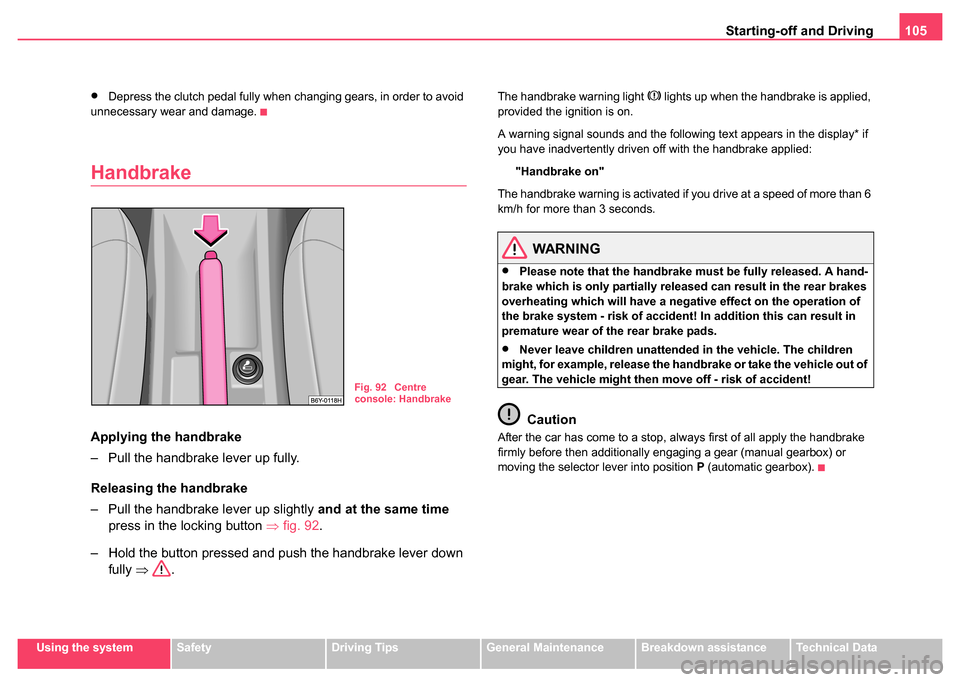
Applying the handbrake
– Pull the handbrake lever up fully.
Releasing the handbrake
– Pull the handbrake lever up slightly and at the same time
press in the locking button ⇒fig. 92 .
– Hold the button pressed and push the handbrake lever down fully ⇒ .
The handbrake warning light lights up when the handbrake is applied,
provided the ignition is on.
A warning signal sounds and the following text appears in the display* if
you have inadvertently driven off with the handbrake applied:
"Handbrake on"
The handbrake warning is activated if you drive at a speed of more than 6
km/h for more than 3 seconds.
WARNING
•Please note that the handbrake must be fully released. A hand-
brake which is only partially released can result in the rear brakes
overheating which will have a nega tive effect on the operation of
the brake system - risk of accident! In addition this can result in
premature wear of the rear brake pads.
•Never leave children unattended in the vehicle. The children
might, for example, release the handbrake or take the vehicle out of
gear. The vehicle might then move off - risk of accident!
Caution
After the car has come to a stop, always first of all apply the handbrake
firmly before then additionally engaging a gear (manual gearbox) or
moving the selector lever into position P (automatic gearbox).
Fig. 92 Centre
console: Handbrake
Page 108 of 247
Starting-off and Driving107
Using the systemSafetyDriving TipsGeneral MaintenanceBreakdown assistanceTechnical Data
Cruise control system (CCS)*
Introduction
The cruise control system (CCS) maintains a constant speed, more than
30 km/h (20 mph), once it has been set, without you having to depress the
accelerator pedal. This is only possible within the range which is permitted
by the power output and braking power of the engine. The cruise control
system makes it possible - particularly on long journeys - for you to rest
your “accelerator foot”.
WARNING
•The cruise control system must not, for safety reasons, be used
in dense traffic or on unfavourable road surfaces (such as icy
roads, slippery roads or loose chippings) - risk of accident!
•In order to prevent unintentional use of the cruise control
system, always switch off the system after use.
Note
•Models fitted with a manual gearbox: Always depress the clutch pedal
if you switch on the cruise control system when the gearbox is in Neutral.
Otherwise the engine can rev up unintentionally.
•The cruise control system is not able to maintain a constant speed
when driving on steep downhill sections. The weight of the vehicle
increases the speed at which it travels. One should shift down in good time
to a lower gear or slow the vehicle down by applying the foot brake.
•It is not possible on vehicles fitted with an automatic gearbox to switch
on the cruise control system if the selector lever is in the position P, N , R
or 1.
Storing a speed
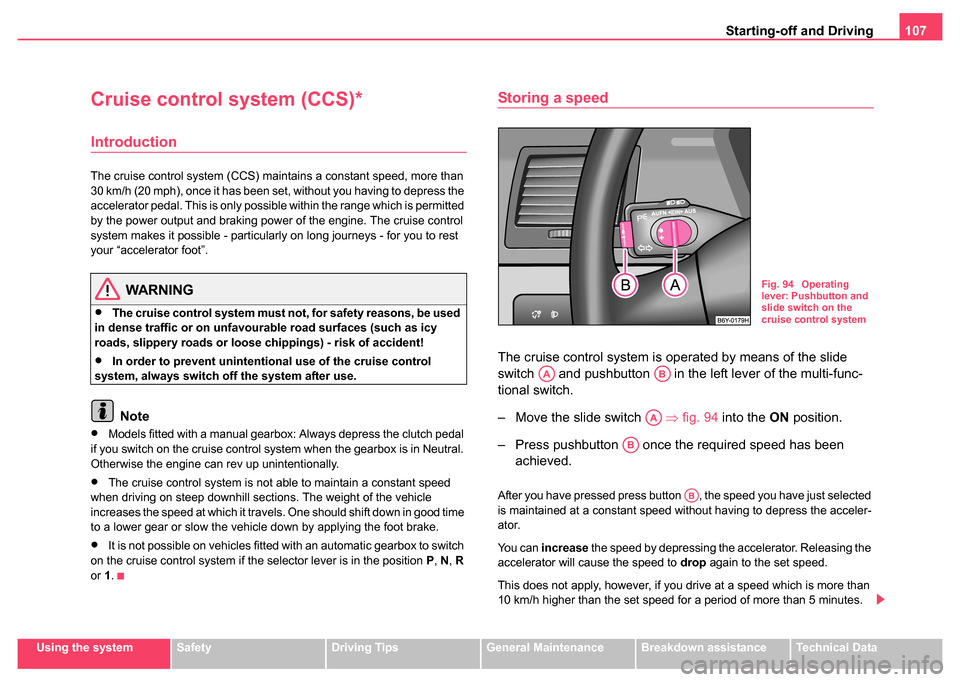
The cruise control system is operated by means of the slide
switch and pushbutton in the left lever of the multi-func-
tional switch.
– Move the slide switch ⇒fig. 94 into the ON position.
– Press pushbutton once the required speed has been achieved.
After you have pressed press button , the speed you have just selected
is maintained at a constant speed without having to depress the acceler-
ator.
You can increase the speed by depressing the accelerator. Releasing the
accelerator will cause the speed to drop again to the set speed.
This does not apply, however, if you drive at a speed which is more than
10 km/h higher than the set speed for a period of more than 5 minutes.
Fig. 94 Operating
lever: Pushbutton and
slide switch on the
cruise control system
AAAB
AA
AB
AB
Page 110 of 247

Starting-off and Driving109
Using the systemSafetyDriving TipsGeneral MaintenanceBreakdown assistanceTechnical Data
WARNING
First ensure that it is not too high for the traffic conditions which
exist at that moment before resuming the stored speed.
Switching off the cruise control system completely
– Move the slide switch ⇒page 107, fig. 94 up to the stop
into the OFF position.AA
Page 112 of 247
Automatic gearbox*111
Using the systemSafetyDriving TipsGeneral MaintenanceBreakdown assistanceTechnical Data
Selector lever positions
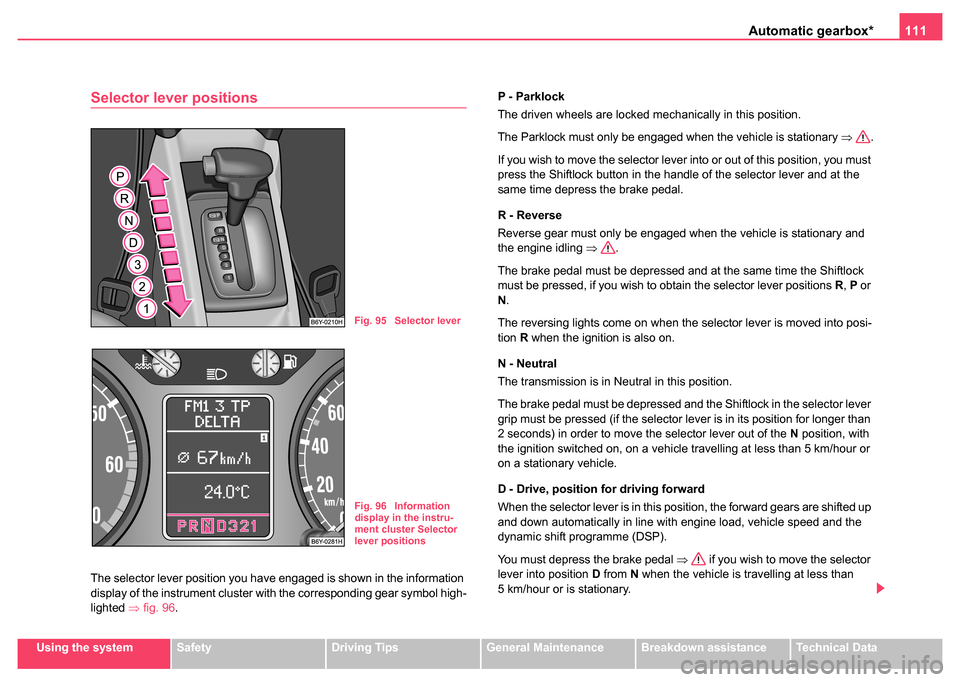
The selector lever position you have engaged is shown in the information
display of the instrument cluster with the corresponding gear symbol high-
lighted ⇒fig. 96. P - Parklock
The driven wheels are locked mechanically in this position.
The Parklock must only be engaged when the vehicle is stationary
⇒.
If you wish to move the selector lever into or out of this position, you must
press the Shiftlock button in the handle of the selector lever and at the
same time depress the brake pedal.
R - Reverse
Reverse gear must only be engaged when the vehicle is stationary and
the engine idling ⇒.
The brake pedal must be depressed and at the same time the Shiftlock
must be pressed, if you wish to obtain the selector lever positions R, P or
N .
The reversing lights come on when the selector lever is moved into posi-
tion R when the ignition is also on.
N - Neutral
The transmission is in Neutral in this position.
The brake pedal must be depressed and the Shiftlock in the selector lever
grip must be pressed (if the selector lever is in its position for longer than
2 seconds) in order to move the selector lever out of the N position, with
the ignition switched on, on a vehicle travelling at less than 5 km/hour or
on a stationary vehicle.
D - Drive, position for driving forward
When the selector lever is in this position, the forward gears are shifted up
and down automatically in line with engine load, vehicle speed and the
dynamic shift programme (DSP).
You must depress the brake pedal ⇒ if you wish to move the selector
lever into position D from N when the vehicle is travelling at less than
5 km/hour or is stationary.
Fig. 95 Selector lever
Fig. 96 Information
display in the instru-
ment cluster Selector
lever positions
Page 114 of 247
Automatic gearbox*113
Using the systemSafetyDriving TipsGeneral MaintenanceBreakdown assistanceTechnical Data
Selector lever lock
Automatic selector lever lock
With the ignition on, the selector lever is locked when it is in the positions
P and N. You must depress the brake pedal first and press the Shiftlock
button at the same time in order to move the selector lever out of these
positions. The following will be displayed in the information display*:
P LOCKED
or
N LOCKED
Symbol
also lights up in the selector lever cover until the brake pedal
is actuated.
A time delay element ensures that the selector lever is not blocked when
rapidly switching over the position N (e.g. from R to D). This does, for
example, allow one to seesaw out a stuck vehicle. The selector lever lock
will click into place if the lever is in the N position for more than 2 seconds
without the brake pedal being pressed.
The selector lever lock is only active if the vehicle is stationary or moving
at speed of less than 5 km/hour. The lock is switched off automatically into
position N when the car is travelling at a higher speed.
Shiftlock button
The Shiftlock button in the handle of selector lever prevents certain
selector lever positions being engaged inadvertently. The selector lever
lock is cancelled when you press the Shiftlock button.
Kickdown function
The kickdown function provides you with maximum accel-
eration power.
Depressing the accelerator pedal beyond the pressure point casues the
automatic gearbox to shift down into a lower gear (in line with vehicle
speed and engine speed). The gearbox shifts up into the next higher gear
when the engine has reached its maximum revolations.
WARNING
Please note that using the kickdown function can result in the
driven wheels spinning on a smooth or slippery road surface - risk
of skidding!
Dynamic shift programme
The automatic gearbox of your vehicle is controlled electronically. Shifting
up and down through the gears is performed automatically on the basis of
pre-defined driving programmes.
Adopting a moderate style of driving will cause the gearbox to select the
most economical driving programme. Shifting up into a higher gear as
soon as possible and shifting down as late as possible will have a favour-
able effect on your fuel consumption.
Adopting a faster style of driving with rapid movements of the acceler-
ator pedal combined with sharp acceleration and frequent changes in
speed, exploiting the top speed of the car or operating the kickdown func-
tion, will cause the gearbox to switch over to the sporty driving
programme. Shifting up later into a higher gear makes it possible to fully
exploit the power reserves of the engine. The gearbox also then shifts
Page 116 of 247

Communication115
Using the systemSafetyDriving TipsGeneral MaintenanceBreakdown assistanceTechnical Data
Communication
Universal telephone connection*
A telephone mount is factory-fitted. The mount is attached to the
centre console. Adapter “Cullmann” and mobile phone are not
factory-fitted by Škoda Auto.
Initialisation
– Withdraw the ignition key.
– First insert the adapter without the mobile phone into the
mount in the direction of arrow ⇒fig. 97 until the
adapter is touching the stop. Press the adapter slightly in the
direction of arrow until it locks into position. – Plug the adapter cable into the mobile phone socket. The
power socket is located under the front passenger storage
compartment.
– Switch on the ignition.
– Wait for approximately 15 seconds, switch off ignition.
– Insert the mobile phone into the adapter (as specified in manufacturer's instructions) and switch on the ignition.
Removing the mobile phone and adapter
– Press the button and remove the mobile telephone.
An initialisation must be carried out:
•after the first connection of the adapter
•after reconnecting the battery
•after pulling out the adapter cable from the power socket for the mobile
phone
This enables you to make full use of the advantages of a normal carphone
(“handsfree system” using a microphone integrated in the vehicle, optimal
transmission of signals using an external aerial etc.). The battery of the
mobile phone is also constantly charged.
Please contact your Škoda dealer If there are any points which are not
clear.
Please also refer to the additional instructions ⇒page 116, “Mobile
phones and two-way radio systems”.
Fig. 97 Universal tele-
phone connection
ABA1
A2
AA
AC
Page 118 of 247
Passive Safety117
Using the systemSafetyDriving TipsGeneral MaintenanceBreakdown assistanceTechnical Data
Safety
Passive Safety
Basic information
Driving the safe way
Passive safety measures reduce the risk of injury in acci-
dent situations.
In this section you will find important information, tips and notes on the
subject of passive safety in your vehicle. We have combined everything
here which you should be familiar with, for example, regarding seat belts,
airbags, child seats and safety of children. It is therefore important, in
particular, to comply with the notes and warnings in this section for your
own interest and in the interest of those travelling with you.
WARNING
•This chapter contains important information on how to use the
vehicle for the driver and his occupants. You will find further infor-
mation on safety, which concerns you and those travelling with
you, in the following chapters of this Owner's Manual.
•The complete on-board literature should always be in the
vehicle. This applies in particular, if you rent out or sell the
vehicle.
Safety equipment
The safety equipment is part of the occupant protection
and it can reduce the risk of injuries in accident situations.
“Do not put at risk” your safety and the safety of those travelling with you
. In the event of an accident, the safety equipment can reduce the risk of
injuries. The following list contains part of the safety equipment in your
vehicle:
•Three-point seat belts for all the seats,*,
•belt force limiter for front seats*,
•belt tensioner for front seats,
•seat belt height adjuster for front seats,
•front airbags*,
•Side airbags*,
•anchoring points for child seat using the “ISOFIX” system,
•head restraint adjustable for height,
•adjustable steering column.
The specified safety equipment works together, in order to optimally
protect you and those travelling with you in accident situations. The safety
equipment does not protect you or the people travelling with you, if you or
your occupants adopt an incorrect seated position or the equipment is not
correctly adjusted or used.
For this reason you will be provided with information on why this equip-
ment is very important, how it protects you and the occupants, what
Page 120 of 247
Passive Safety119
Using the systemSafetyDriving TipsGeneral MaintenanceBreakdown assistanceTechnical Data
Correct seated position
Correct seated position for the driver
Correct seated position for the driver is important for safe
and relaxed driving.
For your own safety and to reduce the risk of injury in the event of an acci-
dent, we recommend the following setting.
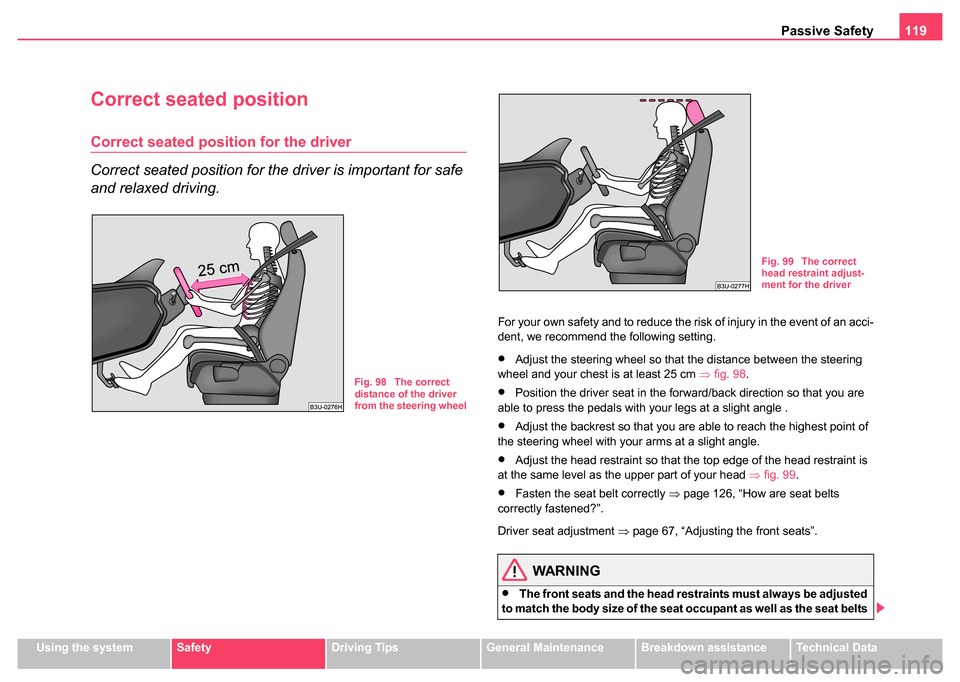
•Adjust the steering wheel so that the distance between the steering
wheel and your chest is at least 25 cm ⇒fig. 98 .
•Position the driver seat in the forward/back direction so that you are
able to press the pedals with your legs at a slight angle .
•Adjust the backrest so that you are able to reach the highest point of
the steering wheel with your arms at a slight angle.
•Adjust the head restraint so that the top edge of the head restraint is
at the same level as the upper part of your head ⇒fig. 99 .
•Fasten the seat belt correctly ⇒page 126, “How are seat belts
correctly fastened?”.
Driver seat adjustment ⇒page 67, “Adjusting the front seats”.
WARNING
•The front seats and the head restraints must always be adjusted
to match the body size of the seat occupant as well as the seat belts
Fig. 98 The correct
distance of the driver
from the steering wheel
Fig. 99 The correct
head restraint adjust-
ment for the driver
Page 122 of 247

Passive Safety121
Using the systemSafetyDriving TipsGeneral MaintenanceBreakdown assistanceTechnical Data
Correct seated position for th e occupants on the rear
seats
Occupants on the rear seats must sit upright, keep the feet
in the footwell and must have their seat belts correctly
fastened.
To reduce the risk of injury in the event of a sudden braking manoeuvre or
an accident, the occupants on the rear seats must observe the following.
•Adjust the head restraints so that the top edge of the head restraints
are at the same level as the upper part of your head ⇒page 119, fig. 99 .
•Fasten the seat belt correctly ⇒page 126, “How are seat belts
correctly fastened?”.
•If you are transporting ⇒ page 140, “Transporting children safely” chil-
dren in the vehicle, please use a suitable child restraint system.
WARNING
•The head restraints must always be adjusted to match the body
size, in order to offer an optimal protection for you and your occu-
pants.
•Always keep your feet in the footwell when the car is being
driven - never put your feet out of the window or on the surfaces of
the seats. You will be exposed to increased risk of injury if it
becomes necessary to apply the brake or in the event of an acci-
dent. If an airbag is deployed, you may suffer fatal injuries when
adopting an incorrect seated position!
•If the occupants on the rear seats are not sitting upright, the risk
of injury is increased due to in correct routing of the seat belt.
Examples of an incorrect seated position
An incorrect seated position can lead to severe injuries or
death for the occupants.
Seat belts offer their optimum protection only if the webbing of the seat
belts is properly routed. Incorrect seated positions considerably reduce
the protective functions of the seat belts and therefore increase the risk of
injury due to an incorrect routing of the seat belt. The driver is fully respon-
sible for himself and his occupants, in particular for the children. Do not
permit an occupant to adopt an incorrect seated position when the car is
moving.
The following list contains the examples of seated positions which are
dangerous for the occupants. This list is not complete, however we would
like you to get interested in this subject.
Therefore, while the car is moving never:
•stand up in the vehicle,
•stand up on the seats,
•kneel onto the seats,
•tilt the backrest fully to the back,
•lean against the dash panel,
•lie on the rear seats,
•only sit on the front area of the seat,
•sit to the side,
•lean out of the window,
•put the feet out of the window,
•put the feet on the dash panel,
•put the feet on the seat upholstery,
•occupy the footwell,
•have the seat belt not fastened,
Page 124 of 247
Seat belts123
Using the systemSafetyDriving TipsGeneral MaintenanceBreakdown assistanceTechnical Data
Seat belts
Why seat belts?
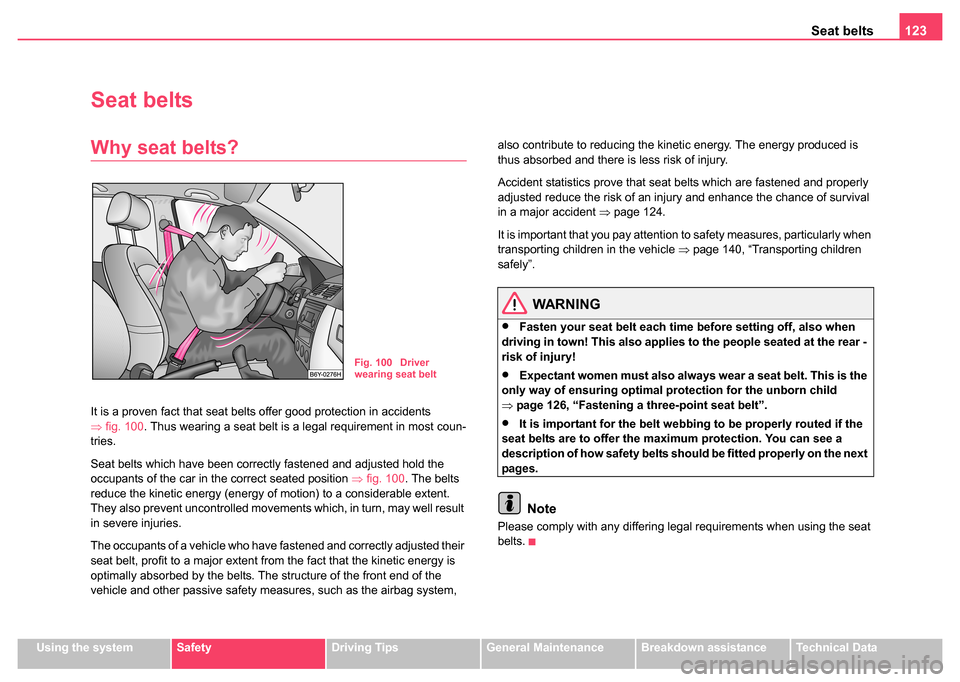
It is a proven fact that seat belts offer good protection in accidents
⇒fig. 100 . Thus wearing a seat belt is a legal requirement in most coun-
tries.
Seat belts which have been correctly fastened and adjusted hold the
occupants of the car in the correct seated position ⇒fig. 100 . The belts
reduce the kinetic energy (energy of motion) to a considerable extent.
They also prevent uncontrolled movements which, in turn, may well result
in severe injuries.
The occupants of a vehicle who have fastened and correctly adjusted their
seat belt, profit to a major extent from the fact that the kinetic energy is
optimally absorbed by the belts. The structure of the front end of the
vehicle and other passive safety measures, such as the airbag system, also contribute to reducing the kinetic energy. The energy produced is
thus absorbed and there is less risk of injury.
Accident statistics prove that seat belts which are fastened and properly
adjusted reduce the risk of an injury and enhance the chance of survival
in a major accident
⇒page 124.
It is important that you pay attention to safety measures, particularly when
transporting children in the vehicle ⇒page 140, “Transporting children
safely”.
WARNING
•Fasten your seat belt each time before setting off, also when
driving in town! This also applies to the people seated at the rear -
risk of injury!
•Expectant women must also always wear a seat belt. This is the
only way of ensuring optimal protection for the unborn child
⇒ page 126, “Fastening a three-point seat belt”.
•It is important for the belt webbing to be properly routed if the
seat belts are to offer the maximum protection. You can see a
description of how safety belts should be fitted properly on the next
pages.
Note
Please comply with any differing legal requirements when using the seat
belts.
Fig. 100 Driver
wearing seat belt