technical data SKODA FABIA 2004 1.G / 6Y Service Manual
[x] Cancel search | Manufacturer: SKODA, Model Year: 2004, Model line: FABIA, Model: SKODA FABIA 2004 1.G / 6YPages: 247
Page 86 of 247
Seats and Stowage85
Using the systemSafetyDriving TipsGeneral MaintenanceBreakdown assistanceTechnical Data
Power socket in the luggage compartment (Estate
car*, Sedan*)
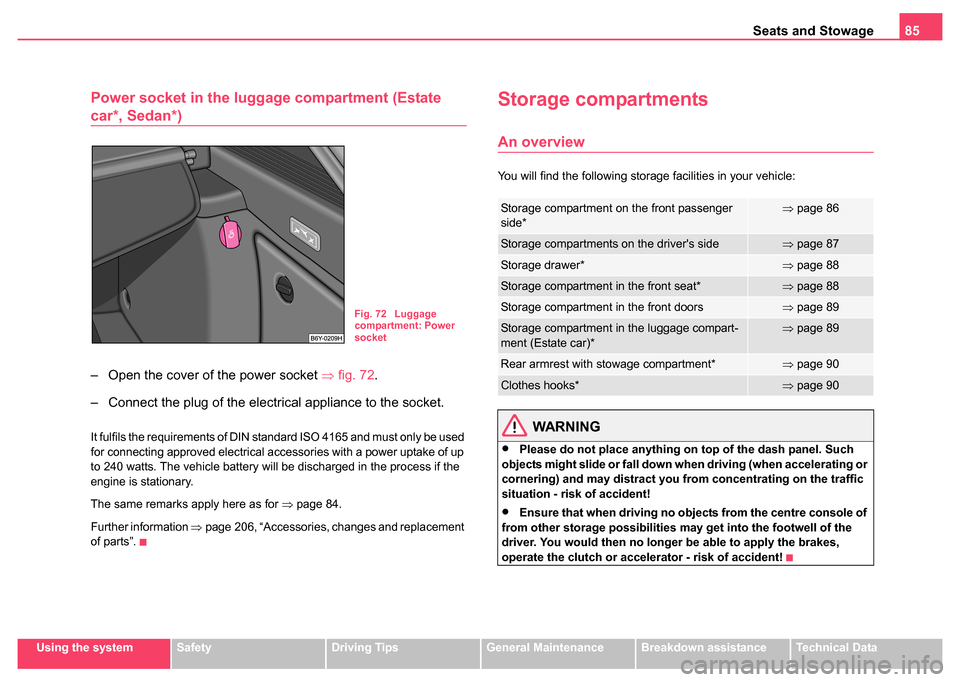
– Open the cover of the power socket ⇒ fig. 72.
– Connect the plug of the electrical appliance to the socket.
It fulfils the requirements of DIN standard ISO 4165 and must only be used
for connecting approved electrical accessories with a power uptake of up
to 240 watts. The vehicle battery will be discharged in the process if the
engine is stationary.
The same remarks apply here as for ⇒page 84.
Further information ⇒page 206, “Accessories, changes and replacement
of parts”.
Storage compartments
An overview
You will find the following storage facilities in your vehicle:
WARNING
•Please do not place anything on top of the dash panel. Such
objects might slide or fall down when driving (when accelerating or
cornering) and may distract you from concentrating on the traffic
situation - risk of accident!
•Ensure that when driving no objects from the centre console of
from other storage possibilities may get into the footwell of the
driver. You would then no longer be able to apply the brakes,
operate the clutch or accelerator - risk of accident!
Fig. 72 Luggage
compartment: Power
socket
Storage compartment on the front passenger
side*⇒ page 86
Storage compartments on the driver's side⇒page 87
Storage drawer*⇒page 88
Storage compartment in the front seat*⇒page 88
Storage compartment in the front doors⇒page 89
Storage compartment in the luggage compart-
ment (Estate car)*⇒page 89
Rear armrest with stowage compartment*⇒page 90
Clothes hooks*⇒page 90
Page 88 of 247
Seats and Stowage87
Using the systemSafetyDriving TipsGeneral MaintenanceBreakdown assistanceTechnical Data
Cooling of storage compar tment on front passenger
side*
The storage compartment is for vehicles fitted with an air-
conditioning system with a closable inlet for cooled air.
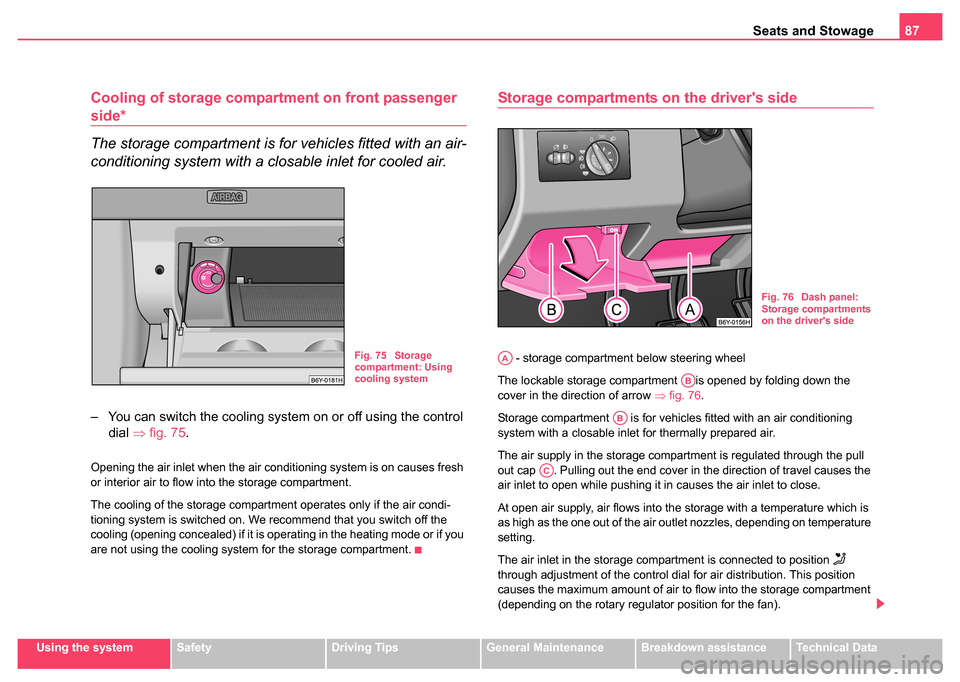
– You can switch the cooling system on or off using the control
dial ⇒fig. 75.
Opening the air inlet when the air conditioning system is on causes fresh
or interior air to flow into the storage compartment.
The cooling of the storage compartment operates only if the air condi-
tioning system is switched on. We recommend that you switch off the
cooling (opening concealed) if it is operating in the heating mode or if you
are not using the cooling system for the storage compartment.
Storage compartments on the driver's side
- storage compartment below steering wheel
The lockable storage compartment is opened by folding down the
cover in the direction of arrow ⇒fig. 76.
Storage compartment is for vehicles fitted with an air conditioning
system with a closable inlet for thermally prepared air.
The air supply in the storage compartment is regulated through the pull
out cap . Pulling out the end cover in the direction of travel causes the
air inlet to open while pushing it in causes the air inlet to close.
At open air supply, air flows into the storage with a temperature which is
as high as the one out of the air outlet nozzles, depending on temperature
setting.
The air inlet in the storage compartment is connected to position
through adjustment of the control dial for air distribution. This position
causes the maximum amount of air to flow into the storage compartment
(depending on the rotary regulator position for the fan).
Fig. 75 Storage
compartment: Using
cooling system
Fig. 76 Dash panel:
Storage compartments
on the driver's side
AA
AB
AB
AC
Page 90 of 247

Seats and Stowage89
Using the systemSafetyDriving TipsGeneral MaintenanceBreakdown assistanceTechnical Data
Storage compartment in the front doors
WARNING
Use the stowage compartments in the door panels only for small
items which do not project out of the compartment in order to avoid
any interference with the proper operation of the side airbags.
Storage compartment in the luggage compartment
(Estate car)*
There are storage compartments situated on the right and the left
in the luggage compartment.
– You can open the compartment by turning the locks in the
direction of arrow ⇒fig. 80.
Fig. 79 Stowage
compartment in door
panel
Fig. 80 Luggage
compartment: Storage
compartments
Page 92 of 247
Heating and air conditioning system 91
Using the systemSafetyDriving TipsGeneral MaintenanceBreakdown assistanceTechnical Data
Heating and air conditioning system
Heating
Using the system
The heating system delivers air into the interior of the
vehicle and warms it as required.
Setting temperature
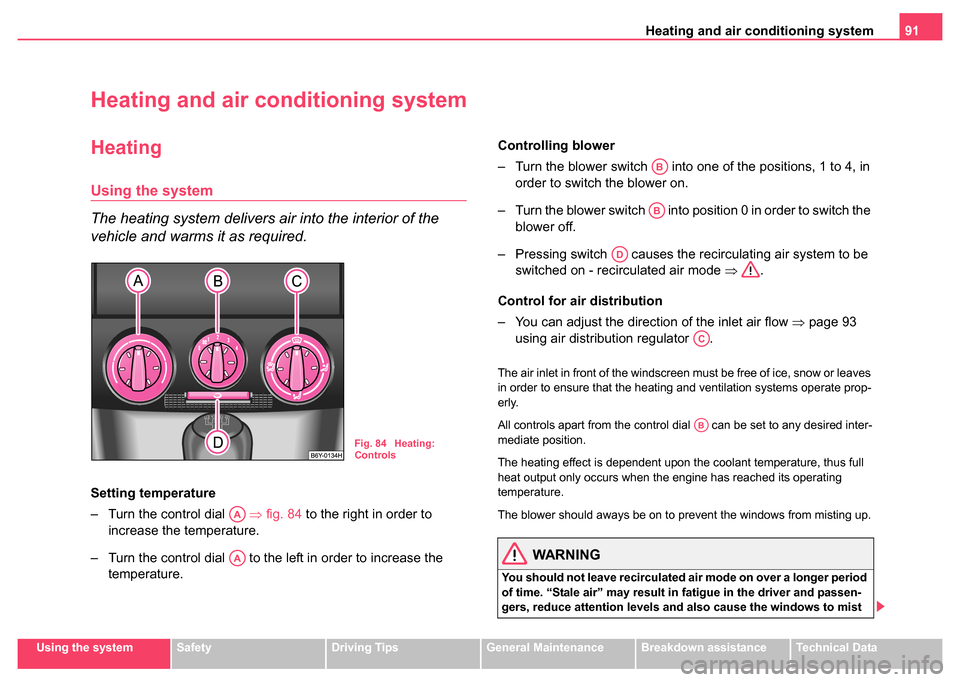
– Turn the control dial ⇒fig. 84 to the right in order to
increase the temperature.
– Turn the control dial to the left in order to increase the temperature. Controlling blower
– Turn the blower switch into one of the positions, 1 to 4, in
order to switch the blower on.
– Turn the blower switch into position 0 in order to switch the blower off.
– Pressing switch causes the recirculating air system to be switched on - recirculated air mode ⇒.
Control for air distribution
– You can adjust the direction of the inlet air flow ⇒page 93
using air distribution regulator .
The air inlet in front of the windscreen must be free of ice, snow or leaves
in order to ensure that the heating and ventilation systems operate prop-
erly.
All controls apart from the control dial can be set to any desired inter-
mediate position.
The heating effect is dependent upon the coolant temperature, thus full
heat output only occurs when the engine has reached its operating
temperature.
The blower should aways be on to prevent the windows from misting up.
WARNING
You should not leave recirculated air mode on over a longer period
of time. “Stale air” may result in fatigue in the driver and passen-
gers, reduce attention levels and also cause the windows to mist
Fig. 84 Heating:
Controls
AA
AA
AB
AB
AD
AC
AB
Page 94 of 247
Heating and air conditioning system 93
Using the systemSafetyDriving TipsGeneral MaintenanceBreakdown assistanceTechnical Data
•Open air outlet vents 3 and 4 ⇒ page 93, fig. 85
The control dial can be set to other positions as required.
Recirculated air mode
In recirculated air mode air is sucked out of the interior of
the vehicle and then fed back into the interior.
Recirculated air mode prevents polluted air outside the vehicle
from getting into the vehicle, for example when driving through a
tunnel or when standing in a traffic jam.
Switching recirculated air mode on
– Press button , the button symbol
lights up ⇒page 91,
fig. 84.
Switching recirculated air mode off
– Press button again, the button symbol
goes out.
The recirculated air mode is switched off automatically if the air distribu-
tion control is in position ⇒ page 91, fig. 84 .
WARNING
You should not leave recirculated air mode on over a longer period
of time. “Stale air” may result in fatigue in the driver and passen-
gers, reduce attention levels and also cause the windows to mist
up. The risk of having an accident increases. Switch recirculated
air mode off as soon as the windows begin misting up.
Air outlet vents
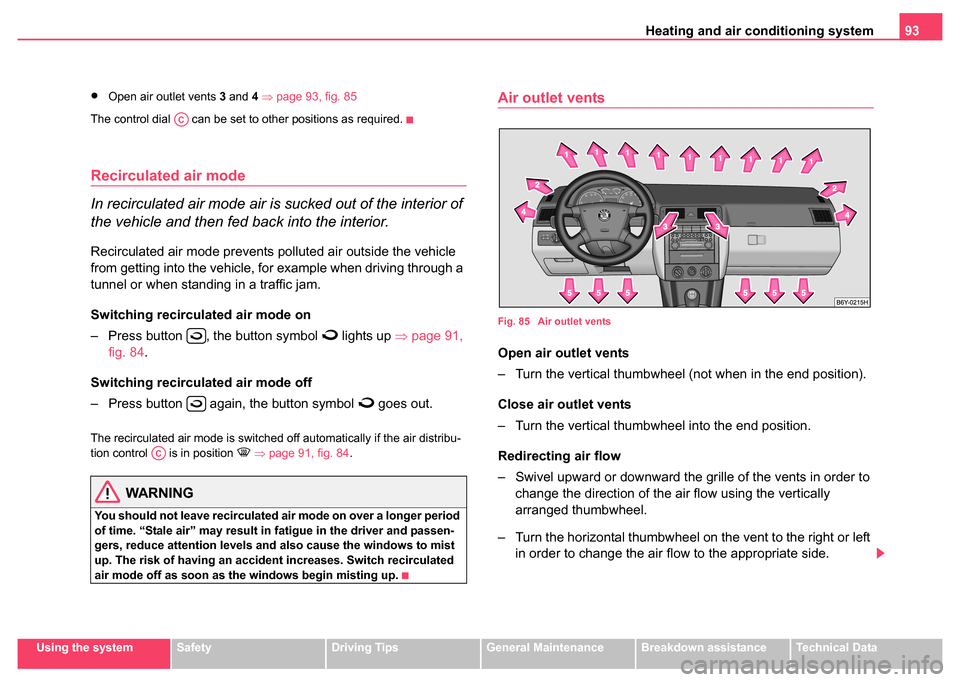
Fig. 85 Air outlet vents
Open air outlet vents
– Turn the vertical thumbwheel (not when in the end position).
Close air outlet vents
– Turn the vertical thumbwheel into the end position.
Redirecting air flow
– Swivel upward or downward the gr ille of the vents in order to
change the direction of the air flow using the vertically
arranged thumbwheel.
– Turn the horizontal thumbwheel on the vent to the right or left in order to change the air flow to the appropriate side.
AC
AC
Page 96 of 247
Heating and air conditioning system 95
Using the systemSafetyDriving TipsGeneral MaintenanceBreakdown assistanceTechnical Data
Note
We recommend that you do not smoke in the vehicle when the recircu-
lating air mode is operating since the smoke which is drawn at the evap-
orator from the interior of the vehicle forms deposits in the evaporator of
the air conditioning system. This produces a permanent odour when the
air conditioning system is operating which can only be eliminated through
considerable effort and expense (replacement of compressor).
Using the system
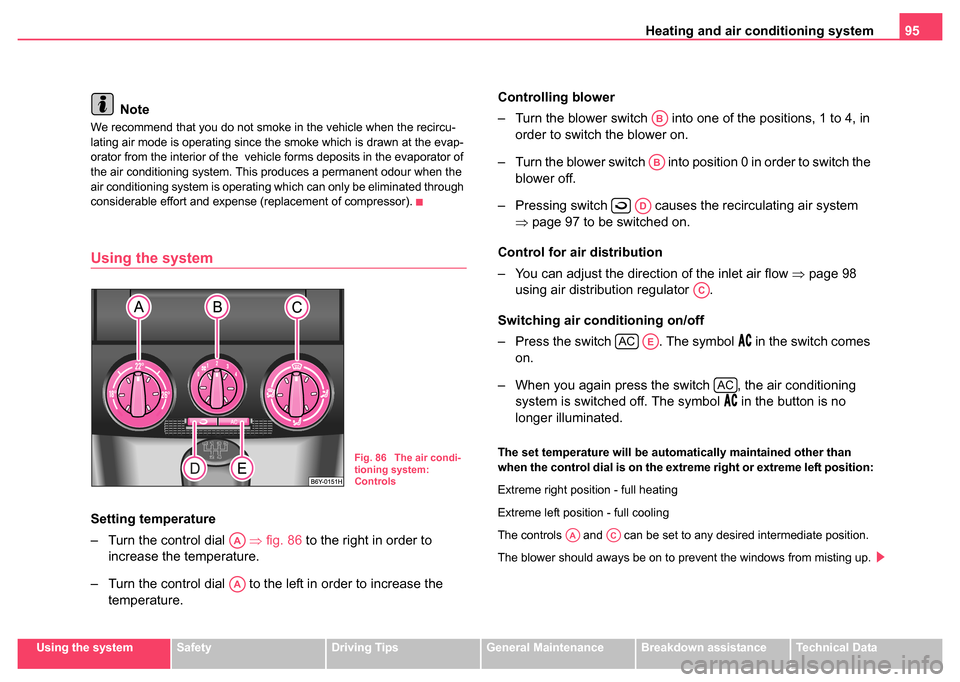
Setting temperature
– Turn the control dial ⇒fig. 86 to the right in order to
increase the temperature.
– Turn the control dial to the left in order to increase the temperature. Controlling blower
– Turn the blower switch into one of the positions, 1 to 4, in
order to switch the blower on.
– Turn the blower switch into position 0 in order to switch the blower off.
– Pressing switch causes the recirculating air system ⇒page 97 to be switched on.
Control for air distribution
– You can adjust the direction of the inlet air flow ⇒page 98
using air distribution regulator .
Switching air conditioning on/off
– Press the switch . The symbol
in the switch comes
on.
– When you again press the switch , the air conditioning system is switched off. The symbol
in the button is no
longer illuminated.
The set temperature will be automatically maintained other than
when the control dial is on the extreme right or extreme left position:
Extreme right position - full heating
Extreme left position - full cooling
The controls and can be set to any desired intermediate position.
The blower should aways be on to prevent the windows from misting up.Fig. 86 The air condi-
tioning system:
Controls
AA
AA
AB
AB
AD
AC
ACAE
AC
AAAC
Page 98 of 247
Heating and air conditioning system 97
Using the systemSafetyDriving TipsGeneral MaintenanceBreakdown assistanceTechnical Data
•Open the air outlet vents 3 and 4
•Switch on the air conditioning system by pressing button
•Switch on recirculated air mode by pressing button .
•we recommend that you press the switch - recirculated air
mode - for a short time
Optimum cooling
•Control dial at the desired heat temperature. This temperature will
be maintained automatically.
•Blower switch in position 1, 2 , or 3
•Turn the air distribution control into the position
•Open the air outlet vents 3 and 4
•Switch on the air conditioning system by pressing button
•We recommend setting the air outlet vents 3 and 4 in such a way that
the air flows to the rear over the heads of the occupants. Do not press
button - recirculated air mode.
Fresh air mode (ventilation)
Non pre-warmed fresh air streams through the air inlet nozzles 3 and 4 for
the following settings.
•Turn the control dial ⇒page 95, fig. 86 to the left up to the stop
•Blower switch in the desired position
•Turn the air distribution control into the position
•Open air outlet vents 3 and 4 ⇒ page 98, fig. 87
•Switch off the recirculated air mode by pressing button .
•Switch off the cooling by pressing button
The control dial can be set to other positions as required.
Recirculated air mode
In recirculated air mode air is sucked out of the interior of
the vehicle and then fed back into the interior.
Recirculated air mode prevents polluted air outside the vehicle
from getting into the vehicle, for example when driving through a
tunnel or when standing in a traffic jam.
Switching recircul ated air mode on
– Press button ⇒ page 95, fig. 86, the button symbol
lights up.
Switching recirculated air mode off
– Press button again, the button symbol
goes out.
Recirculated air mode is switched off automatically if the air distribution
control is in position ⇒ page 95, fig. 86 . You can also switch recir-
culated air mode on again from this setting by repeatedly pressing button .
WARNING
You should not leave recirculated air mode on over a longer period
of time. “Stale air” may result in fatigue in the driver and passen-
gers, reduce attention levels and also cause the windows to mist
up. The risk of having an accident increases. Switch recirculated
air mode off as soon as the windows begin misting up.
AE
AD
AD
AA
AB
AC
AE
AD
AA
AB
AC
AD
AE
AC
AC
AD
Page 100 of 247
Heating and air conditioning system 99
Using the systemSafetyDriving TipsGeneral MaintenanceBreakdown assistanceTechnical Data
•The cooling system has switched off automatically for a short time
because the coolant temperature of the engine is too hot ⇒page 13.
If you are not able to rectify the operational problem yourself, or if the
cooling capacity decreases, switch the air conditioning system off. Please
contact your Škoda dealer.
Page 102 of 247
Starting-off and Driving101
Using the systemSafetyDriving TipsGeneral MaintenanceBreakdown assistanceTechnical Data
the steering wheel firmly in the 12 o'clock position or in another
way (e.g. in the middle of the steering wheel or at the inner steering
wheel edge). In such cases, injuries to the arms, the hands and the
head can occur when the driver airbag is deployed.
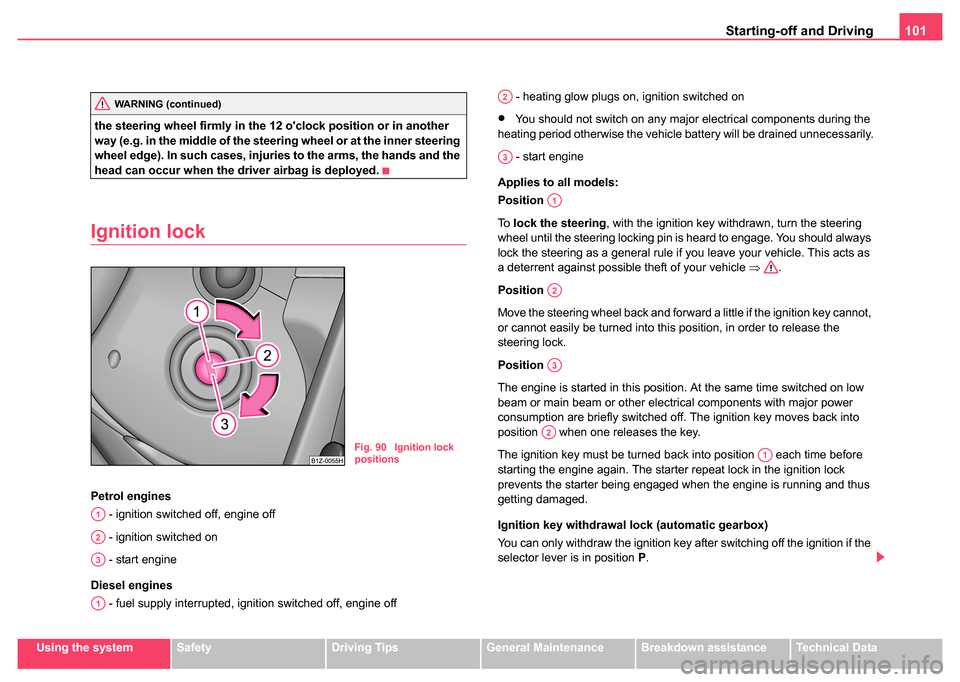
Ignition lock
Petrol engines
- ignition switched off, engine off
- ignition switched on
- start engine
Diesel engines - fuel supply interrupted, ignition switched off, engine off - heating glow plugs on, ignition switched on
•You should not switch on any major electrical components during the
heating period otherwise the vehicle battery will be drained unnecessarily.
- start engine
Applies to all models:
Position
To lock the steering , with the ignition key withdrawn, turn the steering
wheel until the steering locking pin is heard to engage. You should always
lock the steering as a general rule if you leave your vehicle. This acts as
a deterrent against possible theft of your vehicle ⇒.
Position
Move the steering wheel back and forward a little if the ignition key cannot,
or cannot easily be turned into this position, in order to release the
steering lock.
Position
The engine is started in this position. At the same time switched on low
beam or main beam or other electrical components with major power
consumption are briefly switched off. The ignition key moves back into
position when one releases the key.
The ignition key must be turned back into position each time before
starting the engine again. The starter repeat lock in the ignition lock
prevents the starter being engaged when the engine is running and thus
getting damaged.
Ignition key withdrawal lock (automatic gearbox)
You can only withdraw the ignition key after switching off the ignition if the
selector lever is in position P.WARNING (continued)
Fig. 90 Ignition lock
positions
A1
A2
A3
A1
A2
A3
A1
A2
A3
A2
A1
Page 104 of 247
Starting-off and Driving103
Using the systemSafetyDriving TipsGeneral MaintenanceBreakdown assistanceTechnical Data
For the sake of the environment
Never warm up the engine when the vehicle is standing. Drive off right
away. Through this the engine reaches its operating temperature more
rapidly and the pollutant emissions are lower.
Petrol engines
These engines are fitted with a starter system which selects the correct
fuel/air mixture for every external air temperature.
•Do not operate accelerator before and when starting engine.
•Interrupt the attempt at starting after 10 seconds if the engine does not
start right awayand wait for about 30 seconds before repeating the
attempt.
•It is possible that the fuse on the electrical fuel pump is defect if the
engine still does not start. Check the fuse and replace it if necessary
⇒ page 224.
•Contact the nearest Škoda dealer to obtain professional assistance.
It may be necessary, if the engine is very hot, to slightly depress the
accelerator after the engine has started.
Diesel engines
Glow plug system
Diesel engines are equipped with a glow plug system, the preglow period
being controlled automatically in line with the coolant temperature and
outside temperature.
The preglow indicator light
comes on after the ignition has been
switched on. You should not switch on any major electrical components during
the heating period otherwise the vehicle battery will be drained
unnecessarily.
•You should start the engine immediately after the glow plug warning
light has gone out.
•The glow plug warning light will come on for about one second if the
engine is at a normal operating temperature or if the outside temperature
is above +5°C. This means that you can start the engine right away.
•Interrupt the attempt at starting after 10 seconds if the engine does not
start right awayand wait for about 30 seconds before repeating the
attempt.
•It is possible that the fuse on the diesel preglow system is defect if the
engine still does not start. Check the fuse and replace it if necessary
⇒ page 224.
•Contact the nearest Škoda dealer to obtain professional assistance.
Starting the engine after fuel tank has run dry
It may take longer than normal to start the engine after refuelling if the fuel
tank has run completely dry - up to one minute. This is because the fuel
system must first of all be filled while the attempting to start the engine.
Switching the engine off
– The engine can be switched off by turning the ignition key from position ⇒page 101, fig. 90 into position .
WARNING
•Never switch off the engine before the vehicle is stationary - risk
of accident!
A1