tow SKODA FABIA 2005 1.G / 6Y Owner's Manual
[x] Cancel search | Manufacturer: SKODA, Model Year: 2005, Model line: FABIA, Model: SKODA FABIA 2005 1.G / 6YPages: 260
Page 6 of 260
Contents5
Contents
Layout of this Owner's Manual
(explanations)
. . . . . . . . . . . . . . . . . . .
Using the system . . . . . . . . . . . . . . .
Cockpit . . . . . . . . . . . . . . . . . . . . . . . . . . . . . . .
An overview . . . . . . . . . . . . . . . . . . . . . . . . . .
Instruments and Indicator/Warning LightsGeneral view of the instrument cluster . . . . . .
Engine revolutions counter . . . . . . . . . . . . . . .
Coolant temperature gauge . . . . . . . . . . . . . .
Fuel gauge . . . . . . . . . . . . . . . . . . . . . . . . . . .
Speedometer with counter for distance driven
Service Interval Display . . . . . . . . . . . . . . . . .
Digital clock . . . . . . . . . . . . . . . . . . . . . . . . . .
Multi-functional indicator* (onboard computer)
Information display* . . . . . . . . . . . . . . . . . . . .
Auto Check Control . . . . . . . . . . . . . . . . . . . .
Warning lights . . . . . . . . . . . . . . . . . . . . . . . . .
Unlocking and locking . . . . . . . . . . . . . . . . . .
Keys . . . . . . . . . . . . . . . . . . . . . . . . . . . . . . . .
Locking . . . . . . . . . . . . . . . . . . . . . . . . . . . . . .
Child safety locks . . . . . . . . . . . . . . . . . . . . . .
Central locking system* . . . . . . . . . . . . . . . . .
Remote control* . . . . . . . . . . . . . . . . . . . . . . .
Anti-theft alarm system* . . . . . . . . . . . . . . . . .
Power windows* . . . . . . . . . . . . . . . . . . . . . . .
Electric sliding/tilting roof* . . . . . . . . . . . . . . .
Lights and Visibility. . . . . . . . . . . . . . . . . . . . .
Lights . . . . . . . . . . . . . . . . . . . . . . . . . . . . . . .
Interior lighting . . . . . . . . . . . . . . . . . . . . . . . .
Visibility . . . . . . . . . . . . . . . . . . . . . . . . . . . . . Windshield wiper and wash system . . . . . . . .
Rear-view mirror . . . . . . . . . . . . . . . . . . . . . .
Seats and Stowage . . . . . . . . . . . . . . . . . . . .
Front seats . . . . . . . . . . . . . . . . . . . . . . . . . . .
Head restraints . . . . . . . . . . . . . . . . . . . . . . . .
Middle rear head restraint* . . . . . . . . . . . . . . .
Heating the front seats* . . . . . . . . . . . . . . . . .
Rear seats . . . . . . . . . . . . . . . . . . . . . . . . . . .
Pedals . . . . . . . . . . . . . . . . . . . . . . . . . . . . . .
Luggage compartment . . . . . . . . . . . . . . . . . .
Net partition (Estate)* . . . . . . . . . . . . . . . . . . .
The roof luggage rack system* . . . . . . . . . . .
Drinks can holder* . . . . . . . . . . . . . . . . . . . . .
Rear drinks can holder * . . . . . . . . . . . . . . . .
Note holder . . . . . . . . . . . . . . . . . . . . . . . . . .
Ashtray at the front* . . . . . . . . . . . . . . . . . . . .
Ashtray at the rear* . . . . . . . . . . . . . . . . . . . .
Cigarette lighter* and power socket* . . . . . . .
Storage compartments . . . . . . . . . . . . . . . . . .
Heating and air conditioning system . . . . .
Heating . . . . . . . . . . . . . . . . . . . . . . . . . . . . . .
The air conditioning system* . . . . . . . . . . . . .
Starting-off and Driving. . . . . . . . . . . . . . . . .
Setting steering wheel position* . . . . . . . . . . .
Ignition lock . . . . . . . . . . . . . . . . . . . . . . . . . .
Starting engine . . . . . . . . . . . . . . . . . . . . . . . .
Switching the engine off . . . . . . . . . . . . . . . . .
Shifting (manual gearbox) . . . . . . . . . . . . . . .
Handbrake . . . . . . . . . . . . . . . . . . . . . . . . . . .
Parking aid* . . . . . . . . . . . . . . . . . . . . . . . . . .
Cruise control system (CCS)* . . . . . . . . . . . .
Automatic gearbox*. . . . . . . . . . . . . . . . . . . .
4-speed automatic gearbox . . . . . . . . . . . . . .
Communication . . . . . . . . . . . . . . . . . . . . . . .
Universal telephone connection* . . . . . . . . . .
Mobile phones and two-way radio systems . .
The CD changer* . . . . . . . . . . . . . . . . . . . . . .
Safety. . . . . . . . . . . . . . . . . . . . . . . . . . . . . .
Passive Safety . . . . . . . . . . . . . . . . . . . . . . . .
Basic information . . . . . . . . . . . . . . . . . . . . . .
Correct seated position . . . . . . . . . . . . . . . . .
Seat belts. . . . . . . . . . . . . . . . . . . . . . . . . . . . .
Why seat belts? . . . . . . . . . . . . . . . . . . . . . . .
The physical principle of a frontal collision . .
Important safety information regarding the use
of seat belts . . . . . . . . . . . . . . . . . . . . . . . . . .
How are seat belts correctly fastened? . . . . .
Belt tensioners . . . . . . . . . . . . . . . . . . . . . . . .
Airbag system. . . . . . . . . . . . . . . . . . . . . . . . .
Description of the airbag system . . . . . . . . . .
Front airbags . . . . . . . . . . . . . . . . . . . . . . . . .
Side airbags* . . . . . . . . . . . . . . . . . . . . . . . . .
Deactivating an airbag . . . . . . . . . . . . . . . . . .
Transporting children safely . . . . . . . . . . . .
What you should know about transporting
children! . . . . . . . . . . . . . . . . . . . . . . . . . . . . .
Child seat . . . . . . . . . . . . . . . . . . . . . . . . . . . .
Attaching a child seat using the “ISOFIX”*
system . . . . . . . . . . . . . . . . . . . . . . . . . . . . . .
8
9
11
11
13
13
14
14
14
15
16
17
18
22
24
28
38
38
40
41
41
46
49
50
52
55
55
60
62 63
66
67
67
69
70
70
71
74
74
79
81
83
83
84
84
85
85
87
93
93
96
102
102
103
104
105
106
107
108
109 11 2
11 2 11 7
11 7
11 8
11 9
123
123
123
125
129
129
130
131
132
135
137
137
139
141
144
147
147
151
155
sqc.1.book Seite 5 Mittwoch, 13. April 2005 1:09 13
Page 7 of 260
Contents
6
Driving Tips . . . . . . . . . . . . . . . . . . . . . .
Intelligent Technology . . . . . . . . . . . . . . . . . .
Electronic stability programme (ESP)* . . . . . .
Brakes . . . . . . . . . . . . . . . . . . . . . . . . . . . . . .
Brake booster . . . . . . . . . . . . . . . . . . . . . . . .
Antilock brake system (ABS)* . . . . . . . . . . . .
Brake Assist* . . . . . . . . . . . . . . . . . . . . . . . . .
Power steering* . . . . . . . . . . . . . . . . . . . . . . .
Driving and the Environment. . . . . . . . . . . .
The first 1 500 kilometres and then afterwards
Catalytic converter . . . . . . . . . . . . . . . . . . . . .
Driving in an economical and environmentally
conscious manner . . . . . . . . . . . . . . . . . . . . .
Environmental compatibility . . . . . . . . . . . . . .
Motoring abroad . . . . . . . . . . . . . . . . . . . . . . .
Avoiding damage to your vehicle . . . . . . . . . .
Towing a trailer . . . . . . . . . . . . . . . . . . . . . . . .
Towing a trailer . . . . . . . . . . . . . . . . . . . . . . . .
Detachable ball head* . . . . . . . . . . . . . . . . . .
General Maintenance . . . . . . . . . .
Care and cleaning . . . . . . . . . . . . . . . . . . . . .
General . . . . . . . . . . . . . . . . . . . . . . . . . . . . .
Care of the exterior of vehicle . . . . . . . . . . . .
Care of the interior of vehicle . . . . . . . . . . . . .
Fuel. . . . . . . . . . . . . . . . . . . . . . . . . . . . . . . . . .
Petrol . . . . . . . . . . . . . . . . . . . . . . . . . . . . . . .
Diesel . . . . . . . . . . . . . . . . . . . . . . . . . . . . . . .
Refuelling . . . . . . . . . . . . . . . . . . . . . . . . . . . .
Inspecting and Replenishing. . . . . . . . . . . .
Engine compartment . . . . . . . . . . . . . . . . . . .
Engine oil . . . . . . . . . . . . . . . . . . . . . . . . . . . .
Cooling system . . . . . . . . . . . . . . . . . . . . . . .
Brake fluid . . . . . . . . . . . . . . . . . . . . . . . . . . . The battery . . . . . . . . . . . . . . . . . . . . . . . . . .
Windscreen Wiper and Washer System . . . .
Wheels and Tyres . . . . . . . . . . . . . . . . . . . . .
Wheels . . . . . . . . . . . . . . . . . . . . . . . . . . . . .
Accessories, changes and replacement of
parts . . . . . . . . . . . . . . . . . . . . . . . . . . . . . . . . .
Accessories and replacement parts . . . . . . .
Technical changes . . . . . . . . . . . . . . . . . . . . .
Breakdown assistance . . . . . . . .
Breakdown assistance . . . . . . . . . . . . . . . . .
First-aid box* and warning triangle* . . . . . . . .
Fire extinguisher* . . . . . . . . . . . . . . . . . . . . . .
Vehicle tool kit . . . . . . . . . . . . . . . . . . . . . . . .
Spray for repairing a tyre* . . . . . . . . . . . . . . .
Tyre repair kit* . . . . . . . . . . . . . . . . . . . . . . . .
Spare wheel* . . . . . . . . . . . . . . . . . . . . . . . . .
Changing a wheel . . . . . . . . . . . . . . . . . . . . .
Jump-starting . . . . . . . . . . . . . . . . . . . . . . . . .
Tow-starting and towing vehicle . . . . . . . . . . .
Fuses and light bulbs . . . . . . . . . . . . . . . . . .
Electric fuses . . . . . . . . . . . . . . . . . . . . . . . . .
Bulbs . . . . . . . . . . . . . . . . . . . . . . . . . . . . . . .
Technical Data. . . . . . . . . . . . . . . . . . .
General . . . . . . . . . . . . . . . . . . . . . . . . . . . . . .
Identification data . . . . . . . . . . . . . . . . . . . . .
Fabia Praktik . . . . . . . . . . . . . . . . . . . .
Praktik . . . . . . . . . . . . . . . . . . . . . . . . . . . . . . .
Foldable stowage compartment . . . . . . . . . .
Lashing eyes . . . . . . . . . . . . . . . . . . . . . . . . .
Fixing of the loading floor . . . . . . . . . . . . . . .
Index . . . . . . . . . . . . . . . . . . . . . . . . . . . . . .
157
157
157
160
161
161
162
163
164
164
165
166
170
171
171
172
172
174
177
177
177
177
183
186
186
186
188
190
190
193
196
199 201
206
208
208
215
215
215
217
217
217
217
218
219
219
220
220
226
228
232
232
237
247
247
247
249
249
249
249
250
251
sqc.1.book Seite 6 Mittwoch, 13. April 2005 1:09 13
Page 30 of 260
Instruments and Indicator/Warning Lights29
Using the systemSafetyDriving TipsGeneral MaintenanceBreakdown assist-
anceTechnical DataFabia Praktik
WARNING
•If you do not pay attention to the warning lights coming on and
the corresponding descriptions and warning notes, this may result
in severe body injuries or major vehicle damage.
•The engine compartment of your car is a hazardous area. There
is a risk of injuries, scalding, acci dents and fire when working in the
engine compartment, e.g. inspecti ng and replenishing oil and other
fluids. It is also essential to observe all warnings ⇒page 191.
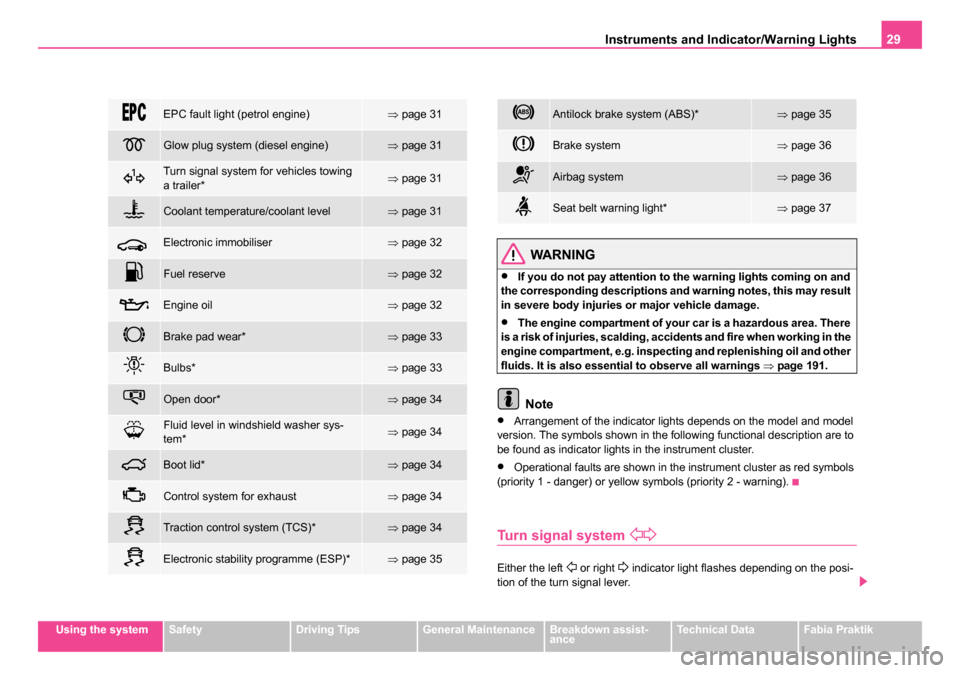
Note
•Arrangement of the indicator lights depends on the model and model
version. The symbols shown in the following functional description are to
be found as indicator lights in the instrument cluster.
•Operational faults are shown in the instrument cluster as red symbols
(priority 1 - danger) or yellow symbols (priority 2 - warning).
Turn signal system
Either the left or right indicator light flashes depending on the posi-
tion of the turn signal lever.
EPC fault light (petrol engine)⇒ page 31
Glow plug system (diesel engine)⇒page 31
Turn signal system for vehicles towing
a trailer*⇒page 31
Coolant temperature/coolant level⇒page 31
Electronic immobiliser⇒page 32
Fuel reserve⇒page 32
Engine oil⇒page 32
Brake pad wear*⇒page 33
Bulbs*⇒page 33
Open door*⇒page 34
Fluid level in windshield washer sys-
tem*⇒page 34
Boot lid*⇒page 34
Control system for exhaust⇒page 34
Traction control system (TCS)*⇒page 34
Electronic stability programme (ESP)*⇒page 35
Antilock brake system (ABS)*⇒page 35
Brake system⇒page 36
Airbag system⇒page 36
Seat belt warning light*⇒page 37
sqc.1.book Seite 29 Mittwoch, 13. April 2005 1:09 13
Page 31 of 260
Instruments and Indicator/Warning Lights
30
The indicator light flashes at twice its normal rate if a turn signal light fails.
This does not apply when towing a trailer.
Switching off the hazard warning light system is switched on will cause all
of the turn signal lights as well as both indicator lights to flash.
Further information about the turn signal system ⇒page 58.
Main beam
The indicator light comes on when the main beam is selected or also
when the headlight flasher is operated.
Further information about the main beam ⇒page 58.
Low beam
The indicator light comes on when low beam is selected ⇒page 55.
The rear fog light
The warning light comes on when the rear fog lights are operating
⇒ page 56.
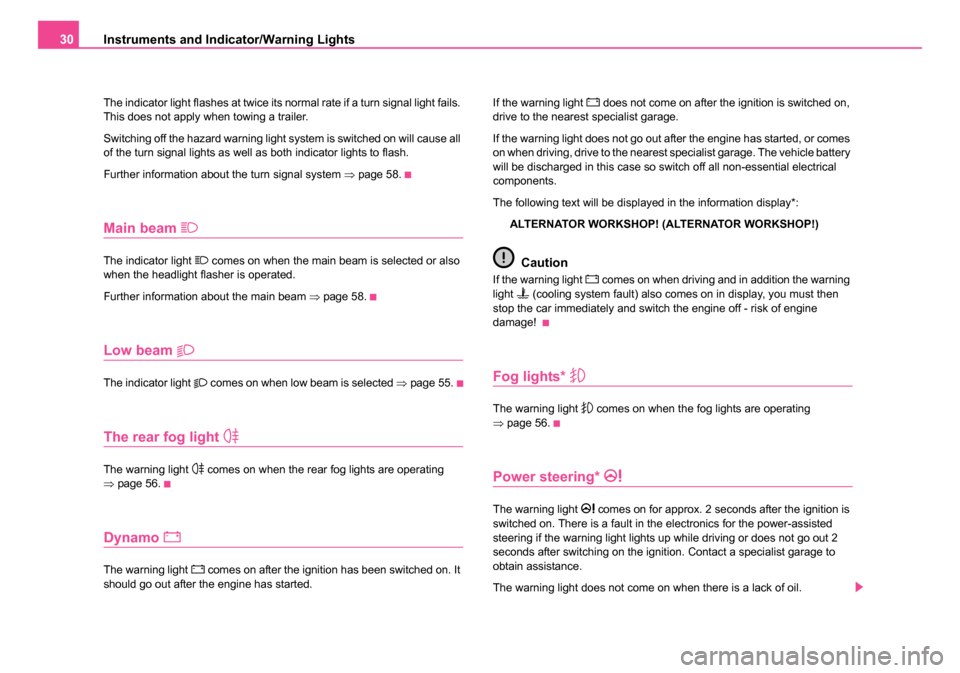
Dynamo
The warning light comes on after the ignition has been switched on. It
should go out after the engine has started. If the warning light
does not come on after the ignition is switched on,
drive to the nearest specialist garage.
If the warning light does not go out after the engine has started, or comes
on when driving, drive to the nearest specialist garage. The vehicle battery
will be discharged in this case so switch off all non-essential electrical
components.
The following text will be displayed in the information display*:
ALTERNATOR WORKSHOP! (ALTERNATOR WORKSHOP!)
Caution
If the warning light comes on when driving and in addition the warning
light (cooling system fault) also comes on in display, you must then
stop the car immediately and switch the engine off - risk of engine
damage!
Fog lights*
The warning light comes on when the fog lights are operating
⇒ page 56.
Power steering*
The warning light comes on for approx. 2 seconds after the ignition is
switched on. There is a fault in the electronics for the power-assisted
steering if the warning light lights up while driving or does not go out 2
seconds after switching on the ignition. Contact a specialist garage to
obtain assistance.
The warning light does not come on when there is a lack of oil.
sqc.1.book Seite 30 Mittwoch, 13. April 2005 1:09 13
Page 32 of 260
Instruments and Indicator/Warning Lights31
Using the systemSafetyDriving TipsGeneral MaintenanceBreakdown assist-
anceTechnical DataFabia Praktik
Further information
⇒page 163, “Power steering*”.
Note
There is no power-assisted steering support when the vehicle is being
towed without the engine running or when the power-assisted steering is
defect. The vehicle is fully steerable however. There is simply increased
force required to turn the steering wheel.
EPC fault light (petrol engine)
The (Electronic Power Control) warning light comes on for a few
seconds when the ignition is switched on.
There is a system fault in the engine control system if the warning light
does not go out or comes on or flashes while driving. The engine manage-
ment system selects an emergency programme which enables you to
drive to the nearest specialist garage by adopting a gentle style of driving.
The following text will be displayed in the information display*:
ENGINE WORKSHOP! (ENGINE FAULT - WORKSHOP!)
Glow plug system (diesel engine)
The indicator light lights up for a cold engine when switching on the
igntion (pre-heat position) 2 ⇒ page 103. Start the engine just as soon as
the indicator light goes out.
The glow plug indicator light will come on for about 1 second if the engine
is at a normal operating temperature or if the outside temperature is
above +5°C. This means that you can start the engine right away. There is a fault in the glow plug system if the indicator light
does not
come on at all or lights up continuously. Contact a specialist garage as
soon as possible to obtain professional assistance.
There is a system fault in the engine control system if the warning light
has started to flash while driving. The engine management system selects
an emergency programme which enables you to drive to the nearest
specialist garage by adopting a gentle style of driving.
The following text will be displayed in the information display*:
ENGINE WORKSHOP! (ENGINE FAULT - WORKSHOP!)
Turn signal system for vehicles towing a trailer*
The indicator light on vehicles towing a trailer flashes together with the
respective indicator light for the turn signal system.
The indicator light
does not flash if a turn signal light on the trailer or
on the vehicle is not operating.
Coolant temperature/coolant level
The warning light comes on for a few seconds 1) when the ignition is
switched on.
The coolant temperature is too high or the coolant level too low if the
warning light
does not go out after the engine is started or flashes while
driving.
1)The warning light on vehicles fitted with information display does not come on
after switching the ignition on, but only if the coolant temperature is too high or the
coolant level is too low.
sqc.1.book Seite 31 Mittwoch, 13. April 2005 1:09 13
Page 46 of 260
Unlocking and locking45
Using the systemSafetyDriving TipsGeneral MaintenanceBreakdown assist-
anceTechnical DataFabia Praktik
Emergency locking of the rear doors
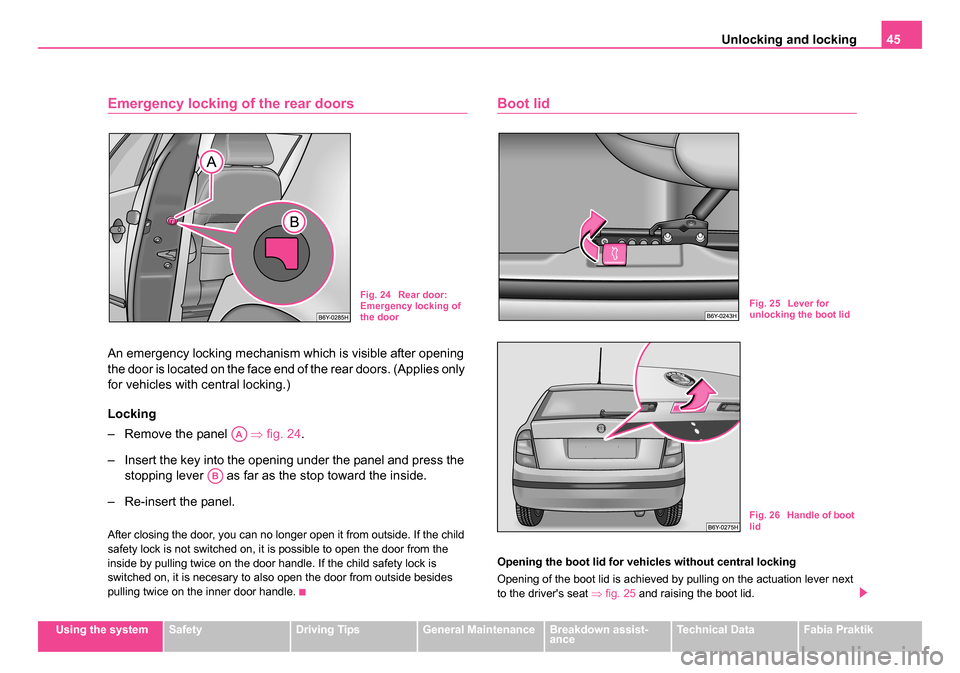
An emergency locking mechanism which is visible after opening
the door is located on the face end of the rear doors. (Applies only
for vehicles with central locking.)
Locking
– Remove the panel ⇒fig. 24 .
– Insert the key into the opening under the panel and press the stopping lever as far as the stop toward the inside.
– Re-insert the panel.
After closing the door, you can no longer open it from outside. If the child
safety lock is not switched on, it is possible to open the door from the
inside by pulling twice on the door handle. If the child safety lock is
switched on, it is necesary to also open the door from outside besides
pulling twice on the inner door handle.
Boot lid
Opening the boot lid for vehicles without central locking
Opening of the boot lid is achieved by pulling on the actuation lever next
to the driver's seat ⇒fig. 25 and raising the boot lid.
Fig. 24 Rear door:
Emergency locking of
the door
AA
AB
Fig. 25 Lever for
unlocking the boot lid
Fig. 26 Handle of boot
lid
sqc.1.book Seite 45 Mittwoch, 13. April 2005 1:09 13
Page 57 of 260
Lights and Visibility
56
•The switching on of the described lights should only be undertaken in
accordance with the legal requirements.
•In the event of cool or humid weather conditons, the headlights can be
misted up from inside.
−The temperature difference between interior and external area of
the headlight lenses is decisive.
− When the driving lights are switched on, the light outlet surfaces are
free from mist after a short period. The headlight lenses can possibly
mist up at the border areas.
− It also concerns reverse light and turn signal lights.
− This mist has no influence on the life of the lighting system.
Fog lights*
Switching on the fog lights
– First of all turn the light switch ⇒page 55, fig. 32 into position
or .
– Pull the light switch out to the first notch .
The rear fog light warning light ⇒ page 28 lights up in the instrument
cluster when the fog light is switched off.
The rear fog light
Switching on the rear fog light
– First of all turn the light switch ⇒page 55, fig. 32 into position
or . – Pull the light switch out to the
second notch . The fog
lights* light up at the same time.
If the vehicle is not fitted with fog lights*, the rear fog light is switched on
by turning the light switch to the position or and is pulled out directly
to the position . This switch does not have two positions, but only one
position.
The rear fog light warning light
⇒ page 28 lights up in the instrument
cluster when the fog light is switched off.
Only the rear fog light of the trailer lights up automatically when you are
towing a trailer using a factory-fitted towing device which is fitted with
the rear fog light .
Caution
The rear fog light should only be switched on if visibility is particularly poor
(conform with any varying legal provisions) to avoid dazzling vehicles
behind your vehicle.
AA
AB
AB
sqc.1.book Seite 56 Mittwoch, 13. April 2005 1:09 13
Page 63 of 260
Lights and Visibility
62
Visibility
Rear window heater
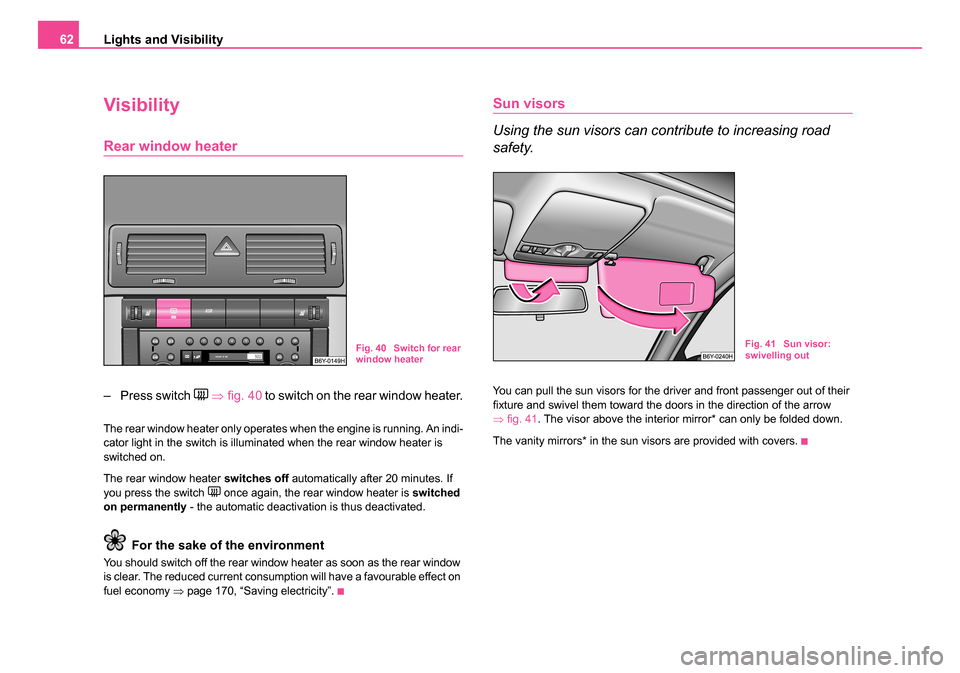
– Press switch ⇒ fig. 40 to switch on the rear window heater.
The rear window heater only operates when the engine is running. An indi-
cator light in the switch is illuminated when the rear window heater is
switched on.
The rear window heater switches off automatically after 20 minutes. If
you press the switch
once again, the rear window heater is switched
on permanently - the automatic deactivation is thus deactivated.
For the sake of the environment
You should switch off the rear window heater as soon as the rear window
is clear. The reduced current consumption will have a favourable effect on
fuel economy ⇒page 170, “Saving electricity”.
Sun visors
Using the sun visors can contribute to increasing road
safety.
You can pull the sun visors for the driver and front passenger out of their
fixture and swivel them toward the doors in the direction of the arrow
⇒fig. 41 . The visor above the interior mirror* can only be folded down.
The vanity mirrors* in the sun visors are provided with covers.
Fig. 40 Switch for rear
window heaterFig. 41 Sun visor:
swivelling out
sqc.1.book Seite 62 Mittwoch, 13. April 2005 1:09 13
Page 64 of 260
Lights and Visibility63
Using the systemSafetyDriving TipsGeneral MaintenanceBreakdown assist-
anceTechnical DataFabia Praktik
Windshield wiper and wash system
Windscreen wipers
You can operate the windscreen wipers and automatic
wipe/wash using the windscreen wiper lever.
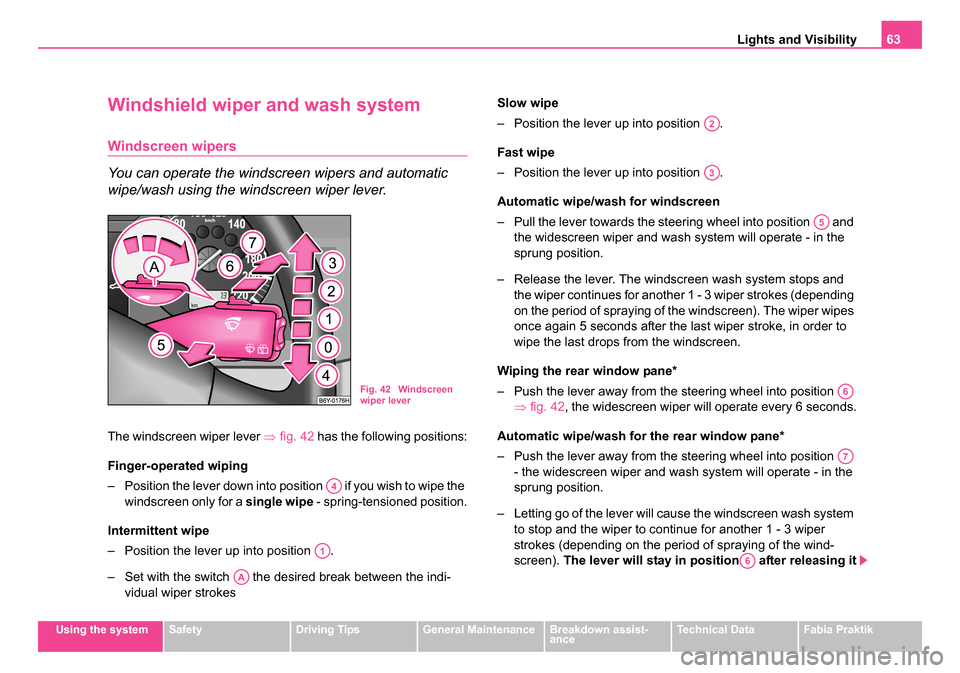
The windscreen wiper lever ⇒fig. 42 has the following positions:
Finger-operated wiping
– Position the lever down into position if you wish to wipe the windscreen only for a single wipe - spring-tensioned position.
Intermittent wipe
– Position the lever up into position .
– Set with the switch the desired break between the indi- vidual wiper strokes Slow wipe
– Position the lever up into position .
Fast wipe
– Position the lever up into position .
Automatic wipe/w
ash for windscreen
– Pull the lever towards the steering wheel into position and the widescreen wiper and wash system will operate - in the
sprung position.
– Release the lever. The windscreen wash system stops and the wiper continues for another 1 - 3 wiper strokes (depending
on the period of spraying of the windscreen). The wiper wipes
once again 5 seconds after the last wiper stroke, in order to
wipe the last drops from the windscreen.
Wiping the rear window pane*
– Push the lever away from the steering wheel into position ⇒fig. 42 , the widescreen wiper will operate every 6 seconds.
Automatic wipe/wash for the rear window pane*
– Push the lever away from the steering wheel into position - the widescreen wiper and wash system will operate - in the
sprung position.
– Letting go of the lever will cause the windscreen wash system to stop and the wiper to continue for another 1 - 3 wiper
strokes (depending on the period of spraying of the wind-
screen). The lever will stay in position after releasing it
Fig. 42 Windscreen
wiper lever
A4
A1
AA
A2
A3
A5
A6
A7
A6
sqc.1.book Seite 63 Mittwoch, 13. April 2005 1:09 13
Page 67 of 260
Lights and Visibility
66
Rear-view mirror
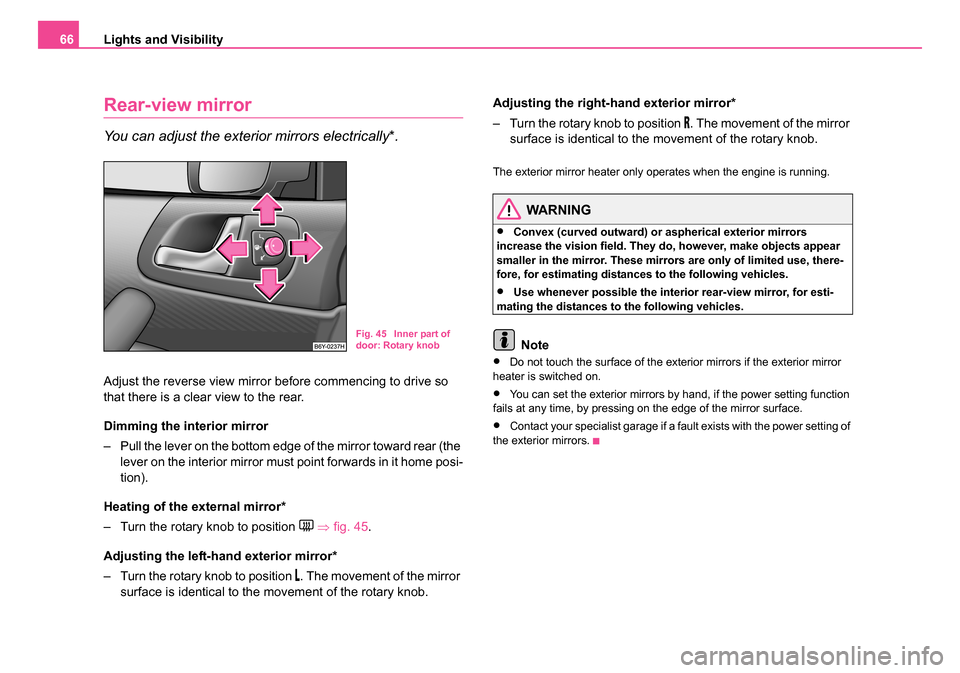
You can adjust the exterior mirrors electrically*.
Adjust the reverse view mirror before commencing to drive so
that there is a clear view to the rear.
Dimming the interior mirror
– Pull the lever on the bottom edge of the mirror toward rear (the
lever on the interior mirror must point forwards in it home posi-
tion).
Heating of the external mirror*
– Turn the rotary knob to position
⇒ fig. 45 .
Adjusting the left-hand exterior mirror*
– Turn the rotary knob to position
. The movement of the mirror
surface is identical to the movement of the rotary knob. Adjusting the right-hand exterior mirror*
– Turn the rotary knob to position
. The movement of the mirror
surface is identical to the movement of the rotary knob.
The exterior mirror heater only operates when the engine is running.
WARNING
•Convex (curved outward) or aspherical exterior mirrors
increase the vision field. They do, however, make objects appear
smaller in the mirror. These mirrors are only of limited use, there-
fore, for estimating distances to the following vehicles.
•Use whenever possible the interior rear-view mirror, for esti-
mating the distances to the following vehicles.
Note
•Do not touch the surface of the exterior mirrors if the exterior mirror
heater is switched on.
•You can set the exterior mirrors by hand, if the power setting function
fails at any time, by pressing on the edge of the mirror surface.
•Contact your specialist garage if a fault exists with the power setting of
the exterior mirrors.
Fig. 45 Inner part of
door: Rotary knob
sqc.1.book Seite 66 Mittwoch, 13. April 2005 1:09 13