technical data SKODA FABIA 2006 2.G / 5J Owner's Manual
[x] Cancel search | Manufacturer: SKODA, Model Year: 2006, Model line: FABIA, Model: SKODA FABIA 2006 2.G / 5JPages: 258, PDF Size: 44.86 MB
Page 224 of 258
Breakdown assistance223
Using the systemSafetyDriving TipsGeneral MaintenanceBreakdown assistanceTechnical Data
The repair with the tyre repair kit is not at all intended to replace a permanent repair on the tyre, this repair only serves to reach the next workshop. The repair can be undertaken on th e vehicle immediately. Please read the attached instructions carefully before the repair.
The tyre repair kit is locate d in the luggage compartment.
Spare wheel*
The spare wheel is stowed in the spare wheel well in the
luggage compartment belo w the floor covering.
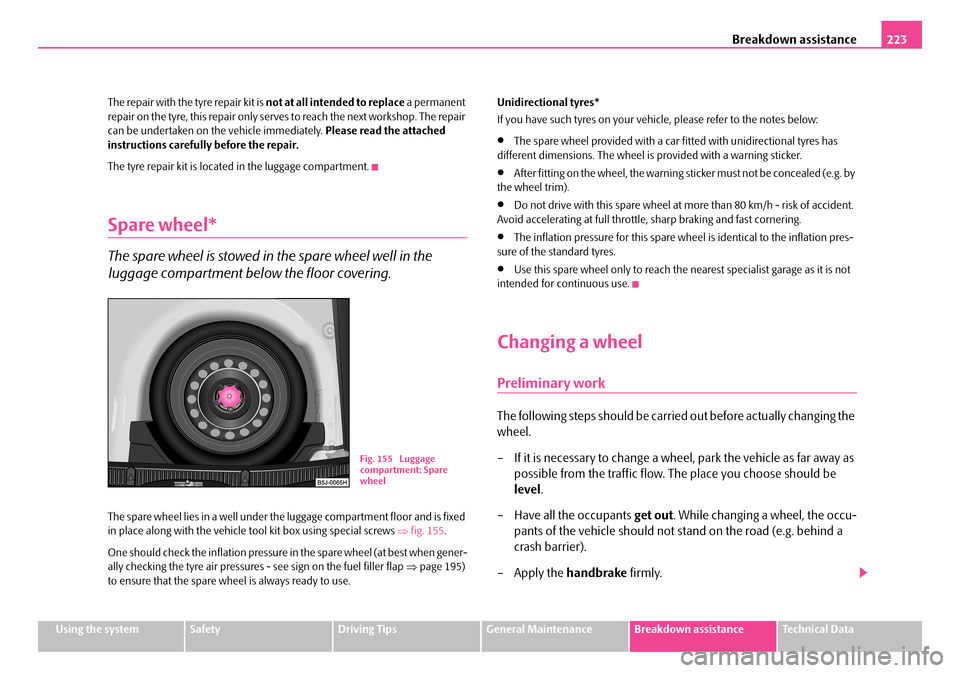
The spare wheel lies in a well under the luggage compartment floor and is fixed in place along with the vehicle tool kit box using special screws ⇒fig. 155.
One should check the inflation pressure in the spare wheel (at best when gener- ally checking the tyre air pressures - see sign on the fuel filler flap ⇒page 195) to ensure that the spare wheel is always ready to use.
Unidirectional tyres*
If you have such tyres on your vehi cle, please refer to the notes below:
•The spare wheel provided with a car fitted with unidirectional tyres has different dimensions. The wheel is provided with a warning sticker.
•After fitting on the wheel, the warning sticker must not be concealed (e.g. by the wheel trim).
•Do not drive with this spare wheel at more than 80 km/h - risk of accident. Avoid accelerating at full throttle, sharp braking and fast cornering.
•The inflation pressure for this spare wheel is identical to the inflation pres- sure of the standard tyres.
•Use this spare wheel only to reach the nearest specialist garage as it is not intended for co ntinuous use.
Changing a wheel
Preliminary work
The following steps should be carried out before actually changing the
wheel.
– If it is necessary to change a wheel, park the vehicle as far away as
possible from the traffic flow. The place you choose should be
level .
– Have all the occupants get out. While changing a wheel, the occu-
pants of the vehicle should not stand on the road (e.g. behind a
crash barrier).
– Apply the handbrake firmly.
Fig. 155 Luggage compartment: Spare wheel
NKO A05Fabia 20.book Page 223 Tuesday, September 26, 2006 8:38 AM
Page 226 of 258
Breakdown assistance225
Using the systemSafetyDriving TipsGeneral MaintenanceBreakdown assistanceTechnical Data
– Stow and attach the replaced wheel in the spare wheel well.
– Stow the vehicle tool kit in the space provided.
– Check the tyre pressure on the spare wheel just mounted as soon
as possible.
– Have the tightening torque of the wheel bolts checked with a
torque wrench as soon as possible. The tightening torque for steel
and light alloy wheels must be 120 Nm.
– Have the defective tyre repaired as soon as possible.
WARNING
It is necessary to observ e the guidelines given on ⇒page 215, “New tyres and wheels” if the vehicle is subsequently fitted with tyres which are different to those it was fitted with at the works.
Note
•If you find, when changing the wheel, that the wheel bolts are corroded and difficult to turn, the bolts must be re placed before checking the tightening torque.
•Drive cautiously and only at a moderate speed to a workshop where the tightening torque can be checked.
Full wheel trim*
Pulling off
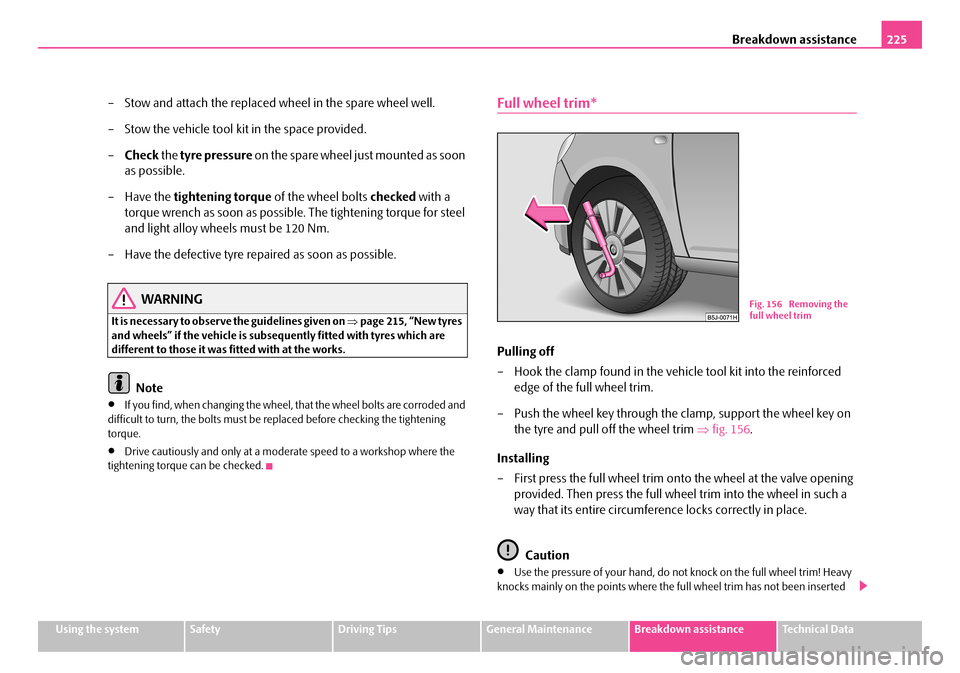
– Hook the clamp found in the vehicle tool kit into the reinforced
edge of the full wheel trim.
– Push the wheel key through the clamp, support the wheel key on
the tyre and pull off the wheel trim ⇒fig. 156.
Installing
– First press the full wheel trim onto the wheel at the valve opening
provided. Then press the full wheel trim into the wheel in such a
way that its entire circumfere nce locks correctly in place.
Caution
•Use the pressure of your hand, do no t knock on the full wheel trim! Heavy knocks mainly on the points where the full wheel trim has not been inserted
Fig. 156 Removing the full wheel trim
NKO A05Fabia 20.book Page 225 Tuesday, September 26, 2006 8:38 AM
Page 228 of 258
Breakdown assistance227
Using the systemSafetyDriving TipsGeneral MaintenanceBreakdown assistanceTechnical Data
Slackening and tightening wheel bolts
Slacken the wheel bolts before jacking up the vehicle.
Slackening wheel bolts
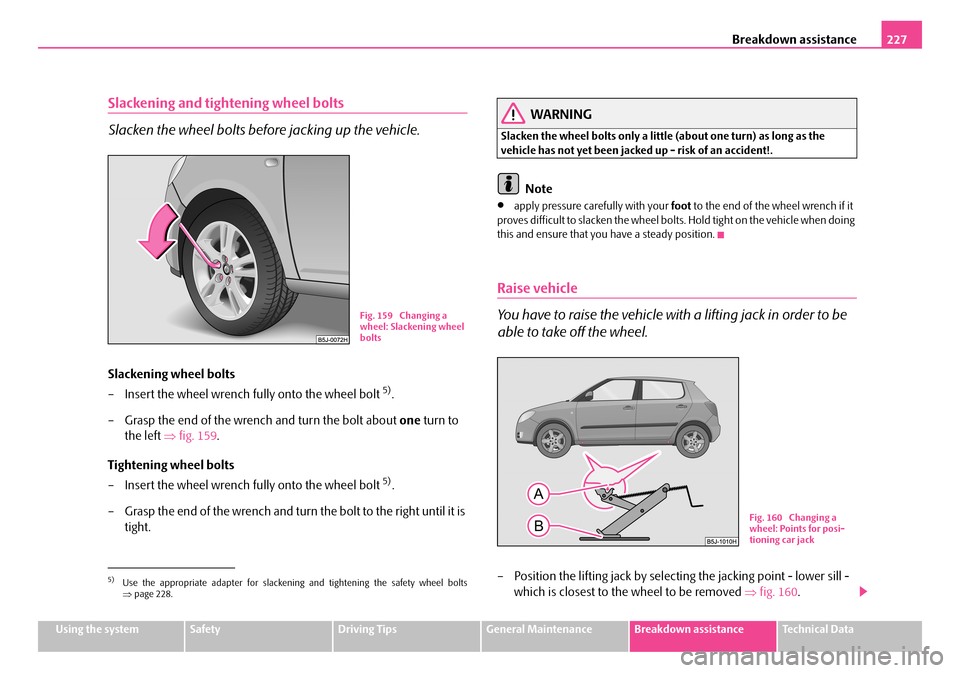
– Insert the wheel wrench fully onto the wheel bolt 5).
– Grasp the end of the wrench and turn the bolt about one turn to
the left ⇒fig. 159.
Tightening wheel bolts
– Insert the wheel wrench fully onto the wheel bolt 5).
– Grasp the end of the wrench and turn the bolt to the right until it is
tight.
WARNING
Slacken the wheel bolts only a little (about one turn) as long as the vehicle has not yet been jacked up - risk of an accident!.
Note
•apply pressure carefully with your foot to the end of the wheel wrench if it proves difficult to slacken the wheel bolts. Hold tight on the vehicle when doing this and ensure that you have a steady position.
Raise vehicle
You have to raise the vehicle with a lifting jack in order to be
able to take off the wheel.
– Position the lifting jack by select ing the jacking point - lower sill -
which is closest to the wheel to be removed ⇒fig. 160.5)Use the appropriate adapter for slackening and tightening the safety wheel bolts ⇒ page 228.
Fig. 159 Changing a wheel: Slackening wheel bolts
Fig. 160 Changing a wheel: Points for posi-tioning car jack
NKO A05Fabia 20.book Page 227 Tuesday, September 26, 2006 8:38 AM
Page 230 of 258
Breakdown assistance229
Using the systemSafetyDriving TipsGeneral MaintenanceBreakdown assistanceTechnical Data
– Have the tightening torque checked with a torque wrench as
soon as possible. Steel and light alloy wheels must be tightened to
a tightening torque of 120 Nm.
The safety wheel bolts on vehicles fitted with them (one safety wheel bolt per wheel) can only be loosened or tighte n up by using the adapter provided.
It is meaningful to note the code num ber hammered into the rear side of the adapter or the rear side of the safety wheel bolts. You can obtain a replacement adapter from a Škoda Service Partner, if necessary, by quoting this number.
We recommend that you always carry th e adapter for the wheel bolts with you in the vehicle. It should be stowed in the vehicle tool kit.
Caution
•Damage can occur to the adapter and sa fety wheel bolt if the safety wheel bolt is tightened up too much.
•On steel wheels, the theft-deterrent whee l bolt must always be installed in the hole, which is close to the valve. Otherwise the full wheel trim cannot be mounted and the full wheel trim can be damaged during the assembly.
Note
The set of safety wheel bolts can be obtained from a Škoda Service Partner.
Jump-starting
Initial steps
You can use the battery of another vehicle for jump-starting yours if the engine does not start because the battery on yo ur vehicle is flat. You will require jump- start cables for this purpose.
Both batteries must have a rated voltage of 12 V. The capacity (Ah) of the battery supplying the power must not be si gnificantly less than the capacity of the discharged battery in your vehicle.
Jump-start cables
Only use jump-start cables which have an adequately large cross-section and insulated terminal clamps. Please pay attention to the manufacturer's instruc- tions.
Positive cable - colour coding in the majority of cases red.
Negative cable - colour coding in the majority of cases black.
WARNING
•A discharged battery may already freeze at temperatures just below 0°C. In case of frozen battery carry out no jump-starting - risk of explo- sion! Also after thawing of the battery there is a risk of caustic burns due to leaking acid. Replac e the frozen battery.
•Please pay attention to the warning instructions relating to working in the engine compartment ⇒page 198.
Note
•There must not be any contact between the two vehicles otherwise current may flow as soon as the negative terminals are connected.
NKO A05Fabia 20.book Page 229 Tuesday, September 26, 2006 8:38 AM
Page 232 of 258
Breakdown assistance231
Using the systemSafetyDriving TipsGeneral MaintenanceBreakdown assistanceTechnical Data
•Do not bend over the batteries - risk of caustic burns!
•The vent screws of the battery cells must be tightened firmly.
•Keep any sources of ignition (naked flame, smouldering cigarettes etc.) away from the battery - risk of an explosion!
Tow-starting and towing vehicle
General
Please pay attention to the following instructions if you are going to
use a tow rope:
Driver of the towing vehicle
– Do not drive off until the tow rope is taught.
– Release the clutch particularly gently when starting off.
Driver of the towed vehicle
– Switch the ignition on so that th e steering wheel is not blocked and
you can also operate the turn signal lights, the headlight flasher,
the windscreen wipers and windscreen washer system.
– Take the vehicle out of gear or move the selector lever into position
N if your vehicle is fitted with an automatic gearbox.
– Note that the brake servo unit and power steering only operate if
the engine is running. You will requ ire significantly greater physical
force to depress the brake pedal and to steer the vehicle if the
engine is not running.
– Ensure that the tow rope is always kept taught.
Tow rope or tow bar
A tow bar is safest way of towing a vehicle and also minimizes any shocks. You can use a tow rope only if a suitable tow bar is not available.
The tow rope must be elastic to protect the vehicle. Thus one should only use plastic fibre rope or a rope made out of a similarly elastic material.
Attach the tow rope or the tow bar only to the towing eyes provided for this purpose ⇒page 232, “Front towing eye” and ⇒page 233, “Rear towing eye”.
Driving style
Towing another vehicle requires a cert ain amount of practice. Both drivers should be familiar with the particular points about towing a vehicle. Unskilled drivers should not attempt to tow in another vehicle or to be towed in.
One should be constantly vigilant not to allow impermissibly high towing forces or jerky loadings. There is always a risk of excessive stresses and damage resulting at the points to which you a ttach the tow rope or tow bar when you attempt to tow a vehicle which is not standing on a paved road.
Caution
If the gearbox of yo ur vehicle no longer contains any oil because of a defect, your vehicle must only be towed in with the driven wheels raised clear of the ground, or on a special vehicle transporter or trailer.
WARNING (continued)
NKO A05Fabia 20.book Page 231 Tuesday, September 26, 2006 8:38 AM
Page 234 of 258
Breakdown assistance233
Using the systemSafetyDriving TipsGeneral MaintenanceBreakdown assistanceTechnical Data
Rear towing eye
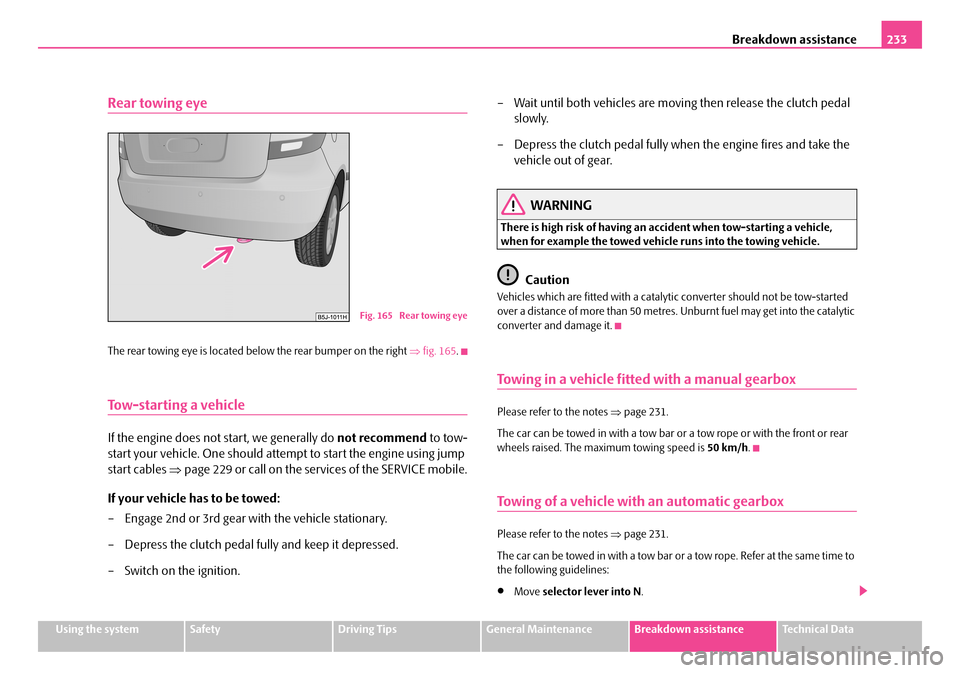
The rear towing eye is located below the rear bumper on the right ⇒fig. 165.
Tow-starting a vehicle
If the engine does not start, we generally do not recommend to tow-
start your vehicle. One should attempt to start the engine using jump
start cables ⇒page 229 or call on the services of the SERVICE mobile.
If your vehicle has to be towed:
– Engage 2nd or 3rd gear wi th the vehicle stationary.
– Depress the clutch pedal fully and keep it depressed.
– Switch on the ignition.
– Wait until both vehicles are movi ng then release the clutch pedal
slowly.
– Depress the clutch pedal fully when the engine fires and take the
vehicle out of gear.
WARNING
There is high risk of having an accident when tow-starting a vehicle, when for example the towed vehicl e runs into the towing vehicle.
Caution
Vehicles which are fitted with a catalytic converter should not be tow-started over a distance of more than 50 metres . Unburnt fuel may get into the catalytic converter and damage it.
Towing in a vehicle fitted with a manual gearbox
Please refer to the notes ⇒page 231.
The car can be towed in with a tow bar or a tow rope or with the front or rear wheels raised. The maximum towing speed is 50 km/h.
Towing of a vehicle with an automatic gearbox
Please refer to the notes ⇒page 231.
The car can be towed in with a tow bar or a tow rope. Refer at the same time to the following guidelines:
•Move selector lever into N.
Fig. 165 Rear towing eye
NKO A05Fabia 20.book Page 233 Tuesday, September 26, 2006 8:38 AM
Page 236 of 258
Fuses and light bulbs235
Using the systemSafetyDriving TipsGeneral MaintenanceBreakdown assistanceTechnical Data
Fuses and light bulbs
Electric fuses
Replacing fuses in the dash panel
Defect fuses must be replaced.
Individual electrical circuits are protected by fuses. The fuses are
located on the left side of the dash panel behind the safety cover.
– Switch the ignition off and also the electrical component affected.
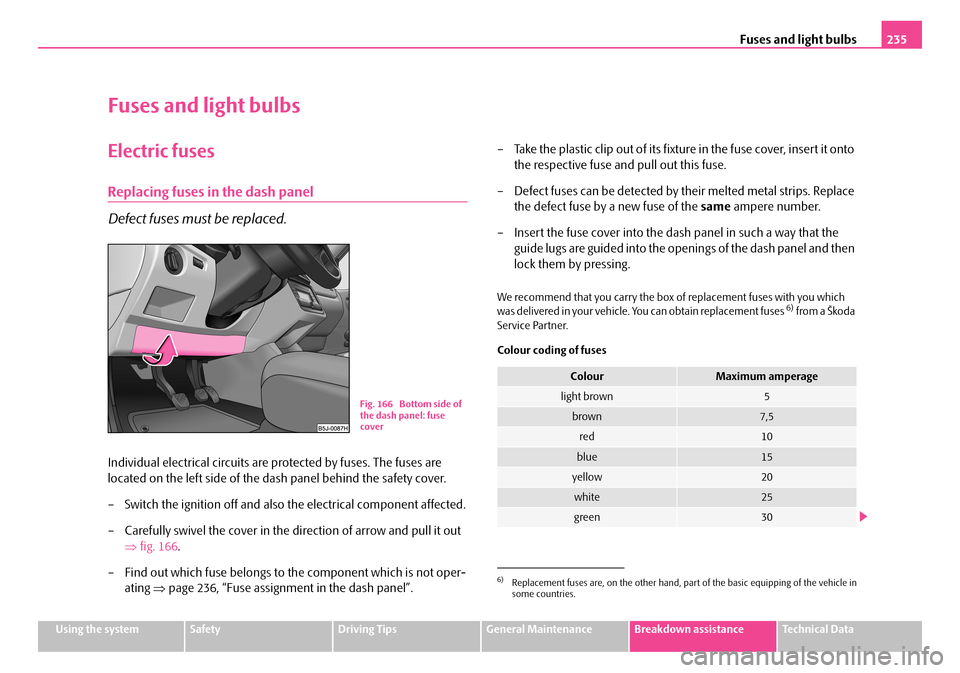
– Carefully swivel the cover in the direction of arrow and pull it out
⇒ fig. 166.
– Find out which fuse belongs to the component which is not oper-
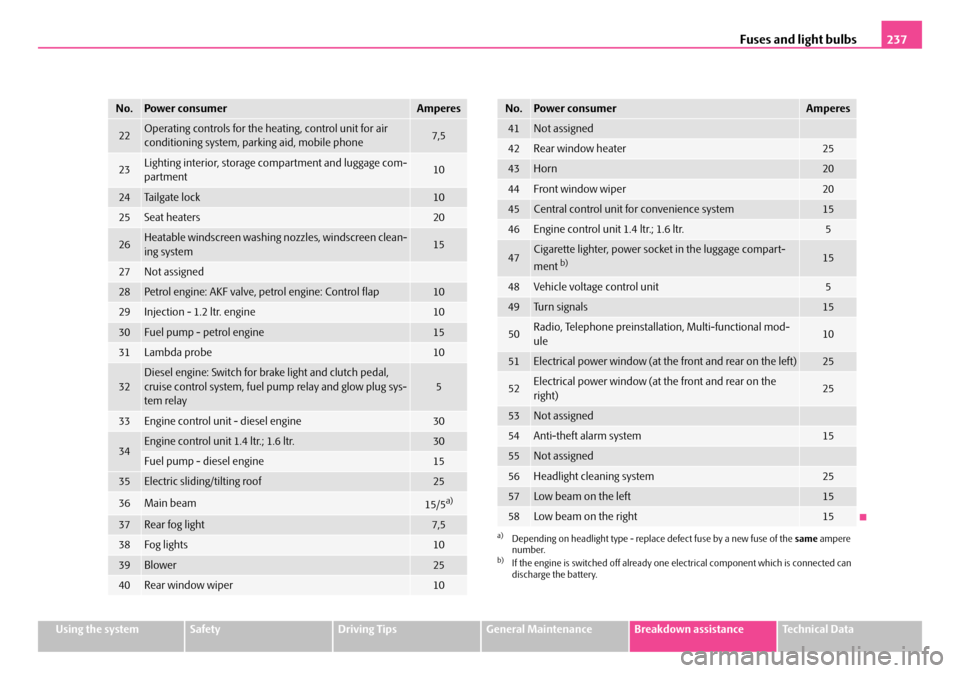
ating ⇒page 236, “Fuse assignment in the dash panel”.
– Take the plastic clip out of its fixture in the fuse cover, insert it onto
the respective fuse and pull out this fuse.
– Defect fuses can be detected by their melted metal strips. Replace
the defect fuse by a new fuse of the same ampere number.
– Insert the fuse cover into the dash panel in such a way that the
guide lugs are guided into the open ings of the dash panel and then
lock them by pressing.
We recommend that you carry the box of replacement fuses with you which was delivered in your vehicle. You can obtain replacement fuses 6) from a Škoda Service Partner.
Colour coding of fuses
Fig. 166 Bottom side of the dash panel: fuse cover
6)Replacement fuses are, on the other hand, pa rt of the basic equipping of the vehicle in some countries.
ColourMaximum amperage
light brown5
brown7,5
red10
blue15
yellow20
white25
green30
NKO A05Fabia 20.book Page 235 Tuesday, September 26, 2006 8:38 AM
Page 238 of 258
Fuses and light bulbs237
Using the systemSafetyDriving TipsGeneral MaintenanceBreakdown assistanceTechnical Data
22Operating controls for the heating, control unit for air conditioning system, parking aid, mobile phone7,5
23Lighting interior, storage compartment and luggage com- partment10
24Tailgate lock10
25Seat heaters20
26Heatable windscreen washin g nozzles, windscreen clean- ing system15
27Not assigned
28Petrol engine: AKF valve, petrol engine: Control flap10
29Injection - 1.2 ltr. engine10
30Fuel pump - petrol engine15
31Lambda probe10
32Diesel engine: Switch for brake light and clutch pedal, cruise control system, fuel pump relay and glow plug sys- tem relay5
33Engine control unit - diesel engine30
34Engine control unit 1.4 ltr.; 1.6 ltr.30
Fuel pump - diesel engine15
35Electric sliding/tilting roof25
36Main beam15/5a)
37Rear fog light7,5
38Fog lights10
39Blower25
40Rear window wiper10
No.Power consumerAmperes
41Not assigned
42Rear window heater25
43Horn20
44Front window wiper20
45Central control unit for convenience system15
46Engine control unit 1.4 ltr.; 1.6 ltr.5
47Cigarette lighter, power sock et in the luggage compart-
ment b)15
48Vehicle voltage control unit5
49Tu r n s i g n a l s15
50Radio, Telephone preinstallation, Multi-functional mod- ule10
51Electrical power window (at th e front and rear on the left)25
52Electrical power window (at the front and rear on the right)25
53Not assigned
54Anti-theft alarm system15
55Not assigned
56Headlight cleaning system25
57Low beam on the left15
58Low beam on the right15
a)Depending on headlight type - replace defect fuse by a new fuse of the same ampere number.b)If the engine is switched off already one electrical component which is connected can discharge the battery.
No.Power consumerAmperes
NKO A05Fabia 20.book Page 237 Tuesday, September 26, 2006 8:38 AM
Page 240 of 258
Fuses and light bulbs239
Using the systemSafetyDriving TipsGeneral MaintenanceBreakdown assistanceTechnical Data
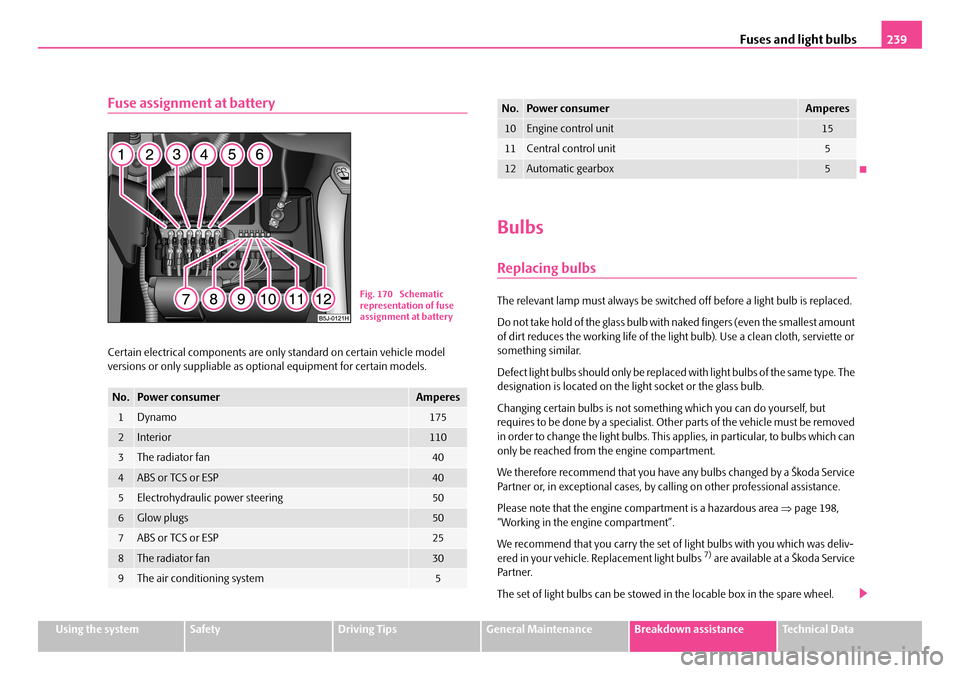
Fuse assignment at battery
Certain electrical components are only standard on certain vehicle model versions or only suppliable as op tional equipment for certain models.
Bulbs
Replacing bulbs
The relevant lamp must always be switched off before a light bulb is replaced.
Do not take hold of the glass bulb with naked fingers (even the smallest amount of dirt reduces the working life of the li ght bulb). Use a clean cloth, serviette or something similar.
Defect light bulbs should only be replaced with light bulbs of the same type. The designation is located on the light socket or the glass bulb.
Changing certain bulbs is not something which you can do yourself, but requires to be done by a specialist. Ot her parts of the vehicle must be removed in order to change the light bulbs. This applies, in particular, to bulbs which can only be reached from the engine compartment.
We therefore recommend that you have any bulbs changed by a Škoda Service Partner or, in exceptional cases, by ca lling on other professional assistance.
Please note that the engine compartment is a hazardous area ⇒page 198, “Working in the engine compartment”.
We recommend that you carry the set of light bulbs with you which was deliv- ered in your vehicle. Replacement light bulbs 7) are available at a Škoda Service Par tner.
The set of light bulbs can be stowed in the locable box in the spare wheel.
No.Power consumerAmperes
1Dynamo175
2Interior110
3The radiator fan40
4ABS or TCS or ESP40
5Electrohydraulic power steering50
6Glow plugs50
7ABS or TCS or ESP25
8The radiator fan30
9The air conditioning system5
Fig. 170 Schematic representation of fuse assignment at battery
10Engine control unit15
11Central control unit5
12Automatic gearbox5
No.Power consumerAmperes
NKO A05Fabia 20.book Page 239 Tuesday, September 26, 2006 8:38 AM
Page 242 of 258
Fuses and light bulbs241
Using the systemSafetyDriving TipsGeneral MaintenanceBreakdown assistanceTechnical Data
Front headlight
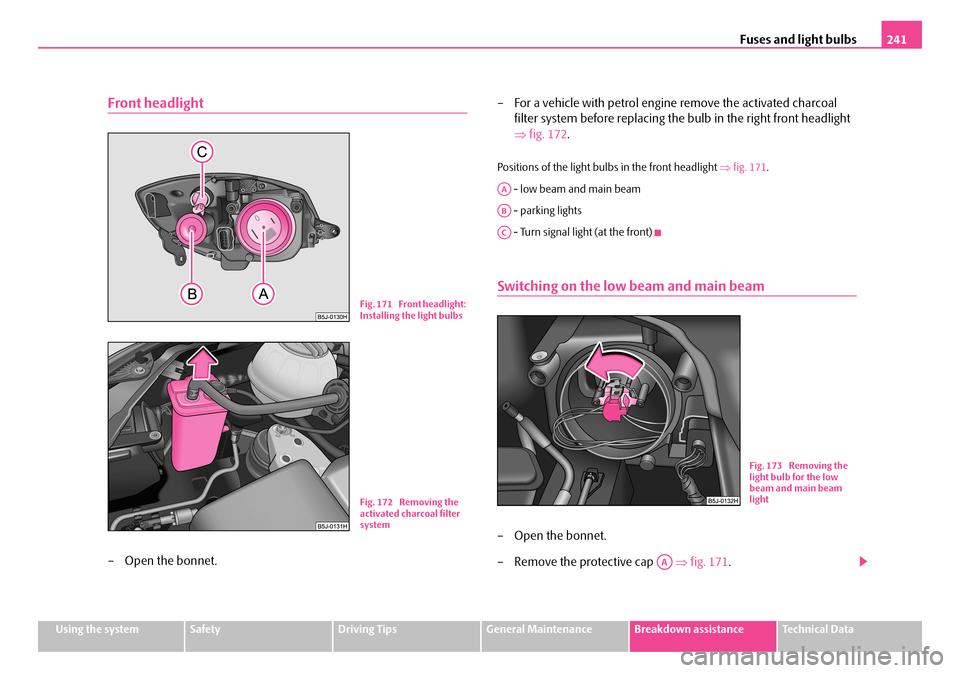
– Open the bonnet.
– For a vehicle with petrol engine remove the activated charcoal
filter system before replacing the bulb in the right front headlight
⇒ fig. 172.
Positions of the light bulbs in the front headlight ⇒fig. 171.
- low beam and main beam
- parking lights
- Turn signal light (at the front)
Switching on the low beam and main beam
– Open the bonnet.
– Remove the protective cap ⇒fig. 171.
Fig. 171 Front headlight: Installing the light bulbs
Fig. 172 Removing the activated charcoal filter system
AA
AB
AC
Fig. 173 Removing the light bulb for the low beam and main beam light
AA
NKO A05Fabia 20.book Page 241 Tuesday, September 26, 2006 8:38 AM