technical data SKODA FABIA 2008 2.G / 5J Owners Manual
[x] Cancel search | Manufacturer: SKODA, Model Year: 2008, Model line: FABIA, Model: SKODA FABIA 2008 2.G / 5JPages: 252, PDF Size: 40.88 MB
Page 182 of 252
Inspecting and Replenishing181
Using the systemSafetyDriving TipsGeneral MaintenanceBreakdown assistanceTechnical Data
ŌĆō Grip the bonnet and lift it up.
ŌĆō Take the bonnet support out of its holder and set it in the opening
designed for it ŌćÆpage 180, fig. 169.
Closing the bonnet
ŌĆō Lift the bonnet slightly and unhook the bonnet support. Press the
bonnet support into the holder designed to hold it.
ŌĆō Allow the bonnet to drop from a height of about 30 cm into the lock -
bonnet do not press down on it!
WARNING
ŌĆóNever open the bonnet if you see that steam or coolant is flowing out of the engine compartment - risk of scalding! Wait long enough until the steam or coolant has stopped escaping.
ŌĆóFor safety reasons, the bonnet must always be properly closed when driving. One should therefore check that the lock has in fact engaged prop-erly after closing the bonnet.
ŌĆóStop your vehicle immediately while driving if you notice that the lock is not properly engaged and close the bonnet properly - risk of an accident!
Caution
ŌĆóBefore opening the bonnet, ensure that the arms of the windscreen wipers are correctly in place against the windscreen. Otherwise, there is a risk of damage to the paintwork.
Working in the engine compartment
Particular care is required when carrying out any work in the engine
compartment!
There is a risk of injuries, scalding, accidents and fire when working in the engine compartment, e.g. inspecting and replenishing oil and other fluids. For
this reason, it is essential to comply with the warning instructions stated below and with the general applicable rules of safety. The engine compart-ment of your car is a hazardous area ŌćÆ.
WARNING
ŌĆóNever open the bonnet if you see that steam or coolant is flowing out of the engine compartment - risk of scalding! Wait long enough until the steam or coolant has stopped escaping.
ŌĆóSwitch off the engine and pull out the ignition key.
ŌĆóApply the handbrake firmly.
ŌĆóIf your vehicle is fitted with a manual gearbox, move the gearshift lever into Neutral, or if it is fitted with automatic gearbox, move the selector lever into position P.
ŌĆóAllow the engine to cool down.
ŌĆóKeep children clear of the engine compartment.
ŌĆóDo not touch any hot engine parts - risk of burns!
ŌĆóNever spill oil and other fluids over the hot engine. Such fluids (e.g. the antifreeze contained in the wash liquid) may ignite!
ŌĆóAvoid short circuits in the electrical system - particularly on the battery.
ŌĆóNever place your hand into the radiator fan as long as the engine is still warm. The fan might suddenly start running!
ŌĆóNever open the cap of the coolant expansion bottle as long as the engine is still warm. The cooling system is pressurized!
ŌĆóCover over the cap of the coolant expansion reservoir with a large cloth when opening it as protection for your face, hands and arms from hot steam or hot coolant.
ŌĆóDo not let objects, such as e.g cleaning cloth or tools lie in the engine compartment.
ŌĆóIf you wish to work under the vehicle, you must secure the vehicle from rolling away and support it with suitable supporting blocks: the car jack is not sufficient for this - risk of injury!
ŌĆóIn cases where it be necessary to carry out inspection work when the engine is running there is an additional risk from rotating parts (e.g. the V-
NKO A05F 20.book Page 181 Wednesday, April 2, 2008 1:02 PM
Page 184 of 252

Inspecting and Replenishing183
Using the systemSafetyDriving TipsGeneral MaintenanceBreakdown assistanceTechnical Data
Engine oil
Engine oil specifications
The grade of engine oil should be selected in accordance with
precise specifications.
The engine of your vehicle has been factory-filled with a high-grade oil which you can use throughout the year - except in extreme climatic regions.
You can mix various oils together with each other when refilling with oil. This does not, however, apply for models with flexible service intervals (QG1).
Engine oils are, of course, undergoing continuous further development. Thus the information stated in this Owner's Manual is only correct at the time of publication.
┼Ākoda Service Partners are informed by ┼Ākoda Auto a.s. about current changes. We recommend having this oil change undertaken by a ┼Ākoda Service Partner.
Engine oil specifications for vehicles with fixed service intervals (QG0, QG2)
Engine oil specifications for models with flexible service intervals (QG1)
Caution
Only the above-mentioned oils may be used on vehicles with flexible service inter-vals (QG1). We recommend always refilling with oil of the same specification since this will maintain the properties of the oil. In exceptional cases, you must top up only once engine oil complying with Specification VW 502 00 (only for petrol engines) or Specification VW 505 01 (only for diesel engines) to maximum 0.5 litres. You must not use other engine oils - risk of engine damage!
Note
ŌĆóBefore a long drive we recommend that you purchase and carry with you engine oil which complies with the specification for your vehicle. Consequently, you will always have the correct engine oil for refilling.
ŌĆóWe recommend using a preservative from the ┼Ākoda original accessories offered by your ┼Ākoda dealer.
ŌĆóFor further information - see Service shedule.
Engine oil specifications
Petrol engines
VW 501 01 VW 502 00 VW 504 00
ACEA A2 a) or A3 a)
a)Only to be used in exceptional cases if the oils specified above are not available.
Diesel enginesVW 505 01b)
VW 507 00 c)
b)Only for engines without diesel particle filter ŌćÆpage 29.c)Only for engines with diesel particle filter ŌćÆpage 29.
Engine oil specifications
Petrol enginesVW 504 00 alternative VW 503 00
Diesel enginesVW 507 00
alternative VW 506 01 a)
a)Only for engines without diesel particle filter ŌćÆpage 29.
NKO A05F 20.book Page 183 Wednesday, April 2, 2008 1:02 PM
Page 186 of 252
Inspecting and Replenishing185
Using the systemSafetyDriving TipsGeneral MaintenanceBreakdown assistanceTechnical Data
Replenishing engine oil
ŌĆō Inspect the oil level ŌćÆpage 184.
ŌĆō Unscrew the cap of the engine oil filler opening.
ŌĆō Wipe off the oil from the sealing surface of the cover and on the coun-
terpart using a clean cloth.
ŌĆō Pour in a suitable grade of oil in portions of 0.5 litres ŌćÆpage 183,
ŌĆ£Engine oil specificationsŌĆØ.
ŌĆō Inspect the oil level ŌćÆpage 184.
ŌĆō Carefully screw on the cap of the filler opening and push the dipstick
in fully.
WARNING
ŌĆóAvoid dripping oil onto hot parts of the engine when topping up will oil - a risk of fire!
ŌĆóRead and observe the warning notes ŌćÆpage 181, ŌĆ£Working in the engine compartmentŌĆØ before working in the engine compartment.
For the sake of the environment
The oil level must on no account be above the range ŌćÆpage 184. Oil will other-wise be drawn in through the crankcase ventilation and may pass through the exhaust system to atmosphere. The oil may combust in the catalytic converter and damage it.
Changing engine oil
The engine oil must be changed at the intervals stated in the Service schedule or according to the service interval indicator ŌćÆpage 11.
WARNING
ŌĆóOnly carry out the engine oil change, if you have the required profes-sional knowledge!
ŌĆóRead and observe the warning notes ŌćÆpage 181, ŌĆ£Working in the engine compartmentŌĆØ before working in the engine compartment.
ŌĆóLet the engine cool down - risk of burning from hot oil.
ŌĆóWear an eye protection - risk of caustic burns due to oil splashes.
ŌĆóOil is toxic! Store old oil in a safe place out of the reach of children and unauthorized persons until you dispose of it properly.
Caution
You must not pour any additives into the engine oil - risk of engine damage! Damage, which results from such product, are excluded from the warranty.
For the sake of the environment
ŌĆóYou must on no account pour oil into the ground or into the sewage system.
ŌĆóIn view of the problems involved in properly disposing of old oil, the material, equipment and the knowledge required for such work, we recommend that you have the oil and oil filter change carried out by your ┼Ākoda Service Partner.
Note
After your skin has come in contact with the oil, you must thoroughly wash your skin.
Aa
NKO A05F 20.book Page 185 Wednesday, April 2, 2008 1:02 PM
Page 188 of 252

Inspecting and Replenishing187
Using the systemSafetyDriving TipsGeneral MaintenanceBreakdown assistanceTechnical Data
Loss of coolant
A loss of coolant is first and foremost an indication of a leak in the system. You should not merely top up the coolant in the reservoir. It is also important to have the cooling system inspected without delay by a specialist garage.
Losses can only occur through the pressure relief in the cap of the coolant expan-sion bottle which is completely free of leaks if the coolant boils as a result of over-heating and is forced out of the cooling system.
WARNING
Read and observe the warning notes ŌćÆpage 181, ŌĆ£Working in the engine compartmentŌĆØ before working in the engine compartment.
Caution
One should contact a specialist garage as soon as possible if the source of over-heating itself cannot be determined and removed, since there may be grave damage to the engine.
Replenishing the coolant
ŌĆō Switch the engine off.
ŌĆō Allow the engine to cool down.
ŌĆō Place a cloth over the cap of the coolant expansion reservoir
ŌćÆpage 186, fig. 172 and unscrew the cap carefully by turning it to the
left ŌćÆ.
ŌĆō Top up the coolant.
ŌĆō Screw the cap tight until it is heard to lock.
The coolant which you use for replenishing the system, must comply with one specific specification ŌćÆpage 186, ŌĆ£CoolantŌĆØ. Do not use an alternative additive if the coolant additive G12 PLUS is not available in exceptional cases. Just top up the
system with water and as soon as possible arrange adjustment to correct the mixing ratio of water and coolant additive again by a specialist garage.
Only use fresh coolant for topping up the system.
Do not fill up over the ŌĆ£MAXŌĆØ marking! Excess coolant which is heated up is forced out of the cooling system through the pressure relief valve in the cap of the coolant compensation bottle.
Wait until the engine has cooled down for a system which has suffered a major loss of coolant before pouring in coolant. This is necessary to avoid engine damage.
WARNING
ŌĆóThe cooling system is pressurized! Do not open the cap of the coolant expansion bottle if the engine is still hot - risk of scalding!
ŌĆóThe coolant additive and thus all of the coolant is harmful to your health. Avoid contact with the coolant. Coolant vapours are also harmful to the health. It is important, therefore, to always safely store any coolant additive in its original container out of the reach of children - risk of poisoning!
ŌĆóIf any splashes of coolant get into your eyes, rinse out your eyes immedi-ately with clear water and contact a doctor as soon as possible.
ŌĆóYou should also consult a doctor without delay if you have inadvertently swallowed coolant.
Caution
Do not continue your journey if for some reason it is not possible under the conditions prevailing to top up with coolant. Switch the engine off and obtain professional assistance from a specialist garage, otherwise it could lead to severe engine damage.
For the sake of the environment
Do not re-use coolant if it is necessary to drain the coolant in the system. It should be collected and disposed of in compliance with environmental protection regulations.
NKO A05F 20.book Page 187 Wednesday, April 2, 2008 1:02 PM
Page 190 of 252

Inspecting and Replenishing189
Using the systemSafetyDriving TipsGeneral MaintenanceBreakdown assistanceTechnical Data
One may only use new genuine brake fluid from ┼Ākoda Auto a.s. The specification for the brake fluid is ŌĆ£FMVSS 116 DOT 4ŌĆØ.
We recommend that you have the brake fluid replaced by a ┼Ākoda Service Partner as part of an Inspection Service.
WARNING
ŌĆóUsing old brake fluid can result in severe stress on the brakes because of the formation of vapour bubbles in the brake system. This greatly impairs the braking efficiency and thus also the safety of your vehicle.
ŌĆóBrake fluid is toxic! It must therefore be kept safely in closed original containers and well away from children and unauthorized persons.
Caution
Brake fluid damages the paintwork of the vehicle.
For the sake of the environment
In view of the problems involved with proper disposal of brake fluid, the special tools and the professional knowledge required, we recommend you have the brake fluid replaced by a ┼Ākoda Service Partner.
Battery
Working on the battery
The battery is located in the engine compartment below a plastic box.
ŌĆō Unlock the interlock on the positive terminal side of the battery
ŌćÆfig. 174.
ŌĆō Open the cover in direction of arrow.
ŌĆō The installation of the battery cover on the positive terminal side takes
place in the reverse order.
Removal and installation of the battery is not recommended since it can, under certain circumstances, lead to major damage to the battery and fuse boxes. Contact a specialist garage.
There is a risk of injuries, scalding, accidents and burns when carrying out any work on the battery and on the electrical system. For this reason, it is essential to comply with the warning instructions ŌćÆ stated below and with the general applicable rules of safety.
Fig. 174 The battery: Open up the cover
NKO A05F 20.book Page 189 Wednesday, April 2, 2008 1:02 PM
Page 192 of 252

Inspecting and Replenishing191
Using the systemSafetyDriving TipsGeneral MaintenanceBreakdown assistanceTechnical Data
Battery with a charge level indicator, the so-called magic eye*
There is a so-called magic eye ŌćÆfig. 175 located on the top of the battery. The ŌĆ£magic eyeŌĆØ changes its colour in line with the charge state of and electrolyte level in the battery.
Air bubbles can influence the colour of the ŌĆ£magic eyeŌĆØ. For this reason carefully knock on the ŌĆ£magic eyeŌĆØ before carrying out the check.
ŌĆóGreen colour - the battery is adequately charged.
ŌĆóDark colour - the battery has to be charged
ŌĆóColourless or yellow colour - we recommend you have the battery checked by a ┼Ākoda Service Partner.
Batteries, which are more than 5 years old, must be replaced. We recommend you have the electrolyte level inspected and adjusted to the correct level or the battery replaced if necessary by a ┼Ākoda Service Partner.
Caution
If the vehicle has not been driven for more than 3 to 4 weeks, the battery will discharge because certain electrical components consume electricity (e.g. control units) also in idle state. You can prevent the discharging of the battery by discon-necting the negative terminal or charging the battery constantly with a very low charging current. Please also refer to the notes when working on the battery ŌćÆpage 189, ŌĆ£Working on the batteryŌĆØ.
Inspecting the electrolyte level
The battery is practically maintenance-free under normal operating conditions. We do, however, recommend that you have the electrolyte level inspected from time to time by a ┼Ākoda Service Partner when outside temperatures are high or when driving on long trips. You should also check the electrolyte level ŌćÆpage 191 each time the battery is charged.
The battery acid level will also be checked as part of the Inspection Service.
Operation in winter
The battery has to provide greater amounts of electricity during the winter. It also has only part of the initial power output at low temperatures that it has at normal temperatures.
A discharged battery may already freeze at temperatures just below 0┬░C.
We therefore recommend that you have the battery checked by a ┼Ākoda Service Partner before the start of the winter, and recharged if necessary.
Charging the battery
A properly charged battery is essential for reliably starting the
engine.
ŌĆō Read the warning notes ŌćÆ in ŌĆ£Working on the batteryŌĆØ on
page 189 and ŌćÆ.
ŌĆō Switch the ignition and all electrical components off.
ŌĆō Only for ŌĆ£quick-chargingŌĆØ: Disconnect both battery cables (first of all
ŌĆ£negativeŌĆØ, then ŌĆ£positiveŌĆØ).
ŌĆō Carefully attach the terminal clamps of the charger to the battery
terminals (red = ŌĆ£positiveŌĆØ, black = ŌĆ£negativeŌĆØ).
ŌĆō You can now plug the mains cable of the charger into the power socket
and switch on the charger.
Fig. 175 Battery with a charge level indicator
NKO A05F 20.book Page 191 Wednesday, April 2, 2008 1:02 PM
Page 194 of 252
Inspecting and Replenishing193
Using the systemSafetyDriving TipsGeneral MaintenanceBreakdown assistanceTechnical Data
Windshield washer system
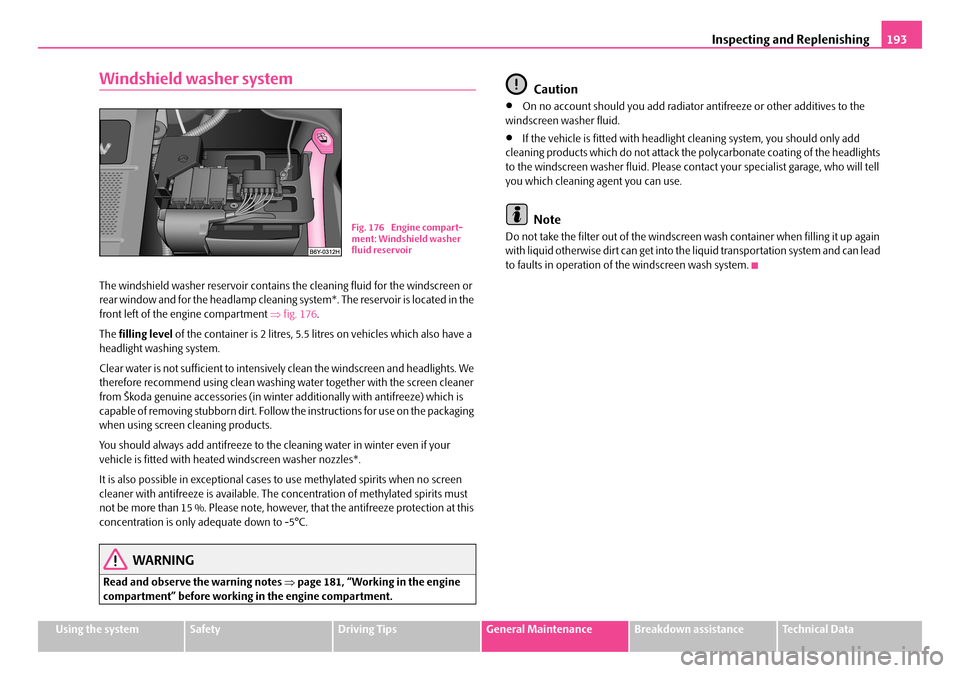
The windshield washer reservoir contains the cleaning fluid for the windscreen or rear window and for the headlamp cleaning system*. The reservoir is located in the front left of the engine compartment ŌćÆfig. 176.
The filling level of the container is 2 litres, 5.5 litres on vehicles which also have a headlight washing system.
Clear water is not sufficient to intensively clean the windscreen and headlights. We therefore recommend using clean washing water together with the screen cleaner from ┼Ākoda genuine accessories (in winter additionally with antifreeze) which is capable of removing stubborn dirt. Follow the instructions for use on the packaging when using screen cleaning products.
You should always add antifreeze to the cleaning water in winter even if your vehicle is fitted with heated windscreen washer nozzles*.
It is also possible in exceptional cases to use methylated spirits when no screen cleaner with antifreeze is available. The concentration of methylated spirits must not be more than 15 %. Please note, however, that the antifreeze protection at this concentration is only adequate down to -5┬░C.
WARNING
Read and observe the warning notes ŌćÆpage 181, ŌĆ£Working in the engine compartmentŌĆØ before working in the engine compartment.
Caution
ŌĆóOn no account should you add radiator antifreeze or other additives to the windscreen washer fluid.
ŌĆóIf the vehicle is fitted with headlight cleaning system, you should only add cleaning products which do not attack the polycarbonate coating of the headlights to the windscreen washer fluid. Please contact your specialist garage, who will tell you which cleaning agent you can use.
Note
Do not take the filter out of the windscreen wash container when filling it up again with liquid otherwise dirt can get into the liquid transportation system and can lead to faults in operation of the windscreen wash system.
Fig. 176 Engine compart-ment: Windshield washer fluid reservoir
NKO A05F 20.book Page 193 Wednesday, April 2, 2008 1:02 PM
Page 196 of 252
Wheels and Tyres195
Using the systemSafetyDriving TipsGeneral MaintenanceBreakdown assistanceTechnical Data
setting off on a long trip. Please do not forget the spare wheel when checking the tyres.
The tyre inflation pressures for summer tyres are indicated on the inside of the fuel filler flap ŌćÆpage 194, fig. 177. The inflation pressures for winter tyres are 20 kPa (0.2 bar) higher than those for summer tyres ŌćÆpage 198.
The tyre pressure should be at the highest pressure specified for your vehicle at all times.
Always check the inflation pressure of tyres when cold. Do not reduce the higher pressure of warm tyres. Adapt the inflation pressure of the tyres accordingly if your vehicle is carrying a significantly higher payload.
Driving style
Fast cornering, sharp acceleration and braking (squealing tyres) increase wear-and-tear on your tyres.
Balancing wheels
The wheels of a new vehicle are balanced. There are a wide range of influences when driving which may result in an imbalance and which makes themselves felt through vibration in the steering.
You should have the wheels rebalanced since any imbalance increases wear-and-tear on the steering, the suspension and tyres. A wheel must also be rebalanced when a new tyre is fitted and each time a tyre is repaired.
Wheel alignment errors
Incorrect wheel alignment at the front and rear will not only increase wear-and-tear on the tyres but will also has an adverse effect on vehicle safety. Contact your specialist garage if you notice any unusual tyre wear.
WARNING
ŌĆóIf the inflation pressure is too low, the tyre must perform a greater rolling resistance. At higher speeds the tyre will warm up as a result of this. This can result in tread separation and even a tyre blowout.
ŌĆóImmediately replace the damaged rims or tyres.
ŌĆóTyres which are 6 years old or more should only be fitted in exceptional cases and when adopting an appropriately cautious style of driving.
For the sake of the environment
Tyres which are insufficiently inflated increase your fuel consumption.
Wear indicators
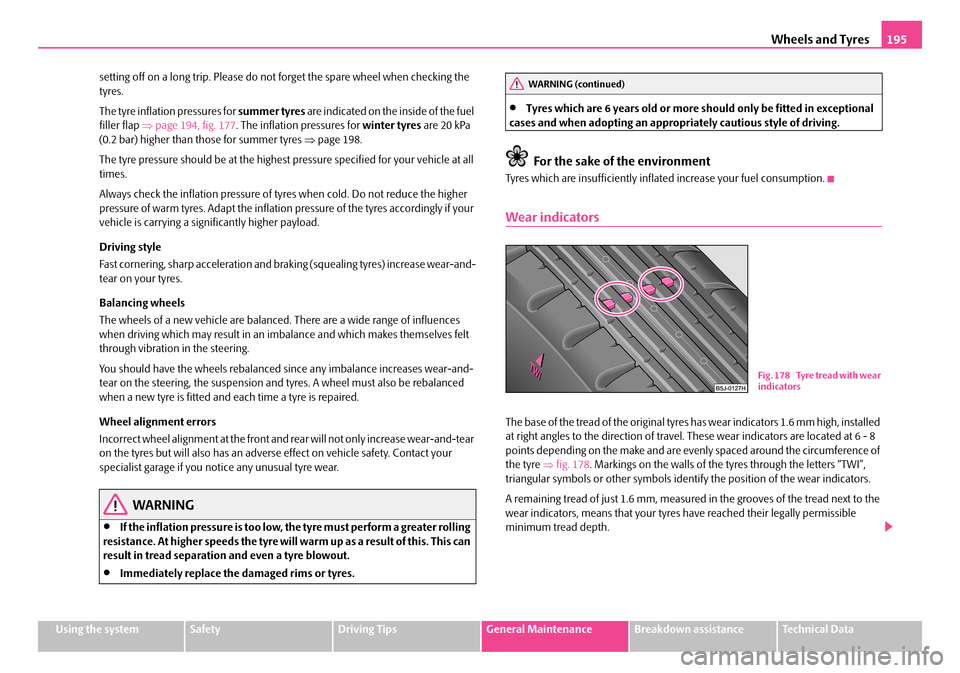
The base of the tread of the original tyres has wear indicators 1.6 mm high, installed at right angles to the direction of travel. These wear indicators are located at 6 - 8 points depending on the make and are evenly spaced around the circumference of the tyre ŌćÆfig. 178. Markings on the walls of the tyres through the letters ŌĆ£TWIŌĆØ, triangular symbols or other symbols identify the position of the wear indicators.
A remaining tread of just 1.6 mm, measured in the grooves of the tread next to the wear indicators, means that your tyres have reached their legally permissible minimum tread depth.
WARNING (continued)
Fig. 178 Tyre tread with wear indicators
NKO A05F 20.book Page 195 Wednesday, April 2, 2008 1:02 PM
Page 198 of 252
Wheels and Tyres197
Using the systemSafetyDriving TipsGeneral MaintenanceBreakdown assistanceTechnical Data
The date of manufacture is also stated on the tyre wall (possibly only on the inside of wheel):
DOT ... 05 07...
means, for example, that the tyre was manufactured in the 40th week of the year 2007.
Any spare wheel which differs from the tyres fitted to the vehicle (e.g. winter tyres or low-profile tyres) should only be used only for a short time in the event of a puncture and when adopting an appropriately cautious style of driving. It should be replaced as quickly as possible by a normal wheel.
WARNING
ŌĆóOnly use those tyres or wheel rims which have been approved for your model of ┼Ākoda Auto a.s. vehicle. Failure to observe this instruction will adversely affect the road safety of your vehicle - risk of accident! Approval and licencing of your vehicle on public roads may also become void as a result.
ŌĆóYou must on no account drive at a higher speed than is permissible for your tyres - risk of an accident resulting from tyre damage and loss of control over your vehicle.
ŌĆóTyres which are 6 years old or more should only be fitted in exceptional cases and when adopting an appropriately cautious style of driving.
ŌĆóNever fit tyres which have already been used without having adequate knowledge of their previous history. Tyres age even if they have not been used at all or only very little. A spare tyre must only be used in exceptional cases and only then when adopting an appropriately cautious style of driving.
ŌĆóDo not, where possible, replace individual tyres but at least replace them on both wheels of a given axle at the same time. Always fit the tyres with the deeper tread depth to the front wheels.
For the sake of the environment
Old tyres must be disposed of in conformity with the appropriate regulations.
Note
It is not normally possible to fit wheels from other models of cars for technical reasons. This may also apply in certain circumstances to the wheels of the same type of vehicle.
Wheel bolts
Wheels and wheel bolts are matched to each other in terms of design. Each time you fit other wheels - e.g. light alloy wheels or wheels with winter tyres - you must therefore also use the matching wheel bolts of the correct length and shape of spherical cap. This is essential to ensure that the wheels are tightly fitted and that the brake system operates properly.
If you retrofit wheel trims (or have this done), please also ensure that an adequate flow of air remains assured for cooling the brake system.
The ┼Ākoda Service Partners are instructed in the technical possibilities which exist regarding converting or retrofitting wheels, tyres and wheel trim.
WARNING
ŌĆóIn case of incorrect treatment of the wheel bolts, the wheel can loosen when the car is moving - risk of accident!
ŌĆóThe wheel bolts must be clean and must turn easily. However, they must never be treated with grease or oil.
ŌĆóIf the wheel bolts are tightened to a too low tightening torque, the rim can lossen when the car is moving - risk of accident! A tightening torque which is too high can damage the bolts and threads and this can result in permanent deformation of the contact surfaces on the rims.
Caution
The prescribed tightening torque of the wheel bolts for steel and light alloy wheels is 120 Nm.
NKO A05F 20.book Page 197 Wednesday, April 2, 2008 1:02 PM
Page 200 of 252
Wheels and Tyres199
Using the systemSafetyDriving TipsGeneral MaintenanceBreakdown assistanceTechnical Data
When driving on wintry roads, snow chains improve not only traction, but also the braking performance.
For technical reasons, it is only permissible to fit snow chains with the following wheel/tyre combinations:
Only use fine-link snow chains. They must not project more than 9 mm - including the chain lock.
Remove the full wheel trims before installing the snow chains.
Observe the national legal requirements relating to the use of snow chains and the maximum vehicle speed with snow chains.
WARNING
Please pay attention to the information in the supplied fitting instructions of the snow chain manufacturer.
Caution
You must take the chains off as soon as you drive on roads which are free of snow. They adversely affect the handling of your vehicle, damage the tyres and are rapidly destroyed.
Note
ŌĆóOnly fit snow chains from the range of ┼Ākoda genuine accessories.
ŌĆóWhen driving with snow chains, switch off the traction control system (TCS).
Wheel sizeDepth (D)Tyre s iz e
5J x 1335 mm155/80
5J x 1435 mm165/70
6J x 1437 mm185/60
6J x 1543 mm185/55
NKO A05F 20.book Page 199 Wednesday, April 2, 2008 1:02 PM