power steering SKODA FABIA 2010 2.G / 5J User Guide
[x] Cancel search | Manufacturer: SKODA, Model Year: 2010, Model line: FABIA, Model: SKODA FABIA 2010 2.G / 5JPages: 244, PDF Size: 29.53 MB
Page 142 of 244
Intelligent Technology
141
Using the system
Safety
Driving Tips
General Maintenance
Breakdown assistance
Technical Data
WARNING
The ABS can also not overcome the physical
limits of your vehicle. Please do
not forget this, particularly when driving on icy or wet road surfaces. If the ABS is operating within the control range,
adapt your speed immediately to the
conditions of the road surface and the traffic situation. The increased safety offered by the ABS must not tempt you to take greater risks than otherwise - risk of an accident!
The normal braking system is
still fully functional if there is an ABS fault.
Visit a specialist garage immediately and
adjust your style of driving according
to the damage to the ABS as you will no
t know how great the damage is and the
limitation it is placing on the braking efficiency.
Note
A warning light comes on if a fault occurs in the ABS system
page 32.
Changes to vehicle (e.g. on engine, on th
e brakes, on chassis or another combina-
tion of tyres and wheels) can in
fluence the function of the ABS
page 184, “Accesso-
ries, changes and replacement of parts”.Brake Assist*During a severe brake application (e.g. if a hazard exists), the Brake Assist increases the braking force and thus makes it possible to
rapidly produce the pressure required in
the brake system. The majority of drivers do apply the brakes
in good time in dangerous situations, but
do not depress the brake pedal with sufficient pressure. Consequently, it is not possible for the vehicle to achieve its maximum deceleration and the vehicle covers a greater distance than necessary. The Brake Assist is activated by the very quick operation of the brake pedal. In such cases, a much greater braking pressure exists
than during a normal
brake application.
This makes it possible, even with a relative
ly low resistance of the brake pedal, to
produce an adequate pressure in the brake system in the shortest possible time, which is required for maximum deceleration of th
e vehicle. You must apply the brake pedal
firmly and hold it in this position in order to achieve the shortest possible braking distance.
The Brake Assist is able to help you achi
eve a shorter braking distance in emergency
situations by rapidly producing the pressure required in the brake system. It fully exploits the attributes of the ABS. After you release the brake pedal, the function of the Brake Assist is automatically switched off
and the brakes operate in the normal way.
The Brake Assist is part of the ESP system. If
a fault occurs in the ESP, the Brake Assist
function is also not available.
Further information on the ESP
page 137.
WARNING
The Brake Assist is also not able to overcome the physical limits of your
vehicle in terms of the braking distance required.
Adapt your speed to the conditions of the road surface and to the traffic situ-
ation.
The increased safety offered by the Brake Assist must not tempt you to take
a greater safety risk than otherwise.Uphill Start Assist*The uphill start assist makes it easier to start off on steep hills. The system assists a start off by holding the brake pressure produced
by the brake pedal actuation for approx. 2
seconds after releasing the brake pedal. The driver can therefore move his foot from the brake pedal to the accelerator pedal and
start off on the slope, without having to
actuate the handbrake. The brake pressure drops gradually the more you operate the accelerator pedal. If the vehicle does not start
off within 2 seconds, it starts to roll back.
The uphill start assist is active as of a 3% slope, if the driver door is closed. It is always active on slopes when in forward or reverse start off. When driving downhill, it is inactive.Electrohydraulic power steeringThe power steering enables you to steer the vehicle with less physical force. The steering characteristics can be changed by a specialist garage.
s3j8.a.book Page 141 Tuesday, April 20, 2010 1:10 PM
Page 143 of 244
Intelligent Technology
142
You will place great stresses on the power steering system if the steering is turned to full lock when the vehicle is stationary. Turn
ing the steering to full lock in such a situa-
tion will be accompanied by noises. It is still possible to fully steer the vehicle if the power steering fails or if the engine is not running (vehicle being towed in). The only
difference is that gr
eater physical effort
is required. It is possible that the hydraulic pump of
the power steering will not run due to the low
vehicle network voltage if the battery has gone flat and the engine must started with the help off jump leads. This condition will
be indicated by lighti
ng up of the warning
light. The power steering operates again if the ba
ttery is charged to a specific range when
engine is running. It also op
erates again, if the engine
can be started with its own
battery. If there is a fault in the power steering, the warning light lights up in the instrument cluster
page 26.
Caution
Do not leave the steering at full lock fo
r more than 15 seconds when the engine is
running - risk of damagi
ng the power steering!
Note
Have the steering inspected as soon as possible by a specialist garage if there is a leak or fault in the system.
Tyre pressure monitoring system*The tyre pressure monitoring system compares with the aid of the ABS sensors the speed and also the rolling circumference of the individual wheels. If the tyre inflation pressure is significantly changed and thus the rolling circumference of a wheel, the warning light
lights up in the instrument cluster
page 31. The tyre pressure moni-
toring system functions late or too sensitively if:
the structure of the tyre is damaged,
the vehicle is loaded to one side or with a load on the roof,
the wheels of an axle are loaded heavily (e.g. when towing a trailer or when driving
uphill or downhill),
the vehicle is operated in unfavourable wi
nter conditions or
on an unfirm ground,
snow chains or emergency wheel* are mounted,
the driver has a sporty style of driving (with sharp acceleration and high speed
when cornering). Basic setting of the system After changing the tyre inflation pressures
or after changing one or several wheels, a
basic setting of the system mu
st be carried
out as follows.
Inflate all tyres to the specified inflation pressure
page 178.
Switch on the ignition.
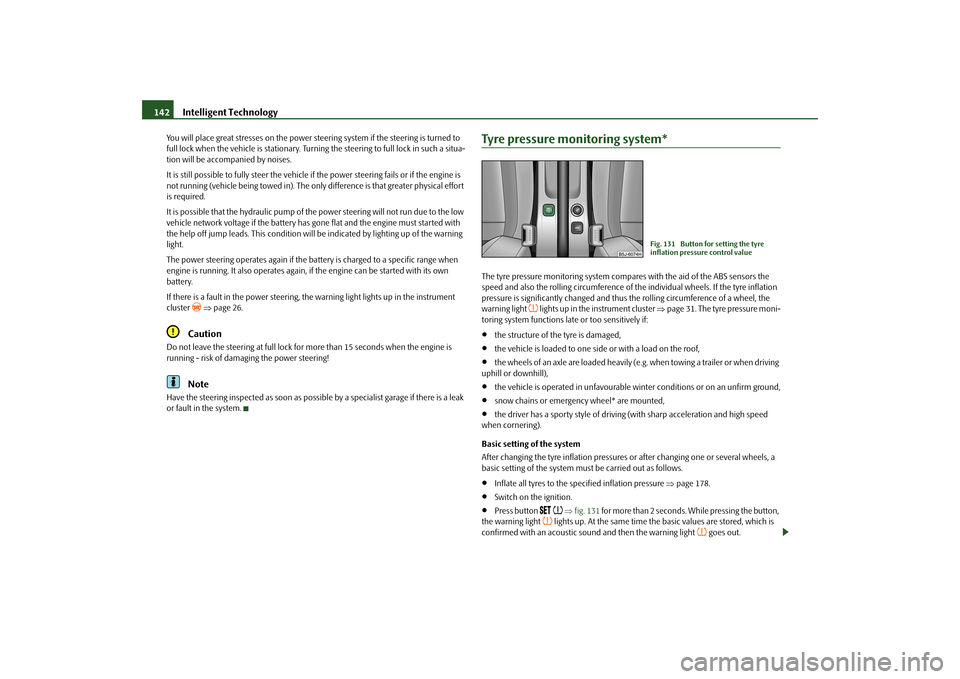
Press button
fig. 131
for more than 2 seconds. While pressing the button,
the warning light
lights up. At the same time the basic values are stored, which is
confirmed with an acoustic sound and then the warning light
goes out.
Fig. 131 Button for setting the tyre inflation pressure control value
s3j8.a.book Page 142 Tuesday, April 20, 2010 1:10 PM
Page 193 of 244
Breakdown assistance
192
WARNING
The non-insulated parts of the terminal clamps must never make contact
with each other. Furthermore, the cable connected to the positive terminal of the battery must not come into contact with electrically conducting parts of the vehicle - risk of a short circuit!
Do not affix the jump starting cables to the negative terminal of the
discharged battery. There is
the risk of detonating gas seeping out the battery
being ignited by the strong spark which
results from the engine being started.
Do not affix the cable end to parts of the fuel and brake system.
Run the jump-start cables so that they cannot be caught by any rotating
parts in the engine compartment.
Do not bend over the batteries - risk of caustic burns!
The vent screws of the battery
cells must be tightened firmly.
Keep any sources of ignition (naked
flame, smouldering
cigarettes etc.)
away from the battery - risk of an explosion!
Never jump-start the batteries which have a too low electrolyte level - risk
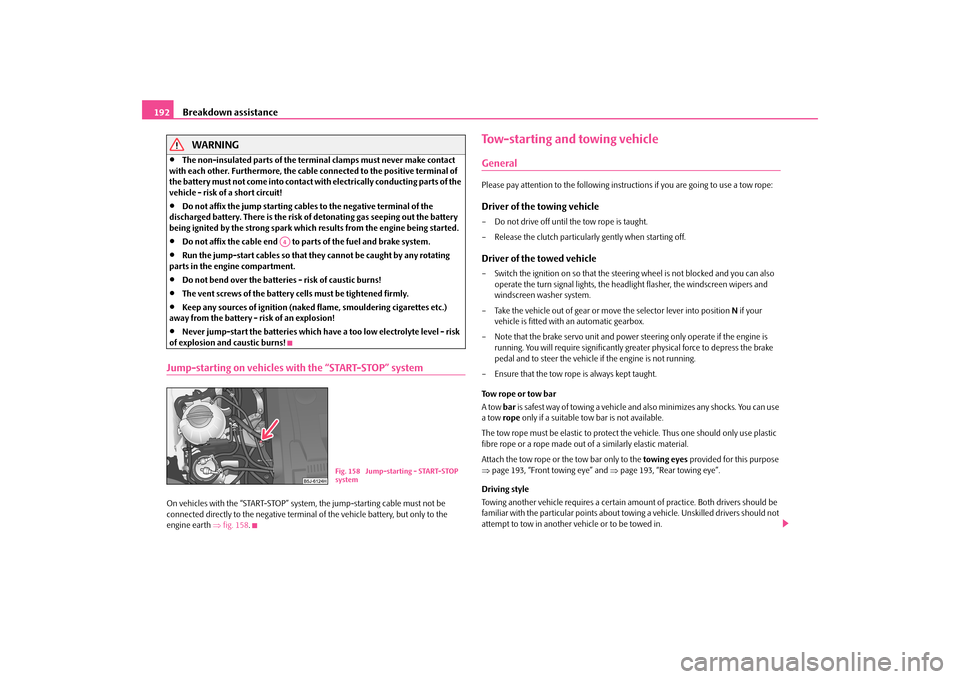
of explosion and caustic burns!Jump-starting on vehicles with the “START-STOP” systemOn vehicles with the “START-STOP” syst
em, the jump-starting cable must not be
connected directly to the negative terminal
of the vehicle battery, but only to the
engine earth
fig. 158
.
Tow-starting and towing vehicleGeneralPlease pay attention to the following instru
ctions if you are going to use a tow rope:
Driver of the towing vehicle– Do not drive off until the tow rope is taught. – Release the clutch particularly gently when starting off.Driver of the towed vehicle– Switch the ignition on so that the steeri
ng wheel is not blocked and you can also
operate the turn signal lights, the headlight flasher, the windscreen wipers and windscreen washer system.
– Take the vehicle out of gear or move the selector lever into position
N if your
vehicle is fitted with an automatic gearbox.
– Note that the brake servo unit and power steering only operate if the engine is
running. You will require significantly greater physical force to depress the brake pedal and to steer the vehicle
if the engine is not running.
– Ensure that the tow rope is always kept taught. Tow rope or tow bar A tow
bar
is safest way of towing a vehicle and also minimizes any shocks. You can use
a tow
rope
only if a suitable tow bar is not available.
The tow rope must be elastic to protect the
vehicle. Thus one shou
ld only use plastic
fibre rope or a rope made out
of a similarly elastic material.
Attach the tow rope or the tow bar only to the
towing eyes
provided for this purpose
page 193, “Front towing eye” and
page 193, “Rear towing eye”.
Driving style Towing another vehicle requires a certain am
ount of practice. Both drivers should be
familiar with the particular points about to
wing a vehicle. Unskilled drivers should not
attempt to tow in another vehicle or to be towed in.
A4
Fig. 158 Jump-starting - START-STOP system
s3j8.a.book Page 192 Tuesday, April 20, 2010 1:10 PM
Page 197 of 244
Fuses and light bulbs
196
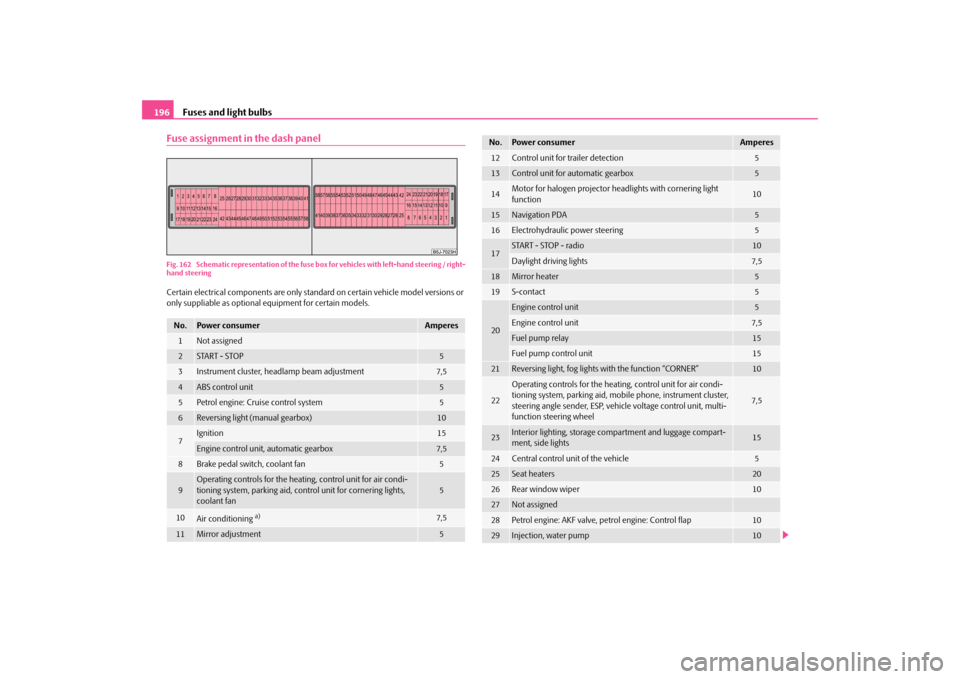
Fuse assignment in the dash panelFig. 162 Schematic representation of the fuse
box for vehicles with left-hand steering / right-
hand steeringCertain electrical components are only standard on certain vehicle model versions or only suppliable as optional
equipment for certain models.
No.
Power consumer
Amperes
1
Not assigned
2
START - STOP
5
3
Instrument cluster, headlamp beam adjustment
7,5
4
ABS control unit
5
5
Petrol engine: Cruise control system
5
6
Reversing light (manual gearbox)
10
7
Ignition
15
Engine control unit, automatic gearbox
7,5
8
Brake pedal switch, coolant fan
5
9
Operating controls for the heating, control unit for air condi- tioning system, parking aid, control unit for cornering lights, coolant fan
5
10
Air conditioning
a)
7,5
11
Mirror adjustment
5
12
Control unit for trailer detection
5
13
Control unit for automatic gearbox
5
14
Motor for halogen projector headlights with cornering light function
10
15
Navigation PDA
5
16
Electrohydraulic power steering
5
17
START - STOP - radio
10
Daylight driving lights
7,5
18
Mirror heater
5
19
S-contact
5
20
Engine control unit
5
Engine control unit
7,5
Fuel pump relay
15
Fuel pump control unit
15
21
Reversing light, fog lights with the function “CORNER”
10
22
Operating controls for the heating, control unit for air condi- tioning system, parking aid, mobi
le phone, instrument cluster,
steering angle sender
, ESP, vehicle voltage control unit, multi-
function stee
ring wheel
7,5
23
Interior lighting, storage compartment and luggage compart- ment, side lights
15
24
Central control unit of the vehicle
5
25
Seat heaters
20
26
Rear window wiper
10
27
Not assigned
28
Petrol engine: AKF valve, petrol engine: Control flap
10
29
Injection, water pump
10
No.
Power consumer
Amperes
s3j8.a.book Page 196 Tuesday, April 20, 2010 1:10 PM
Page 199 of 244
Fuses and light bulbs
198
– Press together the interlocks of the fuse
cover simultaneously in direction of arrow
page 197, fig. 163
and push out the cover in direction of arrow .
– Release the fixtures in the openings using a flat screwdriver and fold the cover
upwards in direction of arrow .
– Find out which fuse belongs to th
e component which is not operating.
– Defect fuses can be detected by their melted metal strips. Replace the defect fuse
by a new fuse of the
same
ampere number.
Caution
Never attempt to “repair” fuses and also do
not replace them with a fuse of a higher
amperage - risk of fire! This
may also cause damage at an
other part of the electrical
system.
Have the electrical system checked as quickl
y as possible by a specialist garage if a
newly inserted fuse blows again after a short time.
Note
We recommend that you have these fuse
s replaced by a specialist garage.
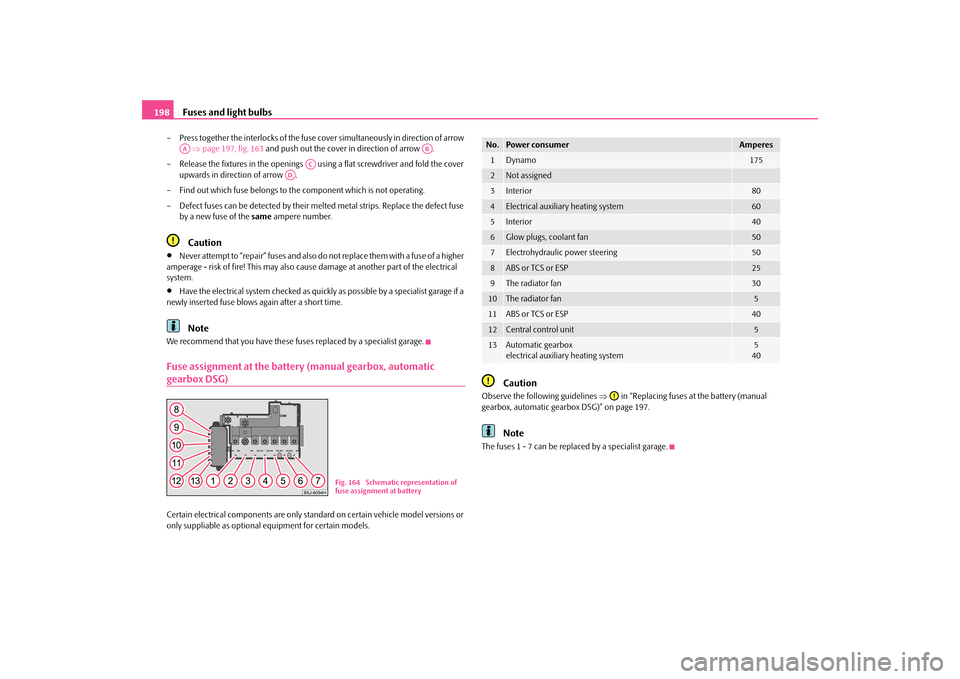
Fuse assignment at the battery (manual gearbox, automatic gearbox DSG)Certain electrical components are only standard on certain vehicle model versions or only suppliable as optional
equipment for certain models.
Caution
Observe the following guidelines
in “Replacing fuses at the battery (manual
gearbox, automatic gearbox DSG)” on page 197.
Note
The fuses 1 - 7 can be replac
ed by a specialist garage.
AA
AB
AC
AD
Fig. 164 Schematic representation of fuse assignment at battery
No.
Power consumer
Amperes
1
Dynamo
175
2
Not assigned
3
Interior
80
4
Electrical auxiliary heating system
60
5
Interior
40
6
Glow plugs, coolant fan
50
7
Electrohydraulic power steering
50
8
ABS or TCS or ESP
25
9
The radiator fan
30
10
The radiator fan
5
11
ABS or TCS or ESP
40
12
Central control unit
5
13
Automatic gearbox electrical auxiliary heating system
540
s3j8.a.book Page 198 Tuesday, April 20, 2010 1:10 PM
Page 200 of 244
Fuses and light bulbs
199
Using the system
Safety
Driving Tips
General Maintenance
Breakdown assistance
Technical Data
Replace fuses at the battery (automatic gearbox)Fig. 165 The battery: Open the posi
tive terminal cover / fuse cover
– Open the positive terminal cover (+)
fig. 165
- left.
– Press onto the interlocks of the fuse covers
fig. 165
on the right and open the
covers.
– Press together the interlocks of the fuse
cover simultaneously and push out the
cover in the direction of the arrow.
– Find out which fuse belongs to th
e component which is not operating
page 199,
“Fuse assignment at the ba
ttery (automatic gearbox)”.
– Defect fuses can be detected by their melted metal strips. Replace the defect fuse
by a new fuse of the
same
ampere number.
Caution
Never attempt to “repair” fuses and also do
not replace them with a fuse of a higher
amperage - risk of fire! This
may also cause damage at an
other part of the electrical
system.
Have the electrical system checked as quickl
y as possible by a specialist garage if a
newly inserted fuse blows again after a short time.
Note
We recommend that you have these fuse
s replaced by a specialist garage.
Some vehicles are only fitted with the cover
fig. 165
.
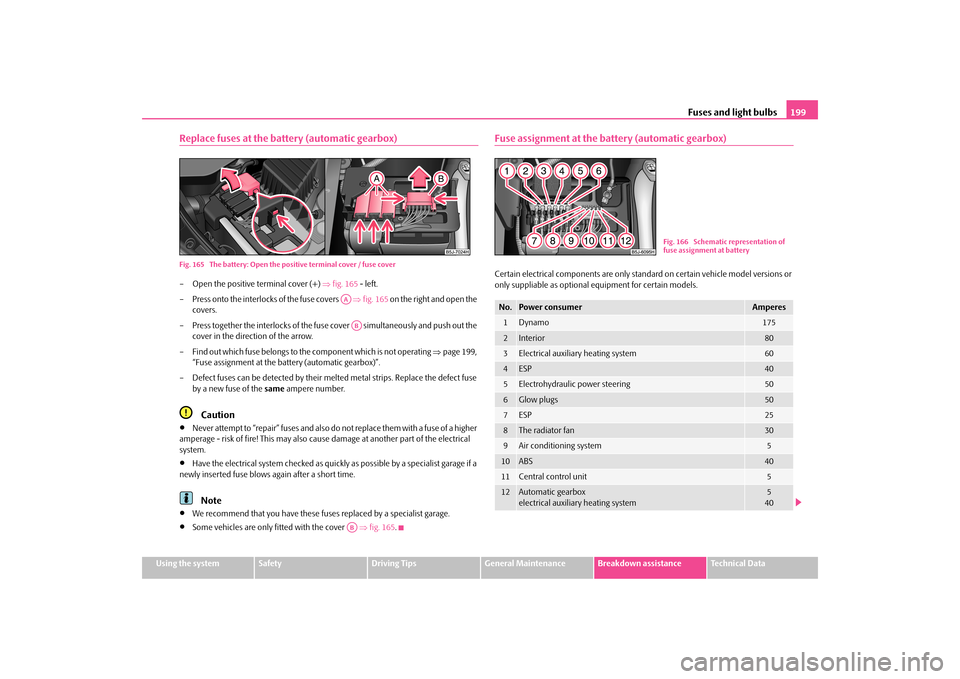
Fuse assignment at the battery (automatic gearbox)Certain electrical components are only stan
dard on certain vehicl
e model versions or
only suppliable as optional
equipment for certain models.
AAABAB
No.
Power consumer
Amperes
1
Dynamo
175
2
Interior
80
3
Electrical auxiliary heating system
60
4
ESP
40
5
Electrohydraulic power steering
50
6
Glow plugs
50
7
ESP
25
8
The radiator fan
30
9
Air conditioning system
5
10
ABS
40
11
Central control unit
5
12
Automatic gearbox electrical auxiliary heating system
540
Fig. 166 Schematic representation of fuse assignment at battery
s3j8.a.book Page 199 Tuesday, April 20, 2010 1:10 PM
Page 236 of 244
Index235
Using the system
Safety
Driving Tips
General Maintenance
Breakdown assistance
Technical Data
Index
AAbroad . . . . . . . . . . . . . . . . . . . . . . . . . . . . . . . . . . . . . . 150
ABS . . . . . . . . . . . . . . . . . . . . . . . . . . . . . . . . . . . . . . . . . 140
Warning light . . . . . . . . . . . . . . . . . . . . . . . . . . . . . 32
Accessories . . . . . . . . . . . . . . . . . . . . . . . . . . . . . . . . . . 184
Adjusting seats . . . . . . . . . . . . . . . . . . . . . . . . . . 59, 114
Adjusting the steering wheel . . . . . . . . . . . . . . . . . . . 89
Air conditioning system . . . . . . . . . . . . . . . . . . . . . . . 83
Airbag . . . . . . . . . . . . . . . . . . . . . . . . . . . . . . . . . . . . . . 122
Deployment . . . . . . . . . . . . . . . . . . . . . . . . . . . . . 123
Front airbag . . . . . . . . . . . . . . . . . . . . . . . . . . . . . . 123
Head airbag . . . . . . . . . . . . . . . . . . . . . . . . . . . . . . 127
Side airbag . . . . . . . . . . . . . . . . . . . . . . . . . . . . . . . 125
Warning light . . . . . . . . . . . . . . . . . . . . . . . . . . . . . 33
Airbag system . . . . . . . . . . . . . . . . . . . . . . . . . . . . . . . 122
Warning light . . . . . . . . . . . . . . . . . . . . . . . . . . . . . 33
Alarm . . . . . . . . . . . . . . . . . . . . . . . . . . . . . . . . . . . . . . . . 42
Alternator
Warning light . . . . . . . . . . . . . . . . . . . . . . . . . . . . . 28
Antilock brake system . . . . . . . . . . . . . . . . . . . . . . . . 140
Antilock brake system (ABS)
Warning light . . . . . . . . . . . . . . . . . . . . . . . . . . . . . 32
Anti-theft alarm system . . . . . . . . . . . . . . . . . . . . . . . 42
Ashtray . . . . . . . . . . . . . . . . . . . . . . . . . . . . . . . . . . . . . . 74
Assistance systems
Start-stop . . . . . . . . . . . . . . . . . . . . . . . . . . . . . . . . . 95
Auto Check Control . . . . . . . . . . . . . . . . . . . . . . . . . . . 23
Auto Computer . . . . . . . . . . . . . . . . . . . . . . . . . . . . . . . 19Automatic gearbox . . . . . . . . . . . . . . . . . . . . . . . . . . . . 98
Emergency programme . . . . . . . . . . . . . . . . . . . 102
Kickdown . . . . . . . . . . . . . . . . . . . . . . . . . . . . . . . . 101
Selector lever-emergency unlocking . . . . . . . 103
Tiptronic . . . . . . . . . . . . . . . . . . . . . . . . . . . . . . . . . 102
Automatic vehicle wash systems . . . . . . . . . . . . . . 155
Automatic wiper/washer system . . . . . . . . . . . . . . . 55
AUX-IN . . . . . . . . . . . . . . . . . . . . . . . . . . . . . . . . . . . . . . 111
Avoiding damage to your vehicle . . . . . . . . . . . . . . 150
BBattery . . . . . . . . . . . . . . . . . . . . . . . . . . . . . . . . . . 28, 172
change . . . . . . . . . . . . . . . . . . . . . . . . . . . . . . . . . . 176
Charge . . . . . . . . . . . . . . . . . . . . . . . . . . . . . . . . . . . 175
Inspecting the electrolyte level . . . . . . . . . . . . . 175
Operation in winter . . . . . . . . . . . . . . . . . . . . . . . 175
Before setting off . . . . . . . . . . . . . . . . . . . . . . . . . . . . . 113
Belt tensioner . . . . . . . . . . . . . . . . . . . . . . . . . . . . . . . . 120
Belt tensioners . . . . . . . . . . . . . . . . . . . . . . . . . . . . . . . 120
Belts . . . . . . . . . . . . . . . . . . . . . . . . . . . . . . . . . . . . . . . . 117
Bicycle holder . . . . . . . . . . . . . . . . . . . . . . . . . . . . . . . . 70
Bonnet . . . . . . . . . . . . . . . . . . . . . . . . . . . . . . . . . . 13, 165
Boot lid . . . . . . . . . . . . . . . . . . . . . . . . . . . . . . . . . . . . . . 40
Lighting . . . . . . . . . . . . . . . . . . . . . . . . . . . . . . . . . . . 54
Warning light . . . . . . . . . . . . . . . . . . . . . . . . . . . . . . 30
Brake
Handbrake . . . . . . . . . . . . . . . . . . . . . . . . . . . . . . . . 92
Brake booster . . . . . . . . . . . . . . . . . . . . . . . . . . . . . . . . 140
Brake fluid . . . . . . . . . . . . . . . . . . . . . . . . . . . . . . . . . . . 171Brake system
Warning light . . . . . . . . . . . . . . . . . . . . . . . . . . . . . . 32
Brakes . . . . . . . . . . . . . . . . . . . . . . . . . . . . . . . . . . . . . . 139
Bulbs . . . . . . . . . . . . . . . . . . . . . . . . . . . . . . . . . . . . . . . 200
Warning light . . . . . . . . . . . . . . . . . . . . . . . . . . . . . . 28
Button on the driver's door
Central locking system . . . . . . . . . . . . . . . . . . . . . 39
Electrical power windows . . . . . . . . . . . . . . . . . . 44
CCar state . . . . . . . . . . . . . . . . . . . . . . . . . . . . . . . . . . . . . . 23
Catalytic converter . . . . . . . . . . . . . . . . . . . . . . . . . . 146
Central locking system . . . . . . . . . . . . . . . . . . . . . . . . . 37
lock . . . . . . . . . . . . . . . . . . . . . . . . . . . . . . . . . . . . . . . 38
unlock . . . . . . . . . . . . . . . . . . . . . . . . . . . . . . . . . . . . 38
Changing a wheel . . . . . . . . . . . . . . . . . . . . . . . . . . . 187
Changing wheels around . . . . . . . . . . . . . . . . . . . . 180
Charging the battery . . . . . . . . . . . . . . . . . . . . . . . . . 175
Warning light . . . . . . . . . . . . . . . . . . . . . . . . . . . . . . 28
Check engine oil level . . . . . . . . . . . . . . . . . . . . . . . 167
Child safety . . . . . . . . . . . . . . . . . . . . . . . . . . . . . . . . . 130
Side airbag . . . . . . . . . . . . . . . . . . . . . . . . . . . . . . 132
Child safety lock . . . . . . . . . . . . . . . . . . . . . . . . . . . . . . . 36
Child safety seat
on the front passenger seat . . . . . . . . . . . . . . . 131
Safety information . . . . . . . . . . . . . . . . . . . . . . . 130
Child seat . . . . . . . . . . . . . . . . . . . . . . . . . . . . . . . . . . . 132
Classification into groups . . . . . . . . . . . . . . . . . 132
ISOFIX system . . . . . . . . . . . . . . . . . . . . . . . . . . . 135
s3j8.a.book Page 235 Tuesday, April 20, 2010 1:10 PM
Page 239 of 244
Index 238
Lights
converting/masking over . . . . . . . . . . . . . . . . . 150
Range adjustment . . . . . . . . . . . . . . . . . . . . . . . . . 51
switching on and off . . . . . . . . . . . . . . . . . . . . . . . 48
Warning lights . . . . . . . . . . . . . . . . . . . . . . . . . . . . . 26
Lights and Visibility . . . . . . . . . . . . . . . . . . . . . . . . . . . . 51
Liquid in reservoir for windscreen washer system
Warning light . . . . . . . . . . . . . . . . . . . . . . . . . . . . . . 30
Loading . . . . . . . . . . . . . . . . . . . . . . . . . . . . . . . . . . . . . . 63
Lock
Central locking system . . . . . . . . . . . . . . . . . . . . . 38
lock
Central locking system . . . . . . . . . . . . . . . . . . . . . 38
Locking . . . . . . . . . . . . . . . . . . . . . . . . . . . . . . . . . . . 36, 37
Remote control . . . . . . . . . . . . . . . . . . . . . . . . . . . . 41
Locking and unlocking from inside . . . . . . . . . . . . . . 39
Locking of the door
in an emergency . . . . . . . . . . . . . . . . . . . . . . . . . . . 39
Low beam . . . . . . . . . . . . . . . . . . . . . . . . . . . . . . . 48, 201
Warning light . . . . . . . . . . . . . . . . . . . . . . . . . . . . . . 27
Luggage compartment . . . . . . . . . . . . . . . . . . . . . . . . . 63
Folding hooks . . . . . . . . . . . . . . . . . . . . . . . . . . . . . 65
Lashing eyes . . . . . . . . . . . . . . . . . . . . . . . . . . . . . . . 64
Luggage compartment - variable loading floor . . . 67
Luggage compartment cover . . . . . . . . . . . . . . . 65, 66
Luggage rack . . . . . . . . . . . . . . . . . . . . . . . . . . . . . . . . . . 72MMain beam . . . . . . . . . . . . . . . . . . . . . . . . . . . 48, 52, 201
Warning light . . . . . . . . . . . . . . . . . . . . . . . . . . . . . . 27
Manual gearbox . . . . . . . . . . . . . . . . . . . . . . . . . . . . . . . 92
Manual shifting of gears . . . . . . . . . . . . . . . . . . . . . . . . 92MDI . . . . . . . . . . . . . . . . . . . . . . . . . . . . . . . . . . . . . . . . 111
Memory for the on-board computer . . . . . . . . . . . 19
Mobile phone . . . . . . . . . . . . . . . . . . . . . . . . . . . . . . . 105
Connection with the hands-free system . . . . 106
Motoring abroad . . . . . . . . . . . . . . . . . . . . . . . . . . . . 150
Headlights . . . . . . . . . . . . . . . . . . . . . . . . . . . . . . . 150
Multifunction steering wheel . . . . . . . . . . . . . . . . . 104
Multi-functional indicator . . . . . . . . . . . . . . . . . . . . . 19
NNew tyres . . . . . . . . . . . . . . . . . . . . . . . . . . . . . . . . . . . 145OOil . . . . . . . . . . . . . . . . . . . . . . . . . . . . . . . . . . . . . . . . . 167
Change . . . . . . . . . . . . . . . . . . . . . . . . . . . . . . . . . . 168
Warning light . . . . . . . . . . . . . . . . . . . . . . . . . . . . . 29
Oil change . . . . . . . . . . . . . . . . . . . . . . . . . . . . . . . . . . 168
Oil dipstick . . . . . . . . . . . . . . . . . . . . . . . . . . . . . . . . . . 167
Onboard computer . . . . . . . . . . . . . . . . . . . . . . . . . . . 19
Opening a single door . . . . . . . . . . . . . . . . . . . . . . . . 37
Opening the door
Warning light . . . . . . . . . . . . . . . . . . . . . . . . . . . . . 30
Operation in winter
Battery . . . . . . . . . . . . . . . . . . . . . . . . . . . . . . . . . . 175
Biodiesel . . . . . . . . . . . . . . . . . . . . . . . . . . . . . . . . 163
De-icing windows . . . . . . . . . . . . . . . . . . . . . . . . 157
Snow chains . . . . . . . . . . . . . . . . . . . . . . . . . . . . . 182
Outside temperature . . . . . . . . . . . . . . . . . . . . . . . . . 20
Overview of the engine compartment . . . . . . . . . 167
PPaint . . . . . . . . . . . . . . . . . . . . . . . . . . . . . . . . . . . . . . . . 157
Paint damage . . . . . . . . . . . . . . . . . . . . . . . . . . . . . . . 157
Parking . . . . . . . . . . . . . . . . . . . . . . . . . . . . . . . . . . . . . . 93
Parking aid . . . . . . . . . . . . . . . . . . . . . . . . . . . . . . . . . . . 93
Parking light . . . . . . . . . . . . . . . . . . . . . . . . . . . . . . . . . . 52
Parking ticket holder . . . . . . . . . . . . . . . . . . . . . . . . . . 74
Passive Safety . . . . . . . . . . . . . . . . . . . . . . . . . . . . . . . 113
Pedals . . . . . . . . . . . . . . . . . . . . . . . . . . . . . . . . . . . . . . . 63
Petrol . . . . . . . . . . . . . . . . . . . . . . . . . . . . . . . . . . . . . . . 162
Petrol engines
Starting the engine . . . . . . . . . . . . . . . . . . . . . . . . 91
Polishing . . . . . . . . . . . . . . . . . . . . . . . . . . . . . . . . . . . . 157
Power socket . . . . . . . . . . . . . . . . . . . . . . . . . . . . . . . . . 75
Power steering . . . . . . . . . . . . . . . . . . . . . . . . . . . . . . 141
Warning light . . . . . . . . . . . . . . . . . . . . . . . . . . . . . 28
Power windows . . . . . . . . . . . . . . . . . . . . . . . . . . . . . . 44
Central locking system . . . . . . . . . . . . . . . . . . . . . 45RRadiator fan . . . . . . . . . . . . . . . . . . . . . . . . . . . . . . . . . 171
Raise vehicle . . . . . . . . . . . . . . . . . . . . . . . . . . . . . . . . 189
Range . . . . . . . . . . . . . . . . . . . . . . . . . . . . . . . . . . . . . . . . 21
Rear fog light . . . . . . . . . . . . . . . . . . . . . . . . . . . . . . . . . 50
Warning light . . . . . . . . . . . . . . . . . . . . . . . . . . . . . 28
Rear mirror . . . . . . . . . . . . . . . . . . . . . . . . . . . . . . . . . . . 57
Rear seats . . . . . . . . . . . . . . . . . . . . . . . . . . . . . . . . . . . . 61
Rear window heater . . . . . . . . . . . . . . . . . . . . . . . . . . 54
Recharge battery . . . . . . . . . . . . . . . . . . . . . . . . . . . . 175
Recirculated air mode . . . . . . . . . . . . . . . . . . . . . . . . . 80
s3j8.a.book Page 238 Tuesday, April 20, 2010 1:10 PM