tow SKODA FABIA 2010 2.G / 5J Owner's Guide
[x] Cancel search | Manufacturer: SKODA, Model Year: 2010, Model line: FABIA, Model: SKODA FABIA 2010 2.G / 5JPages: 244, PDF Size: 29.53 MB
Page 90 of 244
Starting-off and Driving
89
Using the system
Safety
Driving Tips
General Maintenance
Breakdown assistance
Technical Data
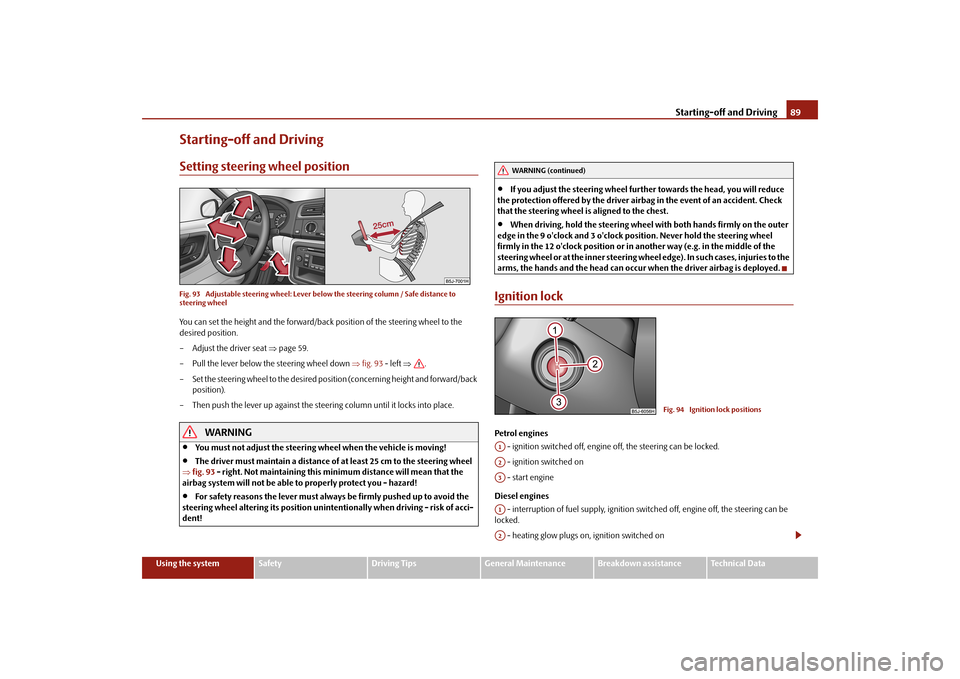
Starting-off and DrivingSetting steering wheel positionFig. 93 Adjustable steering wheel: Lever be
low the steering column / Safe distance to
steering wheelYou can set the height and the forward/back
position of the steering wheel to the
desired position. – Adjust the driver seat
page 59.
– Pull the lever below the steering wheel down
fig. 93
- left
.
– Set the steering wheel to the desired position (concerning height and forward/back
position).
– Then push the lever up against the steering column until it locks into place.
WARNING
You must not adjust the steering wheel when the vehicle is moving!
The driver must maintain a distance of
at least 25 cm to
the steering wheel
fig. 93
- right. Not maintaining this minimum distance will mean that the
airbag system will not be able to properly protect you - hazard!
For safety reasons the lever must always be firmly pushed up to avoid the
steering wheel altering its po
sition unintentionally when driving - risk of acci-
dent!
If you adjust the steering wheel furthe
r towards the head, you will reduce
the protection offered by the driver airbag in the event of an accident. Check that the steering wheel is
aligned to the chest.
When driving, hold the steering wheel
with both hands firmly on the outer
edge in the 9 o'clock and 3 o'clock po
sition. Never hold the steering wheel
firmly in the 12 o'clock position or in another way (e.g. in the middle of the steering wheel or at the inne
r steering wheel edge). In such
cases, injuries to the
arms, the hands and the head can occur
when the driver airbag is deployed.
Ignition lockPetrol engines - ignition switched off, engine
off, the steering can be locked.
- ignition switched on - start engine Diesel engines - interruption of fuel supply, ignition swit
ched off, engine off, the steering can be
locked. - heating glow plugs on, ignition switched onWARNING (continued)
Fig. 94 Ignition lock positions
A1A2A3A1A2
s3j8.a.book Page 89 Tuesday, April 20, 2010 1:10 PM
Page 91 of 244
Starting-off and Driving
90
You should not switch on any major elec
trical components during the heating
period otherwise
the vehicle battery will
be drained unnecessarily.
- start engine Applies to all models: Position
To lock the steering
, with the ignition key withdrawn, turn the steering wheel until the
steering locking pin is heard to
engage. You should always lock the steering as a general
rule if you leave your vehicle. This acts as
a deterrent against possible theft of your
vehicle
.
Position
Move the steering wheel back and forward a little if the ignition key cannot, or cannot easily be turned into this position, in order to release the steering lock. Position
The engine is started in this position. At th
e same time switched on low beam or main
beam or other electrical components wi
th major power consumption are briefly
switched off. The ignition key moves back into position when one releases the key. The ignition key must be turned back into
position each time before starting the
engine again. The starter repeat lock in th
e ignition lock prevents the starter being
engaged when the engine is r
unning and thus getting damaged.
WARNING
When driving, the ignition key must always be in the position (ignition
switched on) without the engine running. This position is indicated by the warning lights coming on. If this is not the case, it could result in unexpected locking of the steering wh
eel - risk of accident!
Do not withdraw the ignition key from the lock until the vehicle has come to
a stop. The steering lock can engage
immediately - risk of accident!
Always withdraw the ignition key if you are going to leave the vehicle, even
for a short time. This is particularly important if children are left in the vehicle. The children might otherwise start the en
gine or operate electrical equipment
(e.g. power windows) - risk of injury!
Starting the engineGeneral You can only start the engine only using an original ignition key.
Place the gearshift lever into neutral (or
place the selector lever to the position
P or
N in the case of an automatic gearbox) and put on the handbrake firmly before starting the engine.
The clutch pedal should be fully depressed when starting the engine - the starter
then only has to crank the engine.
Let go of the key as soon as the engine starts otherwise there may be damage to
the starter. The engine running noises may louder at first be louder for a short time after starting the cold engine until oil pressure can be
built up in the hydraulic valve clearance
compensation. This is quite normal and is not an operating problem. If the engine does not start ... You can use the battery of anothe
r vehicle as a jump-start aid
page 190.
It is only possible to tow-start vehicles fi
tted with a manual gearbox. The tow-starting
distance must not be more than 50 metres
page 193.
WARNING
Never run the engine in non ventilated
or enclosed areas. The exhaust gases
of the engine contain besides the odorless and colourless carbon monoxide a poisonous gas - hazard! Carbon mono
xide can cause unconsciousness and
death.
Never leave your vehicle unattended with the engine running.Caution
The starter may only be operated (ignitio
n key position ), if the engine is not
running. If the starter is imme
diately operated after switchin
g off the engine, the starter
or the engine can be damaged.
A3
A1A2A3
A2
A1
A2
A3
s3j8.a.book Page 90 Tuesday, April 20, 2010 1:10 PM
Page 92 of 244

Starting-off and Driving
91
Using the system
Safety
Driving Tips
General Maintenance
Breakdown assistance
Technical Data
Avoid high engine revolutions, full throttle and high engine loads as long as the
engine has not yet reached its normal oper
ating temperature - risk of damaging the
engine!
Vehicles which are fitted with an exhaust gas catalytic converter should not be tow-
started over a distance of more than 50 metres.
For the sake of the environment
Never warm up the engine when the vehicle is standing. Drive off right away. When driving the engine reaches its operating te
mperature more rapidly and the pollutant
emissions are lower.Petrol enginesThese engines are fitted with a starter system which selects the correct fuel-air mixture for every external air temperature.
Do not operate accelerator before and when starting engine.
Interrupt the attempt at starting after 10
seconds if the engine does not start right
awayand wait for about 30 seconds before repeating the attempt.
It is possible that the fuse on the electric
al fuel pump is defect if the engine still
does not start. Check the fuse and replace it if necessary
page 195.
If the engine does not start, contact the nearest specialist garage to obtain profes-
sional assistance. It may be necessary, if the engine is
very hot
, to slightly depress the accelerator after
the engine has started.Diesel enginesGlow plug system Diesel engines are equipped with a glow
plug system, the preglow period being
controlled automatically in line with the coolant temperature and outside tempera- ture. The preglow indicator light
comes on after the ignition has been switched on.
You should not switch on any major electrical components during the heating period otherwise the vehicle battery will be drained unnecessarily.
You should start the engine immediately after the glow plug warning light
has
gone out.
The glow plug warning light will come on for about one second if the engine is at a
normal operating temperature or if the outside temperature is above +5°C. This means that you can start the engine
right away
.
Interrupt the attempt at starting after 10 seconds if the engine does not start right
awayand wait for about 30 seconds before repeating the attempt.
It is possible that the fuse
on the diesel preglow system is defect if the engine still
does not start. Check the fuse and replace it if necessary
page 195.
Contact the nearest specialist garage to obtain professional assistance.
Starting the engine after fuel tank has run dry It may take longer than normal to start the
engine after refuelling if the fuel tank has
run completely dry - up to one minute. This is
because the fuel system must first of all
be filled while the attempting to start the engine.Switching off the engine– The engine can be switched off by turnin
g the ignition key from position into
page 89, fig. 94
.
WARNING
Never switch off the engine before the ve
hicle is stationary - risk of accident!
The brake booster only operates when the engine is running. Greater phys-
ical effort for braking is required when en
gine is switched off.
Because if you do
not stop as normal, this can cause an accident and severe injuries.
Caution
you should not switch the engine off right away at the end of your journey after the engine has been operated for a lengthy period
at high loads but should be allowed it
to run at idling speed for about 2 minutes.
This prevents any accumulation of heat
when the engine is switched off.
A1
s3j8.a.book Page 91 Tuesday, April 20, 2010 1:10 PM
Page 94 of 244

Starting-off and Driving
93
Using the system
Safety
Driving Tips
General Maintenance
Breakdown assistance
Technical Data
The handbrake warning is acti
vated if you drive at a speed of more than 6 km/h for
more than 3 seconds.
WARNING
Please note that the handbrake must be fully released. A handbrake which
is only partially released can result in the rear brakes overheating which will have a negative effect on the operation of
the brake system - risk of accident! In
addition this can result in premature wear of the rear brake pads.
Never leave children unattended in the vehicle. The children might, for
example, release the handbrake or take
the vehicle out of gear. The vehicle
might then move off - risk of accident!
Caution
After the car has come to a stop, always firs
t of all apply the handbrake firmly before
then additionally engaging a gear (manual gearbox) or moving the selector lever into position
P (automatic gearbox).
Parking aid*The parking aid provides a warning of obstacles behind the vehicle.The audible parking aid determines the di
stance between the rear bumper and an
obstacle located behind the vehicle with the
aid of ultrasound sensors. The sensors are
integrated in the rear bumper.
Range of sensors The clearance warning begins at a distance
of about 160 cm from the obstacle (area
fig. 97
). The interval between the warning si
gnals becomes shorter as the clearance
is reduced. A continuous tone sounds from
a distance of approx. 30
cm (area ) - danger area.
You should not reverse any further after this signal sounds!
If the vehicle is
equipped with a factory-fitted
towing device*, the border of the danger area starts -
continuous tone - 5 cm further behind th
e vehicle. The vehicle can be extended
through an installed deta
chable towing device.
Activating The parking aid is activated automatically when
reverse gear
is engaged and the igni-
tion is turned on. This
is confirmed by a brief acknowledgement signal.
Deactivating The parking aid is deactivated by disengaging the reverse gear or by switching the igni- tion off.
WARNING
The parking aid is not a substitute for
the driver paying proper attention and
it is always the driver's responsibility
to take care when parking the vehicle or
carrying out similar manoeuvres.
You should therefore satisfy yourself, before reversing, that there is no small
obstacle, such as a rock, thin post, trai
ler drawbar etc., behind your vehicle.
Such an obstacle might not be within the range detected by the sensors.
Under certain circumstances, surfaces of certain objects and types of
clothing cannot reflect the signal of the parking aid. Thus, these objects or people who wear such clothing are not recognised by the sensors of the parking aid.
Note
The parking aid does not operate if you
are towing a trailer (applies to models
which feature a factory-fitted towing device*).
A system fault is indicated if a warning signal sounds for about 5 seconds after
switching the ignition on and engaging reverse gear and there is no obstacle close to
Fig. 97 Parking aid: Range of sensors
AA
AB
s3j8.a.book Page 93 Tuesday, April 20, 2010 1:10 PM
Page 97 of 244

Starting-off and Driving
96 Automatic engine shut down (stop phase)– Bring the vehicle to a stop (a
pply the handbrake, if necessary).
– Take the vehicle out of gear.– Release the clutch pedal.Automatic engine start (start phase)– Depress the clutch pedal.Activating and deactivating the “START-STOP” systemYou can deactivate and reactivate the “START-STOP” system by pressing the button page 95, fig. 99
.
If the system is deactivated, the warning light lights up in the button.If the vehicle is in the stop phase when pressing the button, the engine starts immedi- ately. The START-STOP system involves compli
cated switching conditions, some of
them cannot be correctly determined with
out servicing. The
general conditions
for the proper functioning of the START-ST
OP system are listed in the following
overview. Conditions for the automatic en
gine shut down (stop phase)
Conditions that enable an auto
matic engine start (start phase)
Conditions that enable an automatic engine start without driver intervention
Gearshift lever in the neutral positionClutch pedal not depressedThe driver has fastened the seat beltThe driver's door is closedThe bonnet is closedThe vehicle is stationaryThe factory-fitted towing device is no
t electrically connected to a trailer
The engine operating temperature is reachedThe charge state of the vehicle battery is sufficientSlope angle / gradient of the vehicle must not be too great
Engine speed is lower than 1200 rpmThe temperature inside the vehicle battery is not too low or too highThe pressure in the brake system is sufficientThe difference between set and actual temperature in the interior is not too greatThe vehicle has exceeded the speed of 3 km/h since the last automatic startNo cleaning cycle is active in
the diesel particle filter*
page 33
The front wheels are not turned excessively (t
he steering angle is less than 3/4 of a
steering wheel revolution)The clutch pedal is pressedThe temperature setting is changed to min./max.Defrosting windscreen is switched onHigh blower speed is setButton for the START-STOP system is pressedThe vehicle moves at a speed of more than 3 km/hThe difference between the set and the actual temperature in the interior is too greatThe battery voltage is too lowThe pressure in the brake system is not sufficient
s3j8.a.book Page 96 Tuesday, April 20, 2010 1:10 PM
Page 101 of 244

Automatic gearbox
100
the right. In the positions
D and
S the gear you have already engaged will be addition-
ally displayed on the display. - Parklock The driven wheels are locked me
chanically in this position.
The Parklock must only be engage
d when the vehicle is stationary
.
If you wish to move the selector lever into
or out of this position, you must press the
Shiftlock button in the handle of the select
or lever and at the same time depress the
brake pedal. - Reverse gear Reverse gear must only be engaged when the vehicle is stationary and the engine idling
.
The brake pedal must be depressed and at
the same time the Shiftlock must be
pressed, if you wish to obtain the selector lever positions
R, P or N.
When the ignition is switched on an
d the selector lever is in position
R, the reverse
lights will come on. - Neutral The transmission is in Neutral in this position. The brake pedal must be depressed (if the le
ver is in its position for longer than 2
seconds) in order to move the selector lever out of the position
N into the position
D,
with the ignition switched on, on a vehicle travelling at less than 5 km/hour or on a stationary vehicle. - Position for driving forward When the selector lever is in this position
, the forward gears are shifted up and down
automatically in line with engine lo
ad, vehicle speed and the dynamic shift
programme. You must depress the brake pedal if you wish to move into position
D from
N when the
vehicle is travelling at less th
an 5 km/hour or is stationary
.
In certain circumstances (e.g. when driving
in mountainous regions or when towing a
trailer) it may be beneficial to
select the manual shift programme
page 102 for a
short time in order to adapt the gearbox
ratios manually to the driving situations.
- Position for sporty style of driving Shifting up later into a higher gear makes it
possible to fully exploit the power potential
of the engine. The gearbox also then shifts down at higher engine speeds as in the posi-tion
D.
The gearbox does not shift into the 6th gear in the position
S, because the maximum
speed is reached with the 5th gear
7).
The Shiftlock on the selector lever grip mu
st be pressed when moving the selector
lever out of the position
D into the position
S.
WARNING
Never move the selector lever into position R or P when driving - risk of an
accident!
When the engine is running and the vehi
cle is stationary, it is necessary to
hold the car with the brake pedal in all the positions of the selector lever (except P and N) since the power transmission is never completely interrupted, also not when the engine is idling - the vehicle creeps.
You must on no account unintentionally operate the throttle (e.g. by hand
from the engine compartment) if a driv
e position is engaged when the car is
stationary. The vehicle would otherwise
immediately start o
ff - also when the
handbrake is firmly applied - risk of an accident!
You must move the selector lever into position P and firmly apply the hand-
brake first before you or any other person opens the bonnet and starts working on the engine when it is running - risk of accident! It is also essential to observe all warnings
page 166, “Working in the engine compartment”.
Selector lever lockAutomatic selector lever lock
With the ignition on, the selector lever is locked when it is in the positions
P and
N. You
must first of all depress the brake pedal in or
der to move the selector lever out of this
position. The warning light
page 31 lights up in the instrument cluster as a
reminder for the driver when the selector lever is in the positions
P and
N.
APARANAD
7)Not valid for vehicles with automatic gearbox DSG.AS
s3j8.a.book Page 100 Tuesday, April 20, 2010 1:10 PM
Page 104 of 244

Automatic gearbox
103
Using the system
Safety
Driving Tips
General Maintenance
Breakdown assistance
Technical Data
A functional fault can have the following effect:
The gearbox only shifts into certain gears.
The reverse gear
R cannot be used.
The manual shift programme (Tiptronic) is switched off in the emergency mode.
If the gearbox has switch
ed over to emergency mode, drive to the nearest
specialist garage in order to have the fault rectified.Selector lever-emergency unlockingIn case of interruption of the power supply (e
.g. flat vehicle battery, defective fuse) or
defect of the selector lever lock, the select
or lever can no longer be shifted from the
position
P in the normal way and the vehicle ca
n no longer be moved. The selector
lever must be unlocked in case of emergency. – Apply the handbrake firmly.– Carefully pull up the front left and right cover.– Pull up rear cover.– Use the finger to press the yellow plastic part downwards
fig. 103
.
– Simultaneously press the shiftlock button in
the handle of the selector lever in the
position
N9).
Tow-starting and towing vehicle Tow-starting a vehicle It is not possible to tow-start or push-sta
rt vehicles fitted wi
th automatic gearbox.
you can use jump-start
cables connected to the battery of another vehicle for starting
your car if the vehicle battery is flat
page 190.
Towing a vehicle Please pay attention to the following information if it comes necessary to tow-in your car
page 192.
9)If the selector lever is moved again into the position
P, it is once again blocked.Fig. 103 Selector lever-emergency unlocking
s3j8.a.book Page 103 Tuesday, April 20, 2010 1:10 PM
Page 118 of 244

Seat belts
117
Using the system
Safety
Driving Tips
General Maintenance
Breakdown assistance
Technical Data
Seat beltsWhy seat belts?It is a proven fact that seat belt
s offer good protection in accidents
fig. 109
. Thus
wearing a seat belt is a legal requirement in most countries. Seat belts which have been correctly fasten
ed and adjusted hold the occupants of the
car in the correct seated position
fig. 109
. The belts reduce the kinetic energy
(energy of motion) to a considerable exte
nt. They also prevent uncontrolled move-
ments which, in turn, may well result in severe injuries. The occupants of a vehicle who have fastened
and correctly adjusted their seat belt,
profit to a major extent from the fact that
the kinetic energy is optimally absorbed by
the belts. The structure of the front end of the vehicle and other passive safety meas- ures, such as the airbag system, also cont
ribute to reducing the kinetic energy. The
energy produced is thus absorbed and there is less risk of injury. Accident statistics prove that seat belts which are fastened and properly adjusted reduce the risk of an injury and enhance the chance of survival in a major accident page 117. It is important that you pay attention to
safety measures, particularly when trans-
porting children in the vehicle
page 130, “Transporting children safely”.
WARNING
Fasten your seat belt each time before
setting off, also when driving in town!
This also applies to the people seated at the rear - risk of injury!
Expectant women must also always wear
a seat belt. This is the only way of
ensuring optimal protection for the unborn child
page 119, “Fastening
three-point seat belts”.
It is important for the belt webbing to be
properly routed if the seat belts are
to offer the maximum protection. You can see a description of how safety belts should be fitted properly on the next pages.
Note
Please comply with any differing legal requirements when using the seat belts.The physical principle of a frontal collisionFig. 110 The driver is catapulted forward if not
wearing a belt / The rear seat occupant is cata-
pulted forward if not wearing a beltThe physical principle of a frontal a
ccident can be explained quite simply:
Motion energy, so-called kinetic energy, is produced as soon as the vehicle is moving, both for the vehicle and its occupants. The
magnitude of this kinetic energy depends
essentially on the speed at which the vehicl
e is travelling and on the weight of the
vehicle and the occupants. The greater the speed and weight increase, the greater the amount of energy which has to be ab
sorbed in the event of an accident.
Fig. 109 Driver
wearing seat belt
WARNING (continued)
s3j8.a.book Page 117 Tuesday, April 20, 2010 1:10 PM
Page 134 of 244

Transporting children safely
133
Using the system
Safety
Driving Tips
General Maintenance
Breakdown assistance
Technical Data
Children who are more than 1.50 m in height or who weigh more than 36 kg can use the normal seat belts without a seat bolster.Use of child seatsAn overview of the usefulness
of child seats on each of the seats according to the ECE-
R44 standard:
Universal category - seat is suitable for all approved types of child safety seats. The seat can be fitted with
fixing eyes for the “
ISOFIX
*”system.
The seat is equipped as standa
rd with the fixing system “
To p Te t h e r
”.
Child seats of group 0/0+The optimal solution for babies of up to ab
out 9 months old weighing up to 10 kg or
children up to about 18 months old weighing up
to 13 kg is a child safety seat which is
fastened in the opposite direction of travel
fig. 124
.
Child seats in which the child is facing with its back towards the direction of travel should not be used on the front passenger seat when the vehicle is fitted with a front passenger airbag
page 131, “Use of child safety seats on the front passenger
seat”.
WARNING
It is essential to always switch off the front passenger airbag at a specialist
garage or with the switch for front pass
enger airbag* when attaching in excep-
tional circumstances a child safety seat on the front passenger seat where the child is seated with its back facing in direction of travel
page 129.
Please comply with any differing nati
onal legal regulations regarding the
use of child safety seats.
If this is not done, a child seated on
the front passenger seat may suffer
severe or even fatal injuries if the
front passenger airbag or airbags are
deployed.
You should have the front passenger airbag (or airbags) reactivated just as
soon as you no longer use a child safe
ty seat on the front passenger seat.
Child safety seats in Group 1Child seats in Group 1 are for babies and sm
all children up to 4 years of age with a
weight of between 9 and 18 kilograms. It is
best for children in the lower range of this
group, to use a child seat which allows the ch
ild to sit with its back to the direction of
travel. It is best for children in the uppe
r range of the Group 0+, to use a child seat
which allows the child to sit
fig. 125
in the direction of travel.
Child seat of the group
Front passenger
seat
Rear seat outside
Rear seat middle
0
0+
1
2 and 3
AU
AUA+AT
AU
AU
AUA+AT
AU
AU
AUA+AT
AU
AU
AU
AU
AUA+AT
Fig. 124 Child seats of group 0/0+
Fig. 125 Child seat with padded table in Group 1 installed on rear seat bench facing the direction of travel
s3j8.a.book Page 133 Tuesday, April 20, 2010 1:10 PM
Page 135 of 244

Transporting children safely
134
Child seats in which the child is facing with its back towards the direction of travel should not be used on the
front passenger seat when th
e vehicle is fitted with a
front passenger airbag
page 131, “Use of child safety seats on the front passenger
seat”.
WARNING
It is essential to always switch off the front passenger airbag at a specialist
garage or with the switch for front pass
enger airbag* when attaching in excep-
tional circumstances a child safety seat on the front passenger seat where the child is seated with its back facing in direction of travel
page 129.
Please comply with any differing nati
onal legal regulations regarding the
use of child safety seats.
If this is not done, a child seated on
the front passenger seat may suffer
severe or even fatal injuries if the
front passenger airbag or airbags are
deployed.
You should have the front passenger airb
ag (or airbags) re
activated just as
soon as you no longer use a child safe
ty seat on the front passenger seat.
Child safety seats in Group 2For children up to about 7 years of age weighing between 15 and 25 kg the optimal solution is a child safety seat in comb
ination with the three-point seat belt
fig. 126
.
WARNING
When transporting a child on the fron
t passenger seat, please comply with
the appropriate national regulations rega
rding the use of child safety seats.
Switch off the front passenger airbag if
necessary at a specialist garage or
switch it off with the switch for front passenger airbag*
page 129.
The shoulder part of the seat belt mu
st run approximatel
y across the middle
of the shoulder and fit snugly against the chest. It must on no account run across the neck. The lap part of the seat belt must run across the pelvis and fits snugly; it must not run over the belly. Tighten the belt webbing over your hip if necessary.
Please comply with any differing nati
onal legal regulations regarding the
use of child safety seats.Child safety seats in Group 3For children of about 7 years of age weighing between 22 and 36 kg and of a height of less than 150 cm, the optimal solution is a
child safety seat (seat bolster) in combina-
tion with the three-point seat belt
fig. 127
.
Children who are more than 1.50 m in heig
ht or who weigh more than 36 kg can use
the normal seat belts
without a seat bolster.
WARNING
When transporting a child on the fron
t passenger seat, please comply with
the appropriate national regulations rega
rding the use of child safety seats.
Fig. 126 Child seat in Group 2 installed on the rear seat facing the direction of travel
Fig. 127 Child seat in Group 3 installed on the rear seat facing the direction of travel
s3j8.a.book Page 134 Tuesday, April 20, 2010 1:10 PM