lock SKODA FABIA 2013 2.G / 5J Workshop Manual
[x] Cancel search | Manufacturer: SKODA, Model Year: 2013, Model line: FABIA, Model: SKODA FABIA 2013 2.G / 5JPages: 223, PDF Size: 12.77 MB
Page 126 of 223
Note■After coupling the trailer and connecting up the power socket, check the rear
lights on the trailer to ensure they work.■
If there is an error in the trailer lighting system, check the fuses in the fuse box
in the dashboard » page 193.
■
If you tow a trailer frequently, you should also have your car inspected between
service intervals.
■
The handbrake on the towing vehicle must be applied when coupling and un-
coupling the trailer.
Anti-theft alarm system
First read and observe the introductory information and safety warn-
ings
on page 121.
When the vehicle is locked, the alarm is activated as soon as the electrical con- nection to the trailer is interrupted.
Always switch off the anti-theft alarm system before a trailer is coupled or uncou- pled » page 35 .
Conditions for including a trailer in the anti-theft alarm system. The vehicle is factory-fitted with an anti-theft alarm system and towingequipment.
The trailer is electrically connected to the towing vehicle by means of the
trailer socket.
The electrical system of the vehicle and trailer is functional. The vehicle is locked with the vehicle key and the anti-theft alarm system isactivated.
Note
For technical reasons, trailers with rear LED lights cannot be connected to the an-
ti-theft alarm system.
123Towing a trailer
Page 128 of 223
What influences driving safety?First read and observe the introductory information and safety warn-
ings
on page 124.
The driver is fully responsible for himself and his occupants. If your driving safety is effected, you place yourself and the oncoming traffic at risk.
The following guidelines must therefore be observed. › Do not get distracted from concentrating on the traffic situation, e.g. by your
passengers or mobile phone calls.
› Never drive when your driving ability is impaired, e.g. through medication, alco-
hol or drugs.
› Keep to the traffic regulations and the permissible speed limit.
› Always adjust the driving speed to the road, traffic and weather conditions.
› Take regular breaks on long journeys – at least every two hours.
Correct seated position
Introduction
This chapter contains information on the following subjects:
Correct seated position of the driver
126
Correct seated position of the front passenger
126
Correct seated position of the rear seat passengers
126
Examples of incorrect seated positions
126WARNINGGeneral information■The front seats and head restraints must be adjusted to match the body
size at all times and the seat belt must always be fastened properly to provide the most effective levels of protection to the passengers.■
If the occupant adopts an incorrect seated position, he is exposed to life-
threatening injuries, in case he is hit by a deployed airbag.
■
If the occupants on the rear seats are not sitting upright, the risk of injury is
increased due to incorrect routing of the seat belt.
■
The seat backrests must not be reclined too far when driving otherwise this
will affect proper operation of the seat belts and of the airbag system – risk of
injury.
WARNINGInformation for the driver■Always assume the correct seated position before setting off and do not
change this position while driving. Also advise your passengers to adopt the
correct seated position and not to change this position while the car is mov-
ing.■
Keep a distance of at least 25 cm from the steering wheel. Not keeping to
this minimum distance will mean that the airbag system will not be able to
properly protect you – risk of death.
■
When driving, hold the steering wheel with both hands firmly on the outer
edge in the 9 o'clock and 3 o'clock position. Never hold the steering wheel in
the 12 o'clock position or in any other way (e.g. in the middle or inner edge of
the steering wheel). In such cases, you could severely injure your arms, hands
and head when the driver airbag is deployed.
■
Ensure that there are no objects in the driver's footwell as they may get
caught behind the pedals while you are driving or under braking. You would
then no longer be able to operate the clutch, brake or accelerate.
WARNINGInformation for the front seat passenger■Maintain a distance of at least 25 cm from the dash panel. Not maintaining
this minimum distance will mean that the airbag system will not be able to
properly protect you - there is a risk that you could be killed.■
Always keep your feet in the footwell when the car is being driven - never
place your feet on the instrument panel, out of the window or on the seats.
You will be exposed to increased risk of injury if it becomes necessary to apply
the brakes or in the event of an accident. You may suffer fatal injuries when
an airbag is deployed if you have adopted an incorrect seating position.
125Passive Safety
Page 132 of 223
WARNINGObserve the following instructions for the proper use of the seat belts.■Never use a seatbelt to secure two persons (not even children). Nor may the
seat belt be placed over a child who is sitting on the lap of another passenger.■
The lock tongue should only be inserted into the lock which is the correct
one for your seat. Wrong use of the safety belt will reduce its capacity to pro-
tect and the risk of injury increases.
■
The slot of the belt tongue must not be blocked otherwise the belt tongue
will not lock in place properly.
■
Many layers of clothing and loose clothing (e. g. a winter coat over a jacket)
do not allow you to be correctly seated and impairs proper operation of the
seat belts.
■
It is prohibited to use clamps or other objects to adjust seat belts (e. g. for
shortening the belts for smaller persons).
■
The seat belts for the rear seats can only fulfil their function reliably when
the seat backrests are correctly locked into position » page 56.
WARNINGObserve the following instructions for proper use of the seat belts.■The belt webbing must always be kept clean. Soiled belts may impair proper
operation of the inertia reel » page 157, Seat belts .■
The seat belts must not be removed or changed in any way. Do not attempt
to repair the seat belts yourself.
■
Check the condition of all the seat belts on a regular basis. If any damage to
the seat belts, seat belt connections, inertia reel or the lock is detected, the
seat belt concerned must be replaced by a specialist garage.
■
Damaged seat belts which have been subjected to stress in an accident and
were therefore stretched, must be replaced - this is best done by a specialist
garage. The anchorage points of the belts must also be inspected. The an-
chorage points for the belts should also be checked.
Note
The national legal requirements must be observed when using seat belts.
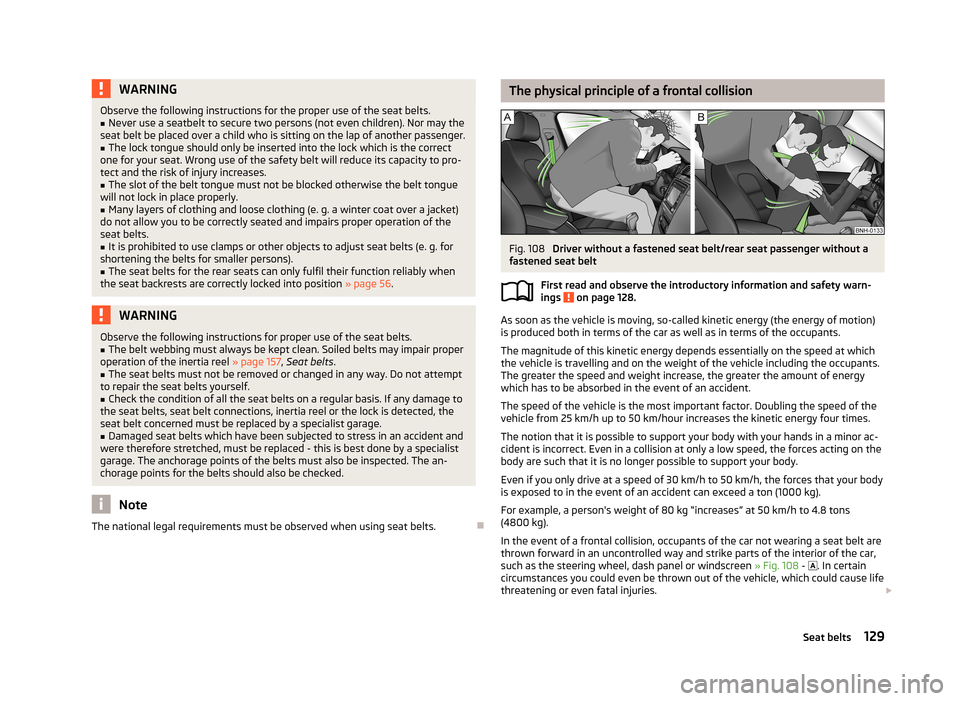
The physical principle of a frontal collisionFig. 108
Driver without a fastened seat belt/rear seat passenger without a
fastened seat belt
First read and observe the introductory information and safety warn-ings
on page 128.
As soon as the vehicle is moving, so-called kinetic energy (the energy of motion)
is produced both in terms of the car as well as in terms of the occupants.
The magnitude of this kinetic energy depends essentially on the speed at which
the vehicle is travelling and on the weight of the vehicle including the occupants.
The greater the speed and weight increase, the greater the amount of energy
which has to be absorbed in the event of an accident.
The speed of the vehicle is the most important factor. Doubling the speed of the
vehicle from 25 km/h up to 50 km/hour increases the kinetic energy four times.
The notion that it is possible to support your body with your hands in a minor ac-cident is incorrect. Even in a collision at only a low speed, the forces acting on thebody are such that it is no longer possible to support your body.
Even if you only drive at a speed of 30 km/h to 50 km/h, the forces that your body is exposed to in the event of an accident can exceed a ton (1000 kg).
For example, a person's weight of 80 kg “increases” at 50 km/h to 4.8 tons
(4800 kg).
In the event of a frontal collision, occupants of the car not wearing a seat belt are
thrown forward in an uncontrolled way and strike parts of the interior of the car,
such as the steering wheel, dash panel or windscreen » Fig. 108 -
. In certain
circumstances you could even be thrown out of the vehicle, which could cause life threatening or even fatal injuries.
129Seat belts
Page 133 of 223
It is also important that rear seat occupants fasten their seat belts as they willotherwise be thrown through the vehicle in an uncontrolled manner in the eventof an accident.
A rear seat passenger who has not fastened the seat belt is a danger not only to
himself but also for those seated in the front » Fig. 108 - .
Fastening and unfastening seat belts
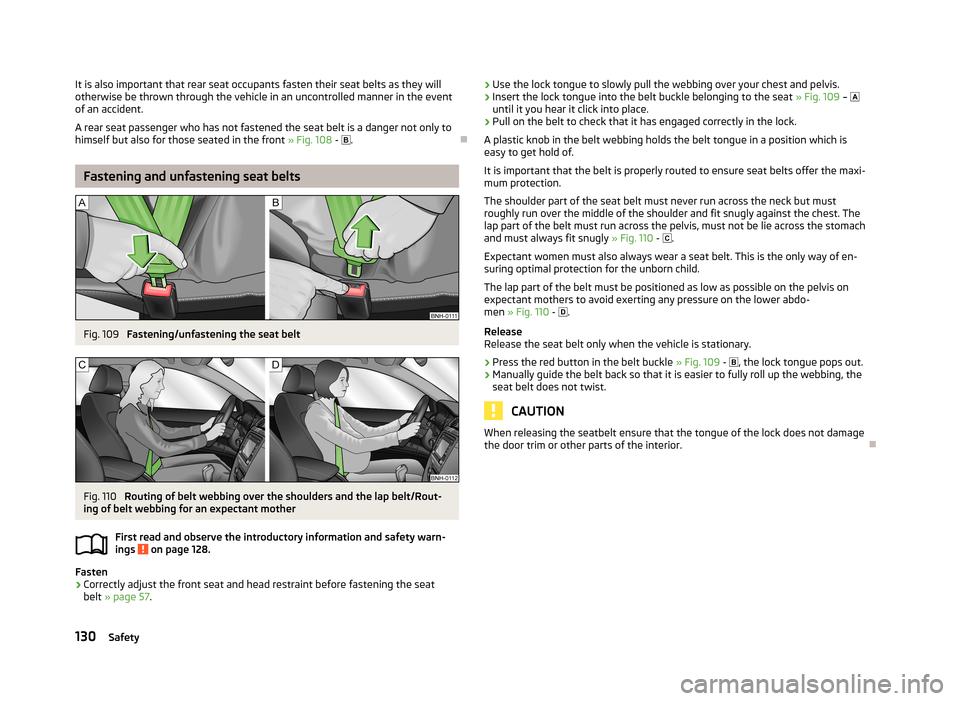
Fig. 109
Fastening/unfastening the seat belt
Fig. 110
Routing of belt webbing over the shoulders and the lap belt/Rout-
ing of belt webbing for an expectant mother
First read and observe the introductory information and safety warn-
ings
on page 128.
Fasten
›
Correctly adjust the front seat and head restraint before fastening the seat belt » page 57 .
›Use the lock tongue to slowly pull the webbing over your chest and pelvis.›Insert the lock tongue into the belt buckle belonging to the seat
» Fig. 109 –
until it you hear it click into place.›
Pull on the belt to check that it has engaged correctly in the lock.
A plastic knob in the belt webbing holds the belt tongue in a position which is
easy to get hold of.
It is important that the belt is properly routed to ensure seat belts offer the maxi- mum protection.
The shoulder part of the seat belt must never run across the neck but must
roughly run over the middle of the shoulder and fit snugly against the chest. The
lap part of the belt must run across the pelvis, must not be lie across the stomach
and must always fit snugly » Fig. 110 -
.
Expectant women must also always wear a seat belt. This is the only way of en-
suring optimal protection for the unborn child.
The lap part of the belt must be positioned as low as possible on the pelvis onexpectant mothers to avoid exerting any pressure on the lower abdo-
men » Fig. 110 -
.
Release
Release the seat belt only when the vehicle is stationary.
›
Press the red button in the belt buckle » Fig. 109 -
, the lock tongue pops out.
›
Manually guide the belt back so that it is easier to fully roll up the webbing, the
seat belt does not twist.
CAUTION
When releasing the seatbelt ensure that the tongue of the lock does not damage
the door trim or other parts of the interior.
130Safety
Page 134 of 223
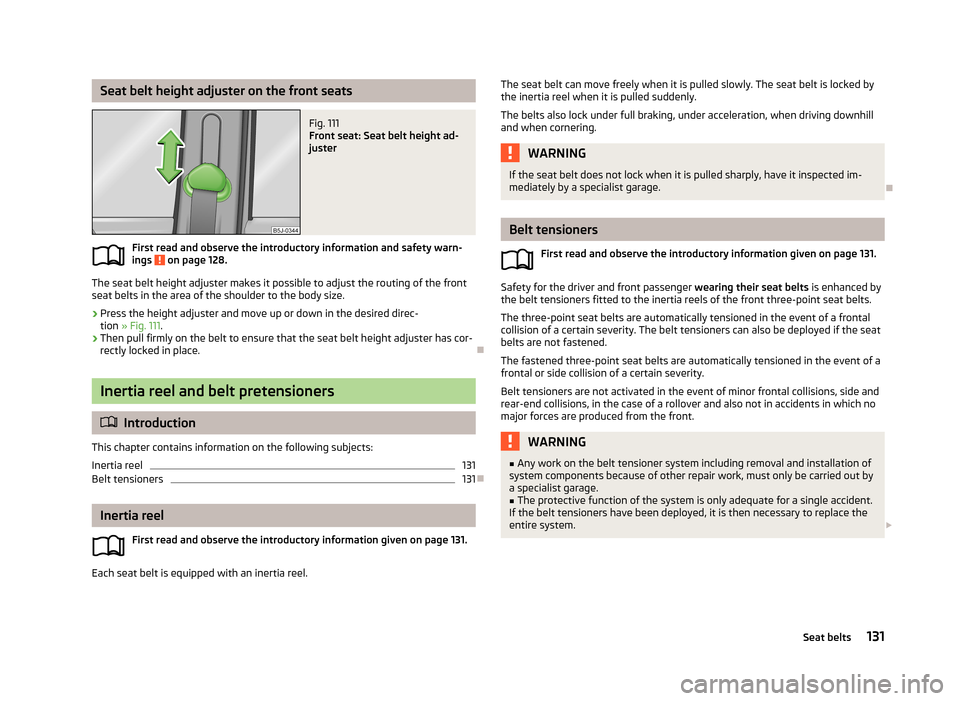
Seat belt height adjuster on the front seatsFig. 111
Front seat: Seat belt height ad-
juster
First read and observe the introductory information and safety warn-
ings on page 128.
The seat belt height adjuster makes it possible to adjust the routing of the front
seat belts in the area of the shoulder to the body size.
›
Press the height adjuster and move up or down in the desired direc- tion » Fig. 111 .
›
Then pull firmly on the belt to ensure that the seat belt height adjuster has cor-
rectly locked in place.
Inertia reel and belt pretensioners
Introduction
This chapter contains information on the following subjects:
Inertia reel
131
Belt tensioners
131
Inertia reel
First read and observe the introductory information given on page 131.
Each seat belt is equipped with an inertia reel.
The seat belt can move freely when it is pulled slowly. The seat belt is locked by
the inertia reel when it is pulled suddenly.
The belts also lock under full braking, under acceleration, when driving downhill
and when cornering.WARNINGIf the seat belt does not lock when it is pulled sharply, have it inspected im- mediately by a specialist garage.
Belt tensioners
First read and observe the introductory information given on page 131.
Safety for the driver and front passenger wearing their seat belts is enhanced by
the belt tensioners fitted to the inertia reels of the front three-point seat belts.
The three-point seat belts are automatically tensioned in the event of a frontal
collision of a certain severity. The belt tensioners can also be deployed if the seat
belts are not fastened.
The fastened three-point seat belts are automatically tensioned in the event of a frontal or side collision of a certain severity.
Belt tensioners are not activated in the event of minor frontal collisions, side andrear-end collisions, in the case of a rollover and also not in accidents in which no
major forces are produced from the front.
WARNING■ Any work on the belt tensioner system including removal and installation of
system components because of other repair work, must only be carried out by
a specialist garage.■
The protective function of the system is only adequate for a single accident.
If the belt tensioners have been deployed, it is then necessary to replace the
entire system.
131Seat belts
Page 137 of 223
In certain accident situations, the several airbags may be deployed simultaneous-
ly.
The airbags are not deployed in the case of minor frontal and side collisions, rear-
end collisions, tilting of the vehicle and vehicle rollover.
Deployment factors
It is not possible to generally determine which deployment conditions apply to the airbag system in every situation. An important role is played by factors such as the type of object that the vehicle hits (hard/soft), the impact angle, vehicle
speed, etc.
A decisive factor for the deployment of the airbags is the deceleration which oc- curs. The control unit analyses the nature of the collision and activates the rele-
vant restraint system.
If the vehicle deceleration which occurs and is measured during the collision re-
mains below the prescribed reference values specified in the control unit, the air-
bags are not deployed although the vehicle may well suffer severe damage to thebodywork as a consequence of the accident.
The following airbags will be deployed in the event of a severe frontal collision.
› Driver’s front airbag.
› Front passenger airbag.
The following airbags will be deployed in the event of a severe side collision.
› Front side airbag on the side of the accident.
› Head airbags on the side of the accident.
In the event of an accident in which the airbags are deployed:
› the interior lighting comes on (if the switch for the interior light is in the door
contact position),
› the hazard warning light is switched on;
› all the doors are unlocked;
› the fuel supply to the engine is interrupted.
Airbag overview
Introduction
This chapter contains information on the following subjects:
Front airbags
135
Side airbags
136
Head airbags
137
134Safety
Page 146 of 223
Fastening systems
Introduction
This chapter contains information on the following subjects:
ISOFIX system attachment points
143
Use of child seats with the ISOFIX system
143
TOP TETHER system attachment points
144
ISOFIX system attachment points
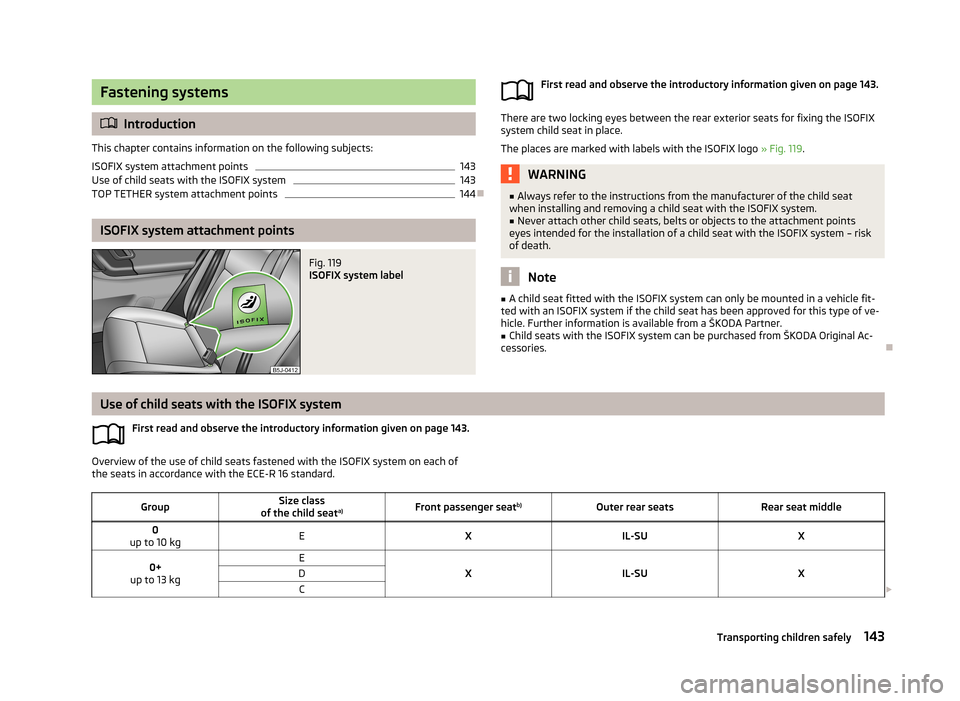
Fig. 119
ISOFIX system label
First read and observe the introductory information given on page 143.
There are two locking eyes between the rear exterior seats for fixing the ISOFIX
system child seat in place.
The places are marked with labels with the ISOFIX logo » Fig. 119.
WARNING■
Always refer to the instructions from the manufacturer of the child seat
when installing and removing a child seat with the ISOFIX system.■
Never attach other child seats, belts or objects to the attachment points
eyes intended for the installation of a child seat with the ISOFIX system – risk
of death.
Note
■ A child seat fitted with the ISOFIX system can only be mounted in a vehicle fit-
ted with an ISOFIX system if the child seat has been approved for this type of ve-
hicle. Further information is available from a ŠKODA Partner.■
Child seats with the ISOFIX system can be purchased from ŠKODA Original Ac-
cessories.
Use of child seats with the ISOFIX system
First read and observe the introductory information given on page 143.
Overview of the use of child seats fastened with the ISOFIX system on each of
the seats in accordance with the ECE-R 16 standard.
GroupSize class
of the child seat a)Front passenger seat b)Outer rear seatsRear seat middle0
up to 10 kgEXIL-SUX0+
up to 13 kgE
XIL-SUX
DC 143Transporting children safely
Page 147 of 223
GroupSize class
of the child seat a)Front passenger seat b)Outer rear seatsRear seat middle
1
9-18 kg
D
XIL-SU IUFX
CBB1Aa)
The size category is shown on the label attached to the child seat.
b)
If the front passenger seat is fitted with the ISOFIX system attachment points, it is suited for the installation of an ISOFIX child seat with the “Semi-Universal” approval.
The seat is suited for installation of an ISOFIX child seat with the “Semi-
Universal” approval. The “Semi-Universal” category means that the ISOFIX
child seat is approved for your vehicle. Observe the information in the list
of vehicles which comes with the child seat.
The seat is suitable for the installation of an ISOFIX child seat with the ap- proval “Universal” and attachment with the TOP TETHER belt.
The seat is not fitted with ISOFIX system attachment points.
TOP TETHER system attachment points
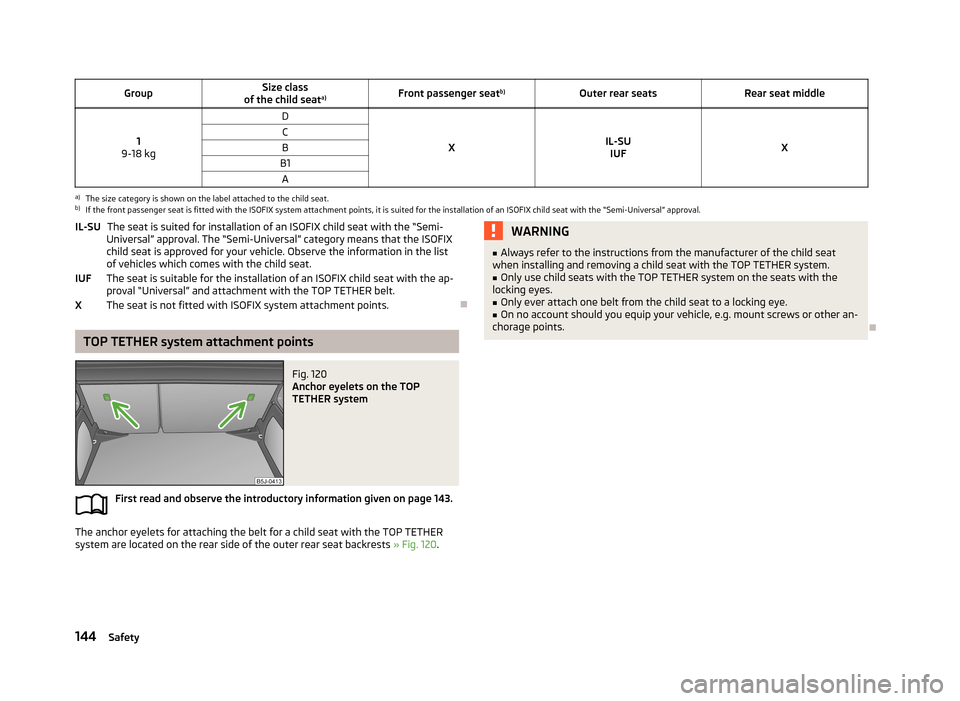
Fig. 120
Anchor eyelets on the TOP
TETHER system
First read and observe the introductory information given on page 143.
The anchor eyelets for attaching the belt for a child seat with the TOP TETHER
system are located on the rear side of the outer rear seat backrests » Fig. 120.
IL-SU
IUFXWARNING■
Always refer to the instructions from the manufacturer of the child seat
when installing and removing a child seat with the TOP TETHER system.■
Only use child seats with the TOP TETHER system on the seats with the
locking eyes.
■
Only ever attach one belt from the child seat to a locking eye.
■
On no account should you equip your vehicle, e.g. mount screws or other an-
chorage points.
144Safety
Page 154 of 223
CAUTION■When washing the car by hand, protect your hands and arms from sharp-edged
metal parts (e.g. when cleaning the undertray, exhaust system, the inside of the
wheel housings or the wheel trims etc.) - there is a risk of cutting yourself.■
Only apply slight pressure when cleaning the vehicle's paintwork.
Automatic car wash systems
First read and observe the introductory information and safety warn-
ings
on page 150.
The usual precautionary measures must be taken before washing the vehicle in
an automatic car wash system (e.g. closing the windows including the sliding/tilt-
ing roof, etc.).
If your vehicle is fitted with any particular mounted parts, such as a spoiler, roof
rack, two-way radio aerial – it is best to consult the operator of the car wash sys-
tem beforehand.
The lips of the windscreen wiper rubbers must be cleaned and degreased with
cleaning agents especially formulated for the task after an automatic wash with
wax.
WARNINGFold in the exterior mirrors to prevent damage before washing the vehicle in
an automatic car wash system.
Washing with a high-pressure cleaner
First read and observe the introductory information and safety warn-
ings
on page 150.
When washing the vehicle with a high-pressure cleaner, the instructions for use
of the equipment must be observed. This applies in particular to the pressure
used and to the spraying distance .
Maintain a sufficiently large distance to the parking aid sensors and soft materials
such as rubber hoses or insulation material.
WARNINGNever use circular spray nozzles or dirt cutters!
CAUTION
■ Do not aim the water jet directly at the lock cylinders or the door or opening
joints when washing the vehicle in the winter using a hose or high-pressure
cleaner – there is a risk of freezing.■
To avoid damaging the parking aid sensors while cleaning with high-pressure
cleaners or steam jets, the sensors must only be directly sprayed for short periods
while a minimum distance of 10 cm must be observed.
■
The temperature of the water used for cleaning must not exceed 60 °C – there
is a risk of damaging the vehicle.
■
See also Washing a vehicle with decorative film trim using a high-pressure
cleaner » page 153 .
Vehicle exterior care
Introduction
This chapter contains information on the following subjects:
Caring for vehicle paintwork
152
Plastic parts
152
Rubber seals
153
Chrome parts
153
Decorative films
153
Windows and exterior mirrors
153
Headlight lenses
154
Door lock cylinders
154
Underbody waxing
154
Wheels
154
Underbody protection
154
Regular and proper care help to retain the efficiency and value of your vehicle. It
may also be one of the requirements for the acceptance of warranty claims relat- ing to corrosion damage and paint defects on the bodywork.
151Car care
Page 157 of 223
■When removing snow or ice from windows and mirror lenses ensure that the
paintwork of the vehicle is not to damage.■
Do not clean the inside of the windows with sharp-edged objects or corrosive
and acidic cleaning agents – there is a risk of damaging the heating elements or
window aerial.
Headlight lenses
First read and observe the introductory information and safety warn-ings
on page 151.
Clean the plastic headlight lenses with clean, warm water and soap.
CAUTION
■ Never wipe the headlights dry.■Do not use any sharp objects to clean the plastic lenses, this may damage the
protective lacquer and consequently cause the cracking on the headlight lenses.■
Do not use any aggressive cleaning or chemical solvent products to clean the
headlights – there is a risk of damaging the headlight lenses.
Door lock cylinders
First read and observe the introductory information and safety warn-
ings
on page 151.
Specific products must be used for de-icing door lock cylinders.
CAUTION
When washing your vehicle, ensure as little water as possible gets into the lock-
ing cylinders.
Underbody waxing
First read and observe the introductory information and safety warn-
ings
on page 151.
All the cavities of your vehicle which are at risk from corrosion are protected for life by a layer of protective wax applied in the factory.
Wax protection does not require to be inspected or re-treated.
If any small amount of wax flow out of the cavities at high temperatures, these must be removed with a plastic scraper and the stains cleaned using a petroleum cleaner.WARNINGSafety regulations should be observed when using petroleum cleaner to re-
move wax – there is a risk of fire.
Wheels
First read and observe the introductory information and safety warn-
ings
on page 151.
Wheel rims
Also thoroughly wash the wheel rims when washing the vehicle on a regular ba- sis.
Regularly remove salt and brake dust otherwise the rim material will be attacked.
Damage to the paint layer on the wheel rims must be touched up immediately.
Light alloy wheels
After washing thoroughly and treat the wheel rims with a protective product for
light alloy wheels. Products which cause abrasion must not be used to treat the
wheel rims.
CAUTION
Severe layers of dirt on the wheels can also result in wheel imbalance. This may
show itself in the form of a wheel vibration which is transmitted to the steering
wheel which, in certain circumstances, can cause premature wear of the steering.
This means it is necessary to remove the dirt.
Underbody protection
First read and observe the introductory information and safety warn-ings
on page 151.
The underside of your vehicle is protected for life against chemical and mechani-
cal influences.
154General Maintenance