steering SKODA FABIA 2014 2.G / 5J Owner's Guide
[x] Cancel search | Manufacturer: SKODA, Model Year: 2014, Model line: FABIA, Model: SKODA FABIA 2014 2.G / 5JPages: 197, PDF Size: 13.56 MB
Page 157 of 197
WARNING■When the warning light illuminates, immediately reduce the speed and
avoid sudden steering and brake manoeuvres. Stop the vehicle as soon as
possible and inspect the tyres and their inflation pressure.■
Under certain circumstances (e.g. sporty style of driving, wintry or un-
paved roads) the warning light
can be delayed or does not light up at all.
CAUTION
■
The system cannot warn in case of very rapid loss of tyre pressure, e.g. in the
event of a sudden puncture. In this case carefully bring the vehicle to a stand-
still without sudden steering movements or sharp braking.■
The basic setting must be repeated every 10,000 km or once a year to ensure
proper functioning of the tyre pressure monitor.
■
The tyre pressure monitor does not replace the need to check tyre pressure
regularly.
Spare and back-up wheel
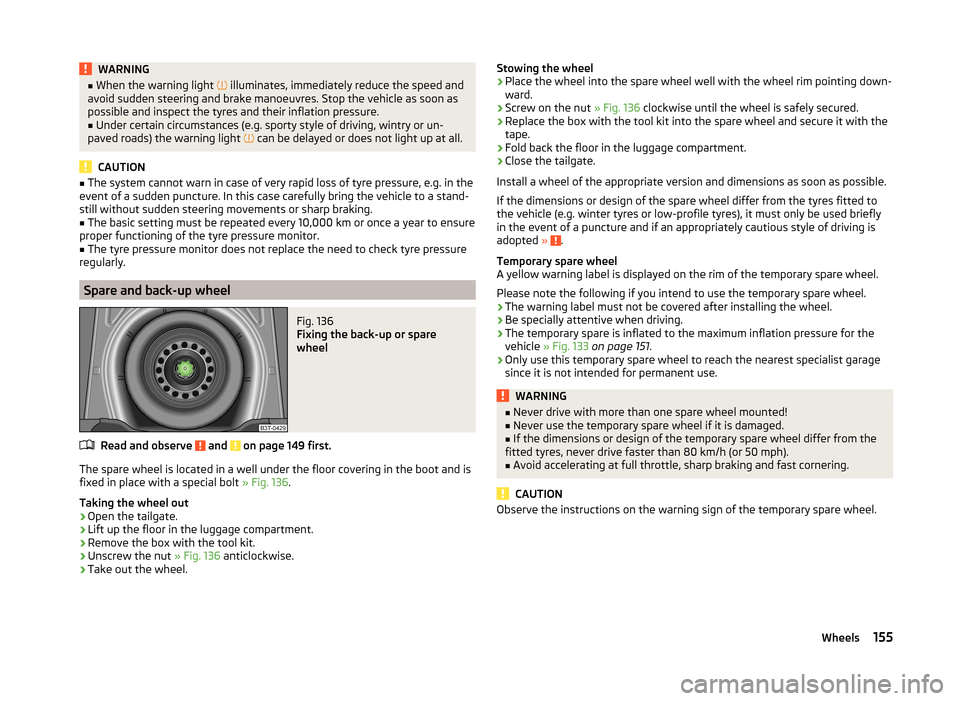
Fig. 136
Fixing the back-up or spare
wheel
Read and observe and on page 149 first.
The spare wheel is located in a well under the floor covering in the boot and is fixed in place with a special bolt » Fig. 136.
Taking the wheel out
›
Open the tailgate.
›
Lift up the floor in the luggage compartment.
›
Remove the box with the tool kit.
›
Unscrew the nut » Fig. 136 anticlockwise.
›
Take out the wheel.
Stowing the wheel›Place the wheel into the spare wheel well with the wheel rim pointing down-
ward.›
Screw on the nut » Fig. 136 clockwise until the wheel is safely secured.
›
Replace the box with the tool kit into the spare wheel and secure it with the
tape.
›
Fold back the floor in the luggage compartment.
›
Close the tailgate.
Install a wheel of the appropriate version and dimensions as soon as possible.
If the dimensions or design of the spare wheel differ from the tyres fitted to
the vehicle (e.g. winter tyres or low-profile tyres), it must only be used briefly
in the event of a puncture and if an appropriately cautious style of driving is
adopted »
.
Temporary spare wheel
A yellow warning label is displayed on the rim of the temporary spare wheel.
Please note the following if you intend to use the temporary spare wheel. › The warning label must not be covered after installing the wheel.
› Be specially attentive when driving.
› The temporary spare is inflated to the maximum inflation pressure for the
vehicle » Fig. 133 on page 151 .
› Only use this temporary spare wheel to reach the nearest specialist garage
since it is not intended for permanent use.
WARNING■ Never drive with more than one spare wheel mounted!■Never use the temporary spare wheel if it is damaged.■
If the dimensions or design of the temporary spare wheel differ from the
fitted tyres, never drive faster than 80 km/h (or 50 mph).
■
Avoid accelerating at full throttle, sharp braking and fast cornering.
CAUTION
Observe the instructions on the warning sign of the temporary spare wheel.155Wheels
Page 168 of 197
Negative cable - colour coding in the majority of cases is black.
Jump-starting in vehicles with the START-STOP system
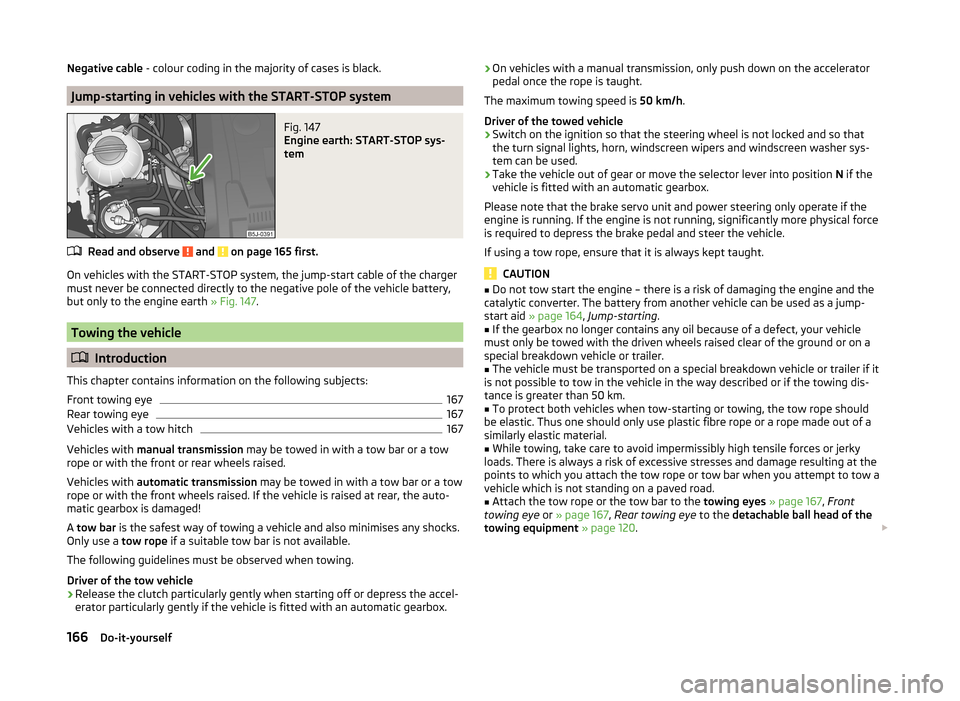
Fig. 147
Engine earth: START-STOP sys-
tem
Read and observe and on page 165 first.
On vehicles with the START-STOP system, the jump-start cable of the charger
must never be connected directly to the negative pole of the vehicle battery,
but only to the engine earth » Fig. 147.
Towing the vehicle
Introduction
This chapter contains information on the following subjects:
Front towing eye
167
Rear towing eye
167
Vehicles with a tow hitch
167
Vehicles with manual transmission may be towed in with a tow bar or a tow
rope or with the front or rear wheels raised.
Vehicles with automatic transmission may be towed in with a tow bar or a tow
rope or with the front wheels raised. If the vehicle is raised at rear, the auto-
matic gearbox is damaged!
A tow bar is the safest way of towing a vehicle and also minimises any shocks.
Only use a tow rope if a suitable tow bar is not available.
The following guidelines must be observed when towing.
Driver of the tow vehicle
›
Release the clutch particularly gently when starting off or depress the accel-
erator particularly gently if the vehicle is fitted with an automatic gearbox.
› On vehicles with a manual transmission, only push down on the accelerator
pedal once the rope is taught.
The maximum towing speed is 50 km/h.
Driver of the towed vehicle›
Switch on the ignition so that the steering wheel is not locked and so that
the turn signal lights, horn, windscreen wipers and windscreen washer sys-
tem can be used.
›
Take the vehicle out of gear or move the selector lever into position N if the
vehicle is fitted with an automatic gearbox.
Please note that the brake servo unit and power steering only operate if the
engine is running. If the engine is not running, significantly more physical force
is required to depress the brake pedal and steer the vehicle.
If using a tow rope, ensure that it is always kept taught.
CAUTION
■ Do not tow start the engine – there is a risk of damaging the engine and the
catalytic converter. The battery from another vehicle can be used as a jump-
start aid » page 164 , Jump-starting .■
If the gearbox no longer contains any oil because of a defect, your vehicle
must only be towed with the driven wheels raised clear of the ground or on a
special breakdown vehicle or trailer.
■
The vehicle must be transported on a special breakdown vehicle or trailer if it
is not possible to tow in the vehicle in the way described or if the towing dis-
tance is greater than 50 km.
■
To protect both vehicles when tow-starting or towing, the tow rope should
be elastic. Thus one should only use plastic fibre rope or a rope made out of a
similarly elastic material.
■
While towing, take care to avoid impermissibly high tensile forces or jerky
loads. There is always a risk of excessive stresses and damage resulting at the
points to which you attach the tow rope or tow bar when you attempt to tow a
vehicle which is not standing on a paved road.
■
Attach the tow rope or the tow bar to the towing eyes » page 167 , Front
towing eye or » page 167 , Rear towing eye to the detachable ball head of the
towing equipment » page 120 .
166Do-it-yourself
Page 170 of 197
Fuses and light bulbs
Fuses
Introduction
This chapter contains information on the following subjects:
Fuses in the dash panel
168
Fuses in the engine compartment
170
Individual electrical circuits are protected by fuses.
› Before replacing a fuse, switch off the ignition and the appropriate consumer
› Find out which fuse belongs to the component that is not operat-
ing » page 168 , Fuses in the dash panel or » page 170 , Fuses in the engine
compartment .
› Take the plastic clip out of its fixture in the cover of the fuse box, place it on
the relevant fuse and pull it out.
Fuse colourMaximum amperagelight brown5dark brown7.5red10blue15yellow20white25green30WARNINGAlways read and observe the warnings before completing any work in the
engine compartment » page 138.
CAUTION
■
“Never repair” fuses or replace them with a fuse of a higher amperage –
there is a risk of fire. This may also cause damage at another part of the elec-
trical system.■
Have the electrical system checked as quickly as possible by a specialist ga-
rage if a newly inserted fuse blows again after a short time.
■
A blown fuses is recognisable by the molten metal strip. Replace the faulty
fuse with a new one of the same amperage.
Note■
We recommend that you always carry replacement fuses in the vehicle. A box
of replacement fuses can be purchased from ŠKODA Original Accessories.■
One fuse may cover several consumers.
■
A single consumer may use several fuses.
Fuses in the dash panel
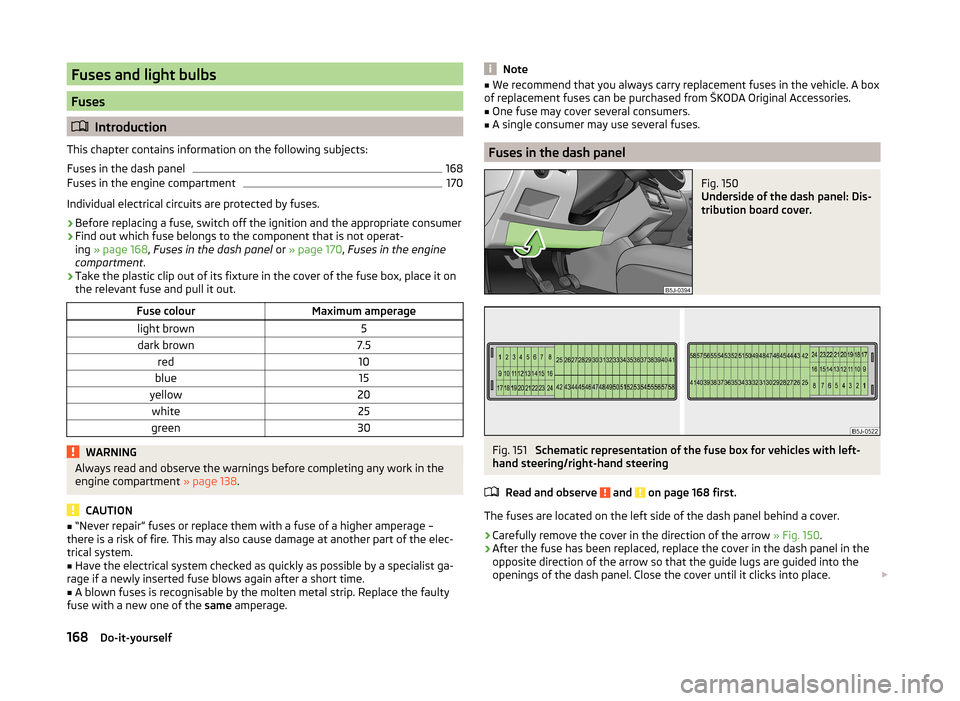
Fig. 150
Underside of the dash panel: Dis-
tribution board cover.
Fig. 151
Schematic representation of the fuse box for vehicles with left-
hand steering/right-hand steering
Read and observe
and on page 168 first.
The fuses are located on the left side of the dash panel behind a cover.
› Carefully remove the cover in the direction of the arrow
» Fig. 150.
› After the fuse has been replaced, replace the cover in the dash panel in the
opposite direction of the arrow so that the guide lugs are guided into the
openings of the dash panel. Close the cover until it clicks into place.
168Do-it-yourself
Page 171 of 197
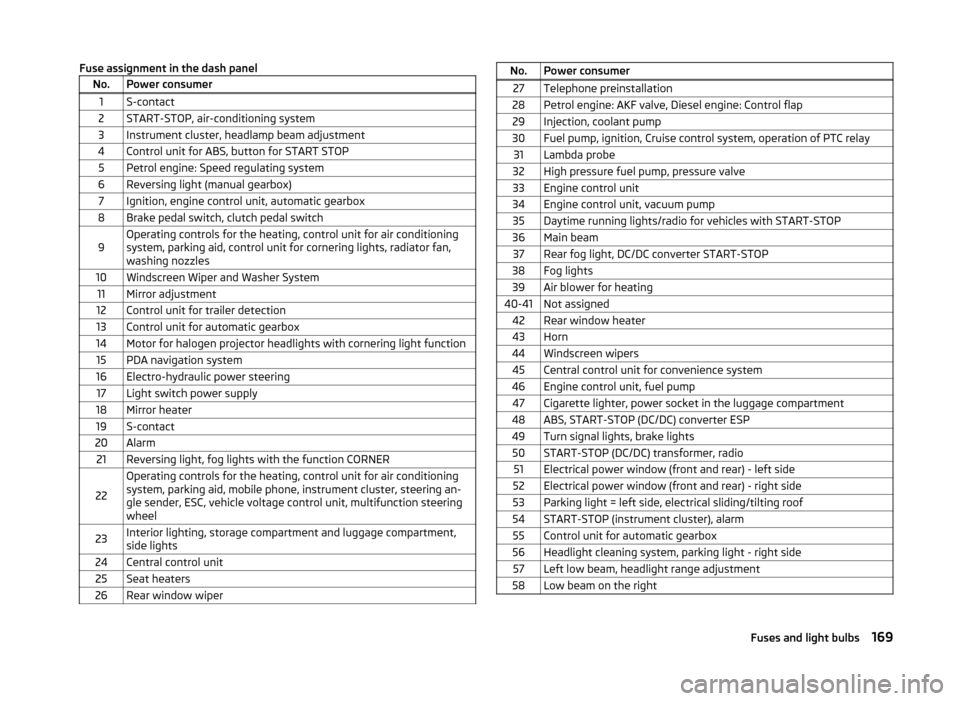
Fuse assignment in the dash panelNo.Power consumer1S-contact2START-STOP, air-conditioning system3Instrument cluster, headlamp beam adjustment4Control unit for ABS, button for START STOP5Petrol engine: Speed regulating system6Reversing light (manual gearbox)7Ignition, engine control unit, automatic gearbox8Brake pedal switch, clutch pedal switch9Operating controls for the heating, control unit for air conditioning
system, parking aid, control unit for cornering lights, radiator fan,
washing nozzles10Windscreen Wiper and Washer System11Mirror adjustment12Control unit for trailer detection13Control unit for automatic gearbox14Motor for halogen projector headlights with cornering light function15PDA navigation system16Electro-hydraulic power steering17Light switch power supply18Mirror heater19S-contact20Alarm21Reversing light, fog lights with the function CORNER
22
Operating controls for the heating, control unit for air conditioning
system, parking aid, mobile phone, instrument cluster, steering an-
gle sender, ESC, vehicle voltage control unit, multifunction steering
wheel23Interior lighting, storage compartment and luggage compartment,
side lights24Central control unit25Seat heaters26Rear window wiperNo.Power consumer27Telephone preinstallation28Petrol engine: AKF valve, Diesel engine: Control flap29Injection, coolant pump30Fuel pump, ignition, Cruise control system, operation of PTC relay31Lambda probe32High pressure fuel pump, pressure valve33Engine control unit34Engine control unit, vacuum pump35Daytime running lights/radio for vehicles with START-STOP36Main beam37Rear fog light, DC/DC converter START-STOP38Fog lights39Air blower for heating40-41Not assigned42Rear window heater43Horn44Windscreen wipers45Central control unit for convenience system46Engine control unit, fuel pump47Cigarette lighter, power socket in the luggage compartment48ABS, START-STOP (DC/DC) converter ESP49Turn signal lights, brake lights50START-STOP (DC/DC) transformer, radio51Electrical power window (front and rear) - left side52Electrical power window (front and rear) - right side53Parking light = left side, electrical sliding/tilting roof54START-STOP (instrument cluster), alarm55Control unit for automatic gearbox56Headlight cleaning system, parking light - right side57Left low beam, headlight range adjustment58Low beam on the right169Fuses and light bulbs
Page 172 of 197
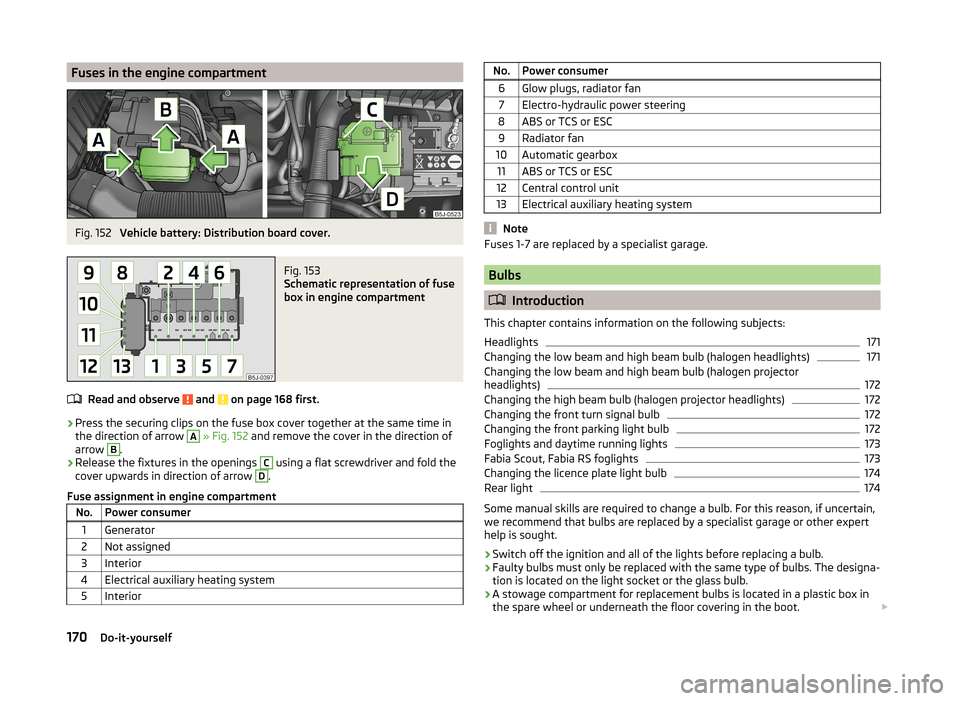
Fuses in the engine compartmentFig. 152
Vehicle battery: Distribution board cover.
Fig. 153
Schematic representation of fuse
box in engine compartment
Read and observe and on page 168 first.
› Press the securing clips on the fuse box cover together at the same time in
the direction of arrow
A
» Fig. 152 and remove the cover in the direction of
arrow
B
.
› Release the fixtures in the openings
C
using a flat screwdriver and fold the
cover upwards in direction of arrow
D
.
Fuse assignment in engine compartment
No.Power consumer1Generator2Not assigned3Interior4Electrical auxiliary heating system5InteriorNo.Power consumer6Glow plugs, radiator fan7Electro-hydraulic power steering8ABS or TCS or ESC9Radiator fan10Automatic gearbox11ABS or TCS or ESC12Central control unit13Electrical auxiliary heating system
Note
Fuses 1-7 are replaced by a specialist garage.
Bulbs
Introduction
This chapter contains information on the following subjects:
Headlights
171
Changing the low beam and high beam bulb (halogen headlights)
171
Changing the low beam and high beam bulb (halogen projector
headlights)
172
Changing the high beam bulb (halogen projector headlights)
172
Changing the front turn signal bulb
172
Changing the front parking light bulb
172
Foglights and daytime running lights
173
Fabia Scout, Fabia RS foglights
173
Changing the licence plate light bulb
174
Rear light
174
Some manual skills are required to change a bulb. For this reason, if uncertain,
we recommend that bulbs are replaced by a specialist garage or other expert
help is sought.
› Switch off the ignition and all of the lights before replacing a bulb.
› Faulty bulbs must only be replaced with the same type of bulbs. The designa-
tion is located on the light socket or the glass bulb.
› A stowage compartment for replacement bulbs is located in a plastic box in
the spare wheel or underneath the floor covering in the boot.
170Do-it-yourself
Page 187 of 197
Index
A
Abroad Driving abroad
113
Unleaded petrol113
ABS115
warning light38
Accessories126
Adjusting Belt height
13
Exterior mirrors64
Head restraints68
Steering wheel8
Adjusting the seats7
Adjustment Headlight beam
56
Seats65
Adjustments and technical changes Spoiler
127
Adjustments and technical modifications Airbags
127
Aerial129
See windows131
Airbag14
Adjustments and impairment of the airbag sys- tem
127
Deactivating18
Deployment14
Front airbag15
Head airbag17
Side airbag16
Switching off the front passenger airbag18
Airbag system14
Air conditioning Operation
88
Air conditioning system Air outlets85
Climatronic90
Manual air conditioning system87
Air outlets85
Alarm49
Anti-theft alarm system49
Operation49
Trailer125
Antilock Braking System115
Armrest83
Ashtray78
ASR115
warning light38
Assist systems ABS
38, 115
ASR38, 115
Cruise control system117
EDS and XDS115
ESC38, 114
Parking aid116
START-STOP118
Auto Check Control34
Automatic gearbox Selector lever-emergency unlocking
108
Starting-off and driving107
Tiptronic106
Automatic load deactivation149
Automatic transmission105
Kickdown107
Malfunction107
Selector lever lock106
Using the selector lever105
AUX99
Avoiding damage to the vehicle Driving through water
112
Avoiding damage to your vehicle112
B
Back-up wheel
155
Ball head Check fitting
122
Fitting122
Ready position121
Removing123
Belts10
Belt tensioners13
Bicycle carrier75
Bonnet Closing
139
Opening139
Boot Cover
70
Emergency unlocking51
Fastening elements69
Fixing nets70
Folding hooks70
see Boot lid50
Unlocking the boot lid51
Boot lid50
automatic locking51
Brake assist114
Brake booster103
Brake fluid145
Changing145
Checking145
Display messages36
Brakes Brake booster
103
Brake fluid145
Handbrake104
Indicator light36
Running in109
Braking Information for braking
103
Breakdown kit163
185Index
Page 192 of 197

SeatAdjusting65
Seat belt warning light
36
Seat belts10
Belt tensioners13
Cleaning134
fastening and unfastening12
Height adjustment13
Seatbelts Inertia reels
13
Seat belts The physical principle of a frontal collision
11
Seats folding forward
66
Head restraints68
Heating66
Removing the seats67
Seats and storage65
see Automatic gearbox Manual gear shifting on the multifunction steering wheel
106
Selector lever see Using the selector lever
105
Service display32
Service intervals126
Setting Heating
87
Manual air conditioning system89
Manually dimmed rear-view mirror64
Setting the clock Clock
28
Shifting gears Driving and saving energy
109
Side airbag16
Sliding/tilting roof53
Comfort operation54
Emergency operation55
Opening and raising54
Operation54
Sliding/tilting sunroof Closing54
Snow chains157
Spare wheel155
Speedometer27
Speed symbol see Wheels
152
Spoiler127
Stalk Main beam
57
Turn signals57
START-STOP118
Operating conditions for the system118
operation119
system-related automatic start-up119
START-STOPP Manually deactivating/activating the system
119
Starting and stopping the engine101
Starting engine Jump-starting
164
Starting the engine102
Jump-starting165
START STOP Information messages
119
Jump-starting166
Steering wheel8
Storage80
Storage Compartment Lighting
60
Storage compartments80
Sun visors61
Switching lights on and off56
Switching off the engine102
Synthetic leather134
T
Tailgate
50
Taking care of the vehicle Natural leather133
Seat belts134
Taking care of your vehicle Automatic car wash system
129
Chrome parts130
Cleaning the wheels132
Door lock cylinders131
Headlight lenses131
High-pressure cleaner129
Plastic parts130
Washing by hand128
Wash system129
Technical data176
Telephone92
Tiptronic106
Tire Explanation of the labelling
152
see wheels152
Tire size152
see wheels152
Tools159
TOP TETHER23
Tourist lights58
Towing166
Towing a trailer120
Towing device Description
121
Drawbar load120
Use and care123
Towing eye Front
167
Rear167
Towing protection50
Traction Control System (ASR)115
Trailer120, 124
Loading124
Towing a trailer124
190Index