bonnet SKODA FABIA 2014 2.G / 5J Owner's Manual
[x] Cancel search | Manufacturer: SKODA, Model Year: 2014, Model line: FABIA, Model: SKODA FABIA 2014 2.G / 5JPages: 197, PDF Size: 13.56 MB
Page 27 of 197
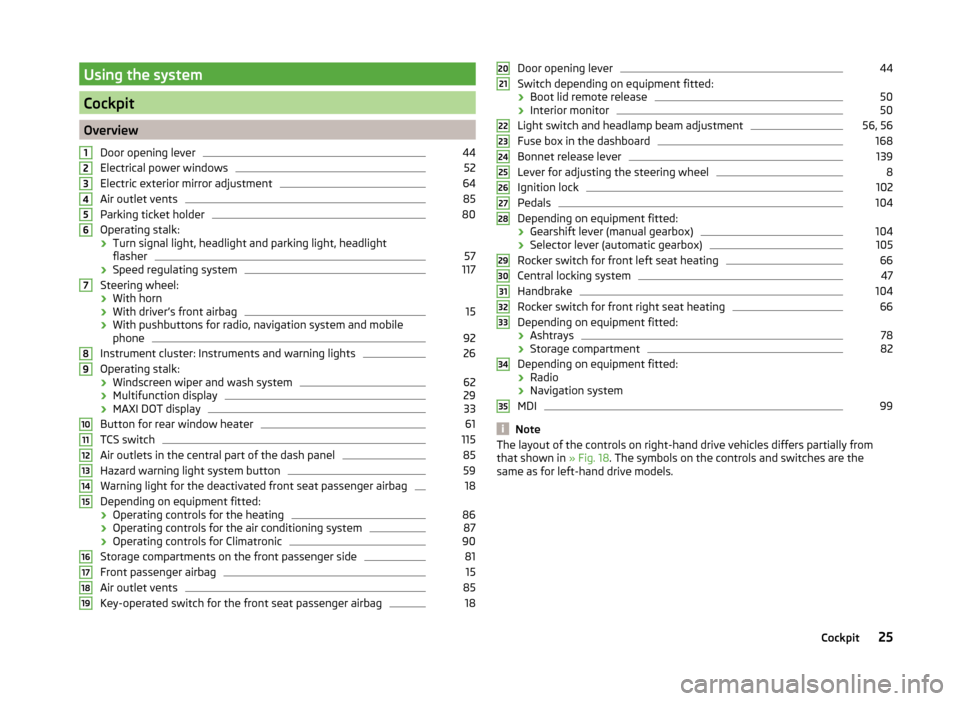
Using the system
Cockpit
OverviewDoor opening lever
44
Electrical power windows
52
Electric exterior mirror adjustment
64
Air outlet vents
85
Parking ticket holder
80
Operating stalk:
› Turn signal light, headlight and parking light, headlight
flasher
57
› Speed regulating system
117
Steering wheel:
› With horn
› With driver’s front airbag
15
›With pushbuttons for radio, navigation system and mobile
phone
92
Instrument cluster: Instruments and warning lights
26
Operating stalk:
› Windscreen wiper and wash system
62
›Multifunction display
29
›MAXI DOT display
33
Button for rear window heater
61
TCS switch
115
Air outlets in the central part of the dash panel
85
Hazard warning light system button
59
Warning light for the deactivated front seat passenger airbag
18
Depending on equipment fitted:
› Operating controls for the heating
86
›Operating controls for the air conditioning system
87
›Operating controls for Climatronic
90
Storage compartments on the front passenger side
81
Front passenger airbag
15
Air outlet vents
85
Key-operated switch for the front seat passenger airbag
1812345678910111213141516171819Door opening lever44
Switch depending on equipment fitted:
› Boot lid remote release
50
›Interior monitor
50
Light switch and headlamp beam adjustment
56, 56
Fuse box in the dashboard
168
Bonnet release lever
139
Lever for adjusting the steering wheel
8
Ignition lock
102
Pedals
104
Depending on equipment fitted:
› Gearshift lever (manual gearbox)
104
›Selector lever (automatic gearbox)
105
Rocker switch for front left seat heating
66
Central locking system
47
Handbrake
104
Rocker switch for front right seat heating
66
Depending on equipment fitted:
› Ashtrays
78
›Storage compartment
82
Depending on equipment fitted:
› Radio
› Navigation system
MDI
99
Note
The layout of the controls on right-hand drive vehicles differs partially from
that shown in » Fig. 18. The symbols on the controls and switches are the
same as for left-hand drive models.2021222324252627282930313233343525Cockpit
Page 35 of 197
NoteThe kilometres remaining until the next service are displayed instead of the
odometer.
Display in the MAXI DOT display
Oil change service
If an oil change service is due, the message Oil change in ... km or .... days.
As soon as the service date has arrived, the message Oil change now! appears
after the ignition is switched on.
Inspection
If an inspection is due, the message Inspection in ... km or ... days.
As soon as the service interval date has arrived, the message Inspection now!
appears after the ignition is switched on.
Displaying the distance and days until the next service interval
You can display the remaining distance and days until the next service in the
Settings menu whenever the ignition is switched on » page 34.
The following message is displayed for 10 seconds. Oil change ... km / ... days
Inspection ... km / ... days
MAXI DOT display
Introduction
This chapter contains information on the following subjects:
Main menu
33
Settings
34
Door, boot lid and bonnet warning
34
Auto Check Control
34
The MAXI DOT display provides you with information about the current operat-
ing state of your vehicle . The information system also provides you with data
(depending on the vehicle equipment) relating to the radio, mobile phone, mul-
ti-functional display, navigation system, the device connected to the MDI input
and the automatic gearbox » page 105.
Lighting up of certain symbols is combined with an acoustic warning signal.
WARNINGConcentrate fully on your driving at all times. As the driver you are fully re-
sponsible for the operation of your vehicle.
Main menu
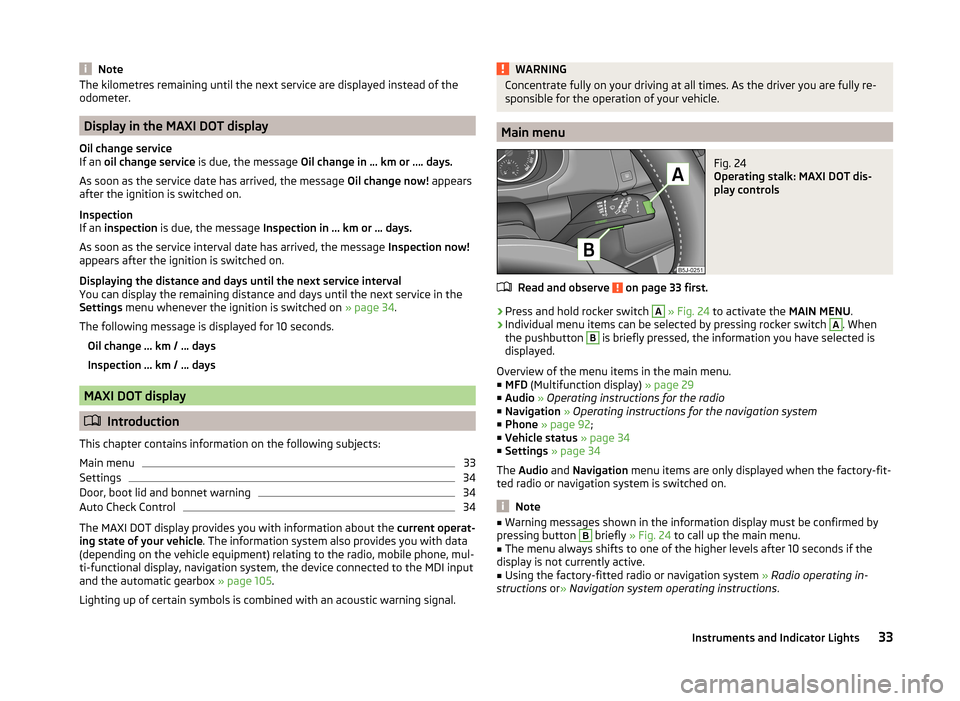
Fig. 24
Operating stalk: MAXI DOT dis-
play controls
Read and observe on page 33 first.
›
Press and hold rocker switch
A
» Fig. 24 to activate the MAIN MENU.
›
Individual menu items can be selected by pressing rocker switch
A
. When
the pushbutton
B
is briefly pressed, the information you have selected is
displayed.
Overview of the menu items in the main menu.
■ MFD (Multifunction display) » page 29
■ Audio » Operating instructions for the radio
■ Navigation » Operating instructions for the navigation system
■ Phone » page 92 ;
■ Vehicle status » page 34
■ Settings » page 34
The Audio and Navigation menu items are only displayed when the factory-fit-
ted radio or navigation system is switched on.
Note
■ Warning messages shown in the information display must be confirmed by
pressing button B briefly » Fig. 24 to call up the main menu.■
The menu always shifts to one of the higher levels after 10 seconds if the
display is not currently active.
■
Using the factory-fitted radio or navigation system » Radio operating in-
structions or» Navigation system operating instructions .
33Instruments and Indicator Lights
Page 36 of 197
SettingsRead and observe
on page 33 first.
You can change certain settings yourself through the MAXI DOT display. The
current menu item is shown in the top of the display under a line.
You can select the following menu options:
Language
You can set the language for the warning and information texts here.
MFD data
Activate or deactivate certain displays of the multifunction display here.
Time
The time, time format (12 or 24 hour indicator) and the changeover between
summer/winter time can be set here.
Winter tyres
Here, you can set the speed at which an audible signal should sound. This
function is, for example, used for winter tyres where the maximum permissible
speed is lower than the maximum speed of the vehicle.
The following is shown on the information display if this speed is exceeded: Winter tyres max. speed ... km/h.
Units of measurement
The units for the temperature, consumption and distance driven can be set
here.
Alt. speed dis.
Display of the second speed in mph 1)
can be activated here.
Service
The days and kilometres remaining until the next service can be displayed
here.
Factory setting
The display can be restored to its factory settings here.
Door, boot lid and bonnet warning
Read and observe
on page 33 first.
If at least one door is open, or the boot or bonnet is open, the MAXI DOT dis-
play shows the vehicle with the corresponding door or boot/bonnet open.
An audible signal also sounds if the vehicle is travelling at more than 6 km/h.
Auto Check Control
Read and observe
on page 33 first.
Vehicle condition
Certain functions and conditions of individual vehicle systems are checked
continuously when the ignition is switched on and also while driving.
Some error messages and other information are displayed in the MAXI DOT
display. The messages are displayed simultaneously with the icons in the MAXI
DOT display or with the warning lights in the instrument cluster » page 35.
The Vehicle status menu item is shown in the main menu of the MAXI DOT
display whenever at least one fault message is present. The first of the fault
messages is displayed after this menu item is selected. Several error messages
are shown on the display under the message e.g. 1/3. This indicates that the
first of a total of three error messages is being displayed.
As long as the operational faults are not rectified, the symbols are always indi-
cated again. After they are displayed for the first time, the symbols continue to
be indicated without any extra messages for the driver.
Warning symbols
Engine oil pressure too low» page 36Clutches of the automatic DSG gearbox
are too hot» page 34Check engine oil level,
engine oil sensor defective» page 36
Clutches of the automatic DSG gearbox are too hot
If the symbol appears in the MAXI DOT display, this indicates that the tem-
perature of the automatic DSG gearbox clutches is too high.
1)
On models on which the speedometer indicates mph, the second speed is displayed in km/h.
34Using the system
Page 38 of 197
Brake systemRead and observe
on page 35 first.
The
indicator light comes on if the brake fluid level in the braking system is
too low or there is a fault in the ABS.
The following message is shown in the MAXI DOT display.
Brake fluid: Log book!
Stop the vehicle, switch off the engine, and check the level of the brake flu-
id » page 145 .
Further information » page 102, Brakes .
WARNING■
If you have to stop for technical reasons, then park the vehicle at a safe
distance from the traffic, switch off the engine and activate the hazard
warning light system » page 59.■
The following guidelines should be observed when opening the bonnet
and checking the brake fluid level » page 138, Engine compartment .
■
If the warning light
is displayed simultaneously with warning light
» page 38 ,
Antilock brake system (ABS) ,
do not continue your
journey! Seek help from a specialist garage.
■
A fault to the ABS system or the braking system can increase the vehi-
cle's braking distance – there is a risk of accident.
Seat belt warning light
Read and observe
on page 35 first.
The indicator light comes on after the ignition is switched on as a reminder
for the driver and front passenger to fasten their seat belt. The indicator light
only goes out once the driver and front passenger have fastened their seat
belt.
A steady warning signal sounds at vehicle speeds greater than 20 km/h and
the flashes if the driver and front passenger have not fastened their seat
belts.
The warning signal is switched off and the indicator light is permanently lit if
the driver and front passenger have not fastened their seat belts within the
next 90 seconds.
Further information » page 10.
Generator
Read and observe
on page 35 first.
If the warning light lights up
when the engine is running, the vehicle battery
is not being charged.
Seek help from a specialist garage. The electrical system requires checking.
WARNINGIf you have to stop for technical reasons, park the vehicle at a safe distance
from the traffic, switch off the engine and switch on the hazard warning
lights system » page 59.
CAUTION
Do not continue driving if the warning light (coolant system fault) lights
up in addition to the warning light while you are driving. Stop the engine -
there is a risk of engine damage.
OPen door
Read and observe
on page 35 first.
The warning light
comes on if one or several doors are opened or if the boot
lid is opened.
The warning light comes on even when the ignition is switched off. The warn-
ing light lights up for a maximum of 5 minutes.
WARNINGIf you have to stop for technical reasons, park the vehicle at a safe distance
from the traffic, switch off the engine and switch on the hazard warning
lights system » page 59.
Engine oil
Read and observe
on page 35 first.
The warning light lights up red (low oil pressure)
The following message is shown in the MAXI DOT display.
Oil pressure: Engine off! Log book!
36Using the system
Page 39 of 197
The warning light comes on for a few seconds when the ignition is switch-
ed on 1)
.
Stop the vehicle, switch off the engine, and check the engine oil lev-
el » page 142 .
Even if the oil level is correct,
do not drive any further if the warning light is
flashing. Also do not leave the engine running at an idling speed.
Seek help from a specialist garage.
The warning light
lights up yellow (oil quantity too low)
The following message is shown in the MAXI DOT display.
Check oil level!
Stop the vehicle, switch off the engine, and check the engine oil lev-
el » page 142 .
An audible signal sounds as a warning signal.
The warning light will go out if the bonnet is left open for more than 30 sec-
onds. If no engine oil has been replenished, the warning light will come on
again after driving about 100 km.
The warning light flashes yellow (engine oil level sensor faulty)
The following message is shown in the MAXI DOT display.
Oil sensor workshop!
If the engine oil level sensor is faulty, the warning light flashes several
times and an audible signal sounds when the ignition is turned on.
Seek help from a specialist garage.WARNINGIf you have to stop for technical reasons, park the vehicle at a safe distance
from the traffic, switch off the engine and switch on the hazard warning
lights system » page 59.
CAUTION
The red oil pressure light is not an oil level indicator! One should therefore
check the oil level at regular intervals, preferably after every refuelling stop. Coolant
Read and observe
on page 35 first.
The indicator light
lights up until the engine reaches operating tempera-
ture 2)
. Avoid high speeds, full throttle and high engine loads.
If the warning light
lights up or flashes, either the coolant temperature is
too high or the coolant level is too low.
An audible signal sounds as a warning tone.
The following message is shown in the MAXI DOT display. ENGINE COOLANT PLEASE CHECK Log book!
Stop the vehicle, switch off the engine, check the level of the cool-
ant » page 144 , and refill the coolant if necessary » page 144.
If the coolant is within the specified range, the increased temperature may be
caused by an operating problem at the radiator fan. Check the fuse for the ra-
diator fan, replace if necessary » page 170, Fuses in the engine compartment .
Do not continue driving if the warning light
does not go off even though
the coolant level is correct and the fuse for the fan is in working order!
Seek help from a specialist garage.
WARNING■ If you have to stop for technical reasons, park the vehicle at a safe dis-
tance from the traffic, switch off the engine and activate the hazard warn-
ing light system » page 59.■
Carefully open the coolant expansion bottle. If the engine is hot, the cool-
ing system is pressurized - risk of scalding! It is therefore best to allow the
engine to cool down before removing the cap.
■
Do not touch the radiator fan. The radiator fan may switch itself on auto-
matically even if the ignition is off.
CAUTION
■ Additional headlights and other attached components in front of the air inlet
impair the cooling efficiency of the coolant.■
Never cover the radiator - there is a risk of the engine overheating.
1)
The warning light does not light up in vehicles fitted with the MAXI DOT display when the ignition is
switched on, but only if there is a fault or the engine oil level is too low.
2)
Not on vehicles with the MAXI DOT display.
37Instruments and Indicator Lights
Page 51 of 197
In addition, when the car is unlocked, the electrically adjustable seats and ex-
terior mirrors move into the position assigned to this key. The stored setting of
driver seat and exterior mirrors is retrieved.
Locking
The turn signal lights flash once to confirm that the vehicle has been correctly
locked.
If the doors or the boot lid remain open after the vehicle has been locked, the
turn signal lights do not flash until they have been closed.
Note
■ Only operate the remote control when the doors and boot lid are closed and
the vehicle is in your line of sight.■
A ŠKODA partner can also activate/deactivate the acoustic signals on vehi-
cles with an anti-theft alarm system.
Synchronization
If the vehicle does not unlock when the remote control is pressed, the key may
not be synchronised. This can occur when the buttons on the remote control
key are pressed several times outside the operating range of the equipment or
if the battery in the remote control key has been replaced.
Synchronise the key as follows.
›
Press any button on the remote control key.
›
Unlock the door with the key within 1 minute of pressing the button.
Anti-theft alarm system
Introduction
This chapter contains information on the following subjects:
Operation
49
Interior monitor and towing protection
50
The anti-theft alarm system increases the level of protection against people
seeking to break into the vehicle. The system triggers audible and visual warn-
ing signals if an attempt is made to break into the vehicle.
Note■ The working life of the alarm siren is 5 years.■Before leaving the car, it must be checked that all of the windows, doors and
the electric sliding/tilting roof are properly closed to ensure the full functional-
ity of the anti-theft alarm system.■
Coding of the radio remote control and the receiver unit precludes the use of
the radio remote control from other vehicles.
Operation
How is the alarm system activated?
The anti-theft alarm system is activated when the vehicle is locked with the
radio remote control or the key in the driver's door . It is activated 30 seconds
after locking the door.
How is the alarm system deactivated?
The alarm system is deactivated by pressing the button on the remote con-
trol. The anti-theft alarm system is reactivated if the vehicle is not opened
within 30 seconds after transmitting the radio signal.
Triggering the alarm
The alarm is triggered when the following unauthorized actions are carried out
on the locked vehicle.
› Opening the bonnet.
› Opening the boot lid.
› Opening the doors.
› Manipulation of the ignition lock.
› Towing the vehicle
» page 50;
› Movement in the vehicle
» page 50.
› Sudden and significant voltage drop of the electrical system.
› Uncoupling the trailer
» page 125.
If the driver's door of a vehicle with a remote control is unlocked and opened
by the lock cylinder, then the alarm is triggered.
Switching off the alarm
The alarm is turned off by pressing the button on the radio remote control
key or switching on the ignition.
CAUTION
Before leaving the vehicle, it must be checked that all of the windows, doors
and the sliding/tilting roof are locked in order to ensure the full functionality of
the anti-theft alarm system.49Unlocking and locking
Page 120 of 197
›The speed will increase continuously, if the rocker button is pressed and held
in the RES position. Release the rocker button once the desired speed is
reached. The set speed is then stored in the memory.
Decreasing the speed›
The stored speed can be reduced by pressing rocker button
B
» Fig. 114 on
page 117 to the SET position.
›
The speed will decrease continuously, if the rocker button is pressed and
held in the SET position. Release the rocker button once the desired speed is
reached. The set speed is then stored in the memory.
›
If the rocker button is released at a speed below around 25 km/h, the speed
is not stored and the memory is erased. The speed must then be stored
again by pressing rocker button
B
to the SET position after increasing the
speed of the vehicle to more than around 25 km/h.
The speed can also be reduced by depressing the brake pedal, which tempora- rily deactivates the system.
Switching off temporarily
Read and observe
and on page 117 first.
The cruise control system can be temporarily switched off by pushing switch
A
» Fig. 114 on page 117 to the spring-loaded CANCEL position or by depress-
ing the brake or clutch pedal.
The set speed remains stored in the memory.
Briefly push rocker button
B
to the RES position to resume the set speed af-
ter the clutch or brake pedal is released.
Switching off completely
Read and observe
and on page 117 first.
›
Press switch
A
» Fig. 114 on page 117 to the right to the OFF position.
START-STOP
Introduction
This chapter contains information on the following subjects:
Operating conditions for the system
118
Operation
119System conditioned automatic start-up119Manually deactivating/activating119
Information messages
119
The START-STOP system (hereinafter referred to just as the system) reduces
fuel consumption and polluting emissions and CO 2 emissions by turning the
engine off, e.g. when stopping at traffic lights, and starting the engine again
when moving off.
WARNING■ Never let the vehicle roll with the engine switched off.■The brake servo unit and power steering only operate if the engine is run-
ning.
Operating conditions for the system
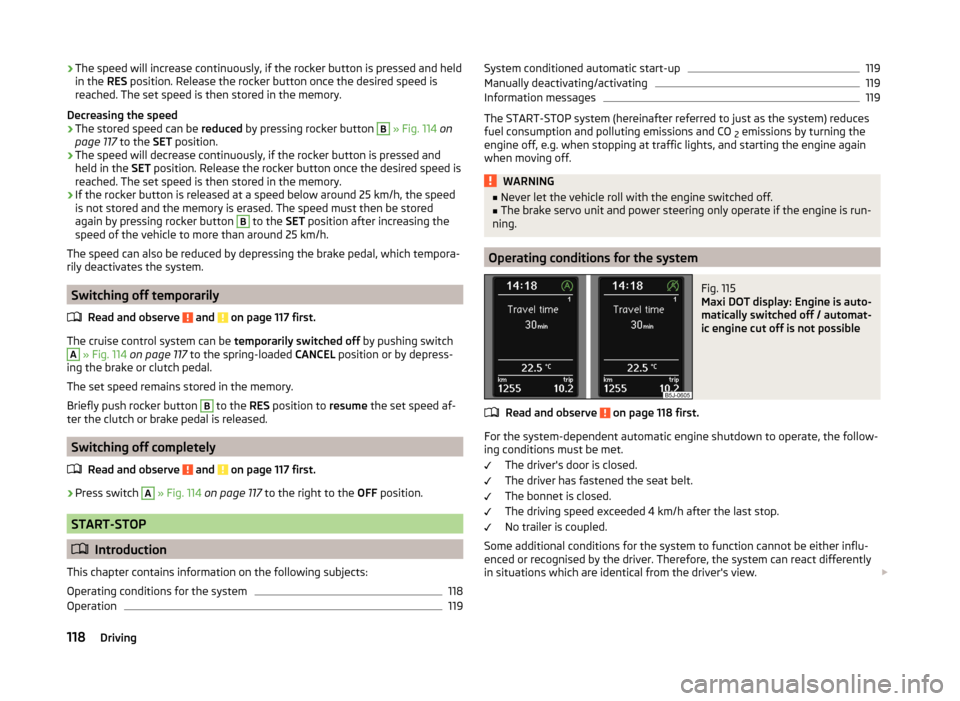
Fig. 115
Maxi DOT display: Engine is auto-
matically switched off / automat-
ic engine cut off is not possible
Read and observe on page 118 first.
For the system-dependent automatic engine shutdown to operate, the follow-
ing conditions must be met.
The driver's door is closed.
The driver has fastened the seat belt.
The bonnet is closed.
The driving speed exceeded 4 km/h after the last stop.
No trailer is coupled.
Some additional conditions for the system to function cannot be either influ-
enced or recognised by the driver. Therefore, the system can react differently
in situations which are identical from the driver's view.
118Driving
Page 140 of 197
CAUTION■The vehicle cannot be operated with biofuel RME, therefore this fuel must
not be filled in the tank and used for driving the vehicle. The use of biofuel
RME can cause considerable damage to parts of the engine or fuel system.■
Do not mix any fuel additives, so-called “flow improvers” (petrol and similar
agents), into the diesel. This can result in considerable damage to parts of the
engine or the exhaust system!
Engine compartment
Introduction
This chapter contains information on the following subjects:
Opening and closing the bonnet
139
Engine compartment overview
140
Radiator fan
140
Windscreen washer system
140WARNINGWhen working in the engine compartment, injuries, scalding, accident or
fire hazards may arise. For this reason, it is essential to comply with the
warning instructions stated below and with the generally applicable rules
of safety. The engine compartment of your car is a hazardous area.WARNINGInstructions before beginning work in the engine compartment■Turn off the engine and withdraw the ignition key.■
Firmly apply the handbrake.
■
If the vehicle is fitted with a manual gearbox, move the gearshift lever in-
to Neutral, or if the vehicle is fitted with an automatic gearbox, move the
selector lever into position P.
■
Allow the engine to cool.
■
Never open the bonnet if you can see steam or coolant flowing out of the
engine compartment – there is a risk of scalding. Wait until the steam or
coolant has stopped escaping.
WARNINGInformation for working in the engine room■Keep all people, especially children, away from the engine compartment.■
Never touch the radiator fan while the engine is still warm. The fan might
suddenly start running!
■
Do not touch any hot engine parts – there is a risk of burns.
■
The coolant is harmful to health.
■
Avoid contact with the coolant.
■
Coolant vapours are harmful to health.
■
Never open the end cover of the coolant expansion reservoir while the
engine is still warm. The cooling system is pressurized!
■
When opening the end cover of the coolant expansion reservoir, cover it
with a cloth to protect your face, hands and arms from hot steam or hot
coolant.
■
If any coolant splashes into your eyes, immediately rinse out your eyes
with clear water and contact a doctor as soon as possible.
■
Always keep the coolant in the original container safe from people who
are not completely independent, especially children - there is a danger of
poisoning!
■
Consult a doctor immediately if coolant is swallowed.
■
Do not leave any items (e.g. cleaning cloths or tools) in the engine com-
partment. There is a fire hazard and the risk of engine damage.
■
Never spill fluids on the hot engine. Such fluids (e.g. the antifreeze con-
tained in the coolant) may ignite!
WARNINGInformation for working in the engine compartment with the engine run-
ning■
Pay particular attention to moving engine parts (e.g. V-ribbed belt, alter-
nator, radiator fan) and the high-voltage ignition unit – there is a risk of
death.
■
Never touch the electric wiring on the ignition system.
■
Avoid short circuits in the electrical system - particularly on the vehicle's
battery.
■
Always make sure that no jewellery, loose clothing or long hair can get
caught in rotating engine parts – there is a risk of death. Always remove
any jewellery, tie back long hair and wear tight fitting clothing before com-
pleting any work.
138General Maintenance
Page 141 of 197
WARNINGInformation for working on the fuel system or the electrical system■Always disconnect the vehicle battery from the electrical system.■
Do not smoke.
■
Never work near open flames.
■
Always have a functioning fire extinguisher nearby.
WARNING■Read the information and warning instructions on the fluid containers.■Keep the working fluids in sealed original containers and safe from peo-
ple who are not completely independent, e.g. children.■
If you wish to work under the vehicle, you must secure the vehicle against
rolling away and support it with suitable axle stands: the car jack is not suf-
ficient for this – there is a risk of injury.
■
Never cover the engine with additional insulation material (e.g. with a
blanket) – there is a risk of fire.
■
The bonnet must always be properly closed when driving. This is why af-
ter closing the bonnet, the lock must always be checked to ensure it has
engaged properly.
■
If you notice that the lock is not properly engaged while driving, stop the
vehicle immediately and close the bonnet – there is the risk of an accident.
CAUTION
Always top up using the correct specification of fluids. This may result in major
operating problems and also vehicle damage!
For the sake of the environment
In view of the requirements for the environmentally friendly disposal of fluids and the special tools and knowledge required for such work, we recommend
that fluids be changed by a specialist garage.
Note
■ If there is anything you are not sure about concerning fluids, please consult a
specialist garage.■
Fluids with the proper specifications can be purchased from the ŠKODA Origi-
nal Accessories or from the ŠKODA Genuine Parts ranges.
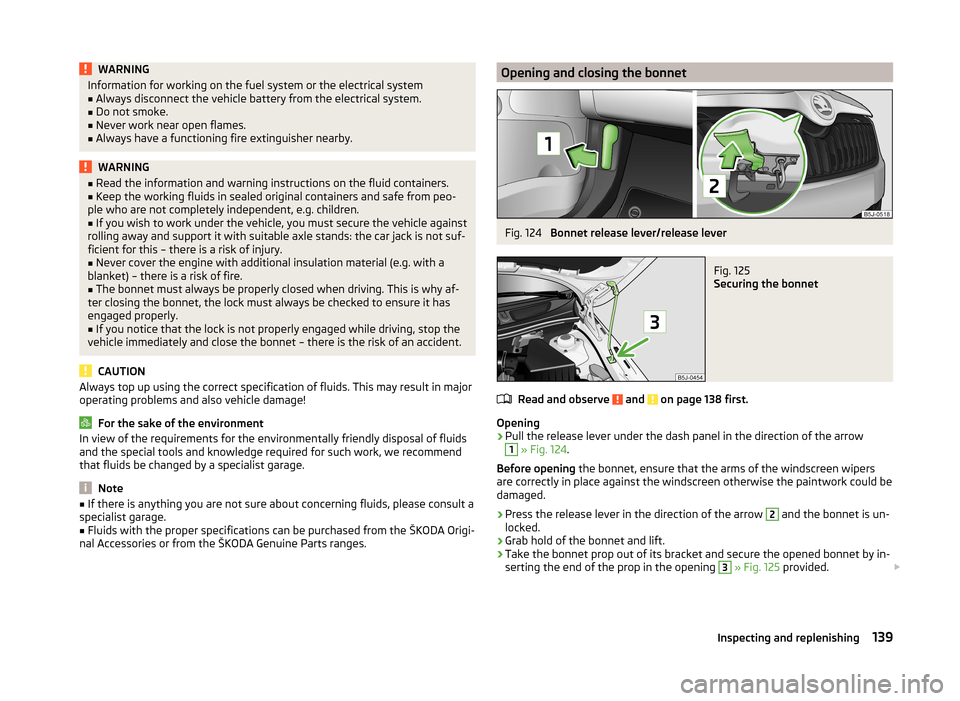
Opening and closing the bonnetFig. 124
Bonnet release lever/release lever
Fig. 125
Securing the bonnet
Read and observe and on page 138 first.
Opening
›
Pull the release lever under the dash panel in the direction of the arrow
1
» Fig. 124 .
Before opening the bonnet, ensure that the arms of the windscreen wipers
are correctly in place against the windscreen otherwise the paintwork could be
damaged.
›
Press the release lever in the direction of the arrow
2
and the bonnet is un-
locked.
›
Grab hold of the bonnet and lift.
›
Take the bonnet prop out of its bracket and secure the opened bonnet by in-
serting the end of the prop in the opening
3
» Fig. 125 provided.
139Inspecting and replenishing
Page 142 of 197

Closing›Lift the bonnet slightly and unhook the bonnet support. Press the bonnet
prop into the bracket provided.›
Let the bonnet drop into the lock carrier lock from a height of around 20 cm –
do not push it in .
WARNINGCheck that the bonnet is closed properly.
CAUTION
Never open the bonnet by the locking lever » Fig. 124.
Engine compartment overview
Fig. 126
Principle sketch: Engine compartment
Read and observe
and on page 138 first.
Explanation of graphic » Fig. 126
Coolant expansion reservoir
144
Windscreen washer fluid reservoir
140
Engine oil filler opening
143
Engine oil dipstick
142
Brake fluid reservoir
145
Vehicle battery
145123456NoteThe location of the inspection points in the engine compartment of petrol and
diesel engines is practically identical.
Radiator fan
Read and observe
and on page 138 first.
The radiator fan is powered by an electric motor. Operation is controlled ac-
cording to the temperature of the coolant.
WARNINGThe fan can intermittently continue to run for approximately 10 minutes af-
ter the ignition is switched off.
Windscreen washer system
Fig. 127
Engine compartment: Wind-
screen washer fluid reservoir
Read and observe and on page 138 first.
The windscreen washer fluid reservoir is located in the engine compart-
ment » Fig. 127 .
This contains the cleaning fluid for the windscreen or rear window and for the
headlight cleaning system.
The capacity of the reservoir is about 3.5 litres or about 5.4 litres on vehicles
that have a headlight cleaning system 1)
.
1)
In some countries, 5.4 ltr. applies for both variants.
140General Maintenance