air condition SKODA FABIA 2014 3.G / NJ Operating Instruction Manual
[x] Cancel search | Manufacturer: SKODA, Model Year: 2014, Model line: FABIA, Model: SKODA FABIA 2014 3.G / NJPages: 216, PDF Size: 30.9 MB
Page 123 of 216

Downloaded from www.Manualslib.com manuals search engine Activate CCS (control deactivated)BTake control againa)
/ Increase speedCStart control / reduce speedDSwitch between GRA and Speed Limiter » page 120a)
If no speed is set the current speed is adopted.
At the start of the regulation the GRA regulates the vehicle to the current
speed, and this speed is shown on the instrument cluster display. The warning
light
illuminates in the instrument cluster.
Automatic control interruption
Automatic control interruption occurs if any of the following conditions are
met.
› The brake pedal is operated.
› When one of the brake assist systems (e.g. ESC) intervenes.
› Through an airbag deployment.
› The key
is actuated.
WARNING■
Always deactivate the cruise control system after use to prevent the sys-
tem being enabled unintentionally.■
Control may only be resumed if the set speed is not too high for the cur-
rent traffic conditions.
Note
■ During control, speed can be increased by pressing the accelerator pedal. Re-
leasing the accelerator pedal will cause the speed to drop again to the set
speed.■
By pressing the
button during the regulation this is cancelled and the
Speed Limiter is activated.
Speed limiter
Introduction
This chapter contains information on the following subjects:
Operation
120
Operation description
121
The Speed Limiter limits the maximum driving speed to the set speed limit.
This limit can only be exceeded by depressing the accelerator pedal fully.
The condition in which the Speed Limiter monitors a potential set speed limit
excess is referred to as Regulation.WARNING■
The speed limiter only serves as an assistance and does not relieve the
driver of the responsibility for the vehicle operation.■
Always adjust the speed and driving style to the current visibility, weath-
er, road and traffic conditions.
Operation
Fig. 132
Maxi DOT display: Examples of Speed Limiter status displays
120Driving
Page 125 of 216
Downloaded from www.Manualslib.com manuals search engine Front Assistant
Introduction
This chapter contains information on the following subjects:
Radar sensor
122
Operation
123
Distance warning (dangerous distance)
123
Warning and automatic braking
123
Disable / enable
124
Information messages
124
The Front Assistant (from here on only referred to as the system) warns you of
the danger of a collision with a vehicle or another obstacle in front of the vehi-
cle and tries to avoid a collision or mitigate its consequences by automatically
applying the brakes as appropriate.
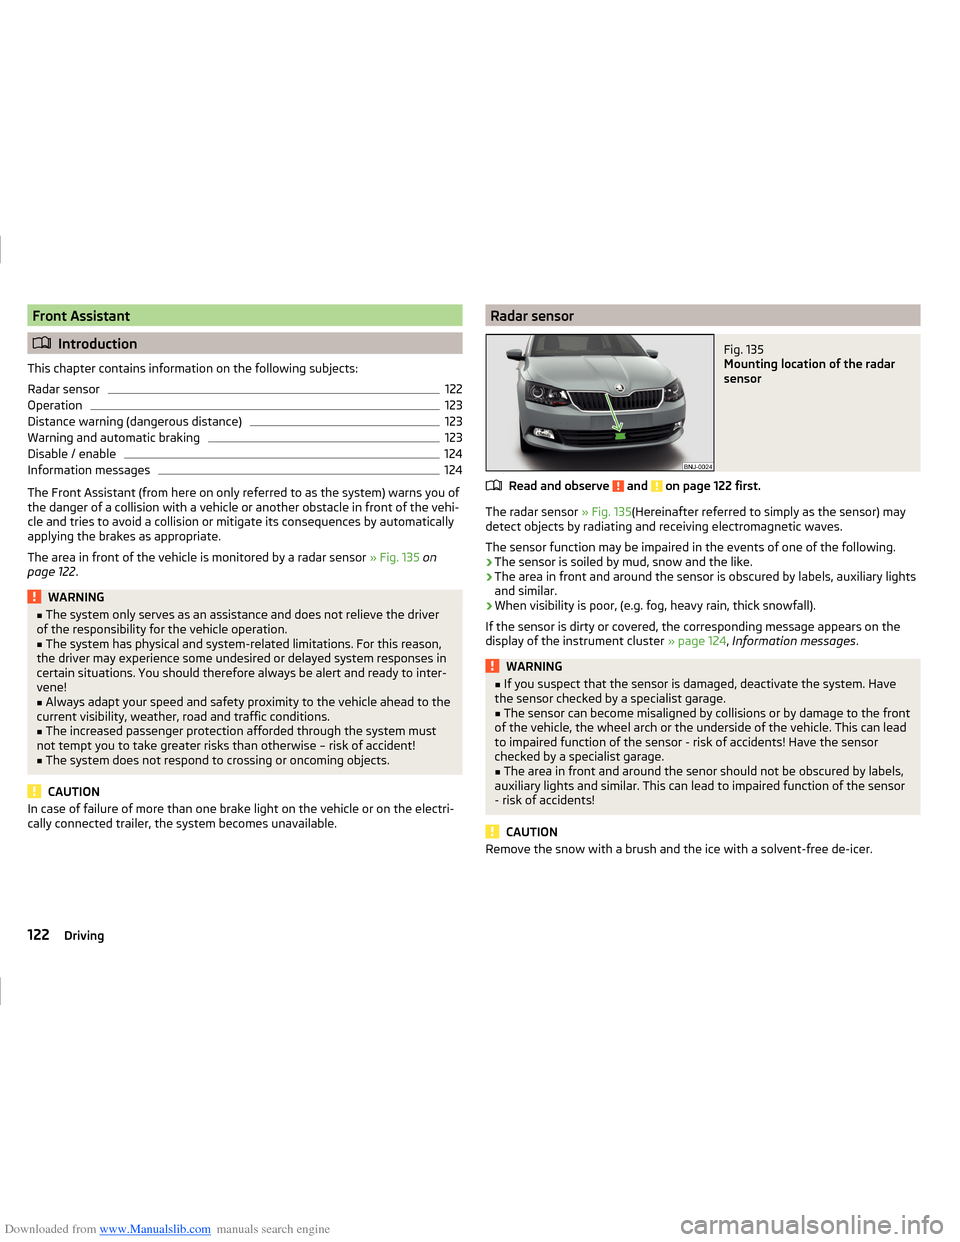
The area in front of the vehicle is monitored by a radar sensor » Fig. 135 on
page 122 .
WARNING■
The system only serves as an assistance and does not relieve the driver
of the responsibility for the vehicle operation.■
The system has physical and system-related limitations. For this reason,
the driver may experience some undesired or delayed system responses in
certain situations. You should therefore always be alert and ready to inter-
vene!
■
Always adapt your speed and safety proximity to the vehicle ahead to the
current visibility, weather, road and traffic conditions.
■
The increased passenger protection afforded through the system must
not tempt you to take greater risks than otherwise – risk of accident!
■
The system does not respond to crossing or oncoming objects.
CAUTION
In case of failure of more than one brake light on the vehicle or on the electri-
cally connected trailer, the system becomes unavailable.Radar sensorFig. 135
Mounting location of the radar
sensor
Read and observe and on page 122 first.
The radar sensor » Fig. 135(Hereinafter referred to simply as the sensor) may
detect objects by radiating and receiving electromagnetic waves.
The sensor function may be impaired in the events of one of the following.
› The sensor is soiled by mud, snow and the like.
› The area in front and around the sensor is obscured by labels, auxiliary lights
and similar.
› When visibility is poor, (e.g. fog, heavy rain, thick snowfall).
If the sensor is dirty or covered, the corresponding message appears on the
display of the instrument cluster » page 124, Information messages .
WARNING■
If you suspect that the sensor is damaged, deactivate the system. Have
the sensor checked by a specialist garage.■
The sensor can become misaligned by collisions or by damage to the front
of the vehicle, the wheel arch or the underside of the vehicle. This can lead
to impaired function of the sensor - risk of accidents! Have the sensor
checked by a specialist garage.
■
The area in front and around the senor should not be obscured by labels,
auxiliary lights and similar. This can lead to impaired function of the sensor
- risk of accidents!
CAUTION
Remove the snow with a brush and the ice with a solvent-free de-icer.122Driving
Page 126 of 216
Downloaded from www.Manualslib.com manuals search engine OperationRead and observe
and on page 122 first.
The system support is provided in the following manner.› Alerts you about a dangerous proximity to the vehicle ahead.
› Warns you of an impending collision.
› Prepares the brakes for emergency braking prior to a detected danger.
› Assists with a brake action triggered by the driver.
› If the driver fails to respond to a detected danger, an automatic braking ac-
tion is performed.
The system can work only if the following basic conditions are met. The system is activated.
The TCS is activated » page 115, Traction control (TCS) .
The vehicle is moving forwards at a speed of more than approx. 5 km/h.
Note
The system can be impaired or may not be available, for example when driving
in “sharp ”curves or with an ESC engagement » page 114.
Distance warning (dangerous distance)
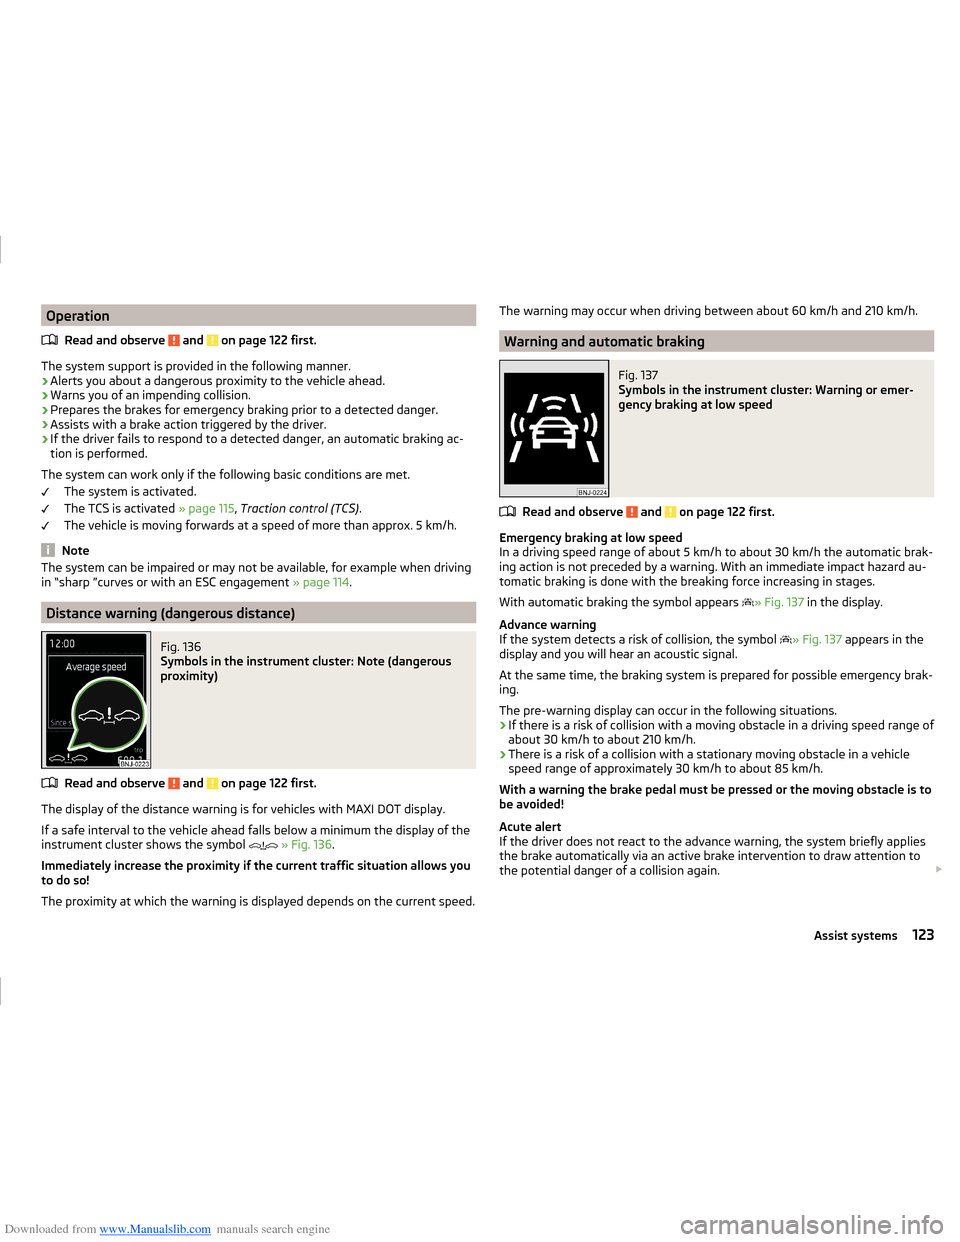
Fig. 136
Symbols in the instrument cluster: Note (dangerous
proximity)
Read and observe and on page 122 first.
The display of the distance warning is for vehicles with MAXI DOT display.
If a safe interval to the vehicle ahead falls below a minimum the display of the
instrument cluster shows the symbol
» Fig. 136 .
Immediately increase the proximity if the current traffic situation allows you to do so!
The proximity at which the warning is displayed depends on the current speed.
The warning may occur when driving between about 60 km/h and 210 km/h.
Warning and automatic braking
Fig. 137
Symbols in the instrument cluster: Warning or emer-
gency braking at low speed
Read and observe and on page 122 first.
Emergency braking at low speed
In a driving speed range of about 5 km/h to about 30 km/h the automatic brak-
ing action is not preceded by a warning. With an immediate impact hazard au-
tomatic braking is done with the breaking force increasing in stages.
With automatic braking the symbol appears » Fig. 137
in the display.
Advance warning
If the system detects a risk of collision, the symbol » Fig. 137
appears in the
display and you will hear an acoustic signal.
At the same time, the braking system is prepared for possible emergency brak- ing.
The pre-warning display can occur in the following situations. › If there is a risk of collision with a moving obstacle in a driving speed range of
about 30 km/h to about 210 km/h.
› There is a risk of a collision with a stationary moving obstacle in a vehicle
speed range of approximately 30 km/h to about 85 km/h.
With a warning the brake pedal must be pressed or the moving obstacle is to
be avoided!
Acute alert
If the driver does not react to the advance warning, the system briefly applies
the brake automatically via an active brake intervention to draw attention to
the potential danger of a collision again.
123Assist systems
Page 139 of 216
Downloaded from www.Manualslib.com manuals search engine General Maintenance
Care and maintenance
Services, modifications and technical alterations
Introduction
This chapter contains information on the following subjects:
Vehicle operating under different weather conditions
136
Statutory checks
136
ŠKODA Service Partners
137
ŠKODA Original parts
137
ŠKODA Original accessories
137
Spoiler
138
Component protection
138
Airbags
138
Acceptance and recycling of used vehicles
139
The instructions and guidelines issued by ŠKODA AUTO a.s. must be observed
when making any modifications, repairs or technical changes to your vehicle.
Compliance with these guidelines and instructions is in the interest of the
roadworthiness and technical condition of your vehicle. The vehicle will comply
with road traffic regulations following the modifications, repairs and technical
changes.
Always consult a ŠKODA Partner » page 137before buying accessories or
parts, or before carrying out any modifications, repairs or technical alterations
to your vehicle.
WARNING■ Works on your vehicle, which have been carried out unprofessionally, can
cause operational faults – risk of accident!■
Interference on the electronic components and their software can lead to
operational faults. This interference can also impair not directly affected
systems because of the networking of the electronic components. The op-
erational safety of the vehicle may be at significant risk and parts may suf-
fer increased wear.
For the sake of the environmentTechnical documents regarding changes carried out on the vehicle must be
kept by the vehicle user, in order to be handed over to the recyclers later. This
ensures that vehicle recycling is in accordance with environmental regulations.
Note
■ We recommend only having these modifications, repairs and technical
changes performed by a specialist garage.■
Any damage caused by technical alterations made without the approval of
the manufacturer is excluded from the » Service schedule warranty.
■
The ŠKODA Partner cannot assume any liability for products which have not
been approved by ŠKODA AUTO a.s. even though these may be products with a
type approval or have been approved by a nationally recognised testing labo-
ratory.
■
We advise you only to use ŠKODA Original Accessories and ŠKODA Original
Parts which have been expressly approved for use on your vehicle. Reliability,
safety and suitability for your vehicle are guaranteed with these.
■
ŠKODA Original Accessories and ŠKODA Original Parts can be purchased from
a ŠKODA Partner who will also fit the purchased parts correctly.
Vehicle operating under different weather conditions
Read and observe
on page 136 first.
If you would like you operate your vehicle in countries other than its intended
weather conditions, you should contact a ŠKODA Partner.
They will advise you on certain precautions that should be taken to ensure the
full functioning of the vehicle as well as to prevent damage.
For example coolant and battery replacement or similar.
Statutory checks
Read and observe
on page 136 first.
Many countries have legislation requiring the operational reliability and road
worthiness and/or exhaust gas properties of a vehicle to be tested at specific
intervals. These tests can be carried out by workshops or testing stations that
have been legally authorised for this purpose.
136General Maintenance
Page 140 of 216
Downloaded from www.Manualslib.com manuals search engine The ŠKODA Service Partners are up-to-date on the legally required tests and
will prepare the vehicle for the tests as part of a service operation if required,
or will be responsible for carrying out these tests. The specialist garages can
carry out the specified tests directly, if required by the customer, if they are
authorised to do so. This saves you time and money.
Even if you want to take your vehicle to an officially approved test centre for
prior checking in preparation of a legally required test, we recommend that you
consult the service consultant of your ŠKODA Service Partner beforehand.
Based on their appraisal, the service consultant will tell you which areas you
should focus on in order to ensure that your vehicle will pass the technical test
without any problems. This allows you to avoid additional expenses resulting
from a possible subsequent test.
ŠKODA Service Partners
Read and observe
on page 136 first.
ŠKODA Service Partners are equipped with modern, specially developed tools
and equipment. Here, trained specialists have access to a comprehensive
range of ŠKODA Original Parts and ŠKODA Original Accessories for carrying out
modifications, repairs and technical alterations.
All ŠKODA service partners operate according to the latest guidelines and in-
structions from ŠKODA AUTO a.s. All service and repair work is therefore car-
ried out on time and to the appropriate quality. Adhering to these instructions
and guidelines helps ensure road safety and helps keep your vehicle in a good
technical condition.
ŠKODA Service Partners are therefore properly prepared to service your vehicle
and to provide quality work. We therefore advise you to have all modifications,
repairs and technical alterations to your vehicle carried out by a ŠKODA Service
Partner.
ŠKODA Original parts
Read and observe
on page 136 first.
We recommend the use of ŠKODA Genuine Parts for your vehicle, since these
parts are approved by ŠKODA AUTO a.s. They correspond exactly to ŠKODA
AUTO a.s. specifications in respect of design, dimensional accuracy and materi-
al and are identical to the components used in the batch production.
ŠKODA AUTO a.s. can guarantee the safety, suitability, and long life of these
products. We therefore recommend that you only use ŠKODA Genuine Parts.
ŠKODA AUTO a.s. supplies the market with a complete range of ŠKODA Genu-
ine Parts not only while the model is still in production but with wear-and-tear parts for at least 15 years after the end of series production and with all other
vehicle parts for at least 10 years.
ŠKODA service partners are liable for any defects in ŠKODA original parts for a
period of 2 years after sale in accordance with materials defect liability under
the law unless otherwise agreed in the purchase agreement. You should keep
the confirmed warranty certificate and the receipt for these components for
this period, so that the commencement of the warranty term may be verified.
Body repairs
ŠKODA vehicles are designed so that if the body suffers damage, it is only nec-
essary to replace those parts which are in fact damaged.
Before you decide to have damaged body parts replaced, however, you should first contact your specialist garage to determine whether or not such parts can
also be repaired. Repairs to body parts are usually cheaper.
ŠKODA Original accessories
Read and observe
on page 136 first.
You should note the following if you wish to fit accessories to your vehicle:
We recommend that you use ŠKODA Genuine Accessories in your vehicle.
ŠKODA AUTO a.s. offers a warranty on the reliability, safety and suitability for
your particular vehicle of these accessories. Although we constantly monitor
the market, we are not able to assess or offer a warranty on other products
even though in some instances such products may have a type approval or
may have been approved by a nationally recognised approval authority.
All accessory products go through a fastidious process of technical develop-
ment (technical tests) and quality inspection (customer tests), and only if all
tests are positive does the product become a ŠKODA Genuine Accessory.
Our ŠKODA Genuine Accessories service also provides expert advice and pro-
fessional fitting if requested by the customer.
ŠKODA Service Partners are liable for any defects in ŠKODA Genuine Parts for a
period of 2 years after installation or delivery in accordance with materials de-
fect liability legislation, unless otherwise agreed in the purchase contract or in
137Care and maintenance
Page 158 of 216
Downloaded from www.Manualslib.com manuals search engine ■Additional headlights and other attached components in front of the air inlet
impair the cooling efficiency of the coolant.■
Never cover the radiator - there is a risk of the engine overheating.
Checking the coolant level
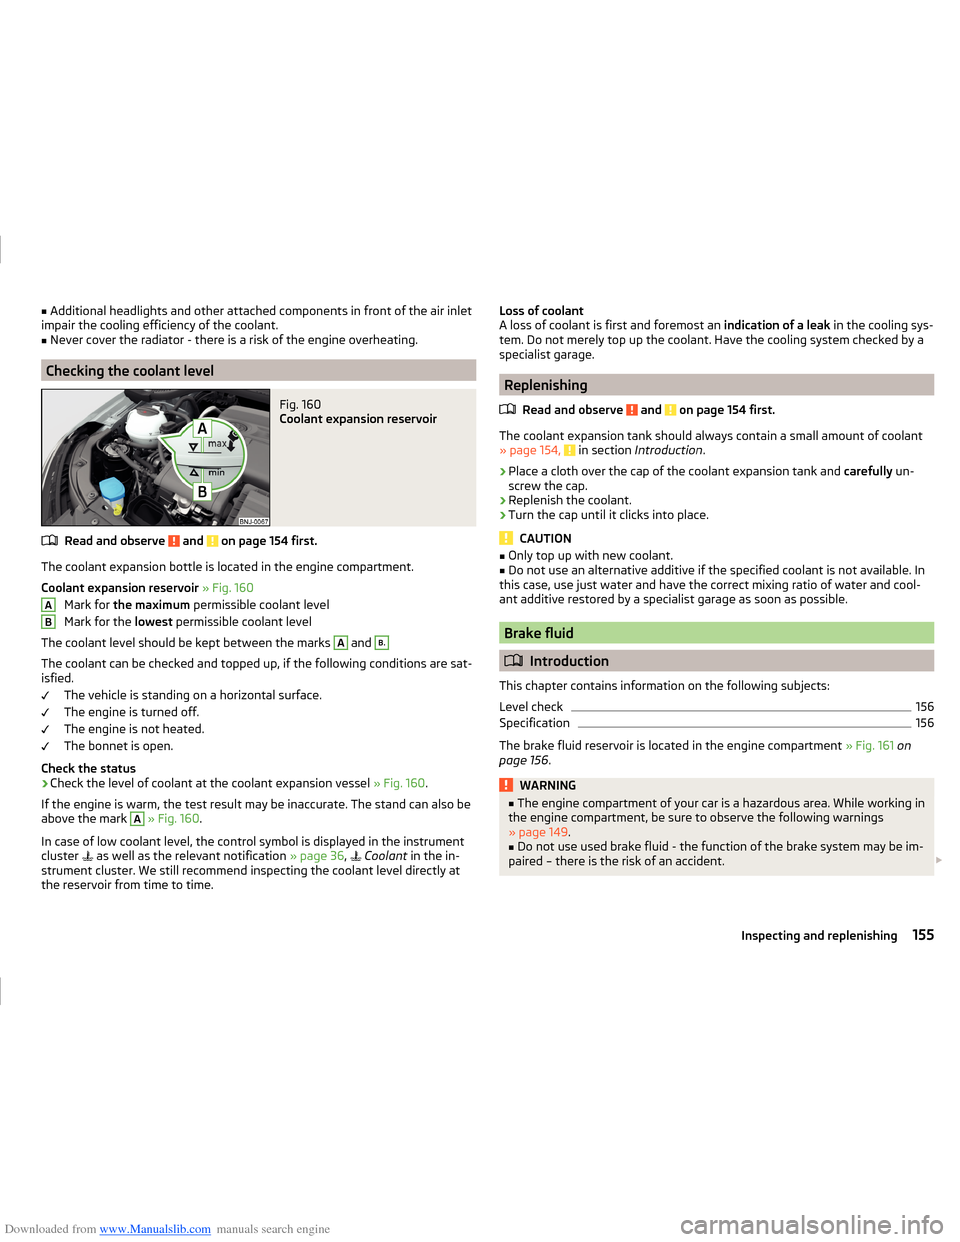
Fig. 160
Coolant expansion reservoir
Read and observe and on page 154 first.
The coolant expansion bottle is located in the engine compartment.
Coolant expansion reservoir » Fig. 160
Mark for the maximum permissible coolant level
Mark for the lowest permissible coolant level
The coolant level should be kept between the marks
A
and
B.
The coolant can be checked and topped up, if the following conditions are sat-
isfied.
The vehicle is standing on a horizontal surface.
The engine is turned off.
The engine is not heated.
The bonnet is open.
Check the status
›
Check the level of coolant at the coolant expansion vessel » Fig. 160.
If the engine is warm, the test result may be inaccurate. The stand can also be
above the mark
A
» Fig. 160 .
In case of low coolant level, the control symbol is displayed in the instrument
cluster as well as the relevant notification
» page 36,
Coolant
in the in-
strument cluster. We still recommend inspecting the coolant level directly at
the reservoir from time to time.
ABLoss of coolant
A loss of coolant is first and foremost an indication of a leak in the cooling sys-
tem. Do not merely top up the coolant. Have the cooling system checked by a
specialist garage.
Replenishing
Read and observe
and on page 154 first.
The coolant expansion tank should always contain a small amount of coolant» page 154, in section Introduction .
›
Place a cloth over the cap of the coolant expansion tank and carefully un-
screw the cap.
›
Replenish the coolant.
›
Turn the cap until it clicks into place.
CAUTION
■ Only top up with new coolant.■Do not use an alternative additive if the specified coolant is not available. In
this case, use just water and have the correct mixing ratio of water and cool-
ant additive restored by a specialist garage as soon as possible.
Brake fluid
Introduction
This chapter contains information on the following subjects:
Level check
156
Specification
156
The brake fluid reservoir is located in the engine compartment » Fig. 161 on
page 156 .
WARNING■
The engine compartment of your car is a hazardous area. While working in
the engine compartment, be sure to observe the following warnings
» page 149 .■
Do not use used brake fluid - the function of the brake system may be im-
paired – there is the risk of an accident.
155Inspecting and replenishing
Page 161 of 216
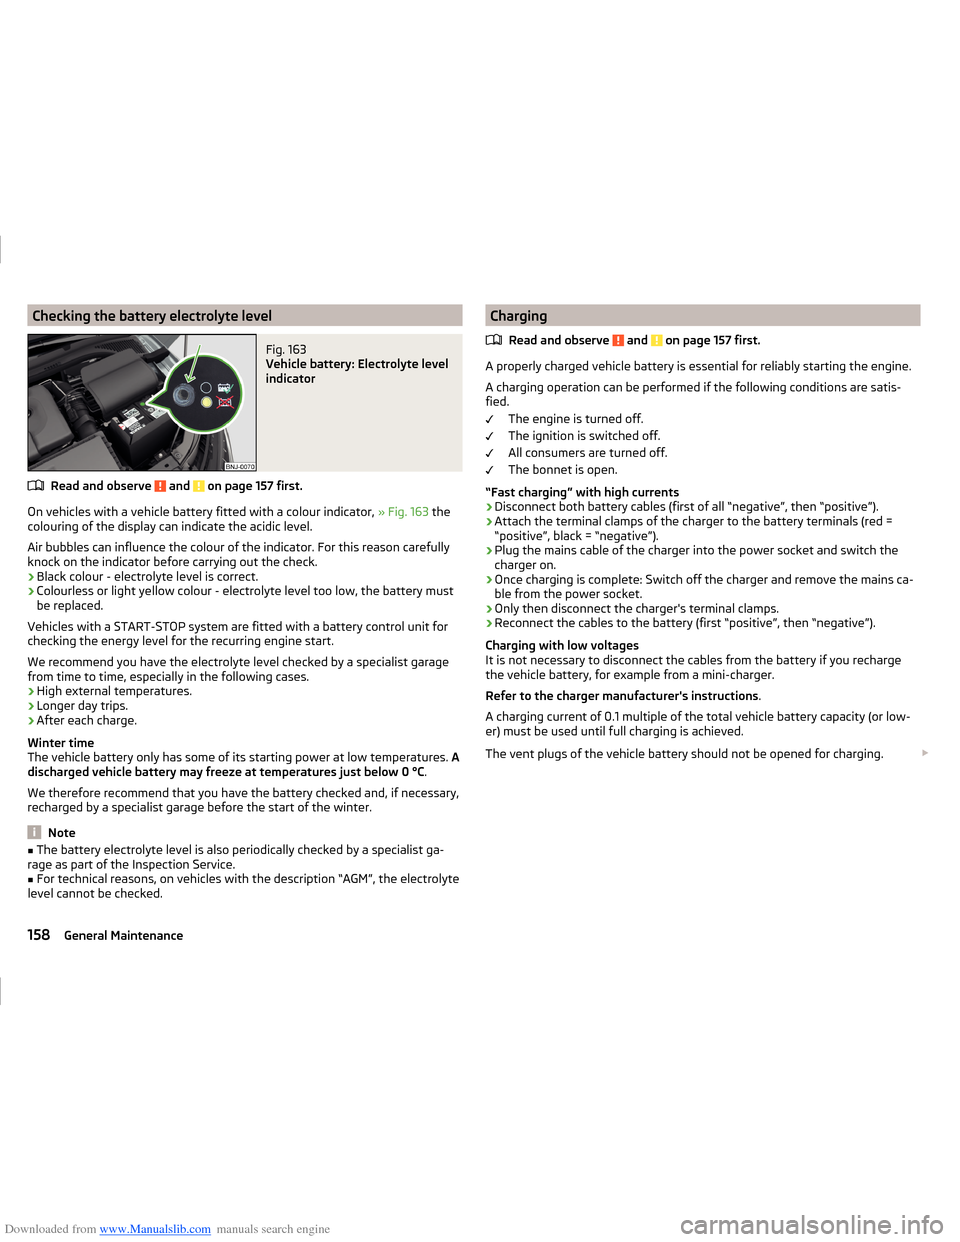
Downloaded from www.Manualslib.com manuals search engine Checking the battery electrolyte levelFig. 163
Vehicle battery: Electrolyte level
indicator
Read and observe and on page 157 first.
On vehicles with a vehicle battery fitted with a colour indicator, » Fig. 163 the
colouring of the display can indicate the acidic level.
Air bubbles can influence the colour of the indicator. For this reason carefully knock on the indicator before carrying out the check.
› Black colour - electrolyte level is correct.
› Colourless or light yellow colour - electrolyte level too low, the battery must
be replaced.
Vehicles with a START-STOP system are fitted with a battery control unit for
checking the energy level for the recurring engine start.
We recommend you have the electrolyte level checked by a specialist garage from time to time, especially in the following cases.
› High external temperatures.
› Longer day trips.
› After each charge.
Winter time
The vehicle battery only has some of its starting power at low temperatures. A
discharged vehicle battery may freeze at temperatures just below 0 °C .
We therefore recommend that you have the battery checked and, if necessary,
recharged by a specialist garage before the start of the winter.
Note
■ The battery electrolyte level is also periodically checked by a specialist ga-
rage as part of the Inspection Service.■
For technical reasons, on vehicles with the description “AGM”, the electrolyte
level cannot be checked.
Charging
Read and observe
and on page 157 first.
A properly charged vehicle battery is essential for reliably starting the engine.A charging operation can be performed if the following conditions are satis-
fied.
The engine is turned off.
The ignition is switched off.
All consumers are turned off.
The bonnet is open.
“Fast charging” with high currents
›
Disconnect both battery cables (first of all “negative”, then “positive”).
›
Attach the terminal clamps of the charger to the battery terminals (red =
“positive”, black = “negative”).
›
Plug the mains cable of the charger into the power socket and switch the
charger on.
›
Once charging is complete: Switch off the charger and remove the mains ca-
ble from the power socket.
›
Only then disconnect the charger's terminal clamps.
›
Reconnect the cables to the battery (first “positive”, then “negative”).
Charging with low voltages
It is not necessary to disconnect the cables from the battery if you recharge
the vehicle battery, for example from a mini-charger.
Refer to the charger manufacturer's instructions .
A charging current of 0.1 multiple of the total vehicle battery capacity (or low-
er) must be used until full charging is achieved.
The vent plugs of the vehicle battery should not be opened for charging.
158General Maintenance
Page 164 of 216
Downloaded from www.Manualslib.com manuals search engine Notes on using wheelsRead and observe
on page 160 first.
During the first 500 km, new tyres do not offer optimum grip and appropriate
care should therefore be taken when driving.
Always fit the tyres with the deeper tread depth to the front wheels.
Tyre storage
Mark the tyres as you remove them so that you are able to refit them to run in
the same direction.
Always store wheels or tyres in a cool, dry and, where possible, dark place.
Tyres which are not fixed to a wheel trim should be stored upright.
Tyre age
Tyres age losing their original characteristics, even if they are not used. The
service life of the tyres is 6 years. Therefore, we recommend not using tyres
older than 6 years.
Wheel bolts
Wheels and wheel bolts are matched to each other in terms of design. There-
fore we recommend that you use wheel rims and wheel bolts from ŠKODA
Original Accessories.
WARNINGNever use tyres if you do not know anything about the condition and age.
Tyre pressure
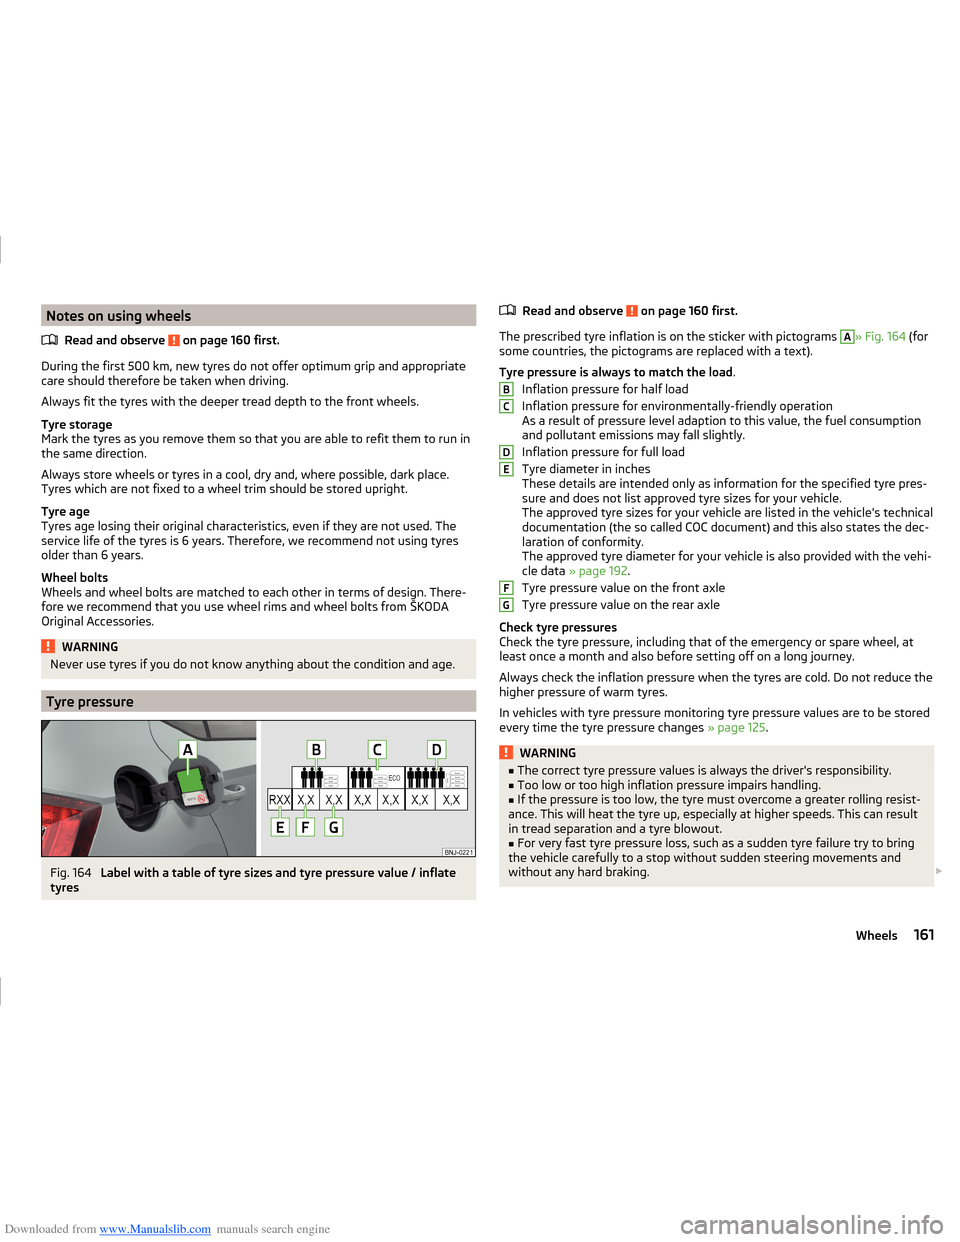
Fig. 164
Label with a table of tyre sizes and tyre pressure value / inflate
tyres
Read and observe on page 160 first.
The prescribed tyre inflation is on the sticker with pictograms
A
» Fig. 164 (for
some countries, the pictograms are replaced with a text).
Tyre pressure is always to match the load .
Inflation pressure for half load
Inflation pressure for environmentally-friendly operation
As a result of pressure level adaption to this value, the fuel consumption
and pollutant emissions may fall slightly.
Inflation pressure for full load
Tyre diameter in inches
These details are intended only as information for the specified tyre pres-
sure and does not list approved tyre sizes for your vehicle.
The approved tyre sizes for your vehicle are listed in the vehicle's technical
documentation (the so called COC document) and this also states the dec-
laration of conformity.
The approved tyre diameter for your vehicle is also provided with the vehi-
cle data » page 192 .
Tyre pressure value on the front axle
Tyre pressure value on the rear axle
Check tyre pressures
Check the tyre pressure, including that of the emergency or spare wheel, at
least once a month and also before setting off on a long journey.
Always check the inflation pressure when the tyres are cold. Do not reduce the
higher pressure of warm tyres.
In vehicles with tyre pressure monitoring tyre pressure values are to be stored
every time the tyre pressure changes » page 125.
WARNING■
The correct tyre pressure values is always the driver's responsibility.■Too low or too high inflation pressure impairs handling.■
If the pressure is too low, the tyre must overcome a greater rolling resist-
ance. This will heat the tyre up, especially at higher speeds. This can result
in tread separation and a tyre blowout.
■
For very fast tyre pressure loss, such as a sudden tyre failure try to bring
the vehicle carefully to a stop without sudden steering movements and
without any hard braking.
BCDEFG161Wheels
Page 185 of 216
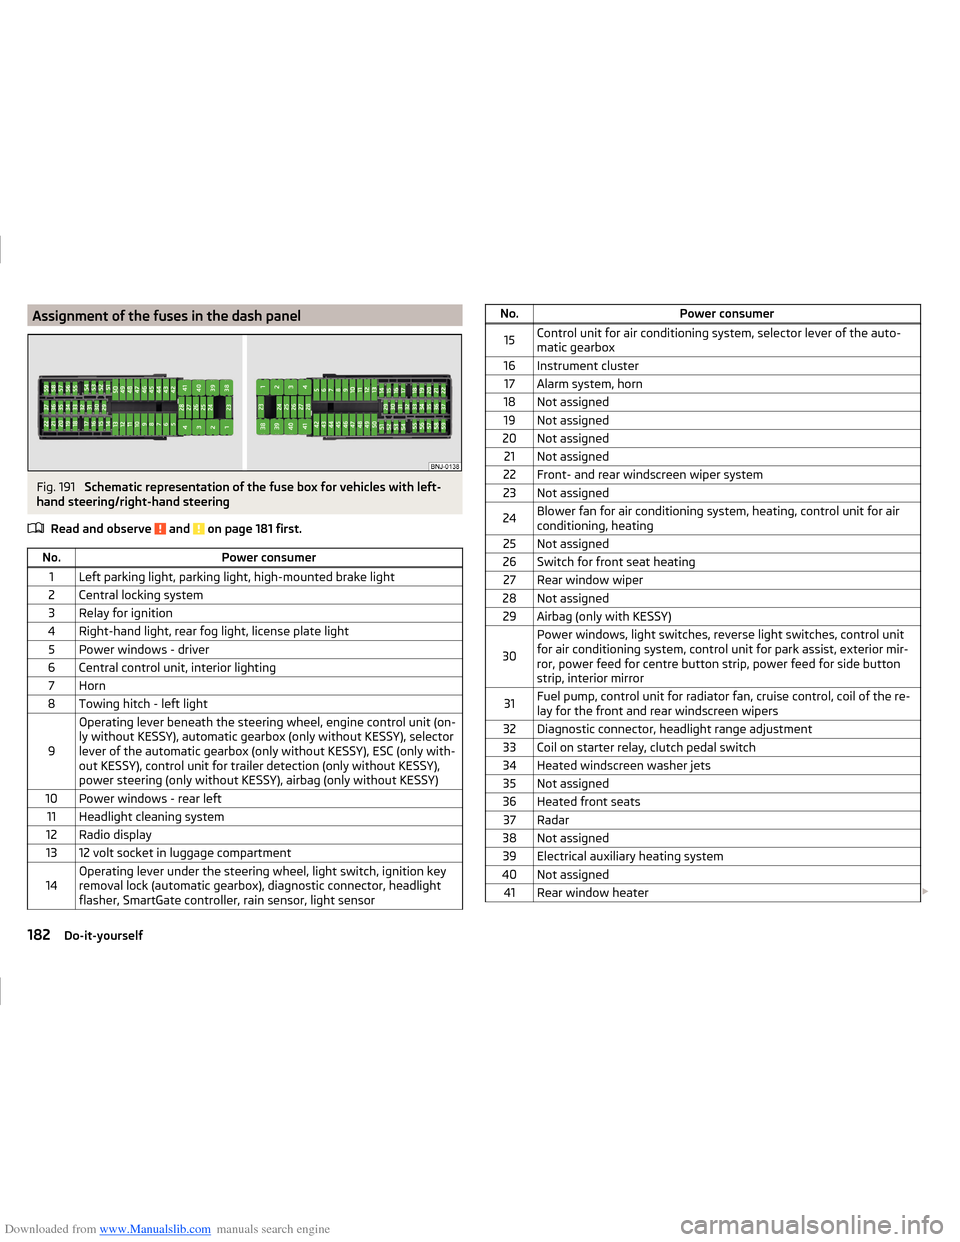
Downloaded from www.Manualslib.com manuals search engine Assignment of the fuses in the dash panelFig. 191
Schematic representation of the fuse box for vehicles with left-
hand steering/right-hand steering
Read and observe
and on page 181 first.
No.Power consumer1Left parking light, parking light, high-mounted brake light2Central locking system3Relay for ignition4Right-hand light, rear fog light, license plate light5Power windows - driver6Central control unit, interior lighting7Horn8Towing hitch - left light
9
Operating lever beneath the steering wheel, engine control unit (on-
ly without KESSY), automatic gearbox (only without KESSY), selector
lever of the automatic gearbox (only without KESSY), ESC (only with-
out KESSY), control unit for trailer detection (only without KESSY),
power steering (only without KESSY), airbag (only without KESSY)10Power windows - rear left11Headlight cleaning system12Radio display1312 volt socket in luggage compartment14Operating lever under the steering wheel, light switch, ignition key
removal lock (automatic gearbox), diagnostic connector, headlight
flasher, SmartGate controller, rain sensor, light sensorNo.Power consumer15Control unit for air conditioning system, selector lever of the auto-
matic gearbox16Instrument cluster17Alarm system, horn18Not assigned19Not assigned20Not assigned21Not assigned22Front- and rear windscreen wiper system23Not assigned24Blower fan for air conditioning system, heating, control unit for air
conditioning, heating25Not assigned26Switch for front seat heating27Rear window wiper28Not assigned29Airbag (only with KESSY)
30
Power windows, light switches, reverse light switches, control unit
for air conditioning system, control unit for park assist, exterior mir-
ror, power feed for centre button strip, power feed for side button
strip, interior mirror31Fuel pump, control unit for radiator fan, cruise control, coil of the re-
lay for the front and rear windscreen wipers32Diagnostic connector, headlight range adjustment33Coil on starter relay, clutch pedal switch34Heated windscreen washer jets35Not assigned36Heated front seats37Radar38Not assigned39Electrical auxiliary heating system40Not assigned41Rear window heater 182Do-it-yourself
Page 195 of 216
Downloaded from www.Manualslib.com manuals search engine Technical data
Technical data
Vehicle data
Introduction
This chapter contains information on the following subjects:
Vehicle characteristics
192
Operating weight and payload
193
measurement of fuel consumption and CO 2 emissions according to ECE
Regulations and EU Directives
193
Dimensions
194
Departure angle
195
Vehicle-specific details per engine type
196
The details given in the vehicle's technical documentation always take prece-
dence over the details in the Owner's Manual.
The listed performance values were determined without performance-reduc- ing equipment, e.g. air conditioning system.
Vehicle characteristics
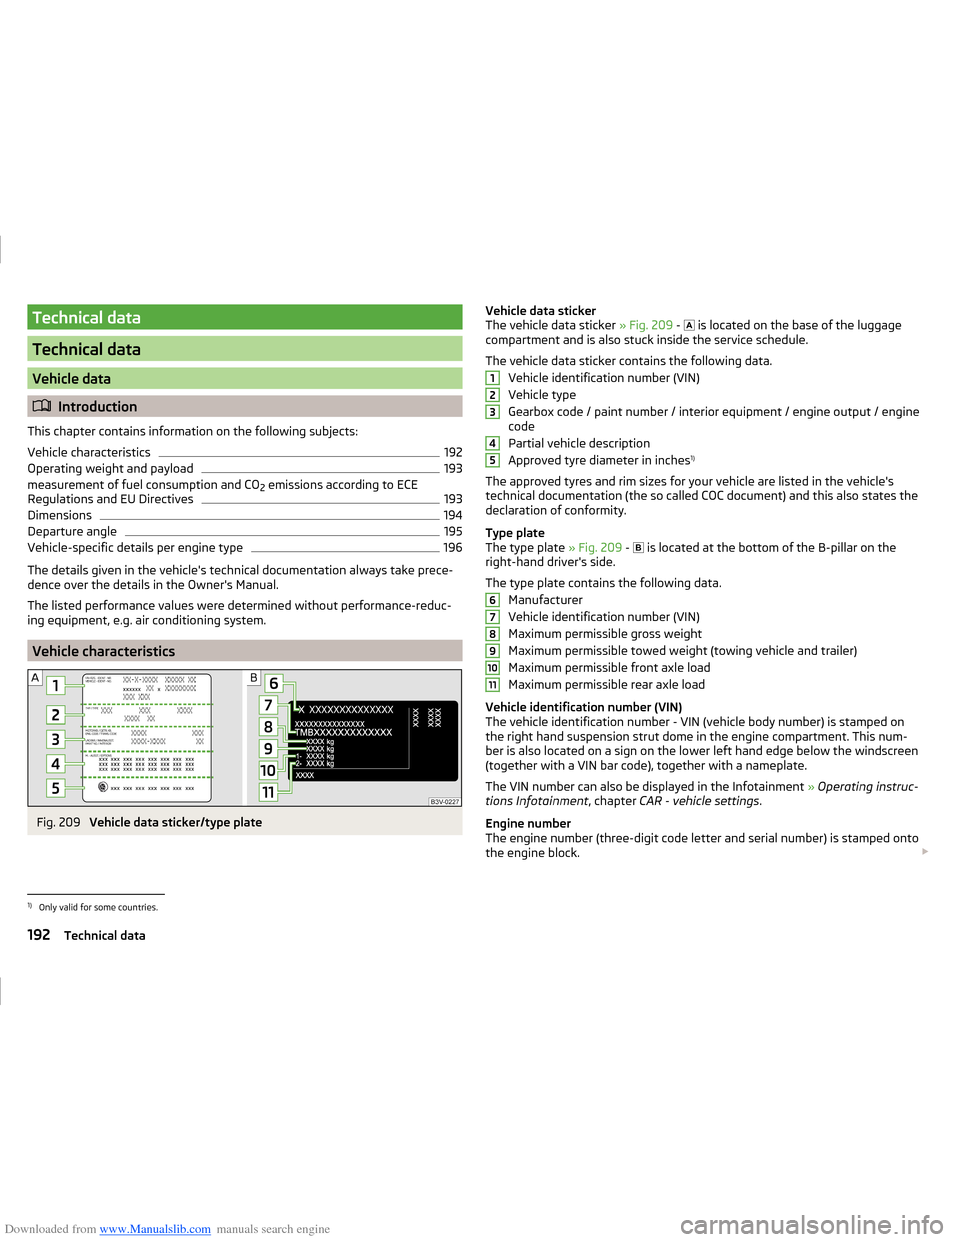
Fig. 209
Vehicle data sticker/type plate
Vehicle data sticker
The vehicle data sticker » Fig. 209 - is located on the base of the luggage
compartment and is also stuck inside the service schedule.
The vehicle data sticker contains the following data. Vehicle identification number (VIN)
Vehicle type
Gearbox code / paint number / interior equipment / engine output / engine code
Partial vehicle description
Approved tyre diameter in inches 1)
The approved tyres and rim sizes for your vehicle are listed in the vehicle's
technical documentation (the so called COC document) and this also states the
declaration of conformity.
Type plate
The type plate » Fig. 209 -
is located at the bottom of the B-pillar on the
right-hand driver's side.
The type plate contains the following data. Manufacturer
Vehicle identification number (VIN)
Maximum permissible gross weight
Maximum permissible towed weight (towing vehicle and trailer)
Maximum permissible front axle load
Maximum permissible rear axle load
Vehicle identification number (VIN)
The vehicle identification number - VIN (vehicle body number) is stamped on
the right hand suspension strut dome in the engine compartment. This num-
ber is also located on a sign on the lower left hand edge below the windscreen
(together with a VIN bar code), together with a nameplate.
The VIN number can also be displayed in the Infotainment » Operating instruc-
tions Infotainment , chapter CAR - vehicle settings .
Engine number
The engine number (three-digit code letter and serial number) is stamped onto
the engine block. 12345678910111)
Only valid for some countries.
192Technical data