ESP SKODA KODIAQ 2016 1.G Owners Manual
[x] Cancel search | Manufacturer: SKODA, Model Year: 2016, Model line: KODIAQ, Model: SKODA KODIAQ 2016 1.GPages: 344, PDF Size: 58.96 MB
Page 286 of 344
CAUTIONEnsure that battery acid does not come into contact with the bodywork – risk
of damage to the paintwork.
Note
■ We recommend having all work on the vehicle battery carried out by a spe-
cialist garage.■
You should replace batteries older than 5 years.
Check condition
Fig. 335
Vehicle battery: Open the cover / acid level indicator
Read and observe
and on page 283 first.
The battery condition is checked regularly by a specialist garage as part of the
inspection service.
Check the acid level
For car batteries with acid level indicator, use the colouration of the display to
check the acid level. In vehicle batteries with the designation “AGM” there is
no acid level examination.
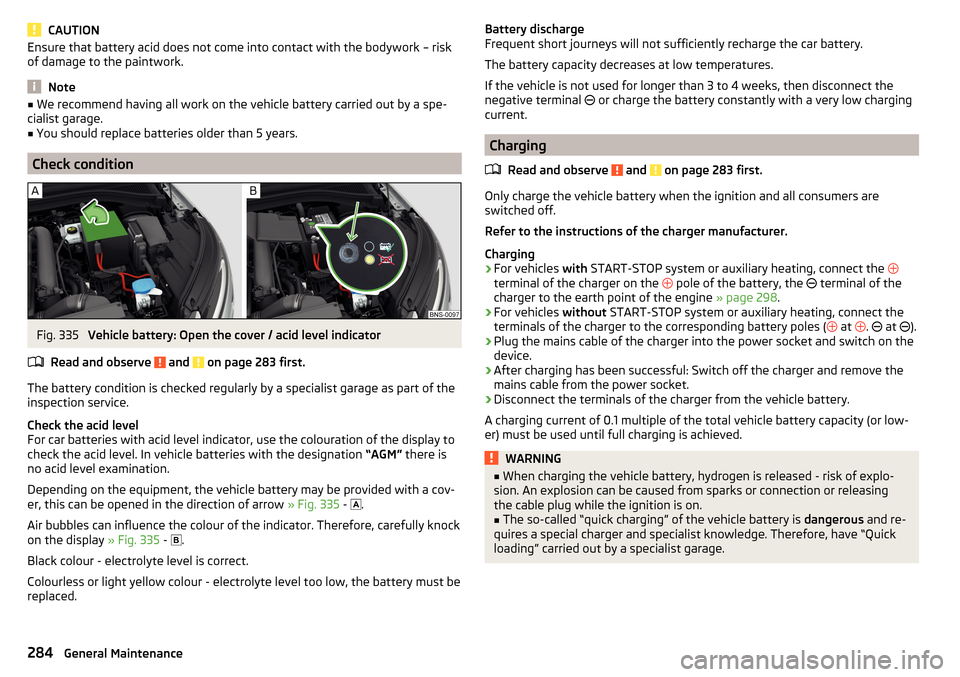
Depending on the equipment, the vehicle battery may be provided with a cov-
er, this can be opened in the direction of arrow » Fig. 335 -
.
Air bubbles can influence the colour of the indicator. Therefore, carefully knock
on the display » Fig. 335 -
.
Black colour - electrolyte level is correct.
Colourless or light yellow colour - electrolyte level too low, the battery must be
replaced.
Battery discharge
Frequent short journeys will not sufficiently recharge the car battery.
The battery capacity decreases at low temperatures.
If the vehicle is not used for longer than 3 to 4 weeks, then disconnect the
negative terminal
or charge the battery constantly with a very low charging
current.
Charging
Read and observe
and on page 283 first.
Only charge the vehicle battery when the ignition and all consumers are
switched off.
Refer to the instructions of the charger manufacturer.
Charging
›
For vehicles with START-STOP system or auxiliary heating, connect the
terminal of the charger on the pole of the battery, the
terminal of the
charger to the earth point of the engine » page 298.
›
For vehicles without START-STOP system or auxiliary heating, connect the
terminals of the charger to the corresponding battery poles ( at
.
at
).
›
Plug the mains cable of the charger into the power socket and switch on the
device.
›
After charging has been successful: Switch off the charger and remove the
mains cable from the power socket.
›
Disconnect the terminals of the charger from the vehicle battery.
A charging current of 0.1 multiple of the total vehicle battery capacity (or low-
er) must be used until full charging is achieved.
WARNING■ When charging the vehicle battery, hydrogen is released - risk of explo-
sion. An explosion can be caused from sparks or connection or releasing
the cable plug while the ignition is on.■
The so-called “quick charging” of the vehicle battery is dangerous and re-
quires a special charger and specialist knowledge. Therefore, have “Quick
loading” carried out by a specialist garage.
284General Maintenance
Page 293 of 344
›To
remove the fire extinguisher, release the safety catches on the two belts
in the direction of arrow » Fig. 340 and remove the fire extinguisher.›
To secure , place the fire extinguisher back in the mount and secure with the
belts.
The Owner´s Manual is fitted next to the fire extinguisher.
Pay attention to the expiration date of the fire extinguisher. After this date,
the correct function of the device is not guaranteed.
WARNINGAlways properly secure the fire extinguisher, there is a risk of injury in the
event of sudden braking or a vehicle collision.
Vehicle tool kit
Fig. 341
Vehicle tool kit
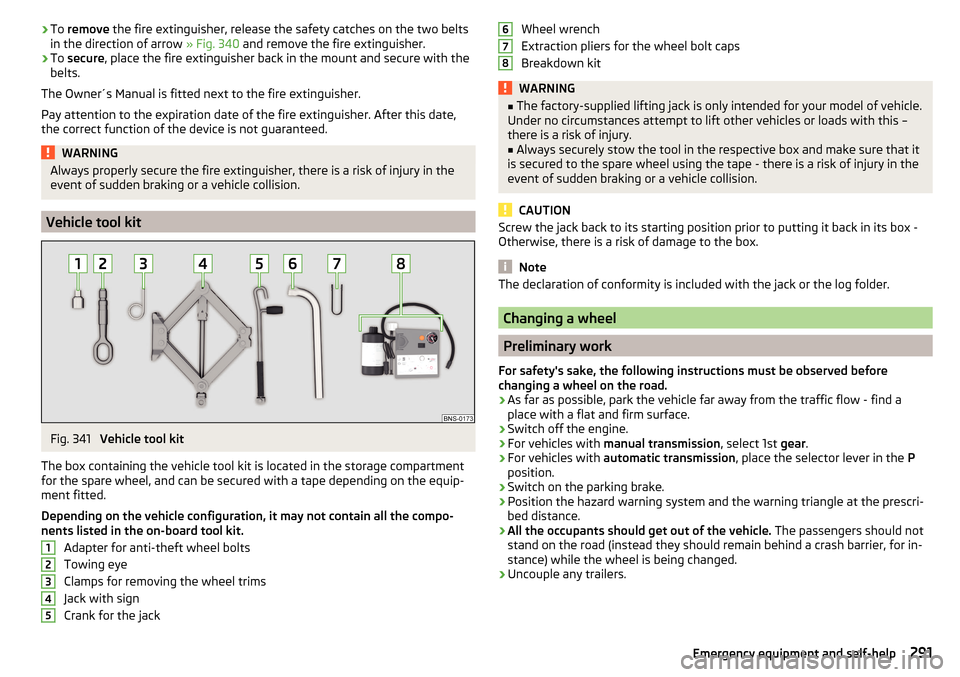
The box containing the vehicle tool kit is located in the storage compartment
for the spare wheel, and can be secured with a tape depending on the equip-
ment fitted.
Depending on the vehicle configuration, it may not contain all the compo-
nents listed in the on-board tool kit.
Adapter for anti-theft wheel bolts
Towing eye
Clamps for removing the wheel trims
Jack with sign
Crank for the jack
12345Wheel wrench
Extraction pliers for the wheel bolt caps
Breakdown kitWARNING■ The factory-supplied lifting jack is only intended for your model of vehicle.
Under no circumstances attempt to lift other vehicles or loads with this –
there is a risk of injury.■
Always securely stow the tool in the respective box and make sure that it
is secured to the spare wheel using the tape - there is a risk of injury in the
event of sudden braking or a vehicle collision.
CAUTION
Screw the jack back to its starting position prior to putting it back in its box -
Otherwise, there is a risk of damage to the box.
Note
The declaration of conformity is included with the jack or the log folder.
Changing a wheel
Preliminary work
For safety's sake, the following instructions must be observed before
changing a wheel on the road.
›
As far as possible, park the vehicle far away from the traffic flow - find a
place with a flat and firm surface.
›
Switch off the engine.
›
For vehicles with manual transmission , select 1st gear.
›
For vehicles with
automatic transmission , place the selector lever in the P
position.
›
Switch on the parking brake.
›
Position the hazard warning system and the warning triangle at the prescri-
bed distance.
›
All the occupants should get out of the vehicle. The passengers should not
stand on the road (instead they should remain behind a crash barrier, for in-
stance) while the wheel is being changed.
›
Uncouple any trailers.
678291Emergency equipment and self-help
Page 299 of 344
›Firmly screw the inflation hose 3 onto the tyre inflater bottle 10. The film on
the cap is pierced automatically.›
Remove the plug from the inflation hose
3
and plug the open end fully onto
the tyre valve.
›
Hold the bottle
10
with the bottom facing upwards and fill all of the sealing
agent from the tyre inflator bottle into the tyre.
›
Remove the filler plug from the tyre valve.
›
Screw in the valve insert using the valve remover
2
.
Inflating
›
Screw the air compressor tyre inflation hose
7
» Fig. 349 on page 296 firmly
onto the tyre valve.
›
For vehicles with manual transmission , set the lever in the neutral position.
›
On vehicles with automatic transmission , place the selector lever in the P
position.
›
Start the engine.
›
Plug the connector
6
into 12 volt socket » page 97.
›
Switch on the air compressor with the ON and OFF switch
9
.
›
Once a tyre inflation pressure of 2.0-2.5 bar is reached, turn off the air com-
pressor. Maximum run time of 6 minutes » .
›
If you cannot reach an air pressure of 2.0 - 2.5 bar, unscrew the tyre inflation
hose
7
from the tyre valve.
›
Drive the vehicle approx. 10 metres forwards or backwards to allow the seal-
ing agent to “distribute” in the tyre.
›
Firmly screw the tyre inflation hose
7
back onto the tyre valve and repeat
the inflation process.
›
Stick the corresponding sticker
1
on the dashboard in the driver's field of
view.
Once a tyre inflation pressure of 2.0 – 2.5 bar is achieved, continue the journey
at a maximum speed of 80 km/h (50 mph).
WARNING■ If it is not possible to inflate the tyre to at least. 2.0 bar, the damage is
too great. The sealing agent cannot be used to seal the tyre. Stop driv-
ing! Seek help from a specialist garage.■
The tyre inflation hose and air compressor may get hot as the tyre is be-
ing inflated – risk of burning.
CAUTIONSwitch off the air compressor after running 6 minutes at the most – risk of
overheating! Allow the air compressor to cool a few minutes before switching
it on again.
Information for driving with repaired tyres
Read and observe
on page 296 first.
The inflation pressure of the repaired tyre must be checked after driving for 10minutes.
If the tyre inflation pressure is 1.3 bar or less
›
The tyre cannot be properly sealed with the breakdown kit.
Do not drive
the vehicle! Seek help from a specialist garage.
If the tyre inflation pressure is 1.3 bar or more
›
Set the tyre pressure back to the correct value » page 286.
›
Continue driving carefully to the nearest specialist garage at a maximum
speed of 80 km/h (50 mph).
WARNINGA tyre filled with sealant has the same driving characteristics as a standard
tyre. The following guidelines must be observed.■
Do not drive faster than 80 km/h (50 mph).
■
Avoid accelerating at full throttle, sharp braking and fast cornering.
Jump-starting
Introduction
This chapter contains information on the following subjects:
Jump-starting using the battery from another vehicle
298WARNING■ The following instructions must be followed at all times when working on
the engine compartment » page 278.■
When handling the vehicle battery, the following warnings must be ob-
served » page 283 .
297Emergency equipment and self-help
Page 305 of 344
›On vehicles with the
KESSY system, hold the emergency key with the handle
facing downwards » Fig. 360 - into the lock cylinder and unlock / lock the
vehicle.›
Pull on the door handle and hold.
›
Replace the cover.
CAUTION
Make sure you do not damage the paint when performing an emergency lock-
ing/unlocking.
Locking the door without locking cylinders
Fig. 361
Emergency locking: Left/right rear door
›
Open the corresponding back door remove the trim
A
» Fig. 361 .
›
Insert the key into the slot and turn in the direction of the arrow (sprung po-
sition).
›
Replace the cover
A
.
After closing, the door is locked.
Unlock the boot lid
Fig. 362
Unlocking the door
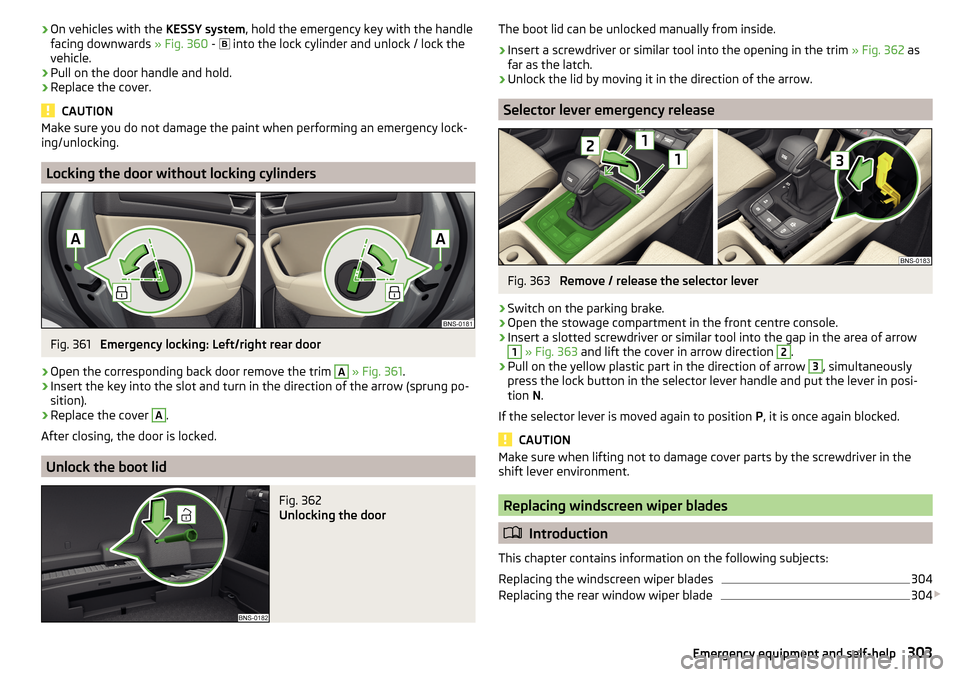
The boot lid can be unlocked manually from inside.›
Insert a screwdriver or similar tool into the opening in the trim » Fig. 362 as
far as the latch.
›
Unlock the lid by moving it in the direction of the arrow.
Selector lever emergency release
Fig. 363
Remove / release the selector lever
›
Switch on the parking brake.
›
Open the stowage compartment in the front centre console.
›
Insert a slotted screwdriver or similar tool into the gap in the area of arrow
1
» Fig. 363 and lift the cover in arrow direction
2
.
›
Pull on the yellow plastic part in the direction of arrow
3
, simultaneously
press the lock button in the selector lever handle and put the lever in posi-
tion N.
If the selector lever is moved again to position P, it is once again blocked.
CAUTION
Make sure when lifting not to damage cover parts by the screwdriver in the
shift lever environment.
Replacing windscreen wiper blades
Introduction
This chapter contains information on the following subjects:
Replacing the windscreen wiper blades
304
Replacing the rear window wiper blade
304
303Emergency equipment and self-help
Page 313 of 344
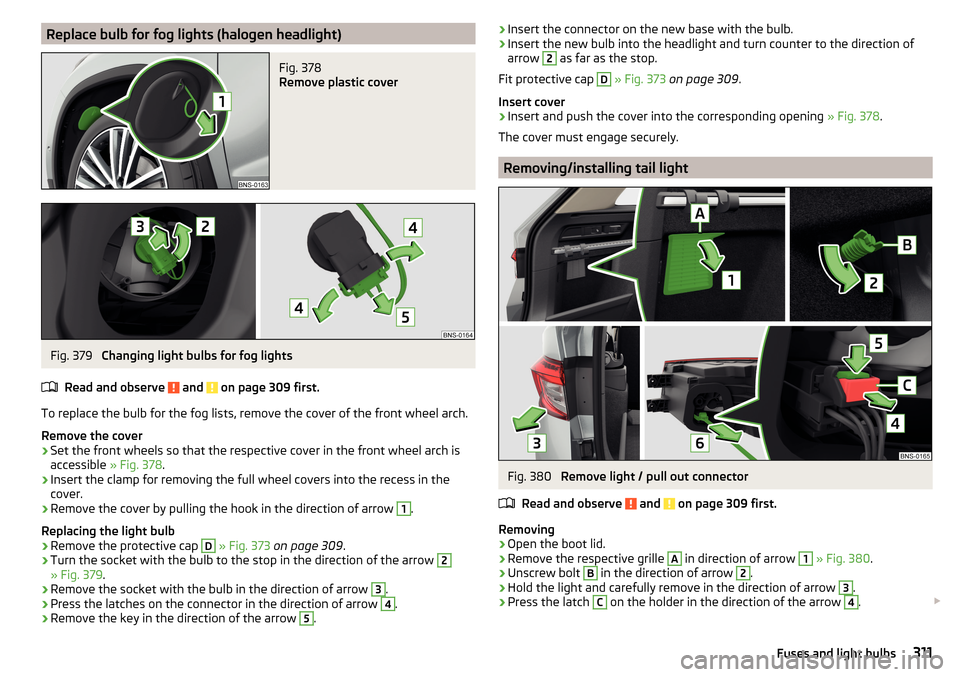
Replace bulb for fog lights (halogen headlight)Fig. 378
Remove plastic cover
Fig. 379
Changing light bulbs for fog lights
Read and observe
and on page 309 first.
To replace the bulb for the fog lists, remove the cover of the front wheel arch.
Remove the cover
›
Set the front wheels so that the respective cover in the front wheel arch is
accessible » Fig. 378.
›
Insert the clamp for removing the full wheel covers into the recess in the
cover.
›
Remove the cover by pulling the hook in the direction of arrow
1
.
Replacing the light bulb
›
Remove the protective cap
D
» Fig. 373 on page 309 .
›
Turn the socket with the bulb to the stop in the direction of the arrow
2
» Fig. 379.
›
Remove the socket with the bulb in the direction of arrow
3
.
›
Press the latches on the connector in the direction of arrow
4
.
›
Remove the key in the direction of the arrow
5
.
›Insert the connector on the new base with the bulb.›Insert the new bulb into the headlight and turn counter to the direction of
arrow 2
as far as the stop.
Fit protective cap
D
» Fig. 373 on page 309 .
Insert cover
›
Insert and push the cover into the corresponding opening » Fig. 378.
The cover must engage securely.
Removing/installing tail light
Fig. 380
Remove light / pull out connector
Read and observe
and on page 309 first.
Removing
›
Open the boot lid.
›
Remove the respective grille
A
in direction of arrow
1
» Fig. 380 .
›
Unscrew bolt
B
in the direction of arrow
2
.
›
Hold the light and carefully remove in the direction of arrow
3
.
›
Press the latch
C
on the holder in the direction of the arrow
4
.
311Fuses and light bulbs
Page 315 of 344
Technical data
Technical data
Basic vehicle data
Introduction
This chapter contains information on the following subjects:
Vehicle data
313
Operating weight
314
Payload
314
Measurement of fuel consumption and CO 2 emissions according to ECE
Regulations and EU Directives
315
Dimensions
316
Overhang angle
317
The details given in the vehicle's technical documentation always take prece-
dence over the details in the Owner's Manual.
The listed performance values were determined without performance-reduc- ing equipment, e.g. air conditioning system.
The values given have been determined in accordance with the rules and con-
ditions specified in statutory or technical regulations for determining opera-
tional and technical data for motor vehicles.
The values listed are for the basic model without any optional equipment.
Vehicle dataFig. 382
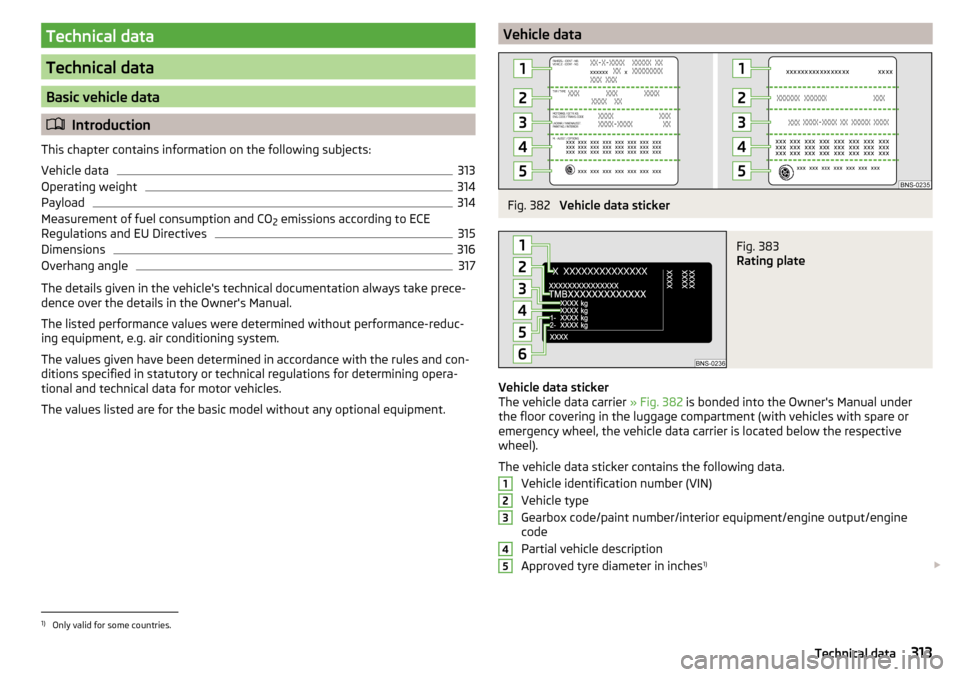
Vehicle data sticker
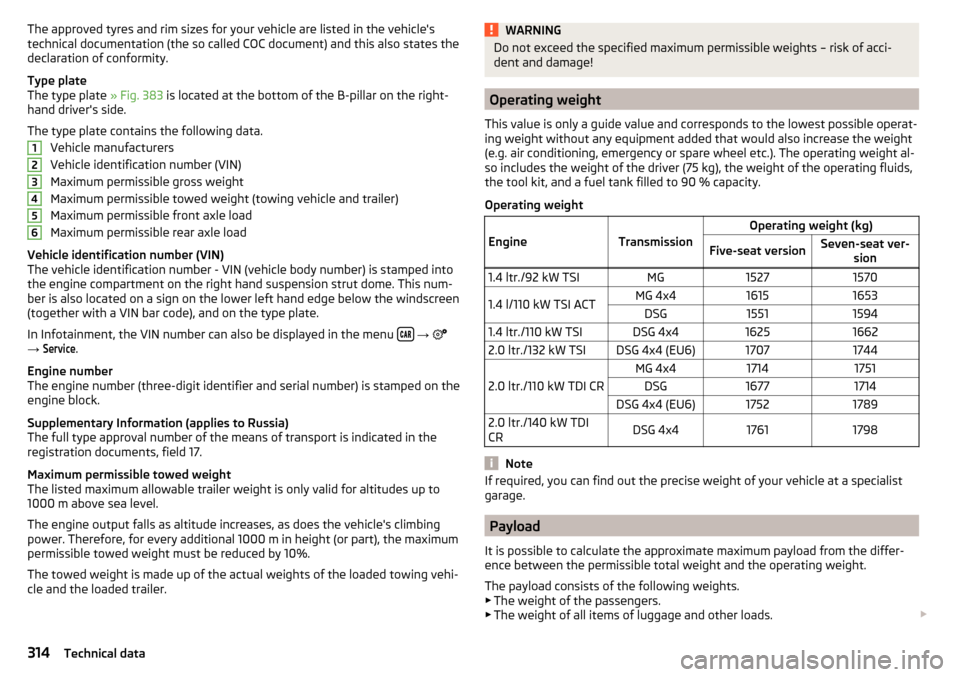
Fig. 383
Rating plate
Vehicle data sticker
The vehicle data carrier » Fig. 382 is bonded into the Owner's Manual under
the floor covering in the luggage compartment (with vehicles with spare or
emergency wheel, the vehicle data carrier is located below the respective
wheel).
The vehicle data sticker contains the following data. Vehicle identification number (VIN)
Vehicle type
Gearbox code/paint number/interior equipment/engine output/engine code
Partial vehicle description
Approved tyre diameter in inches 1)
123451)
Only valid for some countries.
313Technical data
Page 316 of 344
The approved tyres and rim sizes for your vehicle are listed in the vehicle's
technical documentation (the so called COC document) and this also states the
declaration of conformity.
Type plate
The type plate » Fig. 383 is located at the bottom of the B-pillar on the right-
hand driver's side.
The type plate contains the following data. Vehicle manufacturers
Vehicle identification number (VIN)
Maximum permissible gross weight
Maximum permissible towed weight (towing vehicle and trailer)
Maximum permissible front axle load
Maximum permissible rear axle load
Vehicle identification number (VIN)
The vehicle identification number - VIN (vehicle body number) is stamped into
the engine compartment on the right hand suspension strut dome. This num-
ber is also located on a sign on the lower left hand edge below the windscreen
(together with a VIN bar code), and on the type plate.
In Infotainment, the VIN number can also be displayed in the menu
→
→
Service
.
Engine number
The engine number (three-digit identifier and serial number) is stamped on the
engine block.
Supplementary Information (applies to Russia)
The full type approval number of the means of transport is indicated in the
registration documents, field 17.
Maximum permissible towed weight
The listed maximum allowable trailer weight is only valid for altitudes up to
1000 m above sea level.
The engine output falls as altitude increases, as does the vehicle's climbing
power. Therefore, for every additional 1000 m in height (or part), the maximum
permissible towed weight must be reduced by 10%.
The towed weight is made up of the actual weights of the loaded towing vehi-
cle and the loaded trailer.
123456WARNINGDo not exceed the specified maximum permissible weights – risk of acci-
dent and damage!
Operating weight
This value is only a guide value and corresponds to the lowest possible operat-
ing weight without any equipment added that would also increase the weight
(e.g. air conditioning, emergency or spare wheel etc.). The operating weight al-
so includes the weight of the driver (75 kg), the weight of the operating fluids,
the tool kit, and a fuel tank filled to 90 % capacity.
Operating weight
EngineTransmission
Operating weight (kg)Five-seat versionSeven-seat ver- sion1.4 ltr./92 kW TSIMG152715701.4 l/110 kW TSI ACTMG 4x416151653DSG155115941.4 ltr./110 kW TSIDSG 4x4162516622.0 ltr./132 kW TSIDSG 4x4 (EU6)17071744
2.0 ltr./110 kW TDI CR
MG 4x417141751DSG16771714DSG 4x4 (EU6)175217892.0 ltr./140 kW TDI
CRDSG 4x417611798
Note
If required, you can find out the precise weight of your vehicle at a specialist
garage.
Payload
It is possible to calculate the approximate maximum payload from the differ-
ence between the permissible total weight and the operating weight.
The payload consists of the following weights.
▶ The weight of the passengers.
▶ The weight of all items of luggage and other loads.
314Technical data
Page 317 of 344
▶The weight of the roof load including the roof rack system.
▶ The weight of the equipment that is excluded from the operating weight.
▶ Trailer bearing load for trailer towing » table on page 261 .
Measurement of fuel consumption and CO
2 emissions according to
ECE Regulations and EU Directives
The data on fuel consumption and CO 2 emissions were not available at the
time of going to press.
The data on fuel consumption and CO 2 emissions are given on the ŠKODA
websites or in the sales and technical vehicle documentation.
The measurement of the intra-urban cycle begins with a cold start of the en-
gine. Afterwards urban driving is simulated.
In the extra-urban driving cycle, the vehicle is accelerated and decelerated in
all gears, corresponding to daily routine driving conditions. The driving speed
varies between 0 and 120 km/h.
The calculation of the combined fuel consumption considers a weighting of
about 37 % for the intra-urban cycle and 63 % for the extra-urban cycle.
Note
■ The fuel consumption and emission levels given on the ŠKODA websites or in
the commercial and technical vehicle documentation have been established in
accordance with rules and under conditions that are set out by legal or techni-
cal rules for the determination of operational and technical data of motor vehi-
cles.■
Depending on the extent of the equipment, the driving style, traffic condi-
tions, weather influences and vehicle condition, consumption values can in
practice result in fuel economy figures in the use of the vehicle that differ from
the fuel consumption valueslisted on the ŠKODA websites or in the commer-
cial and technical vehicle documentation.
315Technical data