bonnet SKODA KODIAQ 2016 1.G Owner's Manual
[x] Cancel search | Manufacturer: SKODA, Model Year: 2016, Model line: KODIAQ, Model: SKODA KODIAQ 2016 1.GPages: 344, PDF Size: 58.96 MB
Page 14 of 344
Safety
Passive Safety
General information
Introduction
This chapter contains information on the following subjects:
Before setting off
12
Driving safety
12
This section of the manual includes important information on the subject of
passive safety. We have combined everything here which you should be famili-
ar with, for example, regarding seat belts, airbags, safety of children and any-
thing similar.
Other important safety information can also be found in the following chapters
of this Owner´s Manual. The Owner´s Manual should therefore always be in
the vehicle.
Before setting off
For your own safety and the safety of the people travelling with you, please
pay attention to the following points before setting off.
▶ Check the function of the lighting and turn signal systems.
▶ Check the function of the wipers and check the wiper blades for wear. Check
the windscreen washer fluid level.
▶ Ensure that all of the windows offer good visibility to the outside.
▶ Adjust the rear-view mirror so that vision to the rear is guaranteed. Ensure
that the mirrors are not covered.
▶ Check the tyre inflation pressure.
▶ Check the engine oil, brake fluid and coolant level.
▶ Secure all items of luggage.
▶ Do not exceed the permissible axle loads and permissible gross weight of the
vehicle.
▶ Close all doors as well as the bonnet and boot lid.
▶ Ensure that no objects can obstruct the pedals.
▶
Protect children by using a suitable child seat » page 23, Transporting chil-
dren safely .
▶ Adopt the correct seated position. Instruct your passengers to assume the
correct seated position » page 12, Correct and safe seated position .
Driving safety
In the interests of traffic safety, the following information must be observed. ▶ Do not become distracted from concentrating on the traffic situation, (e.g. by
your passengers or mobile phone calls).
▶ Never drive when your driving ability is impaired, (e.g. due to medication, al-
cohol or drugs).
▶ Keep to the traffic regulations and the permissible speed limit.
▶ Always adjust the driving speed to the road, traffic and weather conditions.
▶ Take regular breaks on long journeys (at least every two hours).
Correct and safe seated position
Introduction
This chapter contains information on the following subjects:
Driver’s correct seated position
13
Adjusting the steering wheel position
13
Passenger’s correct seating position
14
Passengers’ correct seating position on the rear seats
14
Always assume the correct seated position before setting off and do not
change this position while driving. Also advise your passengers to adopt the
correct seated position and not to change this position while the car is moving.
The following list contains instructions for the Passenger which, if not ob-
served, may cause serious injuries or death. ▶ Do not lean against the dash panel.
▶ Do not put your feet on the dash panel.
The following list contains instructions for all Passengers which, if not ob-
served, may cause serious injuries or death.
▶ Do not sit only on the front part of the seat.
▶ Do not sit facing to the side.
▶ Do not lean out of the window.
▶ Do not put your limbs out of the window.
▶ Do not put your feet on the seat cushion.
12Safety
Page 33 of 344
Operation
Cockpit
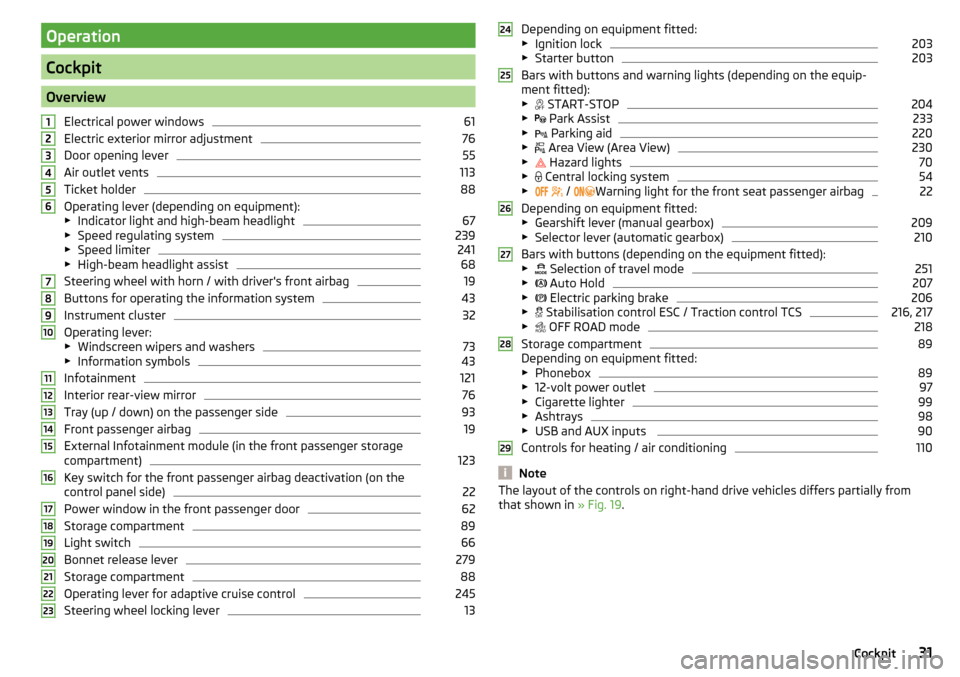
OverviewElectrical power windows
61
Electric exterior mirror adjustment
76
Door opening lever
55
Air outlet vents
113
Ticket holder
88
Operating lever (depending on equipment):
▶ Indicator light and high-beam headlight
67
▶Speed regulating system
239
▶Speed limiter
241
▶High-beam headlight assist
68
Steering wheel with horn / with driver's front airbag
19
Buttons for operating the information system
43
Instrument cluster
32
Operating lever:
▶ Windscreen wipers and washers
73
▶Information symbols
43
Infotainment
121
Interior rear-view mirror
76
Tray (up / down) on the passenger side
93
Front passenger airbag
19
External Infotainment module (in the front passenger storage
compartment)
123
Key switch for the front passenger airbag deactivation (on the
control panel side)
22
Power window in the front passenger door
62
Storage compartment
89
Light switch
66
Bonnet release lever
279
Storage compartment
88
Operating lever for adaptive cruise control
245
Steering wheel locking lever
131234567891011121314151617181920212223Depending on equipment fitted:
▶ Ignition lock203
▶Starter button
203
Bars with buttons and warning lights (depending on the equip-
ment fitted): ▶ START-STOP
204
▶
Park Assist
233
▶
Parking aid
220
▶
Area View (Area View)
230
▶
Hazard lights
70
▶
Central locking system
54
▶
/
Warning light for the front seat passenger airbag
22
Depending on equipment fitted:
▶ Gearshift lever (manual gearbox)
209
▶Selector lever (automatic gearbox)
210
Bars with buttons (depending on the equipment fitted):
▶ Selection of travel mode
251
▶
Auto Hold
207
▶
Electric parking brake
206
▶
Stabilisation control ESC / Traction control TCS
216, 217
▶
OFF ROAD mode
218
Storage compartment
89
Depending on equipment fitted:
▶ Phonebox
89
▶12-volt power outlet
97
▶Cigarette lighter
99
▶Ashtrays
98
▶USB and AUX inputs
90
Controls for heating / air conditioning
110
Note
The layout of the controls on right-hand drive vehicles differs partially from
that shown in » Fig. 19.24252627282931Cockpit
Page 42 of 344
Coolant temperature too high Illumi-
nates
Engine overheat. Stop! Log book!ENGINE OVERHEAT STOP
▶ Stop the vehicle, switch off the engine and let it cool.
▶ Continue your journey only after the warning light
has disappeared.
Engine oil pressure
Read and observe
on page 34 first.
flashes – the engine oil pressure is too low.
▶ Stop the vehicle, switch off the engine, and check the engine oil level.
▶ If the warning light flashes,
stop driving , even if the oil level is OK! Also do
not leave the engine running at an idling speed.
▶ Seek help from a specialist garage.
CAUTION
If it is not possible to top up with engine oil under the given conditions, stop
driving - there is a risk of engine damage! Switch off the engine and seek as-
sistance from a specialist garage.
Engine oil level
Read and observe
on page 34 first.
Engine oil level too low
Illumi-
nates
Oil level: add oil!ADD OIL
▶ Stop the vehicle, switch off the engine, and check the engine oil level, top up
if necessary.
The warning light will go out if the bonnet is left open for more than 30 sec-
onds. If the engine oil is not replenished, the warning light will come on again
after driving about 100 km.
Engine oil level too high
Illumi-
nates
Reduce oil level!OIL LEVEL TOO HIGH
▶ Stop the vehicle, switch off the engine, and check the engine oil level.
▶ If the oil level is too high, you can driven on, exercising appropriate caution.
Seek assistance from a specialist garage immediately.
Fault on the engine oil level sensor Illumi-
nates
Oil sensor: Workshop!OIL SENSOR WORKSHOP
▶ You can drive on, exercising appropriate caution. Seek assistance from a spe-
cialist garage immediately.
CAUTION
If it is not possible to top up with engine oil under the given conditions, stop
driving - there is a risk of engine damage! Switch off the engine and seek as-
sistance from a specialist garage.
AdBlue ®
(diesel engine)
Read and observe
on page 34 first.
AdBlue ®
level too low
Information on the amount of AdBlue ®
to be added is also shown. The values
"min" and "max" stand for the minimum and maximum AdBlue ®
replenishment
amounts.
Illuminates
AdBlue (DEF) refill! Range: ...REFILL ADBLUE (DEF)... RANGE_ ...
The range in the display indicates the distance that can be driven with the re-
maining AdBlue ®
left in the tank.
▶ Add AdBlue ®
» page 277 .
Illumi-
nates
AdBlue (DEF) refill! No start in ...REFILL ADBLUE (DEF)_...NO START IN …
The value in the display indicates the distance that can still be travelled, after
which no engine restart is possible unless AdBlue ®
is added.
▶ Add AdBlue ®
» page 277 .
Illumi-
nates
AdBlue (DEF) refill! Engine start no longer possible.REFILL ADBLUE (DEF)... NO RESTART
It is no longer possible to start the engine.
▶ Add AdBlue ®
» page 277 .
AdBlue ®
fault
Illumi-
nates
Error: AdBlue (DEF). No engine start in ...ADBLUE (DEF) ERROR NO START IN …
40Operation
Page 46 of 344
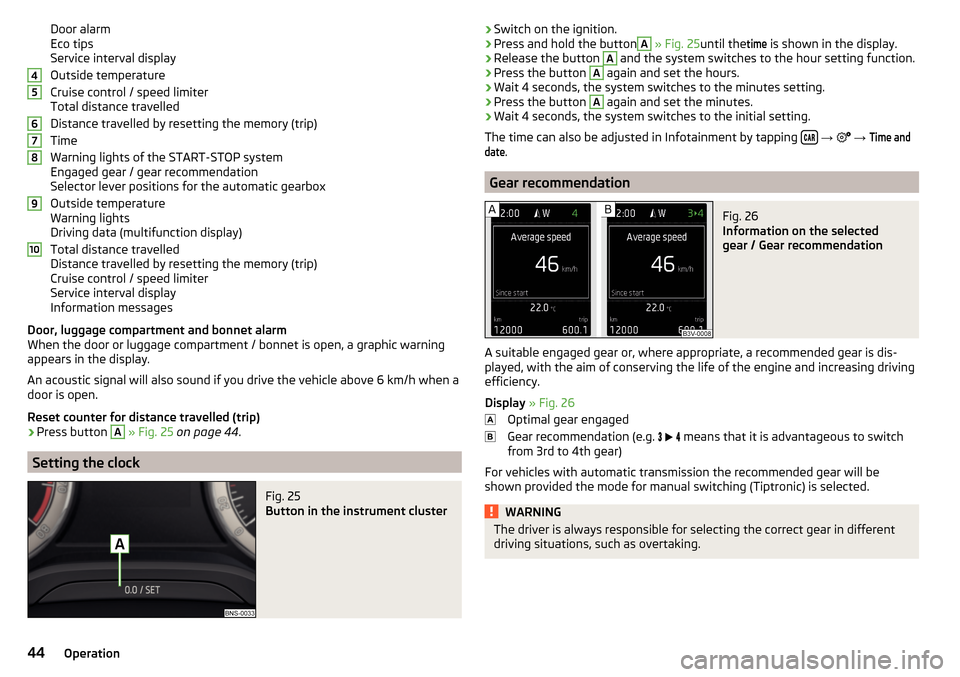
Door alarm
Eco tips
Service interval display
Outside temperature
Cruise control / speed limiter
Total distance travelled
Distance travelled by resetting the memory (trip)
Time
Warning lights of the START-STOP system
Engaged gear / gear recommendation
Selector lever positions for the automatic gearbox
Outside temperature
Warning lights
Driving data (multifunction display)
Total distance travelled
Distance travelled by resetting the memory (trip)
Cruise control / speed limiter
Service interval display
Information messages
Door, luggage compartment and bonnet alarm
When the door or luggage compartment / bonnet is open, a graphic warning
appears in the display.
An acoustic signal will also sound if you drive the vehicle above 6 km/h when a
door is open.
Reset counter for distance travelled (trip)›
Press button
A
» Fig. 25 on page 44 .
Setting the clock
Fig. 25
Button in the instrument cluster
45678910›Switch on the ignition.›Press and hold the buttonA
» Fig. 25 until the
time
is shown in the display.›
Release the button
A
and the system switches to the hour setting function.
›
Press the button
A
again and set the hours.
›
Wait 4 seconds, the system switches to the minutes setting.
›
Press the button
A
again and set the minutes.
›
Wait 4 seconds, the system switches to the initial setting.
The time can also be adjusted in Infotainment by tapping
→
→
Time anddate
.
Gear recommendation
Fig. 26
Information on the selected
gear / Gear recommendation
A suitable engaged gear or, where appropriate, a recommended gear is dis-
played, with the aim of conserving the life of the engine and increasing driving
efficiency.
Display » Fig. 26
Optimal gear engaged
Gear recommendation (e.g.
means that it is advantageous to switch
from 3rd to 4th gear)
For vehicles with automatic transmission the recommended gear will be
shown provided the mode for manual switching (Tiptronic) is selected.
WARNINGThe driver is always responsible for selecting the correct gear in different
driving situations, such as overtaking.44Operation
Page 59 of 344
Locking is displayed in the button by the illumination of the symbol .
When with electric operation in addition to the electric window is blocked in
the respective door.
Malfunctions
Read and observe
and on page 52 first.
Synchronising the remote control
If the buttons on the remote control key have been operated several times be-
yond the effective range of the system or the battery in the remote control key
has been replaced and the vehicle cannot be unlocked using the remote con-
trol, the key must be synchronised.
›
Press any button on the remote control key.
›
Unlock the door with the key in the lock cylinder within 1 minute of pressing
the button.
Fault with the central locking
If the warning light in the driver's door initially flashes quickly for around 2 sec-
onds, and then illuminates for 30 seconds without interruption before flashing
again slowly, you will need to seek the assistance of a specialist garage.
A fault in the central locking system means the vehicle doors and the boot lid
cannot be emergency locked or emergency unlocked » page 302.
Failure of the system KESSY
If there is a fault in the KESSY system, the appropriate error message is dis-
played in the instrument cluster.
Low voltage of the key battery
If the voltage of the key battery is too low, a message appears in the display of
the instrument cluster referring to the need to replace the battery. Replace
the battery » page 300.
Anti-theft alarm system
Introduction
This chapter contains information on the following subjects:
Alarm trigger
57
Interior monitor and towing protection
58The alarm system triggers audible and visual signals if an attempt is made to
break into the vehicle (hereafter referred to as alarm).
The alarm system is activated automatically approximately 30 seconds after
the vehicle is locked. This is automatically disabled after release.
CAUTION
Before leaving the vehicle, it must be checked that all of the windows, doors
and the sliding/tilting roof are locked in order to ensure the full functionality of
the anti-theft alarm system.
Note
The alarm system has its own power source, the service life of which is 5 years.
In order to ensure functionality of the alarm system, we recommend that you
get the alarm checked after this time by a specialist garage.
Alarm trigger
Read and observe
on page 57 first.
The alarm is triggered when one of the following unauthorised actions is acti-
vated on the vehicle with an activated warning system. ▶ Opening the bonnet.
▶ Opening the boot lid.
▶ Opening the doors.
▶ Manipulation of the ignition lock.
▶ Towing the vehicle.
▶ Movement in the vehicle.
▶ Sudden and significant voltage drop of the electrical system.
▶ Uncoupling the trailer.
An alarm is triggered also when the driver's door is unlocked and opened by
the lock cylinder.
The alarm is switched off by pressing the
button on the key or switching on
the ignition.
57Unlocking and opening
Page 75 of 344
Buttons for the heating (depending on vehicle equipment) » Fig. 62
Switch on/off the rear window heater
Switching the windscreen heater on/off
When the heating is switched on, a light illuminates inside or below the but-
ton.
The heating automatically switches off after ten minutes.
If the engine is switched off when the heating is on and turned back on again
within 10 minutes, the heating is continued.
Note
■ If the on-board voltage decreases, the heating switches off automatically
» page 283 , Automatic consumer shutdown - Discharge protection of the vehi-
cle battery .■
If the lighting inside or below the button flashes, the heater will not work be-
cause of the low charge of the battery.
■
If the Climatronic recognises that the windshield could fog up, the windshield
heating is automatically switched on. This function can be activated / deactiva-
ted on the Climatronic control panel menu
→
.
Front sun visor
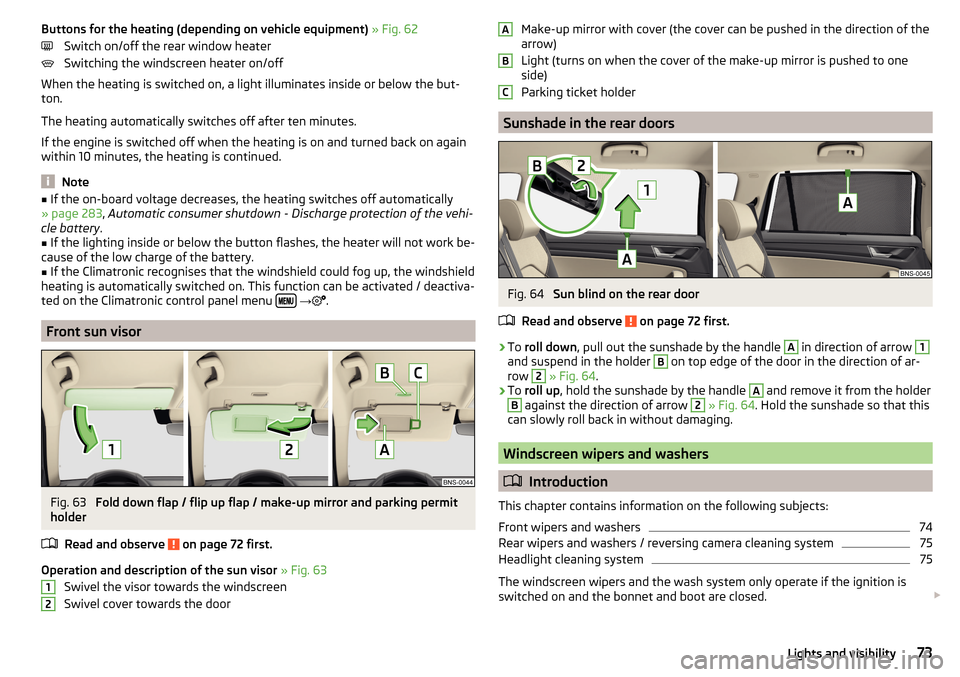
Fig. 63
Fold down flap / flip up flap / make-up mirror and parking permit
holder
Read and observe
on page 72 first.
Operation and description of the sun visor » Fig. 63
Swivel the visor towards the windscreen
Swivel cover towards the door
12Make-up mirror with cover (the cover can be pushed in the direction of the
arrow)
Light (turns on when the cover of the make-up mirror is pushed to one
side)
Parking ticket holder
Sunshade in the rear doors
Fig. 64
Sun blind on the rear door
Read and observe
on page 72 first.
›
To roll down , pull out the sunshade by the handle
A
in direction of arrow
1
and suspend in the holder
B
on top edge of the door in the direction of ar-
row
2
» Fig. 64 .
›
To roll up , hold the sunshade by the handle
A
and remove it from the holder
B
against the direction of arrow
2
» Fig. 64 . Hold the sunshade so that this
can slowly roll back in without damaging.
Windscreen wipers and washers
Introduction
This chapter contains information on the following subjects:
Front wipers and washers
74
Rear wipers and washers / reversing camera cleaning system
75
Headlight cleaning system
75
The windscreen wipers and the wash system only operate if the ignition is
switched on and the bonnet and boot are closed.
ABC73Lights and visibility
Page 76 of 344
WARNINGDo not use the windscreen washer system at low temperatures, without
heating the windscreen beforehand. The window washer fluid could other-
wise freeze on the windscreen and restrict the view to the front.
CAUTION
■ If the windscreen wipers are in rest position, they cannot be folded out from
the windscreen. The wipers must be set to the service position to raise them
off the windscreen » page 304.■
In cold temperatures and during the winter, check before switching on the
ignition that the wiper blades are not frozen to the windscreen. If the wind-
screen wipers are switched on when the blades are frozen to the windscreen,
this may damage both the blades and windscreen wiper motor.
■
Carefully release the frozen-on windscreen wiper blades from the wind-
screen and remove snow and ice.
■
Handle the windscreen wipers with care - there is the risk of damaging the
windscreen with the windscreen wiper arms.
■
Do not switch on the ignition when the front windscreen wiper arms are fol-
ded down - there is the danger of damaging the bonnet by the windscreen
wiper arms.
■
If there is an obstacle on the windscreen, the wipers will try to push away
the obstacle five times. Thereafter, the wipers will stop to prevent them be-
coming damaged. Turn on the wipers again only after the obstacle has been
removed.
Note
■ Each time the ignition switches off for the third time, the position of the
windscreen wipers changes. This counteracts an early fatigue of the wiper
blades.■
The windscreen washer nozzles for the windscreen are heated when the en-
gine is running and the outside temperature is less than +10 °C.
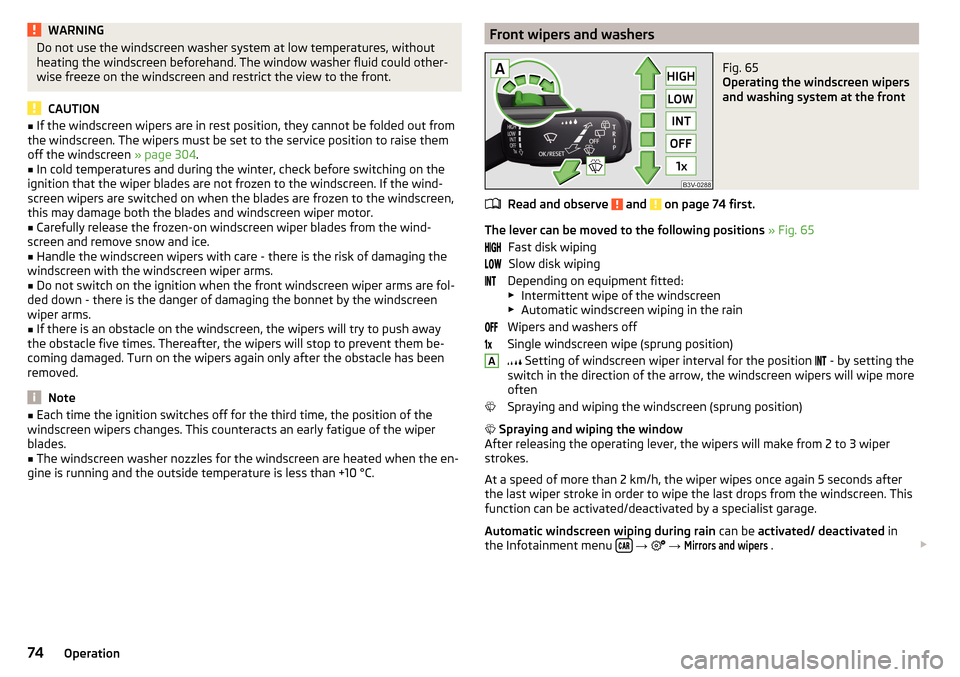
Front wipers and washersFig. 65
Operating the windscreen wipers
and washing system at the front
Read and observe and on page 74 first.
The lever can be moved to the following positions » Fig. 65
Fast disk wiping Slow disk wiping
Depending on equipment fitted:
▶ Intermittent wipe of the windscreen
▶ Automatic windscreen wiping in the rain
Wipers and washers off
Single windscreen wipe (sprung position)
Setting of windscreen wiper interval for the position
- by setting the
switch in the direction of the arrow, the windscreen wipers will wipe more
often
Spraying and wiping the windscreen (sprung position)
Spraying and wiping the window
After releasing the operating lever, the wipers will make from 2 to 3 wiper
strokes.
At a speed of more than 2 km/h, the wiper wipes once again 5 seconds after
the last wiper stroke in order to wipe the last drops from the windscreen. This
function can be activated/deactivated by a specialist garage.
Automatic windscreen wiping during rain can be activated/ deactivated in
the Infotainment menu
→
→
Mirrors and wipers
.
A74Operation
Page 280 of 344
We recommend when refilling using refill bottles that you use refill bottles
from ŠKODA Original Accessories.
When adding AdBlue ®
take note of the minimum and maximum AdBlue ®
tank
capacity shown in the display of the instrument cluster » page 40.
Refill AdBlue ®
under the following conditions.
The vehicle is on a horizontal surface.
The ignition is switched off.
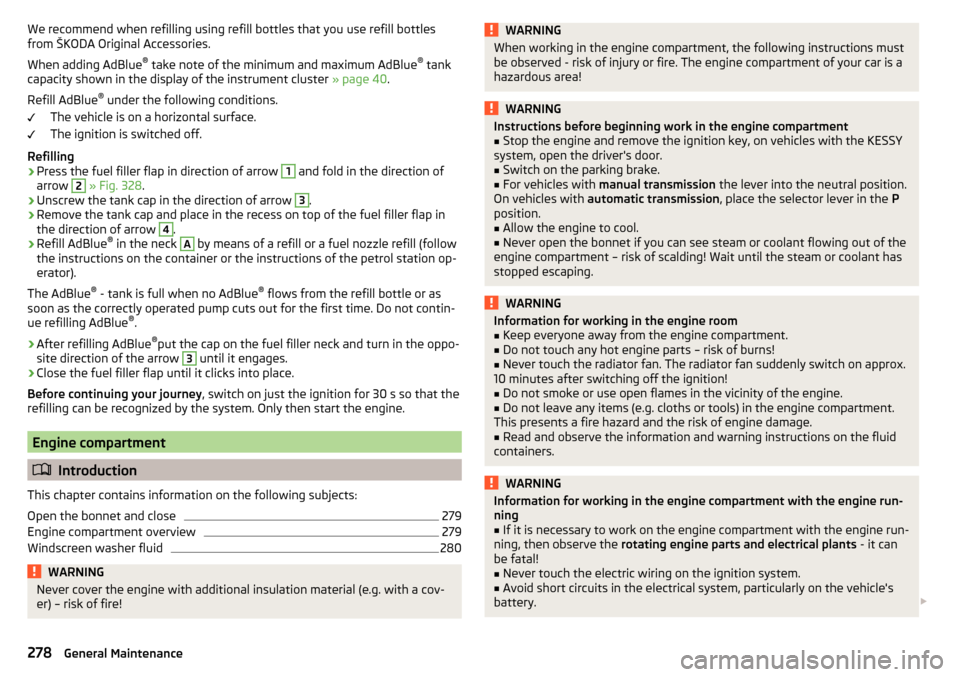
Refilling›
Press the fuel filler flap in direction of arrow
1
and fold in the direction of
arrow
2
» Fig. 328 .
›
Unscrew the tank cap in the direction of arrow
3
.
›
Remove the tank cap and place in the recess on top of the fuel filler flap in
the direction of arrow
4
.
›
Refill AdBlue ®
in the neck
A
by means of a refill or a fuel nozzle refill (follow
the instructions on the container or the instructions of the petrol station op-
erator).
The AdBlue ®
- tank is full when no AdBlue ®
flows from the refill bottle or as
soon as the correctly operated pump cuts out for the first time. Do not contin-
ue refilling AdBlue ®
.
›
After refilling AdBlue ®
put the cap on the fuel filler neck and turn in the oppo-
site direction of the arrow
3
until it engages.
›
Close the fuel filler flap until it clicks into place.
Before continuing your journey , switch on just the ignition for 30 s so that the
refilling can be recognized by the system. Only then start the engine.
Engine compartment
Introduction
This chapter contains information on the following subjects:
Open the bonnet and close
279
Engine compartment overview
279
Windscreen washer fluid
280WARNINGNever cover the engine with additional insulation material (e.g. with a cov-
er) – risk of fire!WARNINGWhen working in the engine compartment, the following instructions must
be observed - risk of injury or fire. The engine compartment of your car is a
hazardous area!WARNINGInstructions before beginning work in the engine compartment■Stop the engine and remove the ignition key, on vehicles with the KESSY
system, open the driver's door.■
Switch on the parking brake.
■
For vehicles with manual transmission the lever into the neutral position.
On vehicles with automatic transmission , place the selector lever in the P
position.
■
Allow the engine to cool.
■
Never open the bonnet if you can see steam or coolant flowing out of the
engine compartment – risk of scalding! Wait until the steam or coolant has
stopped escaping.
WARNINGInformation for working in the engine room■Keep everyone away from the engine compartment.■
Do not touch any hot engine parts – risk of burns!
■
Never touch the radiator fan. The radiator fan suddenly switch on approx.
10 minutes after switching off the ignition!
■
Do not smoke or use open flames in the vicinity of the engine.
■
Do not leave any items (e.g. cloths or tools) in the engine compartment.
This presents a fire hazard and the risk of engine damage.
■
Read and observe the information and warning instructions on the fluid
containers.
WARNINGInformation for working in the engine compartment with the engine run-
ning■
If it is necessary to work on the engine compartment with the engine run-
ning, then observe the rotating engine parts and electrical plants - it can
be fatal!
■
Never touch the electric wiring on the ignition system.
■
Avoid short circuits in the electrical system, particularly on the vehicle's
battery.
278General Maintenance
Page 281 of 344
CAUTIONRefill only operating fluids of the correct specification - danger of damaging
the vehicle!
Note
■ Fluids with the proper specifications can be purchased from the ŠKODA Origi-
nal Accessories or from the ŠKODA Genuine Parts ranges.■
We recommend you have the battery replaced by a specialist garage.
Open the bonnet and close
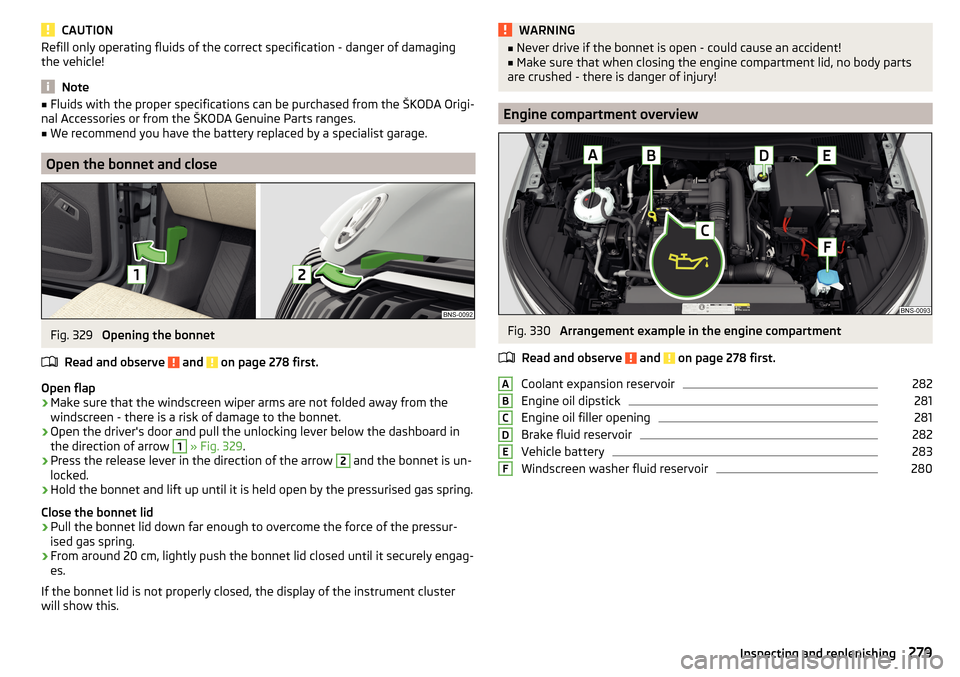
Fig. 329
Opening the bonnet
Read and observe
and on page 278 first.
Open flap
›
Make sure that the windscreen wiper arms are not folded away from the
windscreen - there is a risk of damage to the bonnet.
›
Open the driver's door and pull the unlocking lever below the dashboard in
the direction of arrow
1
» Fig. 329 .
›
Press the release lever in the direction of the arrow
2
and the bonnet is un-
locked.
›
Hold the bonnet and lift up until it is held open by the pressurised gas spring.
Close the bonnet lid
›
Pull the bonnet lid down far enough to overcome the force of the pressur-
ised gas spring.
›
From around 20 cm, lightly push the bonnet lid closed until it securely engag-
es.
If the bonnet lid is not properly closed, the display of the instrument cluster
will show this.
WARNING■ Never drive if the bonnet is open - could cause an accident!■Make sure that when closing the engine compartment lid, no body parts
are crushed - there is danger of injury!
Engine compartment overview
Fig. 330
Arrangement example in the engine compartment
Read and observe
and on page 278 first.
Coolant expansion reservoir
282
Engine oil dipstick
281
Engine oil filler opening
281
Brake fluid reservoir
282
Vehicle battery
283
Windscreen washer fluid reservoir
280ABCDEF279Inspecting and replenishing
Page 324 of 344
Manual shifting on the multifunction steeringwheel211
Selector lever lock210
Start and drive211
Tiptronic211
Warning light39
Automatic switch-off of Infotainment125
Automatic transmission209
Selector lever emergency release303
AUX90, 148
Settings134
Auxiliary heating (auxiliary heating and ventila- tion)
114
In infotainment115
set to115
Auxiliary heating (heating and ventilation) Radio remote control
116
Avoiding damage to your vehicle213
B
Basstöner
130
Battery Changing batteries for the removable light
302
Changing in key300, 301
Replace the battery in the remote control in the auxiliary heating
301
Belts15
Belt tensioners18
reversible18
Blanket96
Bluetooth A2DP / AVRCP
132
Name132
on / off132
Paired external devices132
Profile160
rSAP163
Set139
set to132, 134
Set to132
Switch on/off139
Update129, 133
Updates139
Visibility132, 139
Bluetooth Player149
Bluetooth® update160
bolero external module
123
infotainment Description122
Bonnet279
Boot Class N1 vehicles
106
Boot lid59
Automatic locking59
Contactless open/close61
Open/close58, 60
See boot lid58
Boot lid contactless open/close61
Brake Assist (HBA)217
Brake booster206
Brake fluid282
Check282
specification282
Brake linings Warning light
38
Brake pads new
206
Brake pedal (automatic gearbox) Warning light
38
Brakes Brake booster
206
Brake fluid282
Braking and stabilisation systems215
Information on braking206
Parking brake206
Run in212
Warning light35
Brake system215
breakdown call118
Breakdown call164
Broadcasting141, 142
Bulbs Replacing
308
Buttons on the driver door Electric windows
62
C
Call list Call list
166
CAR201
Car battery Automatic consumer shutdown
283
Check condition284
Cover284
Disconnecting and reconnecting285
Replacing285
Winter operation284
Car care Exterior
273
Interior273
Car cleaning Exterior
273
Windscreens273
Car computer see multifunction display
46
Care and maintenance266
Care Connect118
breakdown call118
emergency call118
information call118
Cargo element105
Carrier108
Carstick171
CD147
cellphone Disclaimer
120
Central locking52
Problems57
Central locking button54
322Index