ESP SKODA OCTAVIA 2008 2.G / (1Z) Columbus Navigation System Manual
[x] Cancel search | Manufacturer: SKODA, Model Year: 2008, Model line: OCTAVIA, Model: SKODA OCTAVIA 2008 2.G / (1Z)Pages: 75, PDF Size: 3.54 MB
Page 52 of 75
Selector key NAV (Navigation)
50
– Press if you wish to end the tour input. The travel destination of your tour and the next stopover de stination is displayed in the main
menu Navigation .
– Press the function key to start route guidance to the first stop- over destination of your tour.
– Press the function key to permanently store the displayed tour under its own name in the destination memory ⇒page 50,
“Storing a tour”.In the menu Tour plan: New tour “New Tour” acts as a replacement for a name
which you can allocate for this tour when the tour is stored.Storing a tourA tour can only be displayed in the tour mode and therefore stored only
in the tour mode.
– Press function key ⇒page 48, fig. 19 to store a tour
displayed in the main menu Navigation.
– Press on in the pop-up window. An entry window for free text entry will open.
– Allocate a name for your tour.
– Confirm the displayed name by pressing .
–The message “ Tour stored” will appear. Press to confirm the
message.You can store max. 10 tours in the destination memory.
Calling up a stored tour– Press on the function key in the main menu Navigation and
then on .
– Press on the function key and on in the pop-up window.
– Press the function key next to a tour name in the menu Lo ad tou r
to display information relating to the corresponding tour in the menu
Tour details .
– Press the function key when in the menu Tou r details or press
directly on the name of a tour when in the menu Load tour so that the
selected tour is displayed in the main menu Navigation
– Press the function key to start the route guidance.Editing a stored tourA tour can only be displayed in the tour mode and therefore only stored
in the tour mode. Call up the tour to be edited.
– If you press at the top of the select ed tour message the tour plan for
this tour will open.
– Alternatively, open the tour plan by pressing the function key . Press on in the pop-up window.
– Press on the function key next to the destination in the tour plan you wish to process. The pop-up wi ndow with the possible options for
processing this input will open.
StartMemory
Memory
Save tour
OK
OK
Extras
To u r m o d e
Memory
Load tour
SelectStrat
Extras
Edit tour
s2u4.6.book Page 50 Wednesday, August 13, 2008 7:57 AM
Page 54 of 75
Selector key NAV (Navigation)
52
– Once you have reached the destin ation of a waypoint tour, the
waypoint mode will close automati cally and the “normal” main menu
Navigation will open again.When in the menu Waypoint navigation , the last active waypoint tour and its
current geo-position will be displayed. If no waypoint tour has been recorded or all
of them have been deleted, a correspond ing message will be inserted. In this case
the function keys for starting, loading or processing a waypoint tour are not active.
If a waypoint tour is disp layed, the waypoint tour ⇒page 53, “Driving a stored
waypoint tour” will be started by pressing the function key .
The following menus and sub-menus are operated analog to the already described
menus of the navigation system and will no longer be described here in detail:•
Pressing on a displayed entry or the function key will always open the
detailed display.
•
Pressing the function key opens a pop- up window for analog processing of
the accompanying input.
The function key
Pressing the function key will open a safety interrogation:
– switches back into the waypoint mode. – terminates the waypoint mode and opens the menu New
destination for selection of an “Onroad destinat ion” from the available navigation
data.
The function key
Pressing the function key will open a pop-up window:
– opens a list of the stored wayp oint tours. Press the corresponding
waypoint tour for selection.
– opens the waypoint tour memory. Stored waypoint
tours can be displayed, renamed or deleted.
The function key
Pressing the function key will open a pop-up window to display a
new waypoint tour or to process the displayed one. – starts after naming the waypoint tour, selecting an accept-
ance mode and displaying a new waypoint tour. A displayed waypoint tour is auto-
matically stored and can be ca lled up later from the via .
– opens a list with the waypoint s of the tour currently displayed
in the menu Waypoint navigation . The waypoints in the li st can be displayed,
deleted, moved or renamed in the map. Further waypoints can be added via the
selection from the map or the input of the GPS position. If a different waypoint tour
has to be processed instead of the one disp layed, it must first of all be called up
from the with .
Display a waypoint tour– Press on the function key in the menu Waypoint naviga-
tion .
– Press on the function key in the pop-up window.
– If a tour is already being displayed in the menu Waypoint navigation
you must select by pressing in the following menu whether you wish
to display the indicated or a .
Start
New dest.
New dest.
BackOnroad destination
Memory
Memory
Load tourEdit waypoint tour memory
Waypoint tour
Waypoint tour
Record waypoint tour
Memory
Load tour
Edit waypoint tour
Memory
Load tour
Fig. 21 Display in the map
illustration with an addi-
tional window in the
compass display.
WaypointLoad tourExtend existing tour
New tour
s2u4.6.book Page 52 Wednesday, August 13, 2008 7:57 AM
Page 55 of 75
Selector key NAV (Navigation)53
– Give a short and clear name to the waypoint tour. Confirm the displayed name by pressing .
– Select an acceptance mode by pressing the respective key.
– Press the function key to a llow the system to automatically
set the waypoints (recommended) during the display.
– Press the function key if you wish to set all waypoints yourself during the display.
– After starting the display, the number of used and still available waypoints as well as the set display mode will be indicated in the
menu Waypoint navigation .
– Press the selector key to change into the map display. Repeated pressing of the selector key will open and close the additional
window ⇒page 52, fig. 21 .
– Press on the selector key to switch back into the main menu Waypoint navigation .
– Press the function key to set the
waypoints manually. When in the ma p display you can find this func-
tion key in the pop-up window for the function key
⇒ page 52, fig. 21 ⇒ page 53, “Function key in the map display”.
Function key in the map display
The waypoints used up to no w for the tour and those still available are indicated in
the function key .
Pressing the function key ⇒page 52, fig. 21 – will open a pop-up window
for controlling the display.
– ends the recording: the last set waypoint becomes the endpoint of the
waypoint tour.
– switches on and off the functions indicating that the
waypoints are set automatically via the sensors in the vehicle when changing the
direction. A tick in the checkbox
indicates that the function is switched on. – sets a manual waypoint at the current driving
position.
Driving a stored waypoint tourBefore you start driving a waypoint tour , you must be in the vicinity of the
desired starting point of this waypoint tour.
Select a waypoint tour
– Press the function key in the menu Waypoint navigation.
– Press on the function key in the pop-up window.
– Choose a waypoint tour in the list by pressing on the respective tour.
Driving a waypoint tour
– Press the function key in the menu Waypoint navigation. The
menu Starting from which waypoint will open. Starting and finishing
points of the waypoint tour are displayed at the top.
– Press the function key in the menu to drive the
selected tour in the opposite direction.
Stopping the route guidance
– Press the third function key at the bottom of the map display for infor- mation about the distance to the closest waypoint and in the pop-up window.
– Alternatively, press the selector key and then press the function key .When driving
Follow the information regarding turns as far as possible. Once you have come as
close as 50 meters to a waypoint, the drive recommendation will appear for the
next waypoint.
OK
AutomaticManualMAP
MAPNAVStore current position as waypoint
Record
RecordRecord
Record
Stop Automatic recording
Add current position as waypoint
Memory
Load tour
StartReverse waypoint tour
Stop route guidance
NAV
Stop
s2u4.6.book Page 53 Wednesday, August 13, 2008 7:57 AM
Page 56 of 75
Selector key NAV (Navigation)
54If a waypoint has not been reached, you mu st ignore it, otherwise the system will
continue to try and guide you to this wayp oint. The distance to the next waypoint
and the number of it according to the sequen ce in the waypoint tour is indicated in
the third function key at the bottom of the map display.
Press this function key and choose in the pop-up window to ignore
the waypoint to which the system wishes to guide you.
Alternatively, press the selector key and press the function key .
Press the function key or in the corresponding
menu to approach the last waypoint again.
While you are approaching a waypoint tour, press on the third function key at the
bottom of the map display and on in the pop-up
window in order to supplement the tour with further waypoints. For example, you
can designate route marks an d name them later or store new detours on route.
Alternatively, call up this function by pressing the selector key and the func-
tion key .
Next Waypoint
NAV
Next Waypoint
Prev. Waypnt.
Previous waypoint
Add current position as waypoint
NAV
Waypoint tour
s2u4.6.book Page 54 Wednesday, August 13, 2008 7:57 AM
Page 57 of 75
Selector key NAV (Navigation)55
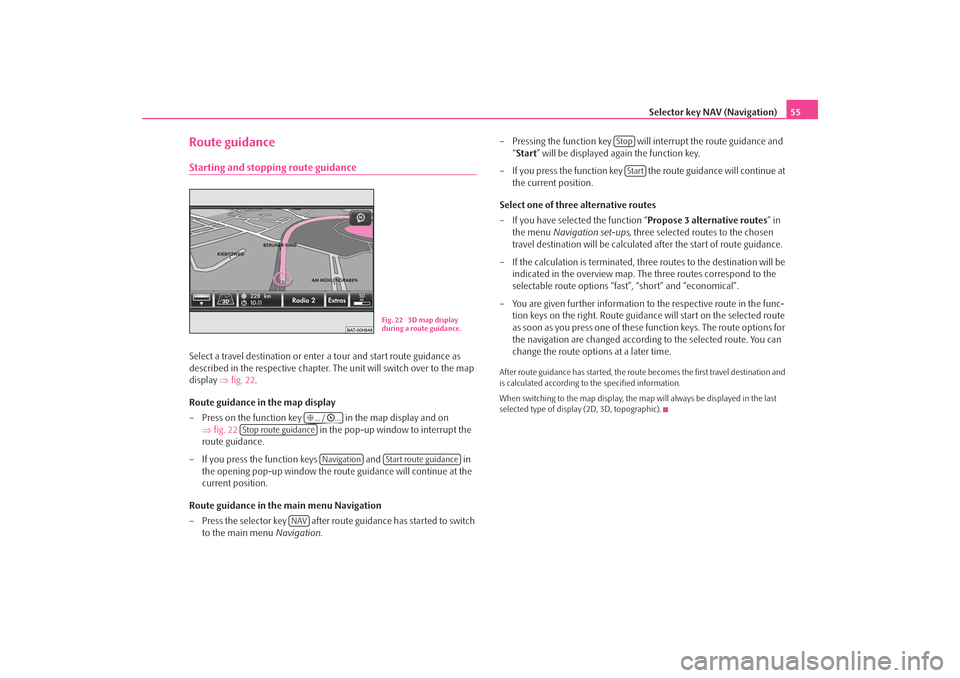
Route guidanceStarting and stopping route guidanceSelect a travel destination or enter a tour and start route guidance as
described in the respective chapter. The unit will switch over to the map
display ⇒fig. 22 .
Route guidance in the map display
– Press on the function key in the map display and on ⇒fig. 22 in the pop-up window to interrupt the
route guidance.
– If you press the function keys and in
the opening pop-up window the rout e guidance will continue at the
current position.
Route guidance in the main menu Navigation
– Press the selector key after rout e guidance has started to switch
to the main menu Navigation. – Pressing the function key will interrupt the route guidance and
“Start ” will be displayed again the function key.
– If you press the function key the route guidance will continue at the current position.
Select one of three alternative routes
– If you have selected the function “ Propose 3 alternative routes” in
the menu Navigation set-ups , three selected routes to the chosen
travel destination will be calculated after the start of route guidance.
– If the calculation is terminated, three routes to the destination will be indicated in the overview map. The three routes correspond to the
selectable route options “fast”, “short” and “economical”.
– You are given further information to the respective route in the func- tion keys on the right. Route guidance will start on the selected route
as soon as you press one of these function keys. The route options for
the navigation are changed according to the selected route. You can
change the route options at a later time.
After route guidance has started, the route becomes the first travel destination and
is calculated according to the specified information.
When switching to the map display, the ma p will always be displayed in the last
selected type of display (2D, 3D, topographic).
Fig. 22 3D map display
during a route guidance.
... / ...
Stop route guidance
Navigation
Start route guidance
NAV
StopStart
s2u4.6.book Page 55 Wednesday, August 13, 2008 7:57 AM
Page 58 of 75
Selector key NAV (Navigation)
56Receiving driving recommendations– Press the key at the unit , if you wish to repeat the last audible
driving recommendation.
– Press the selector key in the map display to insert the additional
window.
– Press the function key at the top left in the additional window.
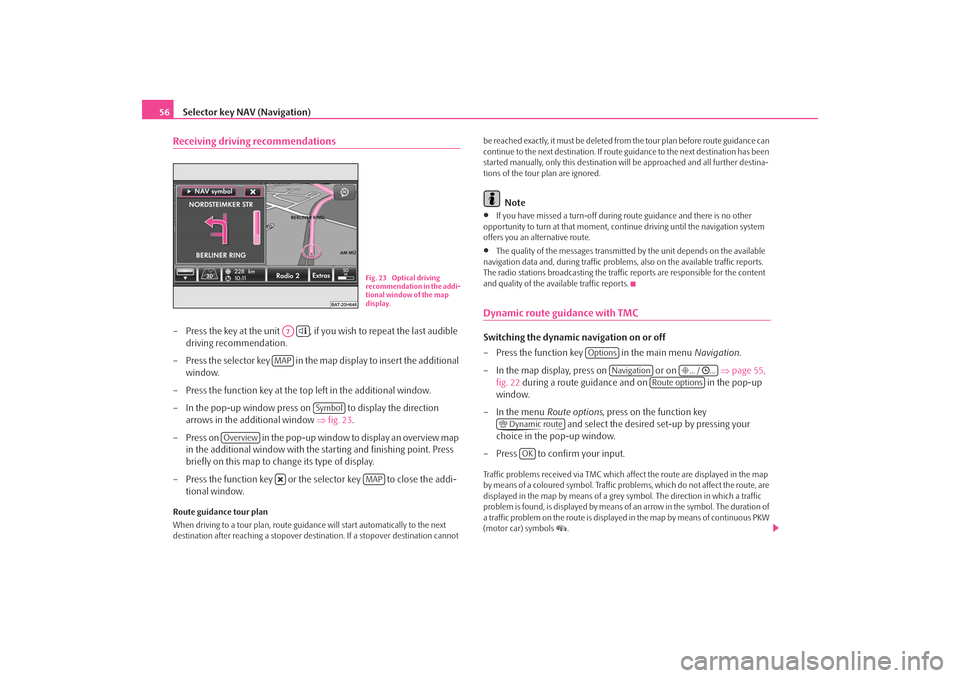
– In the pop-up window press on to display the direction
arrows in the additional window ⇒fig. 23 .
– Press on in the pop-up window to display an overview map in the additional window with the starting and finishing point. Press
briefly on this map to change its type of display.
– Press the function key or the selector key to close the addi- tional window.Route guidance tour plan
When driving to a tour plan, route guidan ce will start automatically to the next
destination after reaching a stopover dest ination. If a stopover destination cannot be reached exactly, it must be deleted from
the tour plan before route guidance can
continue to the next destinat ion. If route guidance to the next destination has been
started manually, only this destination wi ll be approached and all further destina-
tions of the tour plan are ignored.
Note
•
If you have missed a turn-off during route guidance and there is no other
opportunity to turn at that moment, cont inue driving until the navigation system
offers you an alternative route.
•
The quality of the messages transmitte d by the unit depends on the available
navigation data and, during traffic problems, also on the available traffic reports.
The radio stations broadcasting the traffic reports are responsible for the content
and quality of the available traffic reports.
Dynamic route guidance with TMCSwitching the dynamic navigation on or off
– Press the function key in the main menu Navigation.
– In the map display, press on or on ⇒page 55,
fig. 22 during a route guidance and on in the pop-up
window.
– In the menu Route options, press on the function key
and select the desired set-up by pressing your
choice in the pop-up window.
– Press to confirm your input.Traffic problems received via TMC which af fect the route are displayed in the map
by means of a coloured symbol. Traffic prob lems, which do not affect the route, are
displayed in the map by means of a grey symbol. The direction in which a traffic
problem is found, is displayed by means of an arrow in the symbol. The duration of
a traffic problem on the route is displayed in the map by means of continuous PKW
(motor car) symbols
.
Fig. 23 Optical driving
recommendation in the addi-
tional window of the map
display.
A7
MAP
Symbol
Overview
MAP
Options
Navigation
... / ...
Route options
Dynamic route
OK
s2u4.6.book Page 56 Wednesday, August 13, 2008 7:57 AM
Page 66 of 75
Selector key PHONE
64Selector key PHONEOverviewMain menu PHONEConnect your mobile phone with th e mobile phone program according
to the instruction manual a pplicable to your vehicle.
– Press the selector key to call up the main menu PHONE.After the connection process, it will take a few minutes until the phone book data
of the mobile phone connected to the radio unit is available.
Function keys in the main menu PHONE
–Take calls, establish or hold. After pressing the call list, the selected phone
numbers are displayed in the main menu PHONE.
–End conversation or reject call. – establishes a connection to a an em ergency number after further confirma-
tion. This function is also possible wi thout a connected mobile phone. It is,
however, necessary that a connection ca n be established via a mobile phone
company.
and to – Shortcut keys; these can be allocated
to, in each case, one number.
– opens the number block for entering a call number. – opens a pop-up window for selecting a call list. Only call lists of missed,
dialed or accepted calls from the mo bile phone preparation program can be
displayed.
and – switches off the microphone during a conver-
sation. Conversations held inside the vehi cles cannot be heard by the other party
when the microphone is switched off.
– opens the phone book of the connected mobile phone for selecting a call
number.
Enter call numberEnter a number and select
– Press on the function key in the main menu PHONE, in order to
open the number block for entering a call number.
– Press an inserted number key to accept the corresponding number in the entry line.
– You can delete the characters in the entry line from right to left by pressing the function key .
– Press function key when the desired call number is indicated in the entry line. The connection to the entered call number is established.You can select the character “+” instead of the first two digits (for example “ 00”)
when entering a country code. For this step, hold the function key with the little
triangle “
” pressed until a pop-up window with the function keys and fades
in. Accept the desired character into the en try line – the pop-up window will close.
If no entries are entered, the pop-up wi ndow will close automatically after a few
seconds.
The special keys “Stars” and “Rhombus” have the same function as those on
a phone keypad. These characters are prim arily needed when transmitting sound
signals during a call.
Phone bookOpening the phone book
– Press on the function key in the bottom right in the main menu PHONE , in order to open the phone book.
PHONE
SOSVoice mailbox
Memory 2
Memory 6
[:::]CallsExtras
Switch off microphone
[:::]
00
+
*
#
s2u4.6.book Page 64 Wednesday, August 13, 2008 7:57 AM
Page 67 of 75
Selector key PHONE65
Call a call number from the phone book
– When in the menu Phone book move the sliding regulator in the
scrollbar to the bottom to view further stations.
– Press on the function key to select a phone book entry via a search mask.
– Press in the left column on the display of a phone book entry. The connection to the first call number stored for this entry in the phone
book, will now be established.
Displaying information relati ng to a phone book entry
– Press the function key on the right next to the phone book entry you which to display. The call numbe rs stored under this entry are
displayed.
– If you press on the entry of a call number, the connection to this call number will be established.
Searching an entry in the phone book– Press on the function key in the menu Phone book to select a
phone book entry via a search mask.
– Press a selectable character on the keypad while in the search window
to accept it in the entry line.
– Press the function key to open the input window for digits and special characters. Press , to change again to the letter input mask.
– You can delete the characters in the entry line starting from the posi- tion of the character insertion cursor from right to left by pressing the
function key .
– If you press on the button , the connection to the first call number
is established, by doing so an assi gned name is displayed in the entry
line in the telephone.
The upper and lower case which is used wh en searching for a phone book entry, is
not of importance.
Editing field: Indicate specific characters
Some letters are also marked with a small triangle “
”. This indicates that specific
characters based on this letter can be selected.
Continue to press down on the correspond ing button with your finger until a pop-
up window with these specific characters fades in. After pressing the desired char-
acters, these characters are accepted in the entry line and the pop-up window will
close. If no entries are entered, the pop-up window will close automatically after a
few seconds.
Adapt a call numberOpen the display of a call number from the phone book or a call list as
described in the corresponding chapter.
– Press the arrow keys or to move the character entry cursor in the entry line.
– Press on a character inserted into the keypad to accept it behind the character entry cursor in the entry line.
– The connection to the displayed call number will be established as soon as you press the function key .Call listsOnly the dialed numbers which are missed, selected and accepted by the
mobile phone preparation program in the vehicle are stored. The call
lists stored in a mobile phone will not be transferred to the vehicle.
– Press on the function key in the main menu PHONE.
Search
Search
A-Z
Calls
s2u4.6.book Page 65 Wednesday, August 13, 2008 7:57 AM
Page 68 of 75
Selector key PHONE
66
– Select the call list from which you wish to select a call number by pressing your selection in the pop- up window. The corresponding list
is displayed. Call numbers, for which an entry exists in the phone
book, will be displayed together with the corresponding name.You can use the function key , to displa y further information relating to the
stored call number.•
– shows a list of the non-accept ed calls from the mobile phone
preparation program.
•
– shows a list of call number s, with which the mobile phone
preparation program has attemp ted to establish a connection.
•
– shows a list of calls accepted by the mobile phone preparation
program.
If the call number from a call list is stored in the phone book the stored name in the
phone book is displayed instead of the call number.
Incoming calls rejected with the function key will be stored in the call list of the
accepted calls.
Call lists are always assigned to a user profile and are only displayed once the corre-
sponding SIM card is connected agai n with the mobile phone preparation.
Shortcut keysAt the time of the first connection with the SIM card of your mobile tele-
phone all shortcut keys have still not b een assigned after the first call from
the main menu PHONE.
Assigning free shortcut keys
– If you press briefly on a non-assigned shortcut key the menu Shortcut
will open to enable a name and phone number to be entered.
– If you press the function key , an input mask will open to enable a name to be assigned. – If you press the function key a mask will open to enable a
number to be assigned.
– Press the function key or to accept a call
number for these shortcut keys from the corresponding list.
– Press the function key to erase all entries in all entry lines at once after confirmation with .
– If you have completed your entries in the Menu Shortcut, press the
function key .
– The entered name will be displayed in the shortcut key of the main menu PHONE . The call number entered will be assigned to a shortcut
key.
Calling up a connection via the shortcut key
– Briefly press an assigned shortcut key to establish the connection to
the assigned call number.
Modifying assigned shortcut keys
– If the assignment of a shortcut key is to be modified, keep pressing the corresponding shortcut key until the menu shortcut has opened for
modification.
The assignment of the shortcut keys remains stored in the unit and will only be
displayed again when the corresponding SIM card is connected again to the mobile
phone preparation program.
Shortcut key
The shortcut key has not yet been assigned a call number in the
factory, as this depends upon the co rresponding mobile phone company and
country. The name for this shortcut key ha s, however, been specified and cannot be
changed. You should now store your mail box number so that you can quickly check
your voice mail.
Missed callsDialed numbersCalls taken
Name
Number
Call list
Te l e p h o n e b o o k
OK
OK
Voice mailboxVoice mailbox
s2u4.6.book Page 66 Wednesday, August 13, 2008 7:57 AM
Page 70 of 75
Selector key PHONE
68If a DTMF key tone has to be entered during a conversation, you can open the
keypad field by pressing th e function key at the bottom left and follow the instruc-
tions (for example: “For a private conversation with one of our co-workers, please
press ”).
You can store a longer DTMF key tone on yo ur mobile phone. If, during a conversa-
tion, this DTMF key tone has to be entered, call up the corresponding entry from the
phone book as described.
If you press in the input mask on the function key , the displayed character
sequence in the entry line will be played as DTMF key tone sequence.
Please note that in a DTMF key tone sequence the character “+” must not appear,
as it interrupts the playing of a DTMF key tone.
3
DTMF
s2u4.6.book Page 68 Wednesday, August 13, 2008 7:57 AM