sensor SKODA OCTAVIA 2008 2.G / (1Z) Owner's Manual
[x] Cancel search | Manufacturer: SKODA, Model Year: 2008, Model line: OCTAVIA, Model: SKODA OCTAVIA 2008 2.G / (1Z)Pages: 304, PDF Size: 17.69 MB
Page 15 of 304
The brief instruction
14
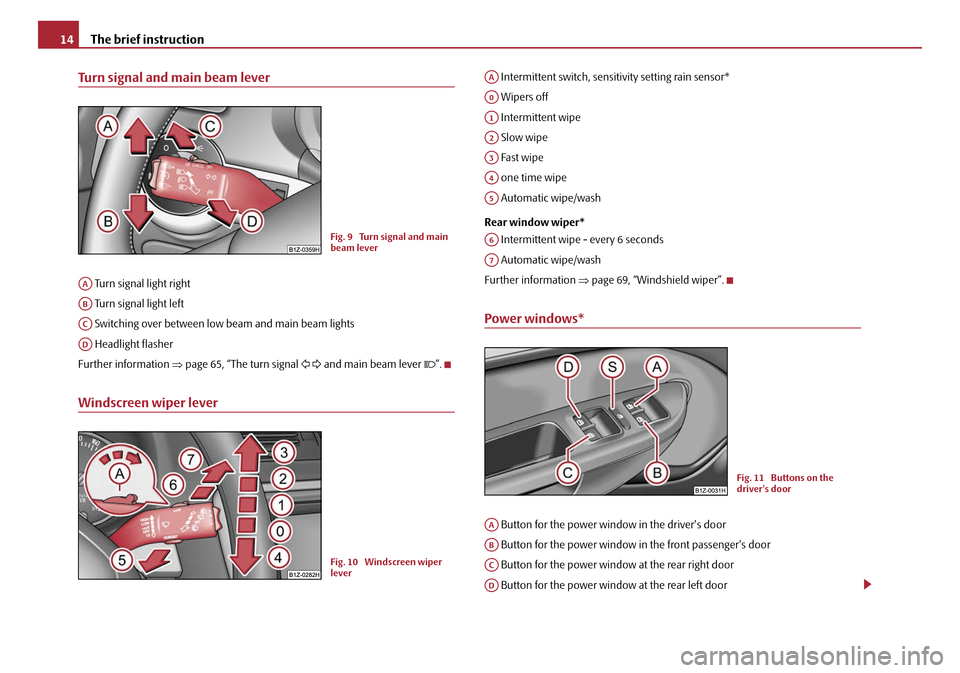
Turn signal and main beam lever
Turn signal light right
Turn signal light left
Switching over between low beam and main beam lights
Headlight flasher
Further information ⇒page 65, “The turn signal and main beam lever ”.
Windscreen wiper lever
Intermittent switch, sensitivity setting rain sensor*
Wipers off
Intermittent wipe
Slow wipe
Fast wipe
one time wipe
Automatic wipe/wash
Rear window wiper* Intermittent wipe - every 6 seconds
Automatic wipe/wash
Further information ⇒page 69, “Windshield wiper”.
Power windows*
Button for the power window in the driver's door
Button for the power window in the front passenger's door
Button for the power window at the rear right door
Button for the power window at the rear left door
Fig. 9 Turn signal and main
beam lever
AA
AB
AC
AD
Fig. 10 Windscreen wiper
lever
AA
A0
A1
A2
A3
A4
A5
A6
A7
Fig. 11 Buttons on the
driver's door
AA
AB
AC
AD
20A5Facelift.book Page 14 Saturday, September 6, 2008 2:13 PM
Page 30 of 304
Instruments and Indicator/Warning Lights29
Using the systemSafetyDriving TipsGeneral MaintenanceBreakdown assistanceTechnical Data
messages are displayed one after the other in an interval of 5 seconds. Check as
soon as possible the displayed error messages.
As long as the operational faults are not rectified, the symbols are always indicated
again. After the first display, the symbols are indicated without information for the
driver.
If a fault occurs, a warning signal will also sound in addition to the symbol and text
in the display:
•Priority 1 - three warning signals
•Priority 2 - one warning signal
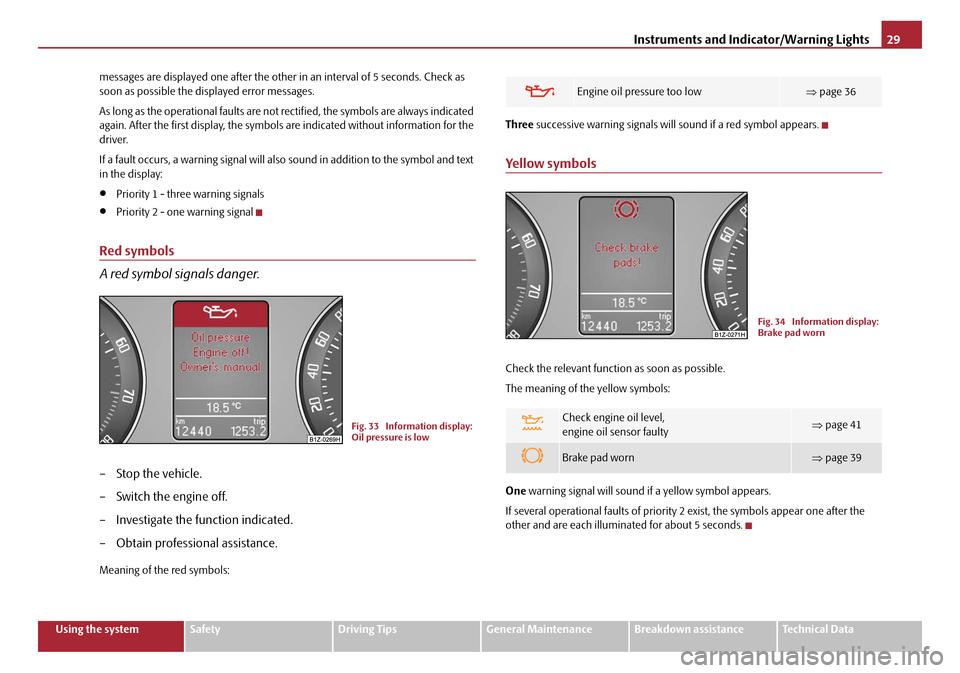
Red symbols
A red symbol signals danger.
– Stop the vehicle.
– Switch the engine off.
– Investigate the function indicated.
– Obtain professional assistance.
Meaning of the red symbols:
Three
successive warning signals will sound if a red symbol appears.
Yellow symbols
Check the relevant function as soon as possible.
The meaning of the yellow symbols:
One warning signal will sound if a yellow symbol appears.
If several operational faults of priority 2 exist, the symbols appear one after the
other and are each illumi nated for about 5 seconds.
Fig. 33 Information display:
Oil pressure is low
Engine oil pressure too low ⇒page 36
Check engine oil level,
engine oil sensor faulty⇒page 41
Brake pad worn⇒page 39
Fig. 34 Information display:
Brake pad worn
20A5Facelift.book Page 29 Saturday, September 6, 2008 2:13 PM
Page 31 of 304
Instruments and Indicator/Warning Lights
30
Set-up
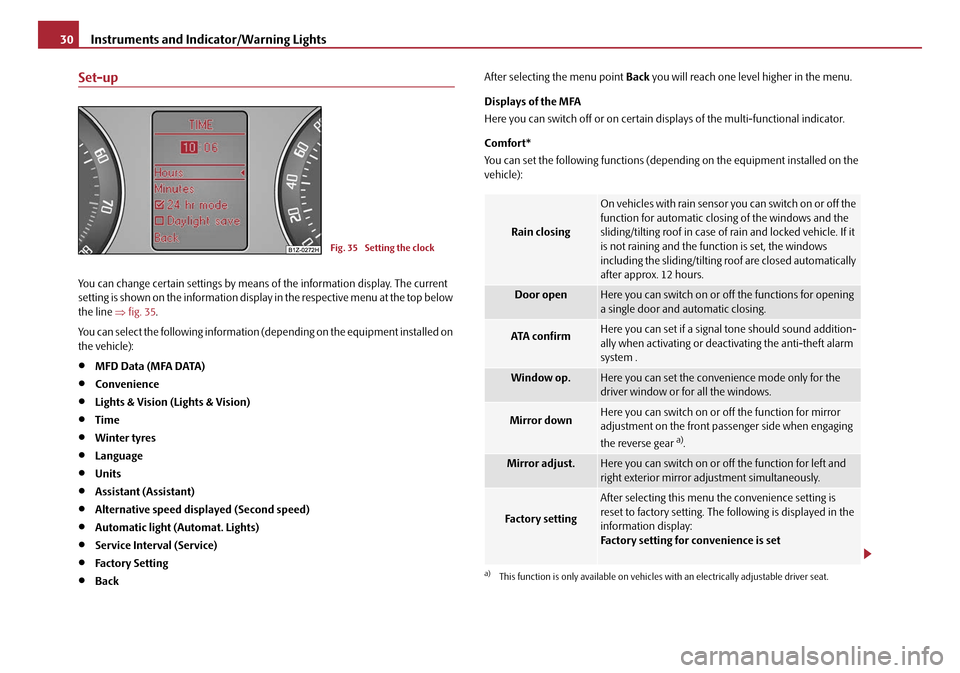
You can change certain settings by means of the information display. The current
setting is shown on the information displa y in the respective menu at the top below
the line ⇒fig. 35 .
You can select the following information (d epending on the equipment installed on
the vehicle):
•MFD Data (MFA DATA)
•Convenience
•Lights & Vision (Lights & Vision)
•Time
•Winter tyres
•Language
•Units
•Assistant (Assistant)
•Alternative speed displayed (Second speed)
•Automatic light (Automat. Lights)
•Service Interval (Service)
•Factory Setting
•Back After selecting the menu point
Back you will reach one level higher in the menu.
Displays of the MFA
Here you can switch off or on certain di splays of the multi-functional indicator.
Comfort*
You can set the following functions (depen ding on the equipment installed on the
vehicle):
Fig. 35 Setting the clock
Rain closing
On vehicles with rain sensor you can switch on or off the
function for automatic closing of the windows and the
sliding/tilting roof in case of rain and locked vehicle. If it
is not raining and the function is set, the windows
including the sliding/tilting roof are closed automatically
after approx. 12 hours.
Door openHere you can switch on or of f the functions for opening
a single door and automatic closing.
ATA confirmHere you can set if a signal tone should sound addition-
ally when activating or deactivating the anti-theft alarm
system .
Window op.Here you can set the convenience mode only for the
driver window or for all the windows.
Mirror downHere you can switch on or off the function for mirror
adjustment on the front passe nger side when engaging
the reverse gear
a).
a)This function is only available on vehicles with an electrically adjustable driver seat.
Mirror adjust.Here you can switch on or off the function for left and
right exterior mirror adjustment simultaneously.
Fa c t o r y s e t t i n g
After selecting this menu the convenience setting is
reset to factory setting. The following is displayed in the
information display:
Factory setting for convenience is set
20A5Facelift.book Page 30 Saturday, September 6, 2008 2:13 PM
Page 42 of 304
Instruments and Indicator/Warning Lights41
Using the systemSafetyDriving TipsGeneral MaintenanceBreakdown assistanceTechnical Data
dropped below the MIN marking, do not
drive any further - risk of accident!
Contact a Škoda dealer to obtain professional assistance.
Alternator
The warning light comes on after the ignition has been switched on. It should go
out after the engine has started.
If the warning light does not go out after the engine has started, or comes on when
driving, drive to the nearest specialist garage. The vehicle battery will be discharged
in this case so switch off all non-essential electrical components.
Caution
If the warning light comes on when driving and in addition the warning light
(cooling system fault) also comes on in di splay, you must then stop the car imme-
diately and switch the engine off - risk of engine damage!
Engine oil level
Warning light lights up
If the warning light
lights up, the quantity of oil in the engine is probably too low.
Check as soon as possible the oil level or top up ⇒page 228, “Replenishing engine
oil” with engine oil.
A peep sounds as an addi tional warning signal.
The following text will be displayed in the information display*: Check oil level!
The warning light will go out if the bonnet is left open for more than 30 seconds. If
no engine oil has been replenished, the warning light will come on again after
driving about 100 km. Warning light
flashes
A fault on the engine oil level sensor is in dicated additionally by an audible signal
and the warning light coming on several ti mes after the ignition has been switched
on.
In this case have the engine inspecte d without delay by a specialist garage.
The following text will be displayed in the information display*: Oil sensor Workshop!
Fuel reserve
The warning light comes on, if the fuel level is still below 9 litres.
An audible signal sounds as an additional warning signal.
The following text will be displayed in the information display*: Please refuel! Range...km
Note
The Text in the information display* goes out only after refuelling and driving a
short distance.
WARNING (continued)
20A5Facelift.book Page 41 Saturday, September 6, 2008 2:13 PM
Page 61 of 304
Lights and Visibility
60
Daylight driving lights*
In some countries, the national legislation requires that the vehicles are
equipped with the function daylight driving lights.
Switching on daylight driving lights
– Switch on the ignition without turning the light switch out of the posi- tion 0.
Deactivate function daylight driving lights
– Pull the turn signal light lever towards the steering wheel up to 3 seconds after switching on the ignition and at the same time, slide it to
the bottom and hold it in this position for at least 3 seconds.
Activate function daylight driving lights
– Pull the turn signal light lever towards the steering wheel up to 3 seconds after switching on the ignition and at the same time, slide it to
the top and hold it in this position for at least 3 seconds.
When the daylight driving lights are switched on, the side lights and the low beam
shine together.
On vehicles which are fitted with bulbs for daylight driving lights* in the fog lights,
the parking lights do not switch on when activating the function daylight driving
lights.
When the daylight driving lights are switch ed on, the illumination of the instrument
cluster is switched off, however, it is switched on in the position
when it is dark
and the low beam shines with full br ightness (100 % of the performance).
On vehicles fitted with an information disp lay*, you can activate or deactivate in the
menu the function dayl ight driving lights:
�„SETUP (Settings)
�„Lights & Vision (Lights & Vision)
Automatic light control*
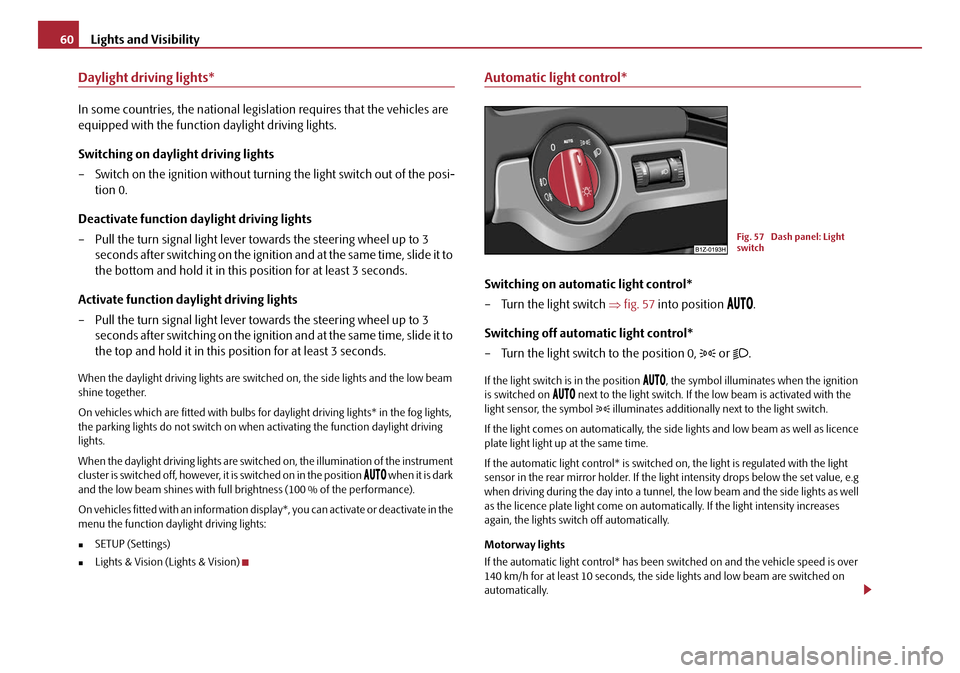
Switching on automatic light control*
– Turn the light switch ⇒fig. 57 into position
.
Switching off automatic light control*
– Turn the light switch to the position 0,
or .
If the light switch is in the position , the symbol illuminates when the ignition
is switched on next to the light switch. If th e low beam is activated with the
light sensor, the symbol illuminates additionally next to the light switch.
If the light comes on automatically, the side lights and low beam as well as licence
plate light light up at the same time.
If the automatic light control* is switched on, the light is regulated with the light
sensor in the rear mirror holder. If the li ght intensity drops below the set value, e.g
when driving during the day into a tunnel, the low beam and the side lights as well
as the licence plate light co me on automatically. If the light intensity increases
again, the lights swit ch off automatically.
Motorway lights
If the automatic light control* has been sw itched on and the vehicle speed is over
140 km/h for at least 10 seconds, the sid e lights and low beam are switched on
automatically.
Fig. 57 Dash panel: Light
switch
20A5Facelift.book Page 60 Saturday, September 6, 2008 2:13 PM
Page 62 of 304
Lights and Visibility61
Using the systemSafetyDriving TipsGeneral MaintenanceBreakdown assistanceTechnical Data
If the vehicle speed is below 65 km/h for at least 2 minutes, the lights are switched
off.
Rain lights
If you switch on the windscreen wipe in
the operation rain sensor* for longer than
10 seconds or in the operation permanent wipe (position 2 or 3) ⇒page 69
switching on for longer than 15 seconds, th e side lights and low beam are switched
on automatically. The light switches off if the windscreen wipe is in operation rain
sensor* for more than 4 minutes or is no t switched on in the operation permanent
wipe.
WARNING
The automatic light control only operates as a support. The driver is not
released from his responsibility to inspect the light and if necessary to switch
on the light depending on the light conditions. The light sensor cannot
detect for example rain or snow. For these conditions we recommend to
switch on the low beam
!
Note
•Do not affix any stickers in front of the light sensor, so that you do not impair its
function or put it out of operation.
•The same principles as fo r using the automatic light control also apply to the
light which is switched on manually ⇒page 59.
Cornering lights*
The cornering lights are used to illuminate the curves by means of the cone of light
swiveling together with the front headlight with Xenon lights*.
WARNING
If the cornering lights are defectiv e, the headlights are automatically
lowered to the emergency position, whic h prevents a possible dazzling of oncoming traffic. Thus the illuminated length of the road is shortened. Drive
carefully and have the car inspected
immediately by a specialist garage.
Coming Home Function
The function makes it possible to switch on the lights in the darkness for
a short time after leaving the vehicle.
Switching on Coming Home Function
– The light switch is in the position automatic driving lamp control
and the low beam illuminates.
– Switch off the ignition.
– After opening the driver's door , the function Coming Home is
switched on.
– Close all the doors and the boot lid and lock the vehicle. After a short time, switch all lights off.
Depending on equipment fitted the function Coming Home switches on the
following lights:
•Parking lights,
•Low beam,
•Entry lighting in the exterior mirrors,
•Licence plate light.
Coming Home Function
The lights go out 10 seconds after cl osing all the doors and the boot lid.
If a door or the boot lid remains open, th e lights go out 60 seconds after switching
off the ignition.
The function Coming Home is controlled wi th the light sensor in the mount of the
interior rear mirror. If the light intensity is higher than the set value of the light
WARNING (continued)
20A5Facelift.book Page 61 Saturday, September 6, 2008 2:13 PM
Page 63 of 304
Lights and Visibility
62
sensor, the Coming Home Func tion is not switched on after switching off the igni-
tion.
Note
•If the Coming Home Function is switch ed on constantly, the battery will be
heavily discharged particularly in short-haul traffic.
•The switching on of the described lights should only be undertaken in accord-
ance with the legal requirements.
•You can change the illumination period for the Coming Home Function by
means of the information display*.
Leaving Home Function
This function makes it possible to switch on the lights when approaching
the vehicle.
Switching on Leaving Home Function
– Unlock the vehicle with the radio remote control - the lights come on.
Depending on equipment fitted the function Leaving Home switches on the
following lights:
•Parking lights,
•Low beam,
•Entry lighting in the exterior mirrors,
•Licence plate light.
Leaving Home Function
The function Leaving Home is controlled wi th the light sensor in the mount of the
interior rear mirror. If the light intensity is higher than the set value of the light
sensor, the Leaving Home Func tion is not switched on after unlocking the vehicle
with the radio remote control. After unlocking the vehicle with the radio remote control, the lights come on for 10
seconds. The Leaving Home Function is also switched off after the ignition is
switched on and after locking the vehicle.
If no door is opened within 30 seconds, th
e lights go out and the vehicle is locked
automatically.
Note
•If the Leaving Home Function is switch ed on constantly, the battery will be
heavily discharged particularly in short-haul traffic.
•The switching on of the described lights should only be undertaken in accord-
ance with the legal requirements.
•You can change the illumination period for the Leaving Home Function by
means of the information display*.
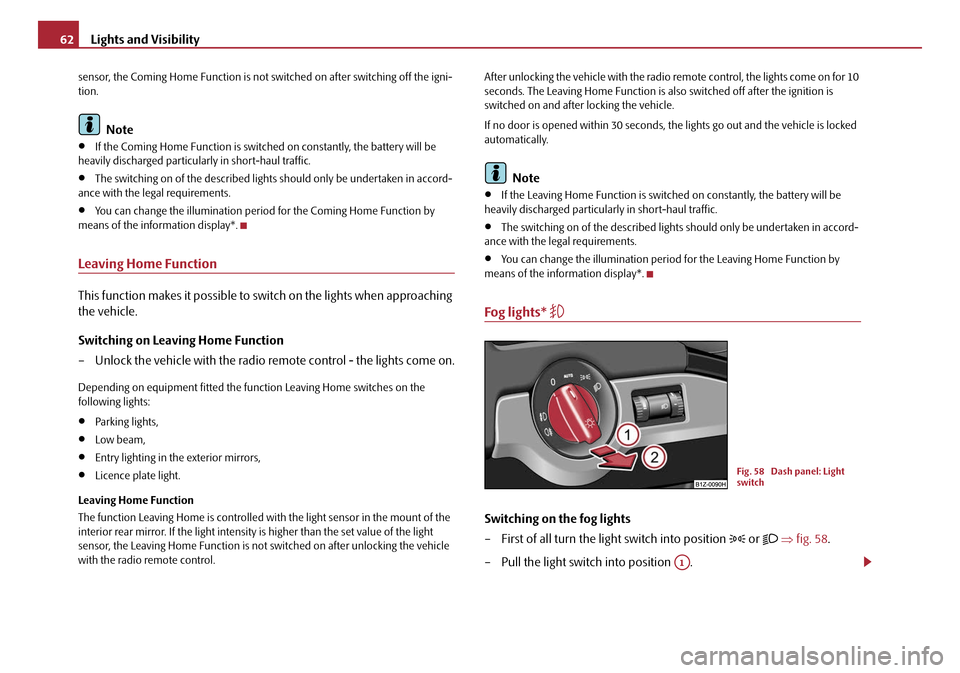
Fog lights*
Switching on the fog lights
– First of all turn the light switch into position
or ⇒ fig. 58 .
– Pull the light switch into position .
Fig. 58 Dash panel: Light
switch
A1
20A5Facelift.book Page 62 Saturday, September 6, 2008 2:13 PM
Page 71 of 304
Lights and Visibility
70
Fast wipe
– Position the lever up into position .
Automatic wipe/wash for windscreen
– Pull the lever towards the steering wheel into sprung position , the wash system sprays immediately, the windscreen wiper starts wiping
a little later. The wash system and the windscreen wiper operate
simultaneously at a speed of more than 120 km/h.
– Release the lever. The windscreen wash system stops and the wiper continues for another 3 - 4 wiper stro kes (depending on the period of
spraying of the windscreen). At a speed of more than 2 km/h, the wiper
wipes once again* 5 seconds after the last wiper stroke in order to
wipe the last drops from the windsc reen. This function can be acti-
vated/deactivated by a specialist garage.
Rain sensor*
– Move the lever into position .
– You can set the sensitivity of the sensor individually with switch .
Wiping the rear window pane*
– Push the lever away from the steering wheel into position - the widescreen wiper will operate every 6 seconds.
Automatic wipe/wash for the rear window pane*
– Press the lever from the steering wheel forward into the sprung posi- tion , the wash system sprays immediately, the windscreen wiper
starts wiping a little later. As long as you hold the lever in this position,
the wiper operates as well as the wash system.
– Letting go of the lever will cause the windscreen wash system to stop and the wiper to continue for anot her 2 - 3 wiper strokes (depending
on the period of spraying of the windscreen). The lever will stay in
position after releasing it . Switching windscreen wipers off
– Move the lever back into its home position .
After the windscreen wiper switches off each
time or the ignition switches off for
the third time, the position of the windscreen wiper changes, this counteracts an
early fatigue of the wiper rubbers.
The windscreen wipers and the wash system only operate if the ignition is switched
on and the bonnet is closed
10).
If the intermittent wipe is switched on, the intervals are also controlled depending
on speed.
The rain sensor* automatically regulates the break between the individual wiper
strokes depending on the intensity of the rain.
The rear window will be wiped again if the front window wipers are on when
reverse gear is selected.
The windscreen washer nozzles are heated* when the ignition is switched on.
Top up with wash liquid ⇒page 235.
Winter position
If the windscreen wipers are in rest posi tion, they cannot be folded out from the
windscreen. For this reason we recommend adjusting the windscreen wipers in
winter so that they can be folded out fr om the windscreen easily. You can set this
rest position as follows:
•Switch on the windscreen wipers.
•Switch off the ignition. The windscreen wipers remain in the position in which
they were when switching off the ignition.
You can also use the service position ⇒page 71 as a winter position.
A3
A5
A1
AA
A6
A7
A6
10)On vehicles which do not have a contact swit ch for the bonnet, the windshield wiper and
wash system operates also when the bonnet is opened.
A0
20A5Facelift.book Page 70 Saturday, September 6, 2008 2:13 PM
Page 72 of 304
Lights and Visibility71
Using the systemSafetyDriving TipsGeneral MaintenanceBreakdown assistanceTechnical Data
WARNING
•Properly maintained windscreen wiper blades are essential for clear visi-
bility and safe driving ⇒page 71.
•Do not use the windscreen washer sy stem at low temperatures, without
heating the windscreen beforehand. Otherwise the window cleaner could
freeze on the windscreen and re strict the view to the front.
•The rain sensor only operates as a support. The driver is not released
from the responsibility to set the function of the windscreen wipers manu-
ally depending on the visibility conditions.
Caution
In frosty weather, please first of all check whether the windscreen wiper blades are
not frozen to the windscreen before swit ching them on. Switching on windscreen
wipers when the blades are frozen to the windscreen may result in damage both to
the blades and the motor of the windscreen wipers!
Note
•If the slower or the faster wiper setting is switched on ⇒page 69, fig. 70
and the vehicle speed decreases to below 4 km/h, the lower wiper step is switched
on automatically. At a speed increase of more than 8 km/h the previous wiper
setting is esta blished again.
•If there is an obstacle on the windscre en, the wiper will try to push away the
obstacle. If the obstacle continues to block the wiper, th e wiper stops after 5 cycles,
in order to avoid a damage to the wiper. Remove the obstacle and and switch on
the wiper again.
Headlight cleaning system*
The headlights are being cleaned after the windscreen has been sprayed for the first
time and fifth time, the low beam or ma in beam are switched on and the wind-
screen wiper lever was he ld in the position ⇒page 69, fig. 70 for about 1
second. The headlight washer nozzles are moved forward out of the bumper by the water
pressure for cleaning the headlights.
You should remove stubborn dirt (such
as insect residues) from the headlight
lenses at regular intervals, for example when refuelling. Please refer to the following
guidelines ⇒page 214, “The headlight lenses”.
You should remove any snow from the fixtures of the washer nozzles and clear ice
in winter with a de-icing spray in order to ensure proper operation of the cleaning
system.
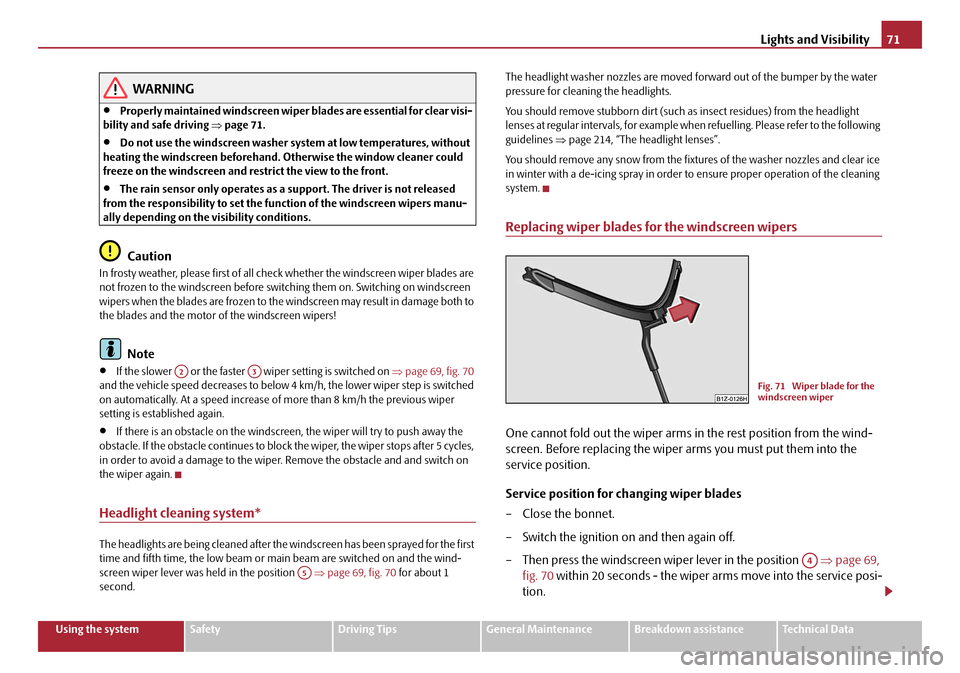
Replacing wiper blades for the windscreen wipers
One cannot fold out the wiper arms in the rest position from the wind-
screen. Before replacing the wiper arms you must put them into the
service position.
Service position for changing wiper blades
– Close the bonnet.
– Switch the ignition on and then again off.
– Then press the windscreen wiper lever in the position ⇒page 69,
fig. 70 within 20 seconds - the wiper arms move into the service posi-
tion.
A2A3
A5
Fig. 71 Wiper blade for the
windscreen wiper
A4
20A5Facelift.book Page 71 Saturday, September 6, 2008 2:13 PM
Page 74 of 304
Lights and Visibility73
Using the systemSafetyDriving TipsGeneral MaintenanceBreakdown assistanceTechnical Data
Rear-view mirror
Manual dimming interior rear-view mirror
Basic setting
– Pull the lever on the bottom edge of the mirror forward.
Dimming mirror
– Pull the lever on the bottom edge of the mirror back.
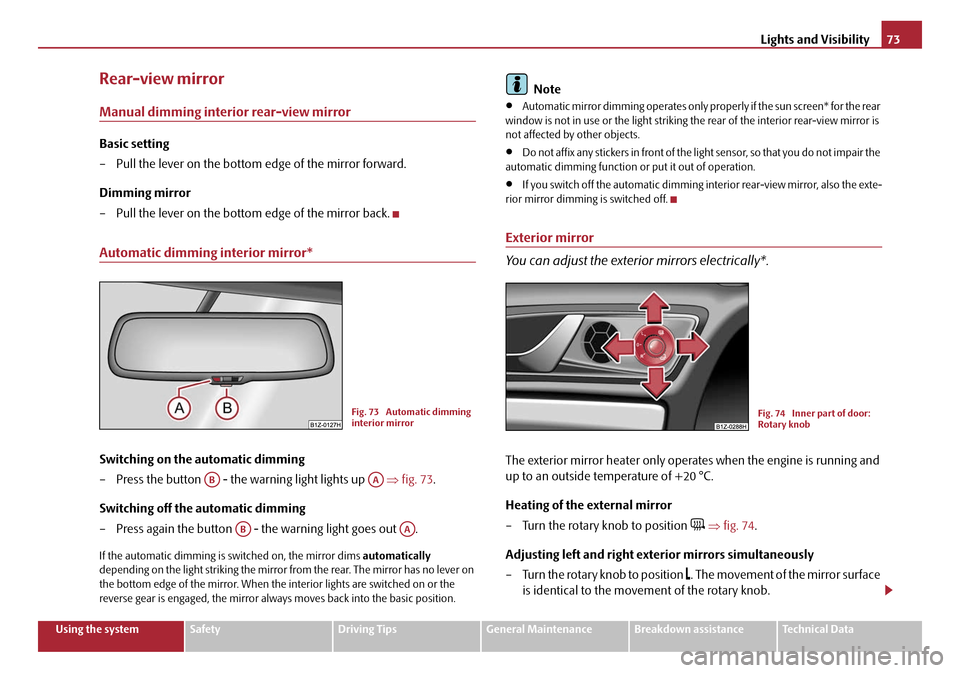
Automatic dimming interior mirror*
Switching on the automatic dimming
– Press the button - the warning light lights up ⇒fig. 73 .
Switching off the automatic dimming
– Press again the button - the warning light goes out .
If the automatic dimming is switched on, the mirror dims automatically
depending on the light striking the mirror from the rear. The mirror has no lever on
the bottom edge of the mirror. When the interior lights are switched on or the
reverse gear is engaged, the mirror alwa ys moves back into the basic position.
Note
•Automatic mirror dimming operates only pr operly if the sun screen* for the rear
window is not in use or the light striking th e rear of the interior rear-view mirror is
not affected by other objects.
•Do not affix any stickers in front of the li ght sensor, so that you do not impair the
automatic dimming function or put it out of operation.
•If you switch off the automatic dimming interior rear-view mirror, also the exte-
rior mirror dimming is switched off.
Exterior mirror
You can adjust the exterior mirrors electrically*.
The exterior mirror heater only oper ates when the engine is running and
up to an outside temperature of +20 °C.
Heating of the external mirror
– Turn the rotary knob to position
⇒ fig. 74 .
Adjusting left and right exterior mirrors simultaneously
– Turn the rotary knob to position
. The movement of the mirror surface
is identical to the movement of the rotary knob.
Fig. 73 Automatic dimming
interior mirror
ABAA
ABAA
Fig. 74 Inner part of door:
Rotary knob
20A5Facelift.book Page 73 Saturday, September 6, 2008 2:13 PM