SKODA OCTAVIA 2011 2.G / (1Z) Owner's Manual
Manufacturer: SKODA, Model Year: 2011, Model line: OCTAVIA, Model: SKODA OCTAVIA 2011 2.G / (1Z)Pages: 248, PDF Size: 3.79 MB
Page 131 of 248
Internet connection
An Internet connection can be established via a PC or PDA.
The control unit on the hands-free system supports the GPRS, EDGE and UMTS/3G
technologies.
An Internet is only possible via a telephone which is connected via the rSAP pro-
file.
The procedure for connecting to the Internet can vary depending on the type and
version of the operating system as well as the type of the device to be connected.
Successfully connecting to the internet requires appropriate knowledge of the op-
erating system for connecting the device .
Process of connection
– Connect the mobile phone with the hands-free system.
– Set the access point (depending on the operator, usually the “Internet”) in the
menu Phone - Settings - Data .
– Switch on the visibility of the hands-free system for the other devices in the
menu Phone - Bluetooth
- Visibility.
– Have the device to be connected search for available Bluetooth ®
devices.
– From the list of found devices, choose the hands-free system (“SKODA_BT” by
default).
– On the device to be connected, enter the password and follow any instructions
given on this device or in the information display.
– Enter the required Internet address in the browser. The operating system re-
quests the entry of the telephone number for the internet access (depending
on the operator, usually
“*99#”).
Music playback via Bluetooth ®The universal telephone preinstallation GSM IIl makes it possible to play back mu-
sic via Bluetooth ®
from the devices such as MP3 player, mobile phone or note-
book.
In order to enable the music playback via Bluetooth ®
, it is necessary to first con-
nect the device to be connected with the hands-free system in the menu Phone -
Bluetooth - Media player . The music playback process is performed on the connected device. Note
● The device to be connected must support the Bluetooth ®
profile A2DP, see
Owner's manual of the device to be coupled.
● This function is not available in vehicles fitted with the car radio Blues.
Multimedia AUX-IN and MDI inputs The input AUX-IN is located below the armrest of the front seats and is marked
with .
The input MDI is located in the glove box.
The inputs AUX-IN and MDI are used to connect external audio sources (e.g. iPod
or MP3 player) and play back music from these devices via your factory-fitted radio
or radio navigation system.
The description of the operation can be found in the relevant Owner's Manual of
your radio or your radio navigation system. Note
● The loudspeakers in the vehicle are matched to a power output of the radio
and radio navigation system of 4x 20 W.
● For the equipment sound system, the loudspeakers are matched to a power
output of the amplifier of 4x40°W + 6x20
W. 129
Communication Using the system Safety Driving Tips General Maintenance Breakdown assistance Technical data
Page 132 of 248
CD changer
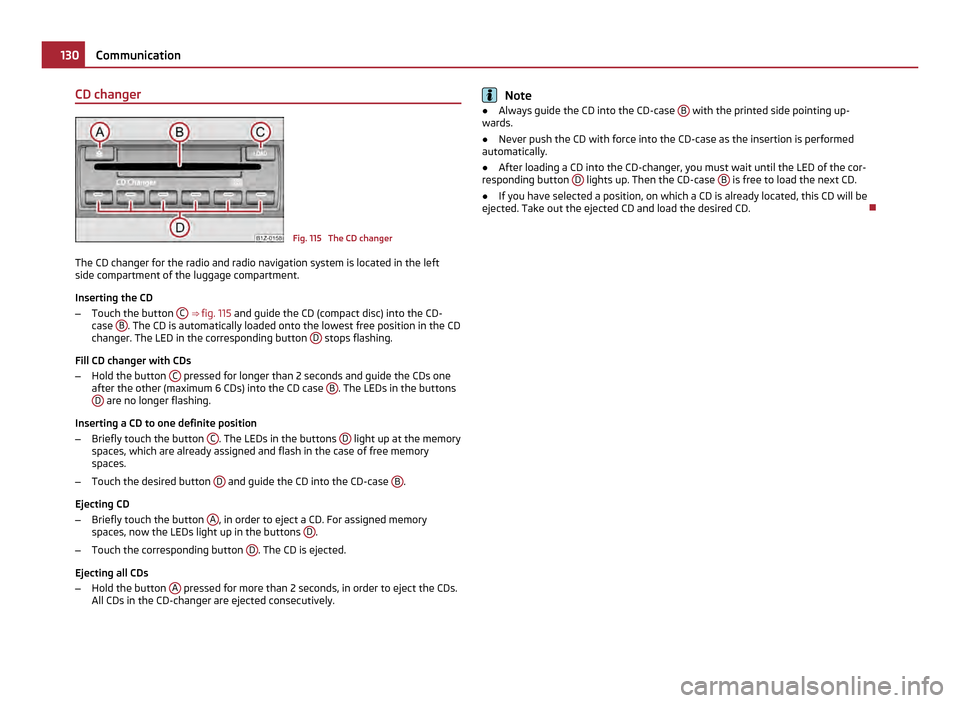
Fig. 115 The CD changer
The CD changer for the radio and radio navigation system is located in the left
side compartment of the luggage compartment.
Inserting the CD
– Touch the button C
⇒ fig. 115 and guide the CD (compact disc) into the CD-
case B . The CD is automatically loaded onto the lowest free position in the CD
changer. The LED in the corresponding button D stops flashing.
Fill CD changer with CDs
– Hold the button C pressed for longer than 2 seconds and guide the CDs one
after the other (maximum 6
CDs) into the CD case B . The LEDs in the buttons
D are no longer flashing.
Inserting a CD to one definite position
– Briefly touch the button C . The LEDs in the buttons
D light up at the memory
spaces, which are already assigned and flash in the case of free memory
spaces.
– Touch the desired button D and guide the CD into the CD-case
B .
Ejecting CD
– Briefly touch the button A , in order to eject a CD. For assigned memory
spaces, now the LEDs light up in the buttons D .
– Touch the corresponding button D . The CD is ejected.
Ejecting all CDs
– Hold the button A pressed for more than 2 seconds, in order to eject the CDs.
All CDs in the CD-changer are ejected consecutively. Note
● Always guide the CD into the CD-case B with the printed side pointing up-
wards.
● Never push the CD with force into the CD-case as the insertion is performed
automatically.
● After loading a CD into the CD-changer, you must wait until the LED of the cor-
responding button D lights up. Then the CD-case
B is free to load the next CD.
● If you have selected a position, on which a CD is already located, this CD will be
ejected. Take out the ejected CD and load the desired CD. 130
Communication
Page 133 of 248
Safety
Passive Safety
Basic information
Driving the safe way Passive safety measures reduce the risk of injury in accident situa-
tions.
In this section you will find important information, tips and notes on the subject of
passive safety in your vehicle. We have combined everything here which you
should be familiar with, for example, regarding seat belts, airbags, child seats and
safety of children. It is therefore important, in particular, to comply with the notes
and warnings in this section for your own interest and in the interest of those
travelling with you. WARNING
● This chapter contains important information on how to use the vehicle for
the driver and his occupants. You will find further information on safety, which
concerns you and those travelling with you, in the following chapters of this
Owner's Manual.
● The complete on-board literature should always be in the vehicle. This ap-
plies in particular, if you rent out or sell the vehicle.
Safety equipment The safety equipment is part of the occupant protection and it can
reduce the risk of injuries in accident situations.
“Do not put at risk
” your safety and the safety of those travelling with you . In the
event of an accident, the safety equipment can reduce the risk of injuries.
The following list contains part of the safety equipment in your vehicle:
● three-point seat belts for all the seats;
● belt force limiter for front and outer rear seats;
● belt tensioners for front seats; ●
seat belt height adjusters for front seats;
● front airbag for the driver and front passenger;
● side airbags;
● head airbags;
● anchoring points for child seat using the “ISOFIX” system;
● anchoring points for child seat using the “Top Tether” system;
● head restraints adjustable for height;
● adjustable steering column.
The specified safety equipment works together, in order to optimally protect you
and those travelling with you in accident situations. The safety equipment does
not protect you or the people travelling with you, if you or your occupants adopt
an incorrect seated position or the equipment is not correctly adjusted or used.
For this reason you will be provided with information on why these equipment
components are very important, how it protects you and the occupants, what
should be observed when using the equipment and how you and the people trav-
elling with you can make full use of the existing safety equipment. This Owner's
Manual contains important warning notes, which you and those travelling with
you should pay attention to in order to reduce a risk of injury.
Safety concerns everybody!
Before setting off The driver is always fully responsible for his occupants and for the
operating safety of the vehicle.
For your own safety and the safety of the people travelling with you, please pay
attention to the following points before setting off.
● Ensure that the lighting and the turn signal system are functioning properly.
● Inspect the tyre inflation pressure.
● Ensure that all the windows offer a good visibility to the outside.
● Safely attach the items of luggage ⇒ page 66
, Loading the luggage compart-
ment. £ 131
Passive Safety Using the system Safety Driving Tips General Maintenance Breakdown assistance Technical data
Page 134 of 248
●
Ensure that no objects can obstruct the pedal.
● Adjust the mirror, the front seat and the head restraint to match your body
size.
● Point out to your occupants that the head restraints must be adjusted to
match their body size.
● Protect the children in suitable child seats with correctly fastened seat belts
⇒ page 147, Transporting children safely.
● Adopt the correct seated position ⇒
page 132, Correct seated position. Also
inform your occupants to adopt the correct seated position.
● Fasten the seat belt correctly. Also inform your occupants to properly fasten
the seat belts ⇒
page 137, How are seat belts correctly fastened?.
What influences the driving safety? The driving safety is primarily determined by the style of driving
and the personal behaviour of all the occupants.
The driver is fully responsible for himself and his occupants. If your driving safety
is effected, you place yourself and the oncoming traffic at risk.
Please refer to the following guidelines.
● Do not get distracted from concentrating on the traffic situation, e.g. by your
occupants or mobile phone calls.
● Never drive when your driving ability is impaired, e.g. through medication, alco-
hol, drugs.
● Keep to the traffic regulations and the permissible speed limit.
● Adjust the driving speed at all times to the road condition as well as to the
traffic and weather conditions.
● Take regular breaks on long journeys - at the latest every two hours. Correct seated position
Correct seated position for the driver Correct seated position for the driver is important for safe and re-
laxed driving.
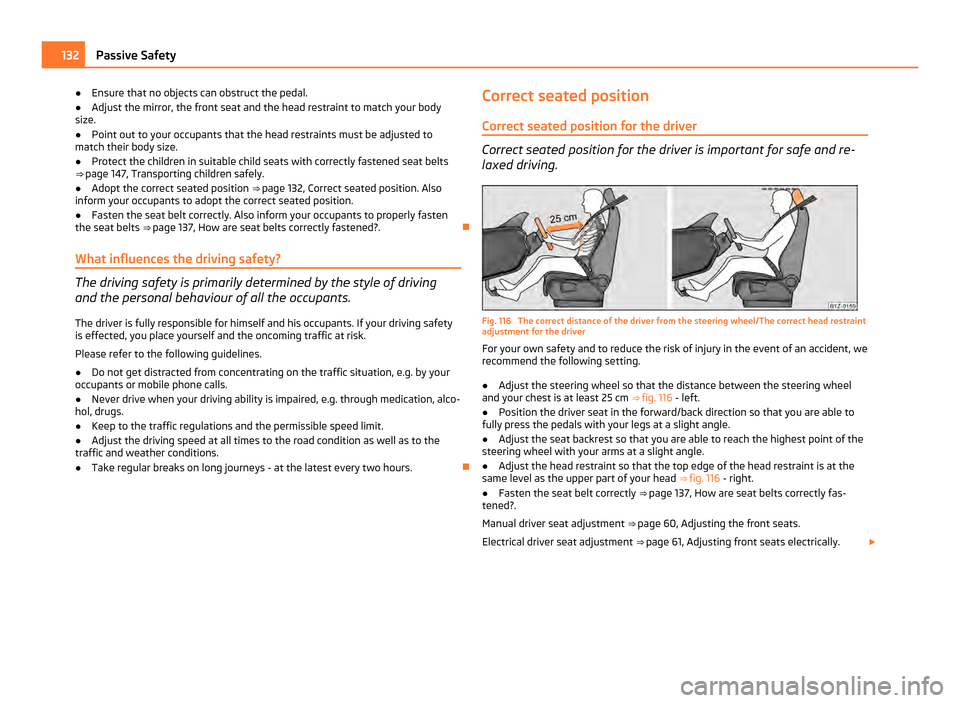
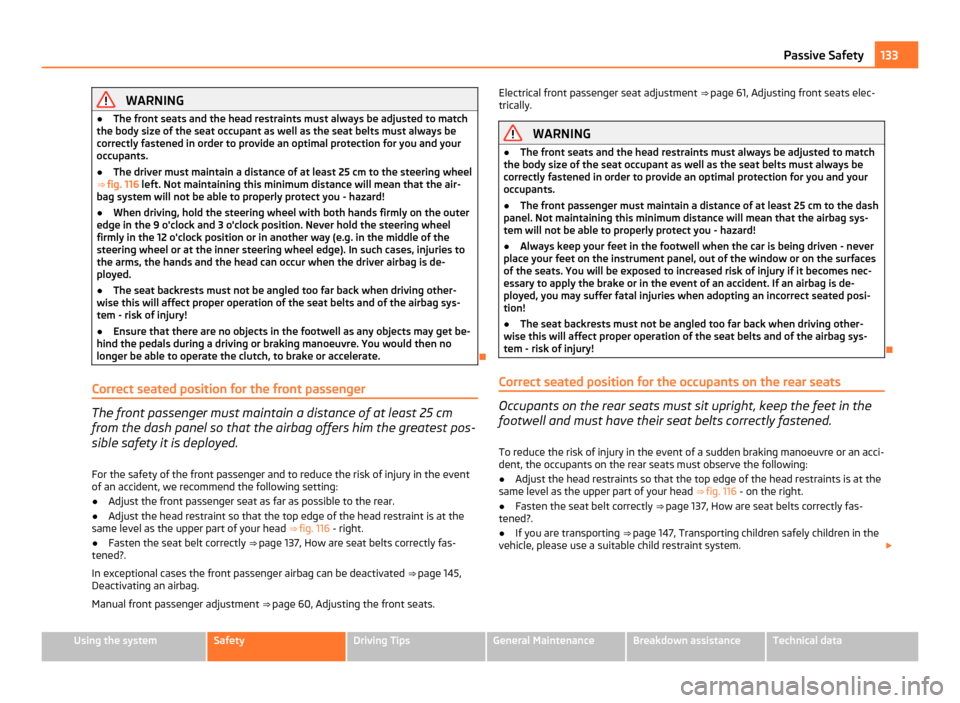
Fig. 116 The correct distance of the driver from the steering wheel/The correct head restraint
adjustment for the driver
For your own safety and to reduce the risk of injury in the event of an accident, we
recommend the following setting.
● Adjust the steering wheel so that the distance between the steering wheel
and your chest is at least 25 cm ⇒ fig. 116 - left.
● Position the driver seat in the forward/back direction so that you are able to
fully press the pedals with your legs at a slight angle.
● Adjust the seat backrest so that you are able to reach the highest point of the
steering wheel with your arms at a slight angle.
● Adjust the head restraint so that the top edge of the head restraint is at the
same level as the upper part of your head ⇒
fig. 116 - right.
● Fasten the seat belt correctly ⇒
page 137, How are seat belts correctly fas-
tened?.
Manual driver seat adjustment ⇒ page 60, Adjusting the front seats.
Electrical driver seat adjustment ⇒ page 61, Adjusting front seats electrically. £132
Passive Safety
Page 135 of 248
WARNING
● The front seats and the head restraints must always be adjusted to match
the body size of the seat occupant as well as the seat belts must always be
correctly fastened in order to provide an optimal protection for you and your
occupants.
● The driver must maintain a distance of at least 25 cm to the steering wheel
⇒ fig. 116 left. Not maintaining this minimum distance will mean that the air-
bag system will not be able to properly protect you - hazard!
● When driving, hold the steering wheel with both hands firmly on the outer
edge in the 9 o'clock and 3 o'clock position. Never hold the steering wheel
firmly in the 12 o'clock position or in another way (e.g. in the middle of the
steering wheel or at the inner steering wheel edge). In such cases, injuries to
the arms, the hands and the head can occur when the driver airbag is de-
ployed.
● The seat backrests must not be angled too far back when driving other-
wise this will affect proper operation of the seat belts and of the airbag sys-
tem - risk of injury!
● Ensure that there are no objects in the footwell as any objects may get be-
hind the pedals during a driving or braking manoeuvre. You would then no
longer be able to operate the clutch, to brake or accelerate.
Correct seated position for the front passenger The front passenger must maintain a distance of at least 25 cm
from the dash panel so that the airbag offers him the greatest pos-
sible safety it is deployed.
For the safety of the front passenger and to reduce the risk of injury in the event
of an accident, we recommend the following setting:
● Adjust the front passenger seat as far as possible to the rear.
● Adjust the head restraint so that the top edge of the head restraint is at the
same level as the upper part of your head ⇒
fig. 116 - right.
● Fasten the seat belt correctly ⇒
page 137, How are seat belts correctly fas-
tened?.
In exceptional cases the front passenger airbag can be deactivated ⇒ page 145,
Deactivating an airbag.
Manual front passenger adjustment ⇒ page 60, Adjusting the front seats. Electrical front passenger seat adjustment
⇒
page 61, Adjusting front seats elec-
trically. WARNING
● The front seats and the head restraints must always be adjusted to match
the body size of the seat occupant as well as the seat belts must always be
correctly fastened in order to provide an optimal protection for you and your
occupants.
● The front passenger must maintain a distance of at least 25 cm to the dash
panel. Not maintaining this minimum distance will mean that the airbag sys-
tem will not be able to properly protect you - hazard!
● Always keep your feet in the footwell when the car is being driven - never
place your feet on the instrument panel, out of the window or on the surfaces
of the seats. You will be exposed to increased risk of injury if it becomes nec-
essary to apply the brake or in the event of an accident. If an airbag is de-
ployed, you may suffer fatal injuries when adopting an incorrect seated posi-
tion!
● The seat backrests must not be angled too far back when driving other-
wise this will affect proper operation of the seat belts and of the airbag sys-
tem - risk of injury!
Correct seated position for the occupants on the rear seats Occupants on the rear seats must sit upright, keep the feet in the
footwell and must have their seat belts correctly fastened.
To reduce the risk of injury in the event of a sudden braking manoeuvre or an acci-
dent, the occupants on the rear seats must observe the following:
● Adjust the head restraints so that the top edge of the head restraints is at the
same level as the upper part of your head ⇒ fig. 116 - on the right.
● Fasten the seat belt correctly ⇒ page 137,
How are seat belts correctly fas-
tened?.
● If you are transporting ⇒ page 147, Transporting children safely
children in the
vehicle, please use a suitable child restraint system. £ 133
Passive Safety Using the system Safety Driving Tips General Maintenance Breakdown assistance Technical data
Page 136 of 248
WARNING
● The head restraints must always be adjusted to match the body size, in or-
der to offer an optimal protection for you and your occupants.
● Always keep your feet in the footwell when the car is being driven - never
put your feet out of the window or on the surfaces of the seats. You will be
exposed to increased risk of injury if it becomes necessary to apply the brake
or in the event of an accident. If the head airbag is deployed and when adopt-
ing an incorrect seated position, you are exposing yourself to an increased risk
of injury and in the event of an accident you may suffer fatal injuries!
● If the occupants on the rear seats are not sitting upright, the risk of injury
is increased due to incorrect routing of the seat belt.
Examples of an incorrect seated position An incorrect seated position can lead to severe injuries or death for
the occupants.
Seat belts offer their optimum protection only if the webbing of the seat belts is
properly routed. Incorrect seated positions considerably reduce the protective
functions of the seat belts and therefore increase the risk of injury due to an in-
correct routing of the seat belt. The driver is fully responsible for himself and the
occupants, in particular for the children. Do not permit an occupant to adopt an
incorrect seated position when the car is moving.
The following list contains the examples of seated positions which are dangerous
for the occupants. This list is not complete, however we would like you to get in-
terested in this subject.
Therefore, while the car is moving never:
● stand up in the vehicle;
● stand up on the seats;
● kneel on the seats;
● tilt the seat backrest fully to the back;
● lean against the dash panel;
● lie on the rear seat bench;
● only sit on the front area of the seat;
● sit to the side;
● lean out of the window;
● put the feet out of the window; ●
put the feet on the dash panel;
● put the feet on the seat upholstery;
● transport somebody in the footwell;
● have the seat belt not fastened when driving;
● occupy the luggage compartment. WARNING
● If the occupant adopts an incorrect seated position, he is exposed to life-
threatening injuries, in case he is hit by a deployed airbag.
● Before setting off, please adopt the correct seated position and do not
change this seated position while the car is moving. Also advise your occu-
pants to adopt the correct seated position and not to change this seated posi-
tion while the car is moving. 134
Passive Safety
Page 137 of 248
Seat belts
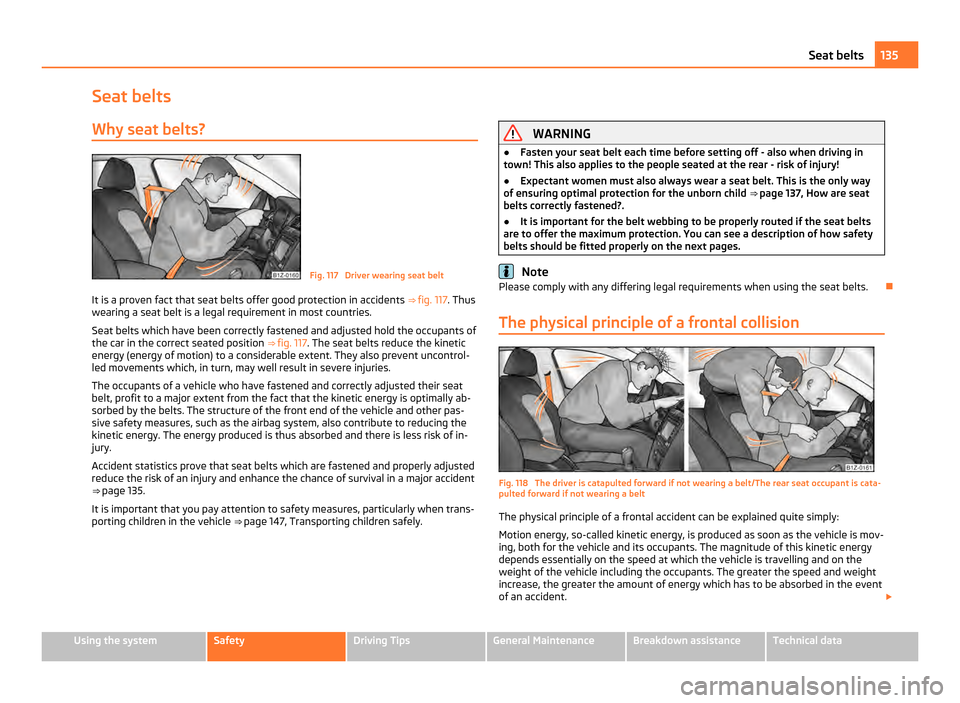
Why seat belts? Fig. 117 Driver wearing seat belt
It is a proven fact that seat belts offer good protection in accidents ⇒ fig. 117. Thus
wearing a seat belt is a legal requirement in most countries.
Seat belts which have been correctly fastened and adjusted hold the occupants of
the car in the correct seated position ⇒ fig. 117. The seat belts reduce the kinetic
energy (energy of motion) to a considerable extent. They also prevent uncontrol-
led movements which, in turn, may well result in severe injuries.
The occupants of a vehicle who have fastened and correctly adjusted their seat
belt, profit to a major extent from the fact that the kinetic energy is optimally ab-
sorbed by the belts. The structure of the front end of the vehicle and other pas-
sive safety measures, such as the airbag system, also contribute to reducing the
kinetic energy. The energy produced is thus absorbed and there is less risk of in-
jury.
Accident statistics prove that seat belts which are fastened and properly adjusted
reduce the risk of an injury and enhance the chance of survival in a major accident
⇒ page 135.
It is important that you pay attention to safety measures, particularly when trans-
porting children in the vehicle ⇒
page 147, Transporting children safely. WARNING
● Fasten your seat belt each time before setting off - also when driving in
town! This also applies to the people seated at the rear - risk of injury!
● Expectant women must also always wear a seat belt. This is the only way
of ensuring optimal protection for the unborn child ⇒ page 137, How are seat
belts correctly fastened?
.
● It is important for the belt webbing to be properly routed if the seat belts
are to offer the maximum protection. You can see a description of how safety
belts should be fitted properly on the next pages. Note
Please comply with any differing legal requirements when using the seat belts.
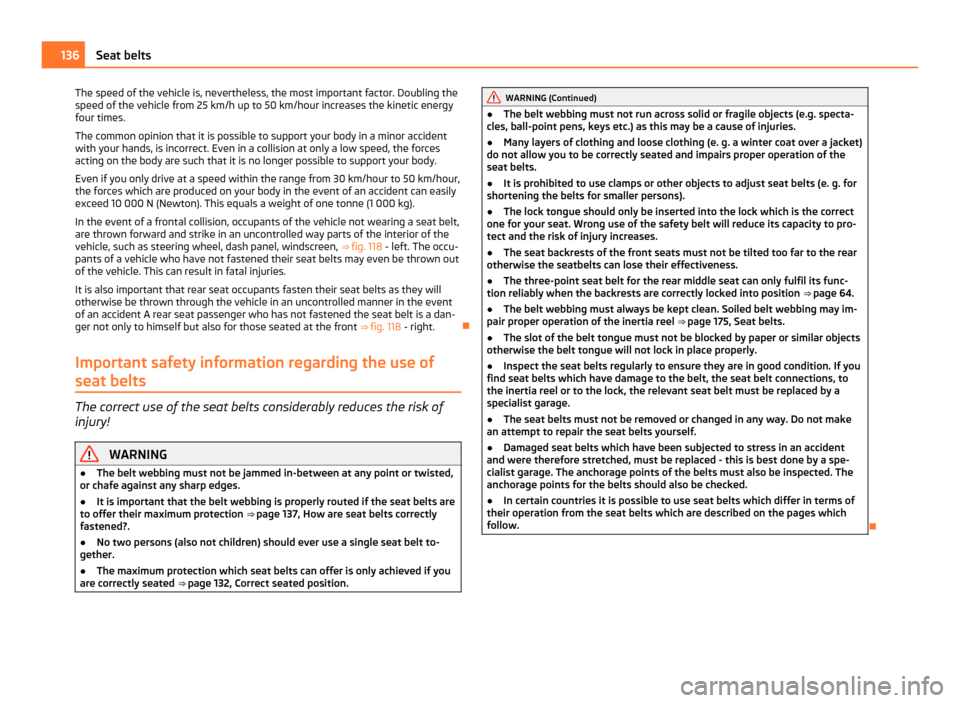
The physical principle of a frontal collision Fig. 118 The driver is catapulted forward if not wearing a belt/The rear seat occupant is cata-
pulted forward if not wearing a belt
The physical principle of a frontal accident can be explained quite simply:
Motion energy, so-called kinetic energy, is produced as soon as the vehicle is mov-
ing, both for the vehicle and its occupants. The magnitude of this kinetic energy
depends essentially on the speed at which the vehicle is travelling and on the
weight of the vehicle including the occupants. The greater the speed and weight
increase, the greater the amount of energy which has to be absorbed in the event
of an accident. £ 135
Seat belts Using the system Safety Driving Tips General Maintenance Breakdown assistance Technical data
Page 138 of 248
The speed of the vehicle is, nevertheless, the most important factor. Doubling the
speed of the vehicle from 25 km/h up to 50 km/hour increases the kinetic energy
four times.
The common opinion that it is possible to support your body in a minor accident
with your hands, is incorrect. Even in a collision at only a low speed, the forces
acting on the body are such that it is no longer possible to support your body.
Even if you only drive at a speed within the range from 30 km/hour to 50 km/hour,
the forces which are produced on your body in the event of an accident can easily
exceed 10
000 N (Newton). This equals a weight of one tonne (1 000 kg).
In the event of a frontal collision, occupants of the vehicle not wearing a seat belt,
are thrown forward and strike in an uncontrolled way parts of the interior of the
vehicle, such as steering wheel, dash panel, windscreen, ⇒ fig. 118 - left. The occu-
pants of a vehicle who have not fastened their seat belts may even be thrown out
of the vehicle. This can result in fatal injuries.
It is also important that rear seat occupants fasten their seat belts as they will
otherwise be thrown through the vehicle in an uncontrolled manner in the event
of an accident A rear seat passenger who has not fastened the seat belt is a dan-
ger not only to himself but also for those seated at the front ⇒ fig. 118 - right.
Important safety information regarding the use of
seat belts The correct use of the seat belts considerably reduces the risk of
injury! WARNING
● The belt webbing must not be jammed in-between at any point or twisted,
or chafe against any sharp edges.
● It is important that the belt webbing is properly routed if the seat belts are
to offer their maximum protection ⇒ page 137, How are seat belts correctly
fastened?
.
● No two persons (also not children) should ever use a single seat belt to-
gether.
● The maximum protection which seat belts can offer is only achieved if you
are correctly seated ⇒
page 132, Correct seated position. WARNING (Continued)
● The belt webbing must not run across solid or fragile objects (e.g. specta-
cles, ball-point pens, keys etc.) as this may be a cause of injuries.
● Many layers of clothing and loose clothing (e. g. a winter coat over a jacket)
do not allow you to be correctly seated and impairs proper operation of the
seat belts.
● It is prohibited to use clamps or other objects to adjust seat belts (e. g. for
shortening the belts for smaller persons).
● The lock tongue should only be inserted into the lock which is the correct
one for your seat. Wrong use of the safety belt will reduce its capacity to pro-
tect and the risk of injury increases.
● The seat backrests of the front seats must not be tilted too far to the rear
otherwise the seatbelts can lose their effectiveness.
● The three-point seat belt for the rear middle seat can only fulfil its func-
tion reliably when the backrests are correctly locked into position ⇒ page 64
.
● The belt webbing must always be kept clean. Soiled belt webbing may im-
pair proper operation of the inertia reel ⇒
page 175, Seat belts.
● The slot of the belt tongue must not be blocked by paper or similar objects
otherwise the belt tongue will not lock in place properly.
● Inspect the seat belts regularly to ensure they are in good condition. If you
find seat belts which have damage to the belt, the seat belt connections, to
the inertia reel or to the lock, the relevant seat belt must be replaced by a
specialist garage.
● The seat belts must not be removed or changed in any way. Do not make
an attempt to repair the seat belts yourself.
● Damaged seat belts which have been subjected to stress in an accident
and were therefore stretched, must be replaced - this is best done by a spe-
cialist garage. The anchorage points of the belts must also be inspected. The
anchorage points for the belts should also be checked.
● In certain countries it is possible to use seat belts which differ in terms of
their operation from the seat belts which are described on the pages which
follow. 136
Seat belts
Page 139 of 248
How are seat belts correctly fastened?
Fastening three-point seat belts Fasten your seat belt before starting!
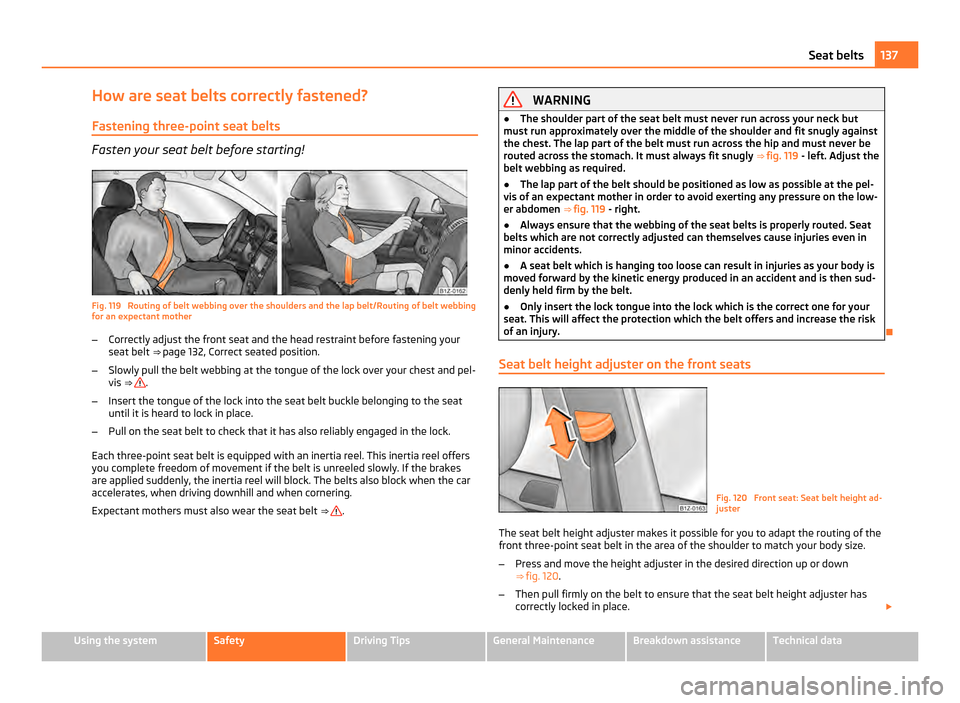
Fig. 119 Routing of belt webbing over the shoulders and the lap belt/Routing of belt webbing
for an expectant mother
–
Correctly adjust the front seat and the head restraint before fastening your
seat belt ⇒
page 132, Correct seated position.
– Slowly pull the belt webbing at the tongue of the lock over your chest and pel-
vis ⇒ .
– Insert the tongue of the lock into the seat belt buckle belonging to the seat
until it is heard to lock in place.
– Pull on the seat belt to check that it has also reliably engaged in the lock.
Each three-point seat belt is equipped with an inertia reel. This inertia reel offers
you complete freedom of movement if the belt is unreeled slowly. If the brakes
are applied suddenly, the inertia reel will block. The belts also block when the car
accelerates, when driving downhill and when cornering.
Expectant mothers must also wear the seat belt ⇒ . WARNING
● The shoulder part of the seat belt must never run across your neck but
must run approximately over the middle of the shoulder and fit snugly against
the chest. The lap part of the belt must run across the hip and must never be
routed across the stomach. It must always fit snugly ⇒
fig. 119 - left. Adjust the
belt webbing as required.
● The lap part of the belt should be positioned as low as possible at the pel-
vis of an expectant mother in order to avoid exerting any pressure on the low-
er abdomen ⇒ fig. 119 - right.
● Always ensure that the webbing of the seat belts is properly routed. Seat
belts which are not correctly adjusted can themselves cause injuries even in
minor accidents.
● A seat belt which is hanging too loose can result in injuries as your body is
moved forward by the kinetic energy produced in an accident and is then sud-
denly held firm by the belt.
● Only insert the lock tongue into the lock which is the correct one for your
seat. This will affect the protection which the belt offers and increase the risk
of an injury.
Seat belt height adjuster on the front seats Fig. 120 Front seat: Seat belt height ad-
juster
The seat belt height adjuster makes it possible for you to adapt the routing of the
front three-point seat belt in the area of the shoulder to match your body size.
– Press and move the height adjuster in the desired direction up or down
⇒ fig. 120 .
– Then pull firmly on the belt to ensure that the seat belt height adjuster has
correctly locked in place. £ 137
Seat belts Using the system Safety Driving Tips General Maintenance Breakdown assistance Technical data
Page 140 of 248
WARNING
Adjust the height of the belt in such a way that the shoulder part of the belt is
positioned approximately across the middle of your shoulder - on no account
across your neck.
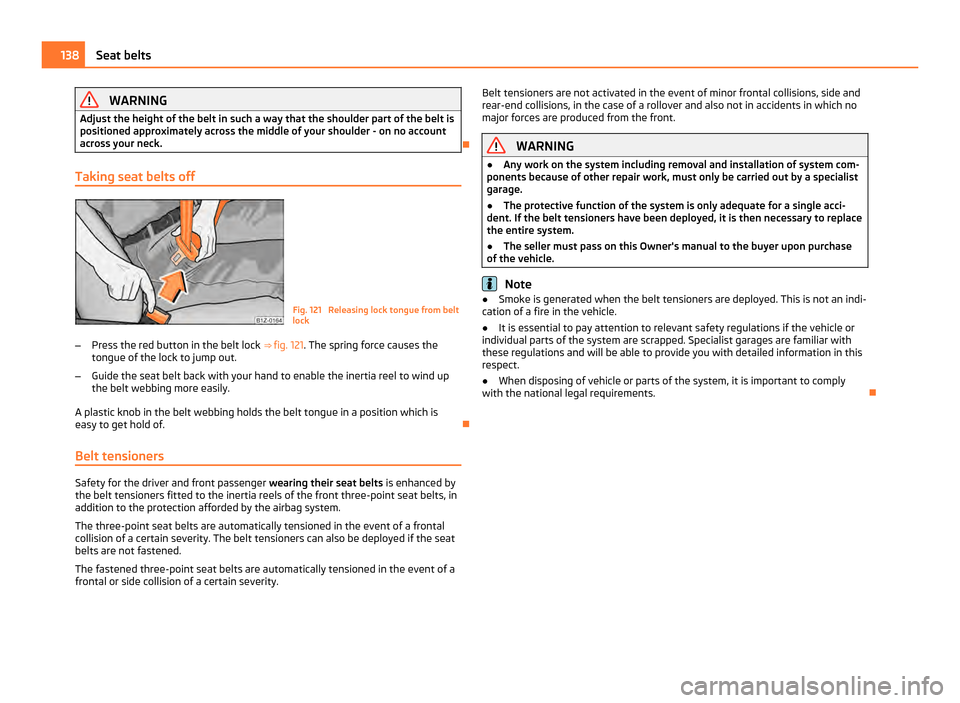
Taking seat belts off Fig. 121 Releasing lock tongue from belt
lock
– Press the red button in the belt lock ⇒ fig. 121. The spring force causes the
tongue of the lock to jump out.
– Guide the seat belt back with your hand to enable the inertia reel to wind up
the belt webbing more easily.
A plastic knob in the belt webbing holds the belt tongue in a position which is
easy to get hold of.
Belt tensioners Safety for the driver and front passenger
wearing their seat belts is enhanced by
the belt tensioners fitted to the inertia reels of the front three-point seat belts, in
addition to the protection afforded by the airbag system.
The three-point seat belts are automatically tensioned in the event of a frontal
collision of a certain severity. The belt tensioners can also be deployed if the seat
belts are not fastened.
The fastened three-point seat belts are automatically tensioned in the event of a
frontal or side collision of a certain severity. Belt tensioners are not activated in the event of minor frontal collisions, side and
rear-end collisions, in the case of a rollover and also not in accidents in which no
major forces are produced from the front. WARNING
● Any work on the system including removal and installation of system com-
ponents because of other repair work, must only be carried out by a specialist
garage.
● The protective function of the system is only adequate for a single acci-
dent. If the belt tensioners have been deployed, it is then necessary to replace
the entire system.
● The seller must pass on this Owner's manual to the buyer upon purchase
of the vehicle. Note
● Smoke is generated when the belt tensioners are deployed. This is not an indi-
cation of a fire in the vehicle.
● It is essential to pay attention to relevant safety regulations if the vehicle or
individual parts of the system are scrapped. Specialist garages are familiar with
these regulations and will be able to provide you with detailed information in this
respect.
● When disposing of vehicle or parts of the system, it is important to comply
with the national legal requirements. 138
Seat belts