remove seats SKODA OCTAVIA 2011 2.G / (1Z) Owner's Manual
[x] Cancel search | Manufacturer: SKODA, Model Year: 2011, Model line: OCTAVIA, Model: SKODA OCTAVIA 2011 2.G / (1Z)Pages: 248, PDF Size: 3.79 MB
Page 66 of 248
The position of the front and rear outer head restraints is adjustable in height.
The middle rear head restraint is adjustable in two positions.
The head restraints must be adjusted to match the size of the seat occupant. Cor-
rectly adjusted head restraints together with the seat belts offer effective protec-
tion for the occupants ⇒ page 132,
Correct seated position.WARNING
● The head restraints must be correctly adjusted in order to offer effective
protection for the occupants in the event of an accident.
● Do not drive under any circumstance with removed head restraints - risk of
injury!
● If the rear seats are occupied, the rear head restraint must not be in the
lower position.
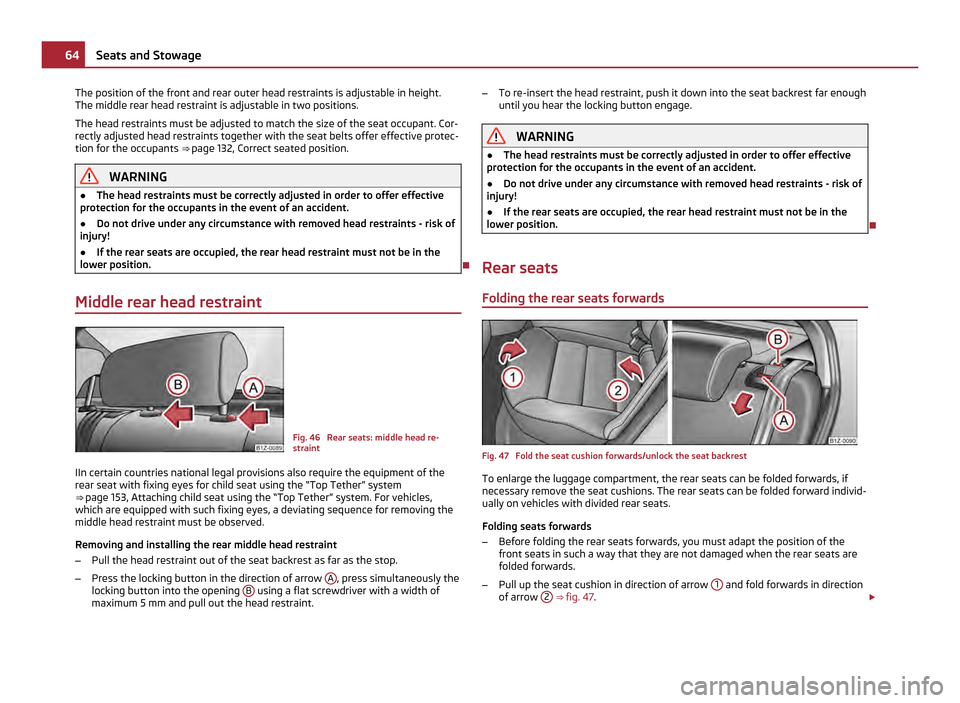
Middle rear head restraint Fig. 46 Rear seats: middle head re-
straint
IIn certain countries national legal provisions also require the equipment of the
rear seat with fixing eyes for child seat using the
“Top Tether” system
⇒ page 153, Attaching child seat using the “Top Tether” system. For vehicles,
which are equipped with such fixing eyes, a deviating sequence for removing the
middle head restraint must be observed.
Removing and installing the rear middle head restraint
– Pull the head restraint out of the seat backrest as far as the stop.
– Press the locking button in the direction of arrow A , press simultaneously the
locking button into the opening B using a flat screwdriver with a width of
maximum 5 mm and pull out the head restraint. –
To re-insert the head restraint, push it down into the seat backrest far enough
until you hear the locking button engage. WARNING
● The head restraints must be correctly adjusted in order to offer effective
protection for the occupants in the event of an accident.
● Do not drive under any circumstance with removed head restraints - risk of
injury!
● If the rear seats are occupied, the rear head restraint must not be in the
lower position.
Rear seats Folding the rear seats forwards Fig. 47 Fold the seat cushion forwards/unlock the seat backrest
To enlarge the luggage compartment, the rear seats can be folded forwards, if
necessary remove the seat cushions. The rear seats can be folded forward individ-
ually on vehicles with divided rear seats.
Folding seats forwards
– Before folding the rear seats forwards, you must adapt the position of the
front seats in such a way that they are not damaged when the rear seats are
folded forwards.
– Pull up the seat cushion in direction of arrow 1 and fold forwards in direction
of arrow 2
⇒ fig. 47 . £64
Seats and Stowage
Page 67 of 248
–
Press the unlocking knob A and fold the seat backrest forwards.
If the front seats are too far back, we recommend that you have the rear head re-
straints removed before the seat backrests are folded forward. Store the removed
head restraints in such a way that they cannot be damaged or soiled. Please refer
to the guidelines ⇒ page 66
.
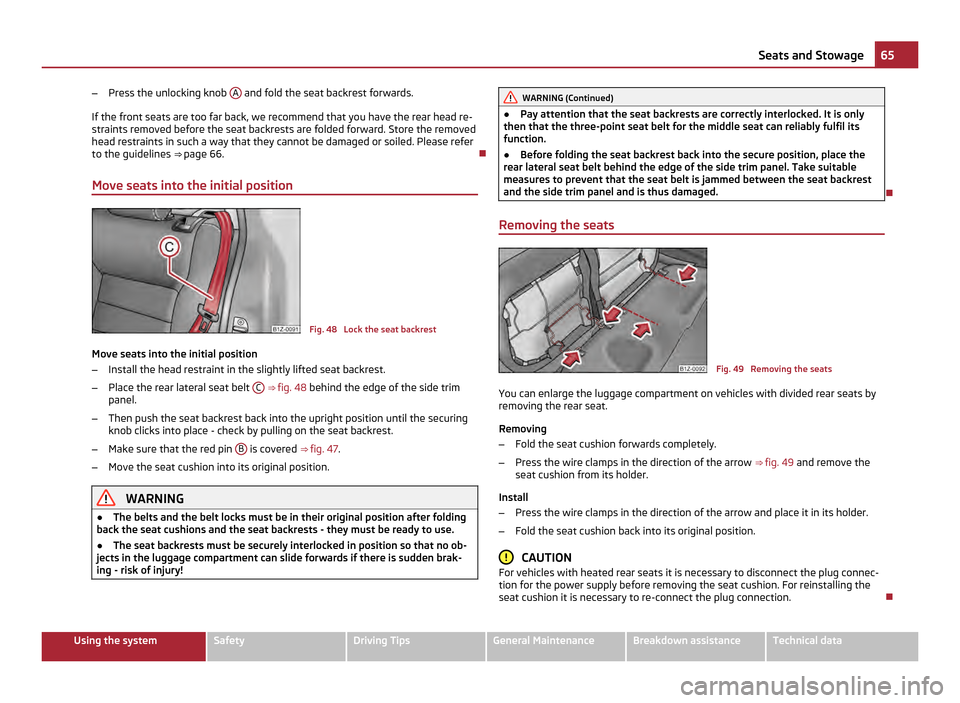
Move seats into the initial position Fig. 48 Lock the seat backrest
Move seats into the initial position
– Install the head restraint in the slightly lifted seat backrest.
– Place the rear lateral seat belt C
⇒ fig. 48 behind the edge of the side trim
panel.
– Then push the seat backrest back into the upright position until the securing
knob clicks into place - check by pulling on the seat backrest.
– Make sure that the red pin B is covered
⇒ fig. 47.
– Move the seat cushion into its original position. WARNING
● The belts and the belt locks must be in their original position after folding
back the seat cushions and the seat backrests - they must be ready to use.
● The seat backrests must be securely interlocked in position so that no ob-
jects in the luggage compartment can slide forwards if there is sudden brak-
ing - risk of injury! WARNING (Continued)
● Pay attention that the seat backrests are correctly interlocked. It is only
then that the three-point seat belt for the middle seat can reliably fulfil its
function.
● Before folding the seat backrest back into the secure position, place the
rear lateral seat belt behind the edge of the side trim panel. Take suitable
measures to prevent that the seat belt is jammed between the seat backrest
and the side trim panel and is thus damaged.
Removing the seats Fig. 49 Removing the seats
You can enlarge the luggage compartment on vehicles with divided rear seats by
removing the rear seat.
Removing
– Fold the seat cushion forwards completely.
– Press the wire clamps in the direction of the arrow
⇒ fig. 49
and remove the
seat cushion from its holder.
Install
– Press the wire clamps in the direction of the arrow and place it in its holder.
– Fold the seat cushion back into its original position. CAUTION
For vehicles with heated rear seats it is necessary to disconnect the plug connec-
tion for the power supply before removing the seat cushion. For reinstalling the
seat cushion it is necessary to re-connect the plug connection. 65
Seats and Stowage Using the system Safety Driving Tips General Maintenance Breakdown assistance Technical data
Page 72 of 248
Luggage compartment cover (Octavia)
You can use the luggage compartment cover behind the head re-
straints for storing light and soft items.
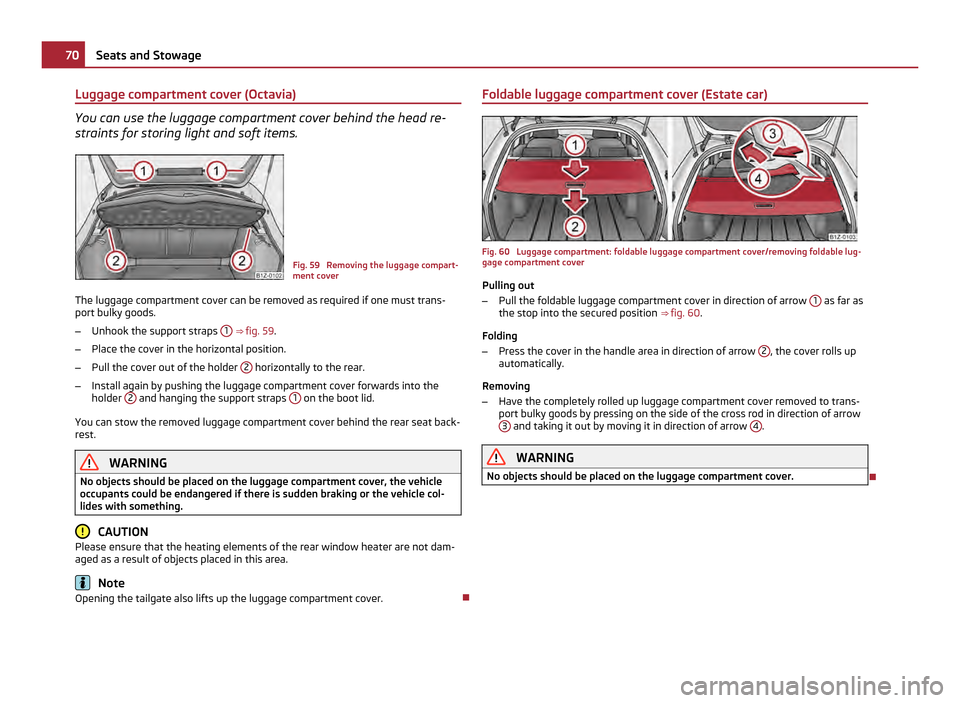
Fig. 59 Removing the luggage compart-
ment cover
The luggage compartment cover can be removed as required if one must trans-
port bulky goods.
– Unhook the support straps 1
⇒ fig. 59 .
– Place the cover in the horizontal position.
– Pull the cover out of the holder 2 horizontally to the rear.
– Install again by pushing the luggage compartment cover forwards into the
holder 2 and hanging the support straps
1 on the boot lid.
You can stow the removed luggage compartment cover behind the rear seat back-
rest. WARNING
No objects should be placed on the luggage compartment cover, the vehicle
occupants could be endangered if there is sudden braking or the vehicle col-
lides with something. CAUTION
Please ensure that the heating elements of the rear window heater are not dam-
aged as a result of objects placed in this area. Note
Opening the tailgate also lifts up the luggage compartment cover. Foldable luggage compartment cover (Estate car)
Fig. 60 Luggage compartment: foldable luggage compartment cover/removing foldable lug-
gage compartment cover
Pulling out
– Pull the foldable luggage compartment cover in direction of arrow 1 as far as
the stop into the secured position ⇒ fig. 60 .
Folding
– Press the cover in the handle area in direction of arrow 2 , the cover rolls up
automatically.
Removing
– Have the completely rolled up luggage compartment cover removed to trans-
port bulky goods by pressing on the side of the cross rod in direction of arrow 3 and taking it out by moving it in direction of arrow
4 .
WARNING
No objects should be placed on the luggage compartment cover. 70
Seats and Stowage
Page 73 of 248
Division of the variable loading floor in the boot
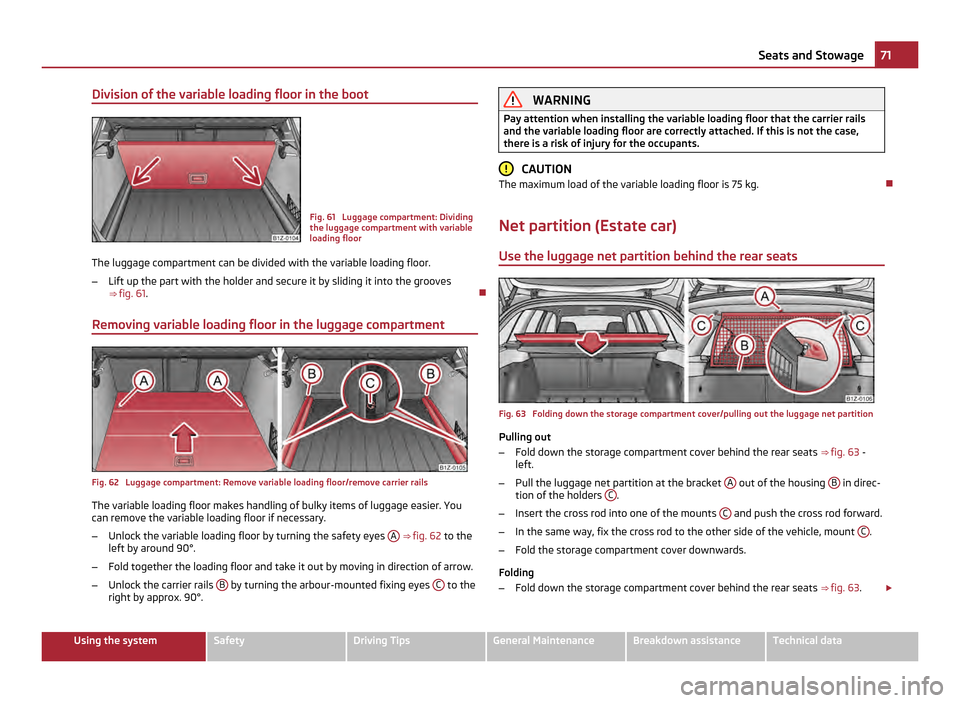
Fig. 61 Luggage compartment: Dividing
the luggage compartment with variable
loading floor
The luggage compartment can be divided with the variable loading floor.
– Lift up the part with the holder and secure it by sliding it into the grooves
⇒ fig. 61 .
Removing variable loading floor in the luggage compartment Fig. 62 Luggage compartment: Remove variable loading floor/remove carrier rails
The variable loading floor makes handling of bulky items of luggage easier. You
can remove the variable loading floor if necessary.
–
Unlock the variable loading floor by turning the safety eyes A
⇒ fig. 62 to the
left by around 90°.
– Fold together the loading floor and take it out by moving in direction of arrow.
– Unlock the carrier rails B by turning the arbour-mounted fixing eyes
C to the
right by approx. 90°. WARNING
Pay attention when installing the variable loading floor that the carrier rails
and the variable loading floor are correctly attached. If this is not the case,
there is a risk of injury for the occupants. CAUTION
The maximum load of the variable loading floor is 75 kg.
Net partition (Estate car) Use the luggage net partition behind the rear seats Fig. 63 Folding down the storage compartment cover/pulling out the luggage net partition
Pulling out
– Fold down the storage compartment cover behind the rear seats
⇒ fig. 63
-
left.
– Pull the luggage net partition at the bracket A out of the housing
B in direc-
tion of the holders C .
– Insert the cross rod into one of the mounts C and push the cross rod forward.
– In the same way, fix the cross rod to the other side of the vehicle, mount C .
– Fold the storage compartment cover downwards.
Folding
– Fold down the storage compartment cover behind the rear seats ⇒ fig. 63 .£ 71
Seats and Stowage Using the system Safety Driving Tips General Maintenance Breakdown assistance Technical data
Page 74 of 248
–
Pull the cross rod back slightly, first on the one side then on the other side and
take the cross rod out of the mounts C .
– Hold the cross rod in such a way that the luggage net partition can roll up
slowly and without damage into the housing B .
– Fold the storage compartment cover downwards.
If you wish to use the entire luggage compartment, you can remove the foldable
luggage compartment cover ⇒
fig. 60 . WARNING
● First check for yourself that the cross road is inserted into the mounts Cin the front position!
●
Pay attention that the rear seat backrest is correctly interlocked. It is only
then that the three-point seat belt for the middle seat can reliably fulfil its
function.
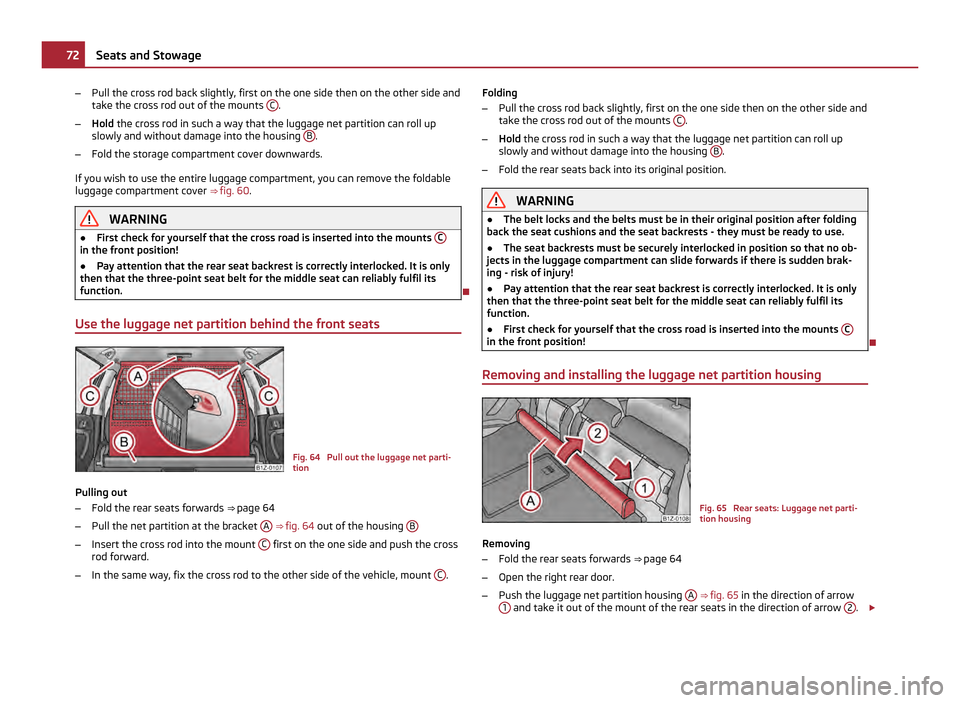
Use the luggage net partition behind the front seats Fig. 64 Pull out the luggage net parti-
tion
Pulling out
– Fold the rear seats forwards ⇒ page 64
– Pull the net partition at the bracket A
⇒ fig. 64 out of the housing B–
Insert the cross rod into the mount C first on the one side and push the cross
rod forward.
– In the same way, fix the cross rod to the other side of the vehicle, mount C .Folding
–
Pull the cross rod back slightly, first on the one side then on the other side and
take the cross rod out of the mounts C .
– Hold the cross rod in such a way that the luggage net partition can roll up
slowly and without damage into the housing B .
– Fold the rear seats back into its original position. WARNING
● The belt locks and the belts must be in their original position after folding
back the seat cushions and the seat backrests - they must be ready to use.
● The seat backrests must be securely interlocked in position so that no ob-
jects in the luggage compartment can slide forwards if there is sudden brak-
ing - risk of injury!
● Pay attention that the rear seat backrest is correctly interlocked. It is only
then that the three-point seat belt for the middle seat can reliably fulfil its
function.
● First check for yourself that the cross road is inserted into the mounts C in the front position!
Removing and installing the luggage net partition housing Fig. 65 Rear seats: Luggage net parti-
tion housing
Removing
– Fold the rear seats forwards ⇒ page 64
– Open the right rear door.
– Push the luggage net partition housing A
⇒
fig. 65 in the direction of arrow
1 and take it out of the mount of the rear seats in the direction of arrow
2 .
£ 72
Seats and Stowage
Page 77 of 248
Note holder
Fig. 69 Windscreen: Note holder
The parking ticket holder is designed e.g. for attaching a car park ticket in parking
areas.
The attached note has to always be removed before starting off in order not to
restrict the driver's vision.
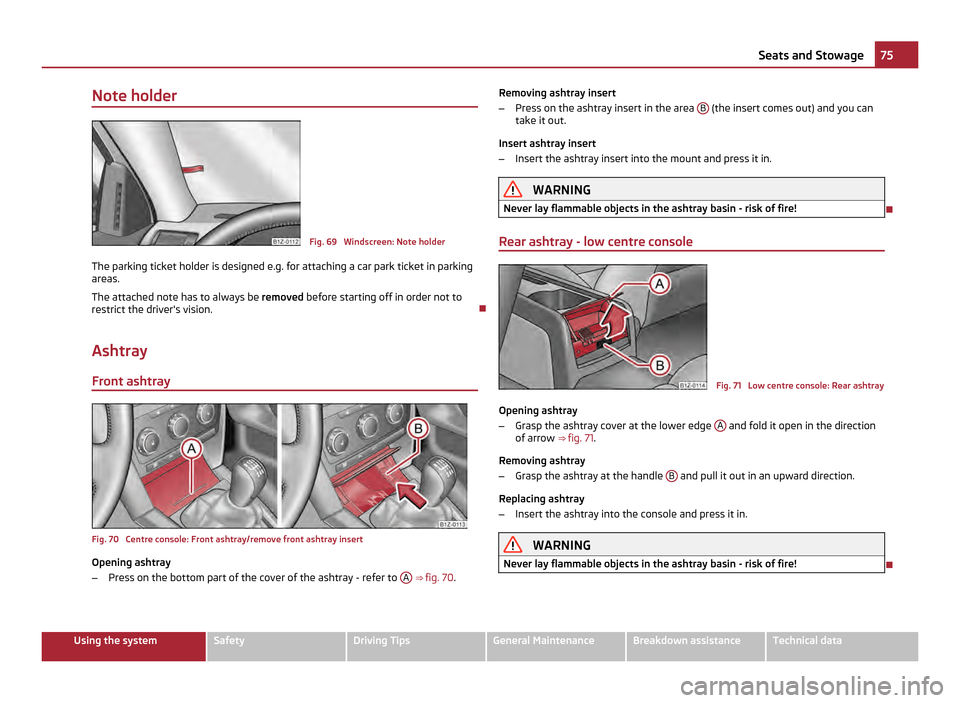
Ashtray Front ashtray Fig. 70 Centre console: Front ashtray/remove front ashtray insert
Opening ashtray
– Press on the bottom part of the cover of the ashtray - refer to A
⇒ fig. 70. Removing ashtray insert
–
Press on the ashtray insert in the area B (the insert comes out) and you can
take it out.
Insert ashtray insert
– Insert the ashtray insert into the mount and press it in. WARNING
Never lay flammable objects in the ashtray basin - risk of fire!
Rear ashtray - low centre console Fig. 71 Low centre console: Rear ashtray
Opening ashtray
– Grasp the ashtray cover at the lower edge A and fold it open in the direction
of arrow ⇒ fig. 71 .
Removing ashtray
– Grasp the ashtray at the handle B and pull it out in an upward direction.
Replacing ashtray
– Insert the ashtray into the console and press it in. WARNING
Never lay flammable objects in the ashtray basin - risk of fire! 75
Seats and Stowage Using the system Safety Driving Tips General Maintenance Breakdown assistance Technical data
Page 78 of 248
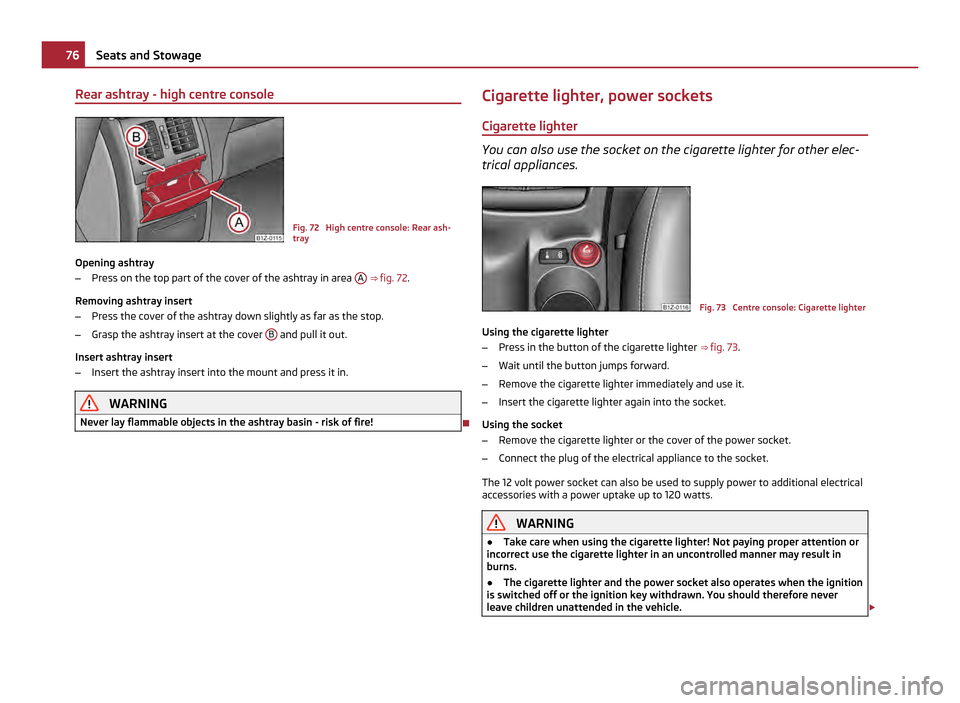
Rear ashtray - high centre console
Fig. 72 High centre console: Rear ash-
tray
Opening ashtray
– Press on the top part of the cover of the ashtray in area A
⇒ fig. 72.
Removing ashtray insert
– Press the cover of the ashtray down slightly as far as the stop.
– Grasp the ashtray insert at the cover B and pull it out.
Insert ashtray insert
– Insert the ashtray insert into the mount and press it in. WARNING
Never lay flammable objects in the ashtray basin - risk of fire! Cigarette lighter, power sockets
Cigarette lighter You can also use the socket on the cigarette lighter for other elec-
trical appliances.
Fig. 73 Centre console: Cigarette lighter
Using the cigarette lighter
– Press in the button of the cigarette lighter ⇒ fig. 73.
– Wait until the button jumps forward.
– Remove the cigarette lighter immediately and use it.
– Insert the cigarette lighter again into the socket.
Using the socket
– Remove the cigarette lighter or the cover of the power socket.
– Connect the plug of the electrical appliance to the socket.
The 12 volt power socket can also be used to supply power to additional electrical
accessories with a power uptake up to 120 watts. WARNING
● Take care when using the cigarette lighter! Not paying proper attention or
incorrect use the cigarette lighter in an uncontrolled manner may result in
burns.
● The cigarette lighter and the power socket also operates when the ignition
is switched off or the ignition key withdrawn. You should therefore never
leave children unattended in the vehicle. £76
Seats and Stowage
Page 85 of 248
WARNING
● After placing skis into the through-loading bag, you must secure the bag
with the securing strap B .
● The strap A must hold the skis tight.
● Make sure that the strap A holds the skis in front of the binding (see also
imprint on the removable through-loading bag). Note
● The through-loading bag is foreseen for four pairs of skis. The total weight of
the skis which are transported must not exceed 17 kg.
● You must put the skis and the sticks in the removable through-loading bag
with the tips facing the rear.
● If there are several pairs of skis in the removable through-loading bag, ensure
that the bindings are positioned at the same height.
● Carefully fold the empty (dry) through-loading bag together, place it in the lug-
gage compartment and secure it to prevent it slipping. The removable through-
loading bag must never be folded together or stowed when moist.
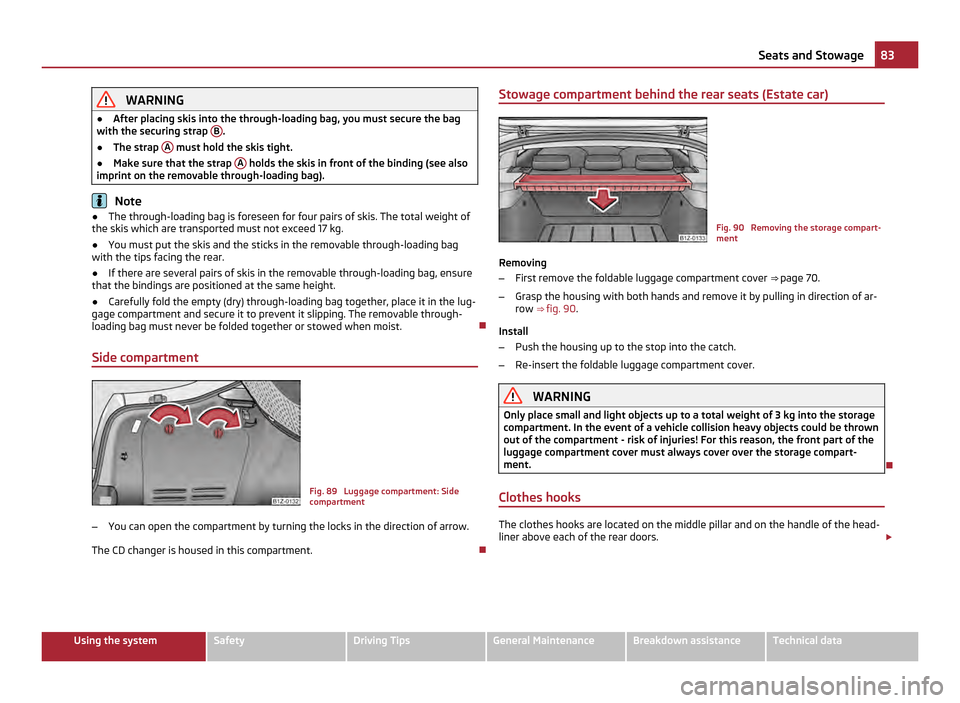
Side compartment Fig. 89 Luggage compartment: Side
compartment
– You can open the compartment by turning the locks in the direction of arrow.
The CD changer is housed in this compartment. Stowage compartment behind the rear seats (Estate car)
Fig. 90 Removing the storage compart-
ment
Removing
– First remove the foldable luggage compartment cover ⇒ page 70.
– Grasp the housing with both hands and remove it by pulling in direction of ar-
row ⇒ fig. 90 .
Install
– Push the housing up to the stop into the catch.
– Re-insert the foldable luggage compartment cover. WARNING
Only place small and light objects up to a total weight of 3 kg into the storage
compartment. In the event of a vehicle collision heavy objects could be thrown
out of the compartment - risk of injuries! For this reason, the front part of the
luggage compartment cover must always cover over the storage compart-
ment.
Clothes hooks The clothes hooks are located on the middle pillar and on the handle of the head-
liner above each of the rear doors.
£ 83
Seats and Stowage Using the system Safety Driving Tips General Maintenance Breakdown assistance Technical data
Page 138 of 248
The speed of the vehicle is, nevertheless, the most important factor. Doubling the
speed of the vehicle from 25 km/h up to 50 km/hour increases the kinetic energy
four times.
The common opinion that it is possible to support your body in a minor accident
with your hands, is incorrect. Even in a collision at only a low speed, the forces
acting on the body are such that it is no longer possible to support your body.
Even if you only drive at a speed within the range from 30 km/hour to 50 km/hour,
the forces which are produced on your body in the event of an accident can easily
exceed 10
000 N (Newton). This equals a weight of one tonne (1 000 kg).
In the event of a frontal collision, occupants of the vehicle not wearing a seat belt,
are thrown forward and strike in an uncontrolled way parts of the interior of the
vehicle, such as steering wheel, dash panel, windscreen, ⇒ fig. 118 - left. The occu-
pants of a vehicle who have not fastened their seat belts may even be thrown out
of the vehicle. This can result in fatal injuries.
It is also important that rear seat occupants fasten their seat belts as they will
otherwise be thrown through the vehicle in an uncontrolled manner in the event
of an accident A rear seat passenger who has not fastened the seat belt is a dan-
ger not only to himself but also for those seated at the front ⇒ fig. 118 - right.
Important safety information regarding the use of
seat belts The correct use of the seat belts considerably reduces the risk of
injury! WARNING
● The belt webbing must not be jammed in-between at any point or twisted,
or chafe against any sharp edges.
● It is important that the belt webbing is properly routed if the seat belts are
to offer their maximum protection ⇒ page 137, How are seat belts correctly
fastened?
.
● No two persons (also not children) should ever use a single seat belt to-
gether.
● The maximum protection which seat belts can offer is only achieved if you
are correctly seated ⇒
page 132, Correct seated position. WARNING (Continued)
● The belt webbing must not run across solid or fragile objects (e.g. specta-
cles, ball-point pens, keys etc.) as this may be a cause of injuries.
● Many layers of clothing and loose clothing (e. g. a winter coat over a jacket)
do not allow you to be correctly seated and impairs proper operation of the
seat belts.
● It is prohibited to use clamps or other objects to adjust seat belts (e. g. for
shortening the belts for smaller persons).
● The lock tongue should only be inserted into the lock which is the correct
one for your seat. Wrong use of the safety belt will reduce its capacity to pro-
tect and the risk of injury increases.
● The seat backrests of the front seats must not be tilted too far to the rear
otherwise the seatbelts can lose their effectiveness.
● The three-point seat belt for the rear middle seat can only fulfil its func-
tion reliably when the backrests are correctly locked into position ⇒ page 64
.
● The belt webbing must always be kept clean. Soiled belt webbing may im-
pair proper operation of the inertia reel ⇒
page 175, Seat belts.
● The slot of the belt tongue must not be blocked by paper or similar objects
otherwise the belt tongue will not lock in place properly.
● Inspect the seat belts regularly to ensure they are in good condition. If you
find seat belts which have damage to the belt, the seat belt connections, to
the inertia reel or to the lock, the relevant seat belt must be replaced by a
specialist garage.
● The seat belts must not be removed or changed in any way. Do not make
an attempt to repair the seat belts yourself.
● Damaged seat belts which have been subjected to stress in an accident
and were therefore stretched, must be replaced - this is best done by a spe-
cialist garage. The anchorage points of the belts must also be inspected. The
anchorage points for the belts should also be checked.
● In certain countries it is possible to use seat belts which differ in terms of
their operation from the seat belts which are described on the pages which
follow. 136
Seat belts
Page 145 of 248

Important safety information on the side airbag
Correct use of the airbag system considerably reduces the risk of
injury! WARNING
● It is essential to always switch off ⇒ page 145 , Deactivating an airbag the
front passenger airbag when attaching a child safety seat on the front pas-
senger seat where the child is seated with its back facing in direction of travel
(in some countries also when the child is facing the direction of travel). If this
is not done, there is a risk of the child suffering severe or even fatal injuries if
the front passenger airbag is deployed. When transporting a child on the front
passenger seat, please comply with the appropriate national regulations re-
garding the use of child safety seats.
● Your head should never be positioned in the deployment area of the side
airbag. You might suffer severe injuries in the event of an accident. This ap-
plies in particular to children who are transported without using a suitable
child safety seat ⇒ page 149
, Child safety and side airbag.
● If children adopt an incorrect seated position when travelling, they may be
exposed to an increased risk of injury in the event of an accident. This can re-
sult in serious injuries ⇒ page 147
, What you should know about transporting
children!.
● There must not be any further persons, animals as well as objects posi-
tioned between the occupants and the deployment area of the airbag. No ac-
cessories, such as a can holder, should be attached to the doors.
● The airbag control unit operates together with the pressure sensors,
which are attached in the front doors. For this reason no adjustments must be
carried out at the doors as well as at the door panels (for example additional
installation of loudspeakers). Resulting damages can have a negative affect
on the operation of the airbag system. All work on the front doors and their
panels must only be carried out by a specialist garage. WARNING (Continued)
● In the event of a side collision, the side airbags will not function properly, if
the sensors cannot measure the increasing air pressure inside the doors, be-
cause the air can escape through large, non-sealed openings in the door pan-
el.
–Never drive with removed inner door panels.
– Never drive, if parts of the inner door panel have been removed and the
remaining openings have not been properly sealed.
– Never drive, if the loudspeakers in the doors have been removed, only if
the loudspeaker openings have been properly sealed.
– Always make sure that the openings are covered or filled, if additional
loudspeakers or other equipment parts are installed in the inner door pan-
els.
– Always work with an authorised ŠKODA Service Partner or have it car-
ried out by a competent specialist workshop.
● Only hang light items of clothing on the clothes hooks to the vehicle. Nev-
er leave any heavy or sharp-edged objects in the pockets of the items of cloth-
ing.
● Ensure that there are no excessive forces, such as violent knocks, kicks
etc., impact on the backrests of the seats otherwise the system may be dam-
aged. The side airbags would not be deployed in such a case!
● Any seat or protective covers which you fit to the driver or front passenger
seats must only be of the type expressly authorized by
ŠKODA. In view of the
fact that the airbag inflates out of the backrest of the seat, use of non-ap-
proved seat or protective covers would considerably impair the protective
function of the side airbag.
● Any damage to the original seat covers in the area of the side airbag mod-
ule must be repaired without delay by your specialist garage.
● The airbag modules in the front seats must not display any damage, cracks
or deep scratches. It is not permissible to use force in order to open the mod-
ules.
● Any work on the side airbag system including removing and installing sys-
tem components because of other repair work (e.g. removing seats) must only
be carried out by a specialist garage. 143
Airbag system Using the system Safety Driving Tips General Maintenance Breakdown assistance Technical data