SKODA OCTAVIA 2012 3.G / (5E) Owner's Manual
Manufacturer: SKODA, Model Year: 2012, Model line: OCTAVIA, Model: SKODA OCTAVIA 2012 3.G / (5E)Pages: 222, PDF Size: 13.52 MB
Page 161 of 222
General Maintenance
Taking care of and cleaning the vehicle
Taking care of your vehicle
Introduction
This chapter contains information on the following subjects:
Washing the vehicle
160
Automatic car wash systems
160
Washing by hand
160
Washing with a high-pressure cleaner
161
Preserving and polishing the vehicle paintwork
161
Chrome parts
161
Paint damage
161
Plastic parts
162
De-icing windows and exterior mirrors
162
Radio reception and aerial
162
Headlight lenses
162
Rubber seals
163
Door lock cylinders
163
Wheels
163
Underbody protection
163
Protection of hollow spaces
164
Artificial leather, cloths and Alcantara ®
164
Fabric covers on electrically heated seats
164
Natural leather
164
Seat belts
165
Regular and proper care help to retain the efficiency and
value of your vehicle. It
may also be one of the requirements for the acceptance of warranty claims relat- ing to corrosion damage and paint defects on the bodywork.
We recommend using care products from ŠKODA Original Accessories that areavailable from ŠKODA Partners. The instructions for use on the package must be
observed.
WARNING■ Care products may be harmful to your health if not used according to the in-
structions.■
Always store care products in a safe place, out of the reach of children – risk
of poisoning!
■
Water and ice in the brake system when washing the vehicle in winter can
affect the braking efficiency – risk of accident!
■
Only wash the vehicle when the ignition is switched off – risk of accident!
■
When washing the car by hand, protect your hands and arms from sharp-
edged metal parts (e.g. when cleaning the underfloor, the inside of the wheel
housings or the wheel trims, etc) - risk of cuts!
■
Air fresheners and scents can be hazardous to heath when the temperature
inside the vehicle is high.
CAUTION
■ Be sure to check clothing for colourfastness to avoid any damage or visible
stains on the material (leather), panels and textiles.■
Cleaners containing solvents can damage the material being cleaned.
■
Do not wash your vehicle in bright sunlight – risk of paint damage.
■
If washing the vehicle in the winter using a hose or high-pressure cleaner, en-
sure that the jet of water is not aimed directly at the locking cylinders or the
door/panel joints – risk of freezing!
■
Do not use any insect sponges, rough kitchen sponges or similar cleaning prod-
ucts – risk of damaging the surface of paintwork.
■
Do not stick any stickers on the inside of the rear windows, the rear side win-
dows and in the vicinity of the heating elements on the windscreen or near the
window aerial. These may get damaged. With regard to the antenna, they may in-terfere with the radio or navigation.
■
Do not clean the inside of the windows with sharp-edged objects or corrosive
and acidic cleaning agents – risk of damaging the heating elements or window
aerial.
■
Do not attach scents and air fresheners to the dashboard – risk of damage to
the dashboard.
■
To avoid damaging the parking aid sensors while cleaning with high-pressure
cleaners or steam jets, the sensors must only be directly sprayed for short periods while a minimum distance of 10 cm must be observed.
■
Do not clean the roof trim with a brush – risk of damage to the trim surface.
■
Fold in the exterior mirrors to prevent damage before washing the vehicle in an
automatic car wash system. Never manually fold in electric exterior mirrors - al-
ways use the electric controls.
159Taking care of and cleaning the vehicle
Page 162 of 222
■For Alcantara ®
do not use any solvents, floor wax, shoe cream, stain remover,
leather cleaners, or similar agents.■
Remove fresh stains such as those from ball-point pens, ink, lipstick, shoe pol-
ish, etc., from the material (leather), panels and textiles as quickly as possible.
For the sake of the environment
■ Used cans of vehicle care products represent a special type of hazardous waste.
These must be disposed of in accordance with national legal regulations.■
Only wash the vehicle at washing bays intended for this purpose.
Note
Due to potential issues with the cleaning and care of the interior of your vehicle,
the special tools and knowledge required, we recommend that cleaning and care of the interior of your vehicle is completed by a ŠKODA Partner.
Washing the vehicle
First read and observe the introductory information and safety warn-
ings
on page 159.
The best protection for your vehicle against harmful environmental influences is
frequent washing and wax treatment. How often the vehicle should be washed
depends on a wide range of factors, such as:
› Frequency of use;
› The parking situation (garage, below trees etc.);
› Season of the year;
› Weather conditions;
› Environmental influences.
The longer insect residues, bird droppings, tree sap, road and industrial dust, tar,
soot particles, road salt and other aggressive deposits remain adhering to the paintwork of your vehicle, the more detrimental their destructive effect can be.
High temperatures, such as those caused by intensive sun's rays, accentuate this
caustic effect.
It is essential to also thoroughly clean the underside of the vehicle at the end of
the winter.
Automatic car wash systems
First read and observe the introductory information and safety warn-
ings
on page 159.
Your vehicle can be washed in automatic car wash systems.
The usual precautionary measures must be taken before washing the vehicle in
an automatic car wash system (closing the windows including the sliding/tilting
roof, etc.).
If your vehicle is fitted with any particular attached parts, such as a spoiler, roof
luggage rack, two-way radio aerial – it is best to consult the operator of the car
wash system beforehand.
It is important to clean and degrease the lips of the windscreen wiper rubbers af-
ter passing through the automatic vehicle wash system.
Washing by hand
First read and observe the introductory information and safety warn-
ings
on page 159.
When washing by hand, first soften the dirt with plenty of water and rinse off as
much as possible.
Clean the vehicle with a soft sponge, a washing glove or a washing brush . Work
from the top to the bottom – starting with the roof. Only apply slight pressure when cleaning the vehicle's paintwork. Only use a car shampoo for stubborn dirt.
Wash out the sponge or washing glove thoroughly at short intervals.
Clean wheels, door sills and similar parts last. Use a second sponge for such
areas.
Give the vehicle a good rinse after washing it and dry it off using a chamois leath- er.
160General Maintenance
Page 163 of 222

Washing with a high-pressure cleanerFirst read and observe the introductory information and safety warn-
ings
on page 159.
When washing the vehicle with a high-pressure cleaner, the instructions for use
of the equipment must be observed. This applies in particular to the pressure
used and to the spraying distance . Maintain a sufficiently large distance to the
parking aid sensors and soft materials such as rubber hoses or insulation materi- al.
WARNINGNever use circular spray nozzles or dirt cutters!
CAUTION
The temperature of the water used for cleaning must not exceed 60 °C – risk of damaging the vehicle.
Preserving and polishing the vehicle paintwork
First read and observe the introductory information and safety warn-
ings
on page 159.
Preserving the vehicle paintwork
Thorough wax treatment is an effective way of protecting the paintwork from harmful environmental influences.
The vehicle must be treated with a high-quality hard wax polish at the latest, when no more drops form on the clean paintwork.
A new layer of a high-quality hard wax polish can be applied to the clean body- work after it has dried thoroughly. Even if you use a wax preserver regularly we
still recommend that you treat the paintwork of the vehicle at least twice a year
with hard wax.
Polishing
Polishing is necessary if the vehicle's paintwork has become unattractive and if it
is no longer possible to achieve a gloss with wax preservatives.
If the polish does not contain any preserving elements, the paint must be treated with a preservative afterwards.
CAUTION■ Never apply wax to the windows.■Mat painted or plastic parts must not be treated with polishing products or hard
waxes.■
Do not polish the paintwork of the vehicle in a dusty environment, otherwise
the paintwork can be scratched.
Chrome parts
First read and observe the introductory information and safety warn-ings
on page 159.
First clean the chrome parts with a damp cloth and then polish them with a soft,
dry cloth. If this method does not completely clean chrome parts, use a specific
chrome care product.
CAUTION
Do not polish the chrome parts in a dusty environment, otherwise they can be
scratched.
Paint damage
First read and observe the introductory information and safety warn-
ings
on page 159.
Slight damage to paintwork such as scratches, scuffs or traces of chip damage
must be treated immediately.
The ŠKODA Partners have a range of matching touch-up pens or spray cans avail-
able in the colour of your vehicle.
Note
We recommend that any repairs to damaged paintwork are carried out by a
ŠKODA Partner.
161Taking care of and cleaning the vehicle
Page 164 of 222
Plastic partsFirst read and observe the introductory information and safety warn-ings
on page 159.
Plastic parts can be cleaned using a damp cloth. If this does not prove to be ade-quate, the parts can be treated with special solvent-free plastic cleaning prod-
ucts .
Paint care products are not suitable for plastic parts.
De-icing windows and exterior mirrors
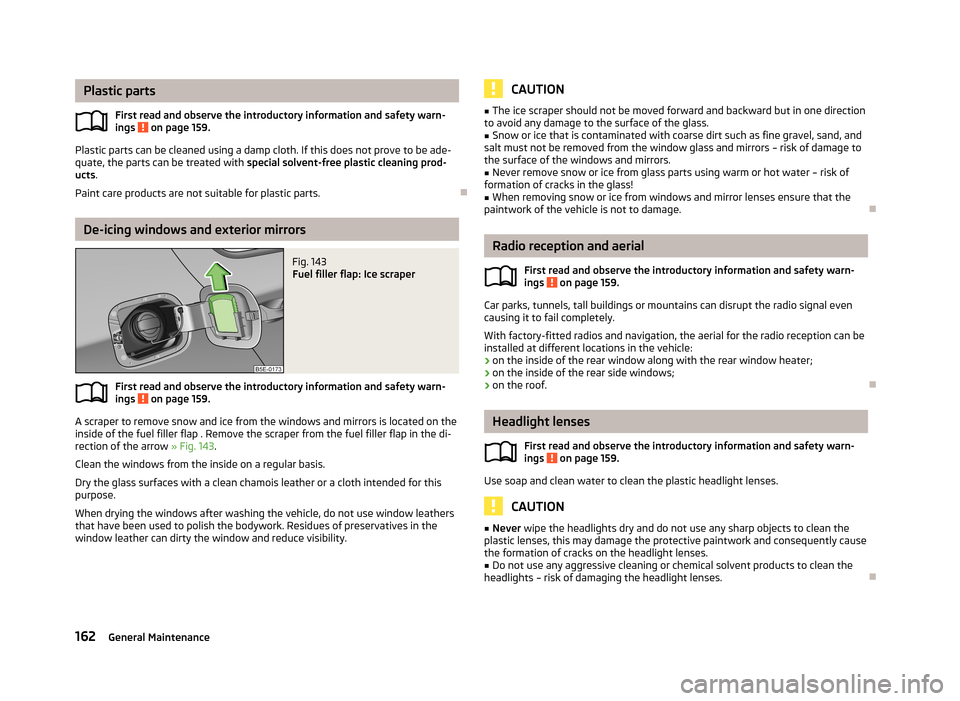
Fig. 143
Fuel filler flap: Ice scraper
First read and observe the introductory information and safety warn- ings on page 159.
A scraper to remove snow and ice from the windows and mirrors is located on the inside of the fuel filler flap . Remove the scraper from the fuel filler flap in the di-
rection of the arrow » Fig. 143.
Clean the windows from the inside on a regular basis. Dry the glass surfaces with a clean chamois leather or a cloth intended for thispurpose.
When drying the windows after washing the vehicle, do not use window leathers
that have been used to polish the bodywork. Residues of preservatives in the
window leather can dirty the window and reduce visibility.
CAUTION■ The ice scraper should not be moved forward and backward but in one direction
to avoid any damage to the surface of the glass.■
Snow or ice that is contaminated with coarse dirt such as fine gravel, sand, and
salt must not be removed from the window glass and mirrors – risk of damage to
the surface of the windows and mirrors.
■
Never remove snow or ice from glass parts using warm or hot water – risk of
formation of cracks in the glass!
■
When removing snow or ice from windows and mirror lenses ensure that the
paintwork of the vehicle is not to damage.
Radio reception and aerial
First read and observe the introductory information and safety warn-ings
on page 159.
Car parks, tunnels, tall buildings or mountains can disrupt the radio signal even causing it to fail completely.
With factory-fitted radios and navigation, the aerial for the radio reception can be installed at different locations in the vehicle:
› on the inside of the rear window along with the rear window heater;
› on the inside of the rear side windows;
› on the roof.
Headlight lenses
First read and observe the introductory information and safety warn-ings
on page 159.
Use soap and clean water to clean the plastic headlight lenses.
CAUTION
■ Never wipe the headlights dry and do not use any sharp objects to clean the
plastic lenses, this may damage the protective paintwork and consequently cause
the formation of cracks on the headlight lenses.■
Do not use any aggressive cleaning or chemical solvent products to clean the
headlights – risk of damaging the headlight lenses.
162General Maintenance
Page 165 of 222

Rubber sealsFirst read and observe the introductory information and safety warn-
ings
on page 159.
The rubber seals on doors, door panels, and the sliding roof remain smoother and
last longer if the seals are treated regularly with a suitable rubber care product.
This helps to prevent leakages and premature wear of the seals. Rubber seals
which are well cared for also do not stick together in cold winter weather.
Door lock cylinders
First read and observe the introductory information and safety warn-
ings
on page 159.
Specific products must be used for de-icing door lock cylinders.
When washing your vehicle, ensure as little water as possible gets into the lock- ing cylinders.
Note
We recommend that suitable materials from ŠKODA Original Accessories are used for maintaining the door lock cylinders.
Wheels
First read and observe the introductory information and safety warn-
ings
on page 159.
Wheel rims
Also thoroughly wash the wheel rims when washing the vehicle on a regular ba- sis. Regularly remove salt and brake abrasion from the wheel rims otherwise the material will be affected. Damage to the paint layer on the wheel rims must be
touched up immediately.
Light alloy wheels
After washing thoroughly and treat the wheel rims with a protective product for
light alloy wheels. Products which cause abrasion must not be used to treat the
wheel rims.
WARNINGWater, ice and grit in the brake system can affect the braking efficiency – risk
of accident!
CAUTION
Severe layers of dirt on the wheels can also result in wheel imbalance. This may
show itself in the form of a wheel vibration which is transmitted to the steering
wheel which, in certain circumstances, can cause premature wear of the steering.
This means it is necessary to remove the dirt.
Note
We recommend that any repairs to damaged paintwork are carried out by a
ŠKODA Partner.
Underbody protection
First read and observe the introductory information and safety warn-ings
on page 159.
The underside of your vehicle is protected for life against chemical and mechani-
cal influences.
As damage to the protective layer when driving cannot be ruled out completely,
we recommend that you inspect the protective layer on the underside of your ve- hicle and on the chassis at specific intervals – preferably at the beginning and end
of the winter.
ŠKODA Partners have suitable spray products and the necessary equipment
available, and are familiar with the instructions for use. We therefore recommend
that touch-up work or additional corrosion protection measures are carried out by
a ŠKODA Partner.
WARNINGNever use additional underbody protection or anti-corrosion agents for ex-
haust pipes, catalytic converters, diesel particle filters or heat shields. When
the engine reaches its operating temperature, these substances might ignite
– risk of fire!
163Taking care of and cleaning the vehicle
Page 166 of 222
Protection of hollow spacesFirst read and observe the introductory information and safety warn-
ings
on page 159.
All the cavities of your vehicle which are at risk from corrosion are protected for life by a layer of protective wax applied in the factory.
Wax protection does not require to be inspected or re-treated. If any small amount of wax flow out of the cavities at high temperatures, these must be re-
moved with a plastic scraper and the stains cleaned using a petroleum cleaner.
WARNINGSafety regulations should be observed when using petroleum cleaner to re-
move wax – risk of fire!
Artificial leather, cloths and Alcantara ®
First read and observe the introductory information and safety warn- ings
on page 159.
The artificial leather can be cleaned using a damp cloth. If this does not prove suf-
ficient, only use cleaning agents designed specifically for this purpose.
Dust and fine dirt particles in pores, creases and seams may chafe and damagethe surface. If you leave your vehicle parked in the open for lengthy periods, pro-
tect the Alcantara ®
seat covers from the direct rays of the sun to prevent fading.
Minor changes in colour caused by use are normal.
Clean upholstery cover materials and cloth trims on doors, luggage compartment
cover, etc. using specific cleaning agents, e.g., dry foam. Use a soft sponge, brush,
or commercially available microfibre cloth. Use a cloth and a specific cleaning
agent to clean the roof trim.
Some clothing materials, such as dark denim, do, in part, not have sufficient col-
our fastness. This can cause damage or clearly visible discolouration to seat cov-
ers (fabric or leather) even when used correctly. This particularly applies to light
seat covers (fabric or leather). This is not a defect in the seat cover, but poor col-
our fastness of the clothing textiles.
CAUTIONDo not use any leather cleaners on Alcantara ®
seat covers.
Fabric covers on electrically heated seats
First read and observe the introductory information and safety warn-
ings
on page 159.
Do not clean the seat covers using moisture as this can damage the seat heating
system.
Use a specific cleaning agent such as dry foam or similar to clean the covers.
Natural leather
First read and observe the introductory information and safety warn-
ings
on page 159.
Depending on the amount of wear-and-tear, the leather should be cleaned on a
regular basis.
Normal cleaning
Clean soiled areas of the leather with slightly moistened cotton or woollen cloth.
Severe soiling
Ensure that the leather is not soaked through at any point and that no water gets
into the stitching of the seams.
Dry off the leather with a soft, dry cloth.
Removing stains
Remove fresh water-based stains (e.g., coffee, tea, juices, blood) with an absorb-
ent cloth or household cleaning paper. A specific cleaning agent is required for
dried-on stains.
Remove fresh grease-based stains (e.g. butter, mayonnaise, chocolate, etc.) with
an absorbent cloth, household cleaning paper, or use a suitable cleaner if the
stain has not yet penetrated into the surface.
Use a grease solvent to remove grease stains which have dried in .
Remove specific stains (e.g. ball-point pens, marker pen, nail varnish, dispersion
paint, shoe polish, etc.) with a special stain remover suitable for leather.
164General Maintenance
Page 167 of 222
Leather care
Treat the leather roughly every six months with a suitable leather care product.
Apply only a small amount of the cleaning and care product.
Dry off the leather with a soft, dry cloth.
Use a care cream with light blocker and impregnation effect on a regular basis and each time after cleaning. The cream nourishes the leather, allows it to
breathe and keeps it supple and also provides moisture. It also creates surface
protection.
Clean the leather every 2 to 3 months, remove any fresh stains as they occur. Also look after the leather dye. Refresh any areas with a special coloured leather cream as required.
The leather is a natural material with specific properties. During the use of the ve- hicle, minor visible changes can occur on the leather parts of the covers (e. g wrin- kles or creases as a result of the stress of the covers).
CAUTION
■ Avoid leaving the vehicle for lengthy periods in bright sunlight to avoid the
leather from bleaching. If the vehicle is parked in the open for lengthy periods,
protect the leather from direct sunlight by covering it.■
Sharp-edged objects on items of clothing such as zip fasteners, rivets, sharp-
edged belts, jewellery and pendants may leave permanent scratches or signs of
rubbing on the surface.
■
The use of a mechanical steering wheel lock may damage the leather surface of
the steering wheel.
Seat belts
First read and observe the introductory information and safety warn-
ings
on page 159.
Keep the seat belts clean!
Clean dirty seat belts using a mild soapy solution and remove coarse dirt with a soft brush!
Check the condition of all the seat belts on a regular basis. Belt webbing which has become severely soiled may prevent the inertia reel from
reeling up the belt properly.
WARNING■ The seat belts must not be removed for cleaning.■Never clean the seat belts chemically as chemical cleaning products could
destroy the fabric. The seat belts must also not be allowed to come into con-
tact with corrosive liquids (such as acids etc.).■
Seat belts which have damage to the webbing, connections, inertia reel or
lock should be replaced by a ŠKODA specialist garage.
■
Inertia reel belts must be completely dried before being reeled up.
Accessories, changes and replacement of parts
Introduction
This chapter contains information on the following subjects:
Repairs and technical modifications
166
Changes and impairments of the airbag system
166
If you want to retrofit your vehicle with accessories, if a vehicle part is to be re-
placed with a new one, or when needing to make technical changes, the follow-
ing instructions must be observed.
› Always seek advice from a ŠKODA Partner
before purchasing any accessories or
parts and before making any technical changes »
.
› Technical modifications must satisfy the latest guidelines and advice issued by
ŠKODA.
› We recommend you have any modifications and adjustments on the vehicle car-
ried out by a ŠKODA Partner. Partners can provide more detailed information
and also carry out all the necessary work professionally and correctly.
› Only install such parts whose version and properties meet factory-installed
parts on the vehicle.
Adhering to the advice given will prevent any kind of damage to the vehicle, and
its travelling and operating safety will be maintained. The vehicle also complies
with German road transport regulations (StVZO).
165Taking care of and cleaning the vehicle
Page 168 of 222
WARNING■Work on your vehicle, which have been carried out unprofessionally, can
cause operational faults – risk of accident!■
We recommend you only use ŠKODA original accessories and ŠKODA original
parts on your vehicle. Only by doing so can you guarantee reliability, safety
and suitability.
■
ŠKODA cannot assume any liability for products which have not been ap-
proved by ŠKODA even though these may be products with a type approval or
have been approved by a nationally recognised testing laboratory.
Note
ŠKODA Original Accessories and ŠKODA Original Parts can be purchased from
ŠKODA Partners who will also professionally undertake the assembly of the pur-
chased parts.
Repairs and technical modifications
First read and observe the introductory information and safety warn-ings
on page 165.
Any damage caused by technical changes made without consent by ŠKODA is ex-
cluded from the warranty – see the warranty certificate.
Interference on the electronic components and their software can lead to opera-
tional faults. This interference can also impair not directly affected systems be- cause of the networking of the electronic components. In other words, the vehi-
cle's roadworthiness may be put at risk and increased wear on parts may arise.
Repairs and technical modifications must comply with ŠKODA guidelines.
WARNING■ Repairs and technical modifications which have been carried out unprofes-
sionally, can cause damage and can seriously impair the effectiveness of driv-
er assist system – risk of accident and serious injury!■
We recommend having these repairs and modifications replaced by a ŠKODA
specialist garage.
For the sake of the environmentTechnical documents regarding changes carried out on the vehicle must be kept
by the vehicle user, in order to be handed over to the recyclers later. This ensures
that vehicle recycling is in accordance with environmental regulations.
Changes and impairments of the airbag system
First read and observe the introductory information and safety warn-ings
on page 165.
We recommend that any modifications and repairs to the front bumper, doors, front seats, headliner or bodywork be carried out by a ŠKODA Partner. These vehi-
cle parts may include system components for the airbag system.
WARNING■ Airbag modules cannot be repaired, but must be replaced.■Repairs and modifications which have been carried out unprofessionally, can
cause damage, operational faults, and can also seriously impair the effective- ness of airbag system – risk of accident and fatal injury!■
Never install any airbag parts into the vehicle that have been removed from
old cars or have been recycled.
■
A modification to the suspension of the vehicle including the use of non-ap-
proved rim-tyre combinations can alter the functioning of the airbag and in-
crease the risk of serious or fatal injuries in an accident.
■
Parts of the airbag system may be damaged during installation/removal of
system parts and when performing other repair work. This may mean that the
airbags will not deploy properly or not at all in the event of an accident.
166General Maintenance
Page 169 of 222
Inspecting and replenishing
Fuel
Introduction
This chapter contains information on the following subjects:
Refuelling
167
Unleaded petrol
168
Diesel fuel
169
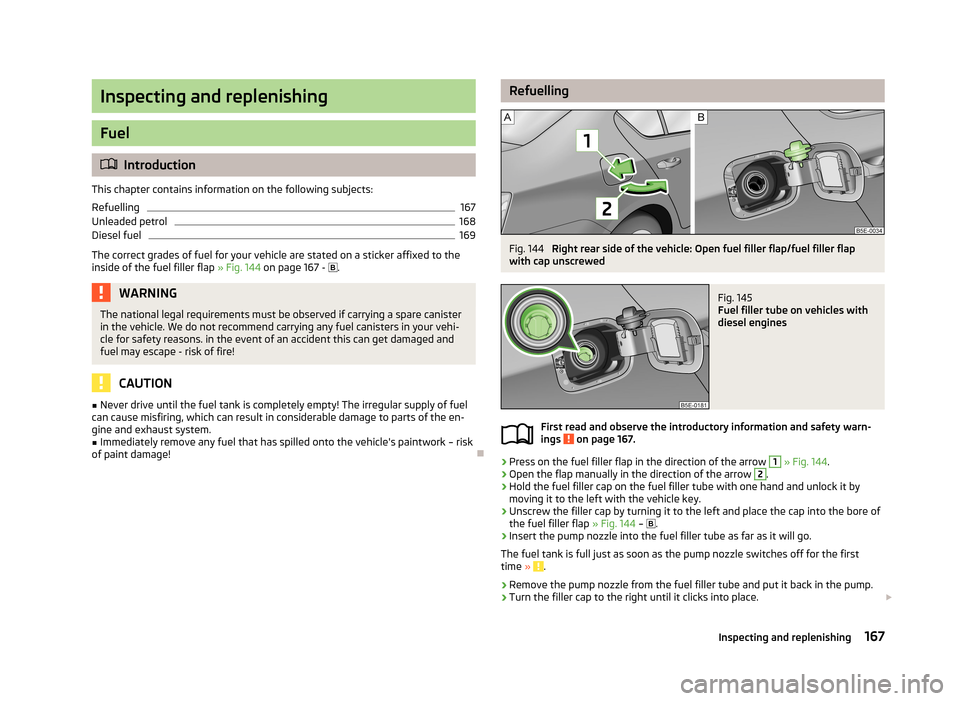
The correct grades of fuel for your vehicle are stated on a sticker affixed to the
inside of the fuel filler flap » Fig. 144 on page 167 -
.
WARNINGThe national legal requirements must be observed if carrying a spare canister
in the vehicle. We do not recommend carrying any fuel canisters in your vehi-
cle for safety reasons. in the event of an accident this can get damaged and fuel may escape - risk of fire!
CAUTION
■ Never drive until the fuel tank is completely empty! The irregular supply of fuel
can cause misfiring, which can result in considerable damage to parts of the en-
gine and exhaust system.■
Immediately remove any fuel that has spilled onto the vehicle's paintwork – risk
of paint damage!
RefuellingFig. 144
Right rear side of the vehicle: Open fuel filler flap/fuel filler flap
with cap unscrewed
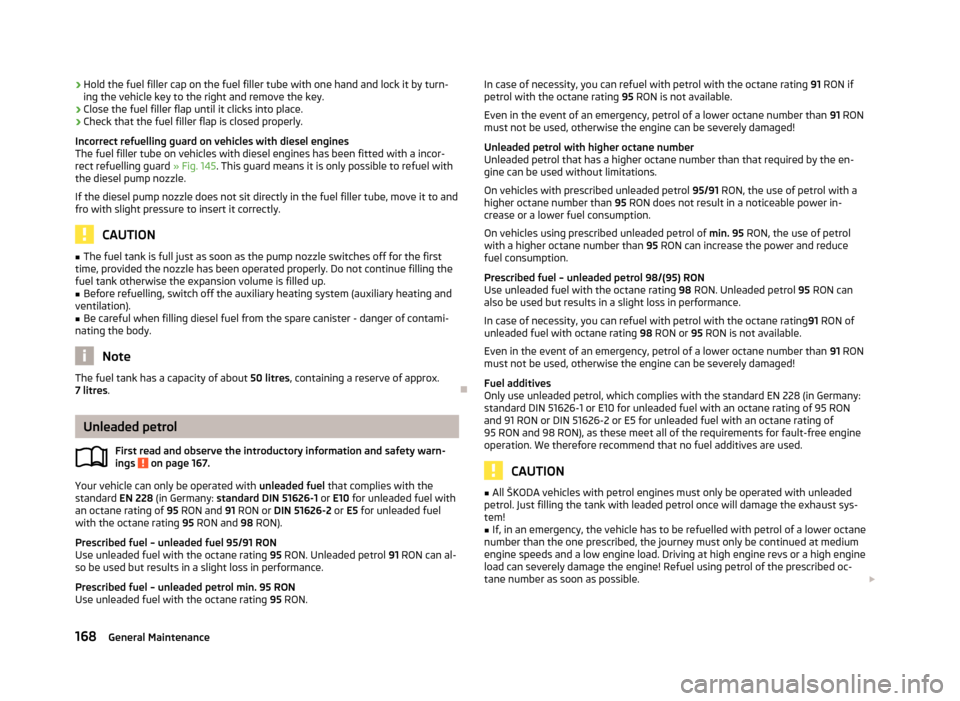
Fig. 145
Fuel filler tube on vehicles with
diesel engines
First read and observe the introductory information and safety warn-
ings on page 167.
›
Press on the fuel filler flap in the direction of the arrow
1
» Fig. 144 .
›
Open the flap manually in the direction of the arrow
2
.
›
Hold the fuel filler cap on the fuel filler tube with one hand and unlock it by
moving it to the left with the vehicle key.
›
Unscrew the filler cap by turning it to the left and place the cap into the bore of
the fuel filler flap » Fig. 144 –
.
›
Insert the pump nozzle into the fuel filler tube as far as it will go.
The fuel tank is full just as soon as the pump nozzle switches off for the first time »
.
›
Remove the pump nozzle from the fuel filler tube and put it back in the pump.
›
Turn the filler cap to the right until it clicks into place.
167Inspecting and replenishing
Page 170 of 222
›Hold the fuel filler cap on the fuel filler tube with one hand and lock it by turn-
ing the vehicle key to the right and remove the key.›
Close the fuel filler flap until it clicks into place.
›
Check that the fuel filler flap is closed properly.
Incorrect refuelling guard on vehicles with diesel engines The fuel filler tube on vehicles with diesel engines has been fitted with a incor-
rect refuelling guard » Fig. 145. This guard means it is only possible to refuel with
the diesel pump nozzle.
If the diesel pump nozzle does not sit directly in the fuel filler tube, move it to and fro with slight pressure to insert it correctly.
CAUTION
■ The fuel tank is full just as soon as the pump nozzle switches off for the first
time, provided the nozzle has been operated properly. Do not continue filling the fuel tank otherwise the expansion volume is filled up.■
Before refuelling, switch off the auxiliary heating system (auxiliary heating and
ventilation).
■
Be careful when filling diesel fuel from the spare canister - danger of contami-
nating the body.
Note
The fuel tank has a capacity of about 50 litres, containing a reserve of approx.
7 litres .
Unleaded petrol
First read and observe the introductory information and safety warn-
ings
on page 167.
Your vehicle can only be operated with unleaded fuel that complies with the
standard EN 228 (in Germany: standard DIN 51626-1 or E10 for unleaded fuel with
an octane rating of 95 RON and 91 RON or DIN 51626-2 or E5 for unleaded fuel
with the octane rating 95 RON and 98 RON).
Prescribed fuel – unleaded fuel 95/91 RON Use unleaded fuel with the octane rating 95 RON. Unleaded petrol 91 RON can al-
so be used but results in a slight loss in performance.
Prescribed fuel – unleaded petrol min. 95 RONUse unleaded fuel with the octane rating 95 RON.
In case of necessity, you can refuel with petrol with the octane rating 91 RON if
petrol with the octane rating 95 RON is not available.
Even in the event of an emergency, petrol of a lower octane number than 91 RON
must not be used, otherwise the engine can be severely damaged!
Unleaded petrol with higher octane number
Unleaded petrol that has a higher octane number than that required by the en-
gine can be used without limitations.
On vehicles with prescribed unleaded petrol 95/91 RON, the use of petrol with a
higher octane number than 95 RON does not result in a noticeable power in-
crease or a lower fuel consumption.
On vehicles using prescribed unleaded petrol of min. 95 RON, the use of petrol
with a higher octane number than 95 RON can increase the power and reduce
fuel consumption.
Prescribed fuel – unleaded petrol 98/(95) RON
Use unleaded fuel with the octane rating 98 RON. Unleaded petrol 95 RON can
also be used but results in a slight loss in performance.
In case of necessity, you can refuel with petrol with the octane rating 91 RON of
unleaded fuel with octane rating 98 RON or 95 RON is not available.
Even in the event of an emergency, petrol of a lower octane number than 91 RON
must not be used, otherwise the engine can be severely damaged!
Fuel additives
Only use unleaded petrol, which complies with the standard EN 228 (in Germany:
standard DIN 51626-1 or E10 for unleaded fuel with an octane rating of 95 RON and 91 RON or DIN 51626-2 or E5 for unleaded fuel with an octane rating of
95 RON and 98 RON), as these meet all of the requirements for fault-free engine operation. We therefore recommend that no fuel additives are used.
CAUTION
■ All ŠKODA vehicles with petrol engines must only be operated with unleaded
petrol. Just filling the tank with leaded petrol once will damage the exhaust sys-
tem!■
If, in an emergency, the vehicle has to be refuelled with petrol of a lower octane
number than the one prescribed, the journey must only be continued at medium
engine speeds and a low engine load. Driving at high engine revs or a high engine
load can severely damage the engine! Refuel using petrol of the prescribed oc-
tane number as soon as possible.
168General Maintenance