SKODA OCTAVIA 2012 3.G / (5E) Owner's Manual
Manufacturer: SKODA, Model Year: 2012, Model line: OCTAVIA, Model: SKODA OCTAVIA 2012 3.G / (5E)Pages: 222, PDF Size: 13.52 MB
Page 131 of 222
Automatic gearbox
Automatic transmission
Introduction
This chapter contains information on the following subjects:
Introductory information
129
Starting-off and driving
130
Selector lever positions
130
Manual shifting of gears (Tiptronic)
131
Selector lever lock
131
Kickdown function
132
Dynamic shift programme
132
Emergency programme
132
Selector lever-emergency unlocking
133WARNING■ Do not depress the accelerator if changing the position of the selector lever
when the vehicle is stationary and the engine is running – risk of accident!■
Never move the selector lever into position R or P when driving – risk of an
accident!
■
When the vehicle is stationery and the engine is running, stopping the vehi-
cle requires you pressing the brake pedal in all selector lever settings. When
the engine is idling, the power transmission is never completely interrupted -
the vehicle creeps.
■
The selector lever must be placed into position P and the handbrake firmly
applied before the bonnet can be opened and work on the running engine can
be completed – risk of accident! The safety guidelines must always be ob-
served » page 169 , Engine compartment .
■
If stopping on a hill (downhill gradient), never try to maintain the vehicle sta-
tionary with the gear engaged by means of the accelerator pedal, i.e. by let-
ting the clutch slip - This can lead to overheating of the clutch. If there is a risk
of overheating of the clutch due to overload, the clutch is opened automati-
cally and the vehicle rolls backward – risk of accident!
WARNING (Continued)■ If you have to stop on a slope, depress and hold the brake pedal to prevent
the vehicle from rolling back.■
On a smooth or slippery road surface using the kickdown function can cause
the driven wheels to spin – risk of skidding!
Note
If the driving mode Sport or Eco » page 124 is selected and the selector lever is in
position D/S, the gearbox is automatically set to mode S or E. The mode is indica-
ted in the instrument cluster display » Fig. 120 on page 130.
Introductory information
First read and observe the introductory information and safety warn-
ings
on page 129.
Starting
The engine can only be started when the selector lever is in position P or N .
When the steering is locked, when the ignition is turned on or off, or when start-
ing the engine, If the selector lever is not in the positions P or N, the following
message appears in the instrument cluster display Move the selector lever to Po-
sition P/N! or ENGAGE N OR P .
Shifting gears
Shifting up and down through the gears is performed automatically. The gearbox
can also be switched to Tiptronic mode. This mode makes it possible for you to
also shift gears manually » page 131.
If the selector lever position N is accidentally selected while driving, it is first nec-
essary to release pressure on the accelerator pedal and wait for the idling speed of the engine to be reached before the selector lever can be engaged in the driveposition.
At temperatures below -10 °C the engine can only be started in the selector lever position P.
Parking
When parking on a level road surface, it suffices to engage selector lever position
P .
129Automatic gearbox
Page 132 of 222
When parking on a slope, the handbrake should be applied firmly before the park
position P is selected. This ensures that there is no excessive pressure on the
lock mechanism and that it is subsequently easier to move the selector lever out of position P.
Starting-off and driving
First read and observe the introductory information and safety warn-
ings
on page 129.
Starting off
›
Firmly depress and hold the brake pedal.
›
Press the Shiftlock button (button in the selector lever handle), move the selec-
tor lever into the desired position » page 130 and then release the Shiftlock
button.
›
Release the brake pedal and accelerate.
Stop
The selector lever position N does not have to be selected when stopping for a
short time, such as at a cross roads.
›
Fully depress and hold the brake pedal until driving is resumed.
Parking
›
Fully depress and hold the brake pedal and bring the vehicle to a stop.
›
Firmly apply the handbrake.
›
Press and Shiftlock button in the selector lever, move the selector lever to P
and then release the Shiftlock button.
Driving in Neutral
›
Select the Eco driving mode » page 124, Select driving mode .
›
Take the foot of the accelerator (selector lever in position D/S).
The vehicle moves without the braking effect of the engine.
Idling can be interrupted by briefly pressing down on the accelerator pedal or
pressing the rocker switch -
on the multifunction steering wheel
» page 131.
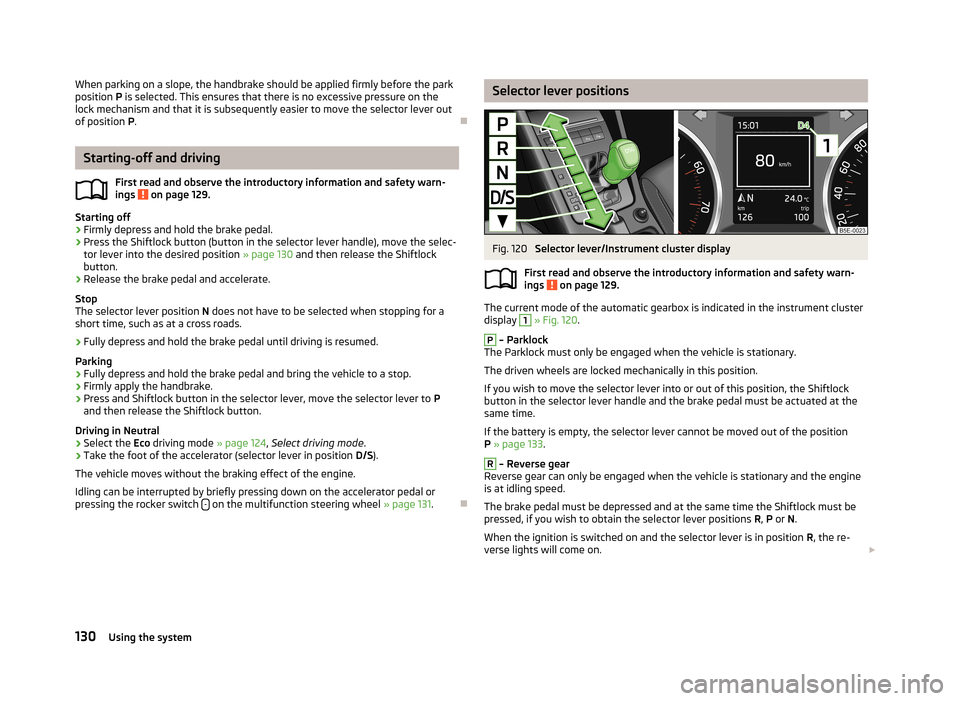
Selector lever positionsFig. 120
Selector lever/Instrument cluster display
First read and observe the introductory information and safety warn- ings
on page 129.
The current mode of the automatic gearbox is indicated in the instrument cluster display
1
» Fig. 120 .
P
– Parklock
The Parklock must only be engaged when the vehicle is stationary.
The driven wheels are locked mechanically in this position.
If you wish to move the selector lever into or out of this position, the Shiftlock
button in the selector lever handle and the brake pedal must be actuated at the
same time.
If the battery is empty, the selector lever cannot be moved out of the position
P » page 133 .
R
– Reverse gear
Reverse gear can only be engaged when the vehicle is stationary and the engine
is at idling speed.
The brake pedal must be depressed and at the same time the Shiftlock must be
pressed, if you wish to obtain the selector lever positions R, P or N.
When the ignition is switched on and the selector lever is in position R, the re-
verse lights will come on.
130Using the system
Page 133 of 222
N – Neutral
The brake pedal must be depressed to move the selector lever out of the position
N (if the lever is in this position for longer than 2 seconds) into the position D/S or
R when the vehicle is travelling at less than 5 km/h and the ignition is switched
on.D/S
- mode for driving forward (Normal program)/mode for driving forward
(Sport program)
The system switches from one mode to the other by moving the selector lever in- to the spring-tensioned position » Fig. 120 .
In the D or S mode, the forward gears are shifted up and down, depending on the
selected driving mode, engine load, driving speed and dynamic shifting program.
In the S mode, shifting up later into a higher gear makes it possible to fully exploit
the power potential of the engine. The gearbox also then shifts down at higher engine speeds as in the position D.
The brake pedal must be depressed to move the selector lever into position D/S
from Nwhen the vehicle is travelling at less than 5 km/h.
Manual shifting of gears (Tiptronic)
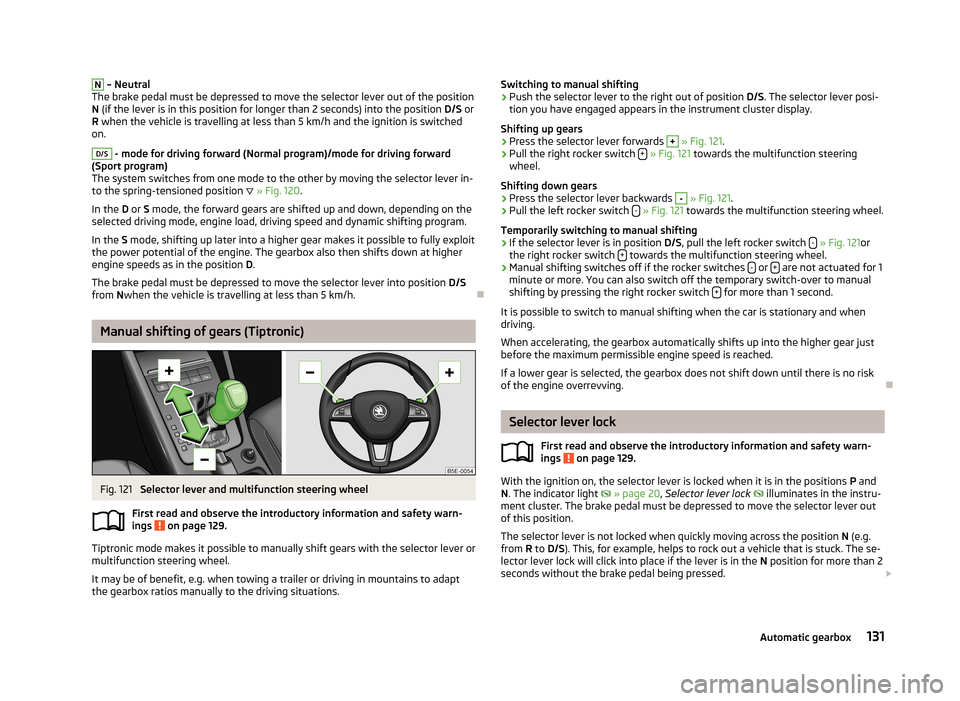
Fig. 121
Selector lever and multifunction steering wheel
First read and observe the introductory information and safety warn-
ings
on page 129.
Tiptronic mode makes it possible to manually shift gears with the selector lever or
multifunction steering wheel.
It may be of benefit, e.g. when towing a trailer or driving in mountains to adapt
the gearbox ratios manually to the driving situations.
Switching to manual shifting›Push the selector lever to the right out of position D/S. The selector lever posi-
tion you have engaged appears in the instrument cluster display.
Shifting up gears›
Press the selector lever forwards
+
» Fig. 121 .
›
Pull the right rocker switch +
» Fig. 121 towards the multifunction steering
wheel.
Shifting down gears
›
Press the selector lever backwards
-
» Fig. 121 .
›
Pull the left rocker switch -
» Fig. 121 towards the multifunction steering wheel.
Temporarily switching to manual shifting
›
If the selector lever is in position D/S, pull the left rocker switch -
» Fig. 121 or
the right rocker switch + towards the multifunction steering wheel.
›
Manual shifting switches off if the rocker switches
- or + are not actuated for 1
minute or more. You can also switch off the temporary switch-over to manual shifting by pressing the right rocker switch +
for more than 1 second.
It is possible to switch to manual shifting when the car is stationary and when
driving.
When accelerating, the gearbox automatically shifts up into the higher gear just before the maximum permissible engine speed is reached.
If a lower gear is selected, the gearbox does not shift down until there is no risk
of the engine overrevving.
Selector lever lock
First read and observe the introductory information and safety warn-ings
on page 129.
With the ignition on, the selector lever is locked when it is in the positions P and
N . The indicator light
» page 20 , Selector lever lock
illuminates in the instru-
ment cluster. The brake pedal must be depressed to move the selector lever out
of this position.
The selector lever is not locked when quickly moving across the position N (e.g.
from R to D/S ). This, for example, helps to rock out a vehicle that is stuck. The se-
lector lever lock will click into place if the lever is in the N position for more than 2
seconds without the brake pedal being pressed.
131Automatic gearbox
Page 134 of 222

The selector lever lock is only effective when the vehicle is stationary and at
speeds up to 5 km/h.
Shiftlock button
The Shiftlock button in the handle of selector lever prevents certain selector lever positions being engaged inadvertently. The selector lever lock is cancelled whenthe Shiftlock button is pressed.
Ignition key withdrawal lock
After the ignition is switched off, the ignition key can only be withdrawn if the se- lector lever is in the position P. If the ignition key is withdrawn, the selector lever
is blocked in position P.
Kickdown function
First read and observe the introductory information and safety warn-ings
on page 129.
The kickdown function provides you with maximum acceleration power.
When the accelerator pedal is fully depressed, the kickdown function is activated
in the desired driving program. The gearbox shifts down to one or several gears in
line with the driving state and the vehicle accelerates.
The gearbox does not shift up into the highest gear until the engine has reached
its maximum revolutions for this gear range.
Note
The kickdown function is also available in the Eco » page 124 driving mode.
Dynamic shift programme
First read and observe the introductory information and safety warn-
ings
on page 129.
The control unit on the automatic gearbox continuously monitors the driving per-
formance and takes the selected driving mode into account » page 124. The dy-
namic shifting program is adapted to it.
Adopting a moderate style of driving will cause the control unit to select the
most economical driving programme. Shifting up into a higher gear as soon as
possible and shifting down as late as possible will have a favourable effect on
your fuel consumption.
If the control unit detects that sporty style of driving is active, the driving pro-
gramme is adapted to this style and gears are shifted down more quickly than in
the moderate style of driving.
Emergency programme
First read and observe the introductory information and safety warn-
ings
on page 129.
An emergency programme exists in the event of a fault in the system.
The gearbox operates in a corresponding emergency programme if there are
functional faults in the gearbox electronics.
A functional fault can have the following effect:
› The gearbox only shifts into certain gears;
› The reverse gear
R cannot be used,
› The manual shift programme is switched off in emergency mode.
Note
When the gearbox has switched to emergency mode, consult a ŠKODA Specialist
garage.
132Using the system
Page 135 of 222
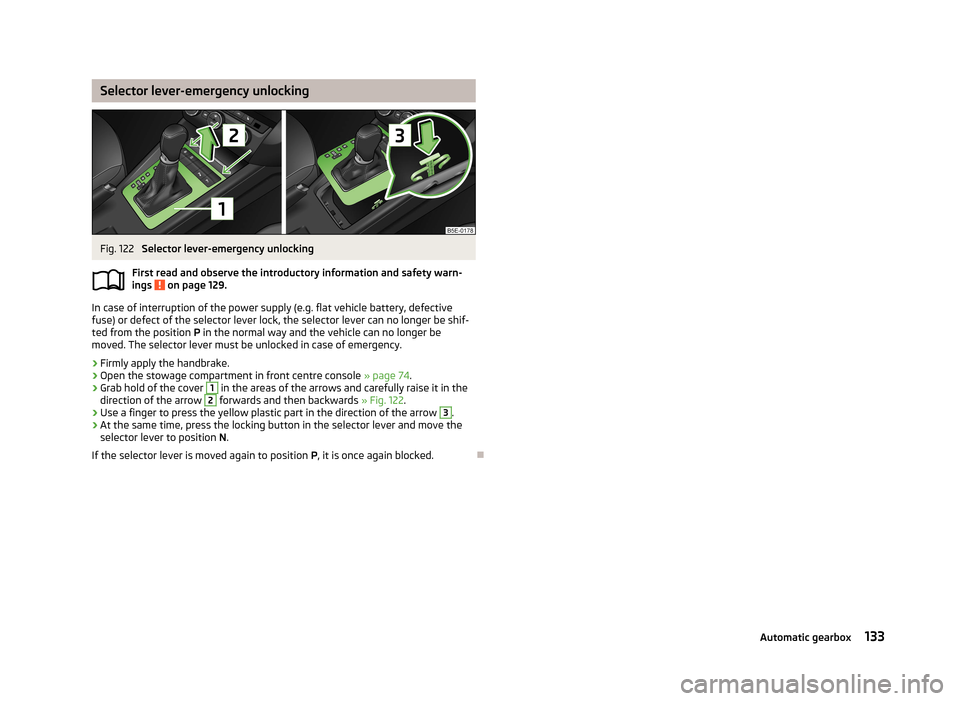
Selector lever-emergency unlockingFig. 122
Selector lever-emergency unlocking
First read and observe the introductory information and safety warn- ings
on page 129.
In case of interruption of the power supply (e.g. flat vehicle battery, defective
fuse) or defect of the selector lever lock, the selector lever can no longer be shif-
ted from the position P in the normal way and the vehicle can no longer be
moved. The selector lever must be unlocked in case of emergency.
›
Firmly apply the handbrake.
›
Open the stowage compartment in front centre console » page 74.
›
Grab hold of the cover
1
in the areas of the arrows and carefully raise it in the
direction of the arrow
2
forwards and then backwards » Fig. 122.
›
Use a finger to press the yellow plastic part in the direction of the arrow
3
.
›
At the same time, press the locking button in the selector lever and move the
selector lever to position N.
If the selector lever is moved again to position P, it is once again blocked.
133Automatic gearbox
Page 136 of 222
Communication
Introductory information
For more information about controlling hands-free equipment, multimedia, Navi-
gation, etc. see » operating instructions for Infotainment .
ŠKODA permits the operation of mobile phones and two-way radio systems with
a professionally installed external aerial and a maximum transmission power of up to 10 watts.
Please refer to a ŠKODA Partner for information about the possibilities of instal- ling and operating mobile phones and two-way radio systems that have a trans-
mission power of more than 10 W.
Operating mobile phones or two-way radio systems may interfere with the func- tionality of the electronic systems in your vehicle.
The reasons for this are as follows:
› no external aerial;
› external aerial incorrectly installed;
› transmission power greater than 10 watts.
WARNING■
Concentrate fully at all times on your driving! As the driver you are fully re-
sponsible for the operation of your vehicle. Use the telephone system only to
such an extent that you are in full control of your vehicle at any time.■
The national regulations for using a mobile phone in a vehicle must be ob-
served.
■
If a mobile phone or a two-way radio system is operated in a vehicle without
an external aerial or an external aerial which has been installed incorrectly,
this can increase the strength of the electromagnetic field inside the vehicle.
■
Two-way radio systems, mobile phones or mounts must not be installed on
airbag covers or within the immediate deployment range of the airbags.
■
Never leave a mobile phone on a seat, on the dash panel or in another area,
from which it can be thrown during a sudden braking manoeuvre, an accident
or a collision – risk of injury.
■
In the event of air transport, the Bluetooth ®
function for the hands-free sys-
tem must be switched off by a specialist garage.
CAUTION■ Not all mobile phones that enable Bluetooth ®
communication are compatible
with the universal telephone preinstallation. You can ask an authorised ŠKODA Partner whether your telephone is compatible with the universal telephone pre- installation.■
The range of the Bluetooth ®
connection to the hands-free system is restricted
to the vehicle interior. The range is dependent on local factors, e.g. obstacles be- tween the devices and mutual interferences with other devices. If your mobilephone is in a jacket pocket, for example, this can lead to difficulties when estab-lishing a connection with the hands-free-system or transferring data.
Note
We recommend that the installation of mobile phones and two-way radio sys-
tems in a vehicle be carried out by a ŠKODA Partner.
Declaration of conformity
ŠKODA AUTO a.s. hereby declares that the ŠKODA Infotainment systems meet the basic requirements and additional provisions of Directive 1999/5/EC.
Warning statement
Valid for infotainment systems ŠKODA.
FCC § 15.19 Labelling requirements
This device complies with part 15 of the FCC Rules and Industry Canada license-
exempt RSS standard(s). Operation is subject to the following two conditions:
(1) This device may not cause harmful interference, and (2) this device must accept any interference received, including interference thatmay cause undesired operation.
FCC § 15.21 Information to user
Changes or modifications not expressly approved by the party responsible for
compliance could void the user’s authority to operate the equipment.
134Using the system
Page 137 of 222
INDUSTRY CANADA Statements
Le présent appareil est conforme aux CNR d'Industrie Canada applicables aux
appareils radio exempts de licence. L'exploitation est autorisée aux deux
conditions suivantes : (1) l'appareil ne doit pas produire de brouillage, et (2)
l'utilisateur de l'appareil doit accepter tout brouillage radioélectrique subi, même
si le brouillage est susceptible d'en compromettre le fonctionnement.
Phonebox
The vehicle body partially interferes with the telephone signal and makes use of
the mobile telephone somewhat more difficult in regions with a weak signal. The
current consumption and the telephone battery discharges more quickly.
To reduce the effects of these defects, an induction plate is located on the bot-
tom of the stowage compartment in the centre console » Fig. 68 on page 74. The
induction plate generates a induction field for the telephone signal which is direc- ted to the plate on the roof aerial where it is amplified.
The mobile phone kept in the stowage compartment with the underside on the
induction plate can use a signal boosted by around 20 %.
As a result:
› the sending and receiving power of the telephone is improved;
› the discharge of the phone battery is reduced;
› the electromagnetic radiation is reduced in the vehicle interior.
Multimedia
Operating Infotainment from the multifunction steering wheel
Fig. 123
Multifunction steering wheel: Control buttons and dials
Buttons and dials are located on the multifunction steering wheel for operating
some Infotainment functions » Fig. 123.
The buttons and dials operate the functions for the current operating mode of the Infotainment.Button/ adjust- ment
wheel
ActionRadio, traffic report, TVAudio, Video, DVD, DVD menuNavigation
1Press brieflyChange audio source, change frequency range1Press button for a
long period of timeChange the audio source and call up the last context status (e.g. the last radio station that was played or title a)
)2Press brieflySwitch off/on tone b)
135Communication
Page 138 of 222
Button/adjust- ment
wheel
ActionRadio, traffic report, TVAudio, Video, DVD, DVD menuNavigation
2Turn upwardsIncrease volume2Turn downwardsDecrease volume3
Press brieflyChanging to the next stored radio station
Changing to the next stored traffic information Interrupting the traffic reportChange to the next title a)
Change to the next chapter c)
Change to the first chapter d)Function based on the current audio
source3Press button for a
long period of timeInterruption of the traffic reportFast forward a)4
Press brieflyChanging to the previously stored radio station
Changing to the previously stored traffic information Interrupting the traffic reportChange to previous title a)
Change to previous chapter c)4Press button for a
long period of timeInterruption of the traffic reportFast rewind a)5Press brieflyInterruption of the traffic reportwithout functionRepeats the last navigation announce-
ment5
Turn upwardsDisplay of the stored/accessible stationsScroll upwards
Interruption of the traffic reportChange to previous title a)
Change to previous chapter c)
Displays list of last destinations
5
Turn downwardsDisplay of the stored/accessible stations
Scroll downwards
Interruption of the traffic reportChange to the next title a)
Change to the next chapter c)
Change to the first chapter d)6Press brieflyCall up main menu on information displaya)
Does not apply for AUX.
b)
The tone is switched on again by pressing one of the buttons
1
,
3
or
4
and the adjustment wheel
2
is rotated.
c)
Applies for DVD.
d)
Applies for the DVD menu.
Note■
If the ignition and the side lights are switched on, the buttons and dials on the
multifunction steering wheel are also illuminated.■
The set of loudspeakers in the vehicle is matched to a power output of the Info-
tainment of 4x20 W.
■
Vehicles with the CANTON sound system equipment are fitted with a loud-
speaker set including centre speaker and bass. The loudspeaker set is tuned with
a external 10 channel amp for a total output of 570 W.
136Using the system
Page 139 of 222

USB-, AUX- and MEDIA IN inputsFig. 124
USB- and AUX inputs/MEDIA IN input
The USB and AUX inputs or MEDIA IN input are located above the stowage com- partment in the front centre console » Fig. 124.
A data carrier or audio system can be connected directly to the USB/AUX input or via an adapter from the ŠKODA range of original accessories.
The USB input can be used to charge the batteries of most devices which allow
charging via USB.
An audio system cab be attached to the MEDIA IN input via an adapter from the
ŠKODA original range of accessories.
137Communication
Page 140 of 222
Safety
Passive Safety
General information
Introduction
This chapter contains information on the following subjects:
Safety equipment
138
Before setting off
138
What influences the driving safety?
139
In this section you will find important information, tips and notes on the subject
of passive safety in your vehicle. We have combined everything here which you
should be familiar with, for example, regarding seat belts, airbags, child seats and safety of children. It is therefore important, in particular, to comply with the notes
and warnings in this section for your own interest and in the interest of those
travelling with you.
WARNING■ This chapter contains important information on how to use the vehicle for
the driver and his occupants. You will find further information on safety, which concerns you and those travelling with you, in the following chapters of this
Owner's Manual.■
The complete on-board literature should always be in the vehicle. This ap-
plies in particular, if you rent out or sell the vehicle.
Safety equipment
First read and observe the introductory information and safety warn-ings
on page 138.
The following list contains part of the safety equipment in your vehicle:
› three-point seat belts for all the seats;
› belt force limiters for the front seats;
›
belt tensioners for front seats;
› seat belt height adjusters for front seats;
› Front airbag for the driver and the front seat passenger;
› driver’s knee airbag;
› front side airbags;
› rear side airbags;
› head airbags;
› anchoring points for child seat using the ISOFIX system;
› anchoring points for child seat using the TOP TETHER system;
› head restraints adjustable for height;
› adjustable steering column.
The specified safety equipment works together, in order to optimally protect you
and those travelling with you in accident situations. The safety equipment does
not protect you or the people travelling with you, if you or your occupants adopt
an incorrect seated position or the equipment is not correctly adjusted or used. If
the seat belt is not fastened properly, this may result in injuries during an acci-
dent caused by the deployed airbag.
Before setting off
First read and observe the introductory information and safety warn-
ings
on page 138.
For your own safety and the safety of the people travelling with you, please pay
attention to the following points before setting off.
› Ensure that the lighting and the turn signal system are functioning properly.
› Check the tyre inflation pressure.
› Ensure that all of the windows offer good visibility to the outside.
› Secure all items of luggage
» page 64, Boot .
› Ensure that no objects can obstruct the pedals.
› Adjust the mirrors, the front seat and head restraint to your body size.
› Advise your passengers to adjust the head restraints to their body size.
› Protect children in suitable child seats with correctly fastened seat
belts » page 154 , Transporting children safely .
› Adopt the correct seated position
» page 139, Correct seated position . Tell your
passengers to assume the correct seated position.
› Correctly fasten the seat belt. Also inform passengers to fasten the seat belt
correctly » page 142 , Seat belts .
138Safety