SKODA OCTAVIA 2013 3.G / (5E) Amundsen Navigation System Manual
Manufacturer: SKODA, Model Year: 2013, Model line: OCTAVIA, Model: SKODA OCTAVIA 2013 3.G / (5E)Pages: 83, PDF Size: 4.7 MB
Page 61 of 83
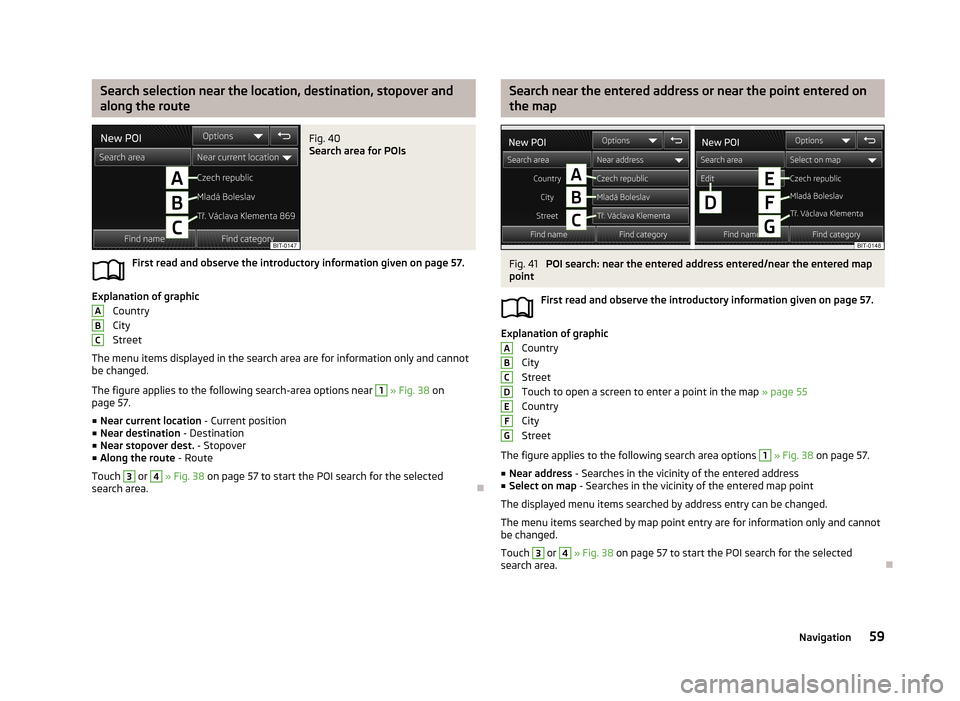
Search selection near the location, destination, stopover and
along the routeFig. 40
Search area for POIs
First read and observe the introductory information given on page 57.
Explanation of graphic Country
City
Street
The menu items displayed in the search area are for information only and cannot
be changed.
The figure applies to the following search-area options near
1
» Fig. 38 on
page 57.
■ Near current location - Current position
■ Near destination - Destination
■ Near stopover dest. - Stopover
■ Along the route - Route
Touch
3
or
4
» Fig. 38 on page 57 to start the POI search for the selected
search area.
ABCSearch near the entered address or near the point entered on
the mapFig. 41
POI search: near the entered address entered/near the entered map
point
First read and observe the introductory information given on page 57.
Explanation of graphicCountry
City
Street
Touch to open a screen to enter a point in the map » page 55
Country
City
Street
The figure applies to the following search area options
1
» Fig. 38 on page 57.
■ Near address - Searches in the vicinity of the entered address
■ Select on map - Searches in the vicinity of the entered map point
The displayed menu items searched by address entry can be changed.
The menu items searched by map point entry are for information only and cannot be changed.
Touch
3
or
4
» Fig. 38 on page 57 to start the POI search for the selected
search area.
ABCDEFG59Navigation
Page 62 of 83
POI categories
Introduction
This chapter contains information on the following subjects:
Car and travel
60
Dining and shopping
60
Businesses and public facilities
61
Emergencies
61
Attractions and leisure
61
Other destinations displayed in the map
61
First and foremost, pay attention to the safety instructions » page 4 , Important
notes .
The map screen can display symbols for the destination type name.
■ Select all - Displays a list of all destinations in the search area, with the nearest
POI listed at the top
■ Categories (alphabetical) - Displays all POI categories in alphabetical order
■ Car and travel
■ Dining and shopping
■ Companies and public services
■ Emergencies
■ Attractions and leisure
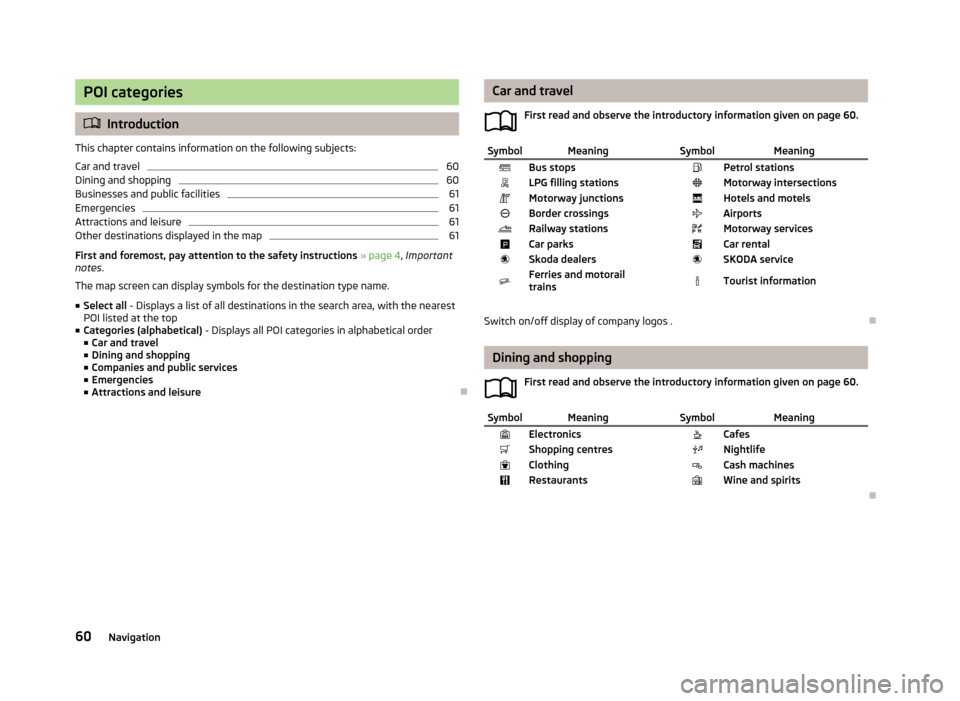
Car and travel
First read and observe the introductory information given on page 60.SymbolMeaning SymbolMeaningBus stops Petrol stationsLPG filling stations Motorway intersectionsMotorway junctions Hotels and motelsBorder crossings AirportsRailway stations Motorway servicesCar parks Car rentalSkoda dealers SKODA serviceFerries and motorail
trains Tourist information
Switch on/off display of company logos .
Dining and shopping
First read and observe the introductory information given on page 60.
SymbolMeaning SymbolMeaningElectronics CafesShopping centres NightlifeClothing Cash machinesRestaurants Wine and spirits
60Navigation
Page 63 of 83
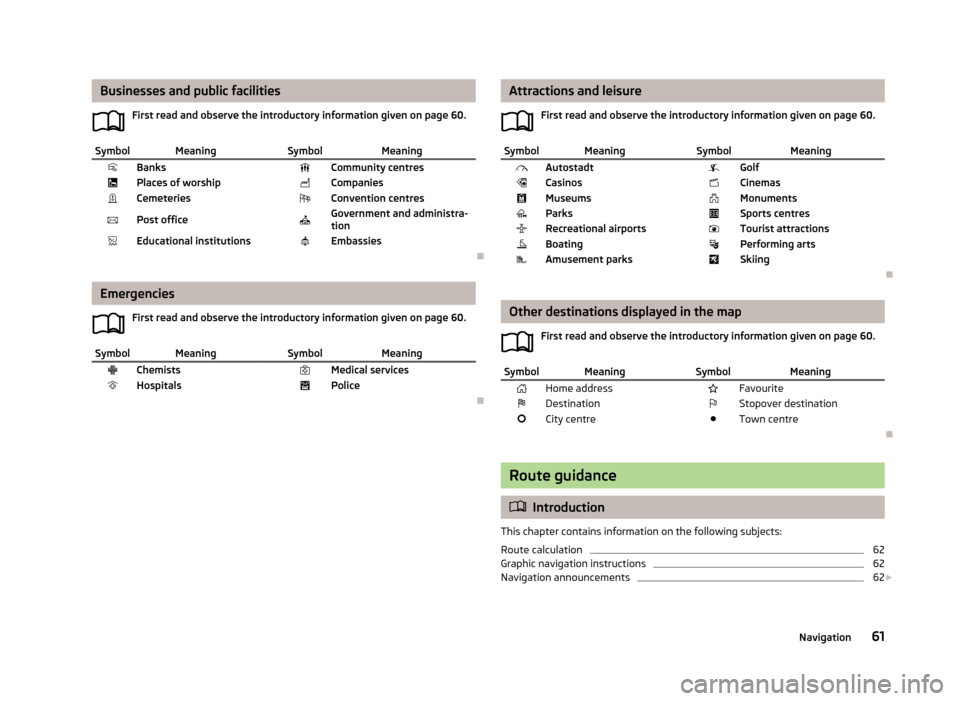
Businesses and public facilitiesFirst read and observe the introductory information given on page 60.SymbolMeaning SymbolMeaningBanks Community centresPlaces of worship CompaniesCemeteries Convention centresPost office Government and administra-
tionEducational institutions Embassies
Emergencies
First read and observe the introductory information given on page 60.
SymbolMeaning SymbolMeaningChemists Medical servicesHospitals Police
Attractions and leisureFirst read and observe the introductory information given on page 60.SymbolMeaning SymbolMeaningAutostadt GolfCasinos CinemasMuseums MonumentsParks Sports centresRecreational airports Tourist attractionsBoating Performing artsAmusement parks Skiing
Other destinations displayed in the mapFirst read and observe the introductory information given on page 60.
SymbolMeaning SymbolMeaningHome address FavouriteDestination Stopover destinationCity centre Town centre
Route guidance
Introduction
This chapter contains information on the following subjects:
Route calculation
62
Graphic navigation instructions
62
Navigation announcements
62
61Navigation
Page 64 of 83
Route63Lane guidance63
First and foremost, pay attention to the safety instructions » page 4 , Important
notes .
Route calculation
First read and observe the introductory information given on page 61.
The route is calculated automatically according to the entered destination. The
calculation takes the settings of the route options » page 47 (route type, dynamic
route, etc.) into account.
The route is recalculated each time if you ignore driving recommendations or change the route. This process takes only a few seconds. Navigation announce-
ments can only then be re-transmitted.
If Demo mode is switched on » page 48, a prompt appears asking whether you
want the guidance to start in demo mode or normal mode.
The Demo mode displays a simulated drive to the destination entered. There is
the option of travelling the calculated route “as a simulation” just on the screen.
If an alternative route option is set, function keys are displayed, following the cal- culation, for the route types with information on the route length and the expec-ted travelling time.
Route type
economical
fast
short
Selecting the route type will start route guidance.
If the option for alternative routes is disabled, the route is calculated and route guidance is started according to the preferred route » page 47.
It is possible to select a pre-calculated route before the calculation of the remain-
ing routes is completed.
The unit tries to allow for continued guidance even if the navigation data is in- complete or there is no data at all for the given area (e.g., one-way streets, road
types, etc.).
Interrupt and continue route guidance
If the ignition is switched off and on again and the key was left in the ignition (in
vehicles with the KESSY system, when the ignition was switched off):
› Within 30 min - route guidance is continued taking into account the calculated
route
› Between 30 and 40 min - the screen switches to “standby” mode (energy-sav-
ing mode of the screen); the route guidance continues using the calculated route
› Between 40 min and 120 min - the unit screen displays the message
Continue
route guidance? ; after you confirm the message, the route guidance continues
using the calculated route;
› After 120 min - route guidance is cancelled.
If ignition is switched off and on again and the key removed temporarily (in vehi-
cles with the KESSY system, ignition switched off and the driver's door opened):
› Within 10 min - route guidance is continued taking into account the calculated
route
› Between 10 min and 120 min - the screen switches to “standby mode” (energy-
saving mode of the screen); the unit screen displays the message Continue
route guidance? ; after you confirm the message, the route guidance continues
using the calculated route
› After 120 min - route guidance is cancelled.
Graphic navigation instructions
First read and observe the introductory information given on page 61.
The graphical navigation instructions are displayed:› in the MAXI DOT display
» page 13.
› in the split screen in the unit screen
» page 52.
Navigation announcements
First read and observe the introductory information given on page 61.
The device makes navigation announcements. The navigation announcementsare started as soon as the route calculation is complete or a route type has been
selected.
Before turning, up to 3 recommendations are issued:
62Navigation
Page 65 of 83
The last navigation announcement can be repeated:› by pressing the menu knob 2
» Fig. 1 on page 5;
› by pressing the dial 2
» Fig. 9 on page 13 on the multifunction steering wheel.
The timing of the navigation announcement depends on the type of road and the
driving speed. For example, on highways the first announcement is heard about
2000 m (6000 ft) before highway exit.
During dynamic route guidance, the unit notifies the driver of traffic problems.
When a new route is being calculated due to traffic problems, the announcement
Calculating the route... . sounds.
Set the output volume of the navigation announcements or mute it during a
phone call » page 47.
Route
First read and observe the introductory information given on page 61.
When there is a calculated route to the destination, the recommended route is
displayed.
›
In the Navigation main menu, press .
The following menu is displayed: ■ Stop route guidance - Stops route guidance
■ New dest./stopover - Enter a new destination or add a destination to the calcu-
lated route » page 54 or » page 65
■ Route information - Display information about the destination and the calcula-
ted route (setup of information displayed » page 48)
■ - Arrival time at destination/stopover 1)
■ - Remaining travelling time to destination or stopover 1)
■ - Distance to destination or stopover
■ Store destination - Save the destination on the input screen » page 9
■ Route list - Display the list of route sections
■ Congestion ahead - If you hear of a traffic problem (e.g. congestion), you can
enter this traffic problem manually. After entering, the device recalculates and
provides an alternative route. Get traffic queue information by touching the scale, with
/
or by turning the menu button
2
» Fig. 1 on page 5 left or right.
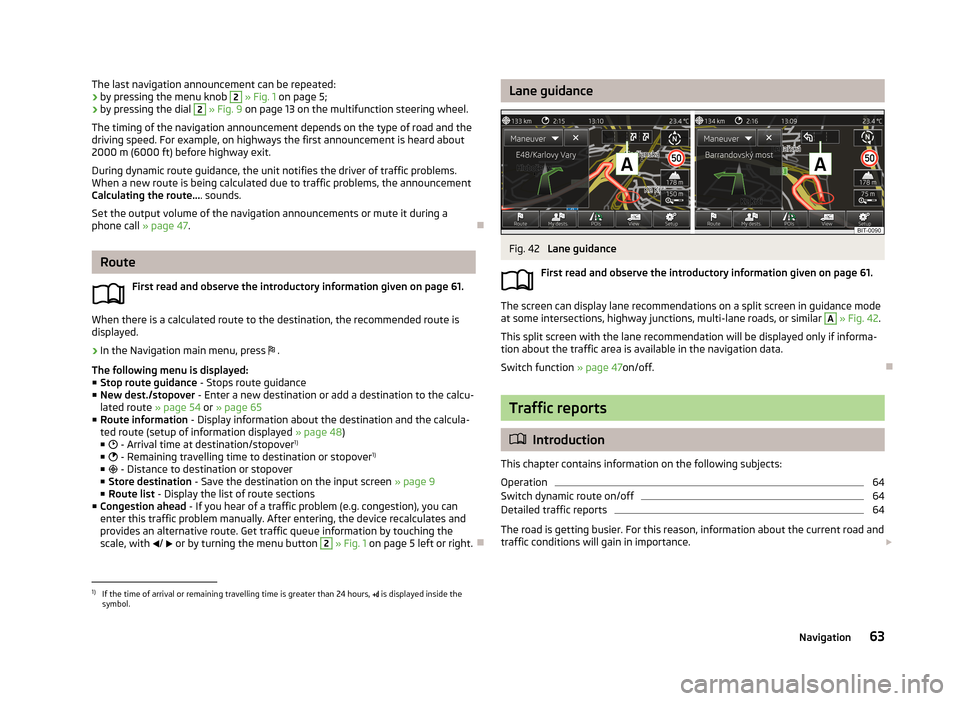
Lane guidanceFig. 42
Lane guidance
First read and observe the introductory information given on page 61.
The screen can display lane recommendations on a split screen in guidance mode
at some intersections, highway junctions, multi-lane roads, or similar
A
» Fig. 42 .
This split screen with the lane recommendation will be displayed only if informa- tion about the traffic area is available in the navigation data.
Switch function » page 47on/off.
Traffic reports
Introduction
This chapter contains information on the following subjects:
Operation
64
Switch dynamic route on/off
64
Detailed traffic reports
64
The road is getting busier. For this reason, information about the current road and
traffic conditions will gain in importance.
1)
If the time of arrival or remaining travelling time is greater than 24 hours,
is displayed inside the
symbol.
63Navigation
Page 66 of 83
TMC traffic reports are used to optimise the route during route guidance when
there are traffic disruptions.
The device can obtain this information by using the following facilities:
› Traffic TP in the FM frequency range
» page 25 .
› TP in the DAB frequency range
› TMC traffic report with dynamic adjustment of the current route option
For the correct TMC function, the following conditions are required: The vehicle is within range of the FM RDS-TMC.Adequate and uninterrupted signal reception of a traffic report station 1)
.
Current navigation data in the device.
Operation
First read and observe the introductory information given on page 63.
TMC (Traffic Message Channel) is a digital data service emitted by the radio sta-tion for continuous transmission of traffic information.
›
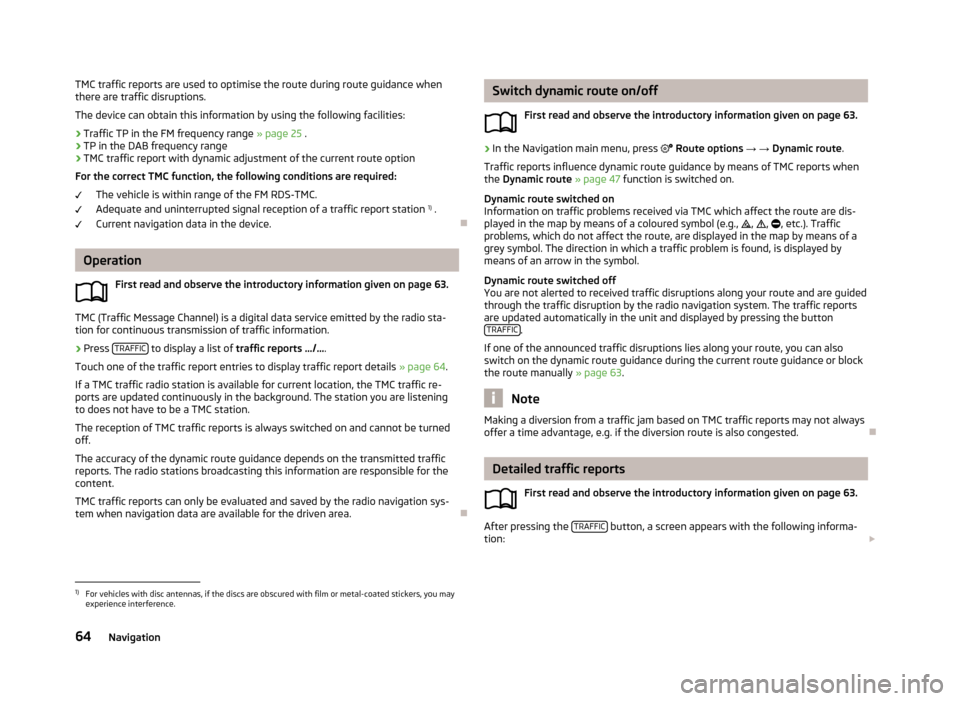
Press TRAFFIC to display a list of
traffic reports …/… .
Touch one of the traffic report entries to display traffic report details » page 64.
If a TMC traffic radio station is available for current location, the TMC traffic re-
ports are updated continuously in the background. The station you are listening
to does not have to be a TMC station.
The reception of TMC traffic reports is always switched on and cannot be turned off.
The accuracy of the dynamic route guidance depends on the transmitted traffic
reports. The radio stations broadcasting this information are responsible for the
content.
TMC traffic reports can only be evaluated and saved by the radio navigation sys- tem when navigation data are available for the driven area.
Switch dynamic route on/off
First read and observe the introductory information given on page 63.›
In the Navigation main menu, press Route options → → Dynamic route .
Traffic reports influence dynamic route guidance by means of TMC reports when
the Dynamic route » page 47 function is switched on.
Dynamic route switched on
Information on traffic problems received via TMC which affect the route are dis-
played in the map by means of a coloured symbol (e.g., , , , etc.). Traffic
problems, which do not affect the route, are displayed in the map by means of a
grey symbol. The direction in which a traffic problem is found, is displayed by
means of an arrow in the symbol.
Dynamic route switched off
You are not alerted to received traffic disruptions along your route and are guided
through the traffic disruption by the radio navigation system. The traffic reports are updated automatically in the unit and displayed by pressing the button TRAFFIC
.
If one of the announced traffic disruptions lies along your route, you can also
switch on the dynamic route guidance during the current route guidance or block
the route manually » page 63.
Note
Making a diversion from a traffic jam based on TMC traffic reports may not always
offer a time advantage, e.g. if the diversion route is also congested.
Detailed traffic reports
First read and observe the introductory information given on page 63.
After pressing the TRAFFIC button, a screen appears with the following informa-
tion:
1)
For vehicles with disc antennas, if the discs are obscured with film or metal-coated stickers, you may
experience interference.
64Navigation
Page 67 of 83
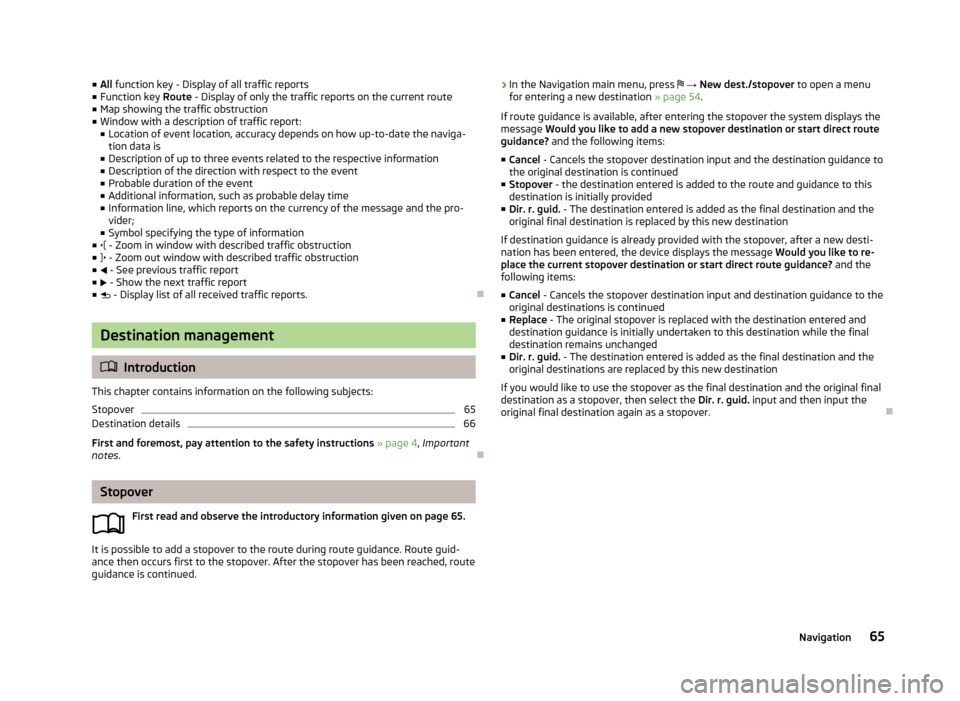
■All function key - Display of all traffic reports
■ Function key Route - Display of only the traffic reports on the current route
■ Map showing the traffic obstruction
■ Window with a description of traffic report:
■ Location of event location, accuracy depends on how up-to-date the naviga-
tion data is
■ Description of up to three events related to the respective information
■ Description of the direction with respect to the event
■ Probable duration of the event
■ Additional information, such as probable delay time
■ Information line, which reports on the currency of the message and the pro-
vider;
■ Symbol specifying the type of information
■ - Zoom in window with described traffic obstruction
■ - Zoom out window with described traffic obstruction
■ - See previous traffic report
■ - Show the next traffic report
■ - Display list of all received traffic reports.
Destination management
Introduction
This chapter contains information on the following subjects:
Stopover
65
Destination details
66
First and foremost, pay attention to the safety instructions » page 4 , Important
notes .
Stopover
First read and observe the introductory information given on page 65.
It is possible to add a stopover to the route during route guidance. Route guid-
ance then occurs first to the stopover. After the stopover has been reached, route guidance is continued.
› In the Navigation main menu, press
→ New dest./stopover to open a menu
for entering a new destination » page 54.
If route guidance is available, after entering the stopover the system displays the
message Would you like to add a new stopover destination or start direct route
guidance? and the following items:
■ Cancel - Cancels the stopover destination input and the destination guidance to
the original destination is continued
■ Stopover - the destination entered is added to the route and guidance to this
destination is initially provided
■ Dir. r. guid. - The destination entered is added as the final destination and the
original final destination is replaced by this new destination
If destination guidance is already provided with the stopover, after a new desti- nation has been entered, the device displays the message Would you like to re-
place the current stopover destination or start direct route guidance? and the
following items:
■ Cancel - Cancels the stopover destination input and destination guidance to the
original destinations is continued
■ Replace - The original stopover is replaced with the destination entered and
destination guidance is initially undertaken to this destination while the final
destination remains unchanged
■ Dir. r. guid. - The destination entered is added as the final destination and the
original destinations are replaced by this new destination
If you would like to use the stopover as the final destination and the original final destination as a stopover, then select the Dir. r. guid. input and then input the
original final destination again as a stopover.
65Navigation
Page 68 of 83
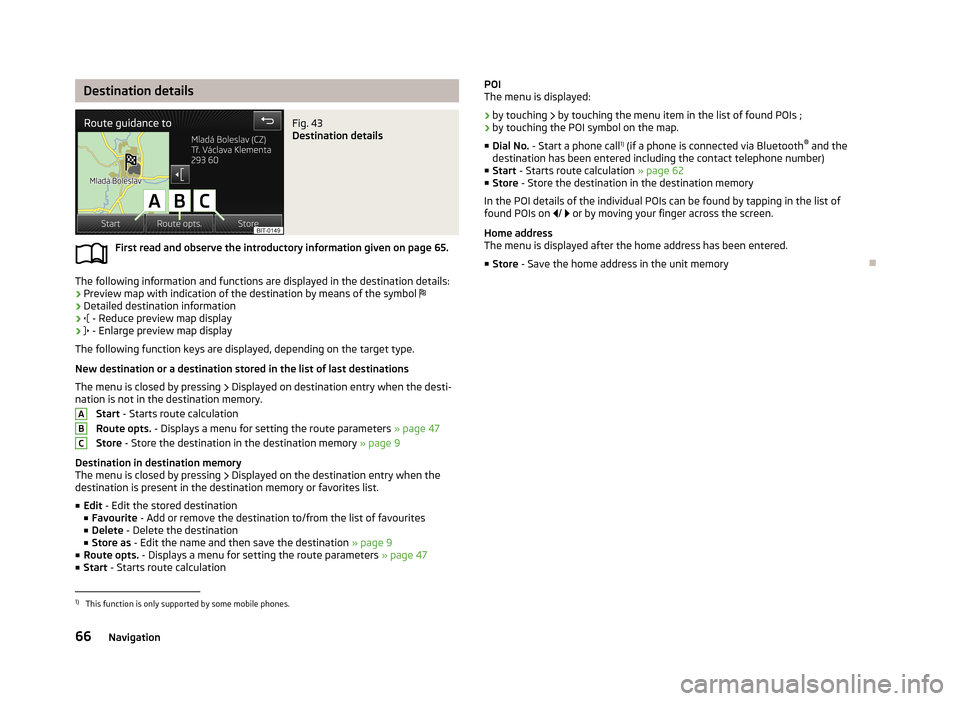
Destination detailsFig. 43
Destination details
First read and observe the introductory information given on page 65.
The following information and functions are displayed in the destination details:› Preview map with indication of the destination by means of the symbol
› Detailed destination information
›
- Reduce preview map display
›
- Enlarge preview map display
The following function keys are displayed, depending on the target type.
New destination or a destination stored in the list of last destinations The menu is closed by pressing
Displayed on destination entry when the desti-
nation is not in the destination memory.
Start - Starts route calculation
Route opts. - Displays a menu for setting the route parameters » page 47
Store - Store the destination in the destination memory » page 9
Destination in destination memory
The menu is closed by pressing
Displayed on the destination entry when the
destination is present in the destination memory or favorites list.
■ Edit - Edit the stored destination
■ Favourite - Add or remove the destination to/from the list of favourites
■ Delete - Delete the destination
■ Store as - Edit the name and then save the destination » page 9
■ Route opts. - Displays a menu for setting the route parameters » page 47
■ Start - Starts route calculation
ABCPOI
The menu is displayed:
› by touching
by touching the menu item in the list of found POIs ;
› by touching the POI symbol on the map.
■ Dial No. - Start a phone call 1)
(if a phone is connected via Bluetooth ®
and the
destination has been entered including the contact telephone number)
■ Start - Starts route calculation » page 62
■ Store - Store the destination in the destination memory
In the POI details of the individual POIs can be found by tapping in the list of
found POIs on / or by moving your finger across the screen.
Home address
The menu is displayed after the home address has been entered.
■ Store - Save the home address in the unit memory1)
This function is only supported by some mobile phones.
66Navigation
Page 69 of 83
Vehicle
Vehicle systems
Vehicle settings
Introduction
This chapter contains information on the following subjects:
Selecting driving mode
67
Vehicle data
68
Auxiliary heater and ventilation
69
ESC system
70
Tires
70
Driver assistance
70
Parking and manoeuvring
71
Light
71
Mirrors and wiper
72
Opening and closing
72
Seats
72
Multifunction display
72
Service
73
Restore factory settings
73
Climatronic settings
73
First and foremost, pay attention to the safety instructions
» page 4 , Important
notes .
Settings relating to the vehicle systems can only be made when the ignition is
switched on.
Note
■ The individual systems are described in the » Vehicle Owner's Manual .■If the functions of some systems are disabled, some functions, such as parts of
the ESC system, are switched on again automatically for security reasons, after
switching the ignition off and on.■
When you press the button CAR, the last displayed menu from
is displayed.
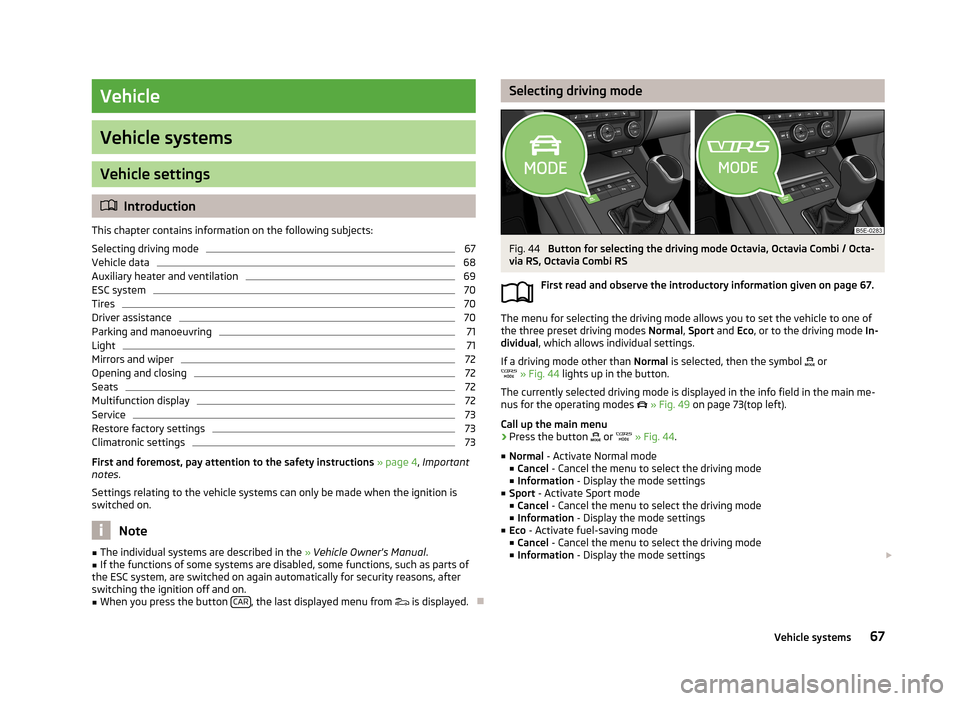
Selecting driving modeFig. 44
Button for selecting the driving mode Octavia, Octavia Combi / Octa-
via RS, Octavia Combi RS
First read and observe the introductory information given on page 67.
The menu for selecting the driving mode allows you to set the vehicle to one of
the three preset driving modes Normal, Sport and Eco, or to the driving mode In-
dividual , which allows individual settings.
If a driving mode other than Normal is selected, then the symbol
or
» Fig. 44 lights up in the button.
The currently selected driving mode is displayed in the info field in the main me-
nus for the operating modes
» Fig. 49 on page 73(top left).
Call up the main menu
›
Press the button
or
» Fig. 44 .
■ Normal - Activate Normal mode
■ Cancel - Cancel the menu to select the driving mode
■ Information - Display the mode settings
■ Sport - Activate Sport mode
■ Cancel - Cancel the menu to select the driving mode
■ Information - Display the mode settings
■ Eco - Activate fuel-saving mode
■ Cancel - Cancel the menu to select the driving mode
■ Information - Display the mode settings
67Vehicle systems
Page 70 of 83
■Individual - Activate the Individual mode
■ Cancel - Cancel the menu to select the driving mode
■ Setup - Individual setting
■ Steering: - Set the power steering characteristics
■ Normal - Normal
■ Sport - Sports
■ Engine: - Set the engine (drive) characteristics
■ Normal - Normal
■ Sport - Sports
■ Eco - Economical
■ ACC: - Set the vehicle acceleration when adaptive cruise control is activated
■ Normal - Normal
■ Sport - Sports
■ Eco - Economical
■ Dynamic bend light.: - Set the characteristics of the adaptive headlights
■ Normal - Normal
■ Sport - Sports
■ Eco - Economical
■ Air conditioning: - Set the Climatronic characteristics
■ Normal - Normal
■ Eco - Economical
■ Reset mode - Sets the profile Normal
Note
If you do not operate the unit for longer than approx. 10 seconds in the "Select
driving mode" menu, it will switch to the last selected menu or switch itself off.
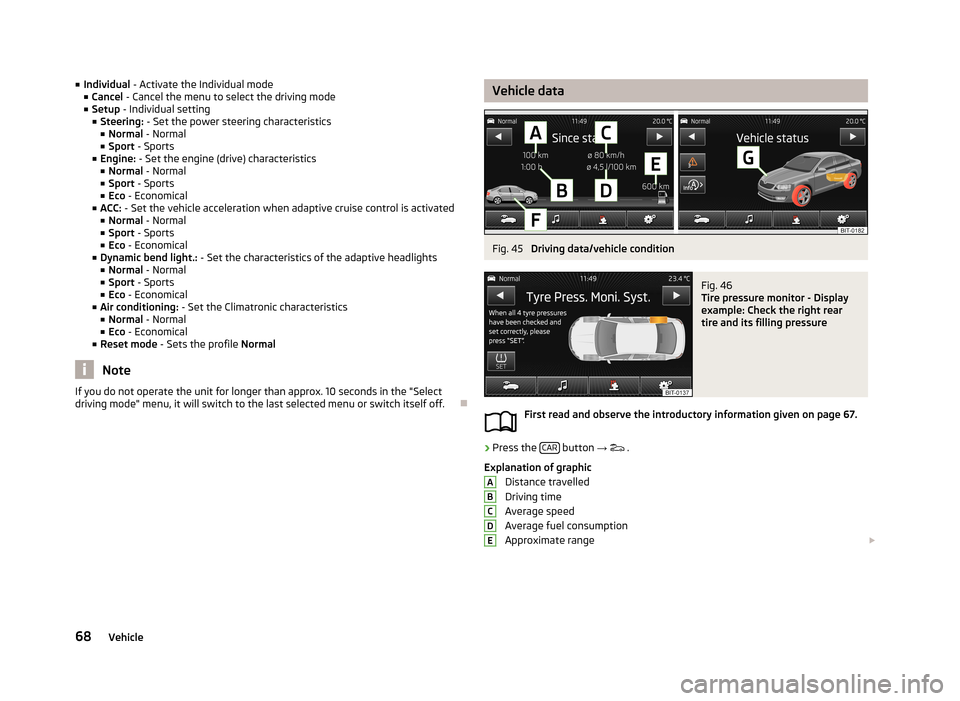
Vehicle dataFig. 45
Driving data/vehicle condition
Fig. 46
Tire pressure monitor - Display
example: Check the right rear
tire and its filling pressure
First read and observe the introductory information given on page 67.
›
Press the CAR button
→
.
Explanation of graphic Distance travelled
Driving time
Average speed
Average fuel consumption
Approximate range
ABCDE68Vehicle