sensor SKODA OCTAVIA 2013 3.G / (5E) Owner's Manual
[x] Cancel search | Manufacturer: SKODA, Model Year: 2013, Model line: OCTAVIA, Model: SKODA OCTAVIA 2013 3.G / (5E)Pages: 287, PDF Size: 18.55 MB
Page 26 of 287
WARNING■If you have to stop for technical reasons, then park the vehicle at a safe dis-
tance from the traffic, switch off the engine and switch on the hazard warning lights » page 61 . The warning triangle must be set up at the prescribed dis-
tance - observe the national legal provisions when doing so.■
Carefully open the coolant expansion bottle. If the engine is hot, the cooling
system is pressurized – risk of scalding! It is therefore best to allow the engine
to cool down before removing the cap.
■
Do not touch the radiator fan. The radiator fan may switch itself on auto-
matically even if the ignition is off.
Engine oil pressure
First read and observe the introductory information and safety warn-
ings
on page 21.
When the warning icon
flashes, the engine oil pressure is too low.
The following message is shown in the information cluster display. Oil pressure: Stop! Owner's manual!
STOP VEHICLE OIL PRESSURE
Stop the vehicle, switch off the engine, and check the level of the engine
oil » page 220 , Checking the oil level .
Even if the oil level is correct, do not drive any further if the warning icon
is
flashing! Also do not leave the engine running at an idling speed.
Seek help from a specialist garage.
WARNINGIf you have to stop for technical reasons, then park the vehicle at a safe dis-
tance from the traffic, switch off the engine and switch on the hazard warning
lights » page 61 . The warning triangle must be set up at the prescribed dis-
tance - observe the national legal provisions when doing so.
Engine oil level
First read and observe the introductory information and safety warn-
ings
on page 21.
Engine oil level too low
If the warning icons and are lit , the engine oil level is too low.
The following message is shown in the information cluster display. Oil level: top up oil!
TOP UP OIL
Stop the vehicle, switch off the engine, and check the level of the engine
oil » page 220 .
The warning icon will go out if the bonnet is left open for more than 30 seconds.
If no engine oil has been replenished, the warning icon will come on again after
driving about 100 km.
Engine oil level too high
If the warning icons
and
are lit in conjunction with the following message on
the display, the engine oil level is too high.
Reduce oil level!
OIL LEVEL TOO HIGH
Stop the vehicle, switch off the engine, and check the level of the engine
oil » page 220 .
Engine oil level sensor
If the warning icons
and
are lit in conjunction with the following message on
the display, the engine oil level sensor is defective.
Oil sensor: workshop!
OIL SENSOR WORKSHOP
Seek assistance from a specialist garage immediately.
23Instruments and warning lights
Page 41 of 287
Unlocking/locking – KESSYFig. 14
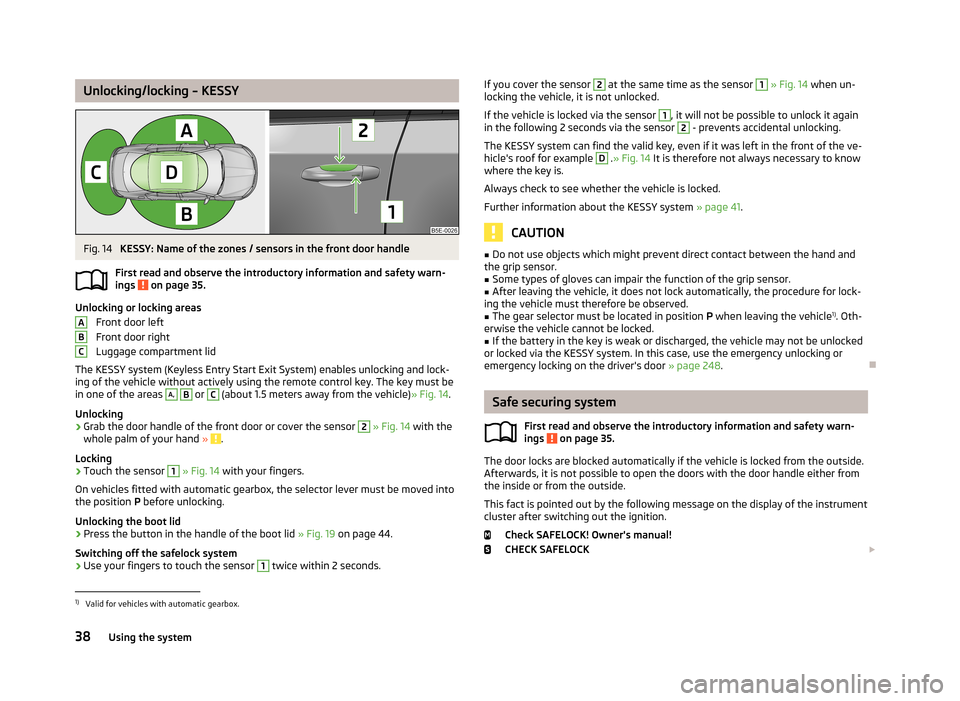
KESSY: Name of the zones / sensors in the front door handle
First read and observe the introductory information and safety warn- ings
on page 35.
Unlocking or locking areas
Front door left
Front door right
Luggage compartment lid
The KESSY system (Keyless Entry Start Exit System) enables unlocking and lock-
ing of the vehicle without actively using the remote control key. The key must be
in one of the areas
A,
B
or
C
(about 1.5 meters away from the vehicle) » Fig. 14.
Unlocking
›
Grab the door handle of the front door or cover the sensor
2
» Fig. 14 with the
whole palm of your hand » .
Locking
›
Touch the sensor
1
» Fig. 14 with your fingers.
On vehicles fitted with automatic gearbox, the selector lever must be moved into the position P before unlocking.
Unlocking the boot lid
›
Press the button in the handle of the boot lid » Fig. 19 on page 44.
Switching off the safelock system
›
Use your fingers to touch the sensor
1
twice within 2 seconds.
ABCIf you cover the sensor 2 at the same time as the sensor 1 » Fig. 14 when un-
locking the vehicle, it is not unlocked.
If the vehicle is locked via the sensor 1
, it will not be possible to unlock it again
in the following 2 seconds via the sensor
2
- prevents accidental unlocking.
The KESSY system can find the valid key, even if it was left in the front of the ve-
hicle's roof for example
D
. » Fig. 14 It is therefore not always necessary to know
where the key is.
Always check to see whether the vehicle is locked. Further information about the KESSY system » page 41.
CAUTION
■
Do not use objects which might prevent direct contact between the hand and
the grip sensor.■
Some types of gloves can impair the function of the grip sensor.
■
After leaving the vehicle, it does not lock automatically, the procedure for lock-
ing the vehicle must therefore be observed.
■
The gear selector must be located in position P when leaving the vehicle 1)
. Oth-
erwise the vehicle cannot be locked.
■
If the battery in the key is weak or discharged, the vehicle may not be unlocked
or locked via the KESSY system. In this case, use the emergency unlocking or emergency locking on the driver's door » page 248.
Safe securing system
First read and observe the introductory information and safety warn-
ings
on page 35.
The door locks are blocked automatically if the vehicle is locked from the outside.
Afterwards, it is not possible to open the doors with the door handle either from
the inside or from the outside.
This fact is pointed out by the following message on the display of the instrument
cluster after switching out the ignition.
Check SAFELOCK! Owner's manual!
CHECK SAFELOCK
1)
Valid for vehicles with automatic gearbox.
38Using the system
Page 44 of 287
WARNING■Make sure that the door has closed correctly as it can open suddenly while
driving – risk of death!■
Only open and close the door when there is no one in the opening/closing
range – risk of injury!
■
An opened door can close automatically if there is a strong wind or the vehi-
cle is on an incline – risk of injury!
KESSY
Introduction
This chapter contains information on the following subjects:
Information message
41
Parking vehicle
41
The KESSY system (Keyless Entry Start Exit System) enables unlocking and lock-
ing of the vehicle without actively using the remote control key.
Information message
First read and observe the introductory information given on page 41.
Key in the vehicle
The protection against inadvertently locking the key in the vehicle unlocks the vehicle automatically if the following conditions are met.
The vehicle, including the boot lit, has been locked.The key with which the vehicle has been locked remains in the vehicle in the
zone
D
» Fig. 14 on page 38.
The turn signal lights flash four times as confirmation that the vehicle has been
unlocked again.
The following message is shown in the information cluster display. Key in vehicle.
KEY IN VEHICLE
Additionally, on vehicles which are fitted with the anti-theft alarm system, an au-
dible signal sounds.
The system has not found a key
If the system has not found a key in the vehicle, the following message appears in the display of the instrument cluster.
Key not found.
Key not detected. Owner's manual!
NO KEY
This can occur if the key is outside the vehicle, the battery in the key is dis-
charged, the key is defective or the electromagnetic field is strongly disturbed.
Fault in KESSY system
If there is a fault in the KESSY system, the following message will appear in the display of the instrument cluster.
Keyless access system faulty.
KEYLESS ACCESS SYSTEM FAULTY
Low voltage of the key battery
If the voltage of the battery in the remote control key is too low, the following message appears in the display of the instrument cluster.
Change the key battery!
KEY BATTERY PLEASE CHANGE
Change the key battery » page 247!
Parking vehicle
First read and observe the introductory information given on page 41.
If the vehicle is not unlocked within 60 or 90 hours, the sensors in the handle of
the driver or front passenger's door are deactivated automatically » Fig. 14 on
page 38.
Activation after 60 hours
›
Unlock the driver's door using the sensor
2
» Fig. 14 on page 38.
›
Press the handle of the boot lid.
›
Unlock the vehicle using the symbol button
on the remote control key.
›
Unlocking the driver's door in an emergency » page 248.
41Unlocking and opening
Page 52 of 287

The window can be completely opened automatically by briefly pressing the but-ton down as far as the stop. Renewed pressing of the button causes the window
to stop immediately.
Closing›
Lightly press the appropriate button up and hold it until the window has moved
into the desired position.
The window can be completely closed automatically by briefly pressing the but-
ton up as far as the stop. Renewed pressing of the button causes the window to
stop immediately.
Force limit
First read and observe the introductory information and safety warn-ings
on page 47.
The electrical power window system is fitted with a force limiter. It reduces the
risk of bruises or injuries when closing the windows.
If there is an obstacle, the closing process is stopped and the window goes down
by several centimetres.
If the obstacle prevents the window from being closed during the next 10 sec-
onds, the closing process is interrupted once again and the window goes down by several centimetres.
If you attempt to close the window again within 10 seconds of the window being moved down for the second time, even though the obstacle was not yet been re-moved, the closing process is only stopped. During this time it is not possible to
automatically close the window. The force limiter is still switched on.
The force limiter is only switched off if you attempt to close the window again
within the next 10 seconds - the window will now close with full force!
If you wait longer than 10 seconds, the force limiter is switched on again.
Window convenience operation
First read and observe the introductory information and safety warn-ings
on page 47.
Convenience opening/closing of all windows can be operated by locking/unlock-
ing the vehicle as follows.
Settings the window convenience operation » Infotainment owner's manual ,
chapter Vehicle settings (button CAR) .
The prerequisite for ensuring that the convenience operating feature correctly is the automatic opening/closing of all windows is operational.
Opening and closing can take place in one of the following ways.
Opening
›
Press the symbol button
button on the remote control key.
›
Hold the key in the driver's lock in the unlock position.
›
Hold button
A
1)
in the opening position » Fig. 23 on page 48.
Closing
›
Press the symbol button
button on the remote control key.
›
Hold the key in the driver's lock in the lock position.
›
Hold button
A
1)
in the closing position » Fig. 23 on page 48.
›
In the KESSY system, hold a finger on the sensor
1
» Fig. 14 on page 38.
You can interrupt the opening or closing process for the windows immediately by
releasing the key or the the button
A
and interrupting the locking/unlocking.
Convenience opening or closing the window using the key in the driver's lock is
only possible within 45 seconds after locking the vehicle.
Operational faults
First read and observe the introductory information and safety warn-
ings
on page 47.
The automatic power windows do not work if the vehicle battery was disconnec- ted and connected while a window is open. The system must be activated.
Activation sequence:
1)
Convenience opening and closing the windows with the button
A
is possible immediately after un-
locking the vehicle or turning off the ignition and opening the driver's or front passenger's door.
49Unlocking and opening
Page 54 of 287

WARNINGWhen closing the sliding/tilting roof proceed with caution to avoid causing
crushing injuries – risk of injury!
CAUTION
During the winter it may be necessary to remove any ice and snow in the vicinity
of the sliding/tilting roof before opening it to prevent any damage to the opening
mechanism.
Note
The sliding / tilting roof is fitted with a force limiter. The sun blind is operated
manually.
Convenience operation of sliding / tilting roof
First read and observe the introductory information and safety warn-ings
on page 50.
The sliding / tilting roof can be operated by locking or unlocking using the key or
using the KESSY system with the aid of the sensor
1
» Fig. 14 on page 38.
Closing
The sliding/tilting roof can be closed as follows.
›
Press the symbol button button on the remote control key.
›
Hold the key in the driver's lock in the lock position.
›
In the KESSY system, hold a finger on the sensor
1
» Fig. 14 on page 38.
By releasing the lock or lifting your finger off the sensor
1
when using the KESSY
system, the closing process is immediately interrupted.
Tilting roof
›
Press the symbol button button on the remote control key.
WARNINGClose the sliding/tilting roof carefully – risk of injury. The force limiter does not
operate with the convenience closing.NoteThe sliding/tilting roof cannot be opened using the convenience operating fea-
ture.
Panoramic sliding/tilting roof (Octavia Estate)
Introduction
This chapter contains information on the following subjects:
Operation
52
Opening/closing the sun screen
52
Convenience operation of sliding / tilting roof
53
The panoramic sliding/tilting roof (abbreviated in the following as 'sliding/tilting
roof') can only be operated when the ignition is turned on and when the outdoor temperature is higher than -20 °C.
The sliding/tilting roof can still be operated for approx. 10 minutes after switchingthe ignition off. However, as soon as the driver or front passenger's door is
opened it is no longer possible to operate the sliding/tilting roof.
CAUTION
■ Always close the sliding/tilting roof before disconnecting the battery.■If, for example, the battery has been disconnected and reconnected, it is possi-
ble that the sliding/tilting roof does not operate correctly. Next, move the rotary
switch into position A
» Fig. 26 on page 52 , pull the recess firmly downwards
and hold forwards firmly. The sliding/tilting roof opens and closes again after
around 10 seconds. Do not release the control dial until it has done so.
■
If, for example, the battery has been disconnected and reconnected, it is possi-
ble that the sun screen does not operate correctly. Then turn the switch to posi-
tion
A
» Fig. 26 on page 52and press and hold the button
G
» Fig. 27 on
page 52. The sun screen opens and closes again after around 10 seconds. Do not
release the control dial until it has done so.
51Unlocking and opening
Page 56 of 287

Convenience operation of sliding / tilting roofFirst read and observe the introductory information and safety warn-ings
on page 51.
The sliding / tilting roof can be operated by locking or unlocking using the key or
using the KESSY system with the aid of the sensor
1
» Fig. 14 on page 38.
Closing
›
Press the symbol button on the key or hold the key in the locking cylinder of
the driver's door in the lock position, or for the KESSY system, keep your finger on the sensor
1
» Fig. 14 on page 38 » .
By releasing the lock or lifting your finger off the sensor
1
when using the KESSY
system, the closing process is immediately interrupted.
Tilting roof
›
Press the symbol button
button on the remote control key.
WARNINGClose the sliding/tilting roof carefully – risk of injury. The force limiter does not
operate with the convenience closing.
Note
The sliding/tilting roof cannot be opened using the convenience operating fea-
ture.
53Unlocking and opening
Page 57 of 287
Lights and visibility
Lights
Introduction
This chapter contains information on the following subjects:
Side lights and low beam
55
Daylight running lights (DAY LIGHT)
55
Turn signal and main beam
56
Automatic driving lamp control
57
Adaptive headlights (AFS)
57
Headlight assist
58
Fog lights
59
Fog lights with the CORNER function
59
Rear fog light
60
COMING HOME / LEAVING HOME
60
Hazard warning light system
61
Parking lights
61
The lights work only with the ignition on, unless otherwise stated.
On models fitted with right-hand steering, the position of some of the controls
differs from that shown in » Fig. 28 on page 55. The symbols which mark the
positions of the controls are identical.
Keep the headlights lenses clean. The following guidelines must be ob-
served » page 207 , Headlight lenses .
WARNING■
The activation of the lights should only be undertaken in accordance with
national legal requirements.■
The driver is always responsible for the correct settings and use of the
lights.
■
The automatic driving lamp control only operates as a support and does
not release the driver from his responsibility to check the light and, if necessa-
ry, to switch on the light depending on the given light conditions. The light sensor cannot, for example, detect rain or snow. Under these conditions we
recommend switching on the low beam or fog lights!
Note
■ If there is a fault in the light switch, the low beam comes on automatically.■The headlights may mist up temporarily. When the driving lights are switched
on, the light outlet surfaces are free from mist after a short period, although the
headlight lenses may still be misted up in the peripheral areas. This mist has no
influence on the life of the lighting system.■
The instruments are also illuminated when the side light, low or high beam light
is switched on. The brightness of the instrument lighting can be activated or de- activated in the Infotainment » Operating instructions for Infotainment , chap-
ter Vehicle settings (CAR button) .
54Using the system
Page 60 of 287
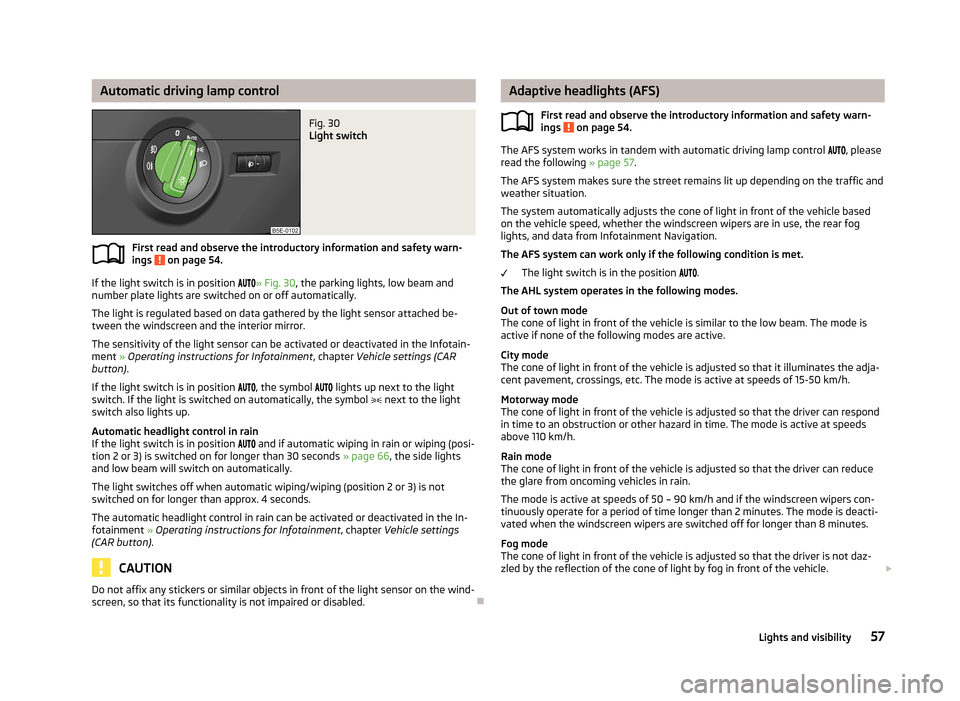
Automatic driving lamp controlFig. 30
Light switch
First read and observe the introductory information and safety warn-
ings on page 54.
If the light switch is in position
» Fig. 30 , the parking lights, low beam and
number plate lights are switched on or off automatically.
The light is regulated based on data gathered by the light sensor attached be- tween the windscreen and the interior mirror.
The sensitivity of the light sensor can be activated or deactivated in the Infotain-
ment » Operating instructions for Infotainment , chapter Vehicle settings (CAR
button) .
If the light switch is in position
, the symbol
lights up next to the light
switch. If the light is switched on automatically, the symbol
next to the light
switch also lights up.
Automatic headlight control in rain
If the light switch is in position
and if automatic wiping in rain or wiping (posi-
tion 2 or 3) is switched on for longer than 30 seconds » page 66, the side lights
and low beam will switch on automatically.
The light switches off when automatic wiping/wiping (position 2 or 3) is not
switched on for longer than approx. 4 seconds.
The automatic headlight control in rain can be activated or deactivated in the In-fotainment » Operating instructions for Infotainment , chapter Vehicle settings
(CAR button) .
CAUTION
Do not affix any stickers or similar objects in front of the light sensor on the wind-
screen, so that its functionality is not impaired or disabled.
Adaptive headlights (AFS)
First read and observe the introductory information and safety warn-ings
on page 54.
The AFS system works in tandem with automatic driving lamp control , please
read the following » page 57.
The AFS system makes sure the street remains lit up depending on the traffic and weather situation.
The system automatically adjusts the cone of light in front of the vehicle based
on the vehicle speed, whether the windscreen wipers are in use, the rear fog
lights, and data from Infotainment Navigation.
The AFS system can work only if the following condition is met. The light switch is in the position
.
The AHL system operates in the following modes.
Out of town mode
The cone of light in front of the vehicle is similar to the low beam. The mode is
active if none of the following modes are active.
City mode
The cone of light in front of the vehicle is adjusted so that it illuminates the adja- cent pavement, crossings, etc. The mode is active at speeds of 15-50 km/h.
Motorway mode
The cone of light in front of the vehicle is adjusted so that the driver can respond in time to an obstruction or other hazard in time. The mode is active at speeds
above 110 km/h.
Rain mode
The cone of light in front of the vehicle is adjusted so that the driver can reduce the glare from oncoming vehicles in rain.
The mode is active at speeds of 50 – 90 km/h and if the windscreen wipers con-tinuously operate for a period of time longer than 2 minutes. The mode is deacti-
vated when the windscreen wipers are switched off for longer than 8 minutes.
Fog mode
The cone of light in front of the vehicle is adjusted so that the driver is not daz-
zled by the reflection of the cone of light by fog in front of the vehicle.
57Lights and visibility
Page 63 of 287
The vehicle is stopped or moves at a speed of no more than 40 km/h.
The low beam is switched on or the light switch is in the position and the
low beam is switched on.
The daytime running lights are not switched on. The fog lights are not switched on.
The CORNER light is mainly intended to be used for illuminating the nearby envi-
ronment at a broad angle in front of and beside the vehicle. It lights up and goes out gradually.
Note
The two fog lights are switched on when you shift into the reverse gear.
Rear fog light
First read and observe the introductory information and safety warn-
ings
on page 54.
Switching on/off
›
Turn the light switch into position
or
» Fig. 32 on page 59.
›
Pull the light switch to position
2
.
The rear fog light is switched off in the reverse order.
If the vehicle is not fitted with fog lights, the rear fog light is switched on by pull-
ing out the light switch directly to the position
2
. This switch can only be put in-
to one position.
The warning light
lights up in the instrument cluster when the rear fog light is
switched on » page 15.
Only the rear fog light on the trailer lights up if the vehicle has a factory-fitted towing device or a towing device from ŠKODA original accessories and it is driven
with a trailer.
COMING HOME / LEAVING HOME
First read and observe the introductory information and safety warn-ings
on page 54.
COMING HOME/LEAVING HOME (hereafter referred to only as function) makes it possible to automatically switch on the lights for a short time after leaving the
vehicle or when approaching the vehicle in poor visibility.
The function is switched on automatically if the following conditions are met: The light switch is in position » Fig. 30 on page 57.
The visibility in the vehicle environment is reduced.
The ignition is switched off.
The function and duration of the lighting can be activated or deactivated in the Infotainment » Operating instructions for Infotainment , chapter Vehicle settings
(button CAR) .
The light is regulated based on data gathered by the light sensor attached be-
tween the windscreen and the interior mirror » page 57.
The function switches on the parking and low beam lights, the entry lighting in
the exterior mirrors and the licence plate light.
COMING HOME
The light turns on automatically when you open the driver's door.
The light turns off after the preset time when you close all the doors and the boot
lid.
If a door or the boot lid remains open, the light goes out after 60 seconds.
LEAVING HOME
The light turns on automatically after the vehicle is unlocked with the remote
control.
The light turns off after a preset time or after the vehicle is locked.
CAUTION
Do not affix any stickers or similar objects in front of the light sensor on the wind-
screen, so that its functionality is not impaired or disabled. 60Using the system
Page 115 of 287
WARNINGNever leave recirculated air mode switched on over a longer period of time, as
“stale air” can cause driver and passenger fatigue, reduce attention levels and
also cause the windows to mist up. The risk of having an accident increases.
Switch off recirculated air mode as soon as the windows start to mist up.
Climatronic (automatic air conditioning system)
Introduction
This chapter contains information on the following subjects:
Control elements
112
Automatic mode
113
Switching the cooling system on/off
113
Setting temperature
113
Automatic recirculation mode
114
Controlling blower
114
Defrosting windscreen
115
The Climatronic in automatic mode ensures the best-possible setting of the tem-
perature of the outflowing air, the blower stage and air distribution.
The system also takes sunlight into account, which eliminates the need to alterthe settings manually.
The cooling system only operates if the following conditions are met. The cooling system is switched on » page 112, Control elements .
The engine is running.
The outside temperature above approx. +2 °C.
The cooling system is switched off at a high coolant temperature in order to pro-
vide cooling at a high load of the engine.
Note
We recommend that you have Climatronic cleaned by a specialist garage once ev-
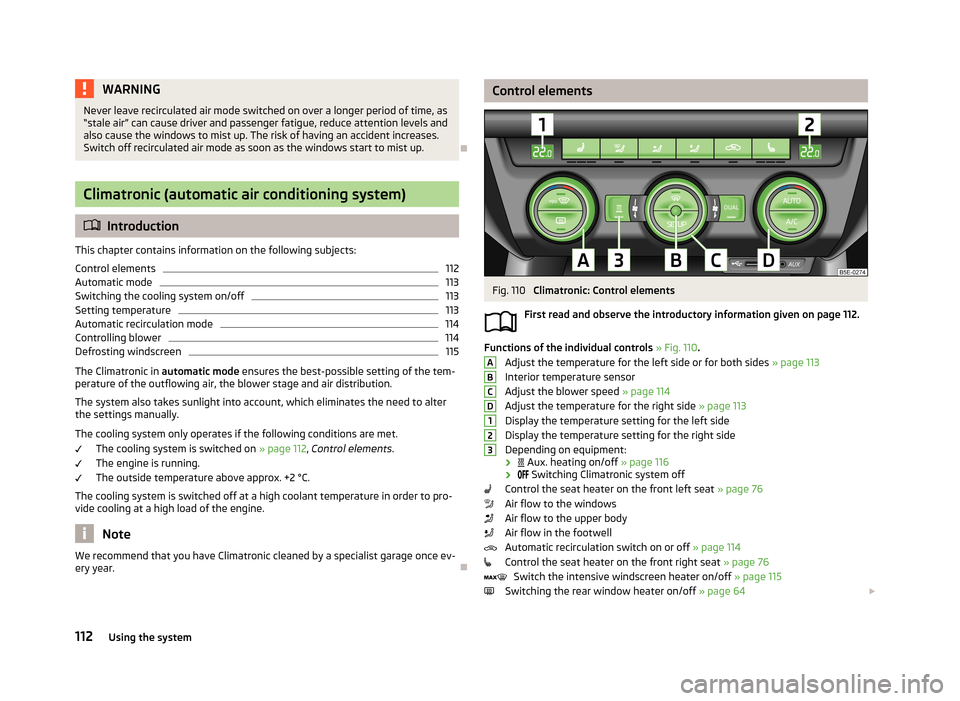
ery year.Control elementsFig. 110
Climatronic: Control elements
First read and observe the introductory information given on page 112.
Functions of the individual controls » Fig. 110 .
Adjust the temperature for the left side or for both sides » page 113
Interior temperature sensor
Adjust the blower speed » page 114
Adjust the temperature for the right side » page 113
Display the temperature setting for the left side
Display the temperature setting for the right side
Depending on equipment:
›
Aux. heating on/off » page 116
›
Switching Climatronic system off
Control the seat heater on the front left seat » page 76
Air flow to the windows
Air flow to the upper body
Air flow in the footwell
Automatic recirculation switch on or off » page 114
Control the seat heater on the front right seat » page 76
Switch the intensive windscreen heater on/off » page 115
Switching the rear window heater on/off » page 64
ABCD123112Using the system