SKODA OCTAVIA 2013 3.G / (5E) Repair Manual
Manufacturer: SKODA, Model Year: 2013, Model line: OCTAVIA, Model: SKODA OCTAVIA 2013 3.G / (5E)Pages: 287, PDF Size: 18.55 MB
Page 61 of 287
The mode is active at speeds of 15 – 70 km/h and if the rear fog light is switchedon for a period of time longer than 10 seconds. The mode is deactivated when the
rear fig light is switched off for longer than 5 seconds.
Dynamic cornering lights
The cone of light in front of the vehicle is adjusted to the steering angle so that the road in the curve is illuminated. This function is active at speeds greater than
10 km.h and in all AFS modes.
Tourist light (Travel mode)
This mode makes it possible to drive in countries with opposing traffic system (driving on the left/right) without dazzling the oncoming vehicles.
When the “tourist light” mode is active, the above-mentioned modes and the side
swivel of the headlights is deactivated.
The "Tourist light" mode can be configured in the Infotainment » Operating in-
structions for Infotainment , chapter Vehicle settings (CAR button) .WARNINGIf the AFS system is defective, the headlights are automatically lowered to the
emergency position, which prevents a possible dazzling of oncoming traffic. This reduces the cone of light in front of the vehicle. Drive carefully and visit a
specialist garage as soon as possible.
Note
If the Eco driving mode is selected, the AFS system is deactivated » page 161.
Headlight assist
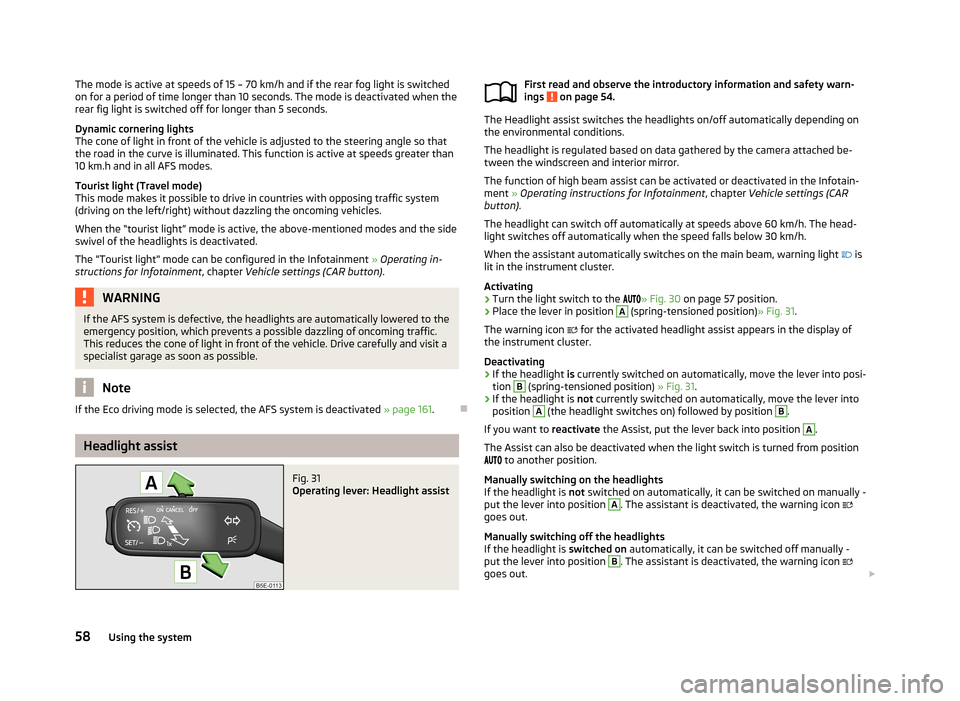
Fig. 31
Operating lever: Headlight assist
First read and observe the introductory information and safety warn-
ings on page 54.
The Headlight assist switches the headlights on/off automatically depending on
the environmental conditions.
The headlight is regulated based on data gathered by the camera attached be-
tween the windscreen and interior mirror.
The function of high beam assist can be activated or deactivated in the Infotain-ment » Operating instructions for Infotainment , chapter Vehicle settings (CAR
button) .
The headlight can switch off automatically at speeds above 60 km/h. The head-
light switches off automatically when the speed falls below 30 km/h.
When the assistant automatically switches on the main beam, warning light
is
lit in the instrument cluster.
Activating
›
Turn the light switch to the
» Fig. 30 on page 57 position.
›
Place the lever in position
A
(spring-tensioned position) » Fig. 31.
The warning icon
for the activated headlight assist appears in the display of
the instrument cluster.
Deactivating
›
If the headlight is currently switched on automatically, move the lever into posi-
tion
B
(spring-tensioned position) » Fig. 31.
›
If the headlight is not currently switched on automatically, move the lever into
position
A
(the headlight switches on) followed by position
B
.
If you want to reactivate the Assist, put the lever back into position
A
.
The Assist can also be deactivated when the light switch is turned from position
to another position.
Manually switching on the headlights
If the headlight is not switched on automatically, it can be switched on manually -
put the lever into position
A
. The assistant is deactivated, the warning icon
goes out.
Manually switching off the headlights
If the headlight is switched on automatically, it can be switched off manually -
put the lever into position
B
. The assistant is deactivated, the warning icon
goes out.
58Using the system
Page 62 of 287
Information message
The messages and information are indicated in the instrument cluster display. Fault: Light Assist
LIGHT ASSIST FAULT
Seek help from a specialist garage. Light Assist: clean the windscreen!
WINDSCREEN PLEASE CLEAN
Check for any obstacles on the windscreen in the viewing area of the camera.WARNINGHeadlight assist only functions as a support and does not relieve the driver of
his responsibility to check the headlights and light beam and, if necessary, to
switch on the lights depending on the light conditions. Manual operation may be required in the following situations.■
Poor visibility conditions, e.g. fog, heavy rain, thick snowfall.
■
The oncoming traffic is partially blocked on roads or motorways.
■
Passing poorly lit road users, e.g. cyclists.
■
Driving around “sharp” curves.
■
Driving on sharp slopes up/large inclines.
■
Driving through poorly-lit locations.
■
Driving over highly reflective surfaces.
■
The windscreen around the camera is dirty, iced up, misted up, or covered by
stickers.
■
Near the camera lens there is a light source, such as the screen of an exter-
nal navigation system.
CAUTION
Do not attach any stickers or similar objects to the windscreen to avoid impairing
the functions of the Assist system.Fog lightsFig. 32
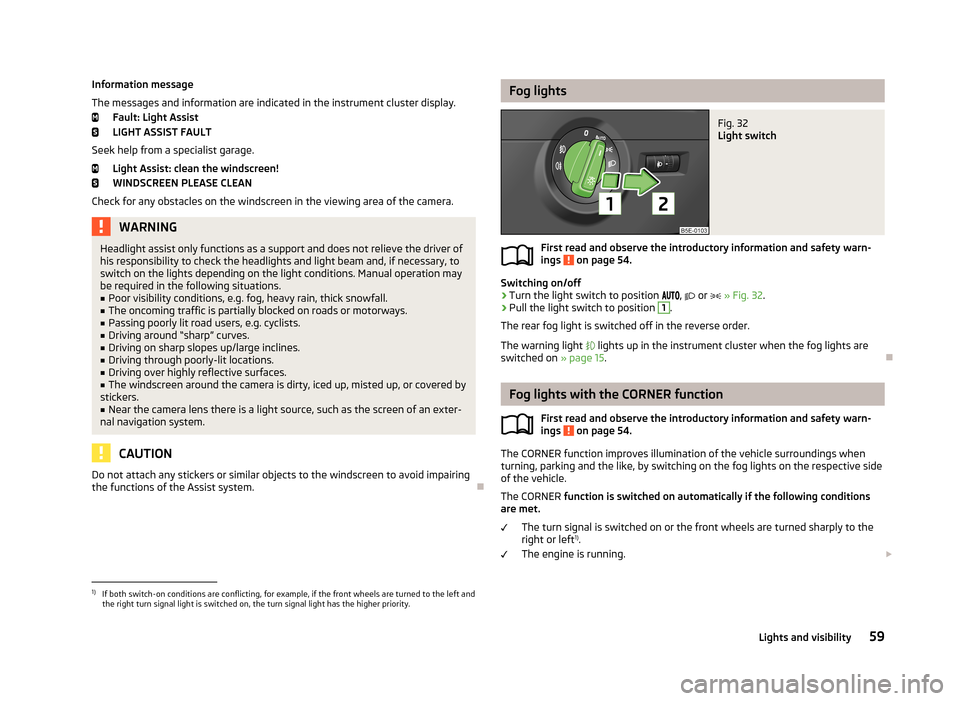
Light switch
First read and observe the introductory information and safety warn-
ings on page 54.
Switching on/off
›
Turn the light switch to position
,
or
» Fig. 32 .
›
Pull the light switch to position
1
.
The rear fog light is switched off in the reverse order.
The warning light
lights up in the instrument cluster when the fog lights are
switched on » page 15.
Fog lights with the CORNER function
First read and observe the introductory information and safety warn-ings
on page 54.
The CORNER function improves illumination of the vehicle surroundings when
turning, parking and the like, by switching on the fog lights on the respective side
of the vehicle.
The CORNER function is switched on automatically if the following conditions
are met.
The turn signal is switched on or the front wheels are turned sharply to the
right or left 1)
.
The engine is running.
1)
If both switch-on conditions are conflicting, for example, if the front wheels are turned to the left and
the right turn signal light is switched on, the turn signal light has the higher priority.
59Lights and visibility
Page 63 of 287
The vehicle is stopped or moves at a speed of no more than 40 km/h.
The low beam is switched on or the light switch is in the position and the
low beam is switched on.
The daytime running lights are not switched on. The fog lights are not switched on.
The CORNER light is mainly intended to be used for illuminating the nearby envi-
ronment at a broad angle in front of and beside the vehicle. It lights up and goes out gradually.
Note
The two fog lights are switched on when you shift into the reverse gear.
Rear fog light
First read and observe the introductory information and safety warn-
ings
on page 54.
Switching on/off
›
Turn the light switch into position
or
» Fig. 32 on page 59.
›
Pull the light switch to position
2
.
The rear fog light is switched off in the reverse order.
If the vehicle is not fitted with fog lights, the rear fog light is switched on by pull-
ing out the light switch directly to the position
2
. This switch can only be put in-
to one position.
The warning light
lights up in the instrument cluster when the rear fog light is
switched on » page 15.
Only the rear fog light on the trailer lights up if the vehicle has a factory-fitted towing device or a towing device from ŠKODA original accessories and it is driven
with a trailer.
COMING HOME / LEAVING HOME
First read and observe the introductory information and safety warn-ings
on page 54.
COMING HOME/LEAVING HOME (hereafter referred to only as function) makes it possible to automatically switch on the lights for a short time after leaving the
vehicle or when approaching the vehicle in poor visibility.
The function is switched on automatically if the following conditions are met: The light switch is in position » Fig. 30 on page 57.
The visibility in the vehicle environment is reduced.
The ignition is switched off.
The function and duration of the lighting can be activated or deactivated in the Infotainment » Operating instructions for Infotainment , chapter Vehicle settings
(button CAR) .
The light is regulated based on data gathered by the light sensor attached be-
tween the windscreen and the interior mirror » page 57.
The function switches on the parking and low beam lights, the entry lighting in
the exterior mirrors and the licence plate light.
COMING HOME
The light turns on automatically when you open the driver's door.
The light turns off after the preset time when you close all the doors and the boot
lid.
If a door or the boot lid remains open, the light goes out after 60 seconds.
LEAVING HOME
The light turns on automatically after the vehicle is unlocked with the remote
control.
The light turns off after a preset time or after the vehicle is locked.
CAUTION
Do not affix any stickers or similar objects in front of the light sensor on the wind-
screen, so that its functionality is not impaired or disabled. 60Using the system
Page 64 of 287
NoteIf this function is activated constantly, the battery will be heavily discharged par-
ticularly in short-haul traffic.
Hazard warning light system
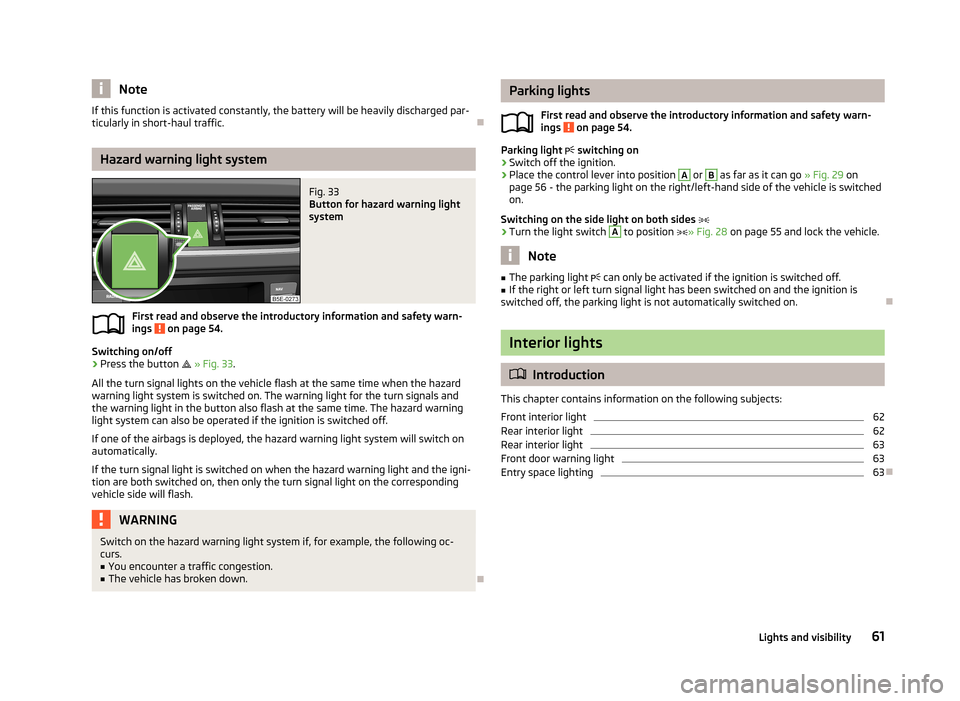
Fig. 33
Button for hazard warning light
system
First read and observe the introductory information and safety warn-
ings on page 54.
Switching on/off
›
Press the button
» Fig. 33 .
All the turn signal lights on the vehicle flash at the same time when the hazard
warning light system is switched on. The warning light for the turn signals and
the warning light in the button also flash at the same time. The hazard warning
light system can also be operated if the ignition is switched off.
If one of the airbags is deployed, the hazard warning light system will switch on
automatically.
If the turn signal light is switched on when the hazard warning light and the igni- tion are both switched on, then only the turn signal light on the corresponding
vehicle side will flash.
WARNINGSwitch on the hazard warning light system if, for example, the following oc-
curs.■
You encounter a traffic congestion.
■
The vehicle has broken down.
Parking lights
First read and observe the introductory information and safety warn-ings
on page 54.
Parking light switching on
›
Switch off the ignition.
›
Place the control lever into position
A
or
B
as far as it can go » Fig. 29 on
page 56 - the parking light on the right/left-hand side of the vehicle is switched
on.
Switching on the side light on both sides
›
Turn the light switch
A
to position » Fig. 28 on page 55 and lock the vehicle.
Note
■
The parking light can only be activated if the ignition is switched off.■If the right or left turn signal light has been switched on and the ignition is
switched off, the parking light is not automatically switched on.
Interior lights
Introduction
This chapter contains information on the following subjects:
Front interior light
62
Rear interior light
62
Rear interior light
63
Front door warning light
63
Entry space lighting
63
61Lights and visibility
Page 65 of 287

Front interior lightFig. 34
Switch for front interior light - 2 versions
Fig. 35
Switch for reading lights - 2 versions
First read and observe the introductory information given on page 61.
Rocker switch positions » Fig. 34 .
switching on
switching off
Operation using the door contact switch (middle position)
For vehicles with interior monitoring there is no icon for the center position (oper-
ation with the door contact switch) » Fig. 34 -
.
Reading lights Switch the reading light on/off » Fig. 35
If light operation with the door contact switch is enabled, the light will come on
when one of the following events occurs:
› The vehicle is unlocked.
› One of the doors or the luggage compartment lid is being opened.
› The ignition key is removed.
If light operation with the door contact switch is enabled, the light will go off
when one of the following events occurs:
› The vehicle is locked.
› The ignition is switched on.
› About 30 seconds after all the doors have been closed.
Note
■
If the interior light remains switched on when the ignition is switched off or if
one of the doors is open, the light will automatically go out after around 10 mi- nutes.■
Two diffuse lights are integrated in the front interior lighting, that illuminate
the gearshift lever and the middle of the dash panel. These are switched on auto-
matically when the parking light is activated. Also, after switching on the ignition when the parking lights are switched on, the door handle lighting comes on.
Rear interior light
Applies to vehicles without a panoramic sliding roof.
Fig. 36
Interior light without reading lights/interior light with reading lights
First read and observe the introductory information given on page 61.
The rear interior light is operated together with the front interior light » page 62.
62Using the system
Page 66 of 287
Switching lamp without reading lights on/off›Press the button » Fig. 36 - .
Switching the reading light on/off›
Press the button or
» Fig. 36 - .
Rear interior light
Applies to vehicles with a panoramic sliding roof.
Fig. 37
Interior lights at the rear
First read and observe the introductory information given on page 61.
The light can be operated by moving the lens into one of the following posi-
tions » Fig. 37 .
switching on
switching off
Operation using the door contact switch (middle position) 1)
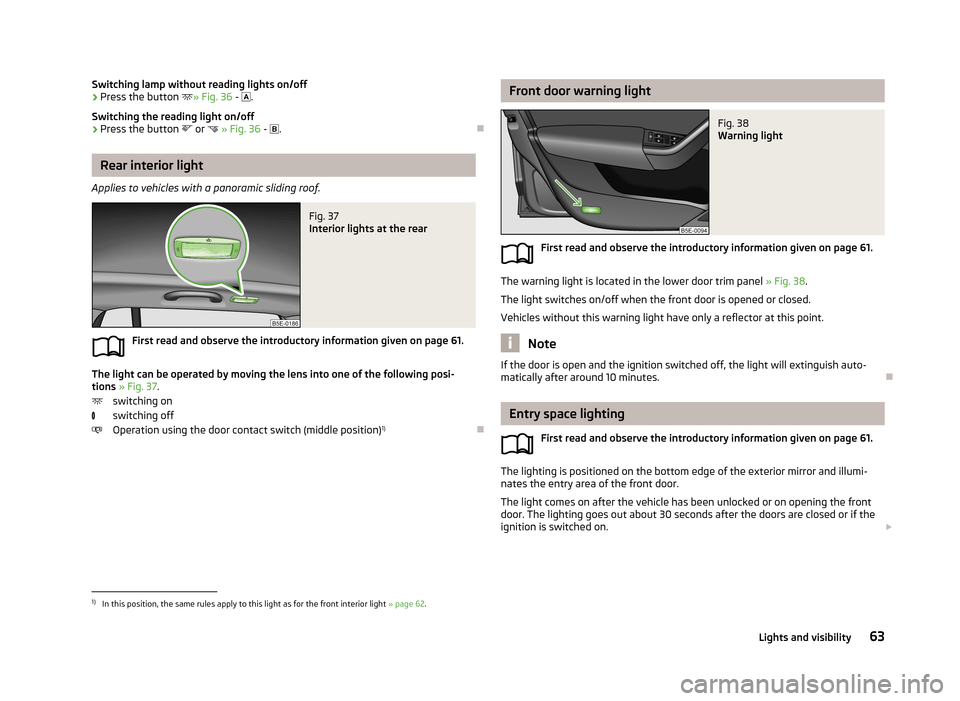
Front door warning lightFig. 38
Warning light
First read and observe the introductory information given on page 61.
The warning light is located in the lower door trim panel
» Fig. 38.
The light switches on/off when the front door is opened or closed.
Vehicles without this warning light have only a reflector at this point.
Note
If the door is open and the ignition switched off, the light will extinguish auto-
matically after around 10 minutes.
Entry space lighting
First read and observe the introductory information given on page 61.
The lighting is positioned on the bottom edge of the exterior mirror and illumi-
nates the entry area of the front door.
The light comes on after the vehicle has been unlocked or on opening the front
door. The lighting goes out about 30 seconds after the doors are closed or if the
ignition is switched on.
1)
In this position, the same rules apply to this light as for the front interior light
» page 62.
63Lights and visibility
Page 67 of 287
WARNINGIf the entry light is on, do not touch its cover – risk of burns!
Note
If the door is open and the ignition switched off, the light will extinguish auto-
matically after around 10 minutes.
Visibility
Introduction
This chapter contains information on the following subjects:
Windscreen and rear window heater
64
Sun visors
65
Sun screen
65
Windscreen and rear window heater
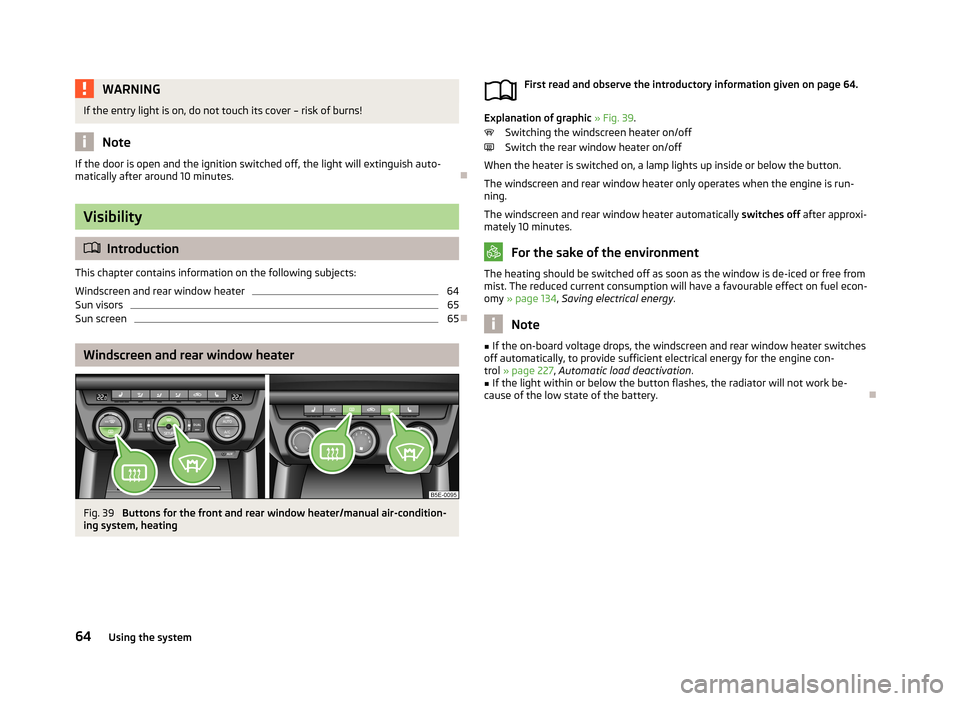
Fig. 39
Buttons for the front and rear window heater/manual air-condition-
ing system, heating
First read and observe the introductory information given on page 64.
Explanation of graphic » Fig. 39 .
Switching the windscreen heater on/off
Switch the rear window heater on/off
When the heater is switched on, a lamp lights up inside or below the button.
The windscreen and rear window heater only operates when the engine is run-
ning.
The windscreen and rear window heater automatically switches off after approxi-
mately 10 minutes.
For the sake of the environment
The heating should be switched off as soon as the window is de-iced or free from
mist. The reduced current consumption will have a favourable effect on fuel econ-
omy » page 134 , Saving electrical energy .
Note
■
If the on-board voltage drops, the windscreen and rear window heater switches
off automatically, to provide sufficient electrical energy for the engine con- trol » page 227 , Automatic load deactivation .■
If the light within or below the button flashes, the radiator will not work be-
cause of the low state of the battery.
64Using the system
Page 68 of 287
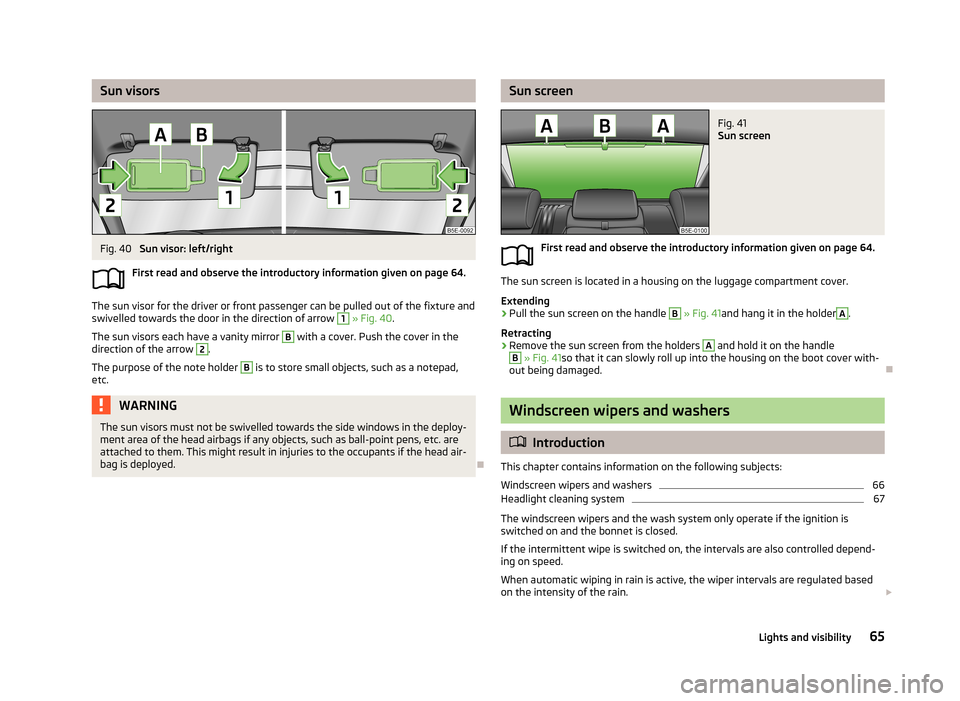
Sun visorsFig. 40
Sun visor: left/right
First read and observe the introductory information given on page 64.
The sun visor for the driver or front passenger can be pulled out of the fixture and
swivelled towards the door in the direction of arrow
1
» Fig. 40 .
The sun visors each have a vanity mirror
B
with a cover. Push the cover in the
direction of the arrow
2
.
The purpose of the note holder
B
is to store small objects, such as a notepad,
etc.
WARNINGThe sun visors must not be swivelled towards the side windows in the deploy-
ment area of the head airbags if any objects, such as ball-point pens, etc. are attached to them. This might result in injuries to the occupants if the head air-
bag is deployed.
Sun screenFig. 41
Sun screen
First read and observe the introductory information given on page 64.
The sun screen is located in a housing on the luggage compartment cover.
Extending
›
Pull the sun screen on the handle
B
» Fig. 41 and hang it in the holder
A
.
Retracting
›
Remove the sun screen from the holders
A
and hold it on the handle
B
» Fig. 41 so that it can slowly roll up into the housing on the boot cover with-
out being damaged.
Windscreen wipers and washers
Introduction
This chapter contains information on the following subjects:
Windscreen wipers and washers
66
Headlight cleaning system
67
The windscreen wipers and the wash system only operate if the ignition is
switched on and the bonnet is closed.
If the intermittent wipe is switched on, the intervals are also controlled depend-
ing on speed.
When automatic wiping in rain is active, the wiper intervals are regulated based
on the intensity of the rain.
65Lights and visibility
Page 69 of 287
The rear window is wiped once automatically if the windscreen wipers are onwhen reverse gear is selected.
Automatic rear window wiping can be activated or deactivated in the Infotain-
ment » Operating instructions for Infotainment , chapter Vehicle settings (CAR
button) .
Top up with windscreen wiper fluid » page 218.WARNING■
Properly maintained windscreen wiper blades are essential for clear visibility
and safe driving » page 250.■
Replace the windscreen wiper blades once or twice a year for safety rea-
sons. These can be purchased from a ŠKODA Partner.
■
Do not use the windscreen washer system at low temperatures, without
heating the windscreen beforehand. Otherwise the window cleaner could
freeze on the windscreen and restrict the view to the front.
■
Automatic wiping in rain only operates as a support. The driver is not re-
leased from the responsibility to set the function of the windscreen wipers
manually depending on the visibility conditions.
CAUTION
■ In cold temperatures and during the winter, check before the journey or before
switching on the ignition that the wiper blades are not frozen to the windscreen. If the windscreen wipers are switched on when the blades are frozen to the
windscreen, this may damage both the blades and windscreen wiper motor!■
If the ignition is switched off while the windscreen wipers are switched on, the
windscreen wipers will continue wiping in the same mode after the ignition is
turned back on. The windscreen wipers could freeze up in cold temperatures be- tween the time the ignition was turned off and when it was turned back on again.
■
Carefully detach frozen wiper blades from the front or rear window.
■
Remove snow and ice from the windscreen wipers before driving.
■
If the windscreen wipers are handled carelessly, there is a risk of damage to the
windscreen.
■
Do not switch on the ignition if the front wiper arms are retracted. The wiper
blades would move back into their rest position and while doing so damage the
paintwork of the bonnet.
■
If there is an obstacle on the windscreen, the wiper will try to push away the
obstacle. The wiper stops automatically after 5 attempts to eliminate the obsta-
cle, in order to avoid a damage to the wiper. Remove the the obstacle and switch
the wiper on again.
Note■ Each time the ignition switches off for the third time, the position of the wind-
screen wipers changes. This counteracts an early fatigue of the wiper rubbers.■
The rear window wiper only operates if the boot lid is closed.
■
Keep the wiper blades clean. They may become soiled, e.g., with wax residues
after washing in automatic car wash systems » page 204.
■
The windscreen washer nozzles for the windscreen are heated when the en-
gine is running and the outside temperature is less than approx. +10 °C.
Windscreen wipers and washers
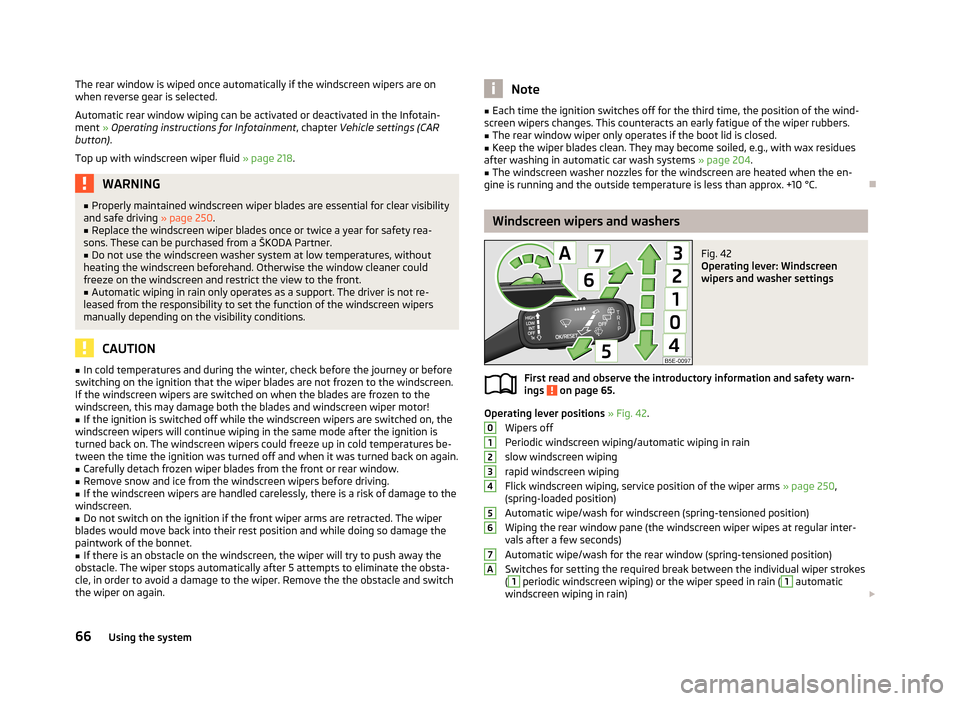
Fig. 42
Operating lever: Windscreen
wipers and washer settings
First read and observe the introductory information and safety warn-
ings on page 65.
Operating lever positions » Fig. 42 .
Wipers off
Periodic windscreen wiping/automatic wiping in rain
slow windscreen wiping
rapid windscreen wiping
Flick windscreen wiping, service position of the wiper arms » page 250,
(spring-loaded position)
Automatic wipe/wash for windscreen (spring-tensioned position)
Wiping the rear window pane (the windscreen wiper wipes at regular inter- vals after a few seconds)
Automatic wipe/wash for the rear window (spring-tensioned position)
Switches for setting the required break between the individual wiper strokes
(
1
periodic windscreen wiping) or the wiper speed in rain (
1
automatic
windscreen wiping in rain)
01234567A66Using the system
Page 70 of 287
Automatic windscreen wiping in rain
Automatic windscreen wiping in rain can be activated or deactivated in the Info-
tainment » Operating instructions for Infotainment , chapter Vehicle settings (CAR
button) .
Automatic wipe/wash for windscreen
The wash system operates immediately, the windscreen wipers wipe somewhat
later. The wash system and the windscreen wiper operate simultaneously at a
speed of more than 120 km/h.
Letting go of the operating lever will cause the windscreen wash system to stop and the wipers to continue for another 2-3 wiper strokes (depending on the spraying duration).
At a speed of more than 2 km/h, the wiper wipes once again 5 seconds after the last wiper stroke in order to wipe the last drops from the windscreen. This func-
tion can be activated/deactivated by a specialist garage.
Automatic wipe/wash for the rear windowThe wash system operates immediately, the windscreen wiper wipes somewhat
later.
Letting go of the operating lever will cause the windscreen wash system to stop and the wiper to continue for another 2-3 wiper strokes (depending on the spray-
ing duration). The operating lever remains in position 6
.
Automatic rear window wipe (Octavia Estate)
If the lever is in position
2
or
3
» Fig. 42 , the rear window is wiped every
30 or 10 seconds if the vehicle's speed exceeds 5 km/h.
If automatic windscreen wiping in rain is activated (the operating lever is in the
position
1
) the function is only active if the windscreen wipers operate in contin-
uous mode (no break between each wiping process).
Automatic rear window wiping can be activated or deactivated in the Infotain-
ment » Operating instructions for Infotainment , chapter Vehicle settings (CAR
button) .
Winter setting of the windscreen wiper If the windscreen wipers are in rest position, they cannot be folded out from thewindscreen. For this reason we recommend adjusting the windscreen wipers in
winter so that they can be folded out from the windscreen easily.
› Switch on the windscreen wipers.
› Switch off the ignition.
The windscreen wipers remain in the position in which they were when switching
off the ignition.
The service position can also be used as a winter position » page 250
.
Note
If the slow or the fast wiper setting is switched on and the vehicle speed decrea-
ses to below 4 km/h, the wiper speed is incrementally set to a lower wiper speed.
The original setting is restored step by step when the speed of the vehicle ex-
ceeds 8 km/h.
Headlight cleaning system
First read and observe the introductory information and safety warn-
ings
on page 65.
The headlights will be cleaned once the ignition is on and always upon the first and after every tenth spraying of the windscreen, when the low beam is switched
on.
Each time the headlamps are cleaned each lamp is sprayed twice. You should remove stubborn dirt (such as insect residues) from the headlight len-
ses at regular intervals, for example when refuelling. The following guidelines
must be observed » page 207, Headlight lenses .
To ensure the proper operation of the cleaning system during the winter, any
snow should be removed from the washer nozzle fixtures and ice should be
cleared with a de-icing spray.
CAUTION
Never remove the nozzles from the headlight cleaning system by hand – risk of
damage!
Note
The headlamp cleaning system works with an ambient temperature of about -12 °
C to + 39 ° C.
67Lights and visibility