ignition SKODA OCTAVIA 2013 3.G / (5E) Repair Manual
[x] Cancel search | Manufacturer: SKODA, Model Year: 2013, Model line: OCTAVIA, Model: SKODA OCTAVIA 2013 3.G / (5E)Pages: 287, PDF Size: 18.55 MB
Page 161 of 287
The emergency brake function is automatically activated or deactivated togetherwith the Front Assist system.
If the emergency brake function triggers an automatic brake action, the display of
the instrument cluster shows the symbol » Fig. 142 on page 156 - .WARNINGThe emergency brake function can slow down the vehicle to a complete
standstill. If the vehicle continues to roll forward after stopping, then it should
be stopped with the footbrake.
CAUTION
Automatic braking interventions by the emergency brake function can be termi-
nated by pressing the clutch or the accelerator, or by moving the steering wheel.
Note
If an automatic brake intervention is triggered by the emergency brake function,
the pressure in the brake system increases and the brake pedal cannot be oper-
ated with the normal pedal stroke.
Information messages
First read and observe the introductory information and safety warn-
ings
on page 154.
The messages and information are indicated in the instrument cluster display.
Front Assist: no sensor view.
The sensor is dirty or has no “visibility”. Stop the car, switch off the engine and clean the sensor or remove the obstacle causing the lack of “visibility” » Fig. 135
on page 149 . If the message appears again after starting the engine, the system
should be disabled » page 157. Seek help from a specialist garage.
Front Assist not available.
Stop the vehicle, switch off the engine and then start it again. If the message ap-
pears again after starting the engine, the system should be disabled » page 157.
Seek help from a specialist garage.
START-STOP
Introduction
This chapter contains information on the following subjects:
Starting/shutting down the engine
159
Operating conditions of the system
160
Manually activating/deactivating the system
160
Information messages
161
The START-STOP system helps you to save fuel while at the same time reducing
harmful exhaust emissions and CO 2 emissions.
The function is automatically activated each time the ignition is switched on.
In the start-stop mode, the engine automatically switches to the vehicle's idle phase, e.g. when stopped at traffic lights. The engine restarts automatically
where necessary.
Information about the current status of the system can be displayed in the Info-
tainment display » operating instructions for Infotainment , chapter Vehicle set-
tings (CAR button) .
The system can work only if the following basic conditions are met. The driver's door is closed.
The driver has fastened the seat belt. The bonnet is closed.
The driving speed was higher than 4 km.h after the last stop.
No trailer is coupled.
WARNING■ The brake servo unit and power steering only operate if the engine is run-
ning.■
Never let the vehicle roll with the engine switched off.
CAUTION
Always deactivate the START-STOPsystem before driving through wa-
ter » page 135 . 158Driving
Page 164 of 287
Information messagesFirst read and observe the introductory information and safety warn-
ings
on page 158.
The messages and information are indicated in the instrument cluster display.
Start the engine manually!
START MANUALLY
The driver sees this message when the conditions for the automatic start proce-
dure are not met during the STOP phase. The engine must be started manual-
ly » page 121 .
Error: start-stop system
START STOP ERROR
Error in the START-STOP system. Seek help from a specialist garage.
Driving mode
Introduction
This chapter contains information on the following subjects:
Selecting driving mode
161
Normal Mode
162
Sportmode
162
Ecomode
162
Individualmode
163
Selecting the driving mode allows you to adjust a range of different driving pa-
rameters for the vehicle.
The set driving mode remains stored even after switching the ignition on and off.
WARNING■ Setting the driving mode while driving can distract you from other traffic –
risk of accident.■
Concentrate fully at all times on your driving! As the driver you are fully re-
sponsible for the operation of your vehicle.
■
Adjust the speed and driving style to the current visibility, weather, road and
traffic conditions.
Note
The driver can change some vehicle functions irrespective of the selected driving
mode. For instance, in the driving mode Eco, the driver can switch the automatic
transmission to the mode S.
Selecting driving mode
Fig. 146
Button for selecting the driving mode: Octavia, Octavia Combi / Fa-
bia RS Octavia RS
First read and observe the introductory information and safety warn-ings
on page 161.
The menu for selecting the driving mode allows you to set the vehicle to one of
the three preset driving modes Normal, Sportand Eco, or to the driving mode
Individual which allows individual settings.
The selected driving mode is accessed by pressing the symbol button
or
» Fig. 146 , and the menu is opened in the Infotainment display. More informa-
tion about setting the driving mode » operating instructions for Infotainment ,
chapter Vehicle settings .
161Assist systems
Page 166 of 287
Note■The Eco driving mode is not available when towing a trailer. When the vehicle is
connected electrically to a trailer and is in the Eco driving mode, the Normal driv-
ing mode is configured automatically.■
The maximum vehicle acceleration (kickdown function) is possible also in driving
mode Eco.
Individualmode
First read and observe the introductory information and safety warn-
ings
on page 161.
In mode Individual you can select between Normal, Sport and Eco for each system
separately » Operating instructions for Infotainment , chapter Vehicle settings .
ProActive passenger protection
Introduction
This chapter contains information on the following subjects:
Function
163WARNINGAdjust the speed and driving style to the current visibility, weather, road and
traffic conditions. The increased safety by ProActive passenger protection must not tempt you to take greater risks than otherwise – risk of accident!
Note
■ If the front passenger front airbag is deactivated » page 191 the belt tension-
ing function for the front passenger seat is switched off.■
The system component service life is monitored electronically. Further informa-
tion » page 19 , Security Systems .
Function
First read and observe the introductory information and safety warn-ings
on page 163.
ProActive passenger protection (From here on referred to only as system) increa-
ses passenger protection in the front seats in situations that could lead to vehicle
impact or overturning.
The system is ready to intervene automatically in the following conditions. The ignition is switched on.
The vehicle moves at a speed of more than 30 km/h.
In critical driving situations (e.g. during emergency braking or a sudden change in
direction), the following steps can be taken separately or combined in order to re-
duce the risk of serious injury.
› The front passenger's and driver's seatbelts, if worn, are automatically
ten-
sioned closely over the body.
› The windows in the side doors (if open) are automatically closed up to a gap of
about 5 cm from the edge.
› The sliding/tilting roof is closed.
Once the critical driving situation has passed, the tension on the seatbelts will be
released again.
The system operates at two levels of protection.
The first level of protection
The system already intervenes in situations that may occur during dynamic driv-
ing. As a result, this primarily helps to keep the driver and the passenger in the
correct seated position.
The first level of protection can be deactivated by one of the following measures. › Deactivation of the system in Infotainment
» Operating instructions for Info-
tainment , chapter Vehicle settings (CAR button) .
› Deactivation of TCS
» page 138.
› Selecting the driving mode Sport
» page 161.
The second level of protection
The system intervenes only if the situation is evaluated as critical, such as in pan-
ic braking at high speeds.
This level of protection cannot be deactivated.
163Assist systems
Page 171 of 287
Infotainment Navigation is not currently providing any data. Check whether the
maps are up-to-date or the whether the vehicle is currently in a location for which
no navigation data are available.
Fatigue detection (break recommendation)
Introduction
This chapter contains information on the following subjects:
Function
168
Information messages
168WARNING■ For the driving ability is always the driver's responsibility. Never drive if you
feel tired.■
The system may not detect all cases where a break is needed.
■
Therefore, take regular, sufficient breaks during long trips.
■
There will be no system warning during the so-called micro-sleep.
Note
■ In some situations, the system may evaluate the driving incorrectly and thus
mistakenly recommend a break (e.g. sporty driving, in adverse weather conditions,
or in bad road conditions).■
The fatigue detection system is designed primarily for motorway driving.
Function
First read and observe the introductory information and safety warn-ings
on page 168.
The fatigue detection system advises the driver on the basis of information about
the steering behaviour, to take a break from driving. The system recommends a
break at speeds of 65-200 km/h.
After the ignition has been switched on, the system evaluates the steering be-
haviour for 15 minutes. This baseline analysis is constantly compared with the
current steering behaviour.
If the system detects deviations from normal steering behaviour due to possible
fatigue of the driver, it recommends to take a break from driving.
The system deletes the stored baseline analysis if one of the following condi-tions is met.
› The vehicle is stopped and the ignition is turned off.
› The vehicle is stopped, the seat belt is taken off and the driver's door is opened.
› The vehicle is stopped for more than 15 minutes.
If none of these conditions is met or the driving style is not changed, the system
recommends a driving break again after 15 minutes.
The system can be activated/deactivated in the Infotainment » operating instruc-
tions for Infotainment , chapter Vehicle settings (CAR button) .
Information messages
First read and observe the introductory information and safety warn-
ings
on page 168.
The icon appears and the following message for a few seconds in the display of the instrument cluster .
Driver alert. Take a break!
DRIVER ALERT TAKE A BREAK
An audible signal is also emitted.
168Driving
Page 177 of 287
WARNING■Never use the safety eye to tow a vehicle!■Adapt your speed to the conditions of the road surface and to the traffic sit-
uation.■
Improper or incorrectly connected electric cables can energise the trailer and
cause functional faults to the vehicle's entire electrical system as well as acci-
dents and severe injuries.
■
Work on the electrical system must only be carried out by specialist garages.
■
Never directly connect the trailer's electrical system with the electrical con-
nections for the tail lights or other current sources.
Note
■ After coupling the trailer and connecting up the power socket, check the rear
lights on the trailer to ensure they work.■
If there is an error in the trailer lighting system, check the fuses in the fuse box
in the dashboard » page 253.
■
Contact between the breakaway cable and the safety eye can result in mechan-
ical wear on the protective surface of the eye. Such wear does not impair the
functioning of the safety eye and is not a fault. It is excluded from the warranty
coverage.
■
If you tow a trailer frequently, have your car inspected between service inter-
vals too.
■
The handbrake on the towing vehicle must be put on when coupling and decou-
pling the trailer.
Trailer stabilisation
First read and observe the introductory information and safety warn-
ings
on page 172.
The trailer stabilisation is an extension of the stabilisation control that works in
conjunction with the counter-steering assistance to reduce the amount the trail-
er "sways".
After turning on the ignition, the ESC warning light
in the instrument cluster
lights up for about 2 seconds longer than the ABS warning light.
Function requirements for trailer stabilisation.
The trailer was shipped from the factory or purchased from the ŠKODA genu-
ine accessories.
The ESC system is active. (The warning light is lit up in the instrument clus-
ter or not ).
The trailer is electrically connected to the towing vehicle by means of the
trailer socket.
The speed is higher than approx. 60 km/h.
The trailer has a rigid drawbar.WARNINGThe increased safety offered by the trailer stabilisation must not tempt you to take greater risks than otherwise.
CAUTION
■ The trailer stabilisation need not be able to correctly detect all of driving situa-
tions.■
Trailers that sway slightly may not always be detected by the trailer stabilisa-
tion and are thus not stabilised accordingly.
■
Release the pressure on the accelerator pedal if the system is being regulated.
■
Avoid abrupt and sudden driving/braking manoeuvres.
Note
The trailer stabilisation works for both braked and unbraked trailers.
Anti-theft alarm system
First read and observe the introductory information and safety warn-
ings
on page 172.
If the vehicle is locked, the alarm is activated when the electrical connection to
the trailer is interrupted.
Always switch off the anti-theft alarm system before a trailer is coupled or uncou- pled » page 42 .
174Driving
Page 188 of 287
Airbag system
Description of the airbag system
Introduction
This chapter contains information on the following subjects:
System description
185
Airbag deployment
185WARNING■ An airbag can only offer you optimal protection in combination with a fas-
tened seat belt .■
The airbag is not a substitute for the seat belt, but instead forms part of the
complete passive vehicle safety concept.
■
To ensure passengers are protected with the greatest possible effect when
the airbag is deployed, the front seats must be correctly adjusted to match
the body size » page 177, Correct seated position .
■
If you do not fasten the seat belts when driving, lean too far forward or
adopt an incorrect seated position, you are exposing yourself to increased risk of injury in the event of an accident.
WARNINGObserve the following instructions for handling the airbag system.■If there is a fault, the airbag system must be checked by a specialist garage
immediately. Otherwise, there is a risk of the airbag not being activated in the
event of an accident.■
No modifications of any kind must be made to parts of the airbag system.
■
Any work on the airbag system including the installation and removal of sys-
tem components due to other repair work (e.g. removal of the steering wheel) must only be carried out by a specialist garage.
■
Never make any changes to the front bumper or bodywork.
■
It is prohibited to manipulate individual parts of the airbag system as this
might result in the airbag being deployed.
■
The protective function of the airbag system is sufficient for only one acci-
dent. The airbag system must then be replaced if the airbag has been de-
ployed.
System description
First read and observe the introductory information and safety warn-ings
on page 185.
The functional status of the airbag system is indicated by the indicator light in
the instrument cluster » page 19.
When the airbags are deployed they fill with gas and inflate.
A grey white or red, non-harmful gas is released when the airbag is inflated. This
is perfectly normal and is not an indication of a fire in the vehicle.
The airbag system consists – depending on the vehicle equipment – of the
following modules.
› Electronic control unit.
› Front airbag for the driver and the front passenger
» page 187.
› Driver’s knee airbag
» page 188.
› Side airbags
» page 188.
› Head airbags
» page 189.
› Airbag warning light in the instrument cluster
» page 19.
› Key switch for the front passenger airbag
» page 191.
› Warning light for the front passenger airbag/activation in dash panel cen-
tre » page 191 .
Note
■
The airbag system needs no maintenance during its working life.■If you sell your vehicle, provide the complete vehicle documentation to the new
owner. Please note that the information relating to the possibility of deactivating
the front passenger airbag must be included!■
When disposing of vehicle or parts of the airbag system, it is important to com-
ply with the national legal requirements.
Airbag deployment
First read and observe the introductory information and safety warn-
ings
on page 185.
The airbags inflate in fractions of a second and at a high speed in order to be able
to offer that additional protection in the event of an accident.
The airbag system is only functional when the ignition is switched on.
185Airbag system
Page 194 of 287
Deactivating airbagsFirst read and observe the introductory information given on page 190.
Deactivating an airbag should be considered in cases such as the ones outlined
below.
› If using a rear-facing child seat on the front passenger seat (due to different le-
gal regulations, the airbag must be deactivated if using a forward-facing child
seat in some countries) » page 193, Transporting children safely .
› If not being able to maintain a distance of at least 25 cm between the middle of
the steering wheel and chest, despite the driver's seat being correctly adjusted.
› If special attachments are required in the area of the steering wheel because of
a physical disability.
› If other seats have been installed (e.g. orthopaedic seats without side airbags).
The front passenger airbag can be switched off with the key-operated
switch » page 191 , Deactivating the front passenger airbag .
We recommend that you ask a ŠKODA service partner to deactivate any other air-
bags as appropriate.
Monitoring the airbag system
The functionality of the airbag system is monitored electronically even if one of
the airbags is switched off.
Airbag was switched off using diagnostic equipment › The warning light
lights up for approx. 4 seconds after switching on the igni-
tion and then flashes again for approx. 12 seconds.
Front passenger airbag switched off with the key switch in the storage com-
partment
› The warning light
comes on for about 4 seconds after the ignition has been
switched on.
› The indicator light
3
» Fig. 170 on page 191 lights up after the ignition is
switched on.
Note
■ The national regulations for switching off airbags must be observed.■A ŠKODA service partner will be able to inform you which, if any, of your vehi-
cle's airbags can or must be deactivated.
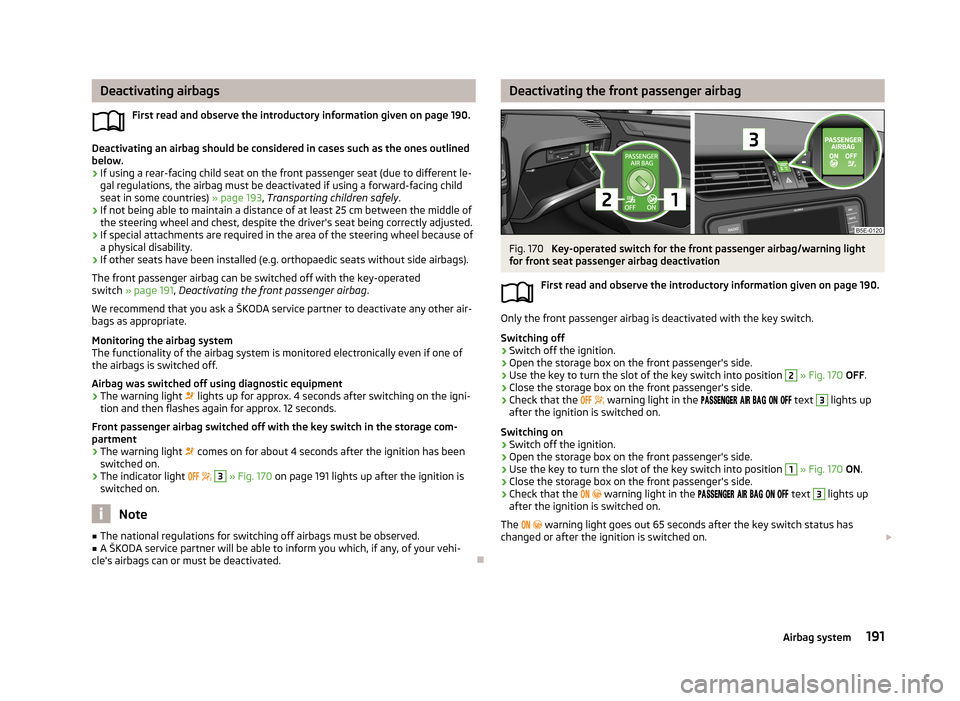
Deactivating the front passenger airbagFig. 170
Key-operated switch for the front passenger airbag/warning light
for front seat passenger airbag deactivation
First read and observe the introductory information given on page 190.
Only the front passenger airbag is deactivated with the key switch.
Switching off
›
Switch off the ignition.
›
Open the storage box on the front passenger's side.
›
Use the key to turn the slot of the key switch into position
2
» Fig. 170 OFF .
›
Close the storage box on the front passenger's side.
›
Check that the
warning light in the
text
3
lights up
after the ignition is switched on.
Switching on
›
Switch off the ignition.
›
Open the storage box on the front passenger's side.
›
Use the key to turn the slot of the key switch into position
1
» Fig. 170 ON .
›
Close the storage box on the front passenger's side.
›
Check that the
warning light in the
text
3
lights up
after the ignition is switched on.
The
warning light goes out 65 seconds after the key switch status has
changed or after the ignition is switched on.
191Airbag system
Page 195 of 287
WARNING■The driver is responsible for whether the airbag is switched on or switched
off.■
Only switch off the airbag when the ignition is switched off! Otherwise a
fault can occur in the system for deactivating the airbag.
■
If the warning light is flashing, the front passenger airbag will not be
deployed in an accident. Have the airbag system checked by a specialist ga- rage immediately.
192Safety
Page 207 of 287
The longer insect residues, bird droppings, tree sap, road and industrial dust, tar,
soot particles, road salt and other aggressive deposits remain adhering to the
paintwork of your vehicle, the more detrimental their destructive effect can be.
High temperatures, such as those caused by intensive sun's rays, accentuate this
caustic effect.
It is essential to also thoroughly clean the underside of the vehicle at the end of
the winter.WARNING■ When washing your vehicle in the winter: Water and ice in the braking sys-
tem can affect the braking efficiency – risk of accident!■
Only wash the vehicle when the ignition is switched off – risk of accident!
CAUTION
Do not wash your vehicle in bright sunlight – risk of paint damage.
For the sake of the environment
Only wash the vehicle at washing bays intended for this purpose.
Washing by hand
First read and observe the introductory information and safety warn-
ings
on page 203.
Soak the dirt with plenty of water and rinse as well as possible.
Clean the vehicle with a soft sponge, a washing glove or a washing brush . Work
from the top to the bottom – starting with the roof.
Only use a car shampoo for stubborn dirt.
Wash out the sponge or washing glove thoroughly at short intervals.
Clean wheels, door sills and similar parts last. Use a second sponge for such
areas.
Give the vehicle a good rinse after washing it and dry it off using a chamois leath- er.
CAUTION■ When washing the car by hand, protect your hands and arms from sharp-edged
metal parts (e.g. when cleaning the underfloor, the inside of the wheel housings
or the wheel trims, etc.) - There is a risk of cuts!■
Only apply slight pressure when cleaning the vehicle's paintwork.
Automatic car wash systems
First read and observe the introductory information and safety warn-
ings
on page 203.
The usual precautionary measures must be taken before washing the vehicle in
an automatic car wash system (e.g. closing the windows and the sliding/tilting
roof etc.).
If your vehicle is fitted with any particular attached parts, such as a spoiler, roof
rack system, two-way radio aerial etc., it is best to consult the operator of the car
wash system beforehand.
After an automatic wash with wax treatment, the lips of the wipers should be cleaned with cleaning agents specially designed for the purpose, and then de-
greased.
WARNINGFold in the exterior mirrors to prevent damage before washing the vehicle in
an automatic car wash system. Never manually fold in electric exterior mirrors
- always use the electric controls.
Washing with a high-pressure cleaner
First read and observe the introductory information and safety warn-
ings
on page 203.
When washing the vehicle with a high-pressure cleaner, the instructions for use
of the equipment must be observed. This applies in particular to the pressure
used and to the spraying distance .
Maintain a sufficiently large distance to the parking aid sensors and soft materials
such as rubber hoses or insulation material.
204General Maintenance
Page 216 of 287
›Place the filler cap onto the fuel filler neck and turn it clockwise until it securely
engages.›
Close the fuel filler flap until it clicks into place.
Check that the fuel filler flap is closed properly.
Incorrect refuelling guard on vehicles with diesel enginesThe fuel filler tube on vehicles with diesel engines has been fitted with a incor-rect refuelling guard » Fig. 179. This guard means it is only possible to refuel with
the diesel pump nozzle.
If the diesel pump nozzle does not sit directly in the fuel filler tube, move it to and fro with slight pressure to insert it correctly.
CAUTION
■ The fuel tank is full just as soon as the pump nozzle switches off for the first
time, provided the nozzle has been operated properly. Do not continue filling the fuel tank otherwise the expansion volume is filled up.■
Be careful when filling diesel fuel from the spare canister – danger of contami-
nating the body.
■
The diameter of the diesel pump nozzle can be identical to that of the petrol
pump nozzle in some countries. When driving in these countries, the incorrect fu-
elling protection should be removed by a specialist company.
Note
The fuel tank has a capacity of about 50 litres, containing a reserve of approx.
7 litres .
Unleaded petrol
First read and observe the introductory information and safety warn-
ings
on page 212.
Your vehicle can only be operated with unleaded petrol in compliance with the
EN 228 1)
standard.
All petrol engines can be operated using petrol that contains at most 10% bioe-
thanol (E10).
Required fuel - unleaded petrol 95/91 or 92 or 93 RON
Use unleaded fuel with the octane rating 95 RON. Unleaded petrol with the oc-
tane ratings 91, 92 or 93 RON can also be used, but may result in a slight loss in
performance.
Prescribed fuel – unleaded petrol min. 95 RON
Use unleaded fuel with the octane rating 95 RON or higher.
In case of necessity, you can refuel with petrol with the octane ratings 91, 92 or
93 RON, if petrol with the octane rating 95 RON is not available »
.
Prescribed fuel – unleaded petrol 98/(95) RON Use unleaded fuel with the octane rating 98 RON or higher. Unleaded petrol
95 RON can also be used but results in a slight loss in performance.
In case of necessity, you can refuel with petrol with the octane ratings 91, 92 or
93 RON, if unleaded fuel with octane rating 98 RON or 95 RON is not availa-
ble »
.
Fuel additives
Unleaded petrol in accordance with the EN 228 standard 1)
meets all the condi-
tions for a smooth-running engine. We therefore recommend that no fuel addi-
tives are used. This can result in considerable damage to parts of the engine or
the exhaust system.
CAUTION
■ Even filling the tank with leaded petrol that does not meet the standards once
can lead to serious damage to parts of the exhaust system!■
If a fuel other than unleaded fuel which complies to the above mentioned
standards (e.g. leaded petrol) is used by mistake, do not start the engine or
switch on the ignition! Extensive damage to engine parts can occur! We recom-
mend that you have the fuel system cleaned by a specialist garage.
1)
In Germany also DIN 51626-1 or E10 for unleaded petrol with octane number 91 or 95 or DIN 51626-2
or E5 for unleaded petrol with octane number 95 and 98.
213Inspecting and replenishing