stop start SKODA OCTAVIA 2014 3.G / (5E) Columbus Infotinment Navigation System Manual
[x] Cancel search | Manufacturer: SKODA, Model Year: 2014, Model line: OCTAVIA, Model: SKODA OCTAVIA 2014 3.G / (5E)Pages: 83, PDF Size: 5.16 MB
Page 60 of 83
If the preferred route type has been set, then touching the Home address will
start the calculation and route guidance, or after the calculation, you need to
select the route type before the route guidance starts.
If the home address has not been entered, an input window is displayed with
the following message:
Please select as your home address: your current position or a new address.
The following function keys are displayed:
› Position
- Entry of the home address through taking the current position of
the vehicle;
› Address
- Enter the home address in writing.
Description of the adjustment or deletion process of the home address:
The home address is also available in the main navigation menu, by pressing
the symbol key
→ Manage memory → Define home address .
Own destination (vCard)
You can import custom destinations in vCard format from an SD memory card,
a CD/DVD or a USB storage device into the device.
›
In the Navigation main menu, press
→ Import destinations .
A list of possible data import sources is displayed » page 26.
After selecting the source and confirming the menu item Import all vCards
from this folder the importing the data stored in vCard format into the device
memory begins.
POI
Introduction
This chapter contains information on the following subjects:
Input a new POI
58
Search area for POIs
59
Find and select a POI
59
Quick select a POI
59
Search selection near the location, destination, stopover and along the
route
59
Search near the entered address or near the point entered on the map
60First and foremost, pay attention to the safety instructions » page 4 , Impor-
tant notes .
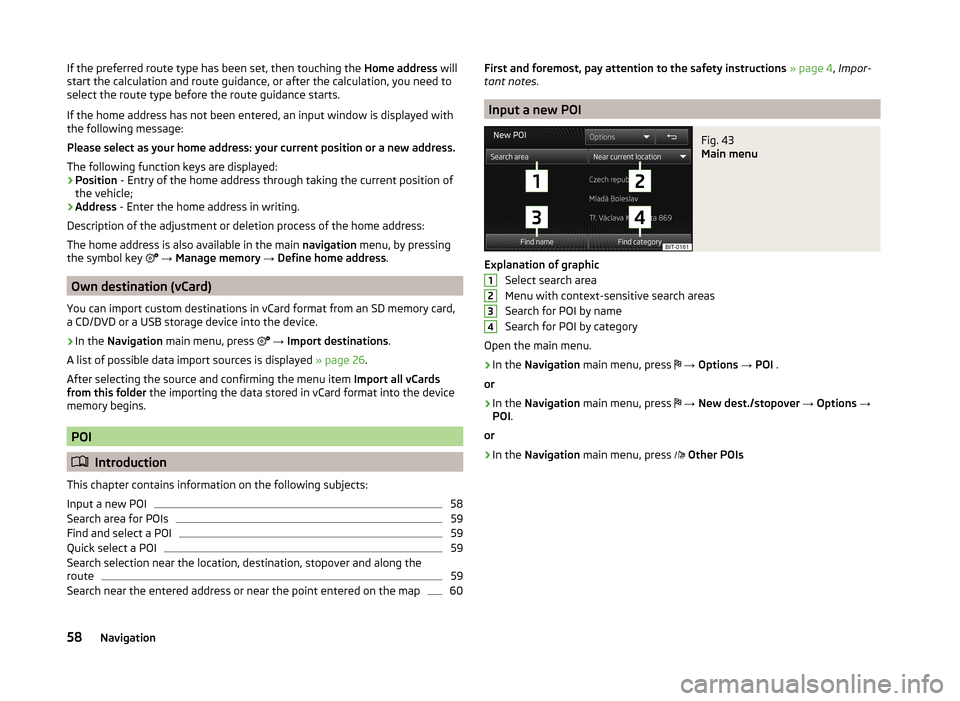
Input a new POI
Fig. 43
Main menu
Explanation of graphic
Select search area
Menu with context-sensitive search areas
Search for POI by name
Search for POI by category
Open the main menu.
›
In the Navigation main menu, press
→ Options → POI .
or
›
In the Navigation main menu, press
→ New dest./stopover → Options →
POI .
or
›
In the Navigation main menu, press
Other POIs
123458Navigation
Page 62 of 83
Touch 3 or 4 » Fig. 43 on page 58 to start the POI search for the selected
search area.
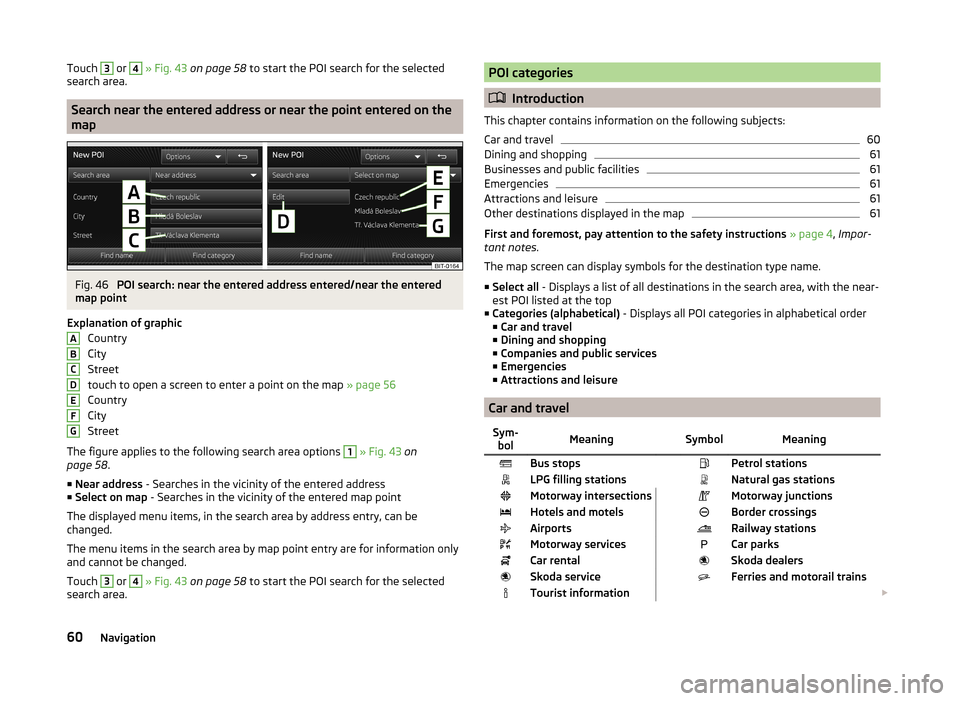
Search near the entered address or near the point entered on the
map
Fig. 46
POI search: near the entered address entered/near the entered
map point
Explanation of graphic Country
City
Street
touch to open a screen to enter a point on the map » page 56
Country
City
Street
The figure applies to the following search area options
1
» Fig. 43 on
page 58 .
■ Near address - Searches in the vicinity of the entered address
■ Select on map - Searches in the vicinity of the entered map point
The displayed menu items, in the search area by address entry, can be
changed.
The menu items in the search area by map point entry are for information only
and cannot be changed.
Touch
3
or
4
» Fig. 43 on page 58 to start the POI search for the selected
search area.
ABCDEFGPOI categories
Introduction
This chapter contains information on the following subjects:
Car and travel
60
Dining and shopping
61
Businesses and public facilities
61
Emergencies
61
Attractions and leisure
61
Other destinations displayed in the map
61
First and foremost, pay attention to the safety instructions » page 4 , Impor-
tant notes .
The map screen can display symbols for the destination type name.
■ Select all - Displays a list of all destinations in the search area, with the near-
est POI listed at the top
■ Categories (alphabetical) - Displays all POI categories in alphabetical order
■ Car and travel
■ Dining and shopping
■ Companies and public services
■ Emergencies
■ Attractions and leisure
Car and travel
Sym-
bolMeaning SymbolMeaningBus stops Petrol stationsLPG filling stations Natural gas stationsMotorway intersections Motorway junctionsHotels and motels Border crossingsAirports Railway stationsMotorway services Car parksCar rental Skoda dealersSkoda service Ferries and motorail trainsTourist information 60Navigation
Page 67 of 83
■ - zoom out window with described traffic obstruction
■ - show previous traffic information
■ - show the following traffic information
■ - display list of all received traffic messages
My tour
Introduction
This chapter contains information on the following subjects:
New tour
65
Tour editing
65
Tour memory
65
First and foremost, pay attention to the safety instructions » page 4 , Impor-
tant notes .
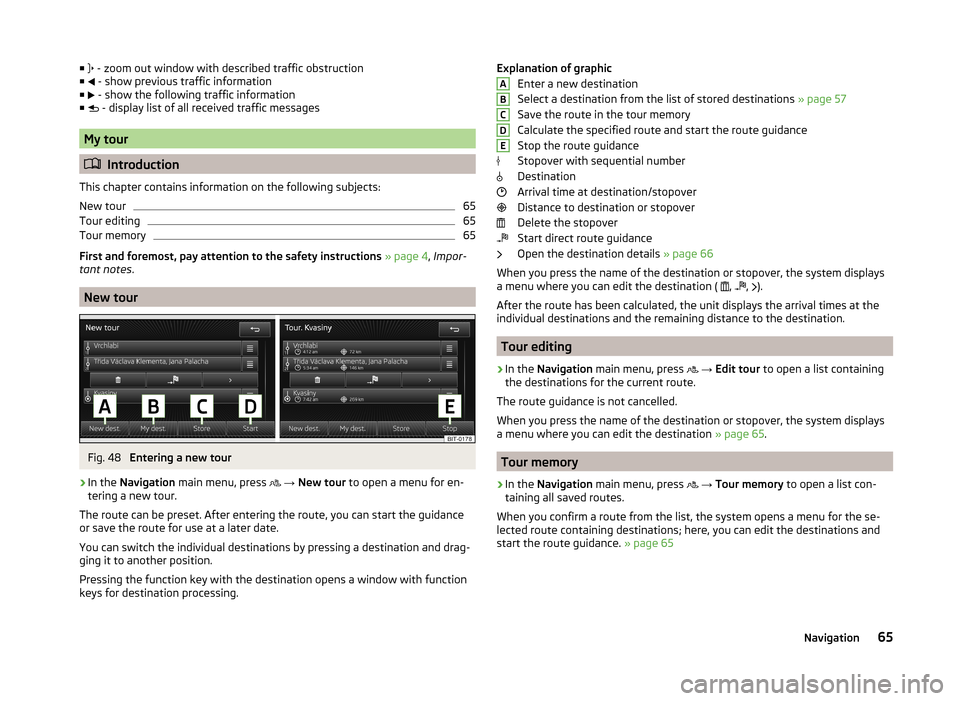
New tour
Fig. 48
Entering a new tour
›
In the Navigation main menu, press
→ New tour to open a menu for en-
tering a new tour.
The route can be preset. After entering the route, you can start the guidance or save the route for use at a later date.
You can switch the individual destinations by pressing a destination and drag- ging it to another position.
Pressing the function key with the destination opens a window with function
keys for destination processing.
Explanation of graphic
Enter a new destination
Select a destination from the list of stored destinations » page 57
Save the route in the tour memory
Calculate the specified route and start the route guidance
Stop the route guidance
Stopover with sequential number
Destination
Arrival time at destination/stopover
Distance to destination or stopover
Delete the stopover
Start direct route guidance
Open the destination details » page 66
When you press the name of the destination or stopover, the system displays
a menu where you can edit the destination ( ,
,
).
After the route has been calculated, the unit displays the arrival times at the
individual destinations and the remaining distance to the destination.
Tour editing
›
In the Navigation main menu, press
→ Edit tour to open a list containing
the destinations for the current route.
The route guidance is not cancelled.
When you press the name of the destination or stopover, the system displays
a menu where you can edit the destination » page 65.
Tour memory
›
In the Navigation main menu, press
→ Tour memory to open a list con-
taining all saved routes.
When you confirm a route from the list, the system opens a menu for the se-
lected route containing destinations; here, you can edit the destinations and
start the route guidance. » page 65
ABCDE65Navigation
Page 68 of 83
Destination management
Introduction
This chapter contains information on the following subjects:
Stopover
66
n details
66
First and foremost, pay attention to the safety instructions » page 4 , Impor-
tant notes .
Stopover
It is possible to add up to ten stopovers to the route during route guidance.
The route guidance is according to the sequence of the stopovers on the
route. After the next stopover has been reached, route guidance to the follow-
ing stopover continues.
›
In the Navigation main menu, press
New dest./stopover a menu opens for
entering a new destination » page 55 and then in the next step a menu for
destination details » page 66.
If the route guidance is active, then after confirming with Start the device
shows after entering the stopover the message, Route guidance is already ac-
tive. Do you want to start route guidance directly to the new destination or
add the new destination as a stopover? and the following points » Fig. 48 on
page 65 :
■ Cancel - the stopover destination input and the destination guidance to the
original destination is continued
■ Stopover - the destination entered is added to the route and guidance to
this destination is initially provided
■ Start - the destination entered is added as the final destination and the orig-
inal final destination is replaced by this new destination
After reaching the maximum number of ten stopover destinations one of the stopover destinations is to be deleted in order to enter the next destination.
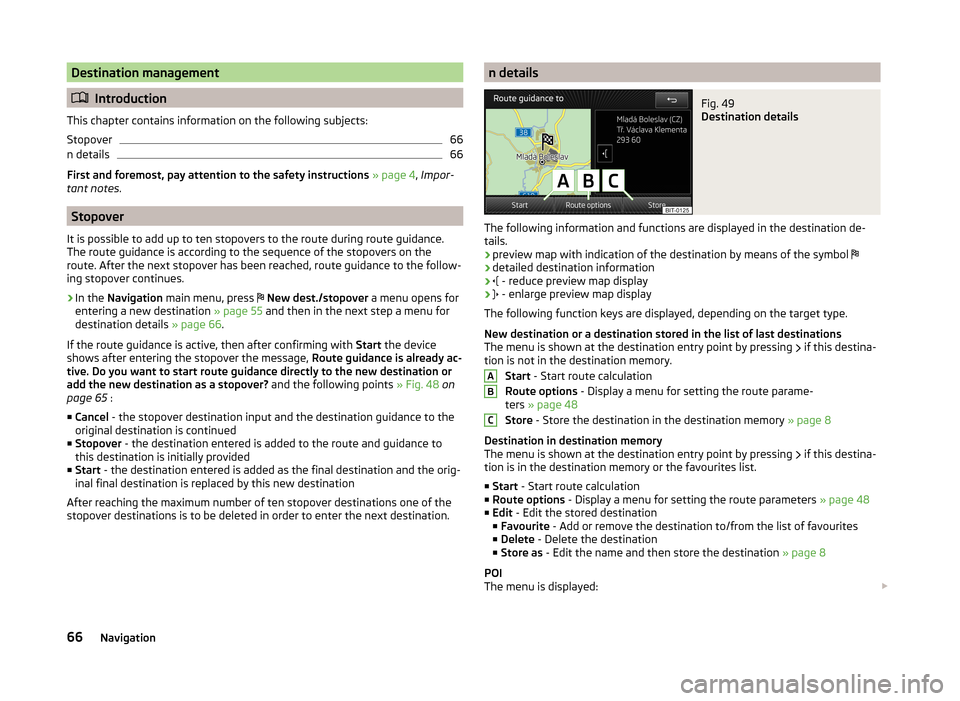
n detailsFig. 49
Destination details
The following information and functions are displayed in the destination de-
tails.
› preview map with indication of the destination by means of the symbol
› detailed destination information
›
- reduce preview map display
›
- enlarge preview map display
The following function keys are displayed, depending on the target type.
New destination or a destination stored in the list of last destinations
The menu is shown at the destination entry point by pressing if this destina-
tion is not in the destination memory.
Start - Start route calculation
Route options - Display a menu for setting the route parame-
ters » page 48
Store - Store the destination in the destination memory » page 8
Destination in destination memory
The menu is shown at the destination entry point by pressing if this destina-
tion is in the destination memory or the favourites list.
■ Start - Start route calculation
■ Route options - Display a menu for setting the route parameters » page 48
■ Edit - Edit the stored destination
■ Favourite - Add or remove the destination to/from the list of favourites
■ Delete - Delete the destination
■ Store as - Edit the name and then store the destination » page 8
POI
The menu is displayed:
ABC66Navigation
Page 72 of 83
■Convenience consumers - Displays up to three consumers which have the
largest share of fuel consumption (such as air conditioning) and displays the
fuel consumption to run all convenience systems
■ Vehicle status - Displays vehicle status » Fig. 51 or tyre pressure monitoring
information
■ Vehicle status - Displays vehicle status information
■ - No message /
- warning messages relating to vehicle status or
number of messages (if there is only one message, one warning message
text is displayed)
■ - Display information about the status of the START-STOP system
■ TPMS - Tyre pressure monitoring function » Fig. 52
■ SET - Storage of the tire pressure values
Switching between the individual menus can be done by using the function
keys
.
Note
After pressing the button, the view from the menu last displayed is shown
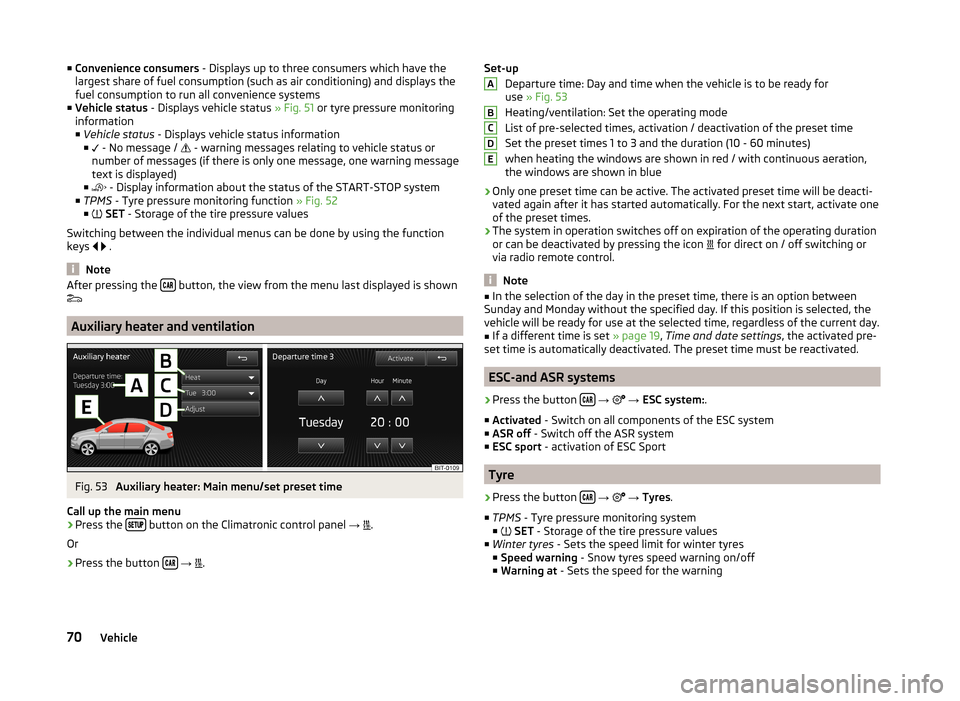
Auxiliary heater and ventilation
Fig. 53
Auxiliary heater: Main menu/set preset time
Call up the main menu
›
Press the button on the Climatronic control panel
→
.
Or
›
Press the button
→
.
Set-up
Departure time: Day and time when the vehicle is to be ready for
use » Fig. 53
Heating/ventilation: Set the operating mode
List of pre-selected times, activation / deactivation of the preset time
Set the preset times 1 to 3 and the duration (10 - 60 minutes) when heating the windows are shown in red / with continuous aeration,the windows are shown in blue
› Only one preset time can be active. The activated preset time will be deacti-
vated again after it has started automatically. For the next start, activate one
of the preset times.
› The system in operation switches off on expiration of the operating duration
or can be deactivated by pressing the icon for direct on / off switching or
via radio remote control.
Note
■ In the selection of the day in the preset time, there is an option between
Sunday and Monday without the specified day. If this position is selected, the
vehicle will be ready for use at the selected time, regardless of the current day.■
If a different time is set » page 19, Time and date settings , the activated pre-
set time is automatically deactivated. The preset time must be reactivated.
ESC-and ASR systems
›
Press the button
→
→ ESC system: .
■ Activated - Switch on all components of the ESC system
■ ASR off - Switch off the ASR system
■ ESC sport - activation of ESC Sport
Tyre
›
Press the button
→
→ Tyres .
■ TPMS - Tyre pressure monitoring system
■
SET - Storage of the tire pressure values
■ Winter tyres - Sets the speed limit for winter tyres
■ Speed warning - Snow tyres speed warning on/off
■ Warning at - Sets the speed for the warning
ABCDE70Vehicle
Page 80 of 83
Emergencies61
Other destinations61
proactive passenger protection71
R
Radio
21
Automatic scan22
DAB - settings25
FM - settings24
List of available stations22
Main menu21
Multifunction steering wheel9
Operation21
Preface21
Radio station store22
Search22
Settings24
Station logo23
Traffic programme (TP)23
Voice control13
Radio station Automatic scan
22
Logo23
Search22
Store22
Radio station logo23
Radio station search22
Radio station store22
Route63
Route calculation62
Route guidance61
Route info.63
Route list63
Route options48
S
Saved destinations
57
Scan Media
28
Screen5, 18
SD memory card32
Search area59
Select in the map56
Seats Settings
72
Select frequency range See main menu
21
Select input source Media
26
Selection of travel mode68
Select radio channel See main menu
21
Select source Images
36
Select video source34
Semi-automatic station scan22
Settings Additional keyboard languages
19
Bluetooth20
DAB25
Driving mode68
DVD video35
FM24
Images36
Keyboard19
Language17
Manage favourites43
Media28
Menus17
Navigation48
Radio24
Restore factory settings20
Screen18
Sound18
Telephone39
Time and date19
Unit17
Units19
User profile43
Voice control20
Volume6
Setting vehicle systems Auxiliary heater and ventilation
70
Parking and manoeuvring71
Restore factory settings73
Setup17
Set vehicle systems Assistance systems
71
Tyre70
Sound18
Source29
Speed limit for snow tyres70
START-STOP69
Station See main menu
21
Status line7
Stopover65, 66
Switching off Volume
6
Switching the unit off6
Switching the unit on6
Synchronous adjustment of both mirrors72
T
Telephone
37
Bluetooth profile40
Conference46
Connect to the device40
Disconnection43
Fast connection42
Functions43
Main menu38
Multifunction steering wheel11
On screen messages38
Pairing41
Select telephone42
Settings39
Telephone conference46
78Index