ignition SKODA OCTAVIA 2016 3.G / (5E) Manual PDF
[x] Cancel search | Manufacturer: SKODA, Model Year: 2016, Model line: OCTAVIA, Model: SKODA OCTAVIA 2016 3.G / (5E)Pages: 324, PDF Size: 48.85 MB
Page 254 of 324
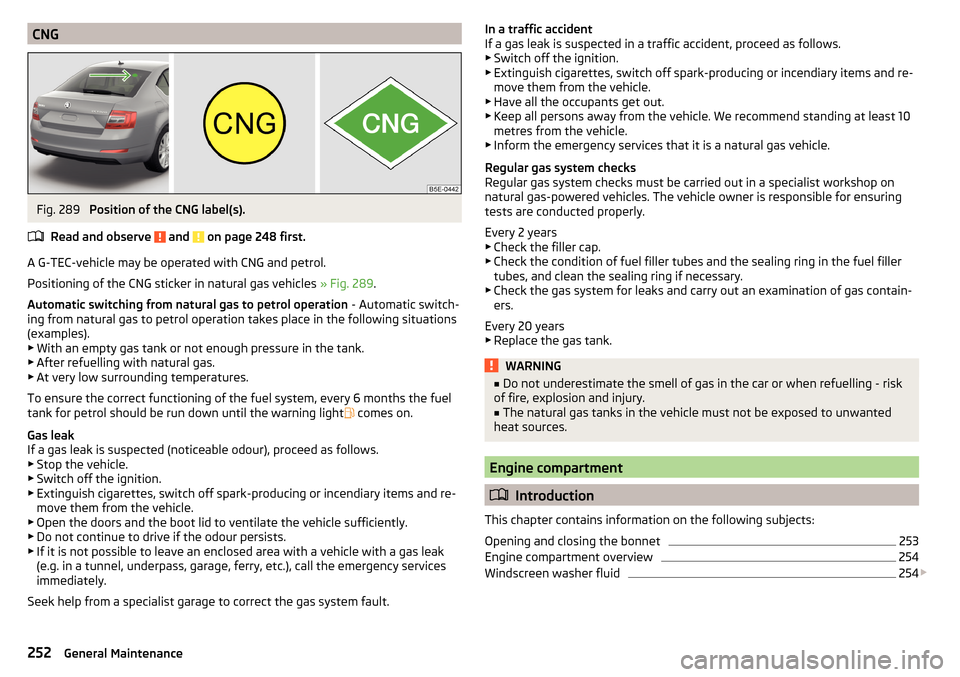
CNGFig. 289
Position of the CNG label(s).
Read and observe
and on page 248 first.
A G-TEC-vehicle may be operated with CNG and petrol.
Positioning of the CNG sticker in natural gas vehicles » Fig. 289.
Automatic switching from natural gas to petrol operation - Automatic switch-
ing from natural gas to petrol operation takes place in the following situations
(examples). ▶ With an empty gas tank or not enough pressure in the tank.
▶ After refuelling with natural gas.
▶ At very low surrounding temperatures.
To ensure the correct functioning of the fuel system, every 6 months the fuel tank for petrol should be run down until the warning light comes on.
Gas leak
If a gas leak is suspected (noticeable odour), proceed as follows. ▶ Stop the vehicle.
▶ Switch off the ignition.
▶ Extinguish cigarettes, switch off spark-producing or incendiary items and re-
move them from the vehicle.
▶ Open the doors and the boot lid to ventilate the vehicle sufficiently.
▶ Do not continue to drive if the odour persists.
▶ If it is not possible to leave an enclosed area with a vehicle with a gas leak
(e.g. in a tunnel, underpass, garage, ferry, etc.), call the emergency services
immediately.
Seek help from a specialist garage to correct the gas system fault.
In a traffic accident
If a gas leak is suspected in a traffic accident, proceed as follows.
▶ Switch off the ignition.
▶ Extinguish cigarettes, switch off spark-producing or incendiary items and re-
move them from the vehicle.
▶ Have all the occupants get out.
▶ Keep all persons away from the vehicle. We recommend standing at least 10
metres from the vehicle.
▶ Inform the emergency services that it is a natural gas vehicle.
Regular gas system checks
Regular gas system checks must be carried out in a specialist workshop on
natural gas-powered vehicles. The vehicle owner is responsible for ensuring
tests are conducted properly.
Every 2 years ▶ Check the filler cap.
▶ Check the condition of fuel filler tubes and the sealing ring in the fuel filler
tubes, and clean the sealing ring if necessary.
▶ Check the gas system for leaks and carry out an examination of gas contain-
ers.
Every 20 years ▶ Replace the gas tank.WARNING■ Do not underestimate the smell of gas in the car or when refuelling - risk
of fire, explosion and injury.■
The natural gas tanks in the vehicle must not be exposed to unwanted
heat sources.
Engine compartment
Introduction
This chapter contains information on the following subjects:
Opening and closing the bonnet
253
Engine compartment overview
254
Windscreen washer fluid
254
252General Maintenance
Page 255 of 324
WARNINGNever cover the engine with additional insulation material (e.g. with a blan-
ket) – risk of fire!WARNINGWhen working in the engine compartment, the following instructions must
be observed - otherwise risk of injury or fire. The engine compartment of
your car is a hazardous area!WARNINGInstructions before beginning work in the engine compartment■Stop the engine and remove the ignition key, on vehicles with the KESSY
system, open the driver's door.■
Firmly apply the handbrake.
■
For vehicles with manual transmission the lever into the neutral position.
For vehicles with automatic transmission , place the selector lever in the P
position.
■
Allow the engine to cool.
■
Never open the bonnet if you can see steam or coolant flowing out of the
engine compartment – risk of scalding! Wait until the steam or coolant has
stopped escaping.
WARNINGInformation for working in the engine compartment■Keep everyone away from the engine compartment.■
Do not touch any hot engine parts – risk of burns!
■
Never touch the radiator fan. The radiator fan may still turn suddenly
about 10 minutes after switching off the ignition!
■
Do not smoke in the vicinity of the engine and avoid the use of open
flames or sparks.
■
Do not leave any items (e.g. cloths or tools) in the engine compartment.
This presents a fire hazard and the risk of engine damage.
■
Read the information and warning instructions on the fluid containers.
WARNINGInformation for working in the engine compartment with the engine run-
ning■
If it is necessary to work on the engine with the engine running, beware
of rotating engine parts and electrical plants - There is a risk to life!
■
Never touch the electric wiring on the ignition system.
■
Avoid short circuits in the electrical system, particularly on the vehicle's
battery.
CAUTION
Only refill using fluids with the proper specification - There is risk of damage to
the vehicle!
Note
■ Fluids with the proper specifications can be purchased from the ŠKODA Origi-
nal Accessories or from the ŠKODA Genuine Parts ranges.■
We recommend you have the operating fluids replaced by a specialist garage.
Opening and closing the bonnet
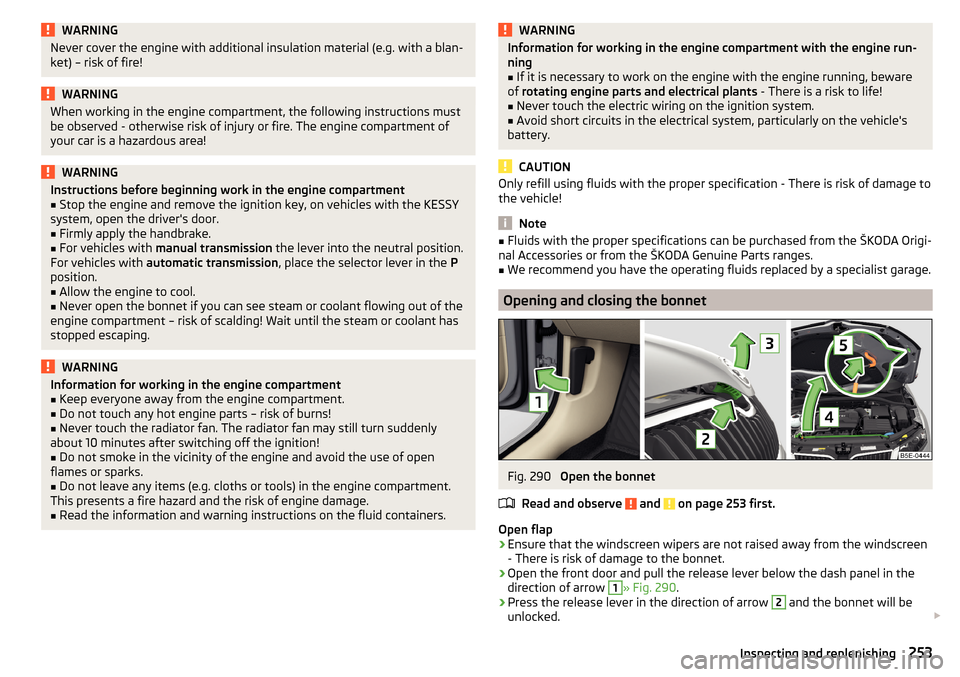
Fig. 290
Open the bonnet
Read and observe
and on page 253 first.
Open flap
›
Ensure that the windscreen wipers are not raised away from the windscreen
- There is risk of damage to the bonnet.
›
Open the front door and pull the release lever below the dash panel in the
direction of arrow
1
» Fig. 290 .
›
Press the release lever in the direction of arrow
2
and the bonnet will be
unlocked.
253Inspecting and replenishing
Page 261 of 324
CAUTIONEnsure that battery acid does not come into contact with the bodywork –
There is a risk of damage to the vehicle.
Note
■ We recommend having all work on the vehicle battery carried out by a spe-
cialist garage.■
You should replace batteries older than 5 years.
Check condition
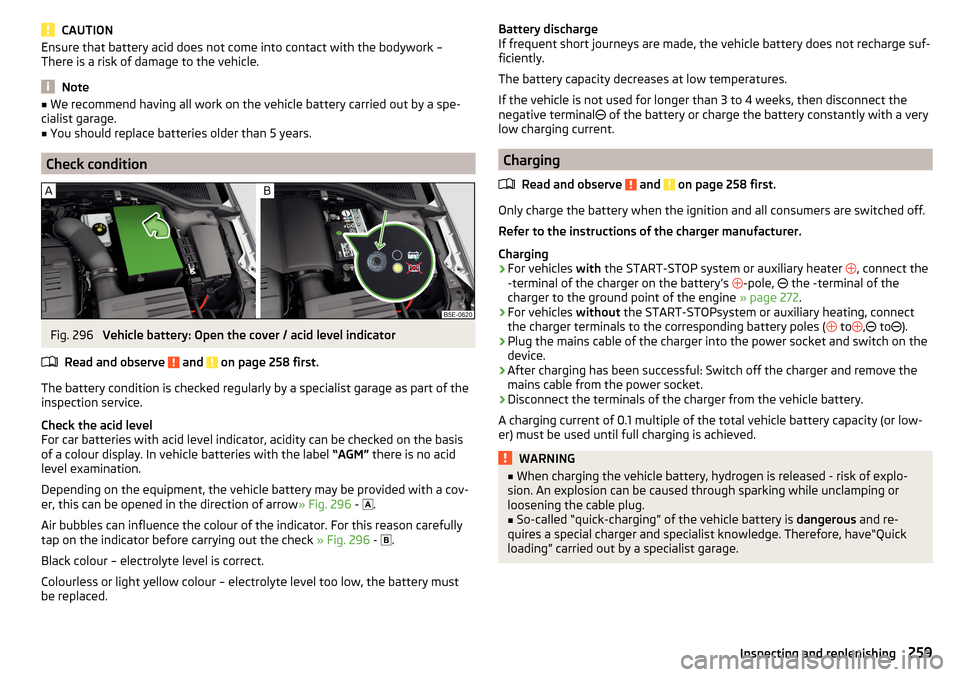
Fig. 296
Vehicle battery: Open the cover / acid level indicator
Read and observe
and on page 258 first.
The battery condition is checked regularly by a specialist garage as part of the
inspection service.
Check the acid level
For car batteries with acid level indicator, acidity can be checked on the basis
of a colour display. In vehicle batteries with the label “AGM” there is no acid
level examination.
Depending on the equipment, the vehicle battery may be provided with a cov-
er, this can be opened in the direction of arrow » Fig. 296 -
.
Air bubbles can influence the colour of the indicator. For this reason carefully
tap on the indicator before carrying out the check » Fig. 296 -
.
Black colour – electrolyte level is correct.
Colourless or light yellow colour – electrolyte level too low, the battery must be replaced.
Battery discharge
If frequent short journeys are made, the vehicle battery does not recharge suf- ficiently.
The battery capacity decreases at low temperatures.
If the vehicle is not used for longer than 3 to 4 weeks, then disconnect the
negative terminal
of the battery or charge the battery constantly with a very
low charging current.
Charging
Read and observe
and on page 258 first.
Only charge the battery when the ignition and all consumers are switched off.
Refer to the instructions of the charger manufacturer.
Charging
›
For vehicles with the START-STOP system or auxiliary heater
, connect the
-terminal of the charger on the battery’s -pole,
the -terminal of the
charger to the ground point of the engine » page 272.
›
For vehicles without the START-STOPsystem or auxiliary heating, connect
the charger terminals to the corresponding battery poles ( to
,
to
).
›
Plug the mains cable of the charger into the power socket and switch on the
device.
›
After charging has been successful: Switch off the charger and remove the
mains cable from the power socket.
›
Disconnect the terminals of the charger from the vehicle battery.
A charging current of 0.1 multiple of the total vehicle battery capacity (or low-
er) must be used until full charging is achieved.
WARNING■ When charging the vehicle battery, hydrogen is released - risk of explo-
sion. An explosion can be caused through sparking while unclamping or
loosening the cable plug.■
So-called “quick-charging” of the vehicle battery is dangerous and re-
quires a special charger and specialist knowledge. Therefore, have“Quick
loading” carried out by a specialist garage.
259Inspecting and replenishing
Page 262 of 324
Disconnect/reconnect and changeRead and observe
and on page 258 first.
The new vehicle battery must have the same capacity, voltage, current and
size as the original battery.
We recommend you have the battery replaced by a specialist garage.
›
To disconnect , switch off the ignition and disconnect the negative terminal
first
, then disconnect the positive terminal
.
›
When reconnecting the battery, reconnect the positive terminal first
, then
connect the negative terminal
.
After disconnecting and re-connecting the vehicle battery, the following func- tions or devices are partially or completely inoperative.
Function / deviceOperating measurePower windows» page 61Panorama sliding/tilting roof» page 62Sun screen» page 63Time settings» page 42
CAUTION
■ Disconnect the battery only with the ignition and consumers turned off -
There is a risk of damaging the electrical system of the vehicle.■
Before disconnecting the battery, close the electric tailgate, all the windows,
the sliding / tilting roof and the electric sunshade - otherwise malfunctions of
equipment elements may occur.
■
Under no circumstances mix up the charging cables – There is a risk of fire.
Note
After disconnecting and reconnecting the vehicle battery, we recommend hav-
ing the vehicle checked by a specialist to ensure that the full functionality of
the vehicle is guaranteed.Wheels
Wheels and tyres
Introduction
This chapter contains information on the following subjects:
Advice on tyre/wheel usage
260
Tyre pressure
261
Tire wear and wheel change
262
Spare wheel
262
Spare wheel
262
Tyre marking
263
Advice on tyre/wheel usage
During the first 500 km, new tyres do not offer optimum grip; appropriate care
should therefore be taken when driving.
Tyres with the deeper profiles should always be fitted to the front wheels.
Rims and wheel bolts are matched to each other in terms of design. We rec-
ommend that you use rims and wheel bolts from ŠKODA Original Accessories.
Wheels and tyres should always be stored in a cool, dry and dark place. The
tyres themselves should be stored vertically.
Tyre life
Tyres age losing their original characteristics, even if they are not used. We
recommend that you do not use tyres that are more than 6 years old.
The manufacturing date is indicated on the tyre sidewall (possibly on the in-
side ). For example, DOT ... 10 16... means, for example, that the tyre was manu-
factured in the 10. week of 2016.
Tyre damage
We recommend checking your tyres and wheel rims for damage (punctures,
cuts, splits and bulges etc.) on a regular basis.
Remove any foreign objects in the tyre’s profile immediately (e.g. small stones).
Foreign bodies which have penetrated into the tyre (e.g. screws or nails)
should not be removed and help should be sought from a specialist garage.
260General Maintenance
Page 275 of 324
WARNING■Never clamp the jump cable to the negative terminal of the discharged
battery - There is a risk of explosion.■
The non-insulated parts of the terminal clamps must never touch each
other – risk of short circuit!
■
The jump-start cable connected to the positive terminal of the battery
must not come into contact with electrically conducting parts of the vehicle
– risk of short circuit!
■
Position the jump cables so that they cannot be caught in rotating parts
in the engine compartment - danger of injuries and the risk of vehicle dam-
age.
Towing the vehicle
Information about the towing process
Fig. 311
Braided tow ropes/spiral tow rope
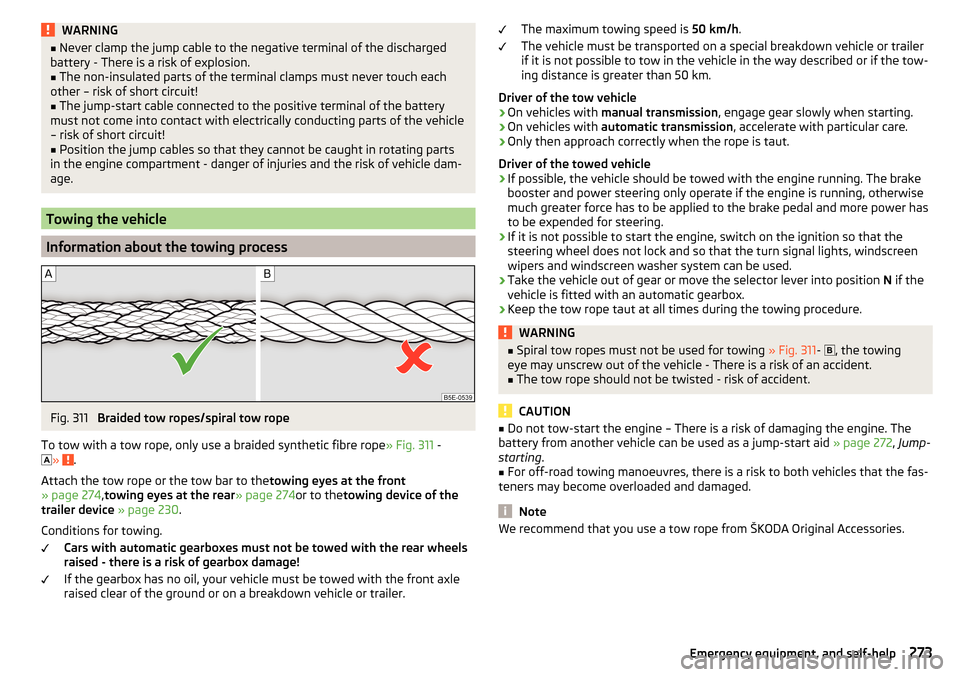
To tow with a tow rope, only use a braided synthetic fibre rope » Fig. 311 -
»
.
Attach the tow rope or the tow bar to the towing eyes at the front
» page 274 ,towing eyes at the rear » page 274or to thetowing device of the
trailer device » page 230 .
Conditions for towing. Cars with automatic gearboxes must not be towed with the rear wheels
raised - there is a risk of gearbox damage!
If the gearbox has no oil, your vehicle must be towed with the front axle
raised clear of the ground or on a breakdown vehicle or trailer.
The maximum towing speed is 50 km/h.
The vehicle must be transported on a special breakdown vehicle or trailer
if it is not possible to tow in the vehicle in the way described or if the tow-
ing distance is greater than 50 km.
Driver of the tow vehicle›
On vehicles with manual transmission , engage gear slowly when starting.
›
On vehicles with automatic transmission , accelerate with particular care.
›
Only then approach correctly when the rope is taut.
Driver of the towed vehicle
›
If possible, the vehicle should be towed with the engine running. The brake
booster and power steering only operate if the engine is running, otherwise
much greater force has to be applied to the brake pedal and more power has
to be expended for steering.
›
If it is not possible to start the engine, switch on the ignition so that the
steering wheel does not lock and so that the turn signal lights, windscreen
wipers and windscreen washer system can be used.
›
Take the vehicle out of gear or move the selector lever into position N if the
vehicle is fitted with an automatic gearbox.
›
Keep the tow rope taut at all times during the towing procedure.
WARNING■ Spiral tow ropes must not be used for towing » Fig. 311- , the towing
eye may unscrew out of the vehicle - There is a risk of an accident.■
The tow rope should not be twisted - risk of accident.
CAUTION
■ Do not tow-start the engine – There is a risk of damaging the engine. The
battery from another vehicle can be used as a jump-start aid » page 272, Jump-
starting .■
For off-road towing manoeuvres, there is a risk to both vehicles that the fas-
teners may become overloaded and damaged.
Note
We recommend that you use a tow rope from ŠKODA Original Accessories.273Emergency equipment, and self-help
Page 279 of 324
›Insert a screwdriver or similar tool into the recess or the opening in the
trim » Fig. 319 as far as the stop.›
Unlock the lid by moving it in the direction of the arrow.
Selector lever-emergency unlocking
Fig. 320
Remove / release the selector lever
›
Firmly apply the handbrake.
›
Open the stowage compartment in the front centre console.
›
Grab hold of the cover
A
in the area of the arrows and carefully raise it for-
wards in the direction of the arrow
1
and then backwards » Fig. 320.
›
Press on the yellow plastic part in the direction of arrow
2
, simultaneously
press the lock button in the selector lever handle and put the lever in posi-
tion N.
If the selector lever is moved again to position P, it is once again blocked.
CAUTION
Make sure when lifting not to damage cover parts by the screwdriver in the
shift lever environment.
Replacing windscreen wiper blades
Introduction
This chapter contains information on the following subjects:
Replacing the windscreen wiper blades
277
Replacing the rear window wiper blade
278WARNINGReplace the windscreen wiper blades once or twice a year for safety rea-
sons.
Replacing the windscreen wiper blades
Fig. 321
Setting the service position for
the wiper arms
Fig. 322
Changing the front windscreen wiper blade
Read and observe
on page 277 first.
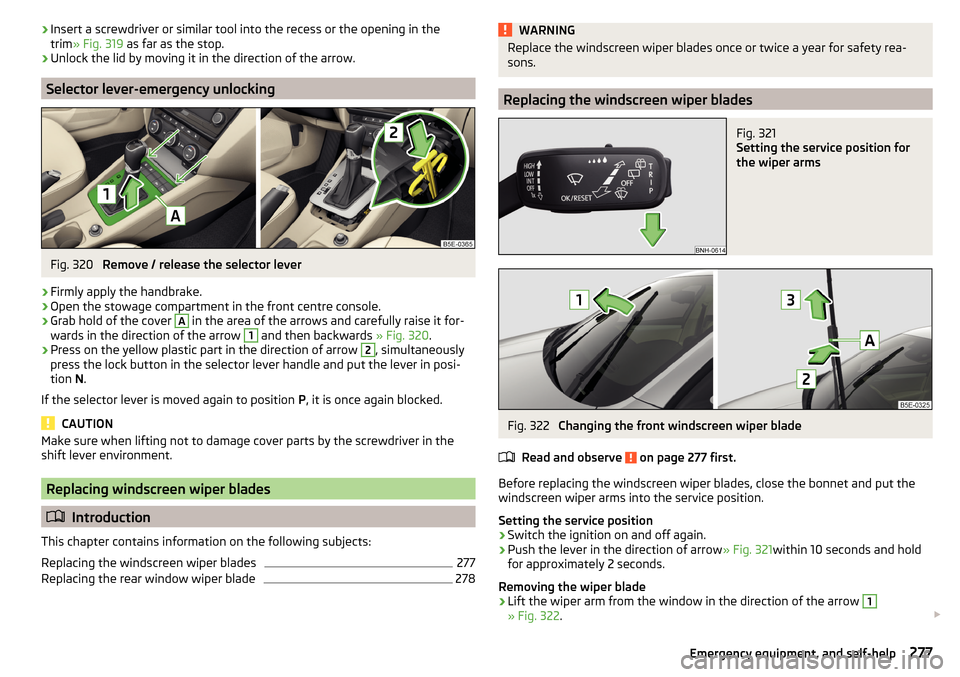
Before replacing the windscreen wiper blades, close the bonnet and put the windscreen wiper arms into the service position.
Setting the service position
›
Switch the ignition on and off again.
›
Push the lever in the direction of arrow » Fig. 321within 10 seconds and hold
for approximately 2 seconds.
Removing the wiper blade
›
Lift the wiper arm from the window in the direction of the arrow
1
» Fig. 322 .
277Emergency equipment, and self-help
Page 280 of 324

›Tilt the wiper blade to the stop in the same direction.›Grip the wiper arm and press securing latch A down in the direction of arrow2
.
›
Remove the wiper blade in the direction of the arrow
3
.
Attaching the windscreen wiper blade
›
Slide the windscreen wiper blade in the opposite direction to arrow
3
until it
locks into place. Check that the windscreen wiper blade is correctly attached.
›
Fold the windscreen wiper arm back to the windscreen.
›
Turn on the ignition and press the lever in the direction of the arrow
» Fig. 321 .
The windscreen wiper arms move into the home position.
Replacing the rear window wiper blade
Fig. 323
Changing the rear window wiper blade
Read and observe
on page 277 first.
Removing the wiper blade
›
Lift the wiper arm from the window in the direction of the arrow
1
» Fig. 323 .
›
Tilt the wiper blade to the stop in the same direction.
›
Grip the wiper arm and press securing latch
A
down in the direction of arrow
2
.
›
Remove the wiper blade in the direction of the arrow
3
.
Attaching the windscreen wiper blade
›
Slide the windscreen wiper blade in the opposite direction to arrow
3
until it
locks into place. Check that the windscreen wiper blade is correctly attached.
›
Fold the windscreen wiper arm back to the windscreen.
Fuses and light bulbs
Fuses
Introduction
Fig. 324
Blown fuse
This chapter contains information on the following subjects:
Fuses in the dashboard - LHD
279
Fuses in the dashboard - RHD
279
Fuse assignment in the dashboard
280
Fuses in the engine compartment
281
Fuse assignment in engine compartment
281
Individual electrical circuits are protected by fuses. A blown fuse is recognisa-
ble from the melted-through metal strip » Fig. 324.
WARNINGAlways read and observe the warnings before completing any work in the
engine compartment » page 252.
CAUTION
■
Replace the faulty fuse with a new one of the same amperage.■If a newly inserted fuse again blows after a short time, then seek assistance
from a specialist garage.■
“Do not repair” the fuses and do not replace them with stronger fuses -
There is a risk of fire and damage to another electrical system.
Note
■ We recommend always carrying replacement fuses in the vehicle.■There can be several power consuming devices for one fuse. Multiple fuses
may exist for a single power consuming device.278Do-it-yourself
Page 281 of 324
Fuses in the dashboard - LHDFig. 325
Storage compartment on the
driver's side
Read and observe and on page 278 first.
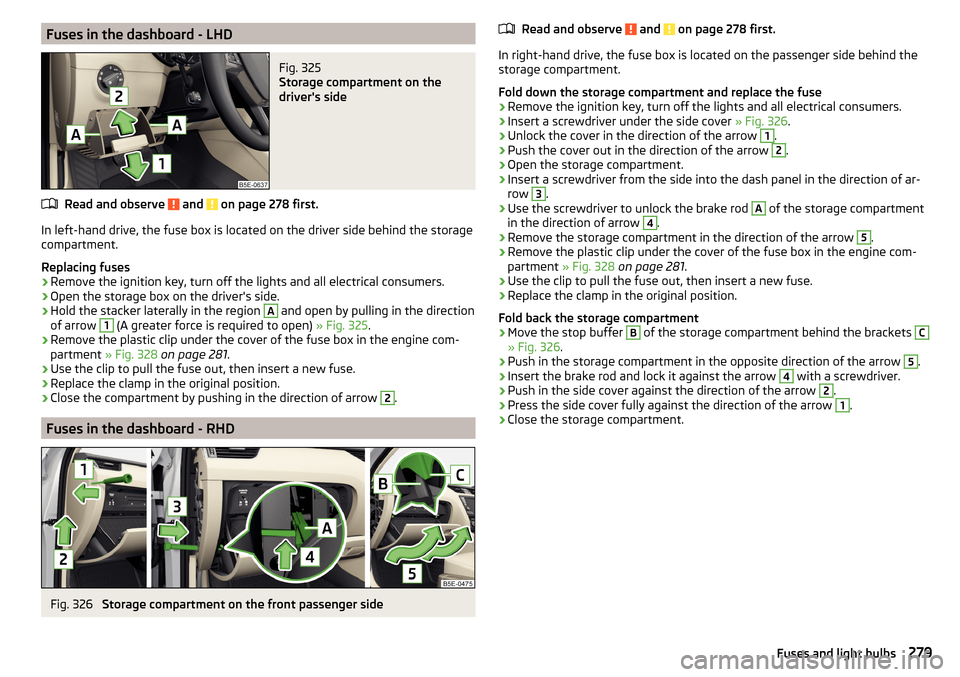
In left-hand drive, the fuse box is located on the driver side behind the storage
compartment.
Replacing fuses
›
Remove the ignition key, turn off the lights and all electrical consumers.
›
Open the storage box on the driver's side.
›
Hold the stacker laterally in the region
A
and open by pulling in the direction
of arrow
1
(A greater force is required to open) » Fig. 325.
›
Remove the plastic clip under the cover of the fuse box in the engine com-
partment » Fig. 328 on page 281 .
›
Use the clip to pull the fuse out, then insert a new fuse.
›
Replace the clamp in the original position.
›
Close the compartment by pushing in the direction of arrow
2
.
Fuses in the dashboard - RHD
Fig. 326
Storage compartment on the front passenger side
Read and observe and on page 278 first.
In right-hand drive, the fuse box is located on the passenger side behind the
storage compartment.
Fold down the storage compartment and replace the fuse
›
Remove the ignition key, turn off the lights and all electrical consumers.
›
Insert a screwdriver under the side cover » Fig. 326.
›
Unlock the cover in the direction of the arrow
1
.
›
Push the cover out in the direction of the arrow
2
.
›
Open the storage compartment.
›
Insert a screwdriver from the side into the dash panel in the direction of ar-
row
3
.
›
Use the screwdriver to unlock the brake rod
A
of the storage compartment
in the direction of arrow
4
.
›
Remove the storage compartment in the direction of the arrow
5
.
›
Remove the plastic clip under the cover of the fuse box in the engine com-
partment » Fig. 328 on page 281 .
›
Use the clip to pull the fuse out, then insert a new fuse.
›
Replace the clamp in the original position.
Fold back the storage compartment
›
Move the stop buffer
B
of the storage compartment behind the brackets
C
» Fig. 326 .
›
Push in the storage compartment in the opposite direction of the arrow
5
.
›
Insert the brake rod and lock it against the arrow
4
with a screwdriver.
›
Push in the side cover against the direction of the arrow
2
.
›
Press the side cover fully against the direction of the arrow
1
.
›
Close the storage compartment.
279Fuses and light bulbs
Page 283 of 324
No.Consumer50Opening the boot lid51Multi-function unit for taxi vehicles52Voltage stabiliser for taxi vehicles53Rear window heating
Fuses in the engine compartment
Fig. 328
Fuse panel cover: Removing cover / plastic clip for fuses
Read and observe
and on page 278 first.
Replacing fuses
›
Remove the ignition key, turn off the lights and all electrical consumers.
›
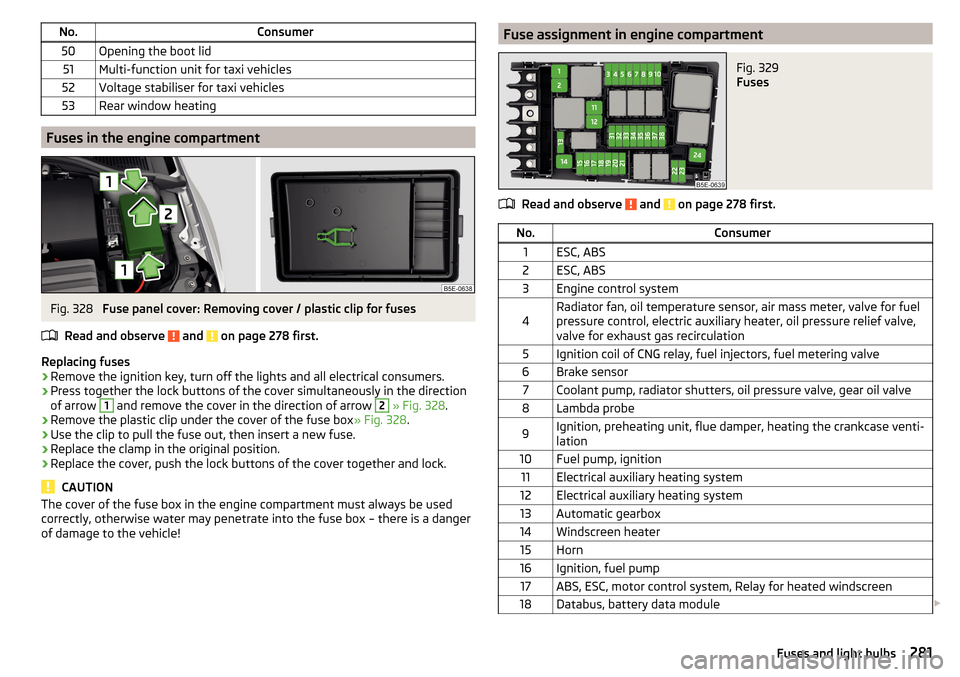
Press together the lock buttons of the cover simultaneously in the direction
of arrow
1
and remove the cover in the direction of arrow
2
» Fig. 328 .
›
Remove the plastic clip under the cover of the fuse box » Fig. 328.
›
Use the clip to pull the fuse out, then insert a new fuse.
›
Replace the clamp in the original position.
›
Replace the cover, push the lock buttons of the cover together and lock.
CAUTION
The cover of the fuse box in the engine compartment must always be used
correctly, otherwise water may penetrate into the fuse box – there is a danger
of damage to the vehicle!Fuse assignment in engine compartmentFig. 329
Fuses
Read and observe and on page 278 first.
No.Consumer1ESC, ABS2ESC, ABS3Engine control system4Radiator fan, oil temperature sensor, air mass meter, valve for fuel
pressure control, electric auxiliary heater, oil pressure relief valve,
valve for exhaust gas recirculation5Ignition coil of CNG relay, fuel injectors, fuel metering valve6Brake sensor7Coolant pump, radiator shutters, oil pressure valve, gear oil valve8Lambda probe9Ignition, preheating unit, flue damper, heating the crankcase venti-
lation10Fuel pump, ignition11Electrical auxiliary heating system12Electrical auxiliary heating system13Automatic gearbox14Windscreen heater15Horn16Ignition, fuel pump17ABS, ESC, motor control system, Relay for heated windscreen18Databus, battery data module 281Fuses and light bulbs
Page 284 of 324
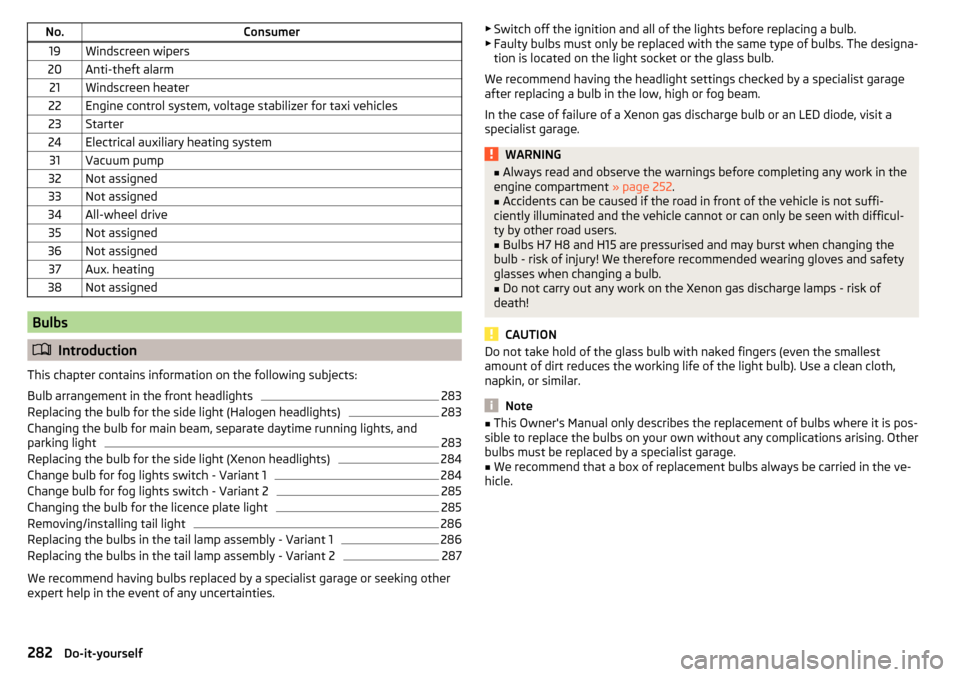
No.Consumer19Windscreen wipers20Anti-theft alarm21Windscreen heater22Engine control system, voltage stabilizer for taxi vehicles23Starter24Electrical auxiliary heating system31Vacuum pump32Not assigned33Not assigned34All-wheel drive35Not assigned36Not assigned37Aux. heating38Not assigned
Bulbs
Introduction
This chapter contains information on the following subjects:
Bulb arrangement in the front headlights
283
Replacing the bulb for the side light (Halogen headlights)
283
Changing the bulb for main beam, separate daytime running lights, and
parking light
283
Replacing the bulb for the side light (Xenon headlights)
284
Change bulb for fog lights switch - Variant 1
284
Change bulb for fog lights switch - Variant 2
285
Changing the bulb for the licence plate light
285
Removing/installing tail light
286
Replacing the bulbs in the tail lamp assembly - Variant 1
286
Replacing the bulbs in the tail lamp assembly - Variant 2
287
We recommend having bulbs replaced by a specialist garage or seeking other
expert help in the event of any uncertainties.
▶ Switch off the ignition and all of the lights before replacing a bulb.
▶ Faulty bulbs must only be replaced with the same type of bulbs. The designa-
tion is located on the light socket or the glass bulb.
We recommend having the headlight settings checked by a specialist garage after replacing a bulb in the low, high or fog beam.
In the case of failure of a Xenon gas discharge bulb or an LED diode, visit a
specialist garage.WARNING■ Always read and observe the warnings before completing any work in the
engine compartment » page 252.■
Accidents can be caused if the road in front of the vehicle is not suffi-
ciently illuminated and the vehicle cannot or can only be seen with difficul-
ty by other road users.
■
Bulbs H7 H8 and H15 are pressurised and may burst when changing the
bulb - risk of injury! We therefore recommended wearing gloves and safety
glasses when changing a bulb.
■
Do not carry out any work on the Xenon gas discharge lamps - risk of
death!
CAUTION
Do not take hold of the glass bulb with naked fingers (even the smallest
amount of dirt reduces the working life of the light bulb). Use a clean cloth,
napkin, or similar.
Note
■ This Owner's Manual only describes the replacement of bulbs where it is pos-
sible to replace the bulbs on your own without any complications arising. Other
bulbs must be replaced by a specialist garage.■
We recommend that a box of replacement bulbs always be carried in the ve-
hicle.
282Do-it-yourself