ESP SKODA OCTAVIA 2016 3.G / (5E) Owner's Manual
[x] Cancel search | Manufacturer: SKODA, Model Year: 2016, Model line: OCTAVIA, Model: SKODA OCTAVIA 2016 3.G / (5E)Pages: 324, PDF Size: 48.85 MB
Page 3 of 324
Preface
You have opted for a ŠKODA – our sincere thanks for your confidence in us.
The description of the vehicle operation, important information about safety,
vehicle care, maintenance and self-help, as well as technical vehicle data,
are included in this Owner's Manual.
Please read this Owner's Manual carefully, because the operation in accord-
ance with these instructions is a prerequisite for proper use of the vehicle.
When using the vehicle, the general binding country-specific legal require-
ments (e.g. transporting children, deactivating the airbag, tyre use, road traf-
fic, etc.) must always be observed.
Please always pay attention when driving! As the driver you are fully respon-
sible for road safety.
We hope you enjoy driving your ŠKODA, and wish you a pleasant journey at
all times.
Your ŠKODA AUTO 5E0012720AK
Page 8 of 324
▶Parts fitted on or in the vehicle, whose use has not been approved by ŠKODA
AUTO, or modification of the vehicle in a manner not approved by ŠKODA
AUTO (e.g. tuning).
▶ Damage caused by you that was not immediately seen to by a specialist ga-
rage or was not rectified properly.
It is the customer’s responsibility to prove that he/she is not the cause of the
damage.
This ŠKODA warranty does not affect the purchaser's statutory rights from ma-
terials defect liability from the vehicle vendor and other potential claims from
product liability laws.
Mobility warranty
The mobility warranty provides a sense of security when travelling in your ve-
hicle.
If your vehicle breaks down on the road due to an unexpected failure, services
to keep you moving are provided under the mobility guarantee, which include
the following services for you: Breakdown assistance at the roadside and tow-
ing to ŠKODA Service partners, technical assistance on the phone or on-site
commissioning.
If your vehicle is not repaired on the same day, the ŠKODA Service Partner may
provide further services as required, such as replacement transportation (bus,
train etc.) or a courtesy vehicle etc.
More information regarding terms and conditions for the provision of a mobility
warranty for your vehicle can be obtained from your ŠKODA Partner. They will
also provide you with detailed terms and conditions for the mobility warranty
with respect to your vehicle. In the event that there is no mobility warranty
coverage in place for your vehicle, you should check with any ŠKODA Service
Partner about the possibility of a supplementary agreement.
Optional ŠKODA extended warranty
If you opted for a ŠKODA extended warranty when purchasing your new car,
the two-year ŠKODA warranty with regards to all free warranty repairs is ex-
tended by the period you chose or until the chosen mileage limit has been
reached, whichever occurs first.
The paint warranty and the warranty against corrosion described above are
unaffected by the ŠKODA extended warranty.
The ŠKODA extended warranty does not apply to external and internal foils.
The information on the detailed conditions of the ŠKODA extended warranty is
provided by your ŠKODA partner.NoteThe ŠKODA extended warranty is only available in some countries.6Liability for defects and ŠKODA Warranty for new cars
Page 9 of 324
Printed Owner's Manual
In the printed Owner's Manual, the most important information relating to ve-
hicle operation is included. The Owner's Manual with further detailed informa- tion is available in the Online Version on ŠKODAweb pages » Fig. 1 on
page 8 .
This Owner's Manual applies to all body variants of the vehicle and all related
model versions as well as all equipment levels .
This Owner's Manual describes all possible equipment variants without identi-
fying them as special equipment, model variants or market-dependent equip-
ment variants. Consequently, this vehicle does not contain all of the equip-
ment components described in this Owner's Manual.
The range of equipment installed in your vehicle depends on the purchase
contract for the vehicle. For questions regarding the scope of equipment,
please contact a ŠKODA Partner.
The illustrations in this Owner's Manual are for illustrative purposes only. The
illustrations can differ in minor details from your vehicle; they are only inten-
ded to provide general information.
ŠKODA AUTO pursues a policy of ongoing product and model development
with all vehicles. Changes to the scope of delivery with regard to design,
equipment and technology are therefore possible at any time. The information
listed in this Owner's Manual corresponds to the information available at the
time of going to press.
Therefore legal claims cannot be made based on the technical data, illustra-
tions and information contained in this Owner's Manual.
We recommend that web pages that are referred to in this Owner's Manual are
displayed using the classic view. Not all necessary information may be dis-
played correctly if the mobile view is chosen.7Printed Owner's Manual
Page 23 of 324
Airbag deactivation
Introduction
This chapter contains information on the following subjects:
Deactivating airbags
21
Deactivating the front passenger airbag
21
Deactivating airbags
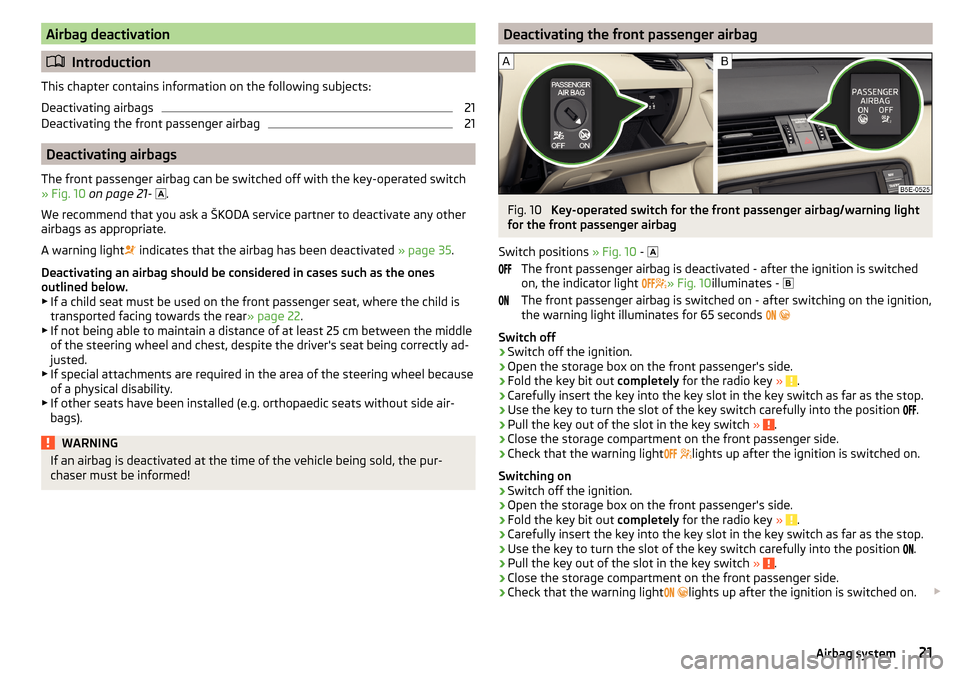
The front passenger airbag can be switched off with the key-operated switch
» Fig. 10 on page 21 -
.
We recommend that you ask a ŠKODA service partner to deactivate any other
airbags as appropriate.
A warning light indicates that the airbag has been deactivated
» page 35.
Deactivating an airbag should be considered in cases such as the ones
outlined below. ▶ If a child seat must be used on the front passenger seat, where the child is
transported facing towards the rear » page 22.
▶ If not being able to maintain a distance of at least 25 cm between the middle
of the steering wheel and chest, despite the driver's seat being correctly ad-
justed.
▶ If special attachments are required in the area of the steering wheel because
of a physical disability.
▶ If other seats have been installed (e.g. orthopaedic seats without side air-
bags).
WARNINGIf an airbag is deactivated at the time of the vehicle being sold, the pur-
chaser must be informed!Deactivating the front passenger airbagFig. 10
Key-operated switch for the front passenger airbag/warning light
for the front passenger airbag
Switch positions » Fig. 10 -
The front passenger airbag is deactivated - after the ignition is switched
on, the indicator light » Fig. 10
illuminates -
The front passenger airbag is switched on - after switching on the ignition,
the warning light illuminates for 65 seconds
Switch off
›
Switch off the ignition.
›
Open the storage box on the front passenger's side.
›
Fold the key bit out completely for the radio key » .
›
Carefully insert the key into the key slot in the key switch as far as the stop.
›
Use the key to turn the slot of the key switch carefully into the position
.
›
Pull the key out of the slot in the key switch
» .
›
Close the storage compartment on the front passenger side.
›
Check that the warning light
lights up after the ignition is switched on.
Switching on
›
Switch off the ignition.
›
Open the storage box on the front passenger's side.
›
Fold the key bit out completely for the radio key » .
›
Carefully insert the key into the key slot in the key switch as far as the stop.
›
Use the key to turn the slot of the key switch carefully into the position
.
›
Pull the key out of the slot in the key switch
» .
›
Close the storage compartment on the front passenger side.
›
Check that the warning light
lights up after the ignition is switched on.
21Airbag system
Page 24 of 324
WARNING■The key cannot be inserted into the key switch while driving. Shocks can
cause the key to turn in the slot and trigger the airbag! The airbag could be
triggered unexpectedly in an accident - it may result in injury or death!■
The driver is responsible for whether the airbag is switched on or switch-
ed off.
■
Only switch off the airbag when the ignition is switched off! Otherwise a
fault can occur in the system for deactivating the airbag.
■
If the warning lights
flash, the front passenger airbag will not
be deployed in the event of an accident! Have the airbag system checked
by a specialist garage immediately.
CAUTION
An insufficiently folded out key bit can damage the key switch!Transporting children safely
Child seat
Introduction
To reduce the risk of injury in an accident, children should only be transported
in child seats!
This chapter contains information on the following subjects:
Use of a child seat on the front passenger seat (variant 1)
23
Use of a child seat on the front passenger seat (variant 2)
24
Child safety and the side airbag
24
Classification of child seats
24
Use of child safety seats which are secured using a seat belt
24
Please refer to the instructions in this Owner's Manual and the child seat man-
ufacturer's instructions with regard to the installation and use of the child
seat.
For safety reasons, we recommend that you always transport children in the
rear seats. Only transport a child in the passenger seat in exceptional circum-
stances.
Child seats complying with the ECE-R 44 Economic Commission for Europe
standard must be used.
Child seats that comply with the ECE-R 44 standard have a test seal that can-
not be removed: a large E within a circle with the test number below.
WARNING■ One should never carry children, and also not babies! - on one's lap.■When leaving the vehicle, do not leave children unattended in the vehicle.
In an emergency, they might not be able to get out of the vehicle on their
own or to help themselves. At very high or very low temperatures can be
fatal!■
The child must be secured in the vehicle during the entire travelling time!
Otherwise, in the event of an accident, the child would be thrown through
the vehicle and as a result may suffer fatal injuries, and also injure other oc-
cupants.
22Safety
Page 25 of 324
WARNING (Continued)■Children are exposed to an increased risk of injury in the event of an acci-
dent if they lean forward or adopt an incorrect seated position when the
vehicle is moving. This particularly applies to children who are transported
on the front passenger seat as they can suffer severe, or even fatal injuries
if the airbag system is deployed!■
Pay particular attention to the information provided by the manufacturer
of the child safety seat regarding the correct routing of the belt. Seat belts
which are not correctly adjusted can themselves cause injuries even in mi-
nor accidents.
■
Safety belts must be checked to ensure that they are running properly.
One should also ensure that the belt is not damaged by sharp-edged fit-
tings.
■
When installing the child seat on the back seat, the corresponding front
seat must be adjusted so that there is no contact between the front seat
and the child seat or the child being transported in a child seat.
■
When installing a child seat in which the child faces forward, adjust the
head restraints so that they are as high as possible.
■
If the head restraints still prevent the child seat from being installed,
even in the highest position, you will need to remove them » page 80. Af-
ter removing the child seat, refit the head restraints.
Note
We recommend that you use child seats from ŠKODA Original Accessories.
These child seats were developed and also tested for use in ŠKODA vehicles.
They meet the ECE-R 44 standard.Use of a child seat on the front passenger seat (variant 1)
Does not apply to TaiwanFig. 11
Warning labels
Read and observe
on page 22 first.
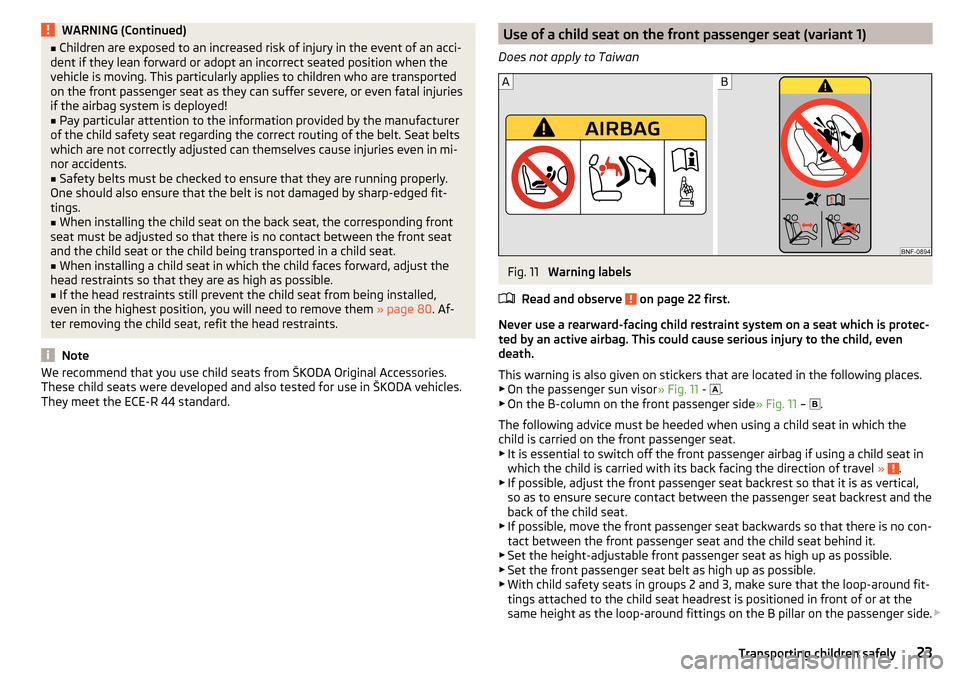
Never use a rearward-facing child restraint system on a seat which is protec-
ted by an active airbag. This could cause serious injury to the child, even
death.
This warning is also given on stickers that are located in the following places.
▶ On the passenger sun visor » Fig. 11 -
.
▶ On the B-column on the front passenger side » Fig. 11 –
.
The following advice must be heeded when using a child seat in which the
child is carried on the front passenger seat.
▶ It is essential to switch off the front passenger airbag if using a child seat in
which the child is carried with its back facing the direction of travel »
.
▶ If possible, adjust the front passenger seat backrest so that it is as vertical,
so as to ensure secure contact between the passenger seat backrest and the
back of the child seat.
▶ If possible, move the front passenger seat backwards so that there is no con-
tact between the front passenger seat and the child seat behind it.
▶ Set the height-adjustable front passenger seat as high up as possible.
▶ Set the front passenger seat belt as high up as possible.
▶ With child safety seats in groups 2 and 3, make sure that the loop-around fit-
tings attached to the child seat headrest is positioned in front of or at the
same height as the loop-around fittings on the B pillar on the passenger side.
23Transporting children safely
Page 34 of 324
Warning lights
Introduction
This chapter contains information on the following subjects:
Handbrake
33
Braking system
33
Front seat belt warning light
33
Adaptive cruise control (ACC)
33
Power steering / steering lock (KESSY system)
33
Stability control (ESC) / Traction control (TCS)
34
Traction control (TCS) disabled
34
Anti-lock braking system (ABS)
34
Rear fog light
34
Emission control system
35
Preheating unit (diesel)
35
EPC warning light (petrol)
35
Safety systems
35
Tyre pressure
35
Brake linings
36
Low fuel - petrol / diesel
36
Lane assist (Lane Assist)
36
Turn signal system
36
Trailer turn signal lights
36
Fog lights
37
Cruise control
37
Brake pedal (automatic gearbox)
37
Natural gas operation
37
Main beam
37
Automatic gearbox
37
Rear seat belt warning light
37
Generator
37
Coolant
38
Engine oil pressure
38
Engine oil level
38
Lamp failure
39
Diesel particle filter (diesel)
39
Windscreen washer fluid level39High beam assistant39
START-STOPsystem
39
Display a low temperature
39
Water in the fuel filter (diesel)
40
Adaptive cruise control (ACC)
40
Distance warning (Front Assist)
40
Front assist
40
OFF ROAD mode
40
Adaptive Chassis Control (DCC)
40
Service
40
The warning lights in the instrument cluster indicate certain functions or
faults.
Some warning lights can be accompanied by acoustic signals and messages in
the display of the instrument cluster.
After switching on the ignition, some warning lights light up briefly as a func-
tion test. If the tested systems are OK, the corresponding warning lights go
out a few seconds after switching on the ignition or after starting the engine.
The warning lights are located at the following positions in the instrument
cluster » Fig. 17 on page 30 .
▶ Tachometer
1
▶Display
2
▶Speedometer
3
▶Bar with warning lights
5
Warning lights in the display
Depending on the importance the warning light (danger) or
(warning) illu-
minate along with some of the warning lights in the list with the warning
lights.
Depending on vehicle equipment, some warning lights can be displayed in col-
our on the display. For example. the coolant warning lamp may be represented
as follows.
▶ - Segment display / monochromatic (“black and white”) MAXI DOT display
▶ - Coloured MAXI DOT display
32Using the system
Page 44 of 324
Setting the clockFig. 22
Button in the instrument cluster
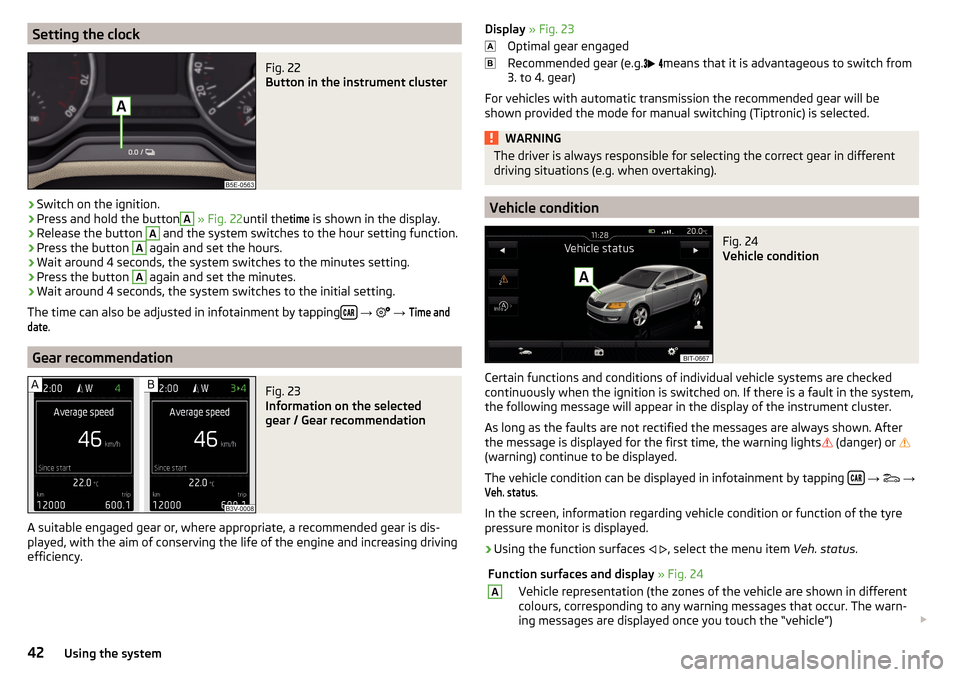
›
Switch on the ignition.
›
Press and hold the button
A
» Fig. 22 until the
time
is shown in the display.
›
Release the button
A
and the system switches to the hour setting function.
›
Press the button
A
again and set the hours.
›
Wait around 4 seconds, the system switches to the minutes setting.
›
Press the button
A
again and set the minutes.
›
Wait around 4 seconds, the system switches to the initial setting.
The time can also be adjusted in infotainment by tapping
→
→
Time anddate
.
Gear recommendation
Fig. 23
Information on the selected
gear / Gear recommendation
A suitable engaged gear or, where appropriate, a recommended gear is dis-
played, with the aim of conserving the life of the engine and increasing driving
efficiency.
Display » Fig. 23
Optimal gear engaged
Recommended gear (e.g.
means that it is advantageous to switch from
3. to 4. gear)
For vehicles with automatic transmission the recommended gear will be
shown provided the mode for manual switching (Tiptronic) is selected.WARNINGThe driver is always responsible for selecting the correct gear in different
driving situations (e.g. when overtaking).
Vehicle condition
Fig. 24
Vehicle condition
Certain functions and conditions of individual vehicle systems are checked
continuously when the ignition is switched on. If there is a fault in the system,
the following message will appear in the display of the instrument cluster.
As long as the faults are not rectified the messages are always shown. After
the message is displayed for the first time, the warning lights
(danger) or
(warning) continue to be displayed.
The vehicle condition can be displayed in infotainment by tapping
→
→
Veh. status
.
In the screen, information regarding vehicle condition or function of the tyre
pressure monitor is displayed.
›
Using the function surfaces
, select the menu item Veh. status.
Function surfaces and display » Fig. 24AVehicle representation (the zones of the vehicle are shown in different
colours, corresponding to any warning messages that occur. The warn-
ing messages are displayed once you touch the “vehicle”) 42Using the system
Page 49 of 324

Menu itemTelephone
The call list with the following symbols is displayed in the
Telephone
menu item.
Incoming call
Outgoing call
Missed call
Symbols in the display Charge status of the telephone battery 1)
Signal strength 1)
A telephone is connected to the unit
Missed calls (if there are several missed calls, the number of calls is shown
next to the symbol)
Switch-off microphone
Menu item
Assist systems
The following systems are activated/deactivated in the
Assist systems
menu
item.
▶ Front Assist
▶ Lane Assist
Menu item
Lap timer
(Stop watch)
The Lap timer function offers the possibility of calculating the lap time, for ex-
ample when driving on a race course. The measured time is shown in the dis-
play.
The calculated times are displayed in minutes, seconds and tenths of seconds.
The following functions are available. ■
Start time
- start the timing manually or continue the interrupted measure-
ment
■
Since start
- Start the timer automatically upon start-up
■
Statistics
- Evaluate and reset the measured times
Time measurement
▶ To start the measurement manually, choose the menu itemLap timer
-
start
.
▶ To start the measurement automatically, choose the menu item
Lap timer
-
Since Start
. Timing will begin automatically when starting up.
▶ To start the measurement of the next lap during time measurement, choose
the menu item
new lap
.
During timing, information about the fastest and the last lap time are also
shown in the display.
Measure split time ▶ During the timing, select the menu item
Split time
. The split time data is dis-
played for about 5 seconds in the display.
The split time can be measured repeatedly during a round.
Stop measurement
▶ During the timing, press the menu item
Stop
.
The time measurement is stopped, the following functions are now available.
■
Continue
- Continue measurement of the current lap time
■
New lap
- Start measurement of the next lap time.
■
Abort lap
- Cancel the timer (the aborted lap time is not stored)
■
Hang up
- End timing (the aborted lap time is stored)
Evaluate recorded times ▶ Select the menu item
Lap timer
-
Statistics
.
The following information is displayed.
▶
Fastest:
- The fastest lap
▶
Slowest:
- The slowest lap
▶
Average:
- The average lap time
▶
Overall time:
- The total of all the lap times
Reset measured times ▶ Select the menu item
Lap timer
-
Statistics
-
Reset
.
WARNING■ Concentrate fully at all times on your driving! As the driver, you are fully
responsible for the operation of your vehicle.■
Only use the
Lap timer
when you are in any traffic situation where you have
full control over the vehicle.
1)
This function is only supported by some mobile phones.
47Information system
Page 51 of 324
SmartGate is a system that transmits certain driving data (such as fuel con-
sumption, speed or similar) via Wi-Fi and Wi-Fi Direct.
The ŠKODA applications installed in a supported external device (e.g. tele-
phone, tablet) give the option to further transmit the received data.
Some ŠKODA applications can be displayed on the Infotainment screen using a
SmartLinkconnection » page 165.
Read in the QR code » Fig. 30 or enter the following address in the web brows-
er to open the website with an overview of the available applications, compati-
ble devices and other information about SmartGate.
http://go.skoda.eu/connectivity-smartgate
CAUTION
■ To increase the access security to the transmitted vehicle data, once the
ŠKODA application has been started, you are requested to change the pass-
word/PIN code if the default password/PIN code has not yet been changed
» page 50 . It is not possible to start the ŠKODA application without changing
it.■
ŠKODA accepts no responsibility for any problems caused by incompatibility
or improper functioning of the external devices.
connection to SmartGate using Wi-Fi
This type of connection is intended for external devices running Android and
iOS operating systems.
Connecting to an Android external device
›
Switch on the ignition.
›
Switch on Wi-Fi in the external device that is to be connected and search for
available Wi-Fi networks (see Owner's Manual for the external device).
›
In the menu of the detected networks, select the “SmartGate_...” 1)
menu item.
›
Enter the password (vehicle identification number using upper-case let-
ters » page 50 ).
›
In the external device that is to be connected to, start the SmartGate appli-
cation.
›
Then follow the instructions in the manual, which is included in the
SmartGate application.
With SmartGate, a maximum of four external devices can be connected simul-
taneously using Wi-Fi, with as many launched ŠKODA applications as required.
Connecting to an external iOS device›
Switch on the ignition.
›
Switch on Wi-Fi in the external device that is to be connected and search for
available Wi-Fi networks (see Owner's Manual for the external device).
›
In the menu of the detected networks, select the “SmartGate_...” 1)
menu item.
›
Enter the password (vehicle identification number using upper-case let-
ters » page 50 ).
With SmartGate, a maximum of four external devices can be connected simul-
taneously using Wi-Fi. In these external devices, up to four ŠKODA applications
can be started simultaneously.
Disconnection
The connection can be switched off in one of the following ways.
›
Switch off the ignition for longer than 5 seconds (for vehicles with a starter
button, switch off the engine and open the driver's door).
›
End the connection in the SmartGate application.
›
Switch off Wi-Fi in the connected external device.
Automatic connection
If the communication device has already had a connection with SmartGate,
then the connection is automatically restored under the following conditions.
The ignition is switched on.
Wi-Fi is switched on in the external device that is to be connected to.
The external device that is to be connected to stores the password re-
quired for the connection check.
Connection to SmartGate using Wi-Fi direct
This type of connection is intended for external devices running the Android
operating system.
Connection set-up
›
Switch on the ignition.
›
In the external device that is to be connected to, start the SmartGate appli- cation.
›
In the application, change the connection type to Wi-Fi direct.
1)
The last 6 characters of the VIN vehicle identification number of your vehicle are displayed at position
....
49Information system