abs SKODA OCTAVIA TOUR 2009 1.G / (1U) User Guide
[x] Cancel search | Manufacturer: SKODA, Model Year: 2009, Model line: OCTAVIA TOUR, Model: SKODA OCTAVIA TOUR 2009 1.G / (1U)Pages: 226, PDF Size: 13.11 MB
Page 135 of 226
Intelligent Technology
134•
when driving with snow chains
•
when driving in deep snow or on a loose surface
•
when it is necessary to rock a ca r free when it has become stuck.
then you should switch on the ESP again.
WARNING
It is also not possible for the ESP to overcome the physical limits of the
vehicle. Even if a vehicle fitted with ESP you should still always adapt your
style of driving to the condition of the road surface and the traffic situation.
This particularly applies when driving on slippery and wet roads. The
increased safety offered must not tempt you to take greater risks than
otherwise - risk of an accident!
Note
•
All four wheels must be fitted with the same tyres in order to achieve problem-
free operation of the ESP. Differing rollin g circumferences of the tyres can lead to
an undesirable reduction in the engine output.
•
Changes to vehicle (e.g. on engine, on the brakes, on chassis or other assign-
ment of tyres and wheels) can influence the function of the ESP ⇒page 181,
“Accessories, changes and replacement of parts”.
Electronic Differential Lock (EDL)*
The electronic differential lock pr events an individual wheel from
slipping.Vehicles fitted with ABS* can be equipped with electron ic differential lock (EDL).
General
The EDL makes it much easier, and sometimes at all possible, to start off, accelerate
and climb a steep hill when the conditio ns of the road surface are unfavourable. Operating principle
The EDL is activated automatically, that is
without any action on the part of the
driver. It monitors the speeds of the driven wheels with the aid of the ABS sensors.
Should only one drive wheel begin spinning on a slippery surface there will be an
appreciable difference in the speed of the driven wheels. The EDL function brakes
the slipping wheel and the differential transmits a greater driving force to the other
driven wheel. This control proces s is also accompanied by noises.
Overheating of the brakes
The EDL switches off automatically if unusually severe stresses exist in order to
avoid excessive heat generation in the disc brake on the wheel which is being
braked. The vehicle can continue to be dr iven and has the same characteristics as
a vehicle not fitted with EDL.
The EDL switches on again automatically as soon as the brake has cooled down.
WARNING
•
Depress the accelerator carefully when accelerating on uniformly slip-
pery road surfaces, such as ice and sn ow. The driven wheels might still spin
despite the EDL and affect the stability of the vehicle - risk of an accident!
•
You should always adapt your style of driving to the condition of road
surface and to the traffic situation even when your vehicle is fitted with EDL.
The increased safety offered must not tempt you to take greater risks than
otherwise - risk of an accident!Note
•
If the ABS warning light comes on, this ma y also indicate a fault in the EDL.
Please have the car inspected as soon as possible by a specialist garage.
•
Changes to vehicle (e.g. on engine, on the brakes, on chassis or other assign-
ment of tyres and wheels) can in fluence the function of the EDL ⇒page 181,
“Accessories, changes and replacement of parts”.
s2ig.book Page 134 Monday, November 10, 2008 11:20 AM
Page 136 of 226
Intelligent Technology135
Using the system
Safety
Driving Tips
General Maintenance
Breakdown assistance
Technical Data
Traction control system (TCS)
The traction control system prevents the driven wheels from spinning
when accelerating.General
The TCS makes it much easier, and sometimes at all possible, to start off, accelerate
and climb a steep hill when the conditio ns of the road surface are unfavourable.
Operating principle
The TCS switches on automatically when th e engine is started and then conducts a
self-test. The system monitors the speeds of the driven wheels with the aid of the
ABS sensors. If the wheels are spinning, the force transmitted to the road surface is
automatically adapted by redu cing the engine speed. This occurs at all speeds.
The TCS operates in combination with the ABS ⇒page 137, “Antilock brake system
(ABS)*”. The TCS will not function if a fault exists in the ABS system.
The TCS warning light ⇒page 33 lights up in the instrument cluster when there is a
fault on the TCS.
Switching off
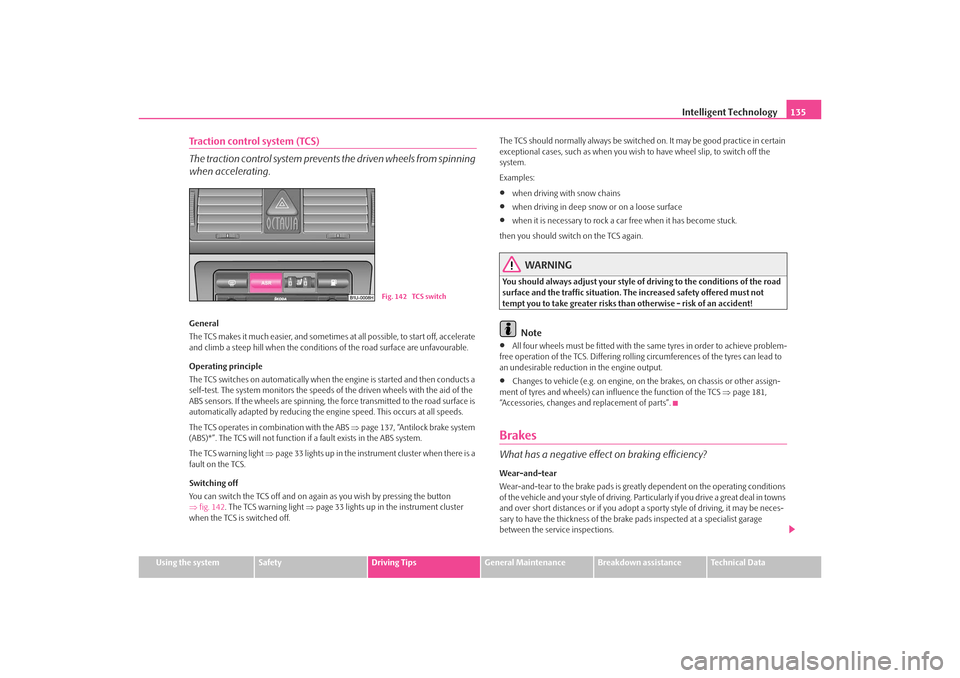
You can switch the TCS off and on again as you wish by pressing the button
⇒ fig. 142 . The TCS warning light ⇒page 33 lights up in the instrument cluster
when the TCS is switched off. The TCS should normally always be switched on. It may be good practice in certain
exceptional cases, such as when you wish
to have wheel slip, to switch off the
system.
Examples:
•
when driving with snow chains
•
when driving in deep snow or on a loose surface
•
when it is necessary to rock a car free when it has become stuck.
then you should switch on the TCS again.
WARNING
You should always adjust your style of driving to the conditions of the road
surface and the traffic situation. The increased safety offered must not
tempt you to take greater risks than otherwise - risk of an accident!
Note
•
All four wheels must be fitted with the same tyres in order to achieve problem-
free operation of the TCS. Differing rolling circumferences of the tyres can lead to
an undesirable reduction in the engine output.
•
Changes to vehicle (e.g. on engine, on the brakes, on chassis or other assign-
ment of tyres and wheels) can in fluence the function of the TCS ⇒ page 181,
“Accessories, changes and replacement of parts”.
BrakesWhat has a negative effect on braking efficiency?Wear-and-tear
Wear-and-tear to the brake pads is greatly dependent on the operating conditions
of the vehicle and your style of driving. Particularly if you drive a great deal in towns
and over short distances or if you adopt a sporty style of driving, it may be neces-
sary to have the thickness of the brake pads inspected at a specialist garage
between the service inspections.
Fig. 142 TCS switch
s2ig.book Page 135 Monday, November 10, 2008 11:20 AM
Page 138 of 226
Intelligent Technology137
Using the system
Safety
Driving Tips
General Maintenance
Breakdown assistance
Technical Data
Antilock brake system (ABS)*ABS prevents the wheels locking when braking.General
The ABS contributes significan tly to enhancing the active safety of your vehicle.
Compared to a car not fitted with the ABS brake system, you are able to retain
optimal steering ability even during a fu ll brake application on a slippery road
surface because the wheels do not lock up.
You must not expect, however, that the br aking distance will be shorter under all
circumstances as a result of the ABS. Th e braking distance for example on gravel
and fresh snow, when you should anyway be driving slowly and cautiously, will be
longer.
Operating principle
The brake pressure will be reduced on a wheel which is rotating at a speed which is
too low for the speed of the vehicle and tend ing to lock. This control cycle is notice-
able from a pulsating movement of the brake pedal which is accompanied by
noises. This is consciously intended to provide the driver with the information that
the wheels are tending to lock (ABS control range). You must always keep the brake
pedal depressed to enable the ABS to optima lly control the brake application in this
braking range. Never interrupt the application of the brakes!
WARNING
•
The ABS can also not overcome the physic al limits of your vehicle. Please
do not forget this, particularly when driving on icy or wet road surfaces. If
the ABS is operating within the contro l range, adapt your speed immediately
to the conditions of the road surface and the traffic situation. The increased
safety offered by the ABS must not tempt you to take greater risks than
otherwise - risk of an accident!
•
The normal braking system is still fully functional if there is an ABS fault.
Visit a specialist garage as quickly as possible and adju st your style of driving
to take account of the ABS fault in the meantime since you will not know how
great the damage is.
Note
•
A warning light comes on if a fault occurs in the ABS system ⇒page 32.
•
Changes to vehicle (e.g. on engine, on the brakes, on chassis or other assign-
ment of tyres and wheels) can in fluence the function of the ABS ⇒page 181,
“Accessories, changes and replacement of parts”.
Brake Assist*During a severe brake application (e.g. if a hazard exists), the Brake Assist increases
the braking force and thus makes it possible to rapidly produce the pressure
required in the brake system.
The majority of drivers do apply the brakes in good time in dangerous situations,
but do not depress the brake pedal with suff icient pressure. Consequently, it is not
possible for the car to achieve its maxi mum deceleration and the car covers a
greater distance than necessary.
The Brake Assist is activated by the very quick operation of the brake pedal. In such
cases, a much greater braking pressure ex ists than during a normal brake applica-
tion. This makes it possible, even with a relatively low resistance of the brake pedal,
to produce an adequate pressure in the brake system in the shortest possible time,
which is required for maximum deceleration of the car. You must apply the brake
pedal firmly and hold it in this position in order to achieve the shortest possible
braking distance.
The Brake Assist is able to help you achi eve a shorter braking distance in emergency
situations by rapidly producing the pressure required in the brake system. It fully
exploits the attributes of the ABS. After yo u release the brake pedal, the function of
the Brake Assist is automatically switched off and the brakes operate in the normal
way.
WARNING
•
The Brake Assist is also not able to overcome the physical limits of your
car in terms of the braking distance required.
s2ig.book Page 137 Monday, November 10, 2008 11:20 AM
Page 156 of 226
Taking care of your vehicle and cleaning the vehicle155
Using the system
Safety
Driving Tips
General Maintenance
Breakdown assistance
Technical Data
Removing stains
– Remove fresh stains which are water-based (e.g. coffee, tea, juices,
blood etc.) with an absorbent cloth or household paper or use the
cleaner from the care set for a stain which has already dried in.
– Remove fresh stains on a fat base (e.g. butter, mayonnaise, chocolate
etc.) with an absorbent cloth or household cleaning paper or with the
cleaner from the care set if the stain has not yet penetrated into the
surface.
– Use a grease dissolver for grease stains which have dried in .
–Eliminate special stains (e.g. ball-point pens, felt pen, nail varnish,
dispersion paint, shoe cream etc.) with a special stain remover suit-
able for leather.
Leather care
– Treat the leather every six months with the leather care product avail- able from specialist garages.
– Apply only a small amount of the care product.
– Dry the leather off with a soft clothWe recommend that you consult a speciali st garage if you have any questions
regarding cleaning and care of the leather interior in your vehicle.
Caution
•
You must on no account treat the leather with solvents (e.g. gasoline, turpen-
tine), floor wax, shoe cream or such like.
•
Avoid leaving your vehicle for lengthy pe riods in bright sunlight in order to
avoid bleaching the leather. If you leave your vehicle parked in the open for lengthy
periods, protect the leather from the direct rays of the sun by covering it over.
•
Sharp-edged objects on items of clothing such as zip fasteners, rivets, sharp-
edged belts may leave permanent scratche s or signs of rubbing on the surface.
Note
•
Use a care cream with light blocker and impregnation effect regularly and each
time after cleaning the leather. The cream no urishes the leather, allows it to breathe
and keeps it supple and also provides moisture. It also creates surface protection.
•
Clean the leather every 2 to 3 months, remove fresh soiling each time this
occurs.
•
Remove fresh stains such as those from ball-point pens, ink, lipstick, shoe
cream etc., as quickly as possible.
•
Care also for the leather dye. Refreshen areas which have lost their colour with
a special coloured leather cream as required.
•
The leather is a natural material with specific properties. During the use of the
vehicle, minor optical change s can occur on the leather parts of the covers (e. g
wrinkles or creases as a result of the stress of the covers).
Seat belts– Keep the seat belts clean!
– Wash seat belts which have become soiled using a mild soapy solu-
tion.
– Inspect the seat belts regularly to ensure they are in good condition.Belt webbing which has become severely so iled may prevent the inertia reel from
reeling up the belt properly.
WARNING
•
The seat belts must not be removed for cleaning.
•
Never clean the seat belts chemically as dry cleaning may destroy the
fabric. The seat belts must also not be allowed to come into contact with
corrosive liquids (such as acids etc.).
•
Seat belts which have damage to the webbing, the connections, the
inertia reel or the lock should be replaced by a specialist garage.
s2ig.book Page 155 Monday, November 10, 2008 11:20 AM
Page 163 of 226
Inspecting and replenishing
162
– Take the bonnet support out of its holder and set it in the opening designed for it ⇒page 161, fig. 152 .
Closing the bonnet
– Lift the bonnet slightly and unhook the bonnet support. Press the bonnet support into the hold er designed to hold it.
– Allow the bonnet to drop from a height of about 30 cm into the lock - bonnet do not press down on it !
WARNING
•
Never open the bonnet if you see that steam or coolant is flowing out of
the engine compartment - risk of scaldi ng! Wait long enough until the steam
or coolant has stopped escaping.
•
For safety reasons, the bonnet must always be properly closed when
driving. One should therefore check that the lock has in fact engaged prop-
erly after closing the bonnet.
•
Stop your vehicle i mmediately while driving if yo u notice that the lock is
not properly engaged and close the bonn et properly - risk of an accident!
Working in the engine compartment
Particular care is required when carrying out any work in the engine
compartment!There is a risk of injuries, scalding, accidents and fire when working in the
engine compartment, e.g. inspecting an d replenishing oil and other fluids. For
this reason, it is essential to comply with the warning instructions stated
below and with the general applicable rules of safety. The engine compart-
ment of your car is a hazardous area ⇒ .
WARNING
•
Never open the bonnet if you see that steam or coolant is flowing out of
the engine compartment - risk of scaldi ng! Wait long enough until the steam
or coolant has stopped escaping.
•
Switch off the engine and pull out the ignition key.
•
Apply the handbrake firmly.
•
If your vehicle is fitted with a manual gearbox, move the gearshift lever
into Neutral.
•
Allow the engine to cool down.
•
Keep children clear of the engine compartment.
•
Never spill oil and other fluids over the hot engine. Such fluids (e.g. the
antifreeze contained in the coolant) may ignite!
•
Avoid short circuits in the electrical system - particularly on the battery.
•
Never place your hand into the radiator fan as long as the engine is still
warm. The fan might suddenly start running!
•
Never open the cap of the coolant expa nsion bottle as long as the engine
is still warm. The cooling system is pressurized!
•
Cover over the cap of the coolant expansion reservoir with a large cloth
when opening it as protection for your face, hands and arms from hot steam
or hot coolant.
•
Do not let objects, such as e.g cleaning cloth or tools lie in the engine
compartment.
•
If you wish to work under the vehicl e, you must secure the vehicle from
rolling away and support it with suitable supporting blocks: the car jack is
not sufficient for this - risk of injury!
•
In cases where it be necessary to carry out inspection work when the
engine is running there is an additional risk from rotating parts (e.g. the V-
ribbed belt, alternator, radiator fan) and from the high-voltage ignition
system. Please observe in addition the following:
−Never touch the electrical cabl es of the ignition system.
− Absolutely avoid any jewellery, loose items of clothing or long hair
from getting into the rotating part s of the engine - Hazard! Therefore
s2ig.book Page 162 Monday, November 10, 2008 11:20 AM
Page 171 of 226
Inspecting and replenishing
170
WARNING
•
Read and observe the warning notes ⇒page 162, “Working in the engine
compartment” before working in the engine compartment.
•
If the fluid level has dropped below the “MIN” marking, do not drive any
further - risk of accident! Ob tain professional assistance.
Replacing brake fluidBrake fluid absorbs moisture. This causes the fluid to absorb moisture from the
surrounding air over a period of time. Excessive water in the brake fluid may be the
cause of corrosion in the brake system. Th e water content also lowers the boiling
point of the brake fluid. This is why brake fluid must be replaced every two
years.
One may only use new genuine brake fluid from Škoda Auto a.s. The specification
for the brake fluid is “FMVSS 116 DOT 4”.
We recommend that you have th e brake fluid replaced by a specialist garage as
part of an Inspection Service.
WARNING
•
Using old brake fluid can result in seve re stress on the brakes because of
the formation of vapour bubbles in the brake system. This greatly impairs
the braking efficiency and thus also the safety of your vehicle.
•
Brake fluid is toxic! It must therefore be kept safely in closed original
containers and well aw ay from children and unauthorized persons.Caution
Brake fluid damages the pa intwork of the vehicle.
For the sake of the environment
In view of the problems involved with prop er disposal of brake fluid, the special
tools and the professional knowledge required, you should have the brake fluid
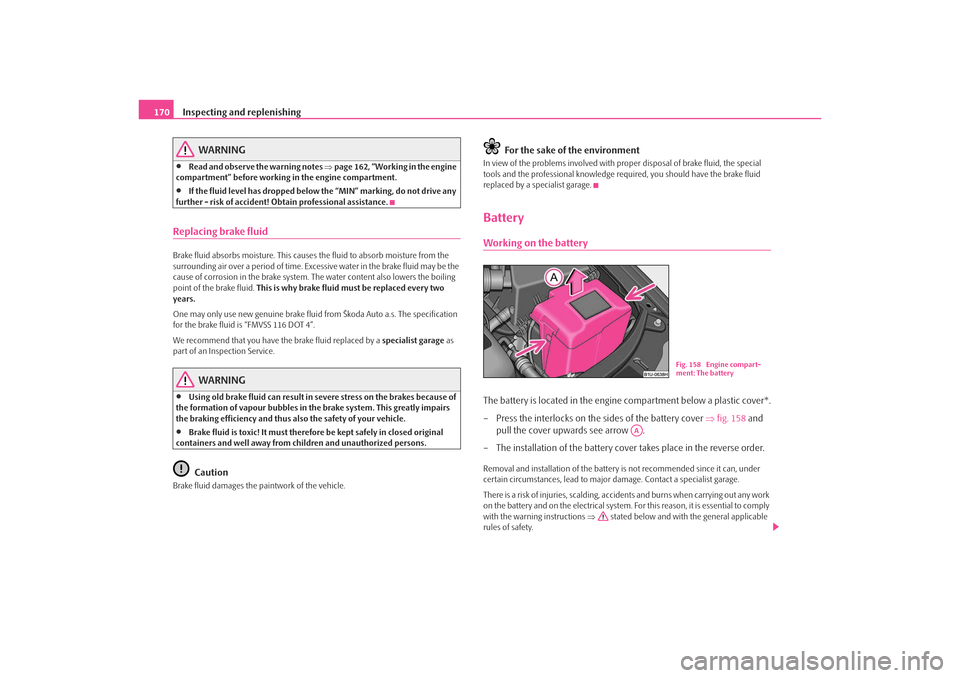
replaced by a specialist garage.BatteryWorking on the batteryThe battery is located in the engine compartment below a plastic cover*.
– Press the interlocks on the sides of the battery cover ⇒fig. 158 and
pull the cover upwards see arrow .
– The installation of the battery cov er takes place in the reverse order.Removal and installation of the battery is not recommended since it can, under
certain circumstances, lead to major damage. Contact a specialist garage.
There is a risk of injuries, scalding, acci dents and burns when carrying out any work
on the battery and on the electrical system. For this reason, it is essential to comply
with the warning instructions ⇒ stated below and with the general applicable
rules of safety.
Fig. 158 Engine compart-
ment: The battery
AA
s2ig.book Page 170 Monday, November 10, 2008 11:20 AM
Page 196 of 226
Fuses and light bulbs195
Using the system
Safety
Driving Tips
General Maintenance
Breakdown assistance
Technical Data
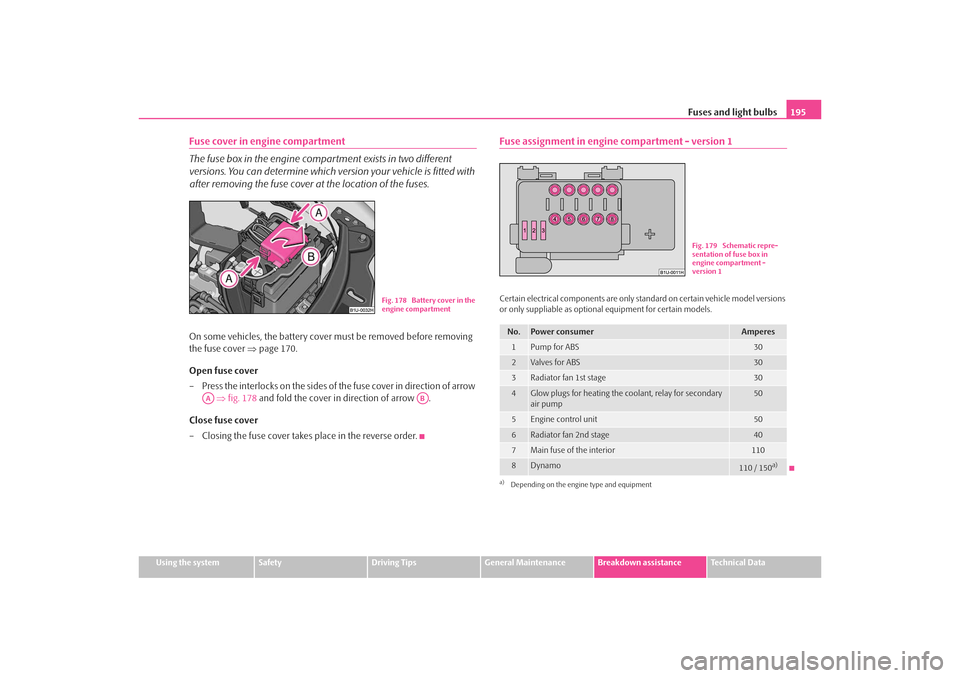
Fuse cover in engine compartment
The fuse box in the engine comp artment exists in two different
versions. You can determine which version your vehicle is fitted with
after removing the fuse cover at the location of the fuses.On some vehicles, the battery cover must be removed before removing
the fuse cover ⇒page 170.
Open fuse cover
– Press the interlocks on the sides of the fuse cover in direction of arrow ⇒ fig. 178 and fold the cover in direction of arrow .
Close fuse cover
– Closing the fuse cover takes place in the reverse order.
Fuse assignment in engine compartment - version 1Certain electrical components are only standard on certain vehicle model versions
or only suppliable as optional equipment for certain models.
Fig. 178 Battery cover in the
engine compartment
AA
AB
No.
Power consumer
Amperes
1
Pump for ABS
30
2
Valves for ABS
30
3
Radiator fan 1st stage
30
4
Glow plugs for heating the coolant, relay for secondary
air pump
50
5
Engine control unit
50
6
Radiator fan 2nd stage
40
7
Main fuse of the interior
110
8
Dynamo
110 / 150
a)
a)Depending on the engine type and equipment
Fig. 179 Schematic repre-
sentation of fuse box in
engine compartment -
version 1
s2ig.book Page 195 Monday, November 10, 2008 11:20 AM
Page 197 of 226
Fuses and light bulbs
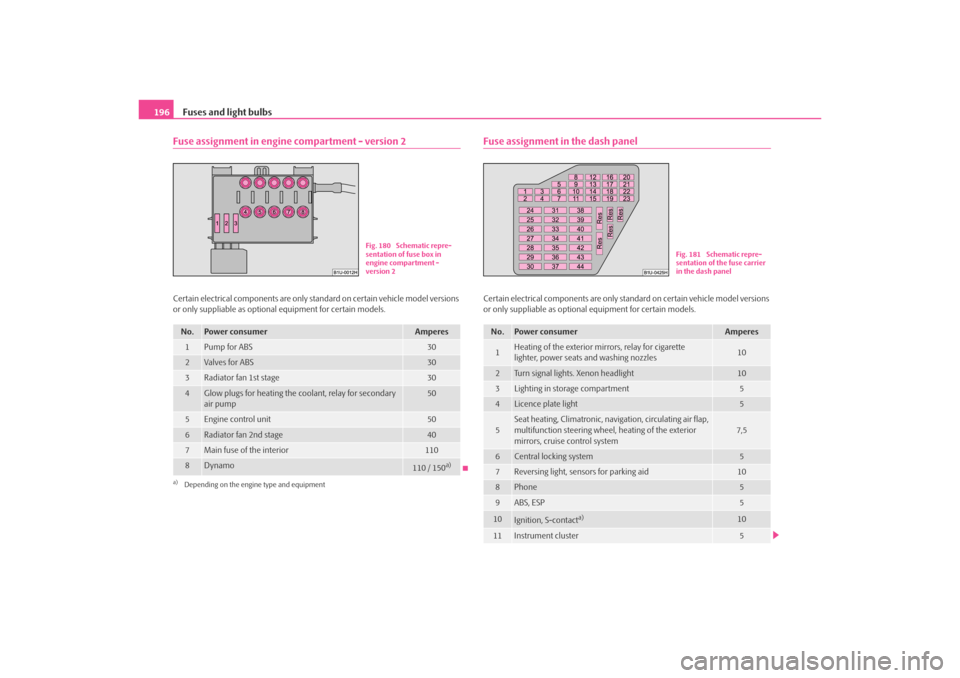
196Fuse assignment in engine compartment - version 2Certain electrical components are only st andard on certain vehicle model versions
or only suppliable as optional equipment for certain models.
Fuse assignment in the dash panelCertain electrical components are only standard on certain vehicle model versions
or only suppliable as optional equipment for certain models.
No.
Power consumer
Amperes
1
Pump for ABS
30
2
Valves for ABS
30
3
Radiator fan 1st stage
30
4
Glow plugs for heating the coolant, relay for secondary
air pump
50
5
Engine control unit
50
6
Radiator fan 2nd stage
40
7
Main fuse of the interior
110
8
Dynamo
110 / 150
a)
a)Depending on the engine type and equipment
Fig. 180 Schematic repre-
sentation of fuse box in
engine compartment -
version 2
No.
Power consumer
Amperes
1
Heating of the exterior mirrors, relay for cigarette
lighter, power seats and washing nozzles
10
2
Turn signal lights. Xenon headlight
10
3
Lighting in storage compartment
5
4
Licence plate light
5
5
Seat heating, Climatronic, navigation, circulating air flap,
multifunction steering wheel, heating of the exterior
mirrors, cruise control system
7,5
6
Central locking system
5
7
Reversing light, sensors for parking aid
10
8
Phone
5
9
ABS, ESP
5
10
Ignition, S-contact
a)
10
11
Instrument cluster
5
Fig. 181 Schematic repre-
sentation of the fuse carrier
in the dash panel
s2ig.book Page 196 Monday, November 10, 2008 11:20 AM
Page 205 of 226
Technical Data
204Gearbox code, paint number, interior equipment number, engine output,
engine code
Partial description of the vehicle
Vehicle identification number (VIN)
The vehicle identification num ber - VIN (vehicle body number) is stamped into the
engine compartment on the right hand shoc k absorber dome. This number is also
located on a sign on the lower left hand edge below the windscreen (together with
a VIN bar code).
Engine number
The engine number is stamped into the engine block.
Type plate (production plate)
The type plate is located in the engine co mpartment at the front on the left hand
shock absorber dome.
Homologation sign
The homologation sign is located on the lo ck carrier. Vehicles for certain countries
do not have an homologation sign.
Sticker on inside of fuel filler flap
The sticker is affixed to the inside of the fuel filler flap. The sticker contains the
following data:
•
The prescribed types of fuel,
•
Tyre si z e,
•
Tyre pressure.
Fuel consumption according to the regulations (99/100/EU)Depending on the range of the special equipment, style of driving, traffic situation,
weather influences an d vehicle condition, the consum ption values which in prac-
tice result when using the vehicle ca n deviate from the indicated values. Urban traffic
The consumption measurement in urban traf
fic begins with starting of the cold
engine. Afterwards the normal urban traffic is simulated.
Non-urban traffic
For the consumption measurement in non-ur ban traffic the vehicle, as in daily
motoring, is accelerated and braked several times in all gears. The vehicle speed
changes within the range from 0 to 120 km/h.
Combined traffic
The consumption value in the combined traf fic consists of 37% from the value for
the urban traffic and of 63% from the value for the non-urban traffic.A3A4s2ig.book Page 204 Monday, November 10, 2008 11:20 AM
Page 218 of 226
Index217
Index
AAbroad . . . . . . . . . . . . . . . . . . . . . . . . . . . . . . . . . . . . . 144
ABS . . . . . . . . . . . . . . . . . . . . . . . . . . . . . . . . . . . . . . . . . 137
Warning light . . . . . . . . . . . . . . . . . . . . . . . . . . . . . 32
Accessories . . . . . . . . . . . . . . . . . . . . . . . . . . . . . . . . . 181
Adjusting seats . . . . . . . . . . . . . . . . . . . . . . . . . . . 60, 106 electrically . . . . . . . . . . . . . . . . . . . . . . . . . . . . . . . . 61
Adjusting the steering wheel . . . . . . . . . . . . . . . . . . . 94
Air conditioning system . . . . . . . . . . . . . . . . . . . . . . . 85 Recirculated air mode . . . . . . . . . . . . . . . . . . . . . 88
Airbag . . . . . . . . . . . . . . . . . . . . . . . . . . . . . . . . . . . . . . 117 Deployment . . . . . . . . . . . . . . . . . . . . . . . . . . . . . 118
Front airbag . . . . . . . . . . . . . . . . . . . . . . . . . . . . . 118
Side airbag . . . . . . . . . . . . . . . . . . . . . . . . . . . . . . 121
Warning light . . . . . . . . . . . . . . . . . . . . . . . . . . . . . 30
Airbag system . . . . . . . . . . . . . . . . . . . . . . . . . . . . . . . 117 Warning light . . . . . . . . . . . . . . . . . . . . . . . . . . . . . 30
Airbags . . . . . . . . . . . . . . . . . . . . . . . . . . . . . . . . . . . . . 117
Alarm . . . . . . . . . . . . . . . . . . . . . . . . . . . . . . . . . . . . . . . . 43
Alternator Warning light . . . . . . . . . . . . . . . . . . . . . . . . . . . . . 33
Antilock brake system . . . . . . . . . . . . . . . . . . . . . . . . 137
Antilock brake system (ABS) Warning light . . . . . . . . . . . . . . . . . . . . . . . . . . . . . 32
Anti-theft alarm system . . . . . . . . . . . . . . . . . . . . . . . 43
Ashtray . . . . . . . . . . . . . . . . . . . . . . . . . . . . . . . . . . . . . . 77
Auto Check Control . . . . . . . . . . . . . . . . . . . . . . . . . . . 25 Auto Computer . . . . . . . . . . . . . . . . . . . . . . . . . . . . . . 19
Automatic seat adjustment . . . . . . . . . . . . . . . . . . . . 62
Automatic vehicle wash systems . . . . . . . . . . . . . . 150
Automatic wiper/washer system . . . . . . . . . . . . . . . 55
Avoiding damage to your vehicle . . . . . . . . . . . . . 144
BBattery . . . . . . . . . . . . . . . . . . . . . . . . . . . . . . . . . . 33, 170
change . . . . . . . . . . . . . . . . . . . . . . . . . . . . . . . . . . 173
Charge . . . . . . . . . . . . . . . . . . . . . . . . . . . . . . . . . . 172
Inspecting the electrolyte level . . . . . . . . . . . . 172
Operation in winter . . . . . . . . . . . . . . . . . . . . . . 172
Before setting off . . . . . . . . . . . . . . . . . . . . . . . . . . . . 105
Belt Warning light . . . . . . . . . . . . . . . . . . . . . . . . . . . . . 34
Belt tensioners . . . . . . . . . . . . . . . . . . . . . . . . . . . . . . 115
Belts . . . . . . . . . . . . . . . . . . . . . . . . . . . . . . . . . . . . . . . . 110
Bonnet . . . . . . . . . . . . . . . . . . . . . . . . . . . . . . . . . . 14, 161
Boot lid . . . . . . . . . . . . . . . . . . . . . . . . . . . . . . . . . . . . . . 41
Brake Handbrake . . . . . . . . . . . . . . . . . . . . . . . . . . . . . . . 98
Warning light . . . . . . . . . . . . . . . . . . . . . . . . . . . . . 34
Brake Assist . . . . . . . . . . . . . . . . . . . . . . . . . . . . . . . . . 137
Brake booster . . . . . . . . . . . . . . . . . . . . . . . . . . . . . . . 136
Brake fluid . . . . . . . . . . . . . . . . . . . . . . . . . . . . . . . . . . 169
Brake pads Warning light . . . . . . . . . . . . . . . . . . . . . . . . . . . . . 31 Brakes . . . . . . . . . . . . . . . . . . . . . . . . . . . . . . . . . . . . . . 135
Button for the central locking system . . . . . . . . . . . 40
Buttons on the driver's door
Power windows . . . . . . . . . . . . . . . . . . . . . . . . . . . 44
CCar jack . . . . . . . . . . . . . . . . . . . . . . . . . . . . . . . . . 184, 189
Car state . . . . . . . . . . . . . . . . . . . . . . . . . . . . . . . . . . . . . 25
Catalytic converter . . . . . . . . . . . . . . . . . . . . . . . . . . 140
Central locking system . . . . . . . . . . . . . . . . . . . . . . . . 38lock . . . . . . . . . . . . . . . . . . . . . . . . . . . . . . . . . . . . . . 39
unlock . . . . . . . . . . . . . . . . . . . . . . . . . . . . . . . . . . . 39
Changing a wheel . . . . . . . . . . . . . . . . . . . . . . . . . . . 185
Changing bulbs . . . . . . . . . . . . . . . . . . . . . . . . . . . . . 197
Changing the engine oil . . . . . . . . . . . . . . . . . . . . . . 166
Changing wheels around . . . . . . . . . . . . . . . . . . . . . 177
Charging the battery . . . . . . . . . . . . . . . . . . . . . . . . . 172 Warning light . . . . . . . . . . . . . . . . . . . . . . . . . . . . . 33
Check engine oil level . . . . . . . . . . . . . . . . . . . . . . . . 165
Child safety . . . . . . . . . . . . . . . . . . . . . . . . . . . . . . . . . 125 Side airbag . . . . . . . . . . . . . . . . . . . . . . . . . . . . . . 127
Child safety lock . . . . . . . . . . . . . . . . . . . . . . . . . . . . . . 37
Child safety seat on the front passenger seat . . . . . . . . . . . . . . . 126
Safety information . . . . . . . . . . . . . . . . . . . . . . . 125
s2ig.book Page 217 Monday, November 10, 2008 11:20 AM