child seat SKODA OCTAVIA TOUR 2009 1.G / (1U) Owner's Manual
[x] Cancel search | Manufacturer: SKODA, Model Year: 2009, Model line: OCTAVIA TOUR, Model: SKODA OCTAVIA TOUR 2009 1.G / (1U)Pages: 226, PDF Size: 13.11 MB
Page 4 of 226
Contents3
ContentsLayout of this Owner's Manual
(explanations)
. . . . . . . . . . . . . . . . . . . . . . . . . .
Using the system
. . . . . . . . . . . . . . . . . . . . . .
Cockpit
. . . . . . . . . . . . . . . . . . . . . . . . . . . . . . . . . . . . . . . .
Overview . . . . . . . . . . . . . . . . . . . . . . . . . . . . . . . . . . . .
The brief instruction
. . . . . . . . . . . . . . . . . . . . . . . . . .
Basic functions and important information . . . . .
Instruments and Indicator/Warning Lights
. . .
General view of the instrument cluster . . . . . . . . .
Engine revolutions counter . . . . . . . . . . . . . . . . . . . .
Coolant temperature gauge . . . . . . . . . . . . . . . . . . .
Fuel gauge . . . . . . . . . . . . . . . . . . . . . . . . . . . . . . . . . . .
Speedometer . . . . . . . . . . . . . . . . . . . . . . . . . . . . . . . .
Counter for distance driven . . . . . . . . . . . . . . . . . . .
Service Interval Display . . . . . . . . . . . . . . . . . . . . . . .
Digital clock . . . . . . . . . . . . . . . . . . . . . . . . . . . . . . . . . .
Multi-functional indicator (onboard computer)*
Information display* . . . . . . . . . . . . . . . . . . . . . . . . . .
Auto Check Control . . . . . . . . . . . . . . . . . . . . . . . . . . .
Warning lights . . . . . . . . . . . . . . . . . . . . . . . . . . . . . . . .
Unlocking and locking
. . . . . . . . . . . . . . . . . . . . . . . .
Key . . . . . . . . . . . . . . . . . . . . . . . . . . . . . . . . . . . . . . . . . .
Changing the battery of the radio remote control
Electronic immobiliser . . . . . . . . . . . . . . . . . . . . . . . .
Locking . . . . . . . . . . . . . . . . . . . . . . . . . . . . . . . . . . . . . .
Child safety lock . . . . . . . . . . . . . . . . . . . . . . . . . . . . . .
Central locking system* . . . . . . . . . . . . . . . . . . . . . . .
Remote control* . . . . . . . . . . . . . . . . . . . . . . . . . . . . . .
Synchonisation of the remote control . . . . . . . . . .
Anti-theft alarm system* . . . . . . . . . . . . . . . . . . . . . . Power windows* . . . . . . . . . . . . . . . . . . . . . . . . . . . . .
Electric sliding/tilting roof* . . . . . . . . . . . . . . . . . . . .
Lights and Visibility
. . . . . . . . . . . . . . . . . . . . . . . . . . .
Lights . . . . . . . . . . . . . . . . . . . . . . . . . . . . . . . . . . . . . . . .
Interior lighting . . . . . . . . . . . . . . . . . . . . . . . . . . . . . . .
Visibility . . . . . . . . . . . . . . . . . . . . . . . . . . . . . . . . . . . . .
Windshield wiper and wash system . . . . . . . . . . . .
Rear-view mirror . . . . . . . . . . . . . . . . . . . . . . . . . . . . .
Seats and Storage
. . . . . . . . . . . . . . . . . . . . . . . . . . . . .
Front seats . . . . . . . . . . . . . . . . . . . . . . . . . . . . . . . . . . .
Adjusting front seats electrically* . . . . . . . . . . . . . .
Head restraints . . . . . . . . . . . . . . . . . . . . . . . . . . . . . . .
Rear seats . . . . . . . . . . . . . . . . . . . . . . . . . . . . . . . . . . . .
Pedals . . . . . . . . . . . . . . . . . . . . . . . . . . . . . . . . . . . . . . .
luggage compartment . . . . . . . . . . . . . . . . . . . . . . . .
Net partition (Combi)* . . . . . . . . . . . . . . . . . . . . . . . .
The roof rack* . . . . . . . . . . . . . . . . . . . . . . . . . . . . . . . .
Note holder . . . . . . . . . . . . . . . . . . . . . . . . . . . . . . . . . .
Ashtray* . . . . . . . . . . . . . . . . . . . . . . . . . . . . . . . . . . . . .
Cigarette lighter*, power sockets . . . . . . . . . . . . . . .
Storage compartments . . . . . . . . . . . . . . . . . . . . . . . .
Heating and air conditioning system
. . . . . . . . .
Air outlet vents . . . . . . . . . . . . . . . . . . . . . . . . . . . . . . .
Heating . . . . . . . . . . . . . . . . . . . . . . . . . . . . . . . . . . . . . .
Air conditioning system* . . . . . . . . . . . . . . . . . . . . . .
Climatronic* (automatic air conditioning) . . . . . .
Starting-off and Driving
. . . . . . . . . . . . . . . . . . . . . . .
Setting steering wheel position . . . . . . . . . . . . . . . .
Ignition lock . . . . . . . . . . . . . . . . . . . . . . . . . . . . . . . . . .
Starting the engine . . . . . . . . . . . . . . . . . . . . . . . . . . .
Switching off the engine . . . . . . . . . . . . . . . . . . . . . . .
Shifting . . . . . . . . . . . . . . . . . . . . . . . . . . . . . . . . . . . . . .
Handbrake . . . . . . . . . . . . . . . . . . . . . . . . . . . . . . . . . . . Rear parking aid* . . . . . . . . . . . . . . . . . . . . . . . . . . . . .
Cruise control system (CCS)* . . . . . . . . . . . . . . . . . .
Communication
. . . . . . . . . . . . . . . . . . . . . . . . . . . . . .
Multifunction steering wheel* . . . . . . . . . . . . . . . . .
Mobile phone, handsfree-system* . . . . . . . . . . . . .
Mobile phones and two-way radio systems . . . . .
Safety
. . . . . . . . . . . . . . . . . . . . . . . . . . . . . . . . . . . . . .
Passive Safety
. . . . . . . . . . . . . . . . . . . . . . . . . . . . . . . . .
Basic information . . . . . . . . . . . . . . . . . . . . . . . . . . . .
Correct seated position . . . . . . . . . . . . . . . . . . . . . . .
Seat belts
. . . . . . . . . . . . . . . . . . . . . . . . . . . . . . . . . . . . . .
Why seat belts? . . . . . . . . . . . . . . . . . . . . . . . . . . . . . .
The physical principle of a frontal collision . . . . .
Important safety information regarding the use of
seat belts . . . . . . . . . . . . . . . . . . . . . . . . . . . . . . . . . . . .
How are seat belts correctly fastened? . . . . . . . . .
Belt tensioners . . . . . . . . . . . . . . . . . . . . . . . . . . . . . . .
Airbag system
. . . . . . . . . . . . . . . . . . . . . . . . . . . . . . . . .
Description of the airbag system . . . . . . . . . . . . . . .
Front airbag . . . . . . . . . . . . . . . . . . . . . . . . . . . . . . . . . .
Side airbags* . . . . . . . . . . . . . . . . . . . . . . . . . . . . . . . . .
Deactivating an airbag . . . . . . . . . . . . . . . . . . . . . . . .
Transporting children safely
. . . . . . . . . . . . . . . . . .
What you should know about transporting
children! . . . . . . . . . . . . . . . . . . . . . . . . . . . . . . . . . . . . .
Child seat . . . . . . . . . . . . . . . . . . . . . . . . . . . . . . . . . . . .
Attaching a child seat using the “ISOFIX” system
6
7
9
9
10
10
16
16
16
16
17
17
18
18
19
19
23
25
27
35
35
36
36
37
37
38
41
42
43 44
46
49
49
53
54
55
58
60
60
61
64
65
67
68
73
75
77
77
78
79
83
83
83
85
89
94
94
95
95
97
97
9898
99
102
102
103
104
105
105
105
106
110
110
111
111
112
115
117
117
118
121
122
125
125
128
131
s2ig.book Page 3 Monday, November 10, 2008 11:20 AM
Page 45 of 226
Unlocking and locking
44Power windows*Buttons on the driver's doorThe power windows operate only when ignition is switched on. After
switching the ignition off, the power windows can still be operated for
approx. 10 minutes if a front door is opened.
Opening a window
– A window is opened by pressing lightly on the respective button in the
door. The process stops when one releases the button.
– Additionally you can open the window automatically (fully opened) by pressing the button up to the stop. Renewed pressing of the button
causes the window to stop immediately.
Closing a window
– A window is closed through pulling lightly on the respective button in
the door. The closing process stops when one releases the button.
– Additionally you can close the window automatically (fully closed) by pulling the button up to the stop. Renewed pulling of the button
causes the window to stop immediately.
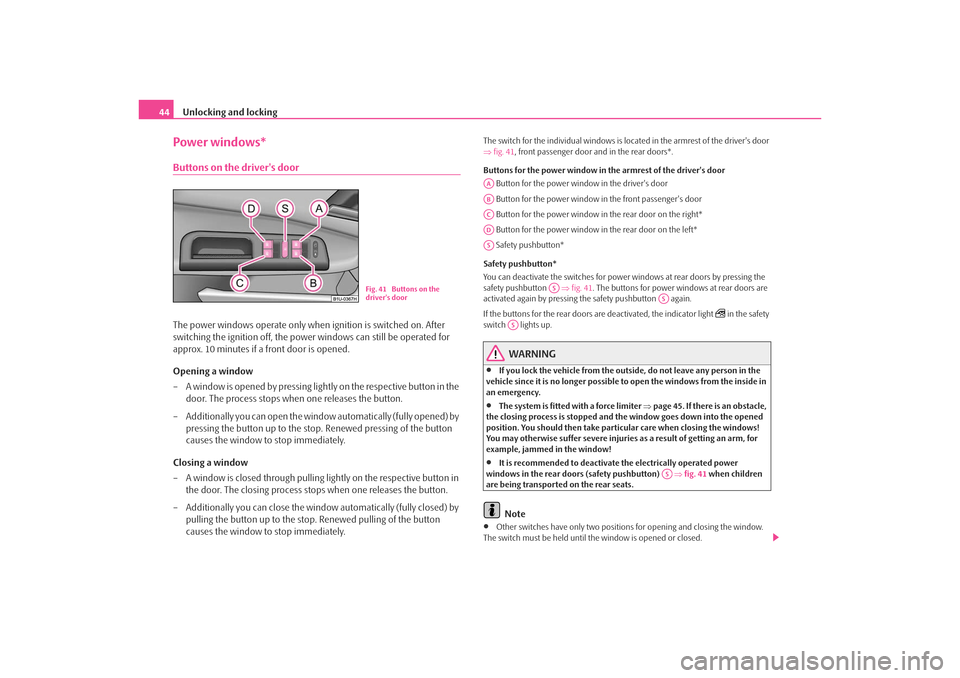
The switch for the individual windows is located in the armrest of the driver's door
⇒fig. 41 , front passenger door and in the rear doors*.
Buttons for the power window in the armrest of th e driver's door
Button for the power window in the driver's door
Button for the power window in the front passenger's door
Button for the power window in the rear door on the right*
Button for the power window in the rear door on the left*
Safety pushbutton*
Safety pushbutton*
You can deactivate the switches for power windows at rear doors by pressing the
safety pushbutton ⇒fig. 41 . The buttons for power windows at rear doors are
activated again by pressing the safety pushbutton again.
If the buttons for the rear doors are deactivated, the indicator light
in the safety
switch lights up.
WARNING
•
If you lock the vehicle from the outside, do not leave any person in the
vehicle since it is no longer possible to open the windows from the inside in
an emergency.
•
The system is fitted with a force limiter ⇒page 45. If there is an obstacle,
the closing process is stopped and the window goes down into the opened
position. You should then take particular care when closing the windows!
You may otherwise suffer severe injuries as a result of getting an arm, for
example, jammed in the window!
•
It is recommended to deactivate the electrically operated power
windows in the rear doors (safety pushbutton) ⇒fig. 41 when children
are being transported on the rear seats.Note
•
Other switches have only two positions for opening and closing the window.
The switch must be held until th e window is opened or closed.
Fig. 41 Buttons on the
driver's door
AAABACADAS
AS
AS
AS
AS
s2ig.book Page 44 Monday, November 10, 2008 11:20 AM
Page 61 of 226
Seats and Storage
60Seats and StorageFront seatsBasic informationThe front seats have a wide range of different settings and can thus be matched to
the physical characteristics of the driver and front passenger. Correct adjustment of
the seats is particularly important for•
safely and quickly reaching the controls,
•
a relaxed, fatigue-free body position,
•
achieving the maximum protection of fered by the seat belts and the
airbag system.
WARNING
•
Never transport more occupants than the maximum seating in the
vehicle.
•
Each occupant must correctly fasten the seat belt belonging to the seat.
Children must be fastened ⇒page 125, “Transporting children safely” with
a suitable restraint system.
•
The front seats and the head restraints must always be adjusted to match
the body size of the seat occupant as well as the seat belts must always be
correctly fastened in order to provide an optimal protection for you and
your occupants.
•
Always keep your feet in the footwell when the car is being driven - never
place your feet on the instrument panel, out of the window or on the
surfaces of the seats. This is particularly important for the front seat
passenger. You will be exposed to increased risk of injury if it becomes
necessary to apply the brake or in the event of an accident. If an airbag is
deployed, you may suffer fatal injuries when adopting an incorrect seated
position!
•
It is important for the driver and front passenger to maintain a distance
of at least 25 cm from the steering wheel or dash panel. Not maintaining this minimum distance will mean that the airbag system will not be able to prop-
erly protect you - hazard! The front
seats and the head restraints must
always also be correctly adjusted to match the body size of the occupant.
•
Ensure that there are no objects in the footwell as any objects may get
behind the pedals during a driving or braking manoeuvre. You would then
no longer be able to operate the clutch, to brake or accelerate.
Adjusting the front seatsAdjusting a seat in a forward/back direction
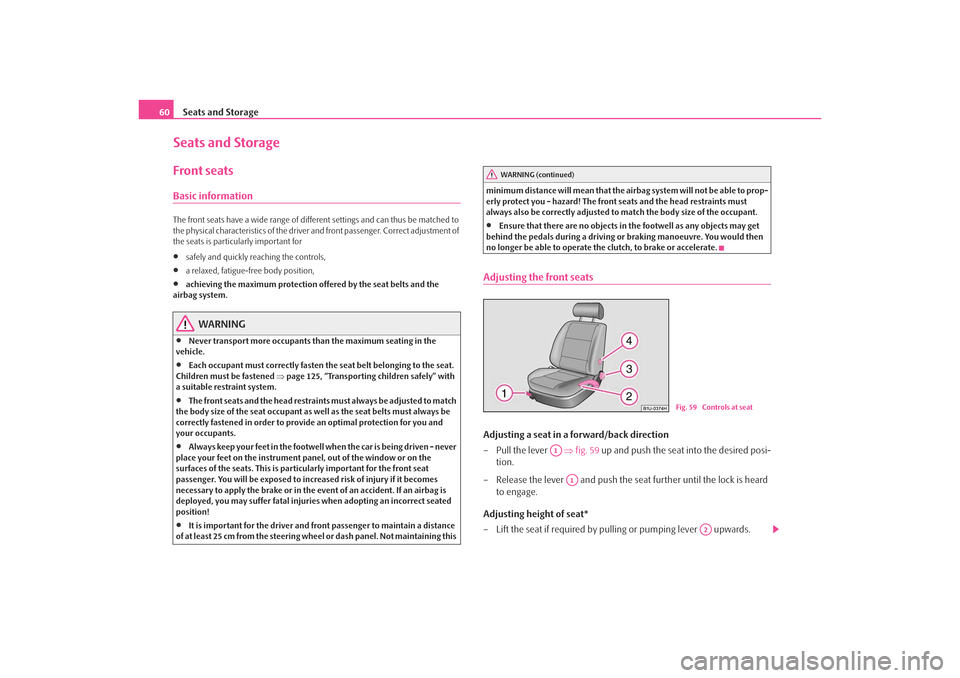
– Pull the lever ⇒fig. 59 up and push the seat into the desired posi-
tion.
– Release the lever and push the seat further until the lock is heard to engage.
Adjusting height of seat*
– Lift the seat if required by pulling or pumping lever upwards.
WARNING (continued)
Fig. 59 Controls at seat
A1
A1
A2
s2ig.book Page 60 Monday, November 10, 2008 11:20 AM
Page 63 of 226
Seats and Storage
62•
In view of the fact that the seats can also be adjusted when the ignition is
switched off (even when ignition key withdrawn), you should never leave
children unattended in the car.
•
The backrests must not be angled too far back when driving otherwise
this will affect proper operation of th e seat belts and of the airbag system -
risk of injury!Note
If the movement of the seat is inadverten tly interrupted during an adjustment, once
again press the switch in the appropriate direction and continue with the adjust-
ment of the seat to the end.Storing settingStoring seat and exterior mirror settings for driving forward
– Switch on the ignition.
– Adjust the seat ⇒page 61.
– Adjust both exterior mirrors ⇒page 58. – Press one of the memory buttons and hold the button pressed for
about 3 seconds until an audible sign al confirms that the setting has
been stored. The setting of this button was stored.
Storing exterior mirror setting for reversing*
– Switch on the ignition.
– Turn the exterior mirror control to position
⇒ page 58.
– Engage reverse gear.
– Move the right exterior mirror into the desired position ⇒page 58.
– Press one of the memory buttons and hold the button pressed for about 3 seconds until an audible sign al confirms that the setting has
been stored. The setting of the selected button was stored.
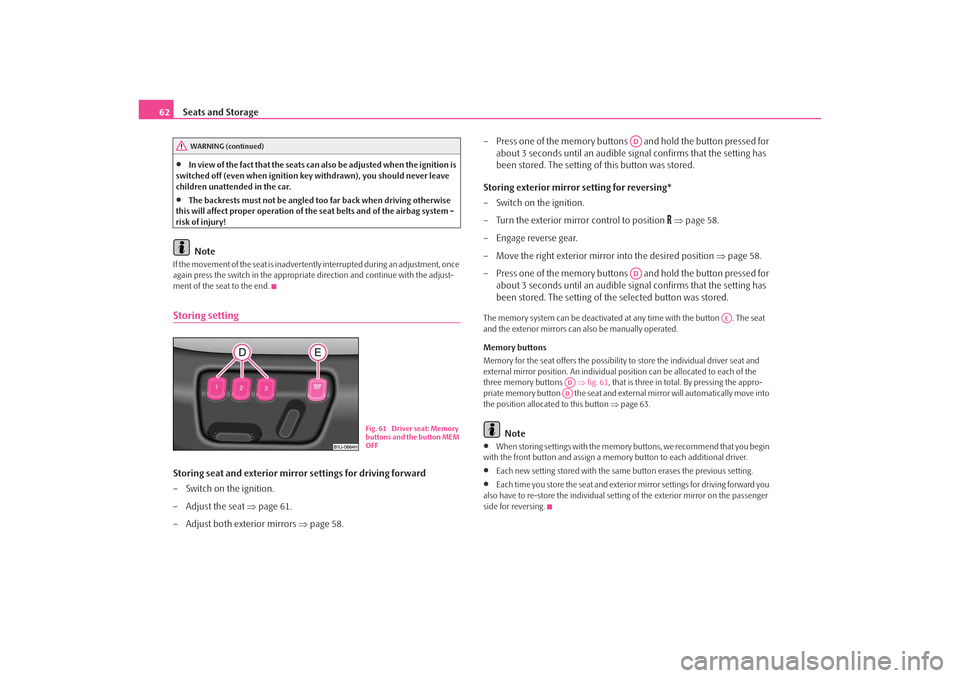
The memory system can be deactivated at any time with the button . The seat
and the exterior mirrors can also be manually operated.
Memory buttons
Memory for the seat offers the possibility to store the individual driver seat and
external mirror position. An individual po sition can be allocated to each of the
three memory buttons ⇒fig. 61 , that is three in total. By pressing the appro-
priate memory button the seat and extern al mirror will automatically move into
the position allocated to this button ⇒page 63.
Note
•
When storing settings with the memory buttons, we recommend that you begin
with the front button and assign a memory button to each additional driver.
•
Each new setting stored with the same button erases the previous setting.
•
Each time you store the seat and exterior mirror settings for driving forward you
also have to re-store the individual settin g of the exterior mirror on the passenger
side for reversing.
WARNING (continued)
Fig. 61 Driver seat: Memory
buttons and the button MEM
OFF
ADAD
AE
ADAD
s2ig.book Page 62 Monday, November 10, 2008 11:20 AM
Page 80 of 226
Seats and Storage79
Using the system
Safety
Driving Tips
General Maintenance
Breakdown assistance
Technical Data
WARNING
•
Take care when using the cigarette li ghter! Not paying proper attention
or incorrect use the cigarette lighter in an uncontrolled manner may result
in burns.
•
The cigarette lighter and the power so cket also operates when the igni-
tion is switched off or the ignition key withdrawn. You should therefore
never leave children unattended in the vehicle.Caution
Always use matching plugs to av oid damaging the power socket.
Note
•
Connecting electrical components when the engine is not running will
drain the battery of the vehicl e - risk of battery draining!
•
Further information ⇒page 181, “Accessories, chan ges and replacement of
parts”.
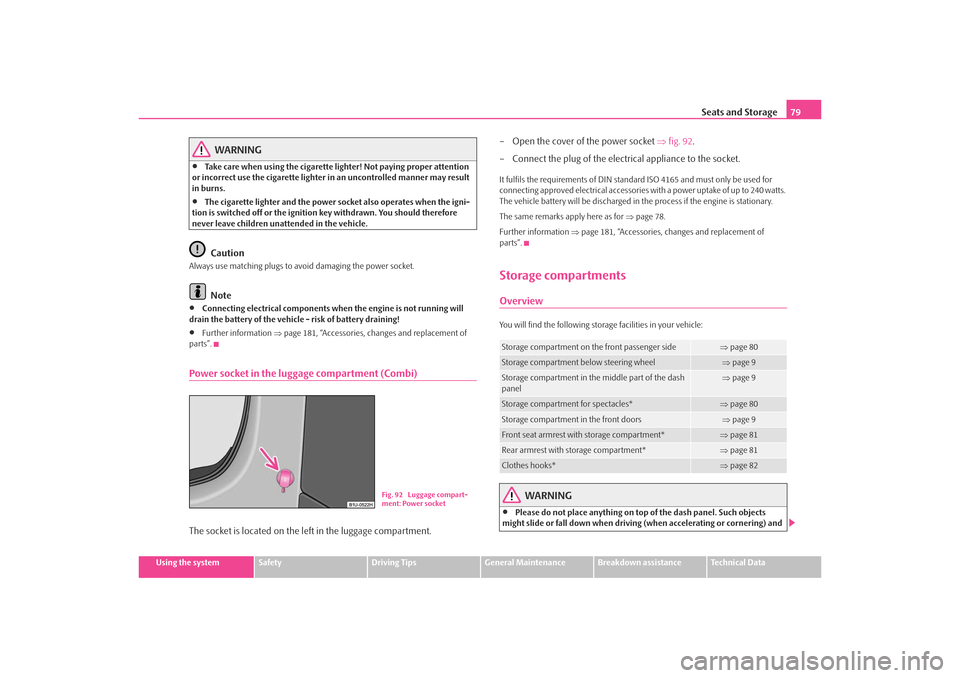
Power socket in the luggage compartment (Combi)The socket is located on the left in the luggage compartment. – Open the cover of the power socket
⇒fig. 92 .
– Connect the plug of the electrical appliance to the socket.
It fulfils the requirements of DIN standard ISO 4165 and must only be used for
connecting approved electrical accessories with a power uptake of up to 240 watts.
The vehicle battery will be discharged in the process if the engine is stationary.
The same remarks apply here as for ⇒page 78.
Further information ⇒page 181, “Accessories, changes and replacement of
parts”.Storage compartmentsOverviewYou will find the following storag e facilities in your vehicle:
WARNING
•
Please do not place anything on top of the dash panel. Such objects
might slide or fall down when driving (when accelerating or cornering) and
Fig. 92 Luggage compart-
ment: Power socket
Storage compartment on the front passenger side
⇒page 80
Storage compartment below steering wheel
⇒page 9
Storage compartment in the middle part of the dash
panel
⇒page 9
Storage compartment for spectacles*
⇒page 80
Storage compartment in the front doors
⇒page 9
Front seat armrest with storage compartment*
⇒page 81
Rear armrest with storage compartment*
⇒page 81
Clothes hooks*
⇒page 82
s2ig.book Page 79 Monday, November 10, 2008 11:20 AM
Page 106 of 226
Passive Safety105
Using the system
Safety
Driving Tips
General Maintenance
Breakdown assistance
Technical Data
SafetyPassive SafetyBasic informationDriving the safe way
Passive safety measures reduce the risk of injury in accident situa-
tions.In this section you will find important inform ation, tips and notes on the subject of
passive safety in your vehicle. We ha ve combined everything here which you
should be familiar with, for example, regarding seat belts, airbags, child seats and
safety of children. It is therefore importan t, in particular, to comply with the notes
and warnings in this section for your own interest and in the interest of those trav-
elling with you.
WARNING
•
This chapter contains important information on how to use the vehicle
for the driver and his occupants. You will find further information on safety,
which concerns you and those travelling with you, in the following chapters
of this Owner's Manual.
•
The complete on-board literature should always be in the vehicle. This
applies in particular, if you rent out or sell the vehicle.
Safety equipment
The safety equipment is part of the occupant protection and it can
reduce the risk of injuries in accident situations.“Do not put at risk” your safety and the safety of those travelling with you . In the
event of an accident, the safety equipmen t can reduce the risk of injuries. The
following list contains part of th e safety equipment in your vehicle:
•
three-point seat belts for all the seats,*,
•
belt force limiter for front seats*,
•
belt tensioner for front seats*,
•
seat belt height adjuster for front seats,
•
front airbags*,
•
side airbags*,
•
anchoring points for child seat using the “ISOFIX” system,
•
head restraint adjustable for height,
•
adjustable steering column.
The specified safety equipment works toge ther, in order to optimally protect you
and those travelling with you in accident situations. The safety equipment does not
protect you or the people travelling with you, if you or your occupants adopt an
incorrect seated position or the equipmen t is not correctly adjusted or used.
Fo r t h i s re a s o n y o u w i l l b e p ro v i d e d w i th i n fo rm a ti o n o n w hy t h i s e q u i p m e nt i s v e r y
important, how it protects you and the o ccupants, what should be observed when
using the equipment and how you and the pe ople travelling with you can make full
use of the existing safety equipment. This Owner's Manual contains important
warning notes, which you and those travelli ng with you should pay attention to in
order to reduce a risk of injury.
Safety concerns everybody!
Before setting off
The driver is always fully responsible for his occupants and for the
operating safety of the vehicle.For your own safety and the safety of the people travelling with you, please pay
attention to the following points before setting off:
s2ig.book Page 105 Monday, November 10, 2008 11:20 AM
Page 107 of 226
Passive Safety
106•
Ensure that the lighting and the turn signal system are functioning properly.
•
Inspect the tyre inflation pressure.
•
Ensure that all the windows offer a good visibility to the outside.
•
Safely attach the items of luggage ⇒page 68, “Loading the luggage compart-
ment”.
•
Ensure that no objects can obstruct the pedal.
•
Adjust the mirror, the front seat and the head restraint to match your body size.
•
Point out to your occupants that the head restraints must be adjusted to match
their body size.
•
Protect the children in suitable child se ats with correctly fastened seat belts
⇒ page 125, “Transporting children safely”.
•
Adopt the correct seated position ⇒page 106, “Correct seated position”. Also
inform your occupants to adopt the correct seated position.
•
Fasten the seat belt correctly. Also inform your occupants to properly fasten the
seat belts ⇒page 112, “How are seat belts correctly fastened?”.
What influences the driving safety?
The driving safety is primarily dete rmined by the style of driving and
the personal behaviour of all the occupants.The driver is fully responsible for himself and his occupants. If your driving safety is
effected, you place yourself and the oncomi ng traffic at risk. Please refer to the
following guidelines.•
Do not get distracted from concentrating on the traffic situation, e.g. by your
occupants or mobile phone calls.
•
Never drive when your driving ability is impaired, e.g. through medication,
alcohol, drugs.
•
Keep to the traffic regulations and the permissible speed limit.
•
Adjust the driving speed at all times to the road condition as well as to the traffic
and weather conditions.
•
Take regular breaks on long journe ys - at the latest every two hours.
Correct seated positionCorrect seated position for the driver
Correct seated position for the driver is important for safe and
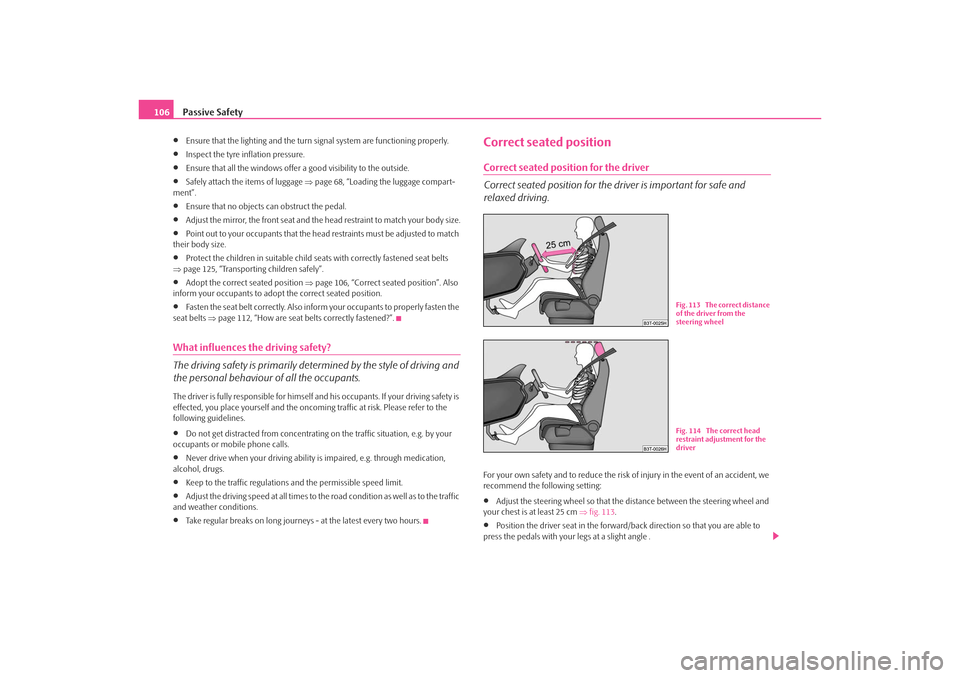
relaxed driving.For your own safety and to reduce the risk of injury in the event of an accident, we
recommend the following setting:•
Adjust the steering wheel so that the distance between the steering wheel and
your chest is at least 25 cm ⇒fig. 113 .
•
Position the driver seat in the forward/ back direction so that you are able to
press the pedals with your legs at a slight angle .
Fig. 113 The correct distance
of the driver from the
steering wheelFig. 114 The correct head
restraint adjustment for the
driver
s2ig.book Page 106 Monday, November 10, 2008 11:20 AM
Page 109 of 226
Passive Safety
108•
The backrests must not be angled too far back when driving otherwise
this will affect proper operation of th e seat belts and of the airbag system -
risk of injury!
Correct seated position for the occupants on the rear seats
Occupants on the rear seats must sit upright, keep the feet in the
footwell and must have their se at belts correctly fastened.To reduce the risk of injury in the event of a sudden braking manoeuvre or an acci-
dent, the occupants on the rear seats must observe the following:•
Adjust the head restraints so that the top edge of the head restraints are at the
same level as the upper part of your head ⇒page 106, fig. 114 .
•
Fasten the seat belt correctly ⇒ page 112, “How are seat belts correctly
fastened?”.
•
If you are transporting ⇒page 125, “Transporting children safely” children in
the vehicle, please use a suitable child restraint system.
WARNING
•
The head restraints must always be adjusted to match the body size, in
order to offer an optimal protection for you and your occupants.
•
Always keep your feet in the footwell when the car is being driven - never
put your feet out of the window or on the surfaces of the seats. You will be
exposed to increased risk of injury if it becomes necessary to apply the brake
or in the event of an accident. If an airbag is deployed, you may suffer fatal
injuries when adopting an incorrect seated position!
•
If the occupants on the rear seats are no t sitting upright, the risk of injury
is increased due to incorrect routing of the seat belt.
Examples of an incorrect seated position
An incorrect seated position can lead to severe injuries or death for
the occupants.Seat belts offer their optimum protection on ly if the webbing of the seat belts is
properly routed. Incorrect seated positio ns considerably reduce the protective
functions of the seat belts and therefore incr ease the risk of injury due to an incor-
rect routing of the seat belt. The driver is fully responsible for himself and the occu-
pants, in particular for the children. Do not permit an occupant to adopt an incor-
rect seated position when the car is moving.
The following list contains the examples of seated positions which are dangerous
for the occupants. This list is not comple te, however we would like you to get inter-
ested in this subject.
Therefore, while the car is moving never:•
stand up in the vehicle,
•
stand up on the seats,
•
kneel onto the seats,
•
tilt the backrest fully to the back,
•
lean against the dash panel,
•
lie on the rear seats,
•
only sit on the front area of the seat,
•
sit to the side,
•
lean out of the window,
•
put the feet out of the window,
•
put the feet on the dash panel,
•
put the feet on the seat upholstery,
•
occupy the footwell,
•
have the seat belt not fastened,
•
occupy the luggage compartment.
WARNING (continued)
s2ig.book Page 108 Monday, November 10, 2008 11:20 AM
Page 111 of 226
Seat belts
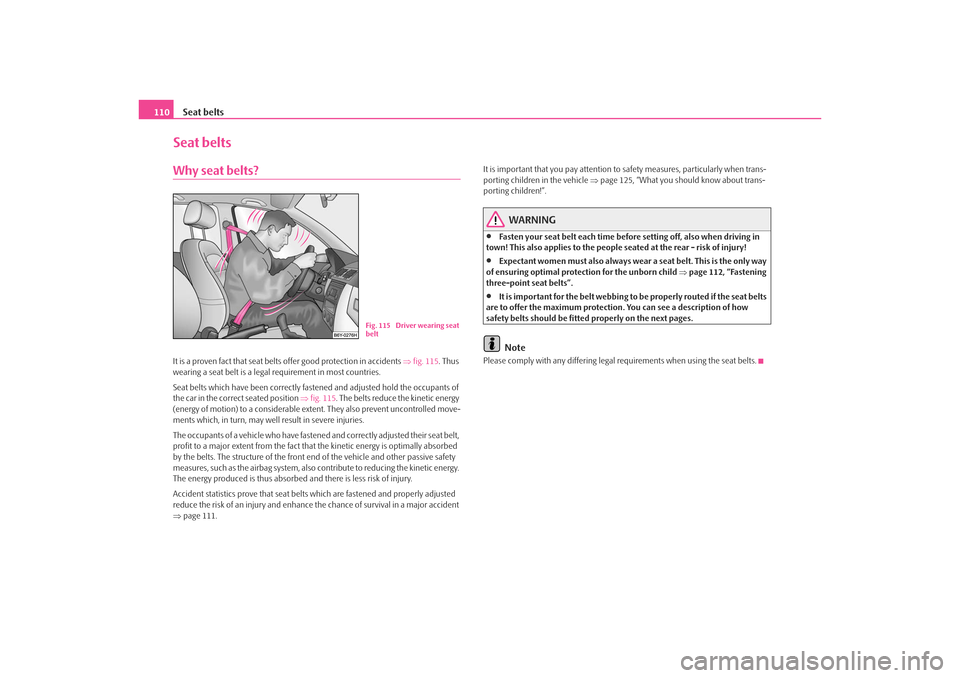
110Seat beltsWhy seat belts?It is a proven fact that seat belt s offer good protection in accidents ⇒fig. 115 . Thus
wearing a seat belt is a legal requirement in most countries.
Seat belts which have been correctly fastened and adjusted hold the occupants of
the car in the correc t seated position ⇒fig. 115 . The belts reduce the kinetic energy
(energy of motion) to a considerable extent. They also prevent uncontrolled move-
ments which, in turn, may well result in severe injuries.
The occupants of a vehicle who have fastened and correctly adjusted their seat belt,
profit to a major extent from the fact that the kinetic energy is optimally absorbed
by the belts. The structure of the front end of the vehicle and other passive safety
measures, such as the airbag system, also contribute to reducing the kinetic energy.
The energy produced is thus absorbed and there is less risk of injury.
Accident statistics prove that seat belts which are fastened and properly adjusted
reduce the risk of an injury and enhance the chance of survival in a major accident
⇒ page 111. It is important that you pay attention to
safety measures, particularly when trans-
porting children in the vehicle ⇒page 125, “What you should know about trans-
porting children!”.
WARNING
•
Fasten your seat belt each time before setting off, also when driving in
town! This also applies to the people seated at the rear - risk of injury!
•
Expectant women must also always wear a seat belt. This is the only way
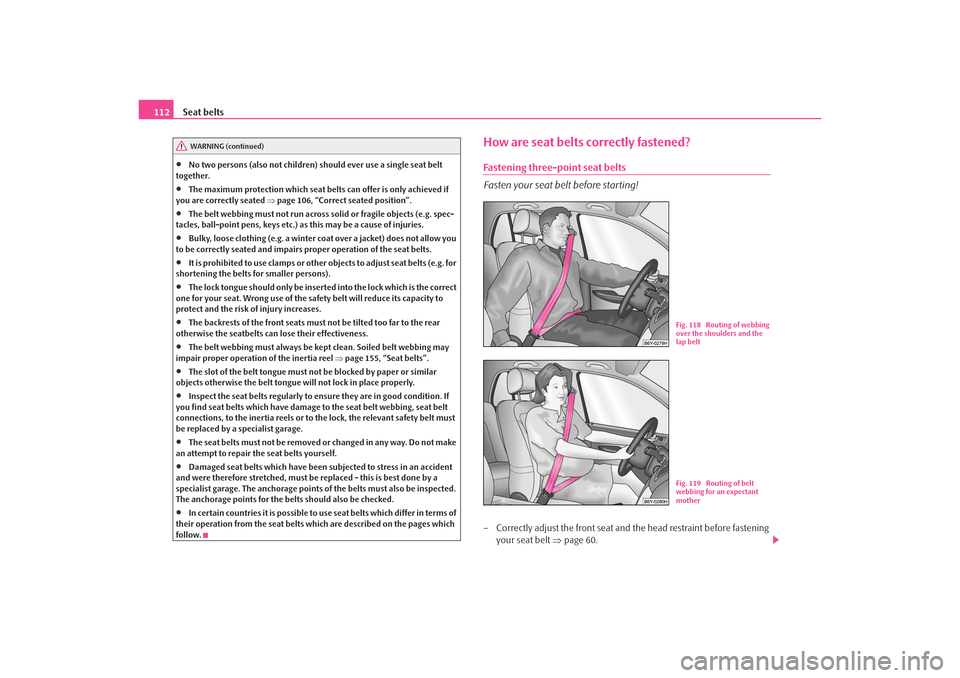
of ensuring optimal protection for the unborn child ⇒ page 112, “Fastening
three-point seat belts”.
•
It is important for the belt webbing to be properly routed if the seat belts
are to offer the maximum protection. You can see a description of how
safety belts should be fitted properly on the next pages.Note
Please comply with any differing legal requirements when using the seat belts.
Fig. 115 Driver wearing seat
belt
s2ig.book Page 110 Monday, November 10, 2008 11:20 AM
Page 113 of 226
Seat belts
112•
No two persons (also not children) should ever use a single seat belt
together.
•
The maximum protection which seat belts can offer is only achieved if
you are correctly seated ⇒page 106, “Correct seated position”.
•
The belt webbing must no t run across solid or fragile objects (e.g. spec-
tacles, ball-point pens, keys etc.) as this may be a cause of injuries.
•
Bulky, loose clothing (e.g. a winter coat over a jacket) does not allow you
to be correctly seated and impairs proper operation of the seat belts.
•
It is prohibited to use clamps or other objects to adjust seat belts (e.g. for
shortening the belts for smaller persons).
•
The lock tongue should only be insert ed into the lock which is the correct
one for your seat. Wrong use of the safety belt will reduce its capacity to
protect and the risk of injury increases.
•
The backrests of the front seats must not be tilted too far to the rear
otherwise the seatbelts can lose their effectiveness.
•
The belt webbing must always be ke pt clean. Soiled belt webbing may
impair proper operation of the inertia reel ⇒page 155, “Seat belts”.
•
The slot of the belt tongue must not be blocked by paper or similar
objects otherwise the belt tongue will not lock in place properly.
•
Inspect the seat belts regularly to ensure they are in good condition. If
you find seat belts which have damage to the seat belt webbing, seat belt
connections, to the inertia reels or to the lock, the relevant safety belt must
be replaced by a specialist garage.
•
The seat belts must not be removed or changed in any way. Do not make
an attempt to repair the seat belts yourself.
•
Damaged seat belts which have been subjected to stress in an accident
and were therefore stretched, must be replaced - this is best done by a
specialist garage. The anchorage points of the belts must also be inspected.
The anchorage points for the be lts should also be checked.
•
In certain countries it is possible to use seat belts which differ in terms of
their operation from the seat belts which are described on the pages which
follow.
How are seat belts correctly fastened?Fastening three-point seat belts
Fasten your seat belt before starting!– Correctly adjust the front seat and the head restraint before fastening
your seat belt ⇒page 60.
WARNING (continued)
Fig. 118 Routing of webbing
over the shoulders and the
lap beltFig. 119 Routing of belt
webbing for an expectant
mother
s2ig.book Page 112 Monday, November 10, 2008 11:20 AM