length SKODA OCTAVIA TOUR 2009 1.G / (1U) Owner's Manual
[x] Cancel search | Manufacturer: SKODA, Model Year: 2009, Model line: OCTAVIA TOUR, Model: SKODA OCTAVIA TOUR 2009 1.G / (1U)Pages: 226, PDF Size: 13.11 MB
Page 50 of 226
Lights and Visibility49
Using the system
Safety
Driving Tips
General Maintenance
Breakdown assistance
Technical Data
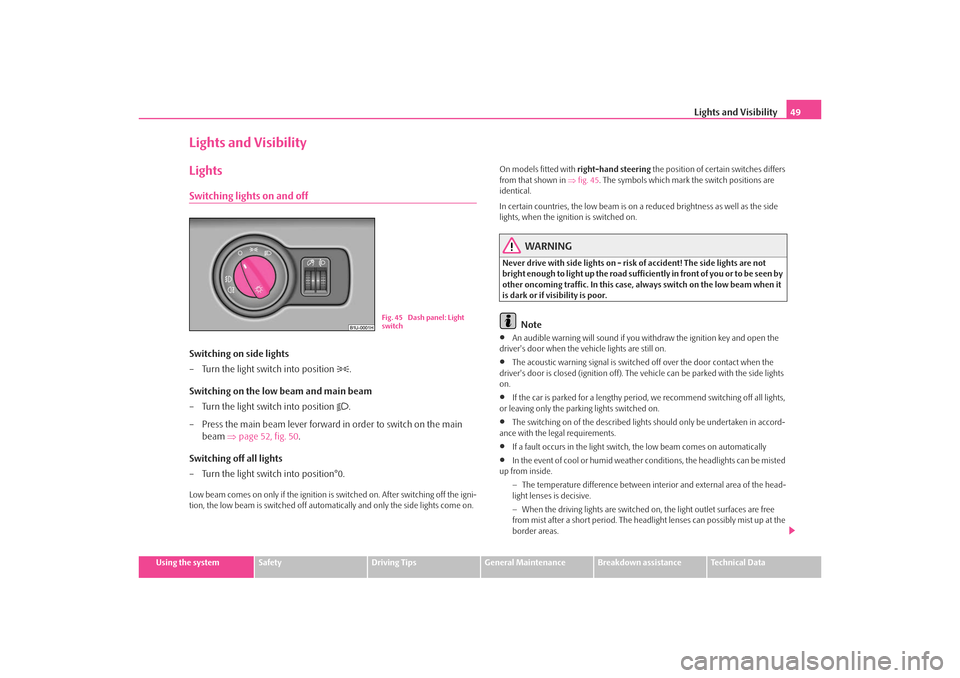
Lights and VisibilityLightsSwitching lights on and offSwitching on side lights
– Turn the light switch into position
.
Switching on the low beam and main beam
– Turn the light switch into position
.
– Press the main beam lever forward in order to switch on the main beam ⇒page 52, fig. 50 .
Switching off all lights
– Turn the light switch into position°0.
Low beam comes on only if the ignition is switched on. After switching off the igni-
tion, the low beam is switched off automatically and only the side lights come on. On models fitted with
right-hand steering the position of certain switches differs
from that shown in ⇒fig. 45 . The symbols which mark the switch positions are
identical.
In certain countries, the low beam is on a reduced brightness as well as the side
lights, when the ignition is switched on.
WARNING
Never drive with side lights on - risk of accident! The side lights are not
bright enough to light up the road suffic iently in front of you or to be seen by
other oncoming traffic. In this case, always switch on the low beam when it
is dark or if visibility is poor.
Note
•
An audible warning will sound if you wi thdraw the ignition key and open the
driver's door when the vehicle lights are still on.
•
The acoustic warning signal is switched off over the door contact when the
driver's door is closed (ignition off). The vehicle can be parked with the side lights
on.
•
If the car is parked for a lengthy period , we recommend switching off all lights,
or leaving only the parking lights switched on.
•
The switching on of the described lights should only be undertaken in accord-
ance with the legal requirements.
•
If a fault occurs in the light switch , the low beam comes on automatically
•
In the event of cool or humid weather co nditions, the headlights can be misted
up from inside.
−The temperature difference between interior and external area of the head-
light lenses is decisive.
− When the driving lights are switched on , the light outlet surfaces are free
from mist after a short period. The headlight lenses can possibly mist up at the
border areas.
Fig. 45 Dash panel: Light
switch
s2ig.book Page 49 Monday, November 10, 2008 11:20 AM
Page 87 of 226
Heating and air conditioning system
86The air conditioning only operates if button ⇒fig. 101 is pressed and the
following conditions are met:•
engine running,
•
outside temperature above +5 °C and
•
blower switch switched on (positions 1 to 4).
If the cooling system is switched on, the temperature and air humidity drops in the
vehicle. The wellbeing of the occupants of the car is enhanced as a result of this
particularly at high outside temperatures and a high air humidity. The system
prevents the windows misting up during the cold season of the year.
The heating effect is dependent upon th e coolant temperature, thus full heat
output only occurs when the engine has reached its operating temperature.
It is possible to briefly activate recirc ulated air mode in order to enhance the
cooling effect ⇒ .
Air at a temperature of about 5°C may flow out of the vents under certain circum-
stances when the cooling system is operating. Lengthy and uneven distribution of
the air flow out of the vents (in particular at the leg area) and large differences in
temperature, for example when getting out of the vehicle, can result in chills in
sensitive persons.
The air inlet in front of the windscreen must be free of ice, snow or leaves in order
to ensure that the heating and cooling systems operate properly.
After switching on the cooling Condensation from the evaporator of the air condi-
tioning may drip down and form a puddle below the vehicle. This is quite normal
and not an indication of a leak!
WARNING
•
For your own safety and that of other road users, ensure that all the
windows are free of ice, snow and mistin g. Please familiarize yourself about
how to correctly operate th e heating and ventilation systems, how to demist
and defrost the windows, as well as with the cooling mode.
•
You should not leave recirculated air mode on over a longer period of
time, as “stale” air may result in fatigue in the driver and occupants, divert
your attention and also cause the windows to mist up. The risk of having an accident increases. Switch recirculated air mode off as soon as the windows
begin misting up.
Note
•
We recommend that you do not smoke in the vehicle when the recirculating air
mode is operating since the smoke which is drawn at the evaporator from the inte-
rior of the vehicle forms deposits in the evaporator of the air conditioning system.
This produces a permanent odour when th e air conditioning system is operating
which can only be eliminated through co nsiderable effort and expense (replace-
ment of compressor).
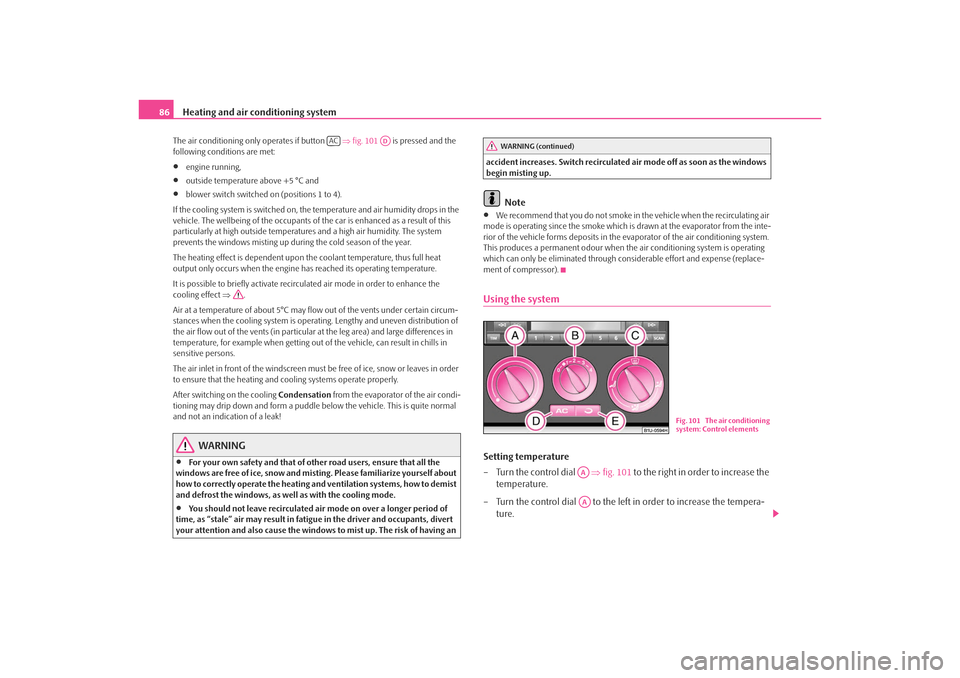
Using the systemSetting temperature
– Turn the control dial ⇒fig. 101 to the right in order to increase the
temperature.
– Turn the control dial to the left in order to increase the tempera- ture.
AC
AD
WARNING (continued)
Fig. 101 The air conditioning
system: Control elements
AAAA
s2ig.book Page 86 Monday, November 10, 2008 11:20 AM
Page 88 of 226
Heating and air conditioning system87
Using the system
Safety
Driving Tips
General Maintenance
Breakdown assistance
Technical Data
Controlling blower
– Turn the blower switch into one of the positions, 1 to 4, in order to
switch the blower on.
– Turn the blower switch into position 0 in order to switch the blower off.
– IF you wish to close the inlet for fresh air, use the switch - Recirculated air mode ⇒page 88.
Control for air distribution
– You can adjust the direction of the air flow using the air distribution
control ⇒page 83.
switching cooling on and off
– Press the button ⇒page 86, fig. 101 . The warning light lights
up in the button. – When you again press the switch , the cooling system is switched
off. The warning light in the button goes out.
Note
•
The whole heat output will be needed to unfrost the windscreen and side
windows. No warm air will be fed to the footwell. This can lead to restriction of the
heating comfort.
•
The used air streams out through the air removal openings in the luggage
compartment.
•
If the cooling system has not been switched on for a lengthy period, odours may
be produced at the evaporator because of deposits. Switch the cooling system on
at least once a month for approximately 5 mi nutes at the highest blower stage - also
during the cold season of the year - in order to remove such odours. Also open a
window for a short time.
•
Please refer to the information regarding recirculated air mode ⇒page 88.
Setting air conditioning systemRecommended settings of ai r conditioning controls:
ABAB
AE
AC
AC
AD
AC
Set-up
Setting of the control dial
Button
Air outlet vents 3
Air outlet vents 4
Defrosting the windscreen
and side windows
up to the stop
towards the right
3
switched off
do not switch on
close
open and align with the side window
Free windscreen and side
windows from mist
desired temper-
ature
2 or 3
switched on
do not switch on
close
open and align with the side window
the fastest heating
up to the stop towards the
right
3
switched off
briefly switched on
open
open
AA
AB
AC
AD
AE
s2ig.book Page 87 Monday, November 10, 2008 11:20 AM
Page 90 of 226
Heating and air conditioning system89
Using the system
Safety
Driving Tips
General Maintenance
Breakdown assistance
Technical Data
For the sake of the environment
When you economize on fuel, you also reduce pollutant emissions.Climatronic* (automatic air conditioning)Description
The Climatronic system is a combination of an automatic heating,
fresh air and cooling system which provides optimal comfort for the
occupants of the car.The Climatronic maintains a constant temp erature fully automatically, once it has
been set. This is achiev ed by automatically varying the temperature of the
outflowing air, the blower stages and the ai r distribution. The system also takes into
account bright sunlight which eliminates the need to alter the settings manually.
The automatic mode ⇒ page 91 ensures maximum wellbeing of the occupants at
all times of the year.
Description of Climatronic system
The cooling operates only if the following conditions are met:•
engine running,
•
outside temperature above +5 °C,
•
the button is not pressed.
If the cooling system is switched on, the temperature and air humidity drops in the
vehicle. The wellbeing of the occupants of the car is enhanced as a result of this
particularly at high outs ide temperatures and a high air humidity. The system
prevents the windows misting up during the cold season of the year.
The heating effect is dependent upon th e coolant temperature, thus full heat
output only occurs when the engine has reached its operating temperature.
It is possible to briefly activate recirc ulated air mode in order to enhance the
cooling effect ⇒ .
The air inlet in front of the windscreen must be free of ice, snow or leaves in order
to ensure that the heating and cooling systems operate properly. The AC compressor is switched off at
a high coolant temperature in order to
provide cooling at a high load of the engine.
After switching on the cooling Condensation from the evaporator of the air condi-
tioning may drip down and form a puddle below the vehicle. This is quite normal
and not an indication of a leak!
If you make a change before switching off the ignition, which differs from the auto-
matic mode, the changed functions remain stored. Only the function “circulating
air” is erased 20 minutes after switching off the ignition.
Recommended setting for all periods of the year:
•
Set the temperature to 22 °C (72 °F).
•
Press the button ⇒page 90, fig. 102 .
•
Move the air outlet vents 3 and 4 so that the air flow is directed slightly upwards
⇒ page 83, fig. 99 .
Switching over between degrees Celsius and degrees Fahrenheit
Press and hold the buttons 17 and 9 ⇒page 90, fig. 102. The infor-
mation in the desired temperature measuring unit appears in the display.
WARNING
•
For your own safety and that of other road users, ensure that all the
windows are free of ice, snow and mistin g. Please familiarize yourself about
how to correctly operate th e heating and ventilation systems, how to demist
and defrost the windows, as well as with the cooling mode.
•
You should not leave recirculated air mode on over a longer period of
time, as “stale” air may result in fatigue in the driver and occupants, divert
your attention and also cause the windows to mist up. The risk of having an
accident increases. Switch recirculated air mode off as soon as the windows
begin misting up.Note
•
If the cooling system has not been switched on for a lengthy period, odours may
be produced at the evaporator because of deposits. Switch the cooling system on
at least once a month for approximately 5 mi nutes at the highest blower stage - also
ECON
AUTO
ECON
AUTO
s2ig.book Page 89 Monday, November 10, 2008 11:20 AM
Page 93 of 226
Heating and air conditioning system
92Recirculated air mode
In recirculated air mode air is sucked out of the interior of the vehicle
and then fed back into the interior.Recirculated air mode prevents polluted air outside the vehicle from
getting into the vehicle, for example when driving through a tunnel or
when standing in a traffic jam.
Switching recirculated air mode on
– Press the button - the warning light lights up in the button.
Switching recirculated air mode off
– Press again the button or the button - the warning light in
the button goes out.
WARNING
You should not leave recirculated air mode on over a longer period of time,
as “stale” air may result in fatigue in the driver and occupants, divert your
attention and also cause the windows to mist up. The risk of having an acci-
dent increases. Switch recirculated air mode off as soon as the windows
begin misting up.
Note
If the windscreen mists up, press the button ⇒page 90, fig. 102 . After the
windscreen has been demisted, press the button .Setting temperatureYou can set the interior temperature randomly with the buttons and .
You can set the interior temperature between +18°C (64°F) and +29°C (28.89°C).
The interior temperature is regulated automa tically within this range. If you select
the temperature below +18°C (17.78°C), “LO” appears in the display. If you select
the temperature higher than +29°C (28.89°C), “HI” appears in the display. In both
limit positions the Climatronic operates at maximum cooling or heating capacity,
respectively. The temperature is not controlled in this case.
Lengthy and uneven distribution of the air flow out of the vents (in particular at the
leg area) and large differences in temperature, for example when getting out of the
vehicle, can result in chills in sensitive persons.Controlling blower
There are a total of six blower stages available.The Climatronic system controls the bl ower stages automatically in line
with the interior temperature. You can also, however, adapt the blower
stages manually to suit your particular needs.
– Press the button or ⇒page 90, fig. 102 in order to decrease or
increase the speed.Switch off the blowers, the Climatronic is switched off and in the display shows
OFF .
The set blower speed is indicated by the lighting up of the respective number of
bars at the point .
WARNING
•
“Stale air” may result in fatigue in the driver and occupants, reduce
attention levels and also cause the windows to mist up. The risk of having an
accident increases.
•
Do not switch the Climatronic syst em off for longer than necessary.
•
Switch the Climatronic system on as soon as the windows mist up.
AUTO
A1AUTO
A15
A16
A11
A12
A2
s2ig.book Page 92 Monday, November 10, 2008 11:20 AM
Page 98 of 226
Starting-off and Driving97
Using the system
Safety
Driving Tips
General Maintenance
Breakdown assistance
Technical Data
Starting the engine after the fuel tank has run dry
It may take longer than normal to start the
engine after refuelling if the fuel tank has
run completely dry - up to one minute. This is because the fuel system must first of
all be filled while the attempting to start the engine.
Switching off the engine– The engine can be switched off by turning the ignition key from posi- tion into ⇒page 95, fig. 105 .
WARNING
•
Never switch off the engine before the vehicle is stationary - risk of acci-
dent!
•
The brake booster only operates when the engine is running. Greater
physical effort for braking is required when engine is switched off. Because
if you do not stop as normal, this can cause an accident and severe injuries.Caution
you should not switch the engine off right away at the end of your journey after the
engine has been operated for a lengthy period at high loads but should be allowed
it to run at idling speed for about 2 minutes . This prevents any accumulation of heat
when the engine is switched off.
Note
•
The radiator fan may continue running fo r a further 10 minutes or so after the
engine and the ignition have been switched off. The coolant fan may, however, also
switch on again after some time if the coolant temperature rises because of an
accumulation of heat in the engine or if the engine is warm and the engine
compartment is additionally heated by strong sunlight.
•
This is why particular care is required when carrying out any work in the engine
compartment ⇒page 162, “Working in the engine compartment”.
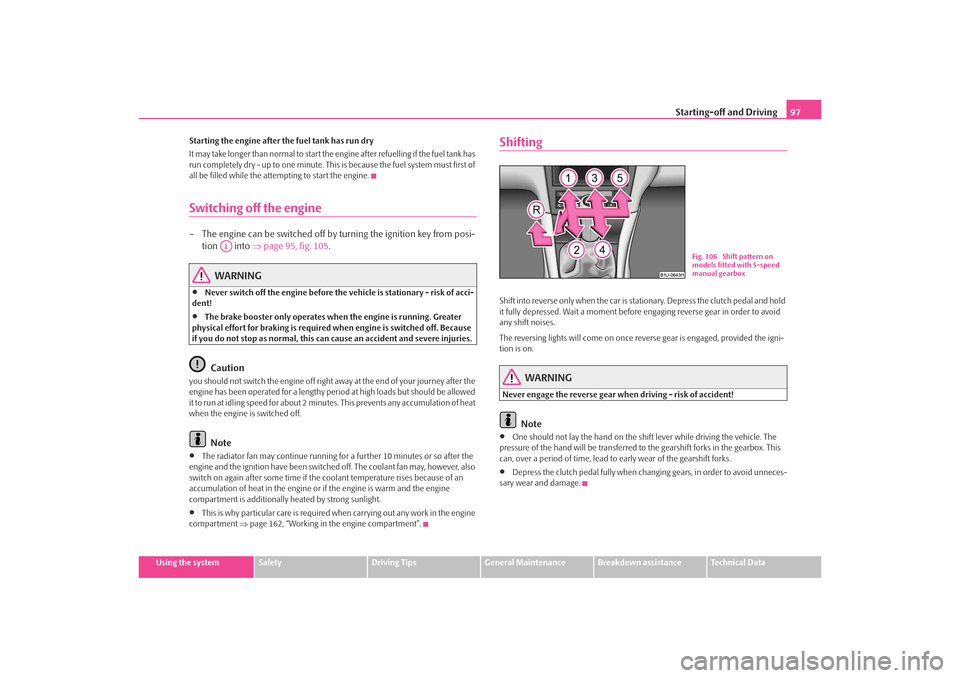
ShiftingShift into reverse only when the car is stationary. Depress the clutch pedal and hold
it fully depressed. Wait a moment before engaging reverse gear in order to avoid
any shift noises.
The reversing lights will come on once re verse gear is engaged, provided the igni-
tion is on.
WARNING
Never engage the reverse gear when driving - risk of accident!
Note
•
One should not lay the hand on the shift lever while driving the vehicle. The
pressure of the hand will be transferred to the gearshift forks in the gearbox. This
can, over a period of time, lead to early wear of the gearshift forks.
•
Depress the clutch pedal fully when changing gears, in order to avoid unneces-
sary wear and damage.
A1
Fig. 106 Shift pattern on
models fitted with 5-speed
manual gearbox
s2ig.book Page 97 Monday, November 10, 2008 11:20 AM
Page 116 of 226

Seat belts115
Using the system
Safety
Driving Tips
General Maintenance
Breakdown assistance
Technical Data
The pelvic belt*The rear middle seat is fitted with a pelvic belt. The lock part of the two-
point pelvic belt is operated in the same way as for a three-point safety
belt. An unused pelvic belt should be stowed away together with the lock
for safety reasons.
Extending the pelvic belt
– Hold the lock tongue at right an gles to the belt webbing and pull
through the desired amount of belt webbing ⇒fig. 123 . Shortening the pelvic belt
– Pull on the free end of the belt.
– Fix the excess belt length by threading it through the plastic slider.
The adjustment of the belt length is facili
tated by simultaniously pressing the belt
tongue and the belt cover lengthwise.
WARNING
The pelvic belt must always sit firmly across the pelvis; tighten the belt
webbing if necessary.Belt tensionersSafety for the driver and front passenger wearing their seat belts is enhanced by
the belt tensioners fitted to the inertia reels of the front three-point seat belts, in
addition to the protection afforded by the airbag system.
The three-point seat belts are automatically tensioned in the event of a frontal colli-
sion of a certain severity. The belt tensioners can also be deployed if the seat belts
are not fastened.
The belt tensioner is deployed in the event of a frontal collision of major severity. A
powder charge is ignited in the inertia reels during deployment. The belt webbing
is pulled into the inertia reels by a mech anical system and the belt is tensioned.
Belt tensioners are not activated in the ev ent of minor frontal collisions, side and
rear-end collisions, in the case of a rollover and also not in accidents in which no
major forces are produced from the front.
WARNING
•
Any work on the system including removal and installation of system
components because of other repair work, must only be carried out by a
specialist garage.
Fig. 122 Fasten pelvic beltFig. 123 Extending the pelvic
belt
s2ig.book Page 115 Monday, November 10, 2008 11:20 AM
Page 142 of 226
Driving and the Environment141
Using the system
Safety
Driving Tips
General Maintenance
Breakdown assistance
Technical Data
The fuel consumption can naturally also be
influenced by factors which are beyond
the driver's control. It is, for example, normal for the fu el consumption to increase
in winter and under worsened conditions such as poor road conditions, towing a
trailer, etc.
The technical requirements for low fuel usage and economic efficiency of the
vehicle have already been built into the ve hicle at the works. Special attention has
been given to minimising ne gative effects on the environment. It is necessary to
take note of the guidelines given in this chapter in order to make best use of these
characteristics and to maintain their effectiveness.
The optimal engine speed should be obtained when accelerating, in order to avoid
a high fuel consumption an d resonance of the vehicle.
Looking ahead when driving
A vehicle's highest fuel consumption occurs it accelerates.Avoid accelerating and brakin g unnecessarily. If you drive with forsight you will not
need to brake so often and will also then not have to accelerate so much. Let your
vehicle coast to a stop, for example, if this is possible, when you see that the next
set of traffic lights is at red.Shifting gears and saving energy
Shifting up early saves on fuel.
Manual gearbox
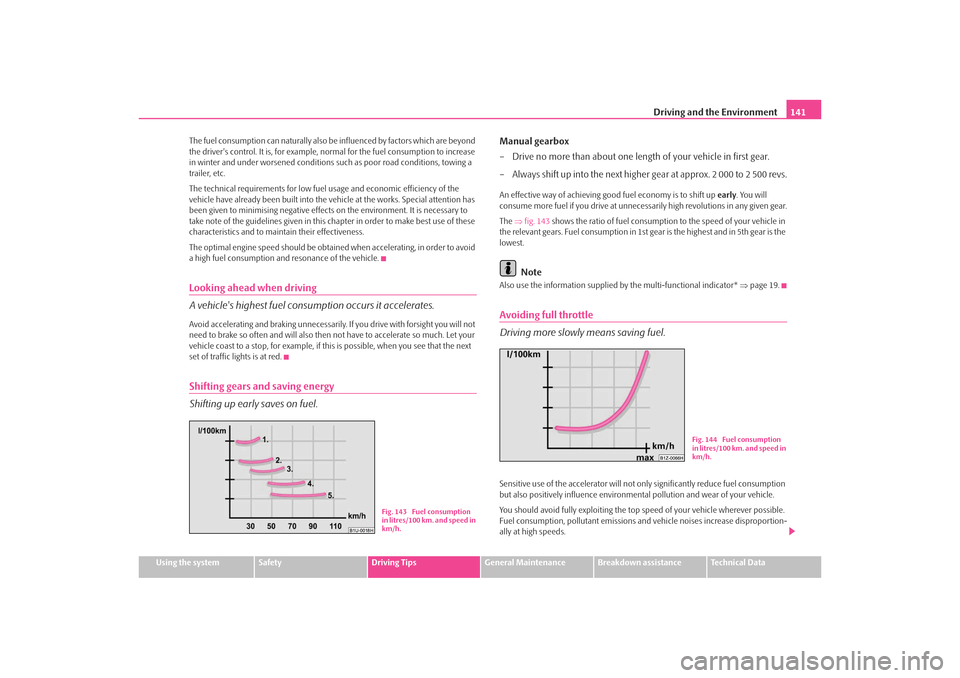
– Drive no more than about one length of your vehicle in first gear.
– Always shift up into the next higher gear at approx. 2 000 to 2 500 revs.An effective way of achieving good fuel economy is to shift up early. You will
consume more fuel if you drive at unnecessa rily high revolutions in any given gear.
The ⇒fig. 143 shows the ratio of fuel consumption to the speed of your vehicle in
the relevant gears. Fuel consumption in 1st gear is the highest and in 5th gear is the
lowest.
Note
Also use the information supplied by the multi-functional indicator* ⇒page 19.Avoiding full throttle
Driving more slowly means saving fuel.Sensitive use of the accelerator will not only significantly reduce fuel consumption
but also positively influe nce environmental pollution and wear of your vehicle.
You should avoid fully exploiting the top speed of your vehicle wherever possible.
Fuel consumption, pollutant emissions an d vehicle noises increase disproportion-
ally at high speeds.
Fig. 143 Fuel consumption
in litres/100 km. and speed in
km/h.
Fig. 144 Fuel consumption
in litres/100 km. and speed in
km/h.
s2ig.book Page 141 Monday, November 10, 2008 11:20 AM
Page 143 of 226
Driving and the Environment
142The ⇒page 141, fig. 144 shows the ratio of fuel consumption to the speed of your
vehicle. You will cut your fuel consumption by half if you only make use three-quar-
ters of the possible top speed of your vehicle.Reducing idling
Idling also costs fuel.It is worthwhile switching off the engine in a traffic jam or when waiting at a level
crossing or at traffic lights with a length y red phase. Even after just 30 - 40 seconds
you will have saved more fuel than that is needed when you start the engine up
again.
If an engine is only idling it takes much longer for it to reach its normal operating
temperature. Wear-and-tear and pollutant em issions, though, are particularly high
in the warming-up phase. This is why you should drive off right after starting the
engine. Do avoid high engine revolutions at this time, however.Regular servicing
A poorly tuned engine consumes an unnecessarily high amount of
fuel.Having your vehicle serviced regularly at a specialist garge enables you to satisfy
one of the requirements for economical motoring even before you set off on your
journey. Keeping your vehicle properly servic ed not only has a positive effect on the
safety of your vehicle and maintaining its value, but also saves on fuel.
A poorly tuned engine can result in a fu el consumption which is 10% higher than
normal.
The foreseen maintenance work should be undertaken exactly according to the
Service schedule by a specialist garage.
Also check the oil level after refueling. Oil consumption is dependent to a consid-
erable extent on the load and speed of the engine. Oil consumption could be as
high as 0.5 litres/1 000 km depending on your style of driving.
It is quite normal that a new engine ha s a higher oil consumption at first, and
reaches its lowest level only after a cert ain running in time. It is therefore not possible to correctly assess the oil cons
umption of a new vehicle until after you
have driven about 5 000 km.
For the sake of the environment
•
You can achieve additional improvements in your fuel economy by using high-
lubricity oils.
•
Check the ground below your car at regula r intervals to detect any leakages in
good time. Please have your vehicle inspected by a specialist garge if you find any
stains caused by oil or other fluids on the floor.
Avoid driving short distances
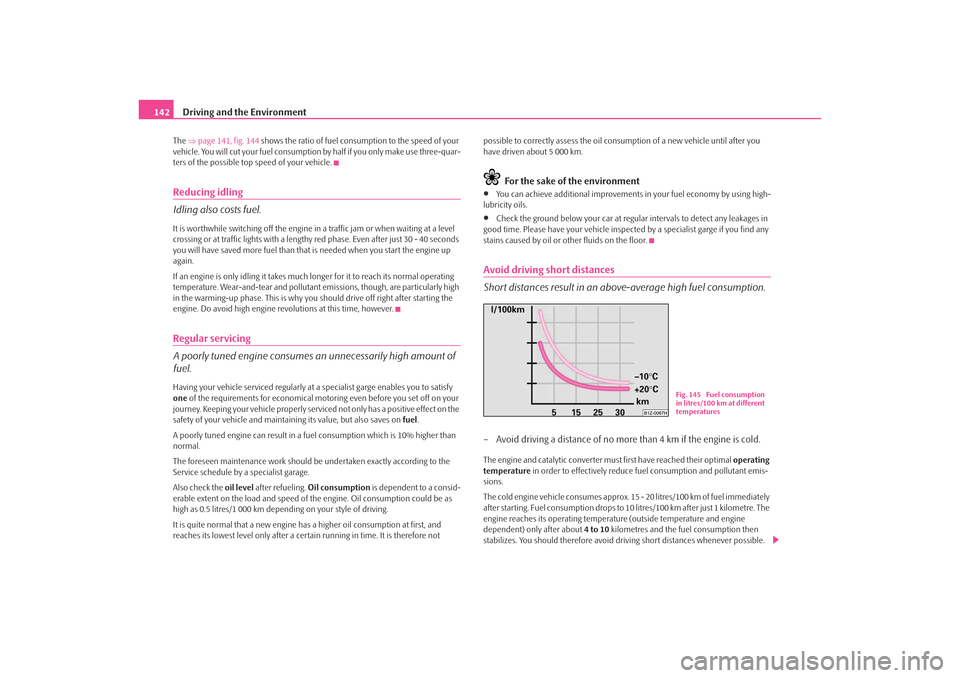
Short distances result in an above-average high fuel consumption.– Avoid driving a distance of no more than 4 km if the engine is cold.The engine and catalytic converter mu st first have reached their optimal operating
temperature in order to effectively reduce fuel consumption and pollutant emis-
sions.
The cold engine vehicle consumes approx. 15 - 20 litres/100 km of fuel immediately
after starting. Fuel consumption drops to 10 litres/100 km after just 1 kilometre. The
engine reaches its operating temperat ure (outside temperature and engine
dependent) only after about 4 to 10 kilometres and the fuel consumption then
stabilizes. You should therefore avoid driving short distances whenever possible.
Fig. 145 Fuel consumption
in litres/100 km at different
temperatures
s2ig.book Page 142 Monday, November 10, 2008 11:20 AM
Page 147 of 226
Towing a trailer
146should be attached to foldin g arms. Adjust the mirrors so that they provide you with
an adequate field of view to the rear.
Headlights
Before starting off with a hitched trailer, also check the setting of the headlights.
Alter the setting as necessary with the aid of the headlight beam adjuster
⇒ page 51.
Detachable ball head
The ball rod is detachable on vehicles wh ich feature a factory-fitted towing device.
It is stowed together with separate fitting instructions in the spare wheel well in the
luggage compartment of the vehicle.
Further information on the towing device ⇒page 147.
Note
•
We recommend that you also have yo ur vehicle inspected between service
intervals if you tow a trailer frequently.
•
The handbrake on the towing vehicle must be put on when coupling and
decoupling the trailer.
Driving Tips
Particular caution is required when towing a trailer.– Do not, as far as possible, drive with your vehicle unladen and the
trailer laden.
– Do not make full use of the legal maximum speeds. This applies in
particular to downhill sections.
– Apply the brakes in good time.
– Keep a check on the coolant temper ature gauge if the outside temper-
ature is high.
Distribution of weight
The distribution of the weight is very poor if your vehicle is unladen and the trailer
is laden. Maintain a particularly low speed if you cannot avoid driving with this
combination.
Driving speed
Do not drive faster than 80 km/hour for sa fety reasons. This also applies for coun-
tries in which higher speeds are allowed.
The fact that the driving stability of the vehicle + trailer combination reduces with
increasing speed means that the legally allowed speed should not be used when
there are unfavourable road, weather or wi nd conditions, particularly near acci-
dent black spots.
You must always reduce your speed immedi ately as soon as you detect even just
the slightest swaying of the trailer. On no account attempt to stop the trailer from
“swaying” by accelerating.
Apply the brakes in good time! If the trailer is fitted with a trailer brake, apply the
brakes gently at first and then brake firmly. This will avoid brake jolts resulting from
the trailer wheels locking. Shift down gears in good time before negotiating a
downhill section to allow the en gine to also act as a brake.
Engine overheating
Please keep a check on the coolant temperature gauge if you have to negotiate a
lengthy slope in a low gear at a high engi ne speed when the outside temperature is
very high ⇒page 16.
If the needle of the coolant temperature gauge moves into the right-hand area or
even the red area of the scale, reduce yo ur speed immediately. Stop and switch off
the engine if the warning light
in the instrument cluste r begins flashing. Wait a
few minutes and check the level of coolant in the coolant expansion bottle
⇒ page 167, “Inspecting the coolant level”.
Please refer to the following guidelines ⇒page 30, “Coolant temperature/ Coolant
quantity ”.
The coolant temperature can be reduced by switching on the heating.
Any increase in the cooling effect of the coolant fan through shifting down a gear
and increasing the engine speed is not possible since the fan speed is independent
s2ig.book Page 146 Monday, November 10, 2008 11:20 AM