lock SKODA RAPID 2013 1.G Owner's Guide
[x] Cancel search | Manufacturer: SKODA, Model Year: 2013, Model line: RAPID, Model: SKODA RAPID 2013 1.GPages: 226, PDF Size: 15.16 MB
Page 56 of 226
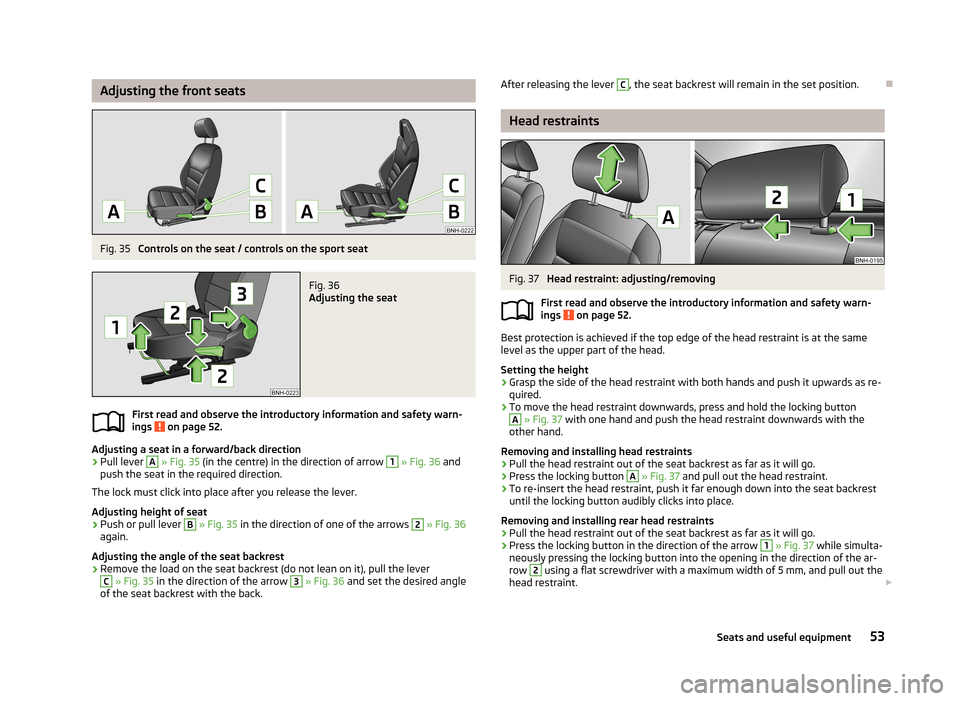
Adjusting the front seatsFig. 35
Controls on the seat / controls on the sport seat
Fig. 36
Adjusting the seat
First read and observe the introductory information and safety warn-
ings on page 52.
Adjusting a seat in a forward/back direction
›
Pull lever
A
» Fig. 35 (in the centre) in the direction of arrow
1
» Fig. 36 and
push the seat in the required direction.
The lock must click into place after you release the lever.
Adjusting height of seat
›
Push or pull lever
B
» Fig. 35 in the direction of one of the arrows
2
» Fig. 36
again.
Adjusting the angle of the seat backrest
›
Remove the load on the seat backrest (do not lean on it), pull the lever
C
» Fig. 35 in the direction of the arrow
3
» Fig. 36 and set the desired angle
of the seat backrest with the back.
After releasing the lever C, the seat backrest will remain in the set position.
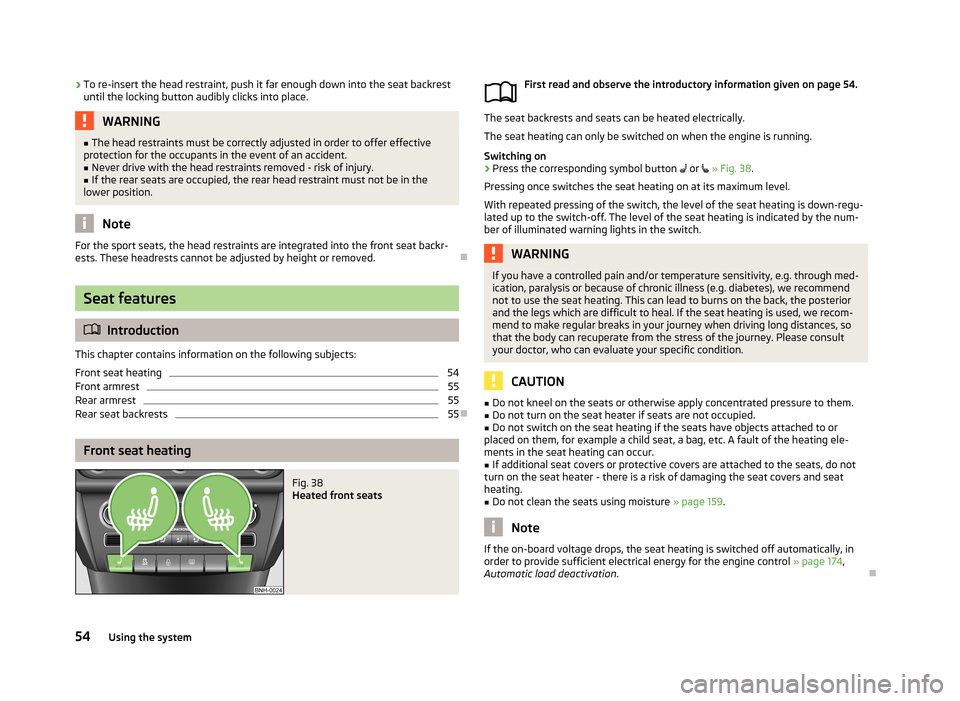
Head restraints
Fig. 37
Head restraint: adjusting/removing
First read and observe the introductory information and safety warn- ings
on page 52.
Best protection is achieved if the top edge of the head restraint is at the same
level as the upper part of the head.
Setting the height
›
Grasp the side of the head restraint with both hands and push it upwards as re-
quired.
›
To move the head restraint downwards, press and hold the locking button
A
» Fig. 37 with one hand and push the head restraint downwards with the
other hand.
Removing and installing head restraints
›
Pull the head restraint out of the seat backrest as far as it will go.
›
Press the locking button
A
» Fig. 37 and pull out the head restraint.
›
To re-insert the head restraint, push it far enough down into the seat backrest
until the locking button audibly clicks into place.
Removing and installing rear head restraints
›
Pull the head restraint out of the seat backrest as far as it will go.
›
Press the locking button in the direction of the arrow
1
» Fig. 37 while simulta-
neously pressing the locking button into the opening in the direction of the ar- row
2
using a flat screwdriver with a maximum width of 5 mm, and pull out the
head restraint.
53Seats and useful equipment
Page 57 of 226
›To re-insert the head restraint, push it far enough down into the seat backrest
until the locking button audibly clicks into place.WARNING■ The head restraints must be correctly adjusted in order to offer effective
protection for the occupants in the event of an accident.■
Never drive with the head restraints removed - risk of injury.
■
If the rear seats are occupied, the rear head restraint must not be in the
lower position.
Note
For the sport seats, the head restraints are integrated into the front seat backr-
ests. These headrests cannot be adjusted by height or removed.
Seat features
Introduction
This chapter contains information on the following subjects:
Front seat heating
54
Front armrest
55
Rear armrest
55
Rear seat backrests
55
Front seat heating
Fig. 38
Heated front seats
First read and observe the introductory information given on page 54.
The seat backrests and seats can be heated electrically. The seat heating can only be switched on when the engine is running.
Switching on
›
Press the corresponding symbol button or » Fig. 38 .
Pressing once switches the seat heating on at its maximum level.
With repeated pressing of the switch, the level of the seat heating is down-regu- lated up to the switch-off. The level of the seat heating is indicated by the num-
ber of illuminated warning lights in the switch.
WARNINGIf you have a controlled pain and/or temperature sensitivity, e.g. through med-
ication, paralysis or because of chronic illness (e.g. diabetes), we recommend
not to use the seat heating. This can lead to burns on the back, the posterior
and the legs which are difficult to heal. If the seat heating is used, we recom-
mend to make regular breaks in your journey when driving long distances, so
that the body can recuperate from the stress of the journey. Please consult
your doctor, who can evaluate your specific condition.
CAUTION
■ Do not kneel on the seats or otherwise apply concentrated pressure to them.■Do not turn on the seat heater if seats are not occupied.■
Do not switch on the seat heating if the seats have objects attached to or
placed on them, for example a child seat, a bag, etc. A fault of the heating ele-
ments in the seat heating can occur.
■
If additional seat covers or protective covers are attached to the seats, do not
turn on the seat heater - there is a risk of damaging the seat covers and seat
heating.
■
Do not clean the seats using moisture » page 159.
Note
If the on-board voltage drops, the seat heating is switched off automatically, in
order to provide sufficient electrical energy for the engine control » page 174,
Automatic load deactivation .
54Using the system
Page 58 of 226
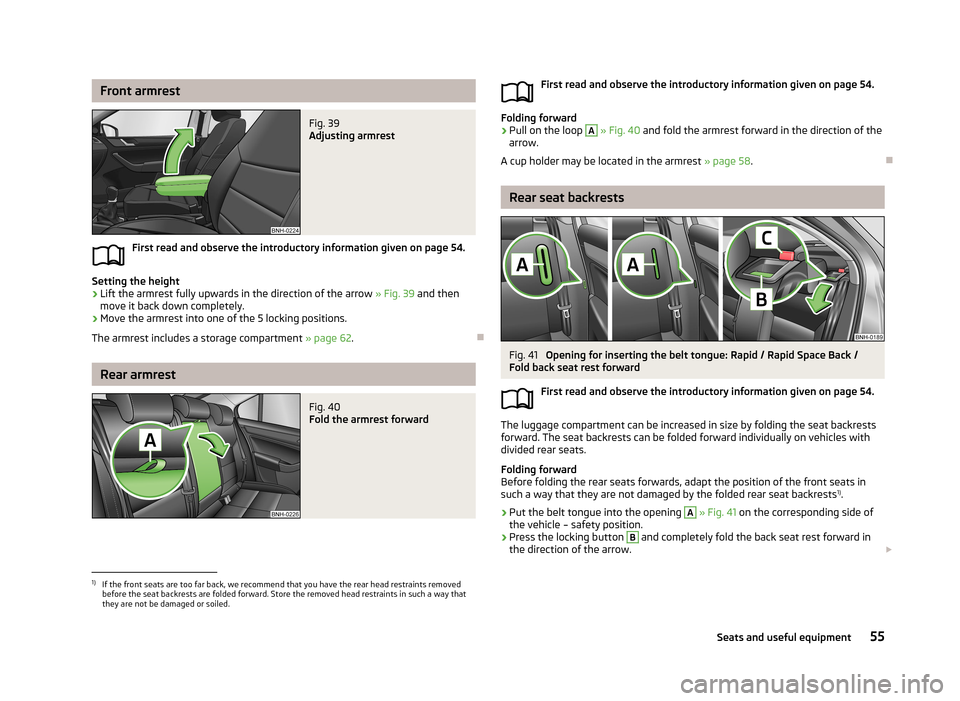
Front armrestFig. 39
Adjusting armrest
First read and observe the introductory information given on page 54.
Setting the height
›
Lift the armrest fully upwards in the direction of the arrow » Fig. 39 and then
move it back down completely.
›
Move the armrest into one of the 5 locking positions.
The armrest includes a storage compartment » page 62.
Rear armrest
Fig. 40
Fold the armrest forwardFirst read and observe the introductory information given on page 54.
Folding forward
›
Pull on the loop
A
» Fig. 40 and fold the armrest forward in the direction of the
arrow.
A cup holder may be located in the armrest » page 58.
Rear seat backrests
Fig. 41
Opening for inserting the belt tongue: Rapid / Rapid Space Back /
Fold back seat rest forward
First read and observe the introductory information given on page 54.
The luggage compartment can be increased in size by folding the seat backrests
forward. The seat backrests can be folded forward individually on vehicles with
divided rear seats.
Folding forward
Before folding the rear seats forwards, adapt the position of the front seats in
such a way that they are not damaged by the folded rear seat backrests 1)
.
›
Put the belt tongue into the opening
A
» Fig. 41 on the corresponding side of
the vehicle – safety position.
›
Press the locking button
B
and completely fold the back seat rest forward in
the direction of the arrow.
1)
If the front seats are too far back, we recommend that you have the rear head restraints removed
before the seat backrests are folded forward. Store the removed head restraints in such a way that
they are not be damaged or soiled.
55Seats and useful equipment
Page 59 of 226
Folding backwards›If you removed the head restraint, you need to reinsert it with the backrest til-ted slightly forwards.›
Then push the seat backrest back into the upright position until the locking but-
ton
B
clicks into place – check by pulling on the seat backrest » .
›
Make sure that the red pin
C
is hidden.
WARNING■
The belts and the belt locks must be in their original position after folding
back the seat backrests – they must be ready to use.■
The seat backrests must be securely locked in position so that no objects in
the luggage compartment can slide into the passenger compartment on sud- den braking – risk of injury.
■
Ensure that the rear seat backrests are properly engaged. Only then can the
seat belt for the middle seat reliably fulfil its function.
CAUTION
Ensure that the seat belts are not damaged when operating the seat backrests. Under no circumstances must the rear seat belts be jammed by the folded back
seat backrests.
Practical equipment
Introduction
This chapter contains information on the following subjects:
Car park ticket holder
56
Storage compartments in the doors
57
Holder for reflective vest
57
Storage compartments in centre console
58
Cup holders
58
Cigarette lighter
59
Ashtray
59
12-volt power outlet
60
Waste container
60
Multimedia holder
61
Storage compartment in the front arm rest
62Glasses storage box62Storage compartment on the passenger side63
Clothes hook
63
Storage pockets on the front seats
64
Meshed pockets on the front seat backrests
64WARNING■ Do not place anything on the dash panel. These objects might slide or fall
down when driving (when accelerating or cornering) and may distract you
from concentrating on the traffic – there is the risk of an accident.■
When driving, ensure that no objects from the centre console or from other
storage compartments can get into the driver's footwell. You would then no
longer be able to apply the brakes or operate the clutch or accelerator pedal –
risk of accident!
■
No objects should be placed in the storage compartments nor in the drinks
holders; the vehicle occupants could be endangered if there is sudden braking
or the vehicle collides with something.
■
Ash and cigarette or cigar stubs must only be discarded in ashtrays!
Car park ticket holder
Fig. 42
Parking ticket holder
First read and observe the introductory information and safety warn-
ings on page 56.
The note holder is designed e.g. for attaching car park tickets.
56Using the system
Page 66 of 226
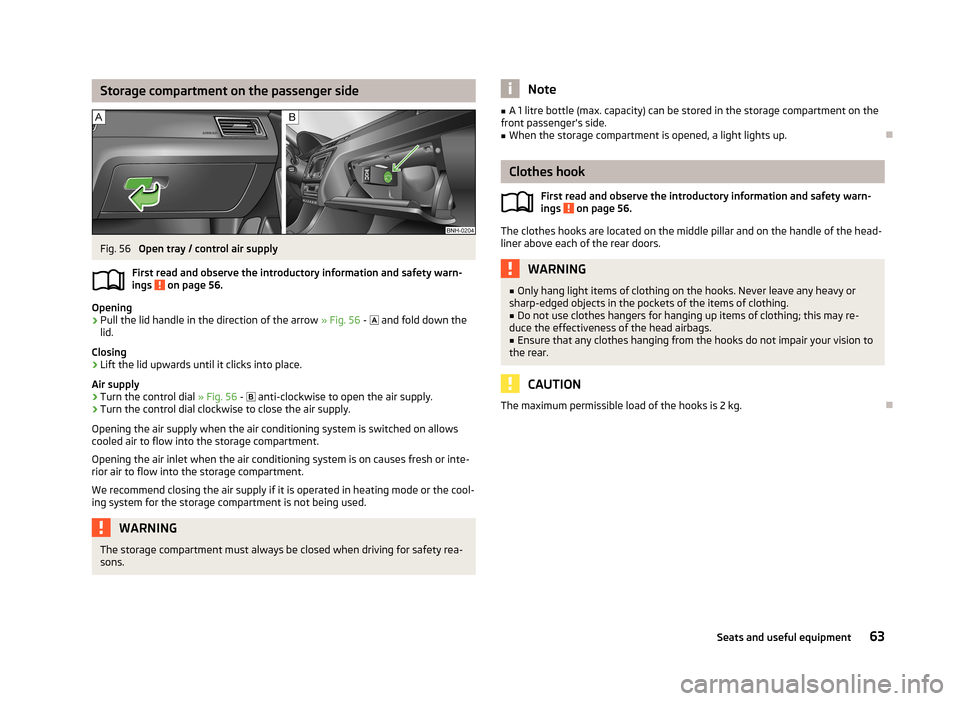
Storage compartment on the passenger sideFig. 56
Open tray / control air supply
First read and observe the introductory information and safety warn- ings
on page 56.
Opening
›
Pull the lid handle in the direction of the arrow » Fig. 56 -
and fold down the
lid.
Closing
›
Lift the lid upwards until it clicks into place.
Air supply
›
Turn the control dial » Fig. 56 -
anti-clockwise to open the air supply.
›
Turn the control dial clockwise to close the air supply.
Opening the air supply when the air conditioning system is switched on allows cooled air to flow into the storage compartment.
Opening the air inlet when the air conditioning system is on causes fresh or inte-rior air to flow into the storage compartment.
We recommend closing the air supply if it is operated in heating mode or the cool- ing system for the storage compartment is not being used.
WARNINGThe storage compartment must always be closed when driving for safety rea-
sons.Note■ A 1 litre bottle (max. capacity) can be stored in the storage compartment on the
front passenger's side.■
When the storage compartment is opened, a light lights up.
Clothes hook
First read and observe the introductory information and safety warn-ings
on page 56.
The clothes hooks are located on the middle pillar and on the handle of the head-
liner above each of the rear doors.
WARNING■ Only hang light items of clothing on the hooks. Never leave any heavy or
sharp-edged objects in the pockets of the items of clothing.■
Do not use clothes hangers for hanging up items of clothing; this may re-
duce the effectiveness of the head airbags.
■
Ensure that any clothes hanging from the hooks do not impair your vision to
the rear.
CAUTION
The maximum permissible load of the hooks is 2 kg.
63Seats and useful equipment
Page 70 of 226
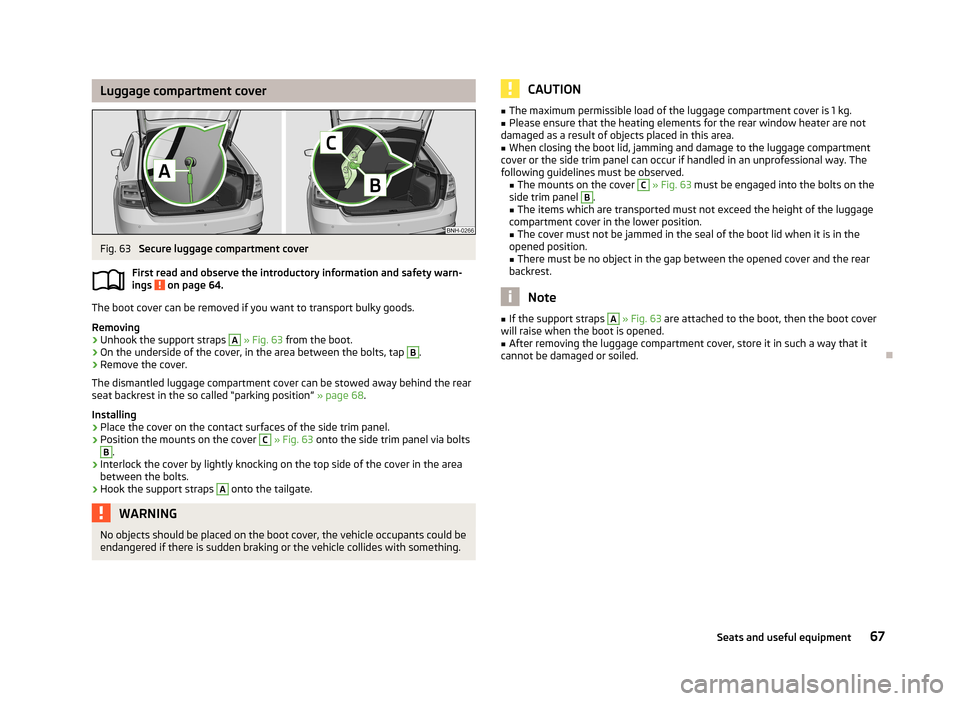
Luggage compartment coverFig. 63
Secure luggage compartment cover
First read and observe the introductory information and safety warn- ings
on page 64.
The boot cover can be removed if you want to transport bulky goods.
Removing
›
Unhook the support straps
A
» Fig. 63 from the boot.
›
On the underside of the cover, in the area between the bolts, tap
B
.
›
Remove the cover.
The dismantled luggage compartment cover can be stowed away behind the rear
seat backrest in the so called “parking position” » page 68.
Installing
›
Place the cover on the contact surfaces of the side trim panel.
›
Position the mounts on the cover
C
» Fig. 63 onto the side trim panel via bolts
B
.
›
Interlock the cover by lightly knocking on the top side of the cover in the area
between the bolts.
›
Hook the support straps
A
onto the tailgate.
WARNINGNo objects should be placed on the boot cover, the vehicle occupants could be
endangered if there is sudden braking or the vehicle collides with something.CAUTION■ The maximum permissible load of the luggage compartment cover is 1 kg.■Please ensure that the heating elements for the rear window heater are not
damaged as a result of objects placed in this area.■
When closing the boot lid, jamming and damage to the luggage compartment
cover or the side trim panel can occur if handled in an unprofessional way. The
following guidelines must be observed. ■ The mounts on the cover
C
» Fig. 63 must be engaged into the bolts on the
side trim panel
B
.
■ The items which are transported must not exceed the height of the luggage
compartment cover in the lower position.
■ The cover must not be jammed in the seal of the boot lid when it is in the
opened position. ■ There must be no object in the gap between the opened cover and the rear
backrest.
Note
■ If the support straps A » Fig. 63 are attached to the boot, then the boot cover
will raise when the boot is opened.■
After removing the luggage compartment cover, store it in such a way that it
cannot be damaged or soiled.
67Seats and useful equipment
Page 72 of 226
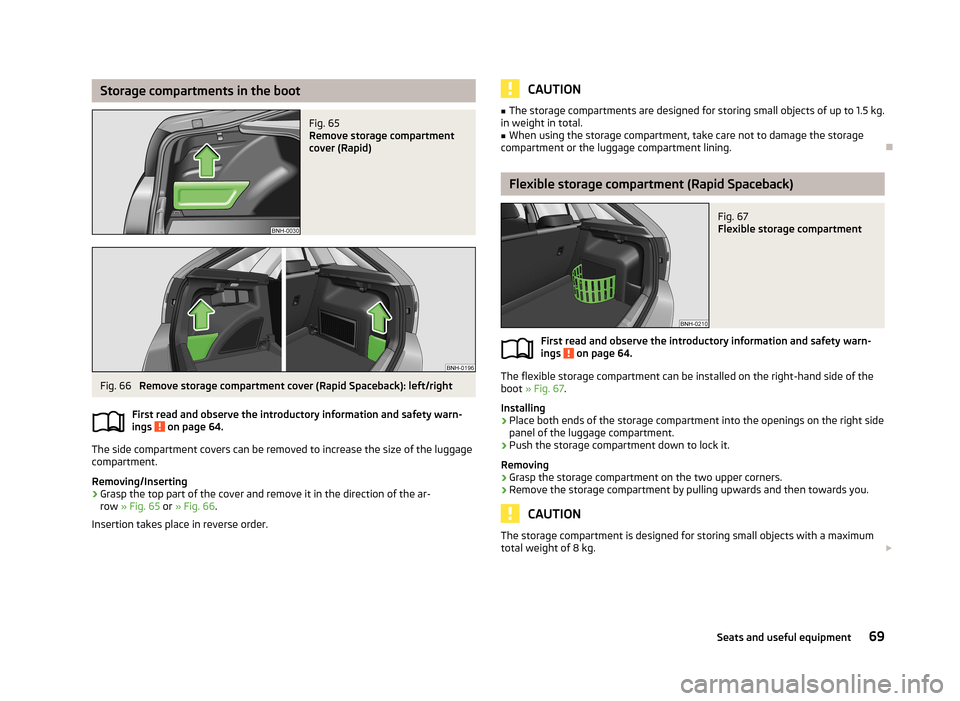
Storage compartments in the bootFig. 65
Remove storage compartment
cover (Rapid)
Fig. 66
Remove storage compartment cover (Rapid Spaceback): left/right
First read and observe the introductory information and safety warn-
ings
on page 64.
The side compartment covers can be removed to increase the size of the luggage
compartment.
Removing/Inserting
›
Grasp the top part of the cover and remove it in the direction of the ar- row » Fig. 65 or » Fig. 66 .
Insertion takes place in reverse order.
CAUTION■ The storage compartments are designed for storing small objects of up to 1.5 kg.
in weight in total.■
When using the storage compartment, take care not to damage the storage
compartment or the luggage compartment lining.
Flexible storage compartment (Rapid Spaceback)
Fig. 67
Flexible storage compartment
First read and observe the introductory information and safety warn-
ings on page 64.
The flexible storage compartment can be installed on the right-hand side of the
boot » Fig. 67 .
Installing
›
Place both ends of the storage compartment into the openings on the right side
panel of the luggage compartment.
›
Push the storage compartment down to lock it.
Removing
›
Grasp the storage compartment on the two upper corners.
›
Remove the storage compartment by pulling upwards and then towards you.
CAUTION
The storage compartment is designed for storing small objects with a maximum
total weight of 8 kg. 69Seats and useful equipment
Page 76 of 226
CAUTION■When removing or inserting the variable loading floor, the maximum distance of
15 cm B » Fig. 73 underneath the boot cover must be adhered to - risk of damag-
ing the boot lid seal.■
When inserting the variable loading floor into the vehicle, the luggage compart-
ment cover must not be in the “parking position” » page 68.
Note
After removing the variable cargo floor, place it down in such a way that it cannot
be damaged or soiled.
Folding up/down
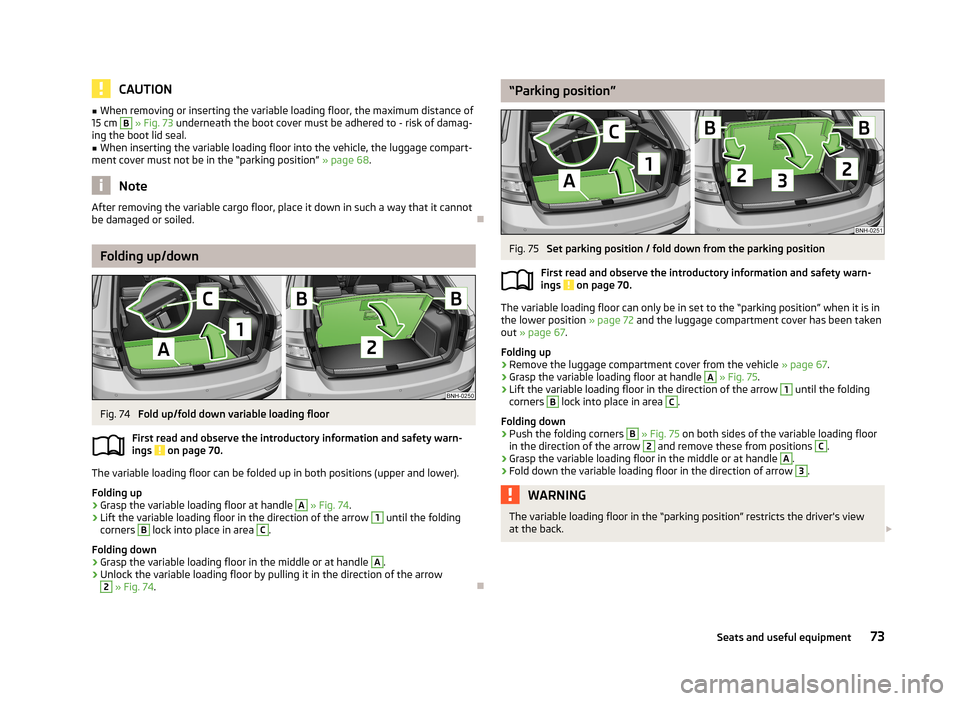
Fig. 74
Fold up/fold down variable loading floor
First read and observe the introductory information and safety warn- ings
on page 70.
The variable loading floor can be folded up in both positions (upper and lower).
Folding up
›
Grasp the variable loading floor at handle
A
» Fig. 74 .
›
Lift the variable loading floor in the direction of the arrow
1
until the folding
corners
B
lock into place in area
C
.
Folding down
›
Grasp the variable loading floor in the middle or at handle
A
.
›
Unlock the variable loading floor by pulling it in the direction of the arrow
2
» Fig. 74 .
“Parking position”Fig. 75
Set parking position / fold down from the parking position
First read and observe the introductory information and safety warn-
ings
on page 70.
The variable loading floor can only be in set to the “parking position” when it is in the lower position » page 72 and the luggage compartment cover has been taken
out » page 67 .
Folding up
›
Remove the luggage compartment cover from the vehicle » page 67.
›
Grasp the variable loading floor at handle
A
» Fig. 75 .
›
Lift the variable loading floor in the direction of the arrow
1
until the folding
corners
B
lock into place in area
C
.
Folding down
›
Push the folding corners
B
» Fig. 75 on both sides of the variable loading floor
in the direction of the arrow
2
and remove these from positions
C
.
›
Grasp the variable loading floor in the middle or at handle
A
.
›
Fold down the variable loading floor in the direction of arrow
3
.
WARNINGThe variable loading floor in the “parking position” restricts the driver's view
at the back. 73Seats and useful equipment
Page 94 of 226
Entering a phone number
The telephone number can be entered as a continuous sequence of numbers spo-
ken one after the other (the whole number at once) or in the form of digit blocks
(separated by short pauses). After each string of digits (separated by a brief pause
in speaking), all of the digits detected up to now are repeated by the system.
The digits 0-9 and symbols +, , # are permitted. The system does not recognize
any combination of connected numbers, e.g. "twenty-three".
Switching on voice control
Briefly press the button 1
» Fig. 83 on the multifunction steering wheel.
Switching off voice control
If the system is currently playing a message, the message that is currently being
played must be terminated by briefly pressing button
1
» Fig. 83 on the multi-
function steering wheel.
If the system is expecting a voice command, you can end the dialogue yourself:
› with the
CANCEL voice command;
› by briefly pressing the button
1
» Fig. 83 on the multifunction steering wheel.
Note
■
The dialogue is immediately terminated in the event of an incoming call.■The voice control is only possible in vehicles fitted with a multifunction steering
wheel with telephone control.
Dialogue – version 2
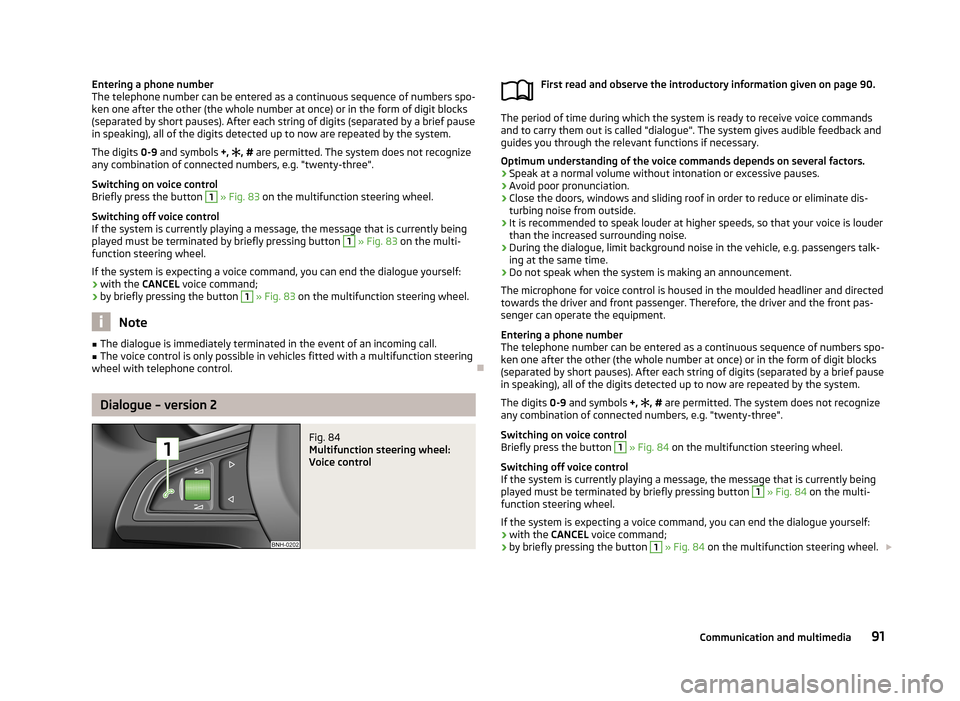
Fig. 84
Multifunction steering wheel:
Voice control
First read and observe the introductory information given on page 90.
The period of time during which the system is ready to receive voice commands and to carry them out is called "dialogue". The system gives audible feedback and
guides you through the relevant functions if necessary.
Optimum understanding of the voice commands depends on several factors. › Speak at a normal volume without intonation or excessive pauses.
› Avoid poor pronunciation.
› Close the doors, windows and sliding roof in order to reduce or eliminate dis-
turbing noise from outside.
› It is recommended to speak louder at higher speeds, so that your voice is louder
than the increased surrounding noise.
› During the dialogue, limit background noise in the vehicle, e.g. passengers talk-
ing at the same time.
› Do not speak when the system is making an announcement.
The microphone for voice control is housed in the moulded headliner and directed towards the driver and front passenger. Therefore, the driver and the front pas-
senger can operate the equipment.
Entering a phone number
The telephone number can be entered as a continuous sequence of numbers spo-
ken one after the other (the whole number at once) or in the form of digit blocks
(separated by short pauses). After each string of digits (separated by a brief pause
in speaking), all of the digits detected up to now are repeated by the system.
The digits 0-9 and symbols +,
, # are permitted. The system does not recognize
any combination of connected numbers, e.g. "twenty-three".
Switching on voice control
Briefly press the button
1
» Fig. 84 on the multifunction steering wheel.
Switching off voice control
If the system is currently playing a message, the message that is currently being
played must be terminated by briefly pressing button
1
» Fig. 84 on the multi-
function steering wheel.
If the system is expecting a voice command, you can end the dialogue yourself:
› with the
CANCEL voice command;
› by briefly pressing the button
1
» Fig. 84 on the multifunction steering wheel.
91Communication and multimedia
Page 99 of 226
Driving
Starting-off and Driving
Steering
Introduction
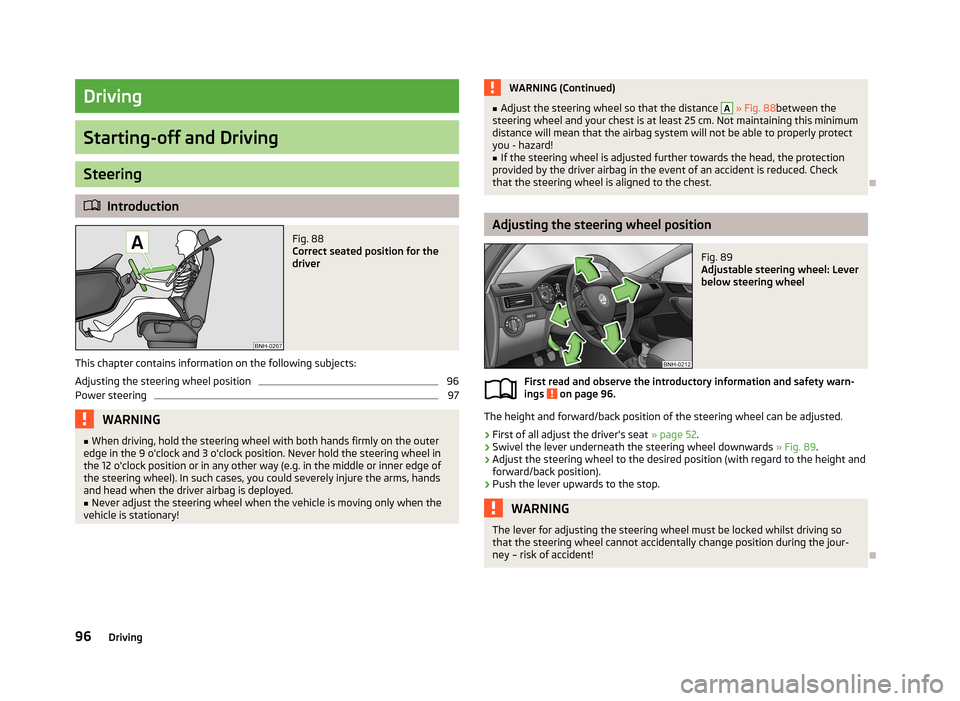
Fig. 88
Correct seated position for the
driver
This chapter contains information on the following subjects:
Adjusting the steering wheel position
96
Power steering
97WARNING■ When driving, hold the steering wheel with both hands firmly on the outer
edge in the 9 o'clock and 3 o'clock position. Never hold the steering wheel in
the 12 o'clock position or in any other way (e.g. in the middle or inner edge of
the steering wheel). In such cases, you could severely injure the arms, hands
and head when the driver airbag is deployed.■
Never adjust the steering wheel when the vehicle is moving only when the
vehicle is stationary!
WARNING (Continued)■ Adjust the steering wheel so that the distance A » Fig. 88 between the
steering wheel and your chest is at least 25 cm. Not maintaining this minimum
distance will mean that the airbag system will not be able to properly protect
you - hazard!■
If the steering wheel is adjusted further towards the head, the protection
provided by the driver airbag in the event of an accident is reduced. Check
that the steering wheel is aligned to the chest.
Adjusting the steering wheel position
Fig. 89
Adjustable steering wheel: Lever
below steering wheel
First read and observe the introductory information and safety warn-
ings on page 96.
The height and forward/back position of the steering wheel can be adjusted.
›
First of all adjust the driver's seat » page 52.
›
Swivel the lever underneath the steering wheel downwards » Fig. 89.
›
Adjust the steering wheel to the desired position (with regard to the height and
forward/back position).
›
Push the lever upwards to the stop.
WARNINGThe lever for adjusting the steering wheel must be locked whilst driving so
that the steering wheel cannot accidentally change position during the jour-
ney – risk of accident!
96Driving