check engine SKODA RAPID 2013 1.G Owner's Guide
[x] Cancel search | Manufacturer: SKODA, Model Year: 2013, Model line: RAPID, Model: SKODA RAPID 2013 1.GPages: 226, PDF Size: 15.16 MB
Page 188 of 226
›Switch off the engine.›Move the gearshift lever into
Neutral or move the selector lever for the auto-
matic gearbox into position P .›
Firmly apply the handbrake.
›
Uncouple any trailers.
›
Remove the vehicle tool kit » page 183 and the spare wheel » page 179 from
the boot.
Changing a wheel
First read and observe the introductory information and safety warn-
ings
on page 184.
›
Remove the full wheel trim » page 180 or caps » page 180 .
›
First of all slacken the anti-theft wheel bolt and then the other wheel
bolts » page 185 .
›
Jack up the vehicle until the wheel that needs changing is clear of the
ground » page 186 .
›
Unscrew the wheel bolts and place them on a clean surface (cloth, paper, etc.).
›
Remove the wheel carefully.
›
Attach the spare wheel and slightly screw on the wheel bolts.
›
Lower the vehicle.
›
Alternately tighten wheel bolts opposite (diagonally) with the wheel wrench.
Tighten the anti-theft wheel bolt last » page 185.
›
Replace the wheel trim or the caps.
Note
■
All bolts must be clean and must turn easily.■Under no circumstances grease or oil the wheel bolts!■
When fitting unidirectional tyres, ensure that the direction of rotation is cor-
rect » page 178 .
Follow-up work
First read and observe the introductory information and safety warn-
ings
on page 184.
The following steps must also be performed after changing the wheel.
› Stow and attach the replaced wheel in the spare wheel well using a special
bolt » page 179 , Spare wheel .›
Stow the tool kit in the space provided and secure using the band.
›
Check the tyre pressure on the installed spare wheel as soon as possible.
›
Have the tightening torque of the wheel bolts checked with a torque wrench
as soon as possible.
›
Replace the damaged wheel or consult a specialist garage about repair options.
Note
■ If it is determined that the wheel bolts are corroded and difficult to turn when
changing the wheel, the bolts must be replaced before checking the tightening
torque.■
Drive cautiously and only at a moderate speed until the tightening torque has
been checked.
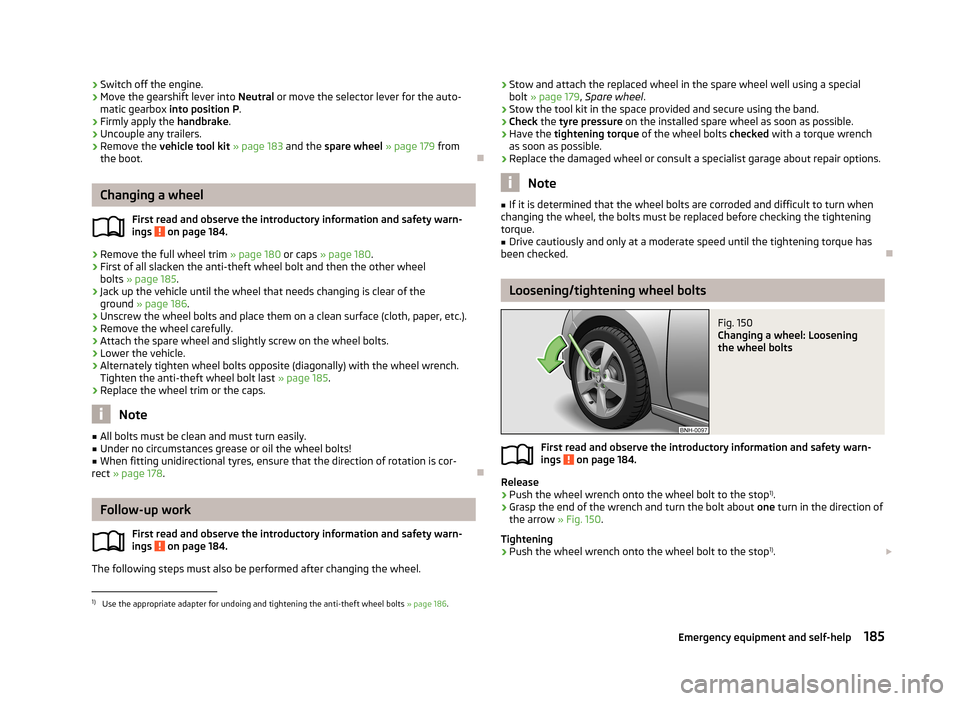
Loosening/tightening wheel bolts
Fig. 150
Changing a wheel: Loosening
the wheel bolts
First read and observe the introductory information and safety warn- ings on page 184.
Release
›
Push the wheel wrench onto the wheel bolt to the stop 1)
.
›
Grasp the end of the wrench and turn the bolt about one turn in the direction of
the arrow » Fig. 150.
Tightening
›
Push the wheel wrench onto the wheel bolt to the stop 1)
.
1)
Use the appropriate adapter for undoing and tightening the anti-theft wheel bolts
» page 186.
185Emergency equipment and self-help
Page 191 of 226
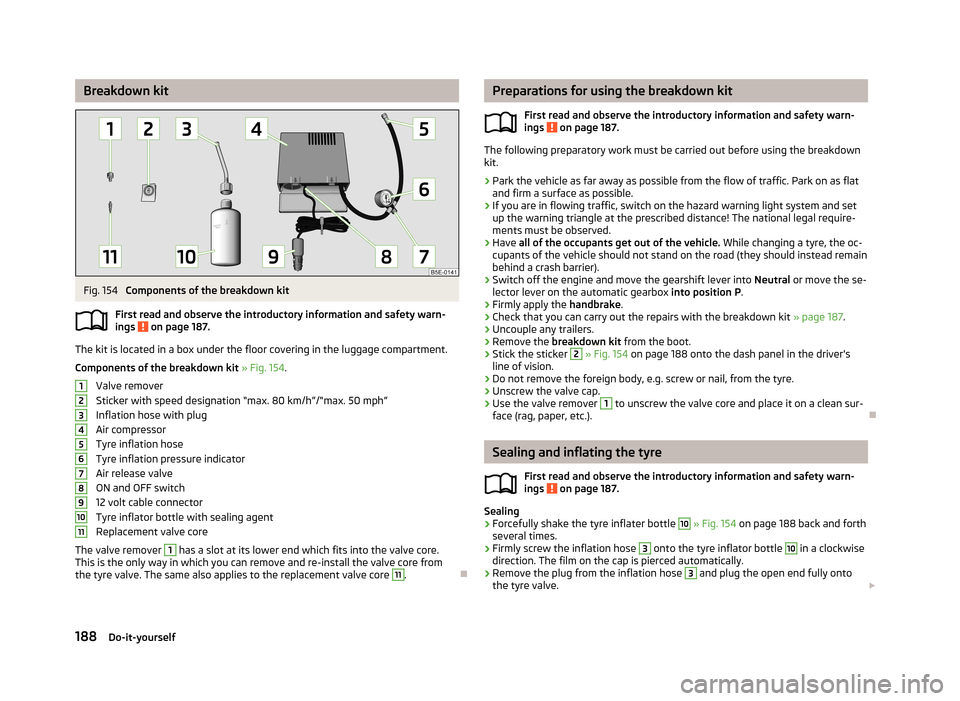
Breakdown kitFig. 154
Components of the breakdown kit
First read and observe the introductory information and safety warn-
ings
on page 187.
The kit is located in a box under the floor covering in the luggage compartment.
Components of the breakdown kit » Fig. 154 .
Valve remover
Sticker with speed designation “max. 80 km/h”/“max. 50 mph”
Inflation hose with plug
Air compressor
Tyre inflation hose
Tyre inflation pressure indicator
Air release valve
ON and OFF switch
12 volt cable connector
Tyre inflator bottle with sealing agent
Replacement valve core
The valve remover
1
has a slot at its lower end which fits into the valve core.
This is the only way in which you can remove and re-install the valve core from
the tyre valve. The same also applies to the replacement valve core
11
.
1234567891011Preparations for using the breakdown kit
First read and observe the introductory information and safety warn-
ings
on page 187.
The following preparatory work must be carried out before using the breakdown kit.
›
Park the vehicle as far away as possible from the flow of traffic. Park on as flat and firm a surface as possible.
›
If you are in flowing traffic, switch on the hazard warning light system and setup the warning triangle at the prescribed distance! The national legal require-
ments must be observed.
›
Have all of the occupants get out of the vehicle. While changing a tyre, the oc-
cupants of the vehicle should not stand on the road (they should instead remain
behind a crash barrier).
›
Switch off the engine and move the gearshift lever into Neutral or move the se-
lector lever on the automatic gearbox into position P.
›
Firmly apply the handbrake.
›
Check that you can carry out the repairs with the breakdown kit » page 187.
›
Uncouple any trailers.
›
Remove the breakdown kit from the boot.
›
Stick the sticker
2
» Fig. 154 on page 188 onto the dash panel in the driver's
line of vision.
›
Do not remove the foreign body, e.g. screw or nail, from the tyre.
›
Unscrew the valve cap.
›
Use the valve remover
1
to unscrew the valve core and place it on a clean sur-
face (rag, paper, etc.).
Sealing and inflating the tyre
First read and observe the introductory information and safety warn-
ings
on page 187.
Sealing
›
Forcefully shake the tyre inflater bottle
10
» Fig. 154 on page 188 back and forth
several times.
›
Firmly screw the inflation hose
3
onto the tyre inflator bottle
10
in a clockwise
direction. The film on the cap is pierced automatically.
›
Remove the plug from the inflation hose
3
and plug the open end fully onto
the tyre valve.
188Do-it-yourself
Page 192 of 226
›Hold the bottle 10 with the bottom facing upwards and fill all of the sealing
agent from the tyre inflator bottle into the tyre.›
Remove the empty tyre inflator bottle from the valve.
›
Screw the valve core back into the tyre valve using the valve remover
1
.
Inflating
›
Screw the air compressor tyre inflation hose
5
» Fig. 154 on page 188 firmly on-
to the tyre valve.
›
Check that the air release valve
7
is closed.
›
Start the engine and run it in idle.
›
Plug the connector
9
into 12 Volt socket » page 60, 12-volt power outlet .
›
Switch on the air compressor with the ON and OFF switch
8
.
›
Allow the air compressor to run until a pressure of 2.0 - 2.5 bar is achieved. Max-
imum run time of 8 minutes » !
›
Switch off the air compressor.
›
If you cannot reach an air pressure of 2.0 – 2.5 bar, unscrew the tyre inflation
hose
5
from the tyre valve.
›
Drive the vehicle 10 metres forwards or backwards to allow the sealing agent to
“distribute” in the tyre.
›
Firmly screw the tyre inflation hose
5
back onto the tyre valve and repeat the
inflation process.
›
If you cannot reach the required tyre inflation pressure here either, this means
the tyre has sustained too much damage. You cannot seal with tyre with the breakdown kit »
.
›
Switch off the air compressor.
›
Remove the tyre inflation hose
5
from the tyre valve.
Once a tyre inflation pressure of 2.0 – 2.5 bar is achieved, continue the journey at
a maximum speed of 80 km/h (50 mph).
Check the tyre inflation pressure after driving for 10 minutes » page 189.
WARNING■
The tyre inflation hose and air compressor may get hot as the tyre is being
inflated – there is a risk of injury.■
Do not place the hot tyre inflation hose or hot air compressor on flammable
materials – there is a risk of fire.
■
If you cannot inflate the tyre to at least 2.0 bar, this means the damage sus-
tained was too serious. The sealing agent cannot be used to seal the tyre.
Do not drive the vehicle. Seek help from a specialist garage.
CAUTIONSwitch off the air compressor after running 8 minutes at the latest – there is a
risk of overheating. Allow the air compressor to cool a few minutes before switch- ing it on again.
Check after 10 minutes' driving
First read and observe the introductory information and safety warn-ings
on page 187.
Check the tyre inflation pressure after driving for 10 minutes!
If the tyre pressure is 1.3 bar or less
›
Do not drive the vehicle! You cannot properly seal with tyre with the break-
down kit.
If the tyre pressure is 1.3 bar or more
›
Adjust the tyre inflation pressure to the correct value (see inside of fuel filler cap).
›
Continue driving carefully to the nearest specialist garage at a maximum speed
of 80 km/h (50 mph).
Jump-starting
Introduction
This chapter contains information on the following subjects:
Jump-starting using the battery from another vehicle
190
Jump-starting in vehicles with the START-STOP system
191WARNING■ A discharged vehicle battery may already freeze at temperatures just below
0 °C. If the battery is frozen, do not jump start with the battery of another ve- hicle – there is a risk of explosion.■
Pay attention to the warning instructions relating to working in the engine
compartment » page 162.
189Emergency equipment and self-help
Page 200 of 226
Fuses and light bulbs
Fuses
Introduction
This chapter contains information on the following subjects:
Fuses in the dash panel
197
Assignment of the fuses in the dash panel
198
Fuses in the engine compartment
199
Fuse assignment in the engine compartment
200
Individual electrical circuits are protected by fuses. Switch off the ignition and the corresponding power consuming device before re-
placing a fuse.
Find out which fuse belongs to the component that is not operating » page 198
or » page 200 .
Fuse colourMaximum amperagelight brown5dark brown7.5red10blue15yellow20white25green30orange40WARNINGAlways read and observe the warning notes before completing any work in
the engine compartment » page 162, Engine compartment .CAUTION■
“Never repair” fuses, and do not replace them with fuses of a higher amperage –
risk of fire! This may also cause damage at other points in the electrical system.■
If a newly inserted fuse blows again after a short time, have the electrical sys-
tem checked as quickly as possible by a specialist garage.
■
A blown fuses is recognisable by the molten metal strip. Replace the faulty fuse
with a new one of the same amperage.
Note
■
We recommend always carrying replacement fuses in the vehicle. A box of re-
placement fuses can be purchased from ŠKODA Original Accessories.■
There can be several power consuming devices for one fuse.
■
There can be several consumer devices for one fuse, depending on the vehicle's
equipment.
■
Multiple fuses may exist for a single power consuming device.
■
Multiple power consuming devices can share a single fuse.
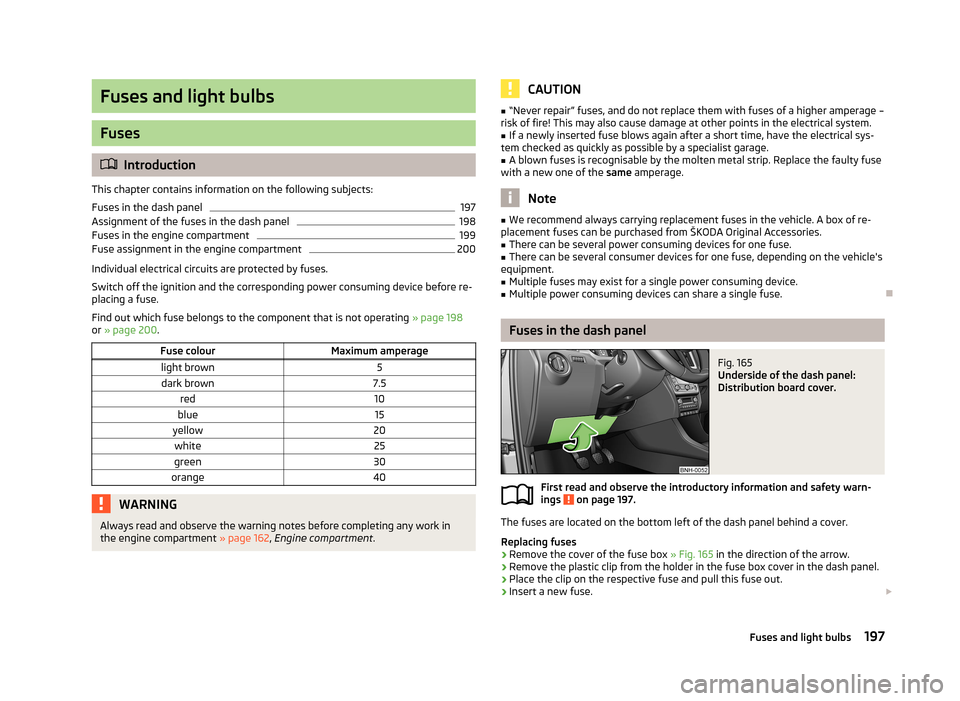
Fuses in the dash panel
Fig. 165
Underside of the dash panel:
Distribution board cover.
First read and observe the introductory information and safety warn-
ings on page 197.
The fuses are located on the bottom left of the dash panel behind a cover.
Replacing fuses
›
Remove the cover of the fuse box » Fig. 165 in the direction of the arrow.
›
Remove the plastic clip from the holder in the fuse box cover in the dash panel.
›
Place the clip on the respective fuse and pull this fuse out.
›
Insert a new fuse.
197Fuses and light bulbs
Page 216 of 226
Indicator light15
Running in105
Braking Information on braking
100
Breakdown kit188
Bulb failure Indicator light
18
Bulbs Indicator light
18
Replacing200
Tail lamp (Rapid Spaceback)205
Button in the driver's door Electrical power windows
38
C
Car computer See multifunction display
25
Car park ticket holder56
Carrier74
Cavity protection156
Central locking button34
Changing Brake fluid
171
Engine oil168
Front turn signal bulb202
Wheels184
Changing a wheel Follow-up work
185
Preliminary work184
Remove and attaching a wheel185
Charging a vehicle battery173
Check Fit ball head properly
121
Checking Battery electrolyte level
173
Brake fluid170
Coolant169
Engine oil167
Oil level167
Windscreen washer fluid165
Children and safety142
Child safety Side airbag
144
Child safety lock35
Child seat Classification
144
ISOFIX145
on the front passenger seat143
TOP TETHER146
Use of child seats144
Use of ISOFIX child seats145
Chrome parts refer to Taking care of your vehicle
155
Cigarette lighter59
Cleaning147
Alcantara158
Artificial leather158
cloths158
Covers of electrically heated seats159
Headlight lenses156
Natural leather158
Plastic parts154
Wheels156
Climatronic82
automatic mode83
Control elements82
Controlling blower84
Cooling system83
Defrosting windscreen84
recirculated air mode83
Setting the temperature83
Clock13
Clothes hook63
Cockpit 12-volt power outlet
60
Ashtray59
Cigarette lighter59
General view9
Lights45
Practical equipment56
Storage compartments56
Compartments56
Computer See multifunction display
25
Coolant168
Checking169
Indicator light16
Information messages16
Replenishing170
Temperature gauge11
CORNER See Fog lights with CORNER function
43
Correct seated position127
Driver128
Front passenger128
Instructions129
Rear seats128
Counter for distance driven12
Cruise control system Activating/deactivating
115
Changing the stored speed115
Indicator light21
Storing and maintaining speed115
Switching off temporarily115
Cruise Control System114
Cup holders58
D
DAY LIGHT See Daytime running lights
42
Daytime running lights42
Deactivating an airbag140
Decorative films155
Defrsoting rear window47
Delayed locking of the boot lid see Boot lid
38
Diesel refer to Fuel
162
Diesel fuel Operation in winter
162
213Index
Page 217 of 226

Diesel particle filter19
Information messages19
Digital clock13
Dipstick167
Disconnecting and reconnecting vehicle battery
174
Display11
Compass points24
Coolant temperature11
Correct gear changes24
Fuel supply12
Service intervals28
Display of the second speed13
Distance driven12
Door Child safety lock
35
Closing35
Indicator light for an open door15
Opening35
Door locking Emergency
194
Doors Emergency locking
194
Double-sided floor covering70
Driving Abroad
110
Driving through water on streets109
Emissions207
Fuel consumption207
Maximum speed209
Driving economically Economical gear changing
106
Driving through water109
E
Economical and environmentally friendly driving 105
Economical driving Ballast
107
Driving at full throttle106
Idling106
Looking ahead106
Regular maintenance107
Saving energy108
Short distances107
Tyre inflation pressure107
EDL112
Electrical power windows Button in the driver's door
38, 39
Button in the rear door39
Electronic Differential Lock (EDL)112
Electronic immobiliser98
Electronic Stability Control (ESC)111
Emergency Changing a wheel
184
Door locking194
Hazard warning light system44
jump-starting190
Jump-starting189
Selector lever-unlocking195
Towing the using the tow hitch192
Towing the vehicle191
Tyre repair187
Unlocking the tailgate194
Emergency equipment Fire extinguisher
183
First aid kit182
Jack183
Vehicle tool kit183
Warning triangle182
Emissions207
Engine Running in
104
Switching off the engine99
Engine compartment162
Brake fluid170
Coolant169
Overview165
Vehicle battery171
Engine oil166
Capacity167
Changing168
Checking167
Indicator light16
Information messages16
Replenishing168
Specifications167
Environment105
Environmental compatibility108
Environmentally friendly driving105
EPC Indicator light
19
ESC Function
111
Warning light17
Exhaust inspection system Indicator light
18
F
Fastening elements
65
Films155
Fire extinguisher183
First aid kit182
Flashing43
Flexible storage compartment69
Fog lights43
Indicator light21
Fog lights with CORNER function43
Footmats101
see footmats101
Force limit Power windows
40
Front airbag137
Fuel160
Diesel162
Fuel gauge12
refer to Fuel160
Refuelling160
Unleaded petrol161
Fuel consumption105
214Index
Page 221 of 226
Side airbag138
Snow chains181
Spare wheel179
Speedometer11
See speedometer11
Speed symbol See Wheels
178
Spoiler151
START-STOP116
Manually activating/deactivating the system117
Operating conditions of the system117
Starting/shutting down the engine116
Starting and stopping the engine with the key97
Starting engine Jump-starting
189
Starting the engine Jump-starting
190
Key98
START STOP Information messages
118
Jump-starting191
Steering force assistance97
Steering wheel96
Storage compartment in centre console58
Storage compartment on the passenger side63
Storage compartments56
Storage compartments in the boot69
Storage compartments in the doors57
Storage pockets on the front seats64
sun roof48
sunshade48
Sun visors47
Switch See Ignition
98
Switching off the engine99
Switch light on/off41
T
Taking care of the vehicle Natural leather
158
Seat belts159
Taking care of your vehicle Automatic car wash system
153
Cavity protection156
Chrome parts155
Cleaning the wheels156
Decorative films155
Door lock cylinders156
Headlight lenses156
High-pressure cleaner153
Plastic parts154
Polishing the paintwork154
Rubber seals155
Taking care of the interior157
Taking care of your vehicle exterior153
Washing152
Washing by hand152
Wash system153
Wax treatment154
Taking care of your vehicles Fabric covers
159
TCS Operation
112
Technical data207
Telephone85
Temporary spare wheel179
Tiptronic103
Tools183
TOP TETHER146
Towing191
Towing a trailer119
Towing device Description
119
Drawbar load119
Use and care122
Towing eye Front192
Rear192
Towing protection36
Traction Control System (TCS)112
Trailer119, 123
13-pin power socket124
driving with a trailer124
Loading123
Safety eye124
Transport Luggage compartment
64
Roof rack system74
Transporting children safely142
Turn signal43
Turn signal system Indicator light
20
two-way radio systems85
Type plate207
Tyre inflation pressure Indicator light
20
Tyre load-bearing capacity See Wheels
177
Tyre pressure monitor Setting
178
Tyre repair Check pressure
189
Preparations188
Sealing and inflating the tyre188
Tyres175
Inflation pressure176
New177
See Wheels177
Sizes176
Tyre wear indicator176
U
Underbody protection
157
Unleaded petrol110
218Index