light SKODA ROOMSTER 2010 1.G Service Manual
[x] Cancel search | Manufacturer: SKODA, Model Year: 2010, Model line: ROOMSTER, Model: SKODA ROOMSTER 2010 1.GPages: 231, PDF Size: 12.91 MB
Page 54 of 231
Lights and Visibility53
Using the system
Safety
Driving Tips
General Maintenance
Breakdown assistance
Praktik
Technical Data
Windshield wiper and wash systemWindshield wiper
You can operate the windscreen wipers and automatic wipe/wash
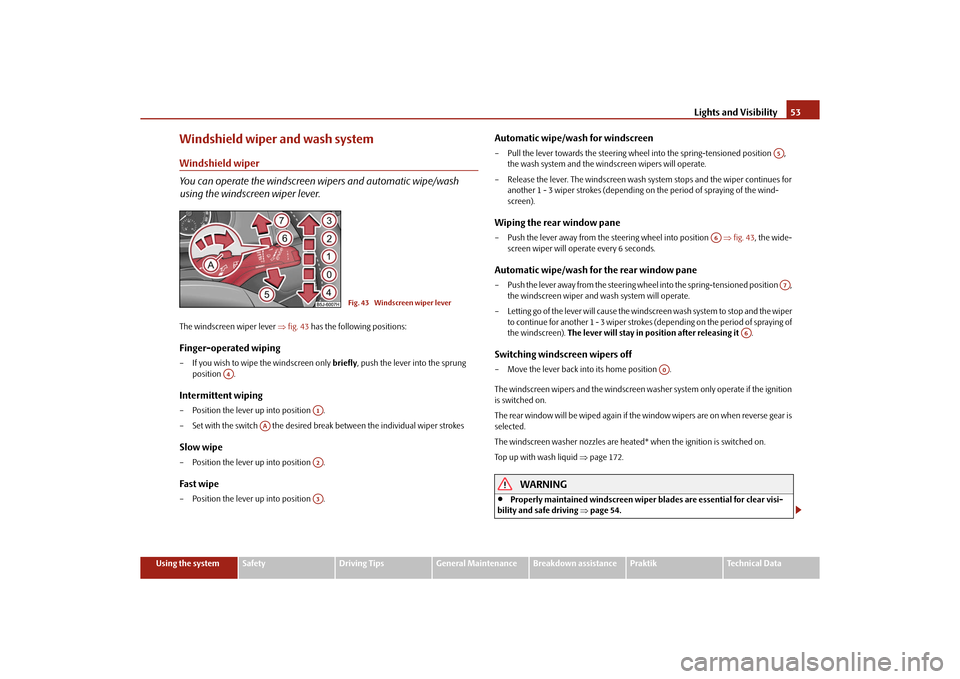
using the windscreen wiper lever.The windscreen wiper lever fig. 43 has the following positions:Finger-operated wiping– If you wish to wipe the windscreen only briefly, push the lever into the sprung
position .Intermittent wiping– Position the lever up into position .
– Set with the switch the desired brea k between the individual wiper strokesSlow wipe– Position the lever up into position .Fast wipe– Position the lever up into position .
Automatic wipe/wash for windscreen– Pull the lever towards the steering wheel into the spring-tensioned position ,
the wash system and the windscreen wipers will operate.
– Release the lever. The windscreen wash system stops and the wiper continues for another 1 - 3 wiper strokes (depending on the period of spraying of the wind-
screen).Wiping the rear window pane– Push the lever away from the st eering wheel into position fig. 43 , the wide-
screen wiper will operate every 6 seconds.Automatic wipe/wash for the rear window pane– Push the lever away from the steering wheel into the spring-tensioned position , the windscreen wiper and wash system will operate.
– Letting go of the lever will cause the windscreen wash system to stop and the wiper to continue for another 1 - 3 wiper strokes (depending on the period of spraying of
the windscreen). The lever will stay in position after releasing it .Switching windscreen wipers off– Move the lever back into its home position .
The windscreen wipers and the windscreen washer system only operate if the ignition
is switched on.
The rear window will be wiped again if the window wipers are on when reverse gear is
selected.
The windscreen washer nozzles are heated* when the ignition is switched on.
Top up with wash liquid page 172.
WARNING
Properly maintained windscreen wiper blades are essential for clear visi-
bility and safe driving page 54.
Fig. 43 Windscreen wiper lever
A4
A1
AA
A2A3
A5
A6
A7
A6
A0
s16g.4.book Page 53 Wednesda y, February 10, 2010 3:53 PM
Page 55 of 231

Lights and Visibility
54
Do not use the windscreen washer sy stem at low temperatures, without
heating the windscreen beforehand. Otherwise the window cleaner could
freeze on the windscreen and re strict the view to the front.
In the event of a freezing up of the wi ndscreen, first of all eliminate the ice
page 153 and then operate the windscr een wiper otherwise the windscreen
wiper blades could be damaged.Caution
In frosty weather, please firs t of all check whether the windscreen wiper blades are not
frozen to the windscreen before switching them on. Switching on windscreen wipers
when the blades are frozen to the windscreen may result in damage both to the blades
and the motor of the windscreen wipers!
Note
The content of the windscreen wiper reserv oir is 3.5 litres. On vehicles which are
equipped with a headlight cleaning system*, the content of the reservoir is 5.4 litres.Headlight cleaning system*The headlights are being cleaned after the windscreen washer system has been oper-
ated for the fifth time, the low beam or main beam are switched on as well as the wind-
screen wiper lever is held in the position page 53, fig. 43 for about 1 second.
You should remove stubborn dirt (such as in sect residues) from the headlight lenses at
regular intervals, for example when refuelling . Please refer to the following guidelines
page 154, “The headlight lenses”.
You should remove any snow from the fixtur es of the washer nozzles and clear ice in
winter with a de-icing spray in order to ensure proper operation of the cleaning
system.
Replacing wiper blades for the windscreen wipersTaking off the wiper blade– Fold windscreen wiper arm away from the windscreen.
– Press the locking button, in order to un lock the wiper blade and pull off in the
direction of arrow.Attaching a wiper blade– Push the wiper blade until it locks up to the stop.
– Check whether the wiper blade is correctly attached.
– Fold the windscreen wiper ar m back onto the windscreen.
Wiper blades in proper condition are essentia l to obtain good visibility. Wiper blades
should not be allowed to become dirtied by dust, insect remains and preserving wax.
Juddering or smearing of the wiper blades co uld then be due to wax residues left on
the windscreen by vehicle washing in automa tic vehicle wash systems. It is therefore
important to degrease the lips of the wiper blades after every pass through an auto-
matic vehicle wash system .
WARNING
If the windscreen wipers are handled ca relessly, there is a risk of damage to
the windscreen.
WARNING (continued)
A5
Fig. 44 Wiper blade for the windscreen
wiper
s16g.4.book Page 54 Wednesda y, February 10, 2010 3:53 PM
Page 56 of 231
Lights and Visibility55
Using the system
Safety
Driving Tips
General Maintenance
Breakdown assistance
Praktik
Technical Data
You should clean the wiper blades regularly with a windscreen cleaner in
order to avoid any smears. Clean a wiper blad e with a sponge or cloth if it is very
dirty, for example from insect residues.
Replace the wiper blades once or twice a year for safety reasons. The wiper
blades are available from specialist garages.
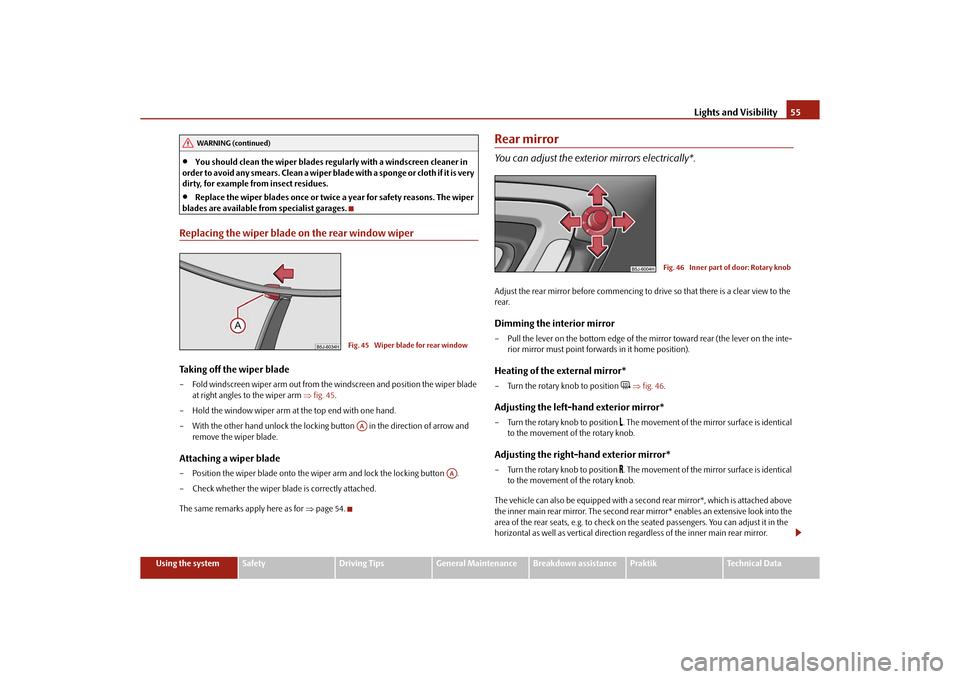
Replacing the wiper blade on the rear window wiperTaking off the wiper blade– Fold windscreen wiper arm out from the windscreen and position the wiper blade at right angles to the wiper arm fig. 45 .
– Hold the window wiper arm at the top end with one hand.
– With the other hand unlock the locking button in the direction of arrow and remove the wiper blade.Attaching a wiper blade– Position the wiper blade onto the wiper arm and lock the locking button .
– Check whether the wiper bl ade is correctly attached.
The same remarks apply here as for page 54.
Rear mirrorYou can adjust the exterior mirrors electrically*.Adjust the rear mirror before commencing to drive so that there is a clear view to the
rear.Dimming the interior mirror– Pull the lever on the bottom edge of the mirror toward rear (the lever on the inte-
rior mirror must point forwards in it home position).Heating of the external mirror*– Turn the rotary knob to position
fig. 46 .
Adjusting the left-hand exterior mirror*– Turn the rotary knob to position
. The movement of the mirror surface is identical
to the movement of the rotary knob.
Adjusting the right-hand exterior mirror*– Turn the rotary knob to position
. The movement of the mirror surface is identical
to the movement of the rotary knob.
The vehicle can also be equipp ed with a second rear mirror*, which is attached above
the inner main rear mirror. The second rear mirror* enables an extensive look into the
area of the rear seats, e.g. to check on the seated passengers. You can adjust it in the
horizontal as well as vertical direction re gardless of the inner main rear mirror.
WARNING (continued)
Fig. 45 Wiper blade for rear windowAA
AA
Fig. 46 Inner part of door: Rotary knob
s16g.4.book Page 55 Wednesday, February 10, 2010 3:53 PM
Page 57 of 231
Lights and Visibility
56
The exterior mirror heater only op erates when the engine is running.
WARNING
Convex (curved outward) or spherical (differently curved) exterior mirrors
increase the vision field. They do, howe ver, make objects appear smaller in the
mirror. These mirrors are only of limited use, therefore, for estimating distances
to the following vehicles.
Use whenever possible the interior rear mirror, for estimating the distances
to the following vehicles.Note
Do not touch the surfaces of the exterior mirrors if the exterior mirror heater is
switched on.
You can set the exterior mirrors by hand, if the power setting function fails at any
time by pressing on the edge of the mirror surface.
Contact your specialist garage if a fault ex ists with the power setting of the exterior
mirrors.
s16g.4.book Page 56 Wednesda y, February 10, 2010 3:53 PM
Page 59 of 231
Seats and Storage
58
Adjust the angle of the seat backrest
– Relieve any pressure on the seat backrest (do not lean on it) and turn the hand-
wheel to adjust the angle of the backrest.
The driver's seat should be adjusted in such a way that the pedals can be fully pressed
to the floor with slightly bent legs.
The seat backrest on the driver's seat should be adjusted in such a way that the upper
point of the steering wheel can be easi ly reached with slightly bent arms.
WARNING
Only adjust the driver seat when the vehicle is stationary - risk of injury!
Take care when adjusting the seat! Adjusting the seat without care can lead
to bruises or injuries.
The seat backrests must not be angled too far back when driving otherwise
this will affect proper operation of the se at belts and of the airbag system - risk
of injury!
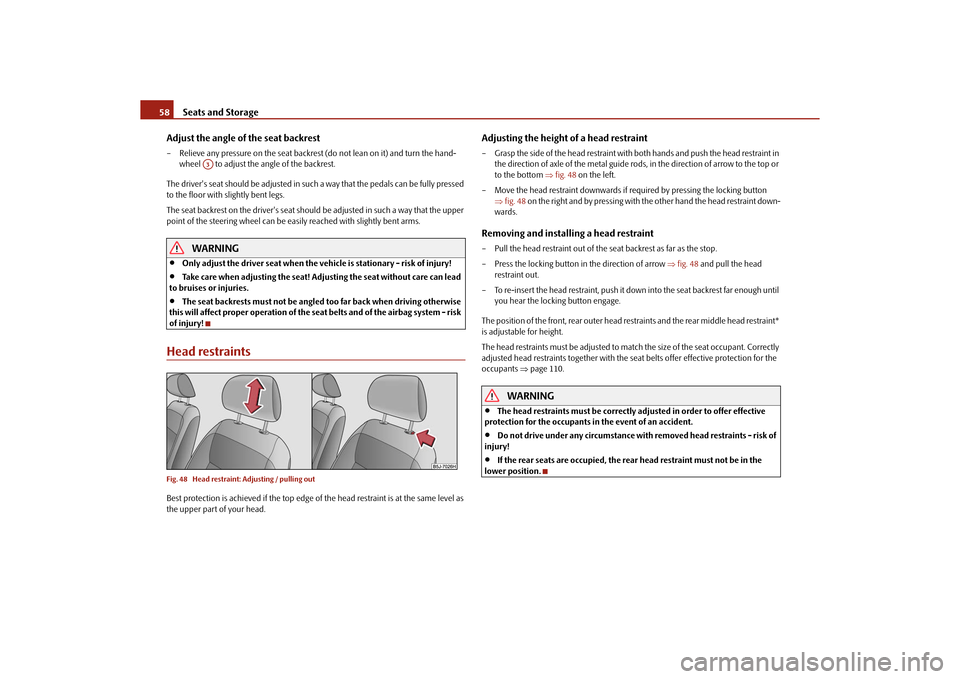
Head restraintsFig. 48 Head restraint: Adjusting / pulling outBest protection is achieved if the top edge of the head restraint is at the same level as
the upper part of your head.
Adjusting the height of a head restraint– Grasp the side of the head restraint with both hands and push the head restraint in the direction of axle of the metal guide rods, in the direction of arrow to the top or
to the bottom fig. 48 on the left.
– Move the head restraint downwards if required by pressing the locking button fig. 48 on the right and by pressing with the other hand the head restraint down-
wards.Removing and installing a head restraint– Pull the head restraint out of the seat backrest as far as the stop.
– Press the locking button in the direction of arrow fig. 48 and pull the head
restraint out.
– To re-insert the head restraint, push it do wn into the seat backrest far enough until
you hear the locking button engage.
The position of the front, rear outer head restraints and the rear middle head restraint*
is adjustable for height.
The head restraints must be adjusted to ma tch the size of the seat occupant. Correctly
adjusted head restraints together with the seat belts offer effective protection for the
occupants page 110.
WARNING
The head restraints must be correctly adjusted in order to offer effective
protection for the occupants in the event of an accident.
Do not drive under any circumstance with removed head restraints - risk of
injury!
If the rear seats are occupied, the rear head restraint must not be in the
lower position.
A3
s16g.4.book Page 58 Wednesda y, February 10, 2010 3:53 PM
Page 63 of 231
Seats and Storage
62Note
The seat belts of the outer seats must always be guided through the guide loops next
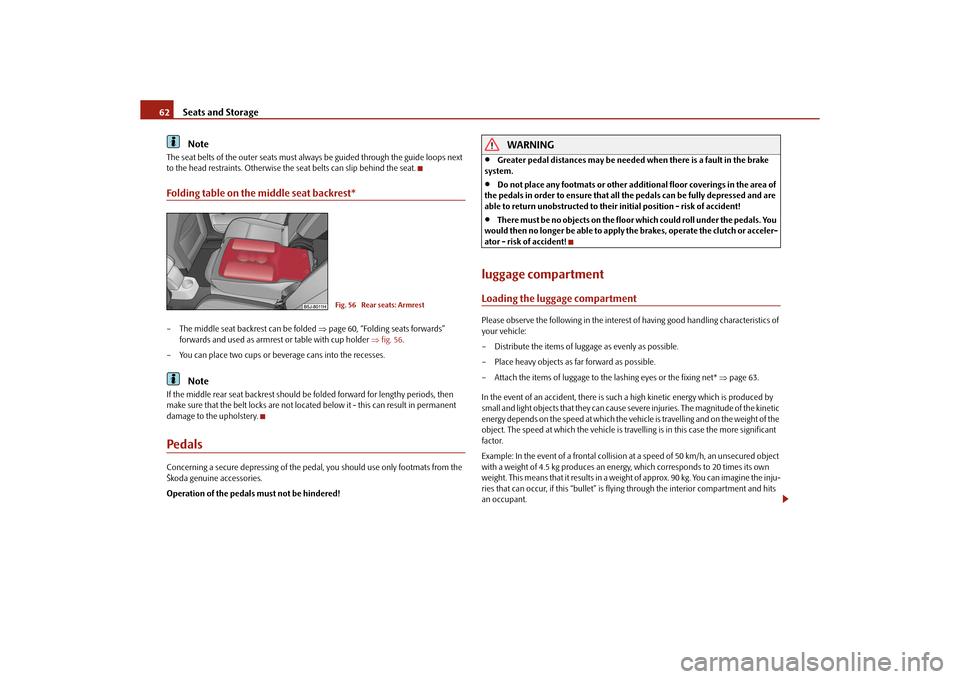
to the head restraints. Otherwise the seat belts can slip behind the seat.Folding table on the middle seat backrest*– The middle seat backrest can be folded page 60, “Folding seats forwards”
forwards and used as armres t or table with cup holder fig. 56 .
– You can place two cups or beverage cans into the recesses.
Note
If the middle rear seat backrest should be folded forward for lengthy periods, then
make sure that the belt locks are not located below it - this can result in permanent
damage to the upholstery.PedalsConcerning a secure depressing of the pedal, you should use only footmats from the
Škoda genuine accessories.
Operation of the pedals must not be hindered!
WARNING
Greater pedal distances may be needed when there is a fault in the brake
system.
Do not place any footmats or other additional floor coverings in the area of
the pedals in order to ensure that all the pedals can be fully depressed and are
able to return unobstructed to their initial position - risk of accident!
There must be no objects on the floor which could roll under the pedals. You
would then no longer be able to apply the brakes, operate the clutch or acceler-
ator - risk of accident!
luggage compartmentLoading the luggage compartmentPlease observe the following in the interest of having good handling characteristics of
your vehicle:
– Distribute the items of luggage as evenly as possible.
– Place heavy objects as far forward as possible.
– Attach the items of luggage to the lashing eyes or the fixing net* page 63.
In the event of an accident, there is such a high kinetic energy which is produced by
small and light objects that they can cause severe injuries. The magnitude of the kinetic
energy depends on the speed at which the vehicle is travelling and on the weight of the
object. The speed at which the vehicle is trave lling is in this case the more significant
factor.
Example: In the event of a frontal collision at a speed of 50 km/h, an unsecured object
with a weight of 4.5 kg produces an en ergy, which corresponds to 20 times its own
weight. This means that it results in a weight of approx. 90 kg. You can imagine the inju-
ries that can occur, if this “bullet” is fl ying through the interior compartment and hits
an occupant.
Fig. 56 Rear seats: Armrest
s16g.4.book Page 62 Wednesda y, February 10, 2010 3:53 PM
Page 64 of 231
Seats and Storage63
Using the system
Safety
Driving Tips
General Maintenance
Breakdown assistance
Praktik
Technical Data
WARNING
Stow the objects in the luggage compartment and attach them to the
lashing eyes.
Loose objects in the passenger compartment can be thrown forward during
a sudden manoeuvre or in case of an accident and can injure the occupants or
other oncoming traffic. This risk is still increased, if the objects which are flying
around are hit by a deployed airbag. In this case, the objects which are thrown
back can injure the occupants - hazard.
Please note that the handling properti es of your vehicle may be affected
when transporting heavy objects as a result of the displacement of the centre of
gravity. The speed and style of driv ing must be adjusted accordingly.
The items carried in the luggage compar tment should be stowed in such a
way that no objects are able to slip fo rward if there are any sudden driving or
braking manoeuvres undertaken - risk of injury!
When transporting fastened objects which are sharp and dangerous in the
luggage compartment enlarged by folding the rear seats forward or removing
the rear seats, ensure the safety of the passengers transported on the other rear
seats page 111, “Correct seated position fo r the occupants on the rear seats”.
If the rear seats next to the folded forward seat are occupied, ensure
maximum safety, e.g. by placing the goods to be transported in such a way that
a folding back of the seat is prev ented in case of a rear collision.
Never drive with the boot lid fully open ed or slightly ajar otherwise exhaust
gases may get into the interior of the vehicle - risk of poisoning!
On no account exceed the permissible axle loads and the permissible gross
weight of the vehicle - risk of accident!
Never transport occupants in the luggage compartment.Caution
Please ensure that the heating elements of the rear window heater are not damaged
as a result of objects sliding in this area.
Note
Tyre pressure must be adjusted to the load page 173, fig. 143.
The circulation of air in the vehicle help s to prevent the windows from misting up.
The used air streams out through the air venting slits which are located under the
bumper in the luggage compartment. Check fo r yourself that the air venting slits are
not covered.
Vehicles of category N1On vehicles of the category N1, which are no t fitted with a protective grille, a lashing
set which complies with the standard EN 12195 (1 - 4) must be used for fastening the
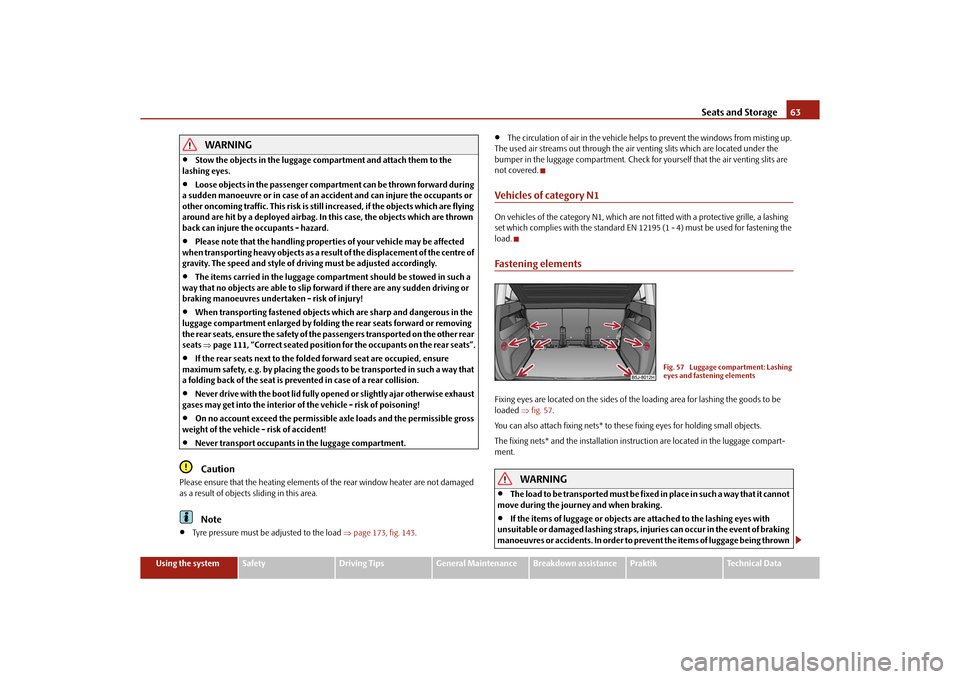
load.Fastening elementsFixing eyes are located on th e sides of the loading area for lashing the goods to be
loaded fig. 57 .
You can also attach fixing nets* to these fixing eyes for holding small objects.
The fixing nets* and the installation inst ruction are located in the luggage compart-
ment.
WARNING
The load to be transported must be fixed in place in such a way that it cannot
move during the journey and when braking.
If the items of luggage or objects are attached to the lashing eyes with
unsuitable or damaged lashing straps, inju ries can occur in the event of braking
manoeuvres or accidents. In order to prevent the items of luggage being thrown
Fig. 57 Luggage compartment: Lashing
eyes and fastening elements
s16g.4.book Page 63 Wednesday, February 10, 2010 3:53 PM
Page 66 of 231
Seats and Storage65
Using the system
Safety
Driving Tips
General Maintenance
Breakdown assistance
Praktik
Technical Data
The luggage compartment cover
You can use the luggage compartment cover behind the head
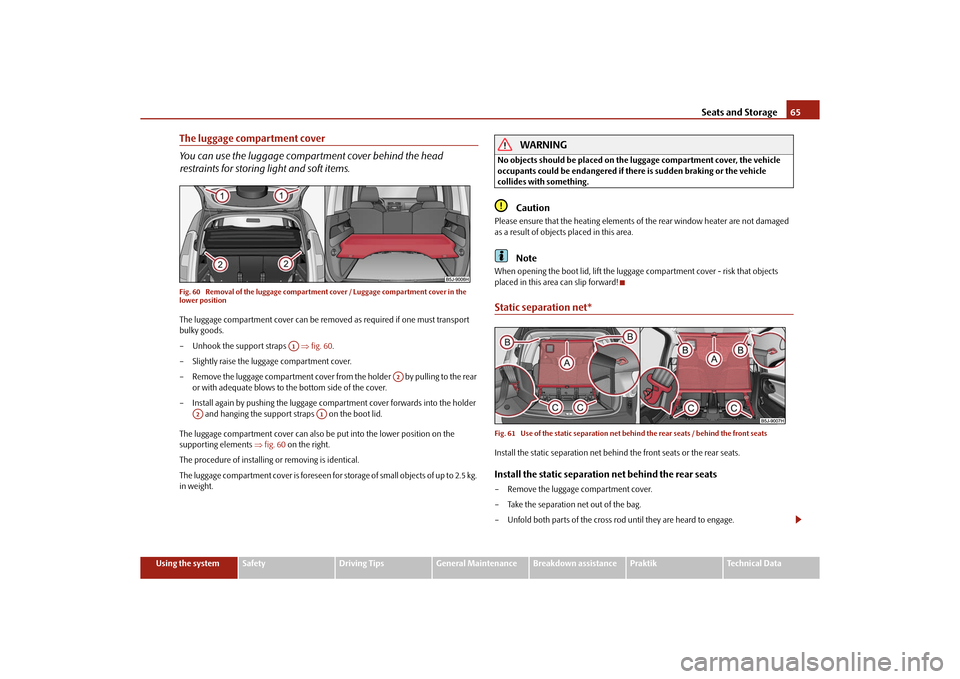
restraints for storing light and soft items.Fig. 60 Removal of the luggage compartmen t cover / Luggage compartment cover in the
lower positionThe luggage compartment cover can be removed as required if one must transport
bulky goods.
– Unhook the support straps fig. 60 .
– Slightly raise the luggage compartment cover.
– Remove the luggage compartment cover from the holder by pulling to the rear or with adequate blows to th e bottom side of the cover.
– Install again by pushing the luggage compartment cover forwards into the holder and hanging the support straps on the boot lid.
The luggage compartment cover can also be put into the lower position on the
supporting elements fig. 60 on the right.
The procedure of installing or removing is identical.
The luggage compartment cover is foreseen for storage of small objects of up to 2.5 kg.
in weight.
WARNING
No objects should be placed on the luggage compartment cover, the vehicle
occupants could be endangered if th ere is sudden braking or the vehicle
collides with something.
Caution
Please ensure that the heating elements of the rear window heater are not damaged
as a result of objects placed in this area.
Note
When opening the boot lid, lift the luggage compartment cover - risk that objects
placed in this area can slip forward!Static separation net*Fig. 61 Use of the static separation net be hind the rear seats / behind the front seatsInstall the static separation net behind the front seats or the rear seats.Install the static separation net behind the rear seats– Remove the luggage compartment cover.
– Take the separation net out of the bag.
– Unfold both parts of the cross rod until they are heard to engage.
A1
A2
A2
A1
s16g.4.book Page 65 Wednesday, February 10, 2010 3:53 PM
Page 69 of 231
Seats and Storage
68
Divide the luggage compartment with variable loading floor*The luggage compartment can be divided with the variable loading floor.
– Lift up the part with the holder and secure it by sliding it into the grooves
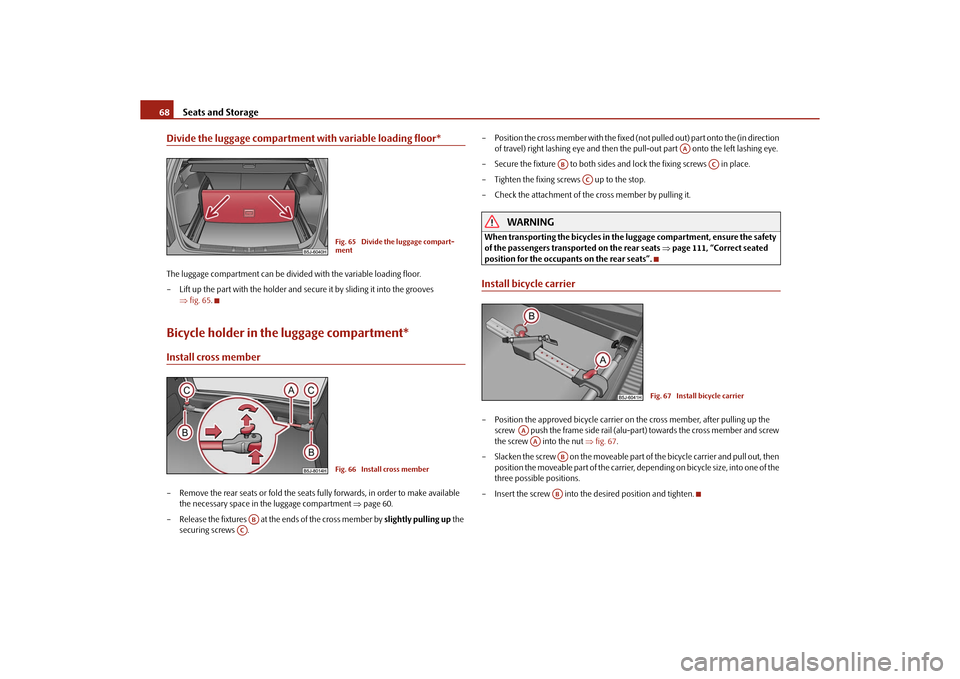
fig. 65 .Bicycle holder in the luggage compartment*Install cross member– Remove the rear seats or fold the seats fully forwards, in order to make available
the necessary space in the luggage compartment page 60.
– Release the fixtures at the ends of the cross member by slightly pulling up the
securing screws . – Position the cross member with the fixed (not
pulled out) part onto the (in direction
of travel) right lashing eye and then the pull-out part onto the left lashing eye.
– Secure the fixture to both sides an d lock the fixing screws in place.
– Tighten the fixing screws up to the stop.
– Check the attachment of the cross member by pulling it.
WARNING
When transporting the bicycles in the luggage compartment, ensure the safety
of the passengers transported on the rear seats page 111, “Correct seated
position for the occupants on the rear seats”.Install bicycle carrier– Position the approved bicycle carrier on the cross member, after pulling up the
screw push the frame side rail (alu-part) towards the cross member and screw
the screw into the nut fig. 67 .
– Slacken the screw on the moveable part of the bicycle carrier and pull out, then
position the moveable part of the carrier, depending on bicycle size, into one of the
three possible positions.
– Insert the screw into the desired position and tighten.
Fig. 65 Divide the luggage compart-
mentFig. 66 Install cross member
AB
AC
AA
AB
AC
AC
Fig. 67 Install bicycle carrier
AAAA
ABAB
s16g.4.book Page 68 Wednesda y, February 10, 2010 3:53 PM
Page 73 of 231
Seats and Storage
72
Parking ticket holderThe note holder is designed e.g. for atta ching a car park ticket in parking areas.
The parking ticket has to always be removed before starting off in order not to restrict
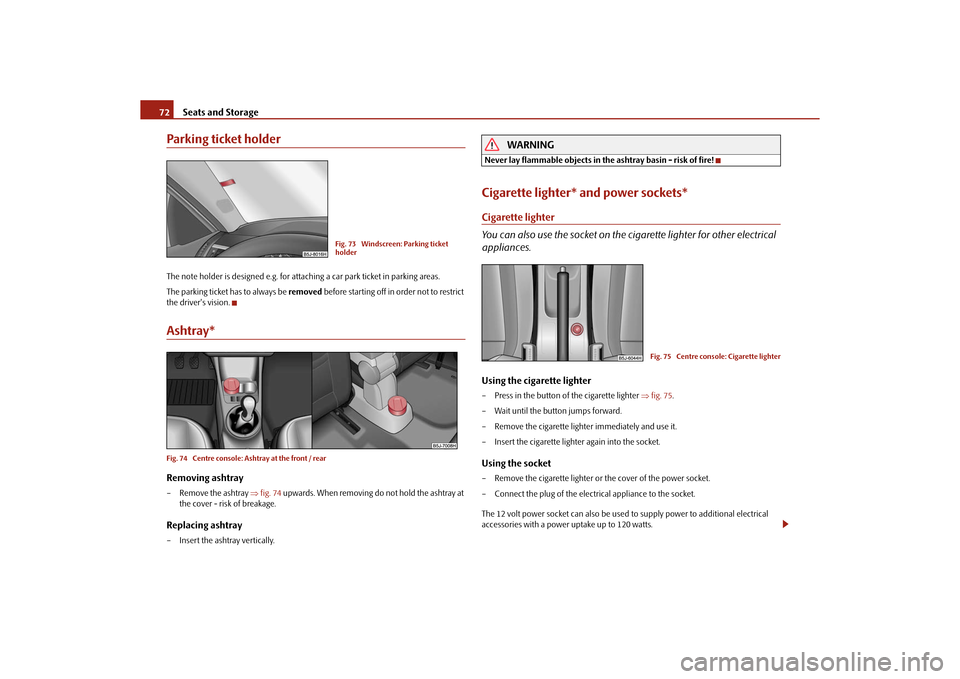
the driver's vision.Ashtray*Fig. 74 Centre console: Ashtray at the front / rearRemoving ashtray– Remove the ashtray fig. 74 upwards. When removing do not hold the ashtray at
the cover - risk of breakage.Replacing ashtray– Insert the ashtray vertically.
WARNING
Never lay flammable objects in the ashtray basin - risk of fire!Cigarette lighter* and power sockets*Cigarette lighter
You can also use the socket on the ci garette lighter for other electrical
appliances.Using the cigarette lighter– Press in the button of the cigarette lighter fig. 75 .
– Wait until the button jumps forward.
– Remove the cigarette lighter immediately and use it.
– Insert the cigarette lighter again into the socket.Using the socket– Remove the cigarette lighter or the cover of the power socket.
– Connect the plug of the electrical appliance to the socket.
The 12 volt power socket can also be used to supply power to additional electrical
accessories with a power uptake up to 120 watts.
Fig. 73 Windscreen: Parking ticket
holder
Fig. 75 Centre console: Cigarette lighter
s16g.4.book Page 72 Wednesda y, February 10, 2010 3:53 PM