ad blue SKODA SUPERB 2005 1.G / (B5/3U) DX Navigation System Manual
[x] Cancel search | Manufacturer: SKODA, Model Year: 2005, Model line: SUPERB, Model: SKODA SUPERB 2005 1.G / (B5/3U)Pages: 75, PDF Size: 3.09 MB
Page 15 of 75
RADIO NAVIGATION SYSTEM14
AUDIO
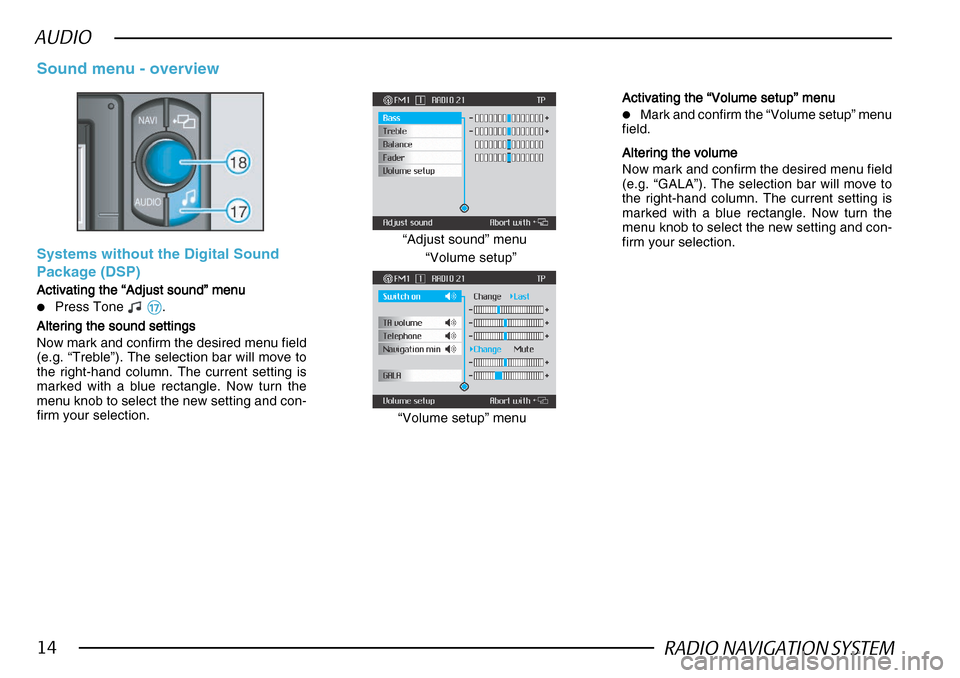
Sound menu - overview
Systems without the Digital Sound
Package (DSP)
Activating the “Adjust sound” menu
Activating the “Adjust sound” menu Activating the “Adjust sound” menu
Activating the “Adjust sound” menu
Activating the “Adjust sound” menu
•Press Tone && &&
&.
Altering the sound settings
Altering the sound settings Altering the sound settings
Altering the sound settings
Altering the sound settings
Now mark and confirm the desired menu field
(e.g. “Treble”). The selection bar will move to
the right-hand column. The current setting is
marked with a blue rectangle. Now turn the
menu knob to select the new setting and con-
firm your selection. “Volume setup”
“Adjust sound” menu
“Volume setup” menu
Activating the “Volume setup” menu
Activating the “Volume setup” menu Activating the “Volume setup” menu
Activating the “Volume setup” menu
Activating the “Volume setup” menu
•Mark and confirm the “Volume setup” menu
field.
Altering the volume
Altering the volume Altering the volume
Altering the volume
Altering the volume
Now mark and confirm the desired menu field
(e.g. “GALA”). The selection bar will move to
the right-hand column. The current setting is
marked with a blue rectangle. Now turn the
menu knob to select the new setting and con-
firm your selection.
Page 16 of 75
RADIO NAVIGATION SYSTEM15
AUDIO
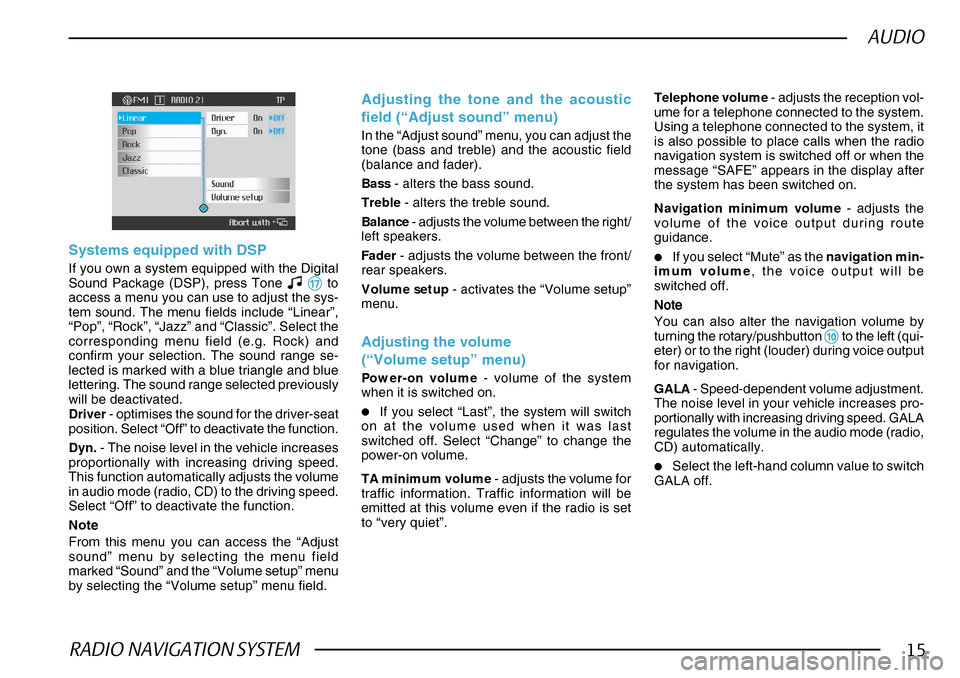
Systems equipped with DSP
If you own a system equipped with the Digital
Sound Package (DSP), press Tone && &&
& to
access a menu you can use to adjust the sys-
tem sound. The menu fields include “Linear”,
“Pop”, “Rock”, “Jazz” and “Classic”. Select the
corresponding menu field (e.g. Rock) and
confirm your selection. The sound range se-
lected is marked with a blue triangle and blue
lettering. The sound range selected previously
will be deactivated.
Driver - optimises the sound for the driver-seat
position. Select “Off” to deactivate the function.
Dyn. - The noise level in the vehicle increases
proportionally with increasing driving speed.
This function automatically adjusts the volume
in audio mode (radio, CD) to the driving speed.
Select “Off” to deactivate the function.
Note
From this menu you can access the “Adjust
sound” menu by selecting the menu field
marked “Sound” and the “Volume setup” menu
by selecting the “Volume setup” menu field.
Adjusting the tone and the acoustic
field (“Adjust sound” menu)
In the “Adjust sound” menu, you can adjust the
tone (bass and treble) and the acoustic field
(balance and fader).
Bass - alters the bass sound.
Treble - alters the treble sound.
Balance - adjusts the volume between the right/
left speakers.
Fader - adjusts the volume between the front/
rear speakers.
Volume setup - activates the “Volume setup”
menu.
Adjusting the volume
(“Volume setup” menu)
Power-on volume - volume of the system
when it is switched on.
•If you select “Last”, the system will switch
on at the volume used when it was last
switched off. Select “Change” to change the
power-on volume.
TA minimum volume - adjusts the volume for
traffic information. Traffic information will be
emitted at this volume even if the radio is set
to “very quiet”. Telephone volume
- adjusts the reception vol-
ume for a telephone connected to the system.
Using a telephone connected to the system, it
is also possible to place calls when the radio
navigation system is switched off or when the
message “SAFE” appears in the display after
the system has been switched on.
Navigation minimum volume - adjusts the
volume of the voice output during route
guidance.
•If you select “Mute” as the navigation min-
imum volume , the voice output will be
switched off.
NoteNote NoteNote
Note
You can also alter the navigation volume by
turning the rotary/pushbutton
00 00
0 to the left (qui-
eter) or to the right (louder) during voice output
for navigation.
GALA - Speed-dependent volume adjustment.
The noise level in your vehicle increases pro-
portionally with increasing driving speed. GALA
regulates the volume in the audio mode (radio,
CD) automatically.
•Select the left-hand column value to switch
GALA off.
Page 19 of 75
RADIO NAVIGATION SYSTEM18
AUDIO
NotesNotes NotesNotes
Notes
For RDS stations, the regional status is also
saved along with the program name.
The memory will not be deleted if the battery
is disconnected.
Any radio station you tune into is automatically
compared with the stations saved on the sta-
tion preset keys
@@ @@
@ (Autocompare). If the PI
code for RDS stations (see page 18) or the
frequency of stations without RDS is identical,
the corresponding station preset key number
will also appear in the status line (e.g.: “FM1
1 Radio 21”).
The field of the station preset selected is
marked in blue in the radio information display.
Recalling the radio station
To recall a station you have saved , just press
the corresponding station preset key briefly @@ @@
@.
The corresponding program name or the fre-
quency will appear in the information display.
If the frequency is not within reception range,
the system will automatically select a suitable
alternate frequency for the station selected
(best-station function).
NoteNote NoteNote
Note
Just press the key briefly, otherwise you will
save the station you are currently tuned into
on that station preset key.
Scanning the radio stations
You can scan all the stations on a waveband
(TP, FM and AM) one after the other for 10
seconds.
•Use the “Select source” menu to select the
desired waveband.
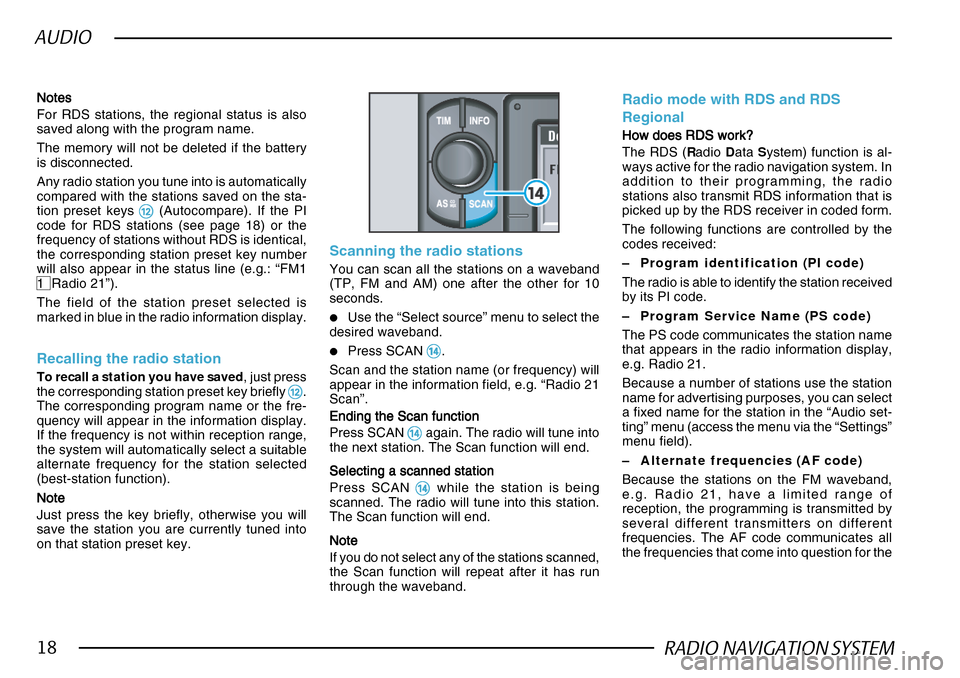
•Press SCAN $$ $$
$.
Scan and the station name (or frequency) will
appear in the information field, e.g. “Radio 21
Scan”.
Ending the Scan function
Ending the Scan function Ending the Scan function
Ending the Scan function
Ending the Scan function
Press SCAN
$$ $$
$ again. The radio will tune into
the next station. The Scan function will end.
Selecting a scanned station
Selecting a scanned station Selecting a scanned station
Selecting a scanned station
Selecting a scanned station
Press SCAN
$$ $$
$ while the station is being
scanned. The radio will tune into this station.
The Scan function will end.
NoteNote NoteNote
Note
If you do not select any of the stations scanned,
the Scan function will repeat after it has run
through the waveband.
Radio mode with RDS and RDS
Regional
How does RDS work?
How does RDS work? How does RDS work?
How does RDS work?
How does RDS work?
The RDS ( Radio Data System) function is al-
ways active for the radio navigation system. In
addition to their programming, the radio
stations also transmit RDS information that is
picked up by the RDS receiver in coded form.
The following functions are controlled by the
codes received:
– Program identification (PI code)
The radio is able to identify the station received
by its PI code.
– Program Service Name (PS code)
The PS code communicates the station name
that appears in the radio information display,
e.g. Radio 21.
Because a number of stations use the station
name for advertising purposes, you can select
a fixed name for the station in the “Audio set-
ting” menu (access the menu via the “Settings”
menu field).
– Alternate frequencies (AF code)
Because the stations on the FM waveband,
e.g. Radio 21, have a limited range of
reception, the programming is transmitted by
several different transmitters on different
frequencies. The AF code communicates all
the frequencies that come into question for the
Page 29 of 75
RADIO NAVIGATION SYSTEM28
NAVIGATION
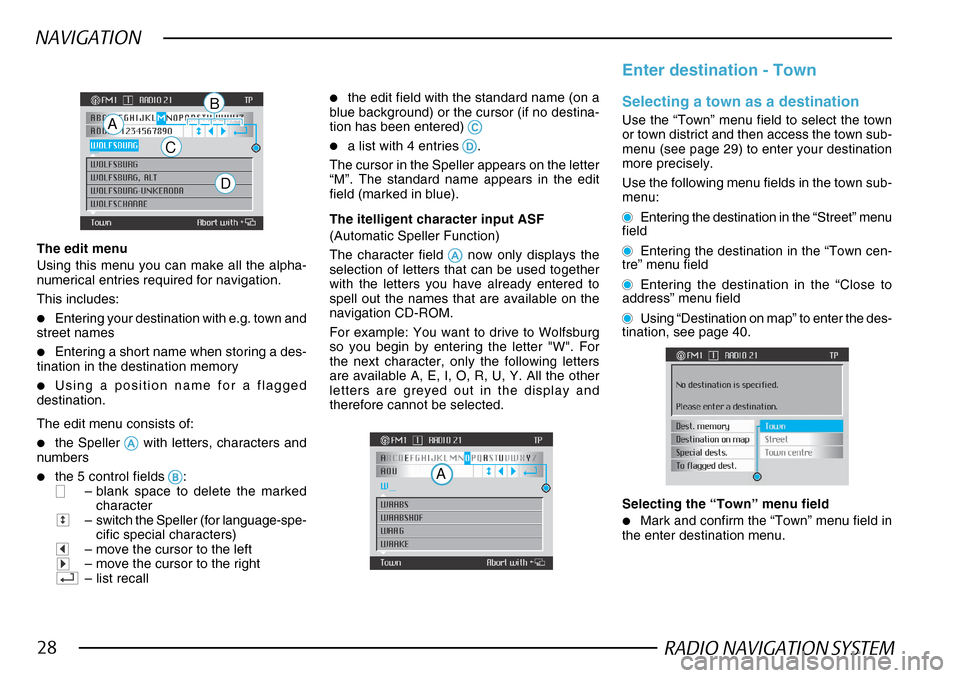
The edit menu
Using this menu you can make all the alpha-
numerical entries required for navigation.
This includes:
•Entering your destination with e.g. town and
street names
•Entering a short name when storing a des-
tination in the destination memory
•Using a position name for a flagged
destination.
The edit menu consists of:
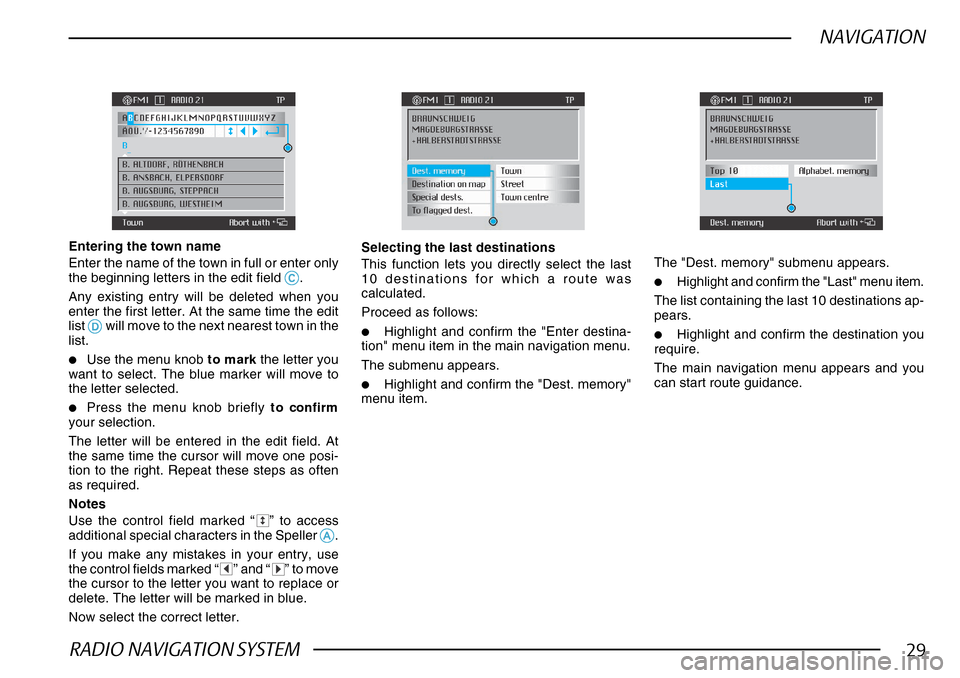
•the Speller AA AA
A with letters, characters and
numbers
•the 5 control fields BB
BB
B:– blank space to delete the marked
character
–switch the Speller (for language-spe-
cific special characters)
–move the cursor to the left–move the cursor to the right–list recall
•the edit field with the standard name (on a
blue background) or the cursor (if no destina-
tion has been entered)
CC CC
C
•a list with 4 entries DD
DD
D.
The cursor in the Speller appears on the letter
“M”. The standard name appears in the edit
field (marked in blue).
A
C
D
B Enter destination - TownSelecting a town as a destination
Use the “Town” menu field to select the town
or town district and then access the town sub-
menu (see page 29) to enter your destination
more precisely.
Use the following menu fields in the town sub-
menu:
Entering the destination in the “Street” menu
field
Entering the destination in the “Town cen-
tre” menu field
Entering the destination in the “Close to
address” menu field
Using “Destination on map” to enter the des-
tination, see page 40.
Selecting the “Town” menu field
•Mark and confirm the “Town” menu field in
the enter destination menu.
The itelligent character input ASF
(Automatic Speller Function)
The character field
AA AA
A now only displays the
selection of letters that can be used together
with the letters you have already entered to
spell out the names that are available on the
navigation CD-ROM.
For example: You want to drive to Wolfsburg
so you begin by entering the letter "W". For
the next character, only the following letters
are available A, E, I, O, R, U, Y. All the other
letters are greyed out in the display and
therefore cannot be selected.
A
Page 30 of 75
RADIO NAVIGATION SYSTEM29
NAVIGATION
Entering the town name
Enter the name of the town in full or enter only
the beginning letters in the edit field
CC CC
C.
Any existing entry will be deleted when you
enter the first letter. At the same time the edit
list
DD DD
D will move to the next nearest town in the
list.
•Use the menu knob to mark the letter you
want to select. The blue marker will move to
the letter selected.
•Press the menu knob briefly to confirm
your selection.
The letter will be entered in the edit field. At
the same time the cursor will move one posi-
tion to the right. Repeat these steps as often
as required.
Notes
Use the control field marked “
” to access
additional special characters in the Speller AA AA
A.
If you make any mistakes in your entry, use
the control fields marked “
” and “” to move
the cursor to the letter you want to replace or
delete. The letter will be marked in blue.
Now select the correct letter.
Selecting the last destinations
This function lets you directly select the last
10 destinations for which a route was
calculated.
Proceed as follows:
•Highlight and confirm the "Enter destina-
tion" menu item in the main navigation menu.
The submenu appears.
•Highlight and confirm the "Dest. memory"
menu item. The "Dest. memory" submenu appears.
•Highlight and confirm the "Last" menu item.
The list containing the last 10 destinations ap-
pears.
•Highlight and confirm the destination you
require.
The main navigation menu appears and you
can start route guidance.
Page 37 of 75
RADIO NAVIGATION SYSTEM36
NAVIGATION
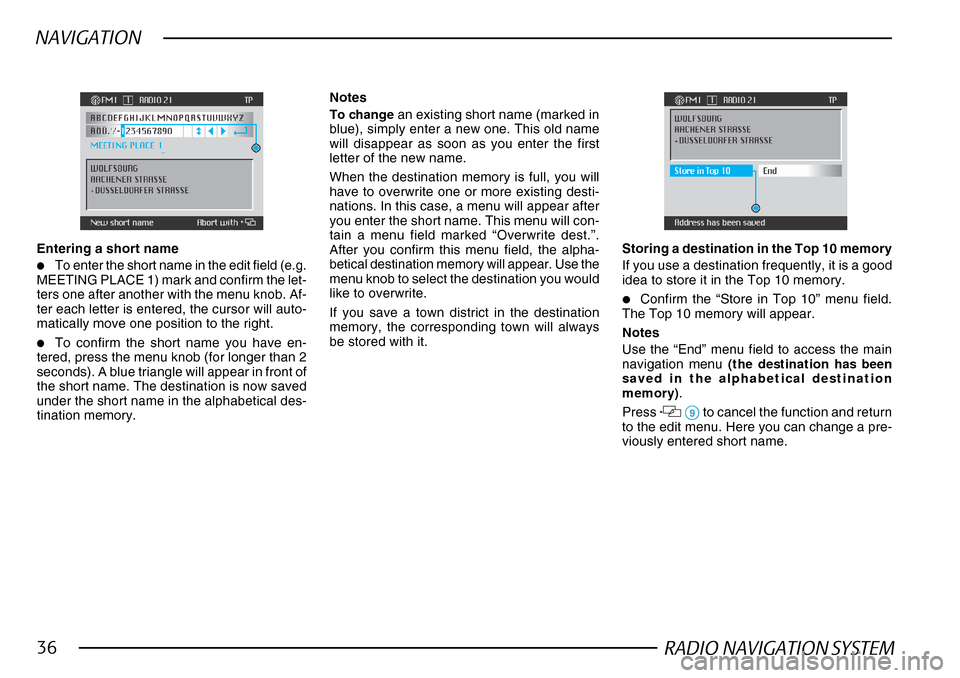
Entering a short name
•To enter the short name in the edit field (e.g.
MEETING PLACE 1) mark and confirm the let-
ters one after another with the menu knob. Af-
ter each letter is entered, the cursor will auto-
matically move one position to the right.
•To confirm the short name you have en-
tered, press the menu knob (for longer than 2
seconds). A blue triangle will appear in front of
the short name. The destination is now saved
under the short name in the alphabetical des-
tination memory.
Notes
To change an existing short name (marked in
blue), simply enter a new one. This old name
will disappear as soon as you enter the first
letter of the new name.
When the destination memory is full, you will
have to overwrite one or more existing desti-
nations. In this case, a menu will appear after
you enter the short name. This menu will con-
tain a menu field marked “Overwrite dest.”.
After you confirm this menu field, the alpha-
betical destination memory will appear. Use the
menu knob to select the destination you would
like to overwrite.
If you save a town district in the destination
memory, the corresponding town will always
be stored with it. Storing a destination in the Top 10 memory
If you use a destination frequently, it is a good
idea to store it in the Top 10 memory.
•Confirm the “Store in Top 10” menu field.
The Top 10 memory will appear.
Notes
Use the “End” menu field to access the main
navigation menu (the destination has been
saved in the alphabetical destination
memory) .
Press
99 99
9 to cancel the function and return
to the edit menu. Here you can change a pre-
viously entered short name.
Page 42 of 75
RADIO NAVIGATION SYSTEM41
NAVIGATION
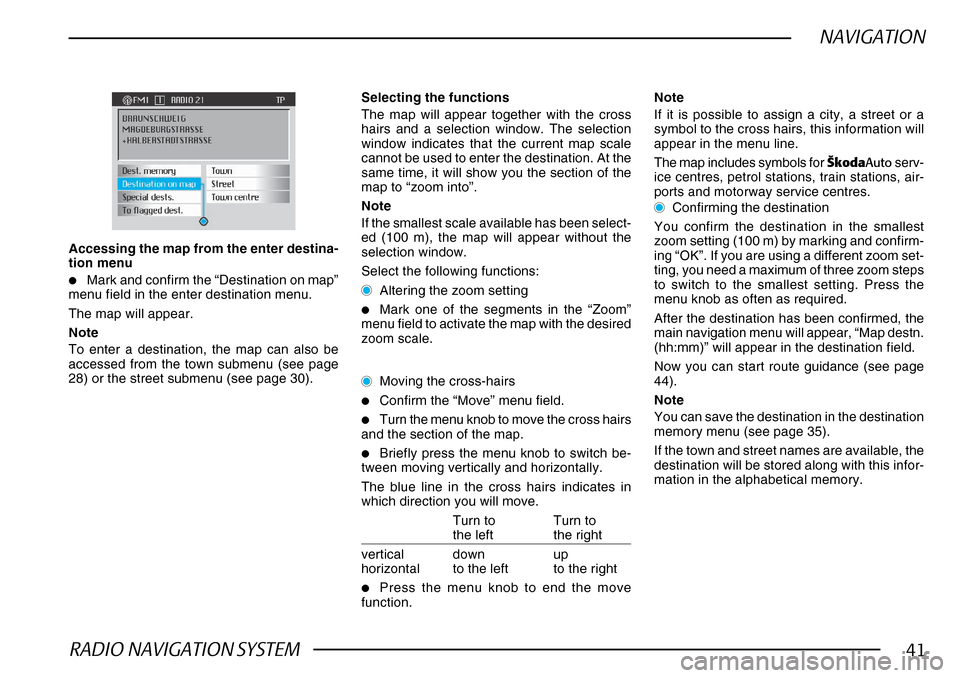
Accessing the map from the enter destina-
tion menu
•Mark and confirm the “Destination on map”
menu field in the enter destination menu.
The map will appear.
Note
To enter a destination, the map can also be
accessed from the town submenu (see page
28) or the street submenu (see page 30).
Selecting the functions
The map will appear together with the cross
hairs and a selection window. The selection
window indicates that the current map scale
cannot be used to enter the destination. At the
same time, it will show you the section of the
map to “zoom into”.
Note
If the smallest scale available has been select-
ed (100 m), the map will appear without the
selection window.
Select the following functions:
Altering the zoom setting
•Mark one of the segments in the “Zoom”
menu field to activate the map with the desired
zoom scale.
Moving the cross-hairs
•Confirm the “Move” menu field.
•Turn the menu knob to move the cross hairs
and the section of the map.
•Briefly press the menu knob to switch be-
tween moving vertically and horizontally.
The blue line in the cross hairs indicates in
which direction you will move.
Turn to Turn to
the left the right
vertical down up
horizontal to the left to the right
•Press the menu knob to end the move
function. Note
If it is possible to assign a city, a street or a
symbol to the cross hairs, this information will
appear in the menu line.
The map includes symbols for
·kodaAuto serv-
ice centres, petrol stations, train stations, air-
ports and motorway service centres.
Confirming the destination
You confirm the destination in the smallest
zoom setting (100 m) by marking and confirm-
ing “OK”. If you are using a different zoom set-
ting, you need a maximum of three zoom steps
to switch to the smallest setting. Press the
menu knob as often as required.
After the destination has been confirmed, the
main navigation menu will appear, “Map destn.
(hh:mm)” will appear in the destination field.
Now you can start route guidance (see page
44).
Note
You can save the destination in the destination
memory menu (see page 35).
If the town and street names are available, the
destination will be stored along with this infor-
mation in the alphabetical memory.
Page 43 of 75
RADIO NAVIGATION SYSTEM42
NAVIGATION
Route options
Planning route guidance and
calculating the route list
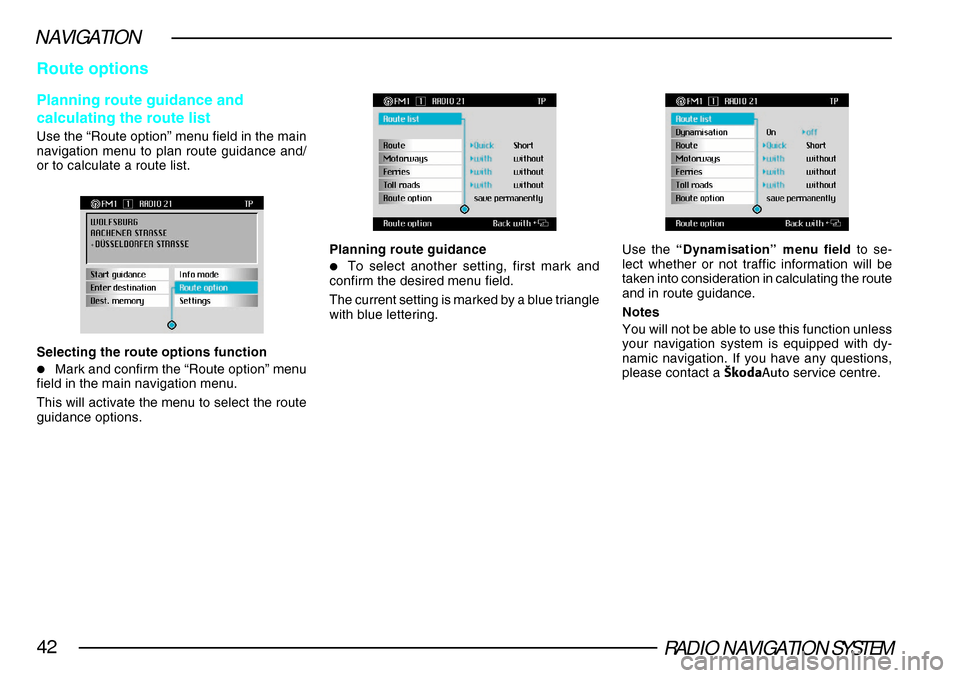
Use the “Route option” menu field in the main
navigation menu to plan route guidance and/
or to calculate a route list.
Selecting the route options function
•Mark and confirm the “Route option” menu
field in the main navigation menu.
This will activate the menu to select the route
guidance options.
Planning route guidance
•To select another setting, first mark and
confirm the desired menu field.
The current setting is marked by a blue triangle
with blue lettering.
Use the “Dynamisation” menu field to se-
lect whether or not traffic information will be
taken into consideration in calculating the route
and in route guidance.
Notes
You will not be able to use this function unless
your navigation system is equipped with dy-
namic navigation. If you have any questions,
please contact a ·kodaAuto service centre.
Page 49 of 75
RADIO NAVIGATION SYSTEM48
NAVIGATION
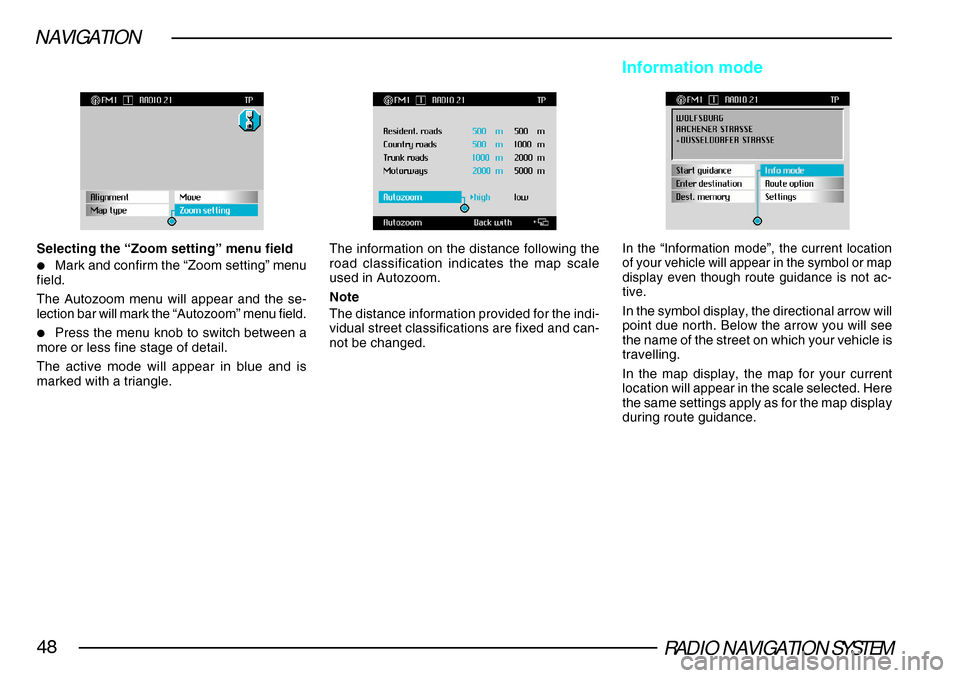
Selecting the “Zoom setting” menu field
•Mark and confirm the “Zoom setting” menu
field.
The Autozoom menu will appear and the se-
lection bar will mark the “Autozoom” menu field.
•Press the menu knob to switch between a
more or less fine stage of detail.
The active mode will appear in blue and is
marked with a triangle.
The information on the distance following the
road classification indicates the map scale
used in Autozoom.
Note
The distance information provided for the indi-
vidual street classifications are fixed and can-
not be changed.
Information mode
In the “Information mode”, the current location
of your vehicle will appear in the symbol or map
display even though route guidance is not ac-
tive.
In the symbol display, the directional arrow will
point due north. Below the arrow you will see
the name of the street on which your vehicle is
travelling.
In the map display, the map for your current
location will appear in the scale selected. Here
the same settings apply as for the map display
during route guidance.
Page 51 of 75
RADIO NAVIGATION SYSTEM50
NAVIGATION
Destination memory - Enter/change short
name
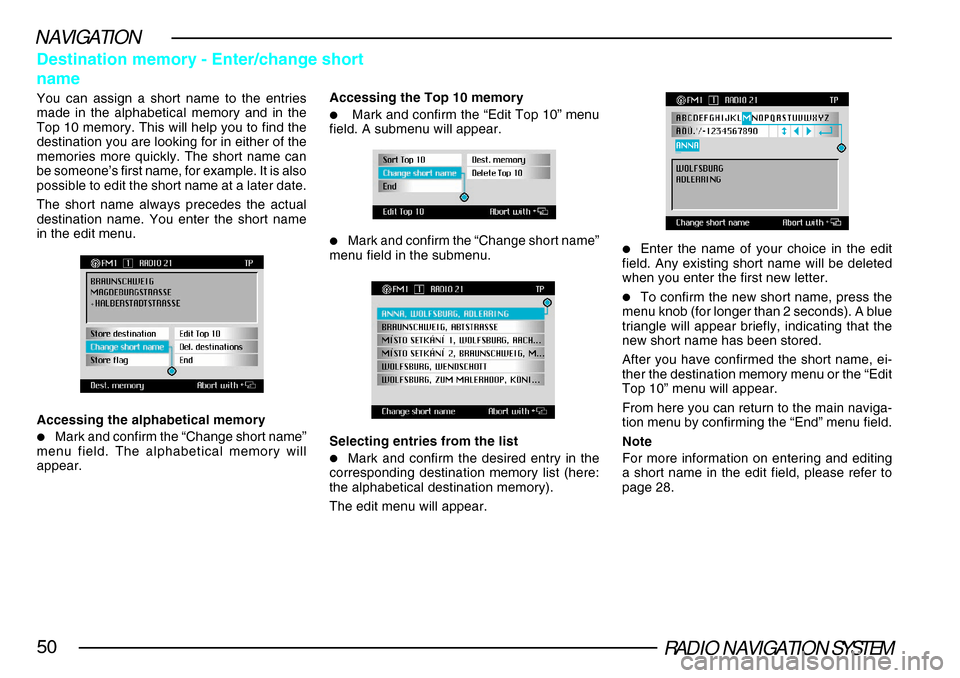
You can assign a short name to the entries
made in the alphabetical memory and in the
Top 10 memory. This will help you to find the
destination you are looking for in either of the
memories more quickly. The short name can
be someone’s first name, for example. It is also
possible to edit the short name at a later date.
The short name always precedes the actual
destination name. You enter the short name
in the edit menu.Accessing the Top 10 memory
•Mark and confirm the “Edit Top 10” menu
field. A submenu will appear.
•Mark and confirm the “Change short name”
menu field in the submenu.
Selecting entries from the list
•Mark and confirm the desired entry in the
corresponding destination memory list (here:
the alphabetical destination memory).
The edit menu will appear.
•Enter the name of your choice in the edit
field. Any existing short name will be deleted
when you enter the first new letter.
•To confirm the new short name, press the
menu knob (for longer than 2 seconds). A blue
triangle will appear briefly, indicating that the
new short name has been stored.
After you have confirmed the short name, ei-
ther the destination memory menu or the “Edit
Top 10” menu will appear.
From here you can return to the main naviga-
tion menu by confirming the “End” menu field.
Note
For more information on entering and editing
a short name in the edit field, please refer to
page 28.
Accessing the alphabetical memory
•Mark and confirm the “Change short name”
menu field. The alphabetical memory will
appear.