language SKODA SUPERB 2005 1.G / (B5/3U) DX Navigation System Manual
[x] Cancel search | Manufacturer: SKODA, Model Year: 2005, Model line: SUPERB, Model: SKODA SUPERB 2005 1.G / (B5/3U)Pages: 75, PDF Size: 3.09 MB
Page 29 of 75

RADIO NAVIGATION SYSTEM28
NAVIGATION
The edit menu
Using this menu you can make all the alpha-
numerical entries required for navigation.
This includes:
•Entering your destination with e.g. town and
street names
•Entering a short name when storing a des-
tination in the destination memory
•Using a position name for a flagged
destination.
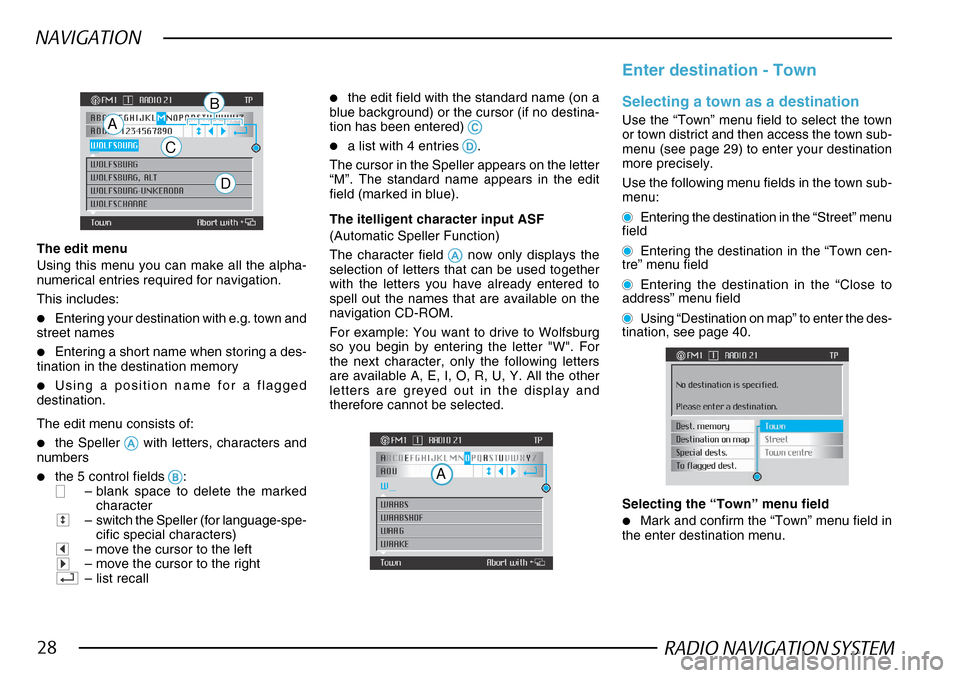
The edit menu consists of:
•the Speller AA AA
A with letters, characters and
numbers
•the 5 control fields BB
BB
B:– blank space to delete the marked
character
–switch the Speller (for language-spe-
cific special characters)
–move the cursor to the left–move the cursor to the right–list recall
•the edit field with the standard name (on a
blue background) or the cursor (if no destina-
tion has been entered)
CC CC
C
•a list with 4 entries DD
DD
D.
The cursor in the Speller appears on the letter
“M”. The standard name appears in the edit
field (marked in blue).
A
C
D
B Enter destination - TownSelecting a town as a destination
Use the “Town” menu field to select the town
or town district and then access the town sub-
menu (see page 29) to enter your destination
more precisely.
Use the following menu fields in the town sub-
menu:
Entering the destination in the “Street” menu
field
Entering the destination in the “Town cen-
tre” menu field
Entering the destination in the “Close to
address” menu field
Using “Destination on map” to enter the des-
tination, see page 40.
Selecting the “Town” menu field
•Mark and confirm the “Town” menu field in
the enter destination menu.
The itelligent character input ASF
(Automatic Speller Function)
The character field
AA AA
A now only displays the
selection of letters that can be used together
with the letters you have already entered to
spell out the names that are available on the
navigation CD-ROM.
For example: You want to drive to Wolfsburg
so you begin by entering the letter "W". For
the next character, only the following letters
are available A, E, I, O, R, U, Y. All the other
letters are greyed out in the display and
therefore cannot be selected.
A
Page 62 of 75

RADIO NAVIGATION SYSTEM61
NAVIGATION
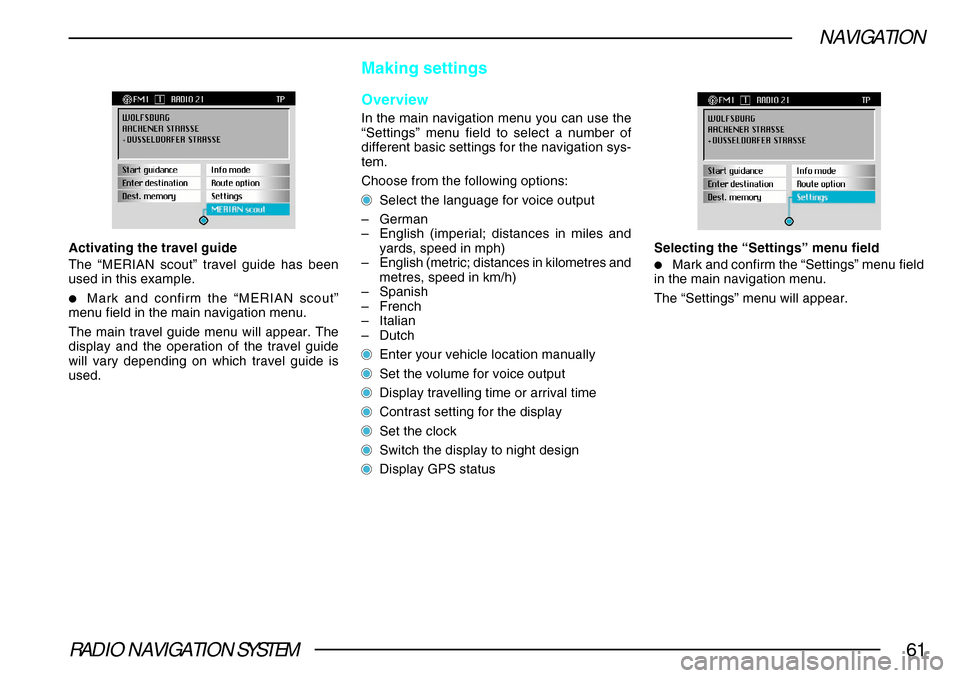
Activating the travel guide
The “MERIAN scout” travel guide has been
used in this example.
•Mark and confirm the “MERIAN scout”
menu field in the main navigation menu.
The main travel guide menu will appear. The
display and the operation of the travel guide
will vary depending on which travel guide is
used.
Making settings
Overview
In the main navigation menu you can use the
“Settings” menu field to select a number of
different basic settings for the navigation sys-
tem.
Choose from the following options:
Select the language for voice output
– German
– English (imperial; distances in miles and
yards, speed in mph)
– English (metric; distances in kilometres and
metres, speed in km/h)
– Spanish
– French
– Italian
– Dutch
Enter your vehicle location manually
Set the volume for voice output
Display travelling time or arrival time
Contrast setting for the display
Set the clock
Switch the display to night design
Display GPS status Selecting the “Settings” menu field
•Mark and confirm the “Settings” menu field
in the main navigation menu.
The “Settings” menu will appear.
Page 63 of 75

RADIO NAVIGATION SYSTEM62
NAVIGATION
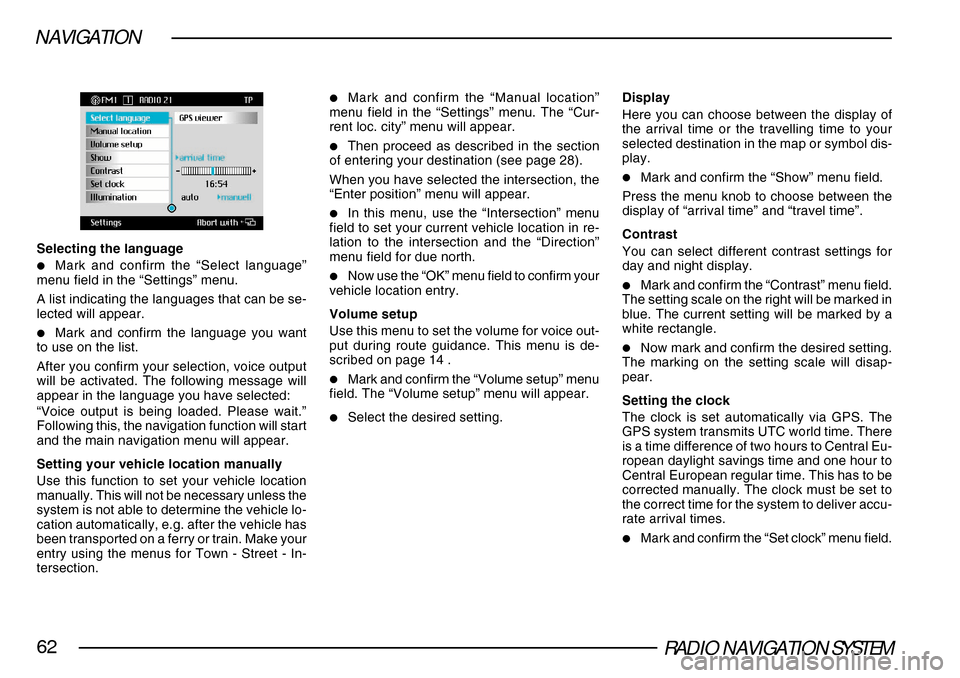
Selecting the language
•Mark and confirm the “Select language”
menu field in the “Settings” menu.
A list indicating the languages that can be se-
lected will appear.
•Mark and confirm the language you want
to use on the list.
After you confirm your selection, voice output
will be activated. The following message will
appear in the language you have selected:
“Voice output is being loaded. Please wait.”
Following this, the navigation function will start
and the main navigation menu will appear.
Setting your vehicle location manually
Use this function to set your vehicle location
manually. This will not be necessary unless the
system is not able to determine the vehicle lo-
cation automatically, e.g. after the vehicle has
been transported on a ferry or train. Make your
entry using the menus for Town - Street - In-
tersection.
•Mark and confirm the “Manual location”
menu field in the “Settings” menu. The “Cur-
rent loc. city” menu will appear.
•Then proceed as described in the section
of entering your destination (see page 28).
When you have selected the intersection, the
“Enter position” menu will appear.
•In this menu, use the “Intersection” menu
field to set your current vehicle location in re-
lation to the intersection and the “Direction”
menu field for due north.
•Now use the “OK” menu field to confirm your
vehicle location entry.
Volume setup
Use this menu to set the volume for voice out-
put during route guidance. This menu is de-
scribed on page 14 .
•Mark and confirm the “Volume setup” menu
field. The “Volume setup” menu will appear.
•Select the desired setting. Display
Here you can choose between the display of
the arrival time or the travelling time to your
selected destination in the map or symbol dis-
play.
•Mark and confirm the “Show” menu field.
Press the menu knob to choose between the
display of “arrival time” and “travel time”.
Contrast
You can select different contrast settings for
day and night display.
•Mark and confirm the “Contrast” menu field.
The setting scale on the right will be marked in
blue. The current setting will be marked by a
white rectangle.
•Now mark and confirm the desired setting.
The marking on the setting scale will disap-
pear.
Setting the clock
The clock is set automatically via GPS. The
GPS system transmits UTC world time. There
is a time difference of two hours to Central Eu-
ropean daylight savings time and one hour to
Central European regular time. This has to be
corrected manually. The clock must be set to
the correct time for the system to deliver accu-
rate arrival times.
•Mark and confirm the “Set clock” menu field.