SKODA SUPERB 2007 1.G / (B5/3U) Owner's Manual
Manufacturer: SKODA, Model Year: 2007, Model line: SUPERB, Model: SKODA SUPERB 2007 1.G / (B5/3U)Pages: 259, PDF Size: 14.71 MB
Page 121 of 259

Communicating and Navigating
120
Fa u lt d i sp la y s
On the radio display the following fault displays can be displayed:
•NO CD CHANGER - CD-changer is not co nnected to the magazine.
•NO CD MAGAZINE - no magazine in the CD-changer.
•NO CD - the selected compartment in the magazine of the CD-changer is
empty.
•SURFACE - in the selected compartment the CD with playback side is inserted
upwards.
Tips for operating the CD-changer
Please pay attention to the following notes for operating the CD-changer.
•Only clean CDs without scratches and damages should be used, in order to
guarantee a proper, high-quality CD-playback.
•Affix no labels to the CDs.
•Always store non-used CDs in the CD-s torage from the Škoda genuine accesso-
ries provided for this as well as in the original folding box.
•Never expose CDs to direct sun rays.
•Use a soft, non-fluffy cloth to clean the CDs. Wipe the CD straight-lined from
the middle to the outside. Strong dirt mu st be eliminated with usual CD-cleaner.
•Please never use liquids such as gasoline , paint thinner or disk cleaner, other-
wise the surface of the CD could get damaged.
Precaution measures for laser equipment
Laser equipment is classifi ed according to DIN IEC 76 (CO) 6/VDE 0837 in the
safety categories 1 - 4.
The Škoda CD-changer correspond s to the safety category 1. The laser used for equipment of category 1 is to such an extent energy-poor and/or
shielded that there is no risk of danger
when used in accordance with the regula-
tion.
WARNING
Please always pay full attention to the traffic situation around you!
Note
Do not remove the equipment cover. The equipment does not contain any parts,
which can be serviced by the user.
Warranty
The same guarantee conditions apply for our factory-fitted radio system as for new
vehicles.
Note
A damage in the sense of the warranty must not be the result from improper
handling of the system or from unprofes sional repair attempts. In addition, no
external damage must be present.
NKO B5 20.book Page 120 Friday, March 2, 2007 1:46 PM
Page 122 of 259
Communicating and Navigating121
Using the systemSafetyDriving TipsGeneral MaintenanceBreakdown assistanceTechnical Data
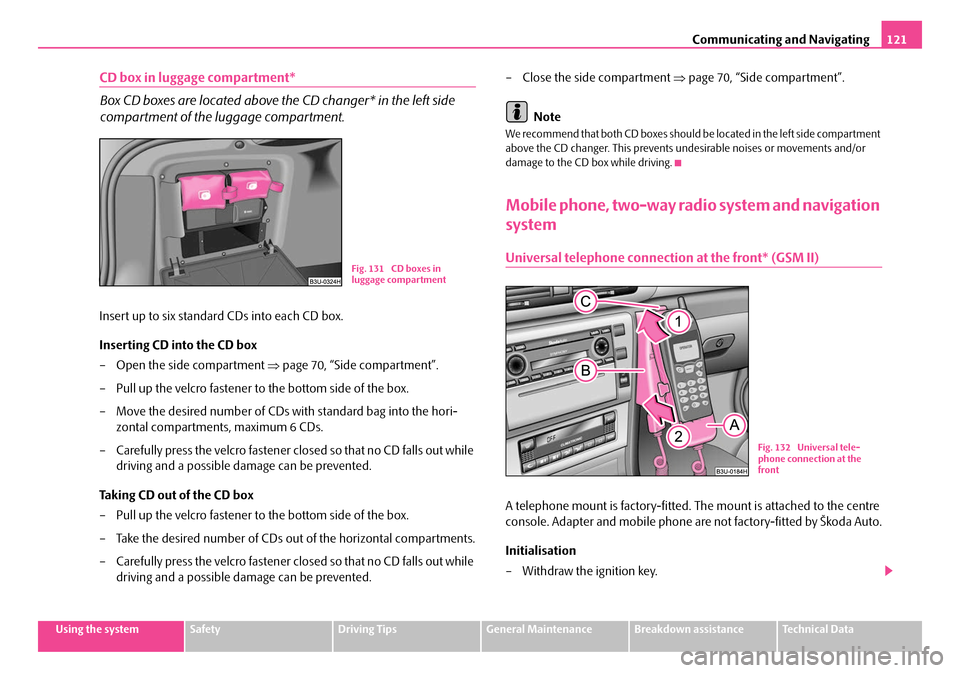
CD box in luggage compartment*
Box CD boxes are located above the CD changer* in the left side
compartment of the luggage compartment.
Insert up to six standard CDs into each CD box.
Inserting CD into the CD box
– Open the side compartment ⇒page 70, “Side compartment”.
– Pull up the velcro fastener to the bottom side of the box.
– Move the desired number of CDs wi th standard bag into the hori-
zontal compartments, maximum 6 CDs.
– Carefully press the velcro fastener closed so that no CD falls out while driving and a possible damage can be prevented.
Taking CD out of the CD box
– Pull up the velcro fastener to the bottom side of the box.
– Take the desired number of CDs ou t of the horizontal compartments.
– Carefully press the velcro fastener closed so that no CD falls out while driving and a possible damage can be prevented. – Close the side compartment
⇒page 70, “Side compartment”.
Note
We recommend that both CD boxes should be located in the left side compartment
above the CD changer. This prevents un desirable noises or movements and/or
damage to the CD box while driving.
Mobile phone, two-way radi o system and navigation
system
Universal telephone connection at the front* (GSM II)
A telephone mount is factory-fitted. The mount is attached to the centre
console. Adapter and mobile phone are not factory-fitted by Škoda Auto.
Initialisation
– Withdraw the ignition key.
B1Z-0042HB1Z-0042HFig. 131 CD boxes in
luggage compartment
Fig. 132 Universal tele-
phone connection at the
front
NKO B5 20.book Page 121 Friday, March 2, 2007 1:46 PM
Page 123 of 259

Communicating and Navigating
122
– First insert the adapter without the mobile phone into the mount in the direction of arrow ⇒page 121, fig. 132 until the adapter is
touching the stop. Press the adapter slightly in the direction of arrow until it locks into position.
– Plug the adapter cable into the mobile phone socket. The socket is located on the mobile phone mount below.
– Switch on the ignition.
– Wait approximately 20 seconds, switch off the ignition and pull the ignition key out of the ignition lock.
– Insert the mobile phone into the adapter (as specified in manufac- turer's instructions) and switch on the ignition.
Removing the mobile phone and adapter
– Press the button and remove the mobile telephone.
An initialisation mu st be carried out:
•after the first connection of the adapter,
•after reconnecting the battery,
•after pulling out the adapter cable from the power socket for the mobile phone.
This enables you to make full use of the ad vantages of a normal carphone (“hands-
free system” using a microphone integrated in the vehicle, optimal transmission of
signals using an external aerial etc.). The battery of the mobile phone is also
constantly charged.
Please contact your Škoda Service Partner if there are any points which are not
clear.
Please also refer to the additional instructions ⇒page 123, “Mobile phones and
two-way radio systems”.
Telephone pre-installation at the front or rear* (GSM III)
Initialisation of the adapter
– Withdraw the ignition key.
– Insert the adapter into the mount (the mobile phone must not be inserted in the adapter).
– Plug the adapter cable into the mobile phone socket.
– Switch on the ignition.
AB
A1
A2
AA
AC
Fig. 133 Universal tele-
phone connection at the
front
B1Z-0042HB1Z-0042H
Fig. 134 Universal tele-
phone connection at the
rear
AAAB
NKO B5 20.book Page 122 Friday, March 2, 2007 1:46 PM
Page 124 of 259
Communicating and Navigating123
Using the systemSafetyDriving TipsGeneral MaintenanceBreakdown assistanceTechnical Data
– Wait approximately 20 seconds, switch off the ignition and pull the
ignition key out of the ignition lock.
– Insert the mobile phone into the adapter (as specified in manufac- turer's instructions) and switch on the ignition.
An initialisation must be carried out:
•after the first connection of the adapter,
•after reconnecting the battery,
•after pulling out the adapter cable from the power socket for the mobile phone.
This enables you to make full use of the advantages of a normal carphone (“hands-
free system” using a microphone integrated in the vehicle, optimal transmission of
signals using an external aerial etc.). The battery of the mobile phone is also
constantly charged.
A telephone mount is factory-fitted for the front mobile phone and for the rear
mobile phone. The front telephone mount is located on the front centre console
⇒ page 122, fig. 133 , the rear on the rear centre console ⇒page 122, fig. 134 .
Adapter (Cullmann) and mobile phone are not factory-fitted by Škoda Auto.
Please also refer to the additional instructions ⇒page 123, “Mobile phones and
two-way radio systems”.
Note
For technical reasons it is not possible to use simultaneously the front and rear
mobile phone. Ensure that the adapter is always inserted only in the bracket
.
Mobile phones and two-way radio systems
The installation of a mobile phone and tw o-way radio system in a vehicle should
only be carried out by a Škoda Dealer.
Škoda Auto a.s. permits the operation of mobile phones and two-way radio
systems with a professionally installed external aerial and a maximum transmission
power of up to 10 watts. Our specialist garage is also happy to inform you about the possibilities available
for installing and operating mobile telephones and radio transmitters which have
an output greater than 10 watts. The Škoda Service Partners can provide you with
details about the technical possibilities for retrofitting of mobile telephones and
radio transmitters.
The operation of commercially available mo
bile phones or two-way radio systems
may cause operational problems in the electronic systems of your car. The reasons
for this may be:
•no external aerial,
•external aerial incorrectly installed,
•transmission power gr eater than 10 watts.
You should therefore not operate a mobile phone or two-way radio system
inside the vehicle without the use of an external aerial, or with an external aerial
which has been incorrectly installed.
You should also be aware of the fact that only an external aerial makes it possible
to achieve the optimal range of such equipment.
WARNING
•If a mobile phone or two-way radio sy stem is operated inside the vehicle
without using an external aerial, or wi th an external aerial which has been
incorrectly installed, the result can be excessive electromagnetic fields
which may cause harm to your health.
•Please always pay full attention to the traffic situation around you!
•You must not install two-way radio systems, mobile phones or mounts
on the covers of the airbags or within the immediate deployment range of
airbags. This might result in injuries to the occupants in the event of an acci-
dent!
Note
Please also refer to the operating instructions of the mobile phones and two-way
radio systems.
AAAB
NKO B5 20.book Page 123 Friday, March 2, 2007 1:46 PM
Page 125 of 259
Communicating and Navigating
124
Navigation system*
The controls for the navigation system, radio, CD player are located in the centre
console on both sides of th e monitor screen. Navigation data is also shown in the
information display.
Please refer to the relevant operating inst ructions for a detailed description of the
navigation system.
NKO B5 20.book Page 124 Friday, March 2, 2007 1:46 PM
Page 126 of 259
Passive Safety125
Using the systemSafetyDriving TipsGeneral MaintenanceBreakdown assistanceTechnical Data
Safety
Passive Safety
Basic information
Driving the safe way
Passive safety measures reduce the risk of injury in accident situa-
tions.
In this section you will find important inform ation, tips and notes on the subject of
passive safety in your vehicle. We ha ve combined everything here which you
should be familiar with, for example, regarding seat belts, airbags, child seats and
safety of children. It is therefore importan t, in particular, to comply with the notes
and warnings in this section for your own interest and in the interest of those trav-
elling with you.
WARNING
•This chapter contains important information on how to use the vehicle
for the driver and his occupants. You will find further information on safety,
which concerns you and those travelling with you, in the following chapters
of this Owner's Manual.
•The complete on-board literature should always be in the vehicle. This
applies in particular, if you rent out or sell the vehicle.
Safety equipment
The safety equipment is part of the occupant protection and it can
reduce the risk of injuries in accident situations.
“Do not put at risk” your safety and the safety of those travelling with you . In the
event of an accident, the safety equipmen t can reduce the risk of injuries. The
following list contains part of th e safety equipment in your vehicle:
•Three-point seat belts for all the seats,
•belt force limiter for front and side rear seats,
•belt tensioner for front and side rear seats,
•seat belt height adjuster for front seats,
•front airbags,
•side airbags,
•head airbags*,
•anchoring points for child seat using the “ISOFIX” system,
•head restraint adjustable for height,
•adjustable steering column.
The specified safety equipment works toge ther, in order to optimally protect you
and those travelling with you in accident situations. The safety equipment does not
protect you or the people travelling with you, if you or your occupants adopt an
incorrect seated position or the equipmen t is not correctly adjusted or used.
Fo r t h i s re a s o n y o u w i l l b e p ro v i d e d w i th i n fo rm a ti o n o n w hy t h i s e q u i p m e nt i s v e r y
important, how it protects you and the o ccupants, what should be observed when
using the equipment and how you and the pe ople travelling with you can make full
use of the existing safety equipment. This Owner's Manual contains important
warning notes, which you and those travelli ng with you should pay attention to in
order to reduce a risk of injury.
Safety concerns everybody!
NKO B5 20.book Page 125 Friday, March 2, 2007 1:46 PM
Page 127 of 259
Passive Safety
126
Before setting off
The driver is always fully respon sible for his occupants and for the
operating safety of the vehicle.
For your own safety and the safety of the people travelling with you, please pay
attention to the following points before setting off.
•Ensure that the lighting and the turn signal system are functioning properly.
•Inspect the tyre inflation pressure.
•Ensure that all the windows offer a good visibility to the outside.
•Safely attach the items of luggage ⇒page 67, “Loading the luggage compart-
ment”.
•Ensure that no objects can obstruct the pedal.
•Adjust the mirror, the front seat and the head restraint to match your body size.
•Point out to your occupants that the head restraints must be adjusted to match
their body size.
•Protect the children in suitable child se ats with correctly fastened seat belts
⇒ page 146, “Transporting children safely”.
•Adopt the correct seated position ⇒page 127. Also inform your occupants to
adopt the correct seated position.
•Fasten the seat belt correctly. Also inform your occupants to properly fasten the
seat belts ⇒page 132, “How are seat belts correctly fastened?”.
What influences the driving safety?
The driving safety is primarily dete rmined by the style of driving and
the personal behaviour of all the occupants.
The driver is fully responsible for himself and his occupants. If your driving safety is
effected, you place yourself and the oncomi ng traffic at risk. Please refer to the
following guidelines.
•Do not get distracted from concentrating on the traffic situation, e.g. by your
occupants or mobile phone calls.
•Never drive when your driving ability is impaired, e.g. through medication,
alcohol, drugs.
•Keep to the traffic regulations and the permissible speed limit.
•Adjust the driving speed at all times to the road condition as well as to the traffic
and weather conditions.
•Take regular breaks on long journe ys - at the latest every two hours.
NKO B5 20.book Page 126 Friday, March 2, 2007 1:46 PM
Page 128 of 259
Passive Safety127
Using the systemSafetyDriving TipsGeneral MaintenanceBreakdown assistanceTechnical Data
Correct seated position
Correct seated position for the driver
Correct seated position for the driver is important for safe and
relaxed driving.
For your own safety and to reduce the risk of injury in the event of an accident, we
recommend the following setting.
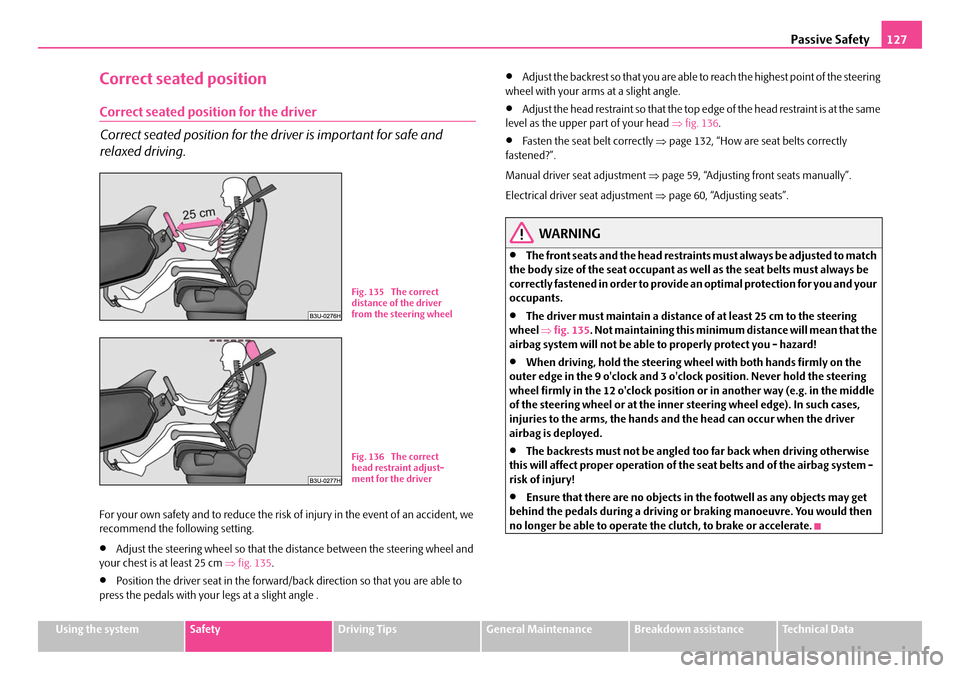
•Adjust the steering wheel so that the distance between the steering wheel and
your chest is at least 25 cm ⇒fig. 135 .
•Position the driver seat in the forward/back direction so that you are able to
press the pedals with your legs at a slight angle .
•Adjust the backrest so that you are able to reach the highest point of the steering
wheel with your arms at a slight angle.
•Adjust the head restraint so that the top edge of the head restraint is at the same
level as the upper part of your head ⇒ fig. 136.
•Fasten the seat belt correctly ⇒page 132, “How are seat belts correctly
fastened?”.
Manual driver seat adjustment ⇒page 59, “Adjusting front seats manually”.
Electrical driver seat adjustment ⇒ page 60, “Adjusting seats”.
WARNING
•The front seats and the head restraints must always be adjusted to match
the body size of the seat occupant as well as the seat belts must always be
correctly fastened in order to provide an optimal protection for you and your
occupants.
•The driver must maintain a distance of at least 25 cm to the steering
wheel ⇒fig. 135 . Not maintaining this minimum distance will mean that the
airbag system will not be able to properly protect you - hazard!
•When driving, hold the steering wheel with both hands firmly on the
outer edge in the 9 o'clock and 3 o'clock position. Never hold the steering
wheel firmly in the 12 o'clock position or in another way (e.g. in the middle
of the steering wheel or at the inner steering wheel edge). In such cases,
injuries to the arms, the hands and the head can occur when the driver
airbag is deployed.
•The backrests must not be angled to o far back when driving otherwise
this will affect proper operation of the seat belts and of the airbag system -
risk of injury!
•Ensure that there are no objects in the footwell as any objects may get
behind the pedals during a driving or braking manoeuvre. You would then
no longer be able to operate the clutch, to brake or accelerate.
Fig. 135 The correct
distance of the driver
from the steering wheel
Fig. 136 The correct
head restraint adjust-
ment for the driver
NKO B5 20.book Page 127 Friday, March 2, 2007 1:46 PM
Page 129 of 259
Passive Safety
128
Correct seated position for the front passenger
The front passenger must maintain a distance of at least 25 cm from
the dash panel so that the airbag offers the greatest possible safety
when an airbag is deployed.
For the safety of the front passenger and to reduce the risk of injury in the event of
an accident, we recommend the following setting.
•Adjust the front passenger seat as far as possible to the rear.
•Adjust the head restraint so that the top edge of the head restraint is at the same
level as the upper part of your head ⇒page 127, fig. 136 .
•Fasten the seat belt correctly ⇒ page 132.
In exceptional cases the front pass enger airbag can be deactivated ⇒page 144,
“Deactivating an airbag”.
Manual front passenger adjustment ⇒page 59, “Adjusting front seats manually”.
Electrical front passenger seat adjustment ⇒page 60, “Adjusting seats”.
WARNING
•The front seats and the head restraints must always be adjusted to match
the body size of the seat occupant as well as the seat belts must always be
correctly fastened in order to provide an optimal protection for you and your
occupants.
•The front passenger must maintain a distance of at least 25 cm to the
dash panel. Not maintaining this minimum distance will mean that the
airbag system will not be able to properly protect you - hazard!
•Always keep your feet in the footwell when the car is being driven - never
place your feet on the instrument panel, out of the window or on the
surfaces of the seats. You will be exposed to increased risk of injury if it
becomes necessary to apply the brake or in the event of an accident. If an
airbag is deployed, you may suffer fata l injuries when adopting an incorrect
seated position!
•The backrests must not be angled too far back when driving otherwise
this will affect proper operation of the seat belts and of the airbag system -
risk of injury!
Correct seated position for the occupants on the rear seats
Occupants on the rear seats must si t upright, keep the feet in the
footwell and must have their seat belts correctly fastened.
To reduce the risk of injury in the event of a sudden braking manoeuvre or an acci-
dent, the occupants on the rear seats must observe the following.
•Adjust the head restraints so that the to p edge of the head restraints are at the
same level as the upper part of your head ⇒ page 127, fig. 136.
•Fasten the seat belt correctly ⇒page 132, “How are seat belts correctly
fastened?”.
•If you are transporting ⇒page 146, “Transporting children safely” children in
the vehicle, please use a suitable child restraint system.
WARNING
•The head restraints must always be adjusted to match the body size, in
order to offer an optimal protection for you and your occupants.
•Always keep your feet in the footwell when the car is being driven - never
put your feet out of the window or on the surfaces of the seats. You will be
exposed to increased risk of injury if it becomes necessary to apply the brake
or in the event of an accident. If an airbag is deployed, you may suffer fatal
injuries when adopting an incorrect seated position!
•If the occupants on the rear seats are not sitting upright, the risk of injury
is increased due to incorrec t routing of the seat belt.
WARNING (continued)
NKO B5 20.book Page 128 Friday, March 2, 2007 1:46 PM
Page 130 of 259
Passive Safety129
Using the systemSafetyDriving TipsGeneral MaintenanceBreakdown assistanceTechnical Data
Examples of an incorrect seated position
An incorrect seated position can lead to severe injuries or death for
the occupants.
Seat belts offer their optimum protection only if the webbing of the seat belts is
properly routed. Incorrect seated positi ons considerably reduce the protective
functions of the seat belts and therefore increase the risk of injury due to an incor-
rect routing of the seat belt. The driver is fully responsible for himself and the occu-
pants, in particular for the children. Do not permit an occupant to adopt an incor-
rect seated position when the car is moving.
The following list contains the examples of seated positions which are dangerous
for the occupants. This list is not comple te, however we would like you to get inter-
ested in this subject.
Therefore, while the car is moving never:
•stand up in the vehicle,
•stand up on the seats,
•kneel onto the seats,
•tilt the backrest fully to the back,
•lean against the dash panel,
•lie on the rear seats,
•only sit on the front area of the seat,
•sit to the side,
•lean out of the window,
•put the feet out of the window,
•put the feet on the dash panel,
•put the feet on the seat upholstery,
•occupy the footwell,
•have the seat belt not fastened,
•occupy the luggage compartment.
WARNING
•If the occupant adopts an incorrect seated position, he is exposed to life-
threatening injuries, in case he is hit by a deployed airbag.
•Before setting off, please adopt the correct seated position and do not
change this seated position while the car is moving. Also advise your occu-
pants to adopt the correct seated position and not to change this seated
position while the car is moving.
NKO B5 20.book Page 129 Friday, March 2, 2007 1:46 PM