radio SKODA SUPERB 2009 2.G / (B6/3T) User Guide
[x] Cancel search | Manufacturer: SKODA, Model Year: 2009, Model line: SUPERB, Model: SKODA SUPERB 2009 2.G / (B6/3T)Pages: 294, PDF Size: 21.33 MB
Page 50 of 294
Unlocking and locking
49
Using the system
Safety
Driving Tips
General Maintenance
Breakdown assistance
Technical Data
You can also open the small boot lid by pressing the button on the remote control
⇒page 51 for approx. 2 seconds.
A handle which makes the clos
ing easier is located on
the inner paneling of the
boot lid.
WARNING
•
Ensure that the lock is properly enga
ged after closing the boot lid. Other-
wise, the boot lid might open suddenly wh
en driving even if the boot lid lock
is closed - risk of accident!•
Never drive with the boot lid fully opened or slightly ajar otherwise
exhaust gases may get into the interior of the vehicle - risk of poisoning!
Hinweis
•
After closing the boot lid, it is automatically locked within 2 seconds and
the anti-theft alarm system* is activated.
This applies only if the vehicle was
locked before closing the boot lid.•
The function of the hand grip on the bottom edge of the boot lid is deactivated
when starting off or as of a speed of more
than 5 km/hour. The function of the hand
grip is acitvated again after stopping the vehicle and after opening the driver or front passenger door or after pressing th
e button on the radio remote control
⇒ page 51.•
Repeated opening and closing of the boot
lid can lead to a temporary failure of
the function due to the overheating prot
ection of the motors of the Twindoor
system.
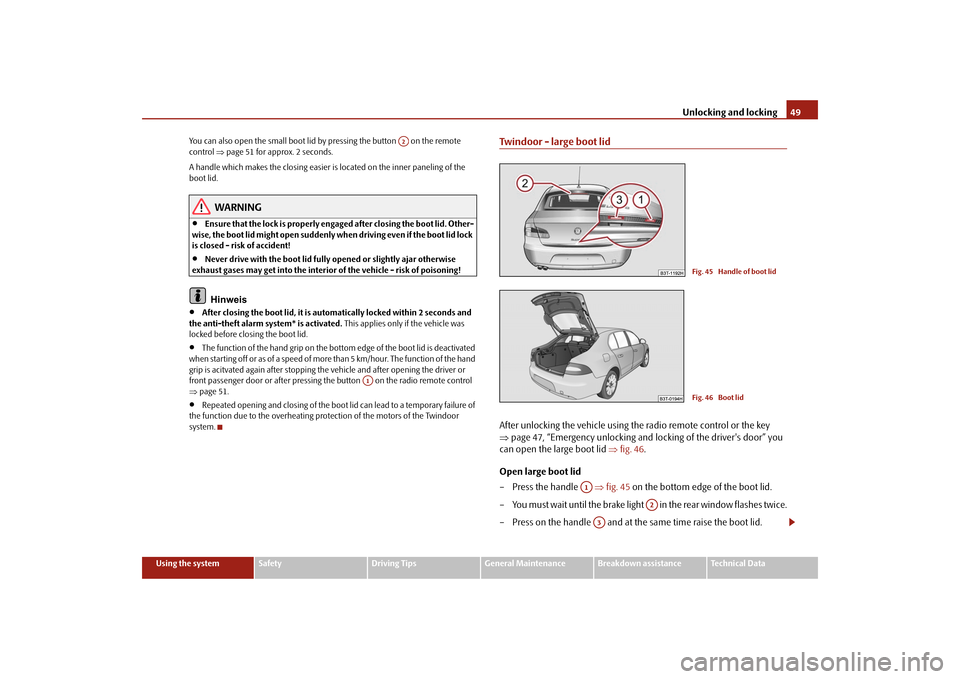
Twindoor - large boot lidAfter unlocking the vehicle using the radio remote control or the key ⇒
page 47, “Emergency unlocking and lo
cking of the driver's door” you
can open the large boot lid
⇒
fig. 46
.
Open large boot lid – Press the handle
⇒
fig. 45
on the bottom edge of the boot lid.
– Yo u must wait until the brake light in the rea r window f lashes twic e. – Press on the handle and at the same time raise the boot lid.
A2
A1
Fig. 45 Handle of boot lidFig. 46 Boot lid
A1
A2
A3
s2dk.1.book Page 49 Wednesday, April 8, 2009 12:23 PM
Page 51 of 294
Unlocking and locking
50
Close large boot lid – Pull the boot lid down and close it with a slight swing
⇒
. The
bonnet locks automatically.
A handle which makes the closing easier is
located on the inner paneling of the
boot lid.
WARNING
•
Ensure that the lock is
properly engaged after clos
ing the boot lid. Other-
wise, the boot lid might open suddenly when
driving even if the boot lid lock
is closed - risk of accident!•
Never drive with the boot lid fully opened or slightly ajar otherwise
exhaust gases may get into the interior of the vehicle - risk of poisoning!
Hinweis
•
After closing the boot lid, it is automatically locked within 2 seconds and
the anti-theft alarm system* is activated.
This applies only if the vehicle was
locked before closing the boot lid.•
The function of the hand grip on the bott
om edge of the boot lid is deactivated
when starting off or as of
a speed of more than 5 km/hou
r. The function of the hand
grip is acitvated again after stopping th
e vehicle and after opening the driver or
front passenger door or after pressing the button on the radio remote control ⇒ page 51.•
Repeated opening and closing of the boot lid can lead to a temporary failure of
the function due to the overheating protection of the motors of the Twindoor system.
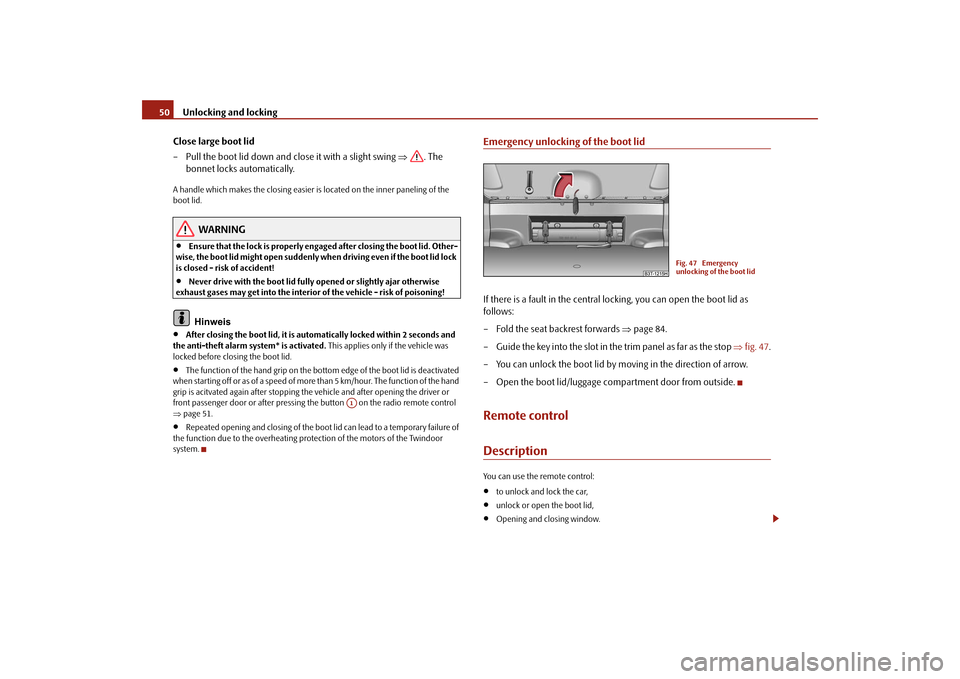
Emergency unlocking of the boot lidIf there is a fault in the central locking, you can open the boot lid as follows: – Fold the seat backrest forwards
⇒
page 84.
– Guide the key into the slot in the trim panel as far as the stop
⇒
fig. 47
.
– You can unlock the boot lid by mo
ving in the direction of arrow.
– Open the boot lid/luggage compartment door from outside.Remote controlDescriptionYou can use the remote control:•
to unlock and lock the car,
•
unlock or open the boot lid,
•
Opening and closing window.
A1
Fig. 47 Emergency unlocking of the boot lid
s2dk.1.book Page 50 Wednesday, April 8, 2009 12:23 PM
Page 53 of 294
Unlocking and locking
52
Folding up of the key – Press button and collapse the key bit in the housing.The turn signal lights flash twice as
confirmation that the vehicle has been
unlocked. The vehicle will lock again auto
matically if you unlock the vehicle using
button but do not open a door or the
boot lid within the next 30 seconds. This
function is intended to prevent the car being unlocked unintentionally. In addition, when the car is unlocked, the
power seats and exterior mirrors* move
into the position assigned to this key. The stored setting of driver seat and exterior mirrors is retrieved. When the vehicle is unlocked or locked, the interior lights and the lights of the entry area are automatically switched
on or off via the door contact.
Display of the locking The turn signal lights flash once to co
nfirm that the vehicle has been correctly
locked. If the doors or the boot lid remain open
after the vehicle has been locked, the turn
signal lights do not flash unt
il they have been closed.
WARNING
If the vehicle is locked from the outside and the safe securing system is acti- vated, there must not be any person in the vehicle as it is then not possible to open either a door or a window from the inside. The locked doors make it more difficult for rescuers to get into
the vehicle in an emergency - hazard!
Note
•
Operate the radio remote control only wh
en the doors and boot lid are closed
and you have visual contact with the vehicle.•
Once in the car, you must not press the lock button
of the radio remote
control before inserting the key into the ignition lock in order to avoid the car being inadvertently locked and, in addition, th
e anti-theft alarm system* being switched
on. Should this happen, press the unlock button
of the radio remote control.
•
The automatic raising of the small boot
lid can be impaired at temperatures
below +4°C.Synchonisation of the remote controlIf the vehicle cannot be unlocked by actuatin
g the remote control system then it is
possible that the code in the key and the
control unit in the vehicle are no longer
synchronised. This can occur when the buttons on the radio-operated key are actu-ated a number of times outside of the operative range of the equipment or the battery on the remote control was replaced. This means it is necessary to
synchronise the code as follows:
•
Press any button on the remote control.
•
Pressing of the button means that the d
oor will unlock with the key within 1
minute
⇒page 47, “Emergency unlocking and locking of the driver's door”.
Anti-theft alarm system*DescriptionThe anti-theft alarm system increases the level of protection against people seeking to break into the vehicle. The system triggers audible and visual warning signals if an attempt is made to break into the vehicle. How is the alarm system activated? The anti-theft alarm system is activated wh
en the vehicle is locked with the key in
the driver's door or by us
ing the radio remote control
⇒page 47, “Emergency
unlocking and locking of the driver's door
”. The door contact monitoring is acti-
vated approx. 15 seconds after the locking. The interior and the towing protection monitoring are activated appr
ox. 30 seconds after the locking. If a door is opened
during activation, the monitoring is
only activated 5 se
conds after closing.
A4
A1
s2dk.1.book Page 52 Wednesday, April 8, 2009 12:23 PM
Page 54 of 294
Unlocking and locking
53
Using the system
Safety
Driving Tips
General Maintenance
Breakdown assistance
Technical Data
How is the alarm system deactivated? The alarm system is deactivated by pressing the unlock button on the radio remote control. The vehicle is automatically locked again if the vehicle is not opened within 30 seconds after reactivating the anti-theft alarm system. The alarm system is also deactivated if you unlock the vehicle door using the key within 45 seconds after locking the vehicle. Once you unlock the vehicle by inserting the key into the driver door within 45 seconds, you then have to insert the key into the ignition lock and switch the igni- tion on within 15 seconds after unlocking th
e door in order to deactivate the alarm
system. The
alarm will be triggered
if you do
not switch on
the ignition within 15
seconds. When is the alarm triggered? The following security areas of the locked vehicle are monitored:•
Bonnet,
•
Boot lid,
•
Doors,
•
Ignition lock,
•
Socket of the factory-fitted towing device,
•
Angle of the vehicle*,
•
Vehicle interior*,
•
A drop in voltage of the on-board power supply.
An alarm is immediately triggered if either
of the two battery terminals is discon-
nected while the anti-theft alarm system is activated. How is the alarm switched off? You switch the alarm off if you unlock the
car with the radio remote control in the
key or if you switch the ignition on.
Note
•
The working life of the alarm siren is 6 years. More detailed information is avail-
able by a specialist garage.
•
Before leaving the car, check that all the doors, windows and the electric
sliding/tilting roof* are properly closed in order to ensure that the anti-theft alarm system is fully operational.•
Coding of the radio remote control and
the receptor part precludes the use of
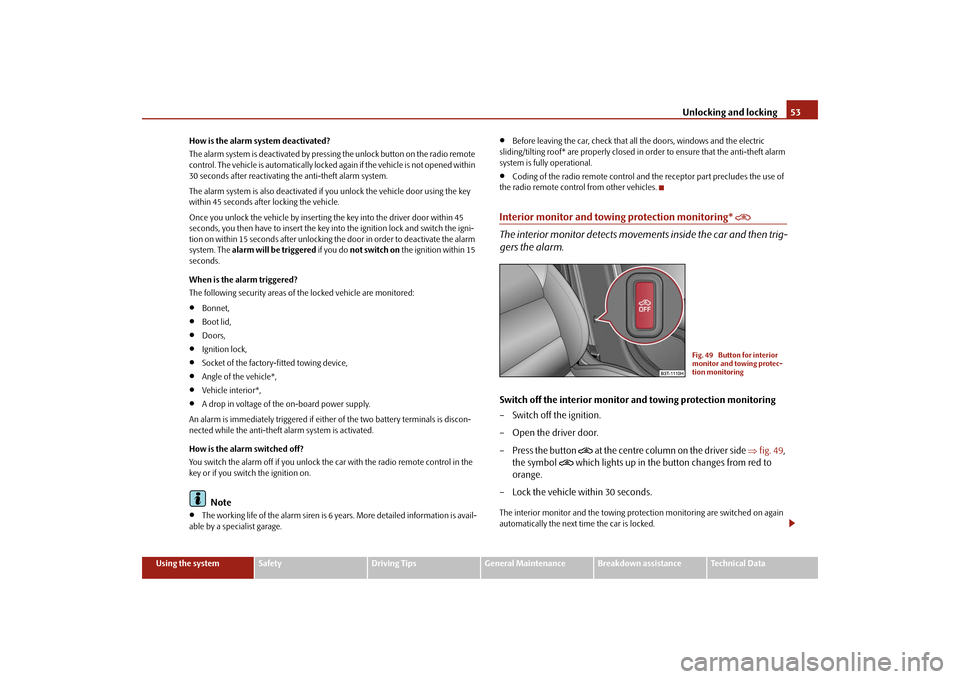
the radio remote control from other vehicles.Interior monitor and towing protection monitoring*
The interior monitor detects movements inside the car and then trig- gers the alarm.Switch off the interior monitor and towing protection monitoring – Switch off the ignition. – Open the driver door. – Press the button
at the centre column on the driver side
⇒
fig. 49
,
the symbol
which lights up in the button changes from red to
orange.
– Lock the vehicle within 30 seconds.The interior monitor and the towing protection monitoring are switched on again automatically the next ti
me the car is locked.
Fig. 49 Button for interior monitor and towing protec-tion monitoring
s2dk.1.book Page 53 Wednesday, April 8, 2009 12:23 PM
Page 59 of 294
Unlocking and locking
58
ClosingSliding closed/closing the sliding/tilting roof – Turn the switch to position
⇒
fig. 52
.
Safety closing The sliding/tilting roof is equipped with an overload protection system. If an obstacle (e.g. ice) prevents closing,
the sliding/tilting roof stops and opens
completely. You can close the sliding/tilting roof completely without overload protection by pressing the
switch to the position
⇒page 57, fig. 52
at the front
for as long as it takes for the sliding/tilting roof to shut completely
⇒
.
WARNING
Close the sliding/tilting roof carefully - risk of injury!Convenience operationYou can also close an open sliding/tilting roof from the outside. – Keep the lock button on the radio remote control pressed or hold the
key in the lock of the driver's do
or in the lock position until the
sliding/tilting roof is closed
⇒
.
The closing operation stops when one releases the key or the lock button.
WARNING
Close the sliding/tilting roof carefully - risk of injury! The overload protec- tion system does not function with the convenience closing.
Electric sliding/tilting roof with solar cells*If there is sufficient bright sunlight, the solar cells on the sliding/tilting roof deliver power for the fresh air blower. Further information
⇒page 109.
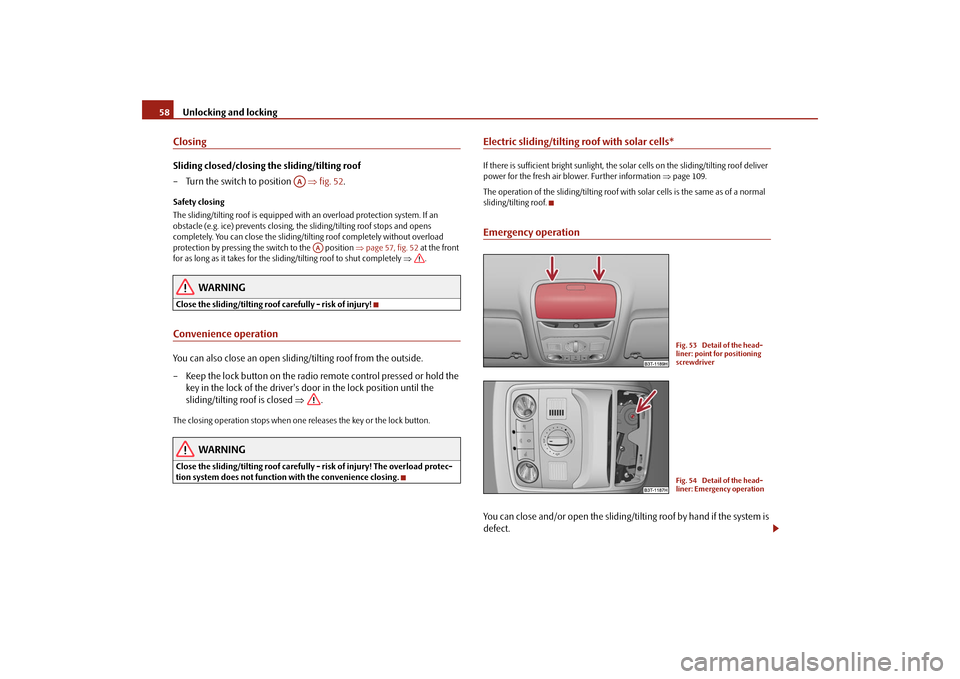
The operation of the sliding/tilting roof with solar cells is the same as of a normal sliding/tilting roof.Emergency operationYou can close and/or open the sliding/tilting roof by hand if the system is defect.
AA
AA
Fig. 53 Detail of the head- liner: point for positioning screwdriverFig. 54 Detail of the head-liner: Emergency operation
s2dk.1.book Page 58 Wednesday, April 8, 2009 12:23 PM
Page 64 of 294

Lights and Visibility
63
Using the system
Safety
Driving Tips
General Maintenance
Breakdown assistance
Technical Data
•
You can change the illumination period
for the Coming Home Function by
means of the information display*.Leaving Home FunctionThis function makes it possible to switch on the lights when approaching the vehicle. Switching on Leaving Home Function – Unlock the vehicle with the radio remote control - the lights come on.Depending on equipment fitted the function Leaving Home switches on the following lights:•
Parking lights,
•
Low beam,
•
Entry lighting in the exterior mirrors,
•
Licence plate light.
Leaving Home Function The function Leaving Home is controlled wi
th the light sensor in the mount of the
interior rear mirror. If the light intensity is higher than the set value of the light sensor, the Leaving Home Function is not
switched on after unlocking the vehicle
with the radio remote control. After unlocking the vehicle with the radio remote control, the lights come on for 30 seconds. The Leaving Home Function is also switched off after the ignition is switched on and after locking the vehicle. If no door is opened within
30 seconds, the lights go out and the vehicle is locked
automatically.
Note
•
If the Leaving Home Function is switch
ed on constantly, the battery will be
heavily discharged particular
ly in short-haul traffic.
•
The switching on of the described lights
should only be und
ertaken in accord-
ance with the legal requirements.•
You can change the illumination period
for the Leaving Home Function by
means of the information display*.Adaptive headlights (AHL)*Switch on Adaptive headlights (AHL)* – Turn the light switch
⇒
page 61, fig. 56
into position
.
The outer illumination switches on if:•
the light sensor recognizes the low light intensity,
•
no reverse gear is engaged,
•
the operation “tourist light” is not switched on.
The light sensor switches on the full ou
ter illumination at low light intensity.
System AHL* makes it possible to change
the length and width of illumination of
the headlight. The length and width of i
llumination changes automatically in rela-
tion to the vehicle speed and the use of the windscreen wiper. System AHL* operates in the following modes. Mode out of town The mode “out of town” is a basic mode. The dispersion of the cone of light in front of the vehicle is similar to the low beam. The mode is active if none of the following modes are active. Mode rain In the mode “rain” the dispersion of the cone of light in front of the vehicle is wider and the width of illumination is shorter,
so that during bad weather (rain) the
dazzling of the oncoming drivers can be reduced. The mode is activated at speeds of 15 - 70 km/h and if the windscreen wi
pers continuously operate for a period of
time longer than 2 minutes. The mode
is deactivated when dropping below or
exceeding the set speed limit or if the windscreen wipers have been switched off for a period of time longer than 8 minutes.
s2dk.1.book Page 63 Wednesday, April 8, 2009 12:23 PM
Page 78 of 294
Lights and Visibility
77
Using the system
Safety
Driving Tips
General Maintenance
Breakdown assistance
Technical Data
Lowerable exterior mirror* with the aid of the key for remote control – If all the windows are closed, press the unlock button on the radio
remote control
⇒
page 51, fig. 48
for approx. 2 seconds.
Tilting surface of front passenger exterior mirror* When the rotary knob is in position
⇒page 76, fig. 76
and the reverse gear is
engaged, the surface of the mirror tilts down slightly. This provides an aid in seeing the kerb of the pavement when parking the car. The mirror returns into its initial position,
after the rotary knob is moved out of the
position
and put into another position or if the speed is more than 15 km/h.
Memory for exterior mirrors* On vehicles fitted with a memory for the driver seat, the relevant setting of the exte- rior mirror is also stored automatica
lly when the seat position is stored.
WARNING
•
Convex (curved outward) or spherical (differently curved) exterior
mirrors increase the vision field. They do, however, make objects appear smaller in the mirror. These mirrors are only of limited use, therefore, for estimating distances to the following vehicles.•
Use whenever possible the interior rear mirror, for estimating the
distances to the following vehicles.
Note
•
Do not touch the surfaces of the exterior mirrors if the exterior mirror heater is
switched on.•
You can set the exterior mirrors by hand, if
the power setting function fails at any
time by pressing on the edge of the mirror surface.•
Contact your specialist garage if a fault exists with the power setting of the exte-
rior mirrors.
Automatic dimming exterior mirror*The exterior mirrors are dimmed together with the interior mirror. If the automatic dimming is switched on, the mirror dims
automatically
depending on the light
striking the mirror from the rear. When the interior lights are switched on or the reverse gear is engaged, the mirror always moves back into the
basic position (not dimmed).
Note
•
Automatic mirror dimming operates only pr
operly if the sun screen* for the rear
window is not in use or the light striking th
e rear of the interior rear-view mirror is
not affected by other objects.•
Do not affix any stickers in front of the li
ght sensor, so that you do not impair the
automatic dimming function or put it out of operation.•
If you switch off the automatic dimming interior rear-view mirror, also the exte-
rior mirror dimming
is switched off.
A3
s2dk.1.book Page 77 Wednesday, April 8, 2009 12:23 PM
Page 82 of 294
Seats and Stowage
81
Using the system
Safety
Driving Tips
General Maintenance
Breakdown assistance
Technical Data
– Engage reverse gear. – Move the right exterior mirror into the desired position
⇒
page 76.
– Take the vehicle out of gear. The set position of the exterior mirror is
stored.
Memory buttons Memory for the seat offers the possibility
to store the individual driver seat and
external mirror position. An individual posi
tion can be allocated to each of the three
memory buttons
⇒page 80, fig. 80
, that is three in tota
l. After pressing the
corresponding memory button , the seat and the exterior mirror are automati-cally moved into the positions which
have been allocated to this button
⇒page 81.
Emergency Off You can interrupt the setting operation at any time, if you operate any button of the driver seat.
Note
•
For safety reasons, it is not possible to store this position if the inclination angle
of the seat backrest is more than 102° in relation to the seat cushion.•
When storing settings with the memory buttons, we recommend that you begin
with the front button and assign a memo
ry button to each additional driver.
•
Each new setting stored with the same
button erases the previous setting.
•
Each time you store the seat and exterior mirror settings for driving forward you
also have to re-store the individual setting
of the exterior mirror on the passenger
side for reversing.Assigning remote control to the memory buttonsAfter storing the settings of the seat
and exterior mirrors, you have 10
seconds in order to assign the radio remote control to the appropriate memory button. – Withdraw the ignition key.
– Press the unlock button
⇒
page 51, after the successful assignment
an audible signal will sound. The setting is stored with the memory button which you have selected.
If you wish to be able to retrieve the settings which are stored in the memory by also using the radio remote control, you have
to assign the radio remote control to a
memory button in each case. If you wish, you can obtain an additional
remote control key from an authorised
Škoda Service partner and then assign th
e remote control key to another memory
button.
Note
•
If the radio remote control had previous
ly been assigned
to another memory
button, this setting is then erased by the new assignment.•
If you assign the radio remote control
to a memory button which has already
been assigned to a radio remote control,
the old assignment is also replaced by a
new assignment in this case.•
The assignment of the radio remote cont
rol to a memory button is retained,
however, after reassigning the seats and exterior mirrors.Retrieving settings of the seat and mirrors You can retrieve the stored settings either with the memory buttons or with the remote control*.Retrieving settings with memory buttons – In order to retrieve the stored setting, you have two possibilities: –
One-touch automatic memory:
Briefly press the desired memory
button
⇒
page 80, fig. 80
. The seat and exterior mirror are moved
automatically into the stored position
s (this applies only if the ignition
is switched on and the speed is less than 5 km/h).
AB
AB
AB
s2dk.1.book Page 81 Wednesday, April 8, 2009 12:23 PM
Page 83 of 294
Seats and Stowage
82
–
Memory keying
: Press and hold the desired memory button
pressed long enough until the seat and the exterior mirror are moved into the stored positions.
Retrieving settings with remote control – If the driver door is clos
ed and the ignition is switched off, briefly press
the unlock button of the radio remote control
⇒
page 51 and then
open the driver door.
– The seat and exterior mirrors now move automatically into the stored
positions.
Retrieving setting of exterior mirror for reversing* – Turn the rotary knob for the exterior mirror setting into the position
⇒
page 76 before engaging the reverse gear.
The mirror returns into its initial position,
after the rotary knob is moved out of the
position
and put into another position or if the speed is more than 15 km/h.
Emergency Off You can interrupt the setting operation at an
y time, if you operate any button of the
driver seat.
Head restraintsBest protection is achieved if the top
edge of the head restraint is at the
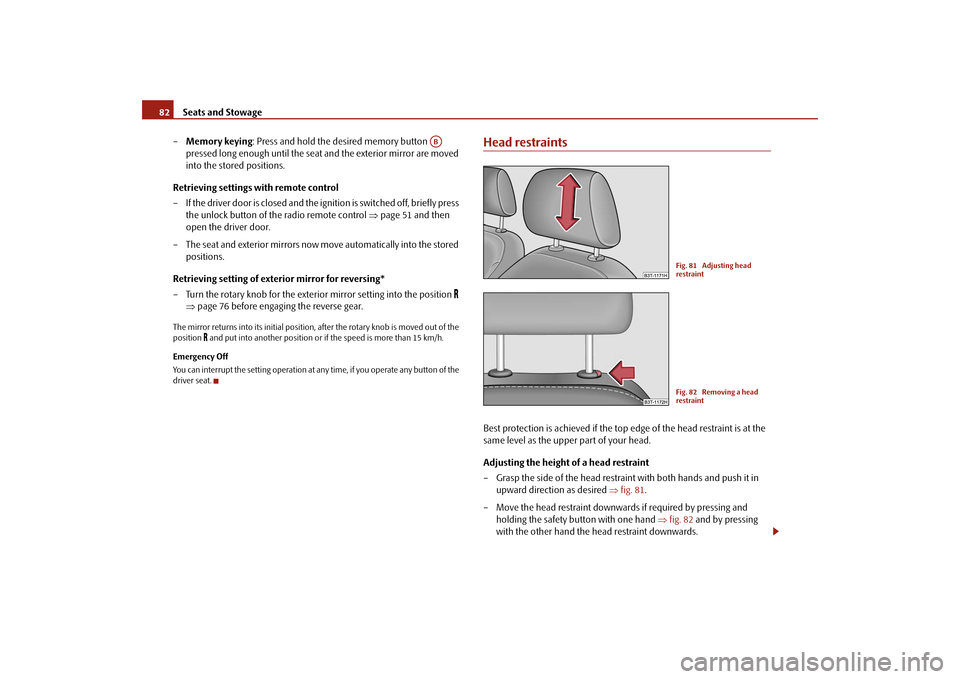
same level as the upper part of your head. Adjusting the height of a head restraint – Grasp the side of the head restraint with both hands and push it in
upward direction as desired
⇒
fig. 81
.
– Move the head restraint downwards if required by pressing and
holding the safety button with one hand
⇒
fig. 82
and by pressing
with the other hand the head restraint downwards.
AB
Fig. 81 Adjusting head restraintFig. 82 Removing a head restraint
s2dk.1.book Page 82 Wednesday, April 8, 2009 12:23 PM
Page 110 of 294
Air conditioning system
109
Using the system
Safety
Driving Tips
General Maintenance
Breakdown assistance
Technical Data
Climatronic* (automatic air conditioning)Description The Climatronic system is a combin
ation of an automatic heating,
fresh air and cooling system which provides optimal comfort for the occupants of the car.The Climatronic maintains fully automatically a convenience temperature. This is achieved by automatically varying the temperature of the outflowing air, the blower stages and the air distribution. The system also takes into account sunlight which eliminates the need to alte
r the settings manually. The
automatic mode
⇒ page 110 ensures maximum wellbeing of th
e occupants at all times of the year.
Description of Climatronic system The cooling operates only if the following conditions are met:•
engine running,
•
outside temperature above approx. +2°C,
•
switched on.
The AC compressor is switched off at a hi
gh coolant temperature in order to provide
cooling at a high load of the engine. Recommended setting for al
l periods of the year:
•
Set the desired temperature, we recommend 22 °C.
•
Press the button
⇒fig. 128
.
•
Move the air outlet vents
2 and
3 so that the air flow is directed slightly upwards.
Aeration of the vehicle when ignition is switched off* On vehicles fitted with power sliding/tilting roof with solar cells* the fresh air blower is automatically switched over to “solar mode” if the sun rays are sufficient after switching off the ignition. The solar
cells on the sliding/tilting roof deliver
power for the fresh air blower
. This supplies the interior of the car with fresh air.
For an optimum ventilation, the air outlet vents
2 and
3 must be opened
⇒ page 105, fig. 125
.
The ventilation functions only when the sliding/tilting roof is closed.
Note
On vehicles equipped with a
factory-fitted radio* or navi
gation*, the information of
the Climatronic is also shown on the display. This function can be switched off, see operating instructions of the ra
dio* or the navigation system*.
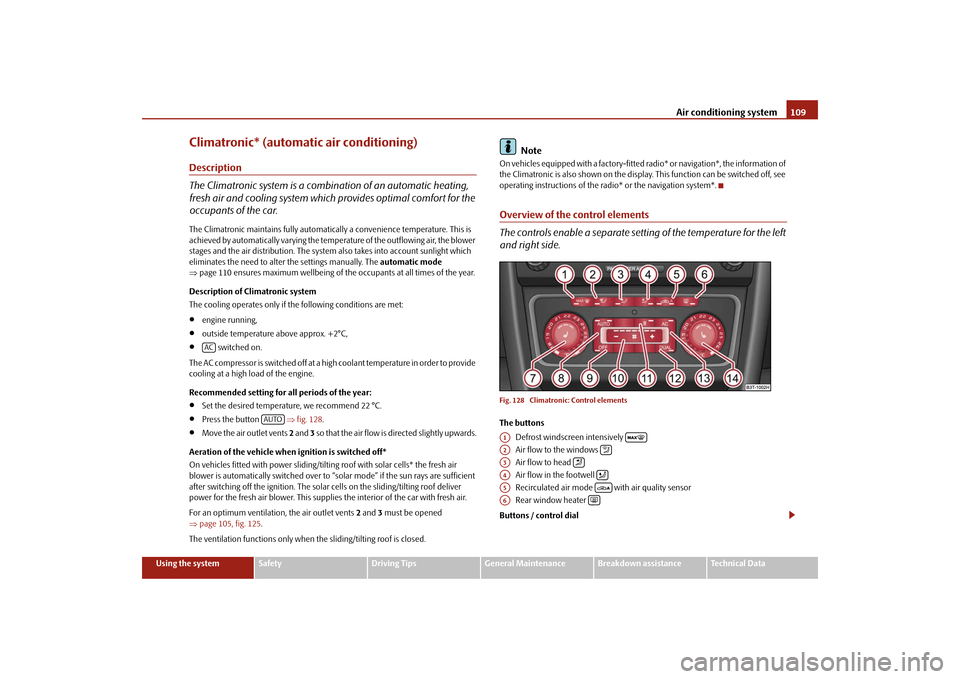
Overview of the control elements The controls enable a separate setting of the temperature for the left and right side.Fig. 128 Climatroni
c: Control elements
The buttons
Defrost windscreen intensively Air flow to the windows Air flow to head Air flow in the footwell Recirculated air mode with air quality sensor Rear window
heater
Buttons / control dial
AC
AUTO
A1
A2
A3
A4
A5
A6
s2dk.1.book Page 109 Wednesday, April 8, 2009 12:23 PM