key SKODA SUPERB 2009 2.G / (B6/3T) Owner's Guide
[x] Cancel search | Manufacturer: SKODA, Model Year: 2009, Model line: SUPERB, Model: SKODA SUPERB 2009 2.G / (B6/3T)Pages: 294, PDF Size: 21.33 MB
Page 69 of 294
Lights and Visibility
68
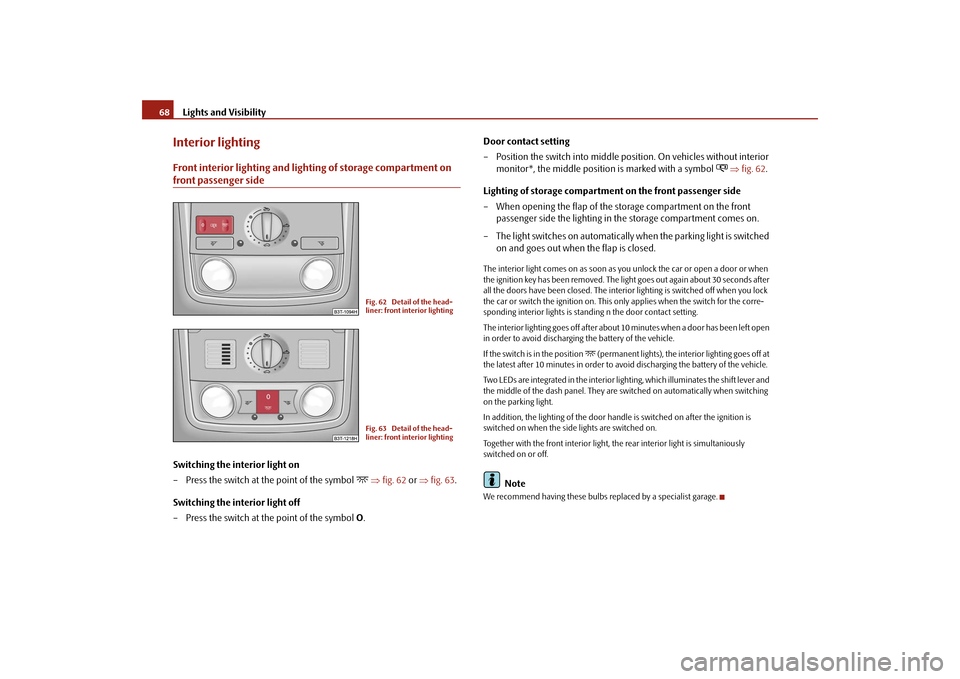
Interior lightingFront interior lighting and lighting of storage compartment on front passenger sideSwitching the interior light on – Press the switch at the point of the symbol
⇒
fig. 62
or
⇒
fig. 63
.
Switching the interior light off – Press the switch at the point of the symbol
O.
Door contact setting – Position the switch into middle position. On vehicles without interior
monitor*, the middle position is marked with a symbol
⇒
fig. 62
.
Lighting of storage compartme
nt on the front passenger side
– When opening the flap of the storage compartment on the front
passenger side the lighting in the storage compartment comes on.
– The light switches on automatically
when the parking light is switched
on and goes out when the flap is closed.
The interior light comes on as soon as yo
u unlock the car or open a door or when
the ignition key has been removed. The light goes out again about 30 seconds after all the doors have been closed. The interior
lighting is switched off when you lock
the car or switch the ignition on. This on
ly applies when the
switch for the corre-
sponding interior lights is stan
ding n the door contact setting.
The interior lighting goes off after about
10 minutes when a door has been left open
in order to avoid discharging the battery of the vehicle. If the switch is in the position
(permanent lights), the interior lighting goes off at
the latest after 10 minutes in order to avoid discharging the battery of the vehicle. Two LEDs are integrated in the interior li
ghting, which illuminates the shift lever and
the middle of the dash panel. They are
switched on automatically when switching
on the parking light. In addition, the lighting of
the door handle is switched on after the ignition is
switched on when the side lights are switched on. Together with the front interior light, the rear interior light is simultaniously switched on or off.
Note
We recommend having these bulbs re
placed by a specialist garage.
Fig. 62 Detail of the head- liner: front interior lightingFig. 63 Detail of the head-liner: front interior lighting
s2dk.1.book Page 68 Wednesday, April 8, 2009 12:23 PM
Page 78 of 294
Lights and Visibility
77
Using the system
Safety
Driving Tips
General Maintenance
Breakdown assistance
Technical Data
Lowerable exterior mirror* with the aid of the key for remote control – If all the windows are closed, press the unlock button on the radio
remote control
⇒
page 51, fig. 48
for approx. 2 seconds.
Tilting surface of front passenger exterior mirror* When the rotary knob is in position
⇒page 76, fig. 76
and the reverse gear is
engaged, the surface of the mirror tilts down slightly. This provides an aid in seeing the kerb of the pavement when parking the car. The mirror returns into its initial position,
after the rotary knob is moved out of the
position
and put into another position or if the speed is more than 15 km/h.
Memory for exterior mirrors* On vehicles fitted with a memory for the driver seat, the relevant setting of the exte- rior mirror is also stored automatica
lly when the seat position is stored.
WARNING
•
Convex (curved outward) or spherical (differently curved) exterior
mirrors increase the vision field. They do, however, make objects appear smaller in the mirror. These mirrors are only of limited use, therefore, for estimating distances to the following vehicles.•
Use whenever possible the interior rear mirror, for estimating the
distances to the following vehicles.
Note
•
Do not touch the surfaces of the exterior mirrors if the exterior mirror heater is
switched on.•
You can set the exterior mirrors by hand, if
the power setting function fails at any
time by pressing on the edge of the mirror surface.•
Contact your specialist garage if a fault exists with the power setting of the exte-
rior mirrors.
Automatic dimming exterior mirror*The exterior mirrors are dimmed together with the interior mirror. If the automatic dimming is switched on, the mirror dims
automatically
depending on the light
striking the mirror from the rear. When the interior lights are switched on or the reverse gear is engaged, the mirror always moves back into the
basic position (not dimmed).
Note
•
Automatic mirror dimming operates only pr
operly if the sun screen* for the rear
window is not in use or the light striking th
e rear of the interior rear-view mirror is
not affected by other objects.•
Do not affix any stickers in front of the li
ght sensor, so that you do not impair the
automatic dimming function or put it out of operation.•
If you switch off the automatic dimming interior rear-view mirror, also the exte-
rior mirror dimming
is switched off.
A3
s2dk.1.book Page 77 Wednesday, April 8, 2009 12:23 PM
Page 81 of 294
Seats and Stowage
80
Adjust the angle of the seat – Press the switch at the front
⇒
page 79, fig. 79
or at the back
⇒
page 79, fig. 79
.
Adjusting the seat backrest – Press the switch
⇒
page 79, fig. 78
in the direction of the desired
setting.
Adjusting lumbar support – Press the switch front
⇒
page 79, fig. 78
in order to enlarge the
curvature of the lumbar support.
– Press the switch rear in order to reduce the curvature of the lumbar
support.
– Press the switch top in order to adjust the curvature of the lumbar
support higher.
– Press the switch bottom in order to adjust the curvature of the
lumbar support lower.
Switch is operated in order to move the seat up/down and forward/back, while switch is operated in order to move the backrest forward or back.
WARNING
•
Only adjust the driver seat when the ve
hicle is stationary - risk of injury!
•
Caution when adjusting the seat! You ma
y suffer injuries or bruises as a
result of adjusting the seat without paying proper attention.•
In view of the fact that the seats can
also be adjusted when the ignition is
switched off (even when ignition key withdrawn), you should never leave children unattended in the car.•
The seat backrests must not be angl
ed too far back when driving other-
wise this will affect proper operation of the seat belts and of the airbag system - risk of injury!
Note
If the movement of the seat is inadvertently interrupted during an adjustment, once again press the switch in the appropriate
direction and continue with the adjust-
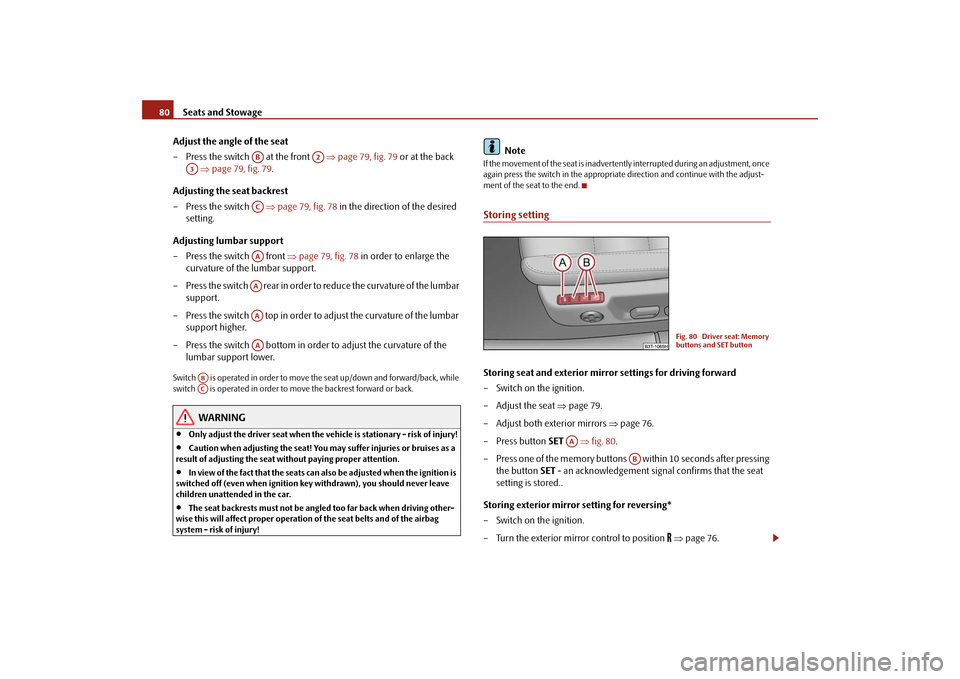
ment of the seat to the end.Storing settingStoring seat and exterior mirror settings for driving forward – Switch on the ignition. – Adjust the seat
⇒
page 79.
– Adjust both exterior mirrors
⇒
page 76.
– Press button
SET
⇒
fig. 80
.
– Press one of the memory buttons within 10 seconds after pressing
the button
SET
- an acknowledgement signal
confirms that the seat
setting is stored..
Storing exterior mirror setting for reversing* – Switch on the ignition. – Turn the exterior mirror control to position
⇒
page 76.
AB
A2
A3
ACAAAAAAAA
ABAC
Fig. 80 Driver seat: Memory buttons and SET button
AA
AB
s2dk.1.book Page 80 Wednesday, April 8, 2009 12:23 PM
Page 82 of 294
Seats and Stowage
81
Using the system
Safety
Driving Tips
General Maintenance
Breakdown assistance
Technical Data
– Engage reverse gear. – Move the right exterior mirror into the desired position
⇒
page 76.
– Take the vehicle out of gear. The set position of the exterior mirror is
stored.
Memory buttons Memory for the seat offers the possibility
to store the individual driver seat and
external mirror position. An individual posi
tion can be allocated to each of the three
memory buttons
⇒page 80, fig. 80
, that is three in tota
l. After pressing the
corresponding memory button , the seat and the exterior mirror are automati-cally moved into the positions which
have been allocated to this button
⇒page 81.
Emergency Off You can interrupt the setting operation at any time, if you operate any button of the driver seat.
Note
•
For safety reasons, it is not possible to store this position if the inclination angle
of the seat backrest is more than 102° in relation to the seat cushion.•
When storing settings with the memory buttons, we recommend that you begin
with the front button and assign a memo
ry button to each additional driver.
•
Each new setting stored with the same
button erases the previous setting.
•
Each time you store the seat and exterior mirror settings for driving forward you
also have to re-store the individual setting
of the exterior mirror on the passenger
side for reversing.Assigning remote control to the memory buttonsAfter storing the settings of the seat
and exterior mirrors, you have 10
seconds in order to assign the radio remote control to the appropriate memory button. – Withdraw the ignition key.
– Press the unlock button
⇒
page 51, after the successful assignment
an audible signal will sound. The setting is stored with the memory button which you have selected.
If you wish to be able to retrieve the settings which are stored in the memory by also using the radio remote control, you have
to assign the radio remote control to a
memory button in each case. If you wish, you can obtain an additional
remote control key from an authorised
Škoda Service partner and then assign th
e remote control key to another memory
button.
Note
•
If the radio remote control had previous
ly been assigned
to another memory
button, this setting is then erased by the new assignment.•
If you assign the radio remote control
to a memory button which has already
been assigned to a radio remote control,
the old assignment is also replaced by a
new assignment in this case.•
The assignment of the radio remote cont
rol to a memory button is retained,
however, after reassigning the seats and exterior mirrors.Retrieving settings of the seat and mirrors You can retrieve the stored settings either with the memory buttons or with the remote control*.Retrieving settings with memory buttons – In order to retrieve the stored setting, you have two possibilities: –
One-touch automatic memory:
Briefly press the desired memory
button
⇒
page 80, fig. 80
. The seat and exterior mirror are moved
automatically into the stored position
s (this applies only if the ignition
is switched on and the speed is less than 5 km/h).
AB
AB
AB
s2dk.1.book Page 81 Wednesday, April 8, 2009 12:23 PM
Page 83 of 294
Seats and Stowage
82
–
Memory keying
: Press and hold the desired memory button
pressed long enough until the seat and the exterior mirror are moved into the stored positions.
Retrieving settings with remote control – If the driver door is clos
ed and the ignition is switched off, briefly press
the unlock button of the radio remote control
⇒
page 51 and then
open the driver door.
– The seat and exterior mirrors now move automatically into the stored
positions.
Retrieving setting of exterior mirror for reversing* – Turn the rotary knob for the exterior mirror setting into the position
⇒
page 76 before engaging the reverse gear.
The mirror returns into its initial position,
after the rotary knob is moved out of the
position
and put into another position or if the speed is more than 15 km/h.
Emergency Off You can interrupt the setting operation at an
y time, if you operate any button of the
driver seat.
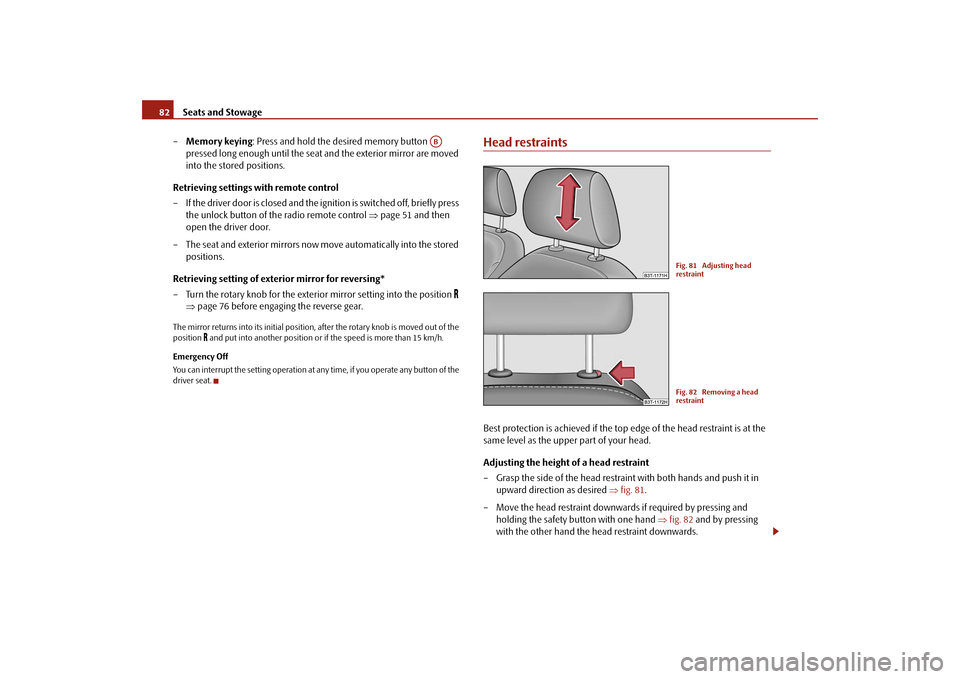
Head restraintsBest protection is achieved if the top
edge of the head restraint is at the
same level as the upper part of your head. Adjusting the height of a head restraint – Grasp the side of the head restraint with both hands and push it in
upward direction as desired
⇒
fig. 81
.
– Move the head restraint downwards if required by pressing and
holding the safety button with one hand
⇒
fig. 82
and by pressing
with the other hand the head restraint downwards.
AB
Fig. 81 Adjusting head restraintFig. 82 Removing a head restraint
s2dk.1.book Page 82 Wednesday, April 8, 2009 12:23 PM
Page 96 of 294

Seats and Stowage
95
Using the system
Safety
Driving Tips
General Maintenance
Breakdown assistance
Technical Data
•
The cigarette lighter and the power so
cket also operates when the igni-
tion is switched off or the ignition key withdrawn. You should therefore never leave children unattended in the vehicle.
Caution
Always use matching plugs to av
oid damaging the power socket.
Note
•
Connecting electrical components when
the engine is not running will
drain the battery of the vehicl
e - risk of battery draining!
•
Further information
⇒page 241.
Power socket in the luggage compartment– Open the cover of the power socket
⇒
fig. 106
.
– Connect the plug of the electr
ical appliance to the socket.
You can only use the power socket for the connection of approved electrical acces- sories with a power uptake up to 180 watt
s. The vehicle battery will be discharged
in the process if the engine is stationary. The same remarks apply here as for
⇒page 94.
Further information
⇒page 241.
Storage compartmentsOverviewYou will find the following storag
e facilities in
your vehicle:
WARNING (continued)
Fig. 106 Luggage compart- ment: Power socket
Storage compartment on the front passenger side
⇒ page 96
Storage compartment on the driver's side
⇒page 97
Storage compartment in front centre console
⇒page 97
Storage net on the front centre console
⇒page 97
Storage compartment for spectacles*
⇒page 98
Storage compartment in the front doors
⇒page 98
Storage compartment below front passenger seat*
⇒page 98
Front seat armrest with storage compartment
⇒page 99
Rear armrest with storage compartment*
⇒page 99
Storage compartment in rear centre console*
⇒page 99
Storage compartment for an umbrella*
⇒page 100
Seat backrest with opening for skis
⇒page 100
Through-loading bag*
⇒page 101
Side compartments in the luggage compartment*
⇒page 102
Clothes hooks*
⇒page 103
s2dk.1.book Page 95 Wednesday, April 8, 2009 12:23 PM
Page 116 of 294

Air conditioning system
115
Using the system
Safety
Driving Tips
General Maintenance
Breakdown assistance
Technical Data
If the system is running, a warning light in
the button for direct switching on/off of
the auxiliary heating lights up. The running system deactivates after expiration of the operating period or is deac- tivated earlier by pressing the button for di
rect switching on/off of the auxiliary
heating
⇒page 113.
The random pre-set time can be deactivated by selecting the menu point
Deactive
in the menu
Activate
.
After selecting the menu point
Fac to r y s e tt ing
in the menu
Aux. heating
(auxiliary heating)
, it is possible to change to the factory setting.
Radio remote control The auxiliary heating (auxiliary heating and ventilation) can be switched on or off with the remote control.– For switching on, press the button . – For switching off, press the button .The transmitter and the battery are housed in the housing of the remote control. The receiver is located in
the interior of the car.
If the battery is properly charged, the ef
fective range is up to 600 m. For switching
on or off the auxiliary heating, hold the
remote control vertically with the antenna
⇒fig. 131
towards the top. You must not cover over the antenna with the
fingers or the palm of th
e hand. Obstacles between the radio remote control and
the vehicle, bad weather co
nditions and a weaker batt
ery can clearly reduce the
range. The auxiliary heating can only be switched
on or off with the radio remote control,
if the distance between the radio remote
control and the vehicle is at least 2 m.
Warning light in the radio remote control The warning light in the radio remote control
⇒fig. 131
indicates after a keystroke
if the remote control signal was received
by the auxiliary heating and if the battery
is adequately charged.
Caution
There are electronic components in the radio remote control, protect the remote control against water, severe
shocks and direct sun rays.
Fig. 131 Auxiliary heating: Radio remote control
ONOFF
AA
Display warning light
Importance
Lights up green for 2 seconds.
The auxiliary heating was switched on.
Lights up red for 2 seconds.
The auxiliary heating was switched off.
Slowly flashes green for 2 seconds.
The ignition signal was not received.
Quickly flashes green for 2 seconds.
The auxiliary heating is blocked, e. g because the tank is nearly empty or there is a fault in the auxiliary heating.
Flashes red for 2 seconds.
The switch off signal was not received.
Lights up orange for 2 seconds, then green or red.
The battery is weak, however the switching on or off signal was received.
Lights up orange for 2 seconds, then flashes green or red.
The battery is weak, however the switching on or off signal was not received.
Flashes orange for 5 seconds.
The battery is discharged, however the switching on or off signal was not received.
s2dk.1.book Page 115 Wednesday, April 8, 2009 12:23 PM
Page 119 of 294
Starting-off and Driving
118
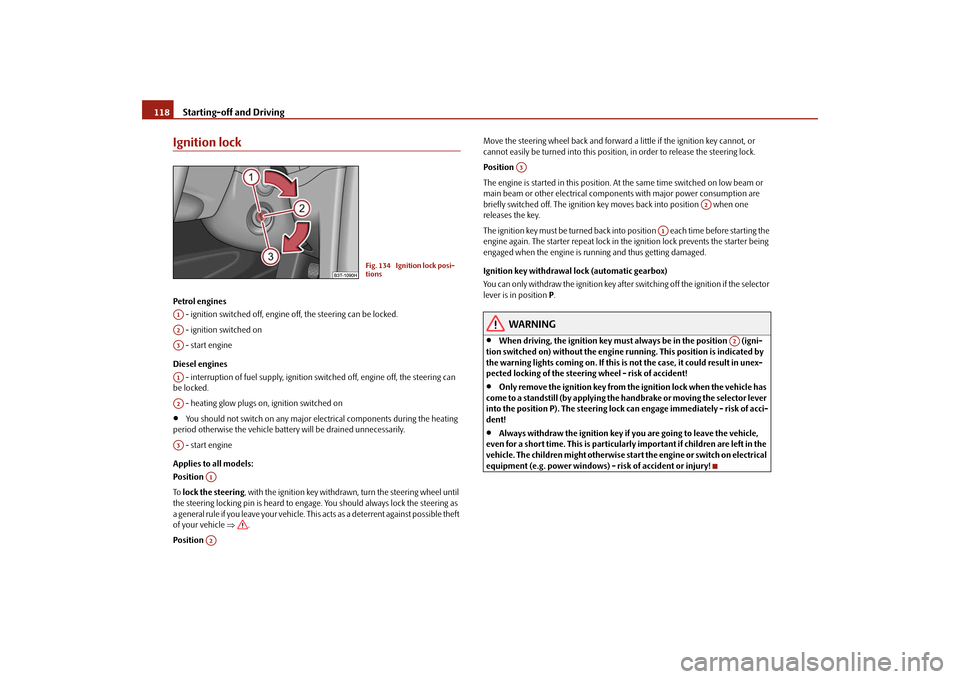
Ignition lockPetrol engines - ignition switched off, engine
off, the steering can be locked.
- ignition switched on - start engine Diesel engines - interruption of fuel supply, ignition sw
itched off, engine off, the steering can
be locked. - heating glow plugs on, ignition switched on•
You should not switch on any major elec
trical components during the heating
period otherwise the vehicle batt
ery will be drained unnecessarily.
- start engine Applies to all models: Position
To lock the steering
, with the ignition key withdrawn, turn the steering wheel until
the steering locking pin is heard to engage. You should always lock the steering as a general rule if you leave your
vehicle. This acts as a deterrent against possible theft
of your vehicle
⇒
.
Position
Move the steering wheel back and forward a little if the ignition key cannot, or cannot easily be turned into
this position, in order to
release the steering lock.
Position
The engine is started in this position. At
the same time switched on low beam or
main beam or other electrical compon
ents with major power consumption are
briefly switched off. The ignition key
moves back into position when one
releases the key. The ignition key must be turned back into position each time before starting the engine again. The starter repeat lock in th
e ignition lock prevents the starter being
engaged when the engine is r
unning and thus getting damaged.
Ignition key withdrawal lock (automatic gearbox) You can only withdraw the ignition key after switching off the ignition if the selector lever is in position
P.
WARNING
•
When driving, the ignition key must always be in the position (igni-
tion switched on) without the engine running. This position is indicated by the warning lights coming on. If this is not the case, it could result in unex- pected locking of the steerin
g wheel - risk of accident!
•
Only remove the ignition key from the ignition lock when the vehicle has
come to a standstill (by applying the handbrake or moving the selector lever into the position P). The steering lock
can engage immediately - risk of acci-
dent!•
Always withdraw the ignition key if
you are going to leave the vehicle,
even for a short time. This is particularly important if children are left in the vehicle. The children might
otherwise start the engine
or switch on electrical
equipment (e.g. power windows) - risk of accident or injury!
Fig. 134 Ignition lock posi- tions
A1A2A3A1A2A3
A1A2
A3
A2
A1
A2
s2dk.1.book Page 118 Wednesday, April 8, 2009 12:23 PM
Page 120 of 294
Starting-off and Driving
119
Using the system
Safety
Driving Tips
General Maintenance
Breakdown assistance
Technical Data
Starting the engineGeneral You can only start the engine only using an original ignition key.•
Place the gearshift lever into neutral (or place the selector lever to the position
P or N in the case of an automatic gearbox)
and put on the handbrake firmly before
starting the engine.•
The clutch pedal should be fully depressed when starting the engine which
means that the starter only
has to crank the engine.
•
Let go of the key as soon as the engine starts otherwise there may be damage
to the starter. The engine running noises may louder at
first be louder for
a short time after
starting the cold engine until oil pressure
can be built up in the hydraulic valve
clearance compensation. This is quite normal and is not an operating problem. If the engine does not start ... You can use the battery of anothe
r vehicle as a jump-start aid
⇒page 250.
It is only possible to tow-start vehicl
es fitted with a manual gearbox. The tow-
starting distance must not be more than 50 metres.
WARNING
•
Never run the engine in non ventilat
ed or enclosed areas. The exhaust
gases of the engine contain besides
the odorless and colourless carbon
monoxide a poisonous gas - hazard! Carbon monoxide can cause uncon- sciousness and death.•
Never leave your vehicle unattended with the engine running.Caution
•
The starter may only be operated (ignition key position ), if the engine is not
running. If the starter is immediately oper
ated after switching off the engine, the
starter or the engine can be damaged.
•
Avoid high engine revolutions, full throttl
e and high engine loads as long as the
engine has not yet reached it
s normal operating temperature - risk of damaging the
engine!•
Vehicles which are fitted wi
th an exhaust gas catalyti
c converter should not be
tow-started over a distance of more than 50 metres.
For the sake of the environment
Never warm up the engine when the vehi
cle is standing. Drive off right away.
Through this the engine reaches its operating temperature more rapidly and the pollutant emissions are lower.Petrol enginesThese engines are fitted with a starter system which selects the correct fuel/air mixture for every external air temperature.•
Do not operate accelerator before and when starting engine.
•
Interrupt the attempt at starting after
10 seconds if the engine does not start
right awayand wait for about 30 se
conds before repeating the attempt.
•
It is possible that the fuse on the electric
al fuel pump is defect if the engine still
does not start. Check the fuse and replace it if necessary
⇒page 256.
•
Contact the nearest specialist garage to obtain professional assistance.
It may be necessary, if the engine is
very hot
, to slightly depress the accelerator
after the engine has started.Diesel enginesGlow plug system Diesel engines are equipped with a glow
plug system, the preglow period being
controlled automatically in
line with the coolant temperature and outside temper-
ature. The preglow indicator light
comes on after the ignition has been switched on.
A3
s2dk.1.book Page 119 Wednesday, April 8, 2009 12:23 PM
Page 121 of 294
Starting-off and Driving
120
You should not switch on any major elec
trical components during the heating
period otherwise the vehicle battery
will be drained unnecessarily.
•
You should start the engine immediately after the glow plug warning light
has gone out.•
The glow plug warning light will come on for about one second if the engine is
at a normal operating temperature or if the outside temperature is above +5°C. This means that you can start the engine
right away
.
•
Interrupt the attempt at starting after 10 seconds if the engine does not start
right awayand wait for about 30 se
conds before repeating the attempt.
•
It is possible that the fuse on the diesel
preglow system is defect if the engine
still does not start. Check the fuse and replace it if necessary
⇒page 256.
•
Contact the nearest specialist garage to obtain professional assistance.
Starting the engine after the fuel tank has run dry It may take longer than normal to start the
engine after refuelling
if the fuel tank has
run completely dry - up to one minute. This is because the fuel system must first of all be filled while the attempting to start the engine.Switching off the engine– The engine can be swit
ched off by turning the ignition key from posi-
tion into
⇒
page 118, fig. 134
.
WARNING
•
Never switch off the engine before the
vehicle is stationary - risk of acci-
dent!•
The brake booster only operates when the engine is running. Greater
physical effort for braking is required
when engine is switched off. Because
if you do not stop as normal, this can cause an accident and severe injuries.
Caution
you should not switch the engine off right
away at the end of your journey after the
engine has been operated for a lengthy peri
od at high loads but should be allowed
it to run at idling speed for about 2 minut
es. This prevents any accumulation of heat
when the engine is switched off.
Note
•
The radiator fan may continue running fo
r a further 10 minutes or so after the
engine and the ignition have
been switched off. The coolant fan may, however, also
switch on again after some time if the coolant temperature rises because of an accumulation of heat in the engine or
if the engine is warm and the engine
compartment is additionally
heated by strong sunlight.
•
This is why particular care is required when carrying out any work in the engine
compartment
⇒page 223, “Working in the engine compartment”.
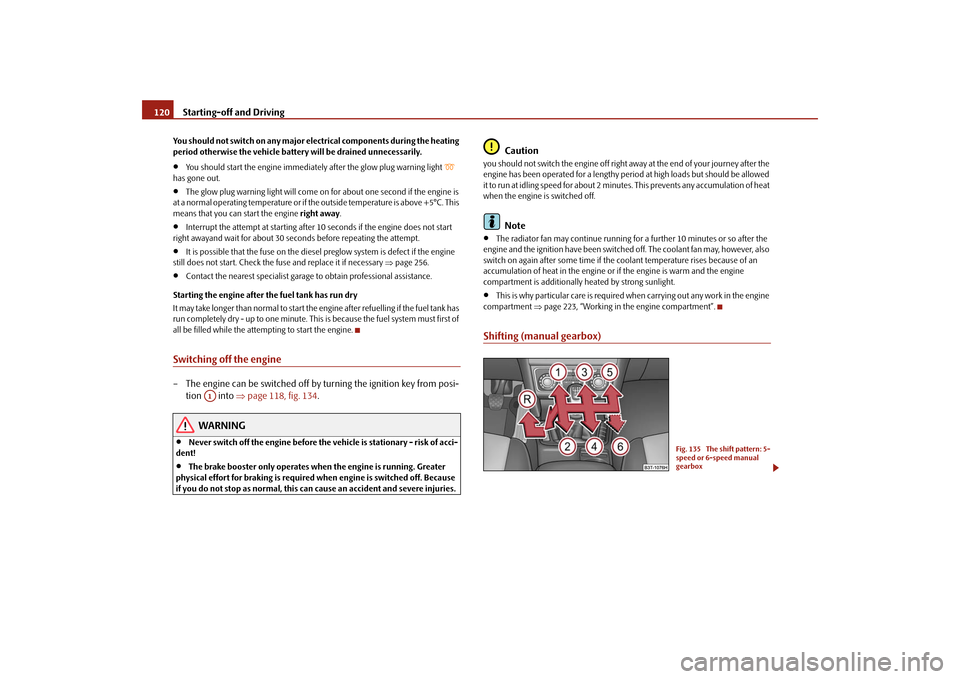
Shifting (manual gearbox)
A1
Fig. 135 The shift pattern: 5- speed or 6-speed manual gearbox
s2dk.1.book Page 120 Wednesday, April 8, 2009 12:23 PM