tow SKODA SUPERB 2009 2.G / (B6/3T) Service Manual
[x] Cancel search | Manufacturer: SKODA, Model Year: 2009, Model line: SUPERB, Model: SKODA SUPERB 2009 2.G / (B6/3T)Pages: 294, PDF Size: 21.33 MB
Page 103 of 294
Seats and Stowage
102
Stowing – Fold the lid and the armrest up to the stop in upward direction - the lid
must click into place audibly. You can recognize this on the fact that the red field above the unlocking button of the luggage compart-ment is not visible
⇒
page 101, fig. 121
.
– Carefully fold the empty (dry) through-loading bag together, place it in
the luggage compartment and secure it to prevent it slipping.
WARNING
•
After placing items into the through-
loading bag, you must secure the
bag with the securing belt .•
The securing belt must hold the items tight.
•
Ensure that the securing belt on ski sport articles lies in the middle
between the bindings (see imprint on the through-loading bag).
Note
•
Place the skis with the tips facing the front, snowboards and ski sticks with the
tips facing the rear into the through-loading bag.•
If there are several pairs of skis in the through-loading bag, ensure that the bind-
ings are positioned at the same height.•
The through-loading bag must never be
folded together or stowed when
moist.
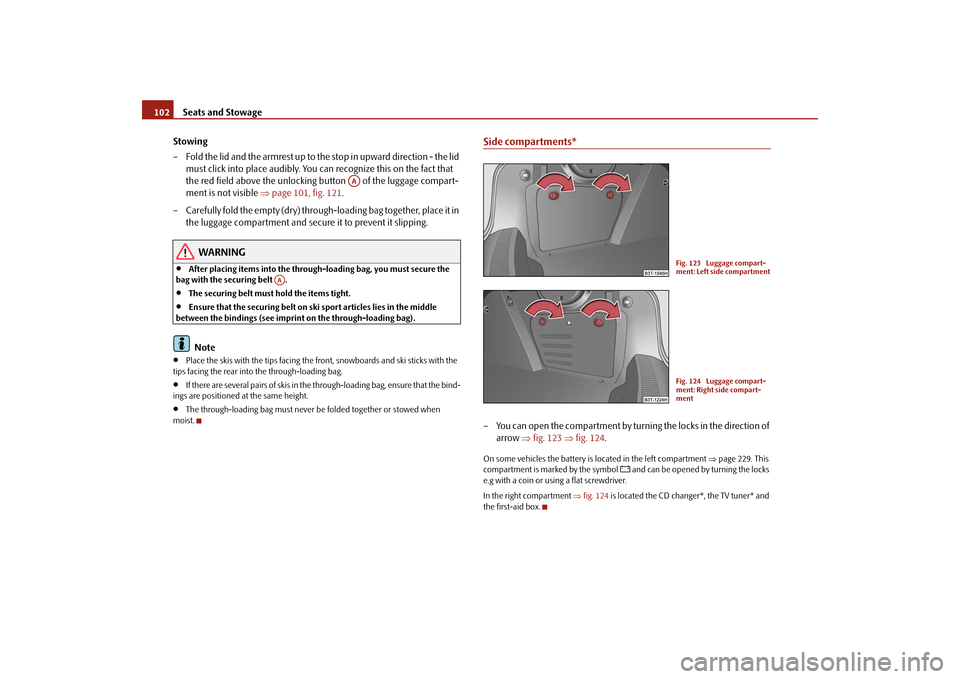
Side compartments*– You can open the compartment by turning the locks in the direction of
arrow
⇒
fig. 123
⇒
fig. 124
.
On some vehicles the battery is
located in the left compartment
⇒page 229. This
compartment is marked by the symbol
and can be opened by turning the locks
e.g with a coin or using a flat screwdriver. In the right compartment
⇒fig. 124
is located the CD changer*, the TV tuner* and
the first-aid box.
AA
AA
Fig. 123 Luggage compart- ment: Left side compartmentFig. 124 Luggage compart-ment: Right side compart-ment
s2dk.1.book Page 102 Wednesday, April 8, 2009 12:23 PM
Page 104 of 294

Seats and Stowage
103
Using the system
Safety
Driving Tips
General Maintenance
Breakdown assistance
Technical Data
Clothes hooksThe clothes hooks are located on the middle
pillar and on the handle of the head-
liner above each of the rear doors.
WARNING
•
Ensure that any clothes hanging from the hooks do not impair your
vision to the rear.•
Use the hooks for hanging only light
items of clothing and ensure that
there are no heavy or sharp-
edged objects in the pockets.
•
The maximum permissable load of the hooks is 2 kg.
•
Do not use clothes hangers for hanging up items of clothing otherwise
this will interfere with the protection offered by the head airbag*.
s2dk.1.book Page 103 Wednesday, April 8, 2009 12:23 PM
Page 109 of 294
Air conditioning system
108
Recirculated air mode In recirculated air mode air is sucked
out of the interior of the vehicle
and then fed back into the interior.Recirculated air mode prevents polluted air outside the vehicle from getting into the vehicle, for example when driving through a tunnel or when standing in a traffic jam. Switching recirculated air mode on – Press the button
⇒
page 106, fig. 127
the warning light lights
up in the button.
Switching recirculated air mode off – Press again the button - the warning light in the button goes out.
The recirculated air mode is switched off au
tomatically if the air
distribution control
is in position
⇒page 106, fig. 127
. You can also switch recirculated air mode
on again from this setting by repeatedly pressing button .
WARNING
You should not leave recirculated air mode on over a longer period of time, as “stale” air may result in fatigue in the driver and occupants, divert your attention and also cause the windows to mist up. The risk of having an acci- dent increases. Switch recirculated air mode off as soon as the windows begin misting up.
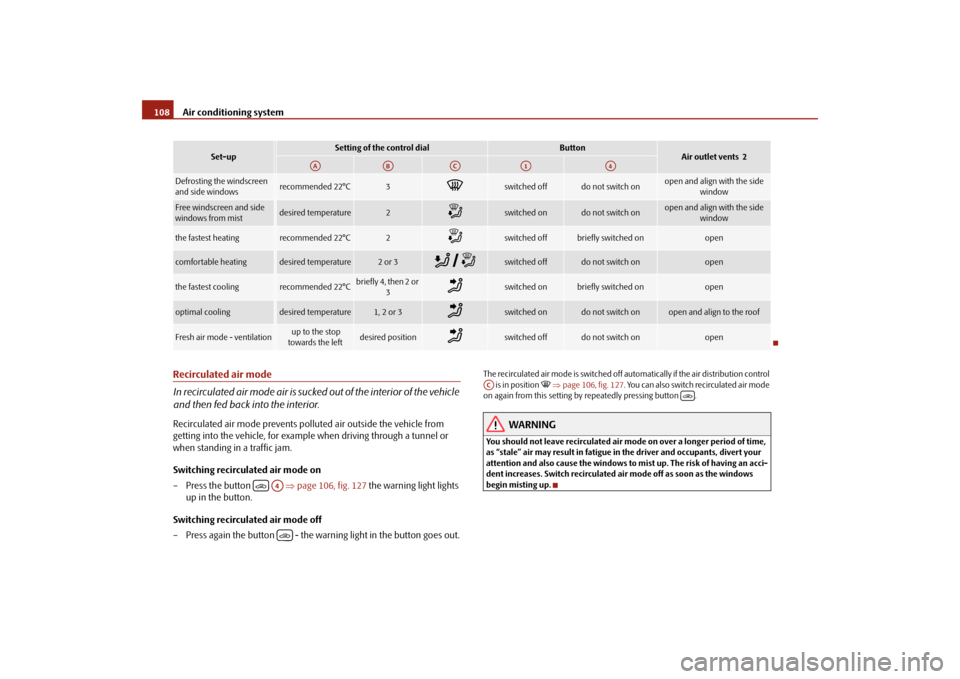
Set-up
Setting of the control dial
Button
Air outlet vents 2
Defrosting the windscreen and side windows
recommended 22°C
3
switched off
do not switch on
open and align with the side
window
Free windscreen and side windows from mist
desired temperature
2
switched on
do not switch on
open and align with the side
window
the fastest heating
recommended 22°C
2
switched off
briefly switched on
open
comfortable heating
desired temperature
2 or 3
switched off
do not switch on
open
the fastest cooling
recommended 22°C
briefly4, then 2or
3
switched on
briefly switched on
open
optimal cooling
desired temperature
1, 2 or 3
switched on
do not switch on
open and align to the roof
Fresh air mode - ventilation
up to the stop towards the left
desired position
switched off
do not switch on
open
AA
AB
AC
A1
A4
A4
AC
s2dk.1.book Page 108 Wednesday, April 8, 2009 12:23 PM
Page 116 of 294

Air conditioning system
115
Using the system
Safety
Driving Tips
General Maintenance
Breakdown assistance
Technical Data
If the system is running, a warning light in
the button for direct switching on/off of
the auxiliary heating lights up. The running system deactivates after expiration of the operating period or is deac- tivated earlier by pressing the button for di
rect switching on/off of the auxiliary
heating
⇒page 113.
The random pre-set time can be deactivated by selecting the menu point
Deactive
in the menu
Activate
.
After selecting the menu point
Fac to r y s e tt ing
in the menu
Aux. heating
(auxiliary heating)
, it is possible to change to the factory setting.
Radio remote control The auxiliary heating (auxiliary heating and ventilation) can be switched on or off with the remote control.– For switching on, press the button . – For switching off, press the button .The transmitter and the battery are housed in the housing of the remote control. The receiver is located in
the interior of the car.
If the battery is properly charged, the ef
fective range is up to 600 m. For switching
on or off the auxiliary heating, hold the
remote control vertically with the antenna
⇒fig. 131
towards the top. You must not cover over the antenna with the
fingers or the palm of th
e hand. Obstacles between the radio remote control and
the vehicle, bad weather co
nditions and a weaker batt
ery can clearly reduce the
range. The auxiliary heating can only be switched
on or off with the radio remote control,
if the distance between the radio remote
control and the vehicle is at least 2 m.
Warning light in the radio remote control The warning light in the radio remote control
⇒fig. 131
indicates after a keystroke
if the remote control signal was received
by the auxiliary heating and if the battery
is adequately charged.
Caution
There are electronic components in the radio remote control, protect the remote control against water, severe
shocks and direct sun rays.
Fig. 131 Auxiliary heating: Radio remote control
ONOFF
AA
Display warning light
Importance
Lights up green for 2 seconds.
The auxiliary heating was switched on.
Lights up red for 2 seconds.
The auxiliary heating was switched off.
Slowly flashes green for 2 seconds.
The ignition signal was not received.
Quickly flashes green for 2 seconds.
The auxiliary heating is blocked, e. g because the tank is nearly empty or there is a fault in the auxiliary heating.
Flashes red for 2 seconds.
The switch off signal was not received.
Lights up orange for 2 seconds, then green or red.
The battery is weak, however the switching on or off signal was received.
Lights up orange for 2 seconds, then flashes green or red.
The battery is weak, however the switching on or off signal was not received.
Flashes orange for 5 seconds.
The battery is discharged, however the switching on or off signal was not received.
s2dk.1.book Page 115 Wednesday, April 8, 2009 12:23 PM
Page 118 of 294
Starting-off and Driving
117
Using the system
Safety
Driving Tips
General Maintenance
Breakdown assistance
Technical Data
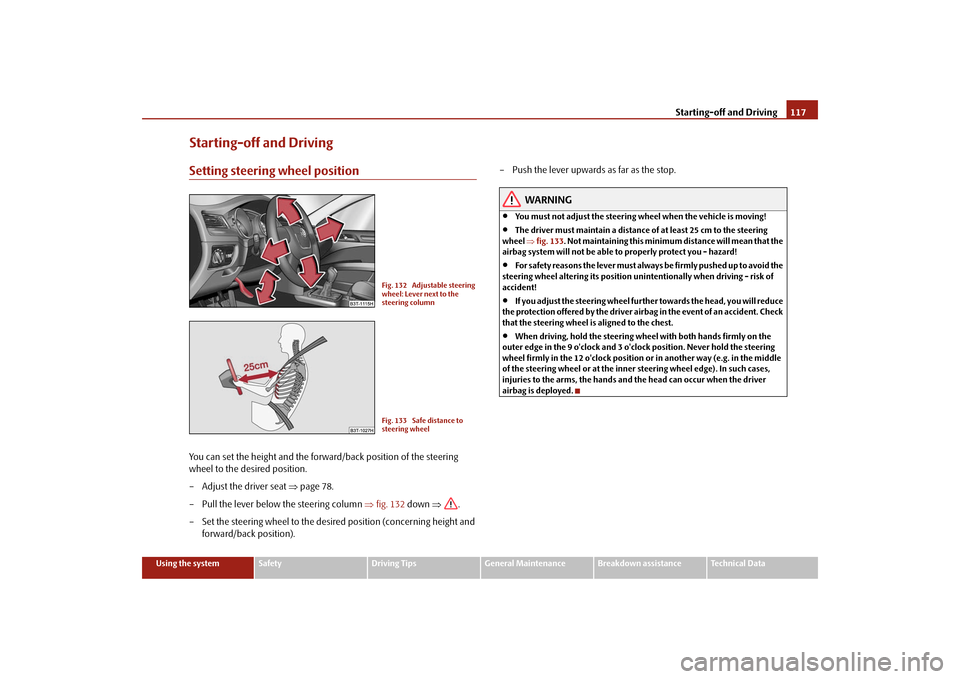
Starting-off and DrivingSetting steering wheel positionYou can set the height and the forw
ard/back position of the steering
wheel to the desired position. – Adjust the driver seat
⇒
page 78.
– Pull the lever below the steering column
⇒
fig. 132
down
⇒
.
– Set the steering wheel to the desired position (concerning height and
forward/back position).
– Push the lever upwards as far as the stop.
WARNING
•
You must not adjust the steering wh
eel when the vehicle is moving!
•
The driver must maintain a distance of at least 25 cm to the steering
wheel
⇒fig. 133
. Not maintaining this minimum distance will mean that the
airbag system will not be able to properly protect you - hazard!•
For s a fe t y re a s ons the le v e r m ust a lwa y s b e fi rm l y pus he d up t o a vo id the
steering wheel altering its position unintentionally when driving - risk of accident!•
If you adjust the steering wheel furthe
r towards the head, you will reduce
the protection offered by the driver airb
ag in the event of an accident. Check
that the steering wheel is aligned to the chest.•
When driving, hold the steering wheel
with both hands firmly on the
outer edge in the 9 o'clock and 3 o'clock position. Never hold the steering wheel firmly in the 12 o'clock position or in another way (e.g. in the middle of the steering wheel or
at the inner steering wheel edge). In such cases,
injuries to the arms, the hands and
the head can occur when the driver
airbag is deployed.
Fig. 132 Adjustable steering wheel: Lever next to the steering columnFig. 133 Safe distance to steering wheel
s2dk.1.book Page 117 Wednesday, April 8, 2009 12:23 PM
Page 120 of 294
Starting-off and Driving
119
Using the system
Safety
Driving Tips
General Maintenance
Breakdown assistance
Technical Data
Starting the engineGeneral You can only start the engine only using an original ignition key.•
Place the gearshift lever into neutral (or place the selector lever to the position
P or N in the case of an automatic gearbox)
and put on the handbrake firmly before
starting the engine.•
The clutch pedal should be fully depressed when starting the engine which
means that the starter only
has to crank the engine.
•
Let go of the key as soon as the engine starts otherwise there may be damage
to the starter. The engine running noises may louder at
first be louder for
a short time after
starting the cold engine until oil pressure
can be built up in the hydraulic valve
clearance compensation. This is quite normal and is not an operating problem. If the engine does not start ... You can use the battery of anothe
r vehicle as a jump-start aid
⇒page 250.
It is only possible to tow-start vehicl
es fitted with a manual gearbox. The tow-
starting distance must not be more than 50 metres.
WARNING
•
Never run the engine in non ventilat
ed or enclosed areas. The exhaust
gases of the engine contain besides
the odorless and colourless carbon
monoxide a poisonous gas - hazard! Carbon monoxide can cause uncon- sciousness and death.•
Never leave your vehicle unattended with the engine running.Caution
•
The starter may only be operated (ignition key position ), if the engine is not
running. If the starter is immediately oper
ated after switching off the engine, the
starter or the engine can be damaged.
•
Avoid high engine revolutions, full throttl
e and high engine loads as long as the
engine has not yet reached it
s normal operating temperature - risk of damaging the
engine!•
Vehicles which are fitted wi
th an exhaust gas catalyti
c converter should not be
tow-started over a distance of more than 50 metres.
For the sake of the environment
Never warm up the engine when the vehi
cle is standing. Drive off right away.
Through this the engine reaches its operating temperature more rapidly and the pollutant emissions are lower.Petrol enginesThese engines are fitted with a starter system which selects the correct fuel/air mixture for every external air temperature.•
Do not operate accelerator before and when starting engine.
•
Interrupt the attempt at starting after
10 seconds if the engine does not start
right awayand wait for about 30 se
conds before repeating the attempt.
•
It is possible that the fuse on the electric
al fuel pump is defect if the engine still
does not start. Check the fuse and replace it if necessary
⇒page 256.
•
Contact the nearest specialist garage to obtain professional assistance.
It may be necessary, if the engine is
very hot
, to slightly depress the accelerator
after the engine has started.Diesel enginesGlow plug system Diesel engines are equipped with a glow
plug system, the preglow period being
controlled automatically in
line with the coolant temperature and outside temper-
ature. The preglow indicator light
comes on after the ignition has been switched on.
A3
s2dk.1.book Page 119 Wednesday, April 8, 2009 12:23 PM
Page 123 of 294
Starting-off and Driving
122
WARNING
•
Please note that the handbrake mu
st be fully released. A handbrake
which is only partially released can re
sult in the rear brakes overheating
which will have a negative effect on th
e operation of the brake system - risk
of accident! In addition this can result in premature wear of the rear brake pads.•
Never leave children unattended in th
e vehicle. The children might, for
example, release the handbrake or take
the vehicle out of gear. The vehicle
might then move off - risk of accident!
Caution
After the car has come to a stop, always firs
t of all apply the handbrake firmly before
then additionally engaging a gear (manual gearbox) or moving the selector lever into position
P (automatic gearbox).
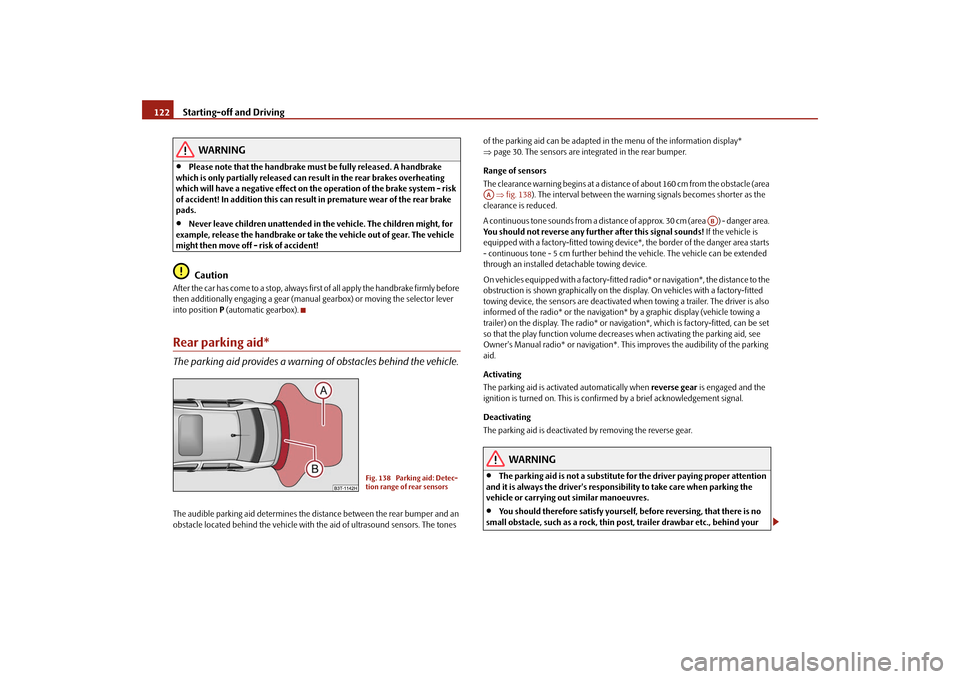
Rear parking aid*The parking aid provides a warning of obstacles behind the vehicle.The audible parking aid determines the distance between the rear bumper and an obstacle located behind the
vehicle with the aid of ultr
asound sensors. The tones
of the parking aid can be adapted in the menu of the information display* ⇒ page 30. The sensors are integrated in the rear bumper. Range of sensors The clearance warning begins at a distance of about 160 cm from the obstacle (area ⇒fig. 138
). The interval between the warning signals becomes shorter as the
clearance is reduced. A continuous tone sounds from a distance
of approx. 30 cm (area ) - danger area.
You should not reverse any further after this signal sounds!
If the vehicle is
equipped with a factory-fitted towing device*, the border of the danger area starts - continuous tone - 5 cm further behind
the vehicle. The vehi
cle can be extended
through an installed deta
chable towing device.
On vehicles equipped with a factory-fitted radio* or navigation*, the distance to the obstruction is shown graphically on the di
splay. On vehicles with a factory-fitted
towing device, the sensors are deactivated wh
en towing a trailer. The driver is also
informed of the radio* or the navigation
* by a graphic display (vehicle towing a
trailer) on the display. The radio* or navi
gation*, which is factory-fitted, can be set
so that the play function volume decreases when activating the parking aid, see Owner's Manual radio* or navigation*. This
improves the audibili
ty of the parking
aid. Activating The parking aid is activated automatically when
reverse gear
is engaged and the
ignition is turned on. This is confir
med by a brief acknowledgement signal.
Deactivating The parking aid is deactivated
by removing the reverse gear.
WARNING
•
The parking aid is not a substitute fo
r the driver paying proper attention
and it is always the driver's responsibility to take care when parking the vehicle or carrying out similar manoeuvres.•
You should therefore satisfy yourself, before reversing, that there is no
small obstacle, such as a rock, thin po
st, trailer drawbar etc., behind your
Fig. 138 Parking aid: Detec- tion range of rear sensors
AA
AB
s2dk.1.book Page 122 Wednesday, April 8, 2009 12:23 PM
Page 124 of 294
Starting-off and Driving
123
Using the system
Safety
Driving Tips
General Maintenance
Breakdown assistance
Technical Data
vehicle. Such an obstacle might not be within the range detected by the sensors.•
Under certain circumstances, surfaces
of certain objects and types of
clothing cannot reflect the signal of the parking aid. Thus, these objects or people who wear such clothing are not recognised by the sensors of the parking aid.
Note
•
The parking aid does not operate if you are towing a trailer (applies to models
which feature a factory-fitted towing device*).•
If a warning signal sounds for about 3 se
conds after switching the ignition on
and engaging reverse gear, and there is no obstacle close to your car, this indicates a system fault. Have the fault rectified by a specialist workshop.•
The sensors must be kept clean and free of ice to enable the parking aid to
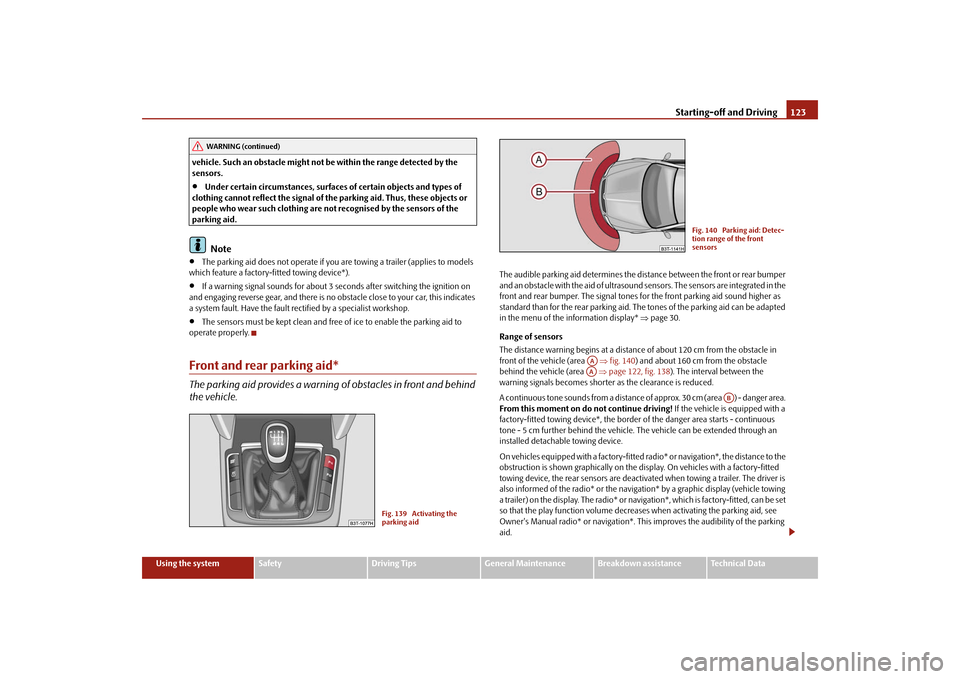
operate properly.Front and rear parking aid*The parking aid provides a warning
of obstacles in front and behind
the vehicle.
The audible parking aid determines the dist
ance between the front or rear bumper
and an obstacle with the aid of ultrasound sensors. The sensors are integrated in the front and rear bumper. The signal tones for the front parking aid sound higher as standard than for the rear parking aid. Th
e tones of the parking aid can be adapted
in the menu of the information display*
⇒page 30.
Range of sensors The distance warning begins at a distance
of about 120 cm from the obstacle in
front of the vehicle (area
⇒fig. 140
) and about 160 cm from the obstacle
behind the vehicle (area
⇒page 122, fig. 138
). The interval between the
warning signals becomes shorter as the clearance is reduced. A continuous tone sounds from a distance
of approx. 30 cm (area ) - danger area.
From this moment on do not continue driving!
If the vehicle is equipped with a
factory-fitted towing device*, the border
of the danger area
starts - continuous
tone - 5 cm further behind the vehicle.
The vehicle can be extended through an
installed detachable towing device. On vehicles equipped wi
th a factory-fitted radio* or na
vigation*, the distance to the
obstruction is shown graphically on the disp
lay. On vehicles with a factory-fitted
towing device, the rear sensors are deactivated when towing a trailer. The driver is also informed of the radio* or the navigation* by a graphic display (vehicle towing a trailer) on the display. The radio* or navi
gation*, which is factory-fitted, can be set
so that the play function volume decrea
ses when activating the parking aid, see
Owner's Manual radio* or navigation*. This
improves the audibility of the parking
aid.
WARNING (continued)
Fig. 139 Activating the parking aid
Fig. 140 Parking aid: Detec-tion range of the front sensors
AAAA
AB
s2dk.1.book Page 123 Wednesday, April 8, 2009 12:23 PM
Page 125 of 294
Starting-off and Driving
124
Activating The parking aid is activated when the
reverse gear
is engaged and the ignition is
turned on or by pressing the button
⇒page 123, fig. 139
- the symbol
lights up
in the button. The activation is confir
med by a brief acknowledgement signal.
Deactivating The parking aid is deactivated after pressing the button°
⇒page 123, fig. 139
or
at a speed of more than 10 km/h - the symbol
in the button is no longer illumi-
nated.
WARNING
•
The parking aid is not a substitute fo
r the driver paying proper attention
and it is always the driver's responsibility to take care when reversing the vehicle or carrying ou
t similar manoeuvres.
•
You should therefore satisfy yourself, before reversing, that there is no
small obstacle, such as a rock, thin post, trailer drawbar etc., in front or behind your vehicle. Such an obstacle might not be within the range detected by the sensors.•
Under certain circumstances, surfaces
of certain objects and types of
clothing cannot reflect the signal of the parking aid. Thus, these objects or people who wear such clothing are not recognised by the sensors of the parking aid.
Note
•
Only the front parking aid operates if yo
u are towing a trailer (applies only to
models which feature a factor
y-fitted towing device*).
•
If a warning signal sounds for about 3 seconds after activating the system and
there is no obstacle close to your car, th
is indicates a system fault. The fault is
confirmed additionally when the symbol
flashes in the button
⇒page 123,
fig. 139
. Have the fault rectified by a specialist workshop.
•
The sensors must be kept clean and free
of ice to enable the parking aid to
operate properly.
•
If the parking aid is activated and the se
lector lever of the automatic gearbox is
in the position , warning signal indicates interruption (vehicle can no longer move).Park Assist*Description and important informationThe park assist assists you when parkin
g in a suitable parallel parking place
between two vehicles or behind a vehicle. The park assist automatically searches fo
r suitable parking spaces after switching
on the ignition and when driving up to 30 km/h. During the parking procedure the park as
sist only takes over the steering move-
ments, the pedals continue to
be operated by the driver.
Function of the system is based on:•
Length and depth measurement of
the parking spaces when driving
•
Evaluation of the size
of the parking space
•
Definition of the correct position of the vehicle for parking
•
Calculating the line on which the vehi
cle drives backwards into the parking
place•
Actuation of the steering force assistan
ce, automatic spinning of the wheels of
the front axle when parking.
WARNING
The park assist does not take away the responsability from the driver when parking.•
Pay particular attention to small chil
dren and animals as they would not
be recognised by the se
nsors of the parking aid.
•
Under certain circumstances, surfaces of certain objects and types of
clothing cannot reflect the signal of th
e park assist or th
e parking aid. Thus,
AP
s2dk.1.book Page 124 Wednesday, April 8, 2009 12:23 PM
Page 126 of 294
Starting-off and Driving
125
Using the system
Safety
Driving Tips
General Maintenance
Breakdown assistance
Technical Data
these objects or people who wear such clothing are not recognised by the sensors of the parking aid.•
The external sound source of the park assist and the parking aid can be
disruptively influenced and under unfavourable conditions, objects or people cannot be recognised by the sensors of the parking aid.
Caution
•
If other vehicles are parked
behind or on the kurb, the park assist guides your
vehicle beyond the kurb or onto it. Make sure that the wheels or the wheel rims of your vehicle are not damaged and
if necessary intervene in time.
•
You should satisfy yourself before parkin
g that there is no small obstacle, such
as a rock, thin post, trailer drawbar etc., in
front or behind your vehicle. Such an
obstacle might not be within the range detected by the sensors.•
Under certain circumstances, surfaces or structures of certain objects such as
wire mesh fences, powder snow etc...,
cannot be recognised by the system.
•
The evaluation of the parking place and the parking procedure depends on the
circumference of the wheels. The system does
not function correctly if your vehicle
is mounted with wheels of non-permissible size, snow chains or a temporary spare wheel (in order to reach the nearest workshop). If the tyres other than those excepted by the manufacturer are mounted,
the resulting position of the vehicle in
the parking place can differ slightly. This
can be avoided throug
h new calibration of
the system in a specialist garage.•
The accuracy of the evaluation for the
parking place can be influenced by the
incorrectly determined outside temperature if
the later is influenced by the thermal
radiation of the engine i.e for stop and go in a traffic jam.•
In order to avoid damaging the sensor
s while cleaning with high-pressure
cleaners or steam jets, the sensors must on
ly be directly sprayed for short periods
while a minimum distance of 10 cm must be observed.
Note
•
A component of the park assist is
the front and rear parking aid*.
•
The electronic stability programme (ESP)
must always be switched on for the
parking procedure.•
Only the front parking aid operates if you are towing a trailer (applies only to
models which feature a factory-fitted towing device*). This is why it is not possible to park backwards with the help of th
e park assist when
towing a trailer.
•
The sensors must be kept clean and free of ice to enable the parking aid to
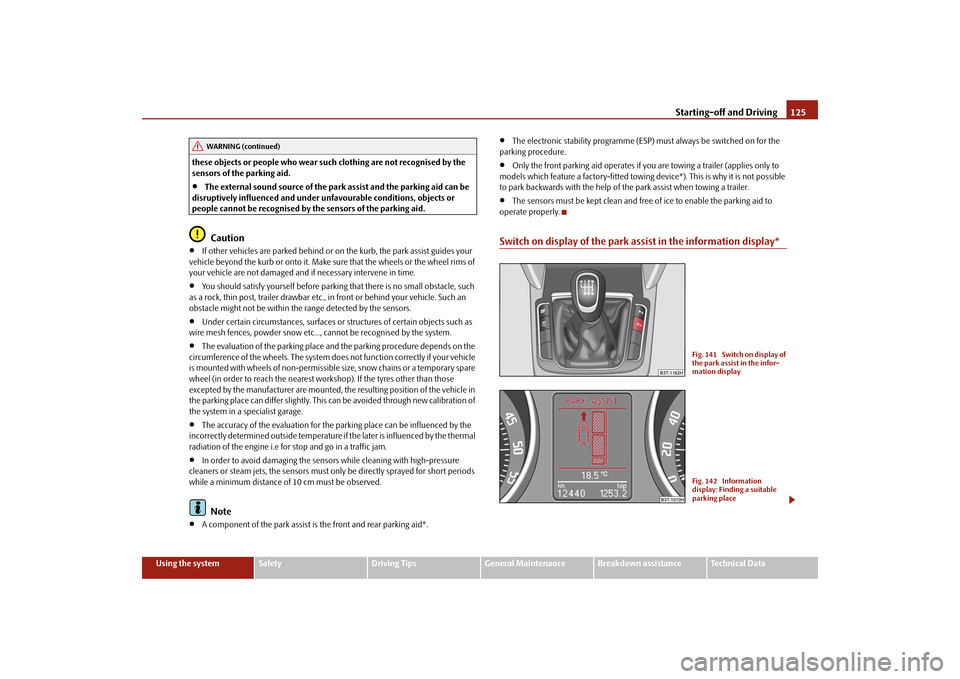
operate properly.Switch on display of the park assist in the information display*
WARNING (continued)
Fig. 141 Switch on display of the park assist in the infor-mation displayFig. 142 Information display: Finding a suitable parking place
s2dk.1.book Page 125 Wednesday, April 8, 2009 12:23 PM