tow SKODA SUPERB 2009 2.G / (B6/3T) Owner's Manual
[x] Cancel search | Manufacturer: SKODA, Model Year: 2009, Model line: SUPERB, Model: SKODA SUPERB 2009 2.G / (B6/3T)Pages: 294, PDF Size: 21.33 MB
Page 4 of 294
Contents3
Using the system
Safety
Driving Tips
General Maintenance
Breakdown assistance
Technical Data
ContentsLayout of this Owner's Manual
(explanations)
. . . . . . . . . . . . . . . . . . . . . . . . . .
Using the system
. . . . . . . . . . . . . . . . . . . . . .
Cockpit
. . . . . . . . . . . . . . . . . . . . . . . . . . . . . . . . . . . . . . . .
Overview . . . . . . . . . . . . . . . . . . . . . . . . . . . . . . . . . . . .
The brief instruction
. . . . . . . . . . . . . . . . . . . . . . . . . .
Basic functions and important information . . . . .
Instruments and Indicator/Warning Lights
. . .
General view of the instrument cluster . . . . . . . . .
Engine revolutions counter . . . . . . . . . . . . . . . . . . . .
Speedometer . . . . . . . . . . . . . . . . . . . . . . . . . . . . . . . .
Coolant temperature gauge . . . . . . . . . . . . . . . . . . .
Fuel gauge . . . . . . . . . . . . . . . . . . . . . . . . . . . . . . . . . . .
Counter for distance driven . . . . . . . . . . . . . . . . . . .
Service Interval Display . . . . . . . . . . . . . . . . . . . . . . .
Digital clock . . . . . . . . . . . . . . . . . . . . . . . . . . . . . . . . . .
Multi-functional indicator (onboard computer)*
Information display* . . . . . . . . . . . . . . . . . . . . . . . . . .
Auto Check Control* . . . . . . . . . . . . . . . . . . . . . . . . . .
Warning lights . . . . . . . . . . . . . . . . . . . . . . . . . . . . . . . .
Unlocking and locking
. . . . . . . . . . . . . . . . . . . . . . . .
Key . . . . . . . . . . . . . . . . . . . . . . . . . . . . . . . . . . . . . . . . . .
Changing the battery of the radio remote control
Electronic immobiliser . . . . . . . . . . . . . . . . . . . . . . . .
Child safety lock . . . . . . . . . . . . . . . . . . . . . . . . . . . . . .
Central locking system . . . . . . . . . . . . . . . . . . . . . . . .
Remote control . . . . . . . . . . . . . . . . . . . . . . . . . . . . . . .
Description . . . . . . . . . . . . . . . . . . . . . . . . . . . . . . . . . .
Unlocking and locking car . . . . . . . . . . . . . . . . . . . . .
Synchonisation of the remote control . . . . . . . . . . Anti-theft alarm system* . . . . . . . . . . . . . . . . . . . . . .
Power windows . . . . . . . . . . . . . . . . . . . . . . . . . . . . . .
Electric sliding/tilting roof* . . . . . . . . . . . . . . . . . . . .
Lights and Visibility
. . . . . . . . . . . . . . . . . . . . . . . . . . .
Lights . . . . . . . . . . . . . . . . . . . . . . . . . . . . . . . . . . . . . . . .
Interior lighting . . . . . . . . . . . . . . . . . . . . . . . . . . . . . . .
Visibility . . . . . . . . . . . . . . . . . . . . . . . . . . . . . . . . . . . . .
Windshield wiper and wash system . . . . . . . . . . . .
Rear-view mirror . . . . . . . . . . . . . . . . . . . . . . . . . . . . .
Exterior mirror . . . . . . . . . . . . . . . . . . . . . . . . . . . . . . .
Automatic dimming exterior mirror* . . . . . . . . . . .
Seats and Stowage
. . . . . . . . . . . . . . . . . . . . . . . . . . . .
Front seats . . . . . . . . . . . . . . . . . . . . . . . . . . . . . . . . . . .
Adjusting front seats electrically* . . . . . . . . . . . . . .
Head restraints . . . . . . . . . . . . . . . . . . . . . . . . . . . . . . .
Middle rear head restraint . . . . . . . . . . . . . . . . . . . . .
Rear seats . . . . . . . . . . . . . . . . . . . . . . . . . . . . . . . . . . . .
luggage compartment . . . . . . . . . . . . . . . . . . . . . . . .
The roof rack* . . . . . . . . . . . . . . . . . . . . . . . . . . . . . . . .
Cup holder . . . . . . . . . . . . . . . . . . . . . . . . . . . . . . . . . . .
Ashtray . . . . . . . . . . . . . . . . . . . . . . . . . . . . . . . . . . . . . .
Cigarette lighter*, power sockets . . . . . . . . . . . . . . .
Storage compartments . . . . . . . . . . . . . . . . . . . . . . . .
Air conditioning system
. . . . . . . . . . . . . . . . . . . . . .
Introduction . . . . . . . . . . . . . . . . . . . . . . . . . . . . . . . . .
Air outlet vents . . . . . . . . . . . . . . . . . . . . . . . . . . . . . . .
Climatic (semi-automatic air conditioning system)
Climatronic* (automatic air conditioning) . . . . . .
Auxiliary heating (auxiliary heating and
ventilation)* . . . . . . . . . . . . . . . . . . . . . . . . . . . . . . . . .
Starting-off and Driving
. . . . . . . . . . . . . . . . . . . . . . .
Setting steering wheel position . . . . . . . . . . . . . . . .
Ignition lock . . . . . . . . . . . . . . . . . . . . . . . . . . . . . . . . . . Starting the engine . . . . . . . . . . . . . . . . . . . . . . . . . . .
Rear parking aid* . . . . . . . . . . . . . . . . . . . . . . . . . . . . .
Front and rear parking aid* . . . . . . . . . . . . . . . . . . . .
Park Assist* . . . . . . . . . . . . . . . . . . . . . . . . . . . . . . . . . .
Cruise control system (CCS)* . . . . . . . . . . . . . . . . . .
Automatic gearbox DSG*
. . . . . . . . . . . . . . . . . . . . .
Automatic gearbox DSG* . . . . . . . . . . . . . . . . . . . . .
Communication
. . . . . . . . . . . . . . . . . . . . . . . . . . . . . .
Multifunction steering wheel* . . . . . . . . . . . . . . . . .
Mobile phones and two-way radio systems . . . . .
Universal telephone preinstallation GSM II* . . . .
Phone voice phonebook* . . . . . . . . . . . . . . . . . . . . .
Universal telephone preinstallation GSM III* . . . .
Phone voice phonebook* . . . . . . . . . . . . . . . . . . . . .
Inputs AUX-IN* and MDI* . . . . . . . . . . . . . . . . . . . . .
CD changer* . . . . . . . . . . . . . . . . . . . . . . . . . . . . . . . . .
Safety
. . . . . . . . . . . . . . . . . . . . . . . . . . . . . . . . . . . . . .
Passive Safety
. . . . . . . . . . . . . . . . . . . . . . . . . . . . . . . . .
Basic information . . . . . . . . . . . . . . . . . . . . . . . . . . . .
Correct seated position . . . . . . . . . . . . . . . . . . . . . . .
Seat belts
. . . . . . . . . . . . . . . . . . . . . . . . . . . . . . . . . . . . . .
Why seat belts? . . . . . . . . . . . . . . . . . . . . . . . . . . . . . .
The physical principle of a frontal collision . . . . .
Important safety information regarding the use of
seat belts . . . . . . . . . . . . . . . . . . . . . . . . . . . . . . . . . . . .
How are seat belts correctly fastened? . . . . . . . . .
Airbag system
. . . . . . . . . . . . . . . . . . . . . . . . . . . . . . . . .
Description of the airbag system . . . . . . . . . . . . . . .
Front airbag . . . . . . . . . . . . . . . . . . . . . . . . . . . . . . . . . .
Driver's knee airbag* . . . . . . . . . . . . . . . . . . . . . . . . . 6
7
9
9
11
11
17
17
18
18
18
18
19
20
21
21
26
29
33
43
43
43
44
44
45
50
50
51
5252
54
57
60
60
68
70
73
75
76
77
78
78
79
82
83
84
86
91
92
93
94
95
104
104
105
106
109
112
117
117
118119
122
123
124
128
131
131
138
138
141
141
148
151
158
160
160
163
163
163
164
168
168
169
169
170
174
174
176
178
s2dk.1.book Page 3 Wednesday, April 8, 2009 12:23 PM
Page 5 of 294
Contents 4Side airbags* . . . . . . . . . . . . . . . . . . . . . . . . . . . . . . . . .
Head airbags* . . . . . . . . . . . . . . . . . . . . . . . . . . . . . . . .
Deactivating an airbag . . . . . . . . . . . . . . . . . . . . . . . . Transporting children safely
. . . . . . . . . . . . . . . . . .
What you should know about transporting children!
Child seat . . . . . . . . . . . . . . . . . . . . . . . . . . . . . . . . . . . .
Attaching a child seat using the “ISOFIX” system .
Attaching child seat using the “Top Tether” system
Driving Tips
. . . . . . . . . . . . . . . . . . . . . . . . . . . . . .
Intelligent Technology
. . . . . . . . . . . . . . . . . . . . . . . .
Electronic stability programme (ESP)* . . . . . . . . . .
Brakes . . . . . . . . . . . . . . . . . . . . . . . . . . . . . . . . . . . . . . .
Brake booster . . . . . . . . . . . . . . . . . . . . . . . . . . . . . . . .
Antilock brake system (ABS) . . . . . . . . . . . . . . . . . . .
Brake Assist* . . . . . . . . . . . . . . . . . . . . . . . . . . . . . . . . .
Uphill-Start off-Assist* . . . . . . . . . . . . . . . . . . . . . . . .
Electromechanical power steering . . . . . . . . . . . . .
Tyre inflation pressure-control system* . . . . . . . . .
Diesel particle filter* (diesel engine) . . . . . . . . . . . .
Driving and the Environment
. . . . . . . . . . . . . . . . .
A new engine . . . . . . . . . . . . . . . . . . . . . . . . . . . . . . . . .
New tyres . . . . . . . . . . . . . . . . . . . . . . . . . . . . . . . . . . . .
New brake pads . . . . . . . . . . . . . . . . . . . . . . . . . . . . . .
Catalytic converter . . . . . . . . . . . . . . . . . . . . . . . . . . . .
Driving in an economical and environmentally
conscious manner . . . . . . . . . . . . . . . . . . . . . . . . . . . .
Environmental compatibility . . . . . . . . . . . . . . . . . . .
Motoring abroad . . . . . . . . . . . . . . . . . . . . . . . . . . . . .
Avoiding damage to your vehicle . . . . . . . . . . . . . .
To w i n g a t r a i l e r
. . . . . . . . . . . . . . . . . . . . . . . . . . . . . . . .
Towing a trailer . . . . . . . . . . . . . . . . . . . . . . . . . . . . . . .
General Maintenance
. . . . . . . . . . . . . . .
Taking care of your vehicle and cleaning the
vehicle
. . . . . . . . . . . . . . . . . . . . . . . . . . . . . . . . . . . . . . . . .
General . . . . . . . . . . . . . . . . . . . . . . . . . . . . . . . . . . . . . .
Care of the exterior of vehicle . . . . . . . . . . . . . . . . . .
Care of the interior of vehicle . . . . . . . . . . . . . . . . . .
Fuel
. . . . . . . . . . . . . . . . . . . . . . . . . . . . . . . . . . . . . . . . . . . .
Petrol . . . . . . . . . . . . . . . . . . . . . . . . . . . . . . . . . . . . . . . .
Diesel . . . . . . . . . . . . . . . . . . . . . . . . . . . . . . . . . . . . . . . .
Refuelling . . . . . . . . . . . . . . . . . . . . . . . . . . . . . . . . . . . .
Inspecting and replenishing
. . . . . . . . . . . . . . . . . .
Engine compartment . . . . . . . . . . . . . . . . . . . . . . . . .
Engine oil . . . . . . . . . . . . . . . . . . . . . . . . . . . . . . . . . . . .
Cooling system . . . . . . . . . . . . . . . . . . . . . . . . . . . . . . .
Brake fluid . . . . . . . . . . . . . . . . . . . . . . . . . . . . . . . . . . .
Battery . . . . . . . . . . . . . . . . . . . . . . . . . . . . . . . . . . . . . . .
Windshield washer system . . . . . . . . . . . . . . . . . . . .
Wheels and Tyres
. . . . . . . . . . . . . . . . . . . . . . . . . . . . . .
Wheels . . . . . . . . . . . . . . . . . . . . . . . . . . . . . . . . . . . . . .
Accessories, changes and replacement of partsAccessories and replacement parts . . . . . . . . . . . . .
Technical changes . . . . . . . . . . . . . . . . . . . . . . . . . . . .
Vehicles of the group N1 . . . . . . . . . . . . . . . . . . . . . .Breakdown assistance
. . . . . . . . . . . . . .
Breakdown assistance
. . . . . . . . . . . . . . . . . . . . . . . .
First-aid box* . . . . . . . . . . . . . . . . . . . . . . . . . . . . . . . . .
Warning triangle . . . . . . . . . . . . . . . . . . . . . . . . . . . . . .
Fire extinguisher* . . . . . . . . . . . . . . . . . . . . . . . . . . . . .
Vehicle tool kit . . . . . . . . . . . . . . . . . . . . . . . . . . . . . . . .
Tyre repair kit* . . . . . . . . . . . . . . . . . . . . . . . . . . . . . . . .
Spare wheel* . . . . . . . . . . . . . . . . . . . . . . . . . . . . . . . . .
Changing a wheel . . . . . . . . . . . . . . . . . . . . . . . . . . . . .
Jump-starting . . . . . . . . . . . . . . . . . . . . . . . . . . . . . . . .
Tow-starting and towing vehicle . . . . . . . . . . . . . . .
Fuses and light bulbs
. . . . . . . . . . . . . . . . . . . . . . . . . .
Electric fuses . . . . . . . . . . . . . . . . . . . . . . . . . . . . . . . . .
Bulbs . . . . . . . . . . . . . . . . . . . . . . . . . . . . . . . . . . . . . . . .
Technical Data
. . . . . . . . . . . . . . . . . . . . . . . . . .
Technical Data
. . . . . . . . . . . . . . . . . . . . . . . . . . . . . . . . .
General information . . . . . . . . . . . . . . . . . . . . . . . . . . .
Used abbreviations . . . . . . . . . . . . . . . . . . . . . . . . . . .
Performances . . . . . . . . . . . . . . . . . . . . . . . . . . . . . . . . .
Weight . . . . . . . . . . . . . . . . . . . . . . . . . . . . . . . . . . . . . . .
Identification details . . . . . . . . . . . . . . . . . . . . . . . . . .
Fuel consumption according to the regulations
(99/100/EU) . . . . . . . . . . . . . . . . . . . . . . . . . . . . . . . . . .
Dimensions . . . . . . . . . . . . . . . . . . . . . . . . . . . . . . . . . .
Engine oil specifications . . . . . . . . . . . . . . . . . . . . . . .
1.4 ltr./92 kW TSI - EU5 . . . . . . . . . . . . . . . . . . . . . . . .
1.8 ltr./118 kW TSI - EU5 . . . . . . . . . . . . . . . . . . . . . . .
3.6 ltr./191 kW FSI - EU5 . . . . . . . . . . . . . . . . . . . . . . .
1.9 ltr./77 kW TDI PD - EU4 . . . . . . . . . . . . . . . . . . . .
2.0 ltr./103 kW TDI PD - EU4 . . . . . . . . . . . . . . . . . . .
2.0 ltr./125 kW TDI CR - EU5 . . . . . . . . . . . . . . . . . . .
Index
. . . . . . . . . . . . . . . . . . . . . . . . . . . . . . . . . . . . . . . . 179
181
182
185
185
188
191
192
193
193
193
196
197
197
198
198
198
199
200
201
201
201
201
202
202
206
206
207
208
208211
211
211
211
216
219
219
219
220
222
222
224
226
228
229
234
235
235
241
241
241
241
243
243
243
243
243
244
244
245
245
250
252256
256
261
267
267
267
267
267
267
268
268
269
270
272
274
276
278
280
282
285
s2dk.1.book Page 4 Wednesday, April 8, 2009 12:23 PM
Page 17 of 294
The brief instruction
16
– Grasp the bonnet at the bottom part
of the radiator grille and lift it
towards the top so that it is held
opened by the gas pressure support.
Further information
⇒page 222, “Opening and closing the bonnet.”.
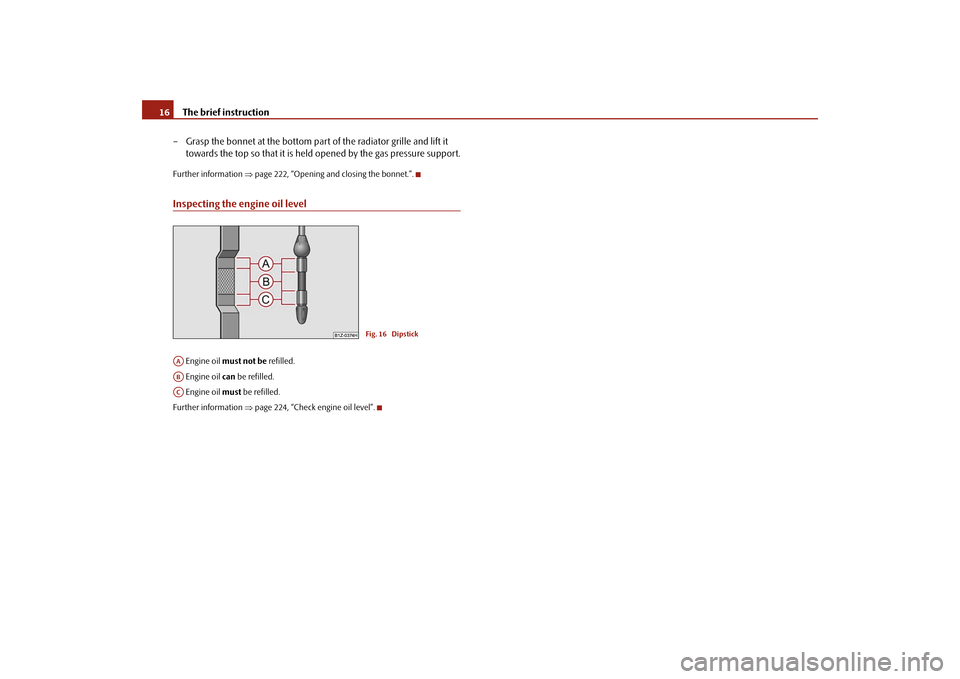
Inspecting the engine oil level Engine oil
must not be
refilled.
Engine oil
can
be refilled.
Engine oil
must
be refilled.
Further information
⇒page 224, “Check engine oil level”.
Fig. 16 Dipstick
AAABACs2dk.1.book Page 16 Wednesday, April 8, 2009 12:23 PM
Page 27 of 294
Instruments and Indicator/Warning Lights
26
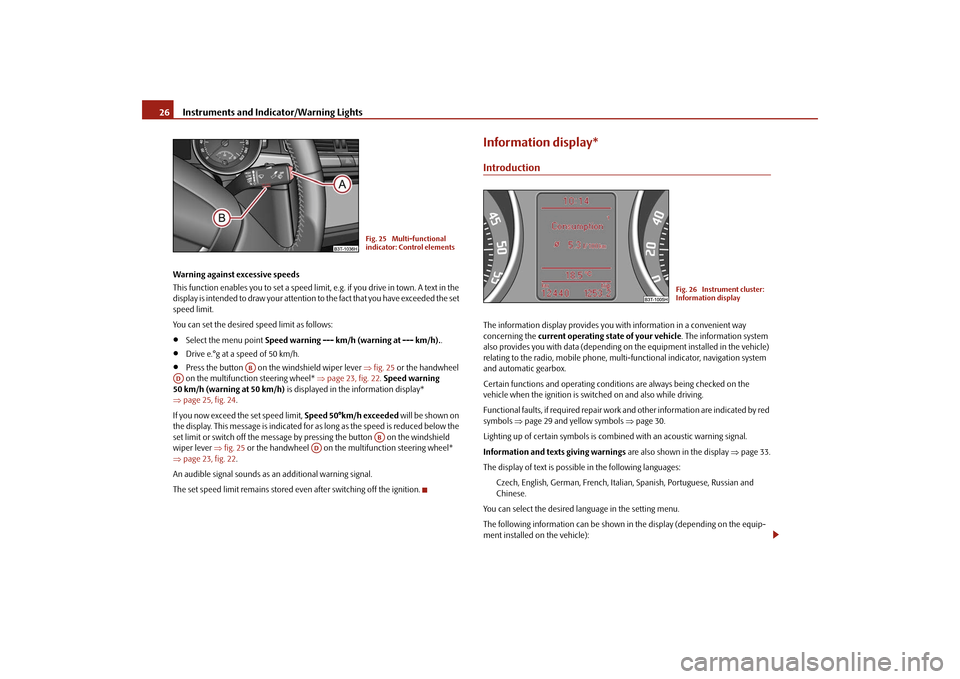
Warning against excessive speeds This function enables you to set a speed limit, e.g. if you drive in town. A text in the display is intended to draw your attention
to the fact that you have exceeded the set
speed limit. You can set the desired
speed limit as follows:
•
Select the menu point
Speed warning --- km/h (warning at --- km/h).
.
•
Drive e.°g at a speed of 50 km/h.
•
Press the button on the windshield wiper lever
⇒fig. 25
or the handwheel
on the multifunction steering wheel*
⇒page 23, fig. 22
. Speed warning
50 km/h (warning at 50 km/h)
is displayed in the information display*
⇒ page 25, fig. 24
.
If you now exceed the set speed limit,
Speed 50°km/h exceeded
will be shown on
the display. This message is indicated for as long as the speed is reduced below the set limit or switch off the message by pr
essing the button on the windshield
wiper lever
⇒fig. 25
or the handwheel on the mu
ltifunction stee
ring wheel*
⇒ page 23, fig. 22
.
An audible signal sounds as an additional warning signal.The set speed limit remains stored even after switching off the ignition.
Information display*IntroductionThe information display provides you with information in a convenient way concerning the
current operating state of your vehicle
. The information system
also provides you with data (depending on the equipment installed in the vehicle) relating to the radio, mobile phone, mult
i-functional indicator,
navigation system
and automatic gearbox. Certain functions and operating conditio
ns are always bein
g checked on the
vehicle when the ignition is switched on and also while driving. Functional faults, if required repair work and other information are indicated by red symbols
⇒page 29 and yellow symbols
⇒page 30.
Lighting up of certain symbols is comb
ined with an acoustic warning signal.
Information and texts giving warnings
are also shown in the display
⇒page 33.
The display of text is possible in the following languages:
Czech, English, German, French, Italia
n, Spanish, Portuguese, Russian and
Chinese.
You can select the desired la
nguage in the setting menu.
The following information can be shown in
the display (depending on the equip-
ment installed on the vehicle):
Fig. 25 Multi-functional indicator: Control elements
AB
AD
AB
AD
Fig. 26 Instrument cluster: Information display
s2dk.1.book Page 26 Wednesday, April 8, 2009 12:23 PM
Page 35 of 294
Instruments and Indicator/Warning Lights
34
WARNING
•
If you do not pay attention to the warning lights coming on and the corre-
sponding descriptions and warning notes, this may result in severe body injuries or majo
r vehicle damage.
•
The engine compartment of your car is
a hazardous area. There is a risk
of injuries, scalding, accidents and fire when working in the engine compartment, e.g. inspecting and replenis
hing oil and other fluids. It is also
essential to obse
rve all warnings
⇒page 223, “Working in the engine
compartment”.
Note
•
The arrangement of the indicator lights
depends on the model version. The
symbols shown in the following functional description are to be found as indicator lights in the instrument cluster.•
Operational faults are shown in the inst
rument cluster as red symbols (priority
1 - danger) or yellow symbols (priority 2 - warning).Turn signal system
Either the left
or right
indicator light flashes depending on the position of the
turn signal lever. The indicator light flashes at twice its normal rate if a turn signal light fails. This does not apply when towing a trailer.
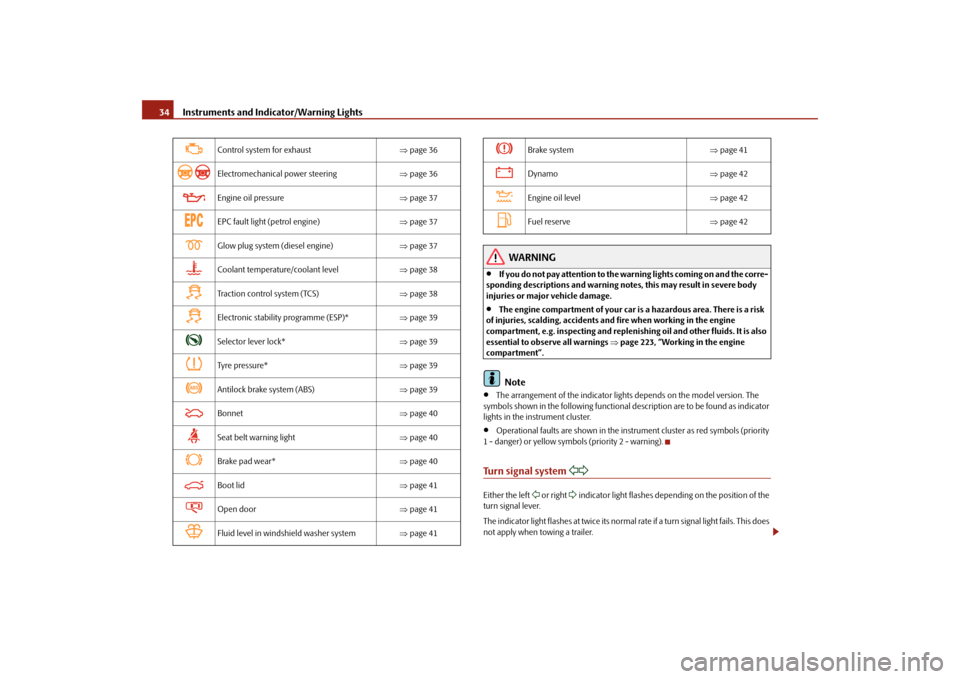
Control system for exhaust
⇒page 36
Electromechanical power steering
⇒page 36
Engine oil pressure
⇒page 37
EPC fault light (petrol engine)
⇒page 37
Glow plug system (diesel engine)
⇒page 37
Coolant temperature/coolant level
⇒page 38
Traction control system (TCS)
⇒page 38
Electronic stability programme (ESP)*
⇒page 39
Selector lever lock*
⇒page 39
Tyre pressure*
⇒page 39
Antilock brake system (ABS)
⇒page 39
Bonnet
⇒page 40
Seat belt warning light
⇒page 40
Brake pad wear*
⇒page 40
Boot lid
⇒page 41
Open door
⇒page 41
Fluid level in windshield washer system
⇒page 41
Brake system
⇒page 41
Dynamo
⇒page 42
Engine oil level
⇒page 42
Fuel reserve
⇒page 42
s2dk.1.book Page 34 Wednesday, April 8, 2009 12:23 PM
Page 46 of 294
Unlocking and locking
45
Using the system
Safety
Driving Tips
General Maintenance
Breakdown assistance
Technical Data
Switching child safety lock on – Use the vehicle key to turn the slit in the rear door to the left in the
direction of the arrow
⇒
page 44, fig. 39
.
Switching child safety lock off – Use the vehicle key to turn the slit
to the right against the direction of
the arrow.
So long as the child safety lock is switched
on it is not possib
le to open the door
from the inside with the door opening lever. In this case the door can be opened only from the outside.Central locking systemDescriptionUnlocking or locking the vehicle causes
all the doors and the fuel filler flap to be
unlocked or locked at the same time by th
e central locking system. The boot lid is
unlocked when opening. Afterwards you ca
n open the boot lid by pressing the
handle on the lower edge of the boot lid
⇒page 48.
Operation of the central locking system is possible:•
by using the radio remote control
⇒page 51,
•
using the buttons for the central locking system
⇒page 46,
•
from the outside using the vehicle key
⇒page 47, “Emergency unlocking and
locking of the driver's door”. Indicator light in the driver's door After locking the vehicle the indicator light flashes for 2 seconds fast, then more slowly. If the vehicle is locked and the safe securing system
⇒page 46 is not operating, the
indicator light in the driver door flashes for about 2 seconds fast, goes out and starts to flash slowly after about 30 seconds.
If the indicator light first of all flashes fast
for about 2 seconds, afterwards lights up
for about 30 seconds without interruption an
d then flashes slowly, there is a fault in
the system of the central locking or in the
interior monitor and in the towing protec-
tion monitoring*
⇒page 53. Visit a specialist garage to obtain assistance.
Convenience operation of windows One can open and close the windows when opening and closing the vehicle ⇒ page 56. Opening a single door* This function allows one to just unlock
the driver's door. The other doors and the
fuel filler flap remain locked and are only unlocked after repetitive unlocking. You can have the function opening a single
door activated by an authorised Škoda
Service Partner on request or you can activate it yourself with the aid of the Infor- mation display*
⇒page 30.
Automatic locking* All the doors and the boot lid are locked automatically once the car reaches a speed of about 15 km/h. If the ignition key is withdrawn, the car
is then automatically unlocked again. In
addition, it is possible for the driver or front passenger to unlock the car by pressing the central locking button
⇒page 46 or by pulling the door opening lever on one
of the front doors. You can have the function of the automatic
locking activated by a specialist garage
on request or you can also activate it yourself with the aid of the Information display*
⇒page 30.
WARNING
Locking the doors prevents involuntary
opening in an exceptional situation
(an accident). Locked doors prevent unwanted entry into the vehicle from outside, for example at road crossings. Locked doors do, however, make it more difficult for rescuers to get into
the vehicle in an emergency - danger to
life!
s2dk.1.book Page 45 Wednesday, April 8, 2009 12:23 PM
Page 53 of 294
Unlocking and locking
52
Folding up of the key – Press button and collapse the key bit in the housing.The turn signal lights flash twice as
confirmation that the vehicle has been
unlocked. The vehicle will lock again auto
matically if you unlock the vehicle using
button but do not open a door or the
boot lid within the next 30 seconds. This
function is intended to prevent the car being unlocked unintentionally. In addition, when the car is unlocked, the
power seats and exterior mirrors* move
into the position assigned to this key. The stored setting of driver seat and exterior mirrors is retrieved. When the vehicle is unlocked or locked, the interior lights and the lights of the entry area are automatically switched
on or off via the door contact.
Display of the locking The turn signal lights flash once to co
nfirm that the vehicle has been correctly
locked. If the doors or the boot lid remain open
after the vehicle has been locked, the turn
signal lights do not flash unt
il they have been closed.
WARNING
If the vehicle is locked from the outside and the safe securing system is acti- vated, there must not be any person in the vehicle as it is then not possible to open either a door or a window from the inside. The locked doors make it more difficult for rescuers to get into
the vehicle in an emergency - hazard!
Note
•
Operate the radio remote control only wh
en the doors and boot lid are closed
and you have visual contact with the vehicle.•
Once in the car, you must not press the lock button
of the radio remote
control before inserting the key into the ignition lock in order to avoid the car being inadvertently locked and, in addition, th
e anti-theft alarm system* being switched
on. Should this happen, press the unlock button
of the radio remote control.
•
The automatic raising of the small boot
lid can be impaired at temperatures
below +4°C.Synchonisation of the remote controlIf the vehicle cannot be unlocked by actuatin
g the remote control system then it is
possible that the code in the key and the
control unit in the vehicle are no longer
synchronised. This can occur when the buttons on the radio-operated key are actu-ated a number of times outside of the operative range of the equipment or the battery on the remote control was replaced. This means it is necessary to
synchronise the code as follows:
•
Press any button on the remote control.
•
Pressing of the button means that the d
oor will unlock with the key within 1
minute
⇒page 47, “Emergency unlocking and locking of the driver's door”.
Anti-theft alarm system*DescriptionThe anti-theft alarm system increases the level of protection against people seeking to break into the vehicle. The system triggers audible and visual warning signals if an attempt is made to break into the vehicle. How is the alarm system activated? The anti-theft alarm system is activated wh
en the vehicle is locked with the key in
the driver's door or by us
ing the radio remote control
⇒page 47, “Emergency
unlocking and locking of the driver's door
”. The door contact monitoring is acti-
vated approx. 15 seconds after the locking. The interior and the towing protection monitoring are activated appr
ox. 30 seconds after the locking. If a door is opened
during activation, the monitoring is
only activated 5 se
conds after closing.
A4
A1
s2dk.1.book Page 52 Wednesday, April 8, 2009 12:23 PM
Page 54 of 294
Unlocking and locking
53
Using the system
Safety
Driving Tips
General Maintenance
Breakdown assistance
Technical Data
How is the alarm system deactivated? The alarm system is deactivated by pressing the unlock button on the radio remote control. The vehicle is automatically locked again if the vehicle is not opened within 30 seconds after reactivating the anti-theft alarm system. The alarm system is also deactivated if you unlock the vehicle door using the key within 45 seconds after locking the vehicle. Once you unlock the vehicle by inserting the key into the driver door within 45 seconds, you then have to insert the key into the ignition lock and switch the igni- tion on within 15 seconds after unlocking th
e door in order to deactivate the alarm
system. The
alarm will be triggered
if you do
not switch on
the ignition within 15
seconds. When is the alarm triggered? The following security areas of the locked vehicle are monitored:•
Bonnet,
•
Boot lid,
•
Doors,
•
Ignition lock,
•
Socket of the factory-fitted towing device,
•
Angle of the vehicle*,
•
Vehicle interior*,
•
A drop in voltage of the on-board power supply.
An alarm is immediately triggered if either
of the two battery terminals is discon-
nected while the anti-theft alarm system is activated. How is the alarm switched off? You switch the alarm off if you unlock the
car with the radio remote control in the
key or if you switch the ignition on.
Note
•
The working life of the alarm siren is 6 years. More detailed information is avail-
able by a specialist garage.
•
Before leaving the car, check that all the doors, windows and the electric
sliding/tilting roof* are properly closed in order to ensure that the anti-theft alarm system is fully operational.•
Coding of the radio remote control and
the receptor part precludes the use of
the radio remote control from other vehicles.Interior monitor and towing protection monitoring*
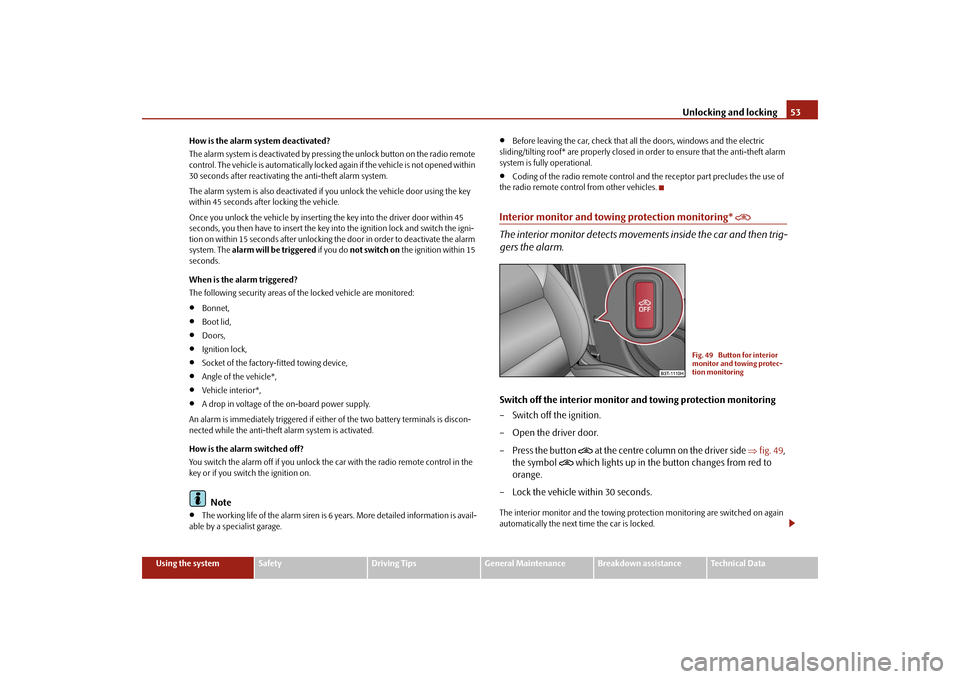
The interior monitor detects movements inside the car and then trig- gers the alarm.Switch off the interior monitor and towing protection monitoring – Switch off the ignition. – Open the driver door. – Press the button
at the centre column on the driver side
⇒
fig. 49
,
the symbol
which lights up in the button changes from red to
orange.
– Lock the vehicle within 30 seconds.The interior monitor and the towing protection monitoring are switched on again automatically the next ti
me the car is locked.
Fig. 49 Button for interior monitor and towing protec-tion monitoring
s2dk.1.book Page 53 Wednesday, April 8, 2009 12:23 PM
Page 55 of 294
Unlocking and locking
54
Note
•
You can switch the interior monitor and th
e towing protection monitoring off if
there is a possibility that movements from (e.g. children or animals) inside the vehicle interior or if the vehicle must be transported (e.g. by train or ship) or towed, might trigger the alarm.•
The opened storage compartment for spectacles* reduces the effectiveness of
the interior monitor. In order to ensure the function of the interior monitor to be fully operational, always close the stor
age compartment for spectacles before
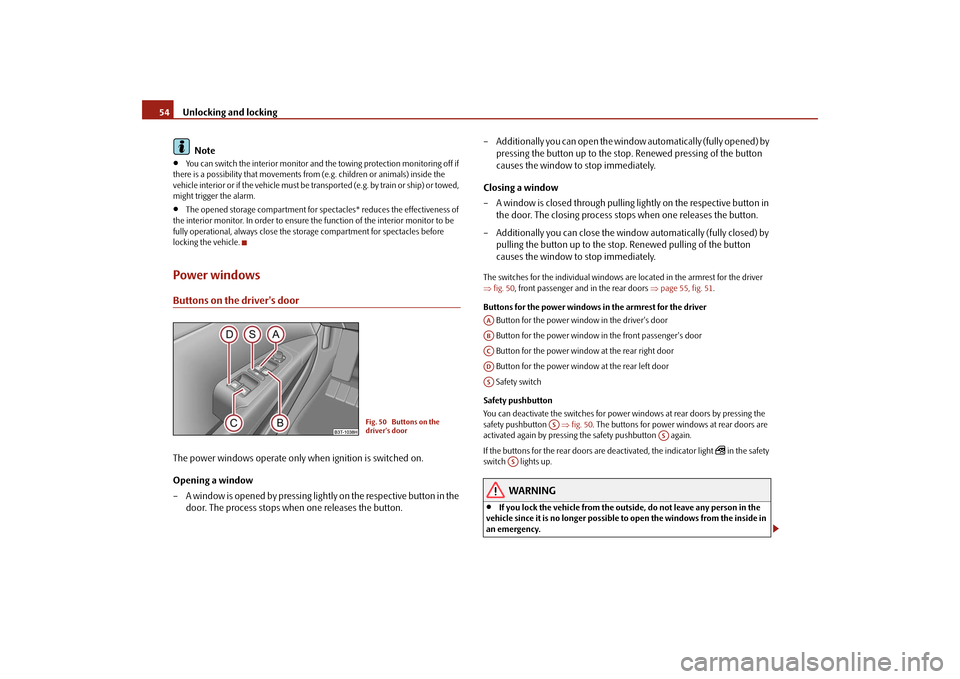
locking the vehicle.Power windowsButtons on the driver's doorThe power windows operate only when ignition is switched on. Opening a window – A window is opened by pressing lightly on the respective button in the
door. The process stops when one releases the button.
– Additionally you can open the window automatically (fully opened) by
pressing the button up to the stop. Renewed pressing of the button causes the window to stop immediately.
Closing a window – A window is closed through pulling lightly on the respective button in
the door. The closing process stops when one releases the button.
– Additionally you can close the window automatically (fully closed) by
pulling the button up to the stop. Renewed pulling of the button causes the window to stop immediately.
The switches for the individual windows are located in the armrest for the driver ⇒ fig. 50
, front passenger and in the rear doors
⇒page 55, fig. 51
.
Buttons for the power windows in the armrest for the driver Button for the power window in the driver's door Button for the power window in the front passenger's door Button for the power window at the rear right door Button for the power window at the rear left door Safety switch Safety pushbutton You can deactivate the switches for power windows at rear doors by pressing the safety pushbutton
⇒fig. 50
. The buttons for power windows at rear doors are
activated again by
pressing the safety pushbutton again.
If the buttons for the rear doors are deactivated, the indicator light
in the safety
switch lights up.
WARNING
•
If you lock the vehicle from the outside, do not leave any person in the
vehicle since it is no longer possible to open the windows from the inside in an emergency.
Fig. 50 Buttons on the driver's door
AAABACADAS
AS
AS
AS
s2dk.1.book Page 54 Wednesday, April 8, 2009 12:23 PM
Page 62 of 294

Lights and Visibility
61
Using the system
Safety
Driving Tips
General Maintenance
Breakdown assistance
Technical Data
− It also concerns reverse light and turn signal lights. − This mist has no influence on th
e life of the lighting system.
Daylight driving lights*In some countries, the national legisl
ation requires that the vehicles are
equipped with the function
daylight driving lights.
Switching on daylight driving lights – Switch on the ignition without turnin
g the light switch out of the posi-
tion 0.
Deactivate function daylight driving lights – Pull the turn signal light lever towards the steering wheel up to 3
seconds after switching on the ignition
and at the same time, slide it to
the bottom and hold it in this position for at least 3 seconds.
Activate function daylight driving lights – Pull the turn signal light lever towards the steering wheel up to 3
seconds after switching on the ignition
and at the same time, slide it to
the top and hold it in this position for at least 3 seconds.
When the daylight driving lights are swit
ched on, also the low beam with reduced
brightness shines together with the side
lights (approx. 92 % of the performance).
This contributes to a longer life of the lamps for the low beam. When the daylight driving lights are switched on, the illumination of the instrument cluster is switched off, however, it is switched on in the position
when it is dark
and the low beam shines with full brightness (100 % of the performance). On vehicles fitted with an information displa
y*, you can activate or
deactivate in the
menu the function daylight driving lights:�„
SETUP (Settings)
�„
Lights & Vision (Lights & Vision)
Automatic light control*Switching on automatic light control* – Turn the light switch
⇒
fig. 56
into position
.
Switching off automatic light control* – Turn the light switch to the position 0,
or
.
If the light switch is in the position
, the symbol illuminates when the ignition
is switched on
next to the light switch. If th
e low beam is activated with the
light sensor, the symbol
illuminates additionally next to the light switch.
If the light comes on automatically, the side lights and low beam as well as licence plate light light up at the same time. If the automatic light control is switched
on, the light is regulated with the light
sensor in the rear mirror holder. If the light intensity drops below the set value, e.g when driving during the day into a tunnel, the low beam and the side lights as well as the licence plate light come on automa
tically. If the light intensity increases
again, the lights switch off automatically. Motorway lights If the automatic light control has been switched on and the vehicle speed is over 140 km/h for at least 10 seconds, the side
lights and low beam are switched on
automatically.
Fig. 56 Dash panel: Light switch
s2dk.1.book Page 61 Wednesday, April 8, 2009 12:23 PM