front SKODA SUPERB 2010 2.G / (B6/3T) Workshop Manual
[x] Cancel search | Manufacturer: SKODA, Model Year: 2010, Model line: SUPERB, Model: SKODA SUPERB 2010 2.G / (B6/3T)Pages: 287, PDF Size: 16.59 MB
Page 104 of 287

Seats and Stowage103
Using the system
Safety
Driving Tips
General Maintenance
Breakdown assistance
Technical Data
Storage net on the front centre console*The storage net in the front center console ´â×fig. 107 is designed for the transport of
smaller objects.
WARNING
´éĚ
In the storage net you must only stow objects (up to a total weight of 0,5 kg).
Heavy objects are not secured sufficiently - risk of injury!
´éĚ
No objects with sharp edges should be stowed in the luggage net, because
they can damage the luggage net.
Storage compartment for spectacles*ÔÇô Press the button ´â×fig. 108 , the storage compartment folds down.
WARNING
The compartment must only be opened when removing or inserting objects
and otherwise must be kept closed.
Caution
On vehicles which are fitted with an anti-theft alarm system*, the opened storage
compartment reduces the effectiveness of the sensors for the interior monitor*.Storage compartment in the front doors
WARNING
Use the storage compartmen ts in the door panels ´â×fig. 109 only for small
items which do not project out of the compartment in order to avoid any inter-
ference with the proper operation of the side airbags.
Fig. 107 Front centre console: Storage
netFig. 108 Detail of the headliner: Storage
compartment for spectacles
AA
Fig. 109 Storage compartment in the
front doors
s3fg.2.book Page 103 Friday, April 30, 2010 12:17 PM
Page 105 of 287
Seats and Stowage
104
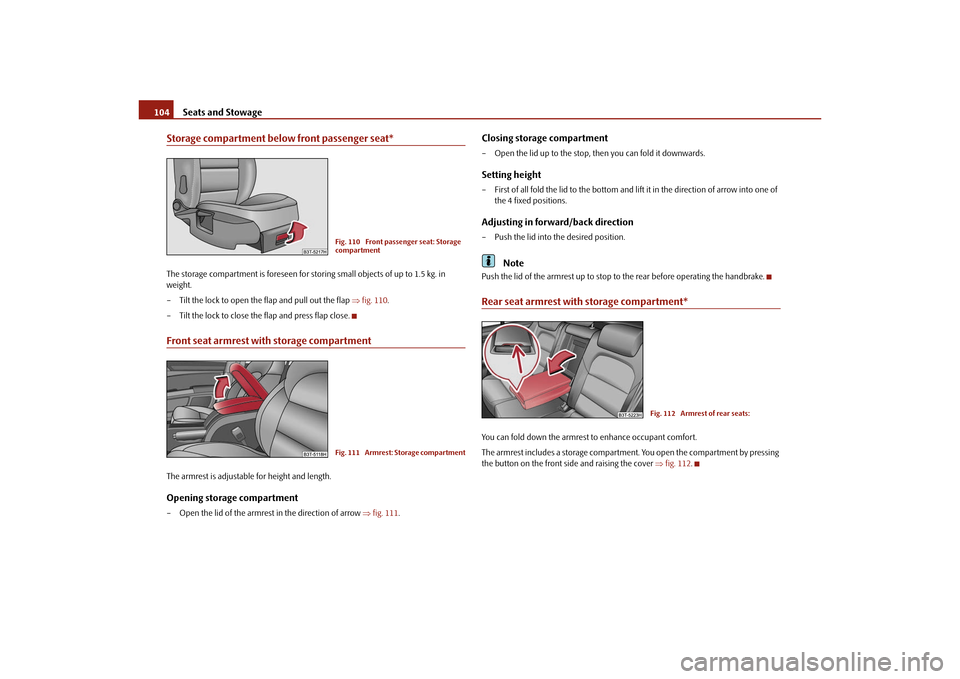
Storage compartment below front passenger seat*The storage compartment is foreseen for storing small objects of up to 1.5 kg. in
weight.
ÔÇô Tilt the lock to open the flap and pull out the flap ´â×fig. 110 .
ÔÇô Tilt the lock to close the flap and press flap close.Front seat armrest with storage compartmentThe armrest is adjustable for height and length.Opening storage compartmentÔÇô Open the lid of the armrest in the direction of arrow ´â×fig. 111 .
Closing storage compartmentÔÇô Open the lid up to the stop, then you can fold it downwards.Setting heightÔÇô First of all fold the lid to the bottom and li ft it in the direction of arrow into one of
the 4 fixed positions.Adjusting in forward/back directionÔÇô Push the lid into the desired position.
Note
Push the lid of the armrest up to stop to the rear before operating the handbrake.Rear seat armrest with storage compartment*You can fold down the armrest to enhance occupant comfort.
The armrest includes a storage compartment. You open the compartment by pressing
the button on the front side and raising the cover ´â×fig. 112 .
Fig. 110 Front passenger seat: Storage
compartmentFig. 111 Armrest: Storage compartment
Fig. 112 Armrest of rear seats:
s3fg.2.book Page 104 Friday, April 30, 2010 12:17 PM
Page 106 of 287

Seats and Stowage105
Using the system
Safety
Driving Tips
General Maintenance
Breakdown assistance
Technical Data
Storage compartment in rear centre consoleThe storage compartment is equipped with a removeable insert.
ÔÇô Open the storage compartment by pulling at the handle ´â×fig. 113 in direction
of arrow.
WARNING
The storage compartment is not a substitu te for the ashtray and must also not
be used for such purposes - risk of fire!Storage compartment for umbrella*The storage compartment for an umbrella is located in the rear left door. You can
purchase an umbrella from the rang e of the Škoda original accessories.
Seat backrest with opening for skisFig. 114 Rear seats: Handle of lid / luggage compartment: Unlock buttonAfter folding open the armrest and the lid, an opening in the seat backrest becomes
visible through which you can push the remo veable through-loading bag with skis. You
can fold open the armrest and the lid from the passenger or luggage compartment.Opening from passenger compartmentÔÇô Fold the rear armrest downwards ´â×page 86, fig. 75.
ÔÇô Pull the handle up to the stop in upward direction and fold open the lid downwards
´â× fig. 114 - left.Opening from luggage compartmentÔÇô Push the unlock button ´â×fig. 114 downwards and fold the lid (with armrest) to
the front.ClosingÔÇô Fold the lid and the armrest up to the stop in upward direction - the lid must click into place audibly.
Ensure that the armrest is always locked into place after closing. You can recognize this
on the fact that the red field above the unlocking button of the luggage compart-
ment is not visible.
Fig. 113 Centre console at rear: Storage
compartment
AA
AA
AA
s3fg.2.book Page 105 Friday, April 30, 2010 12:17 PM
Page 107 of 287
Seats and Stowage
106WARNING
The opening for the skis is solely used for transporting skis which are placed in
a properly secured removeable through-loading bag ´â×page 106.Through-loading bag*
The removeable through-loading bag is solely used for transporting
skis.LoadingÔÇô Open the boot lid.
ÔÇô Fold the rear armrest and the cover in the seat backrest downwards ´â×page 105.
ÔÇô Place the empty through-loading bag in such a way that the end of the bag with the
zip lies in the boot.
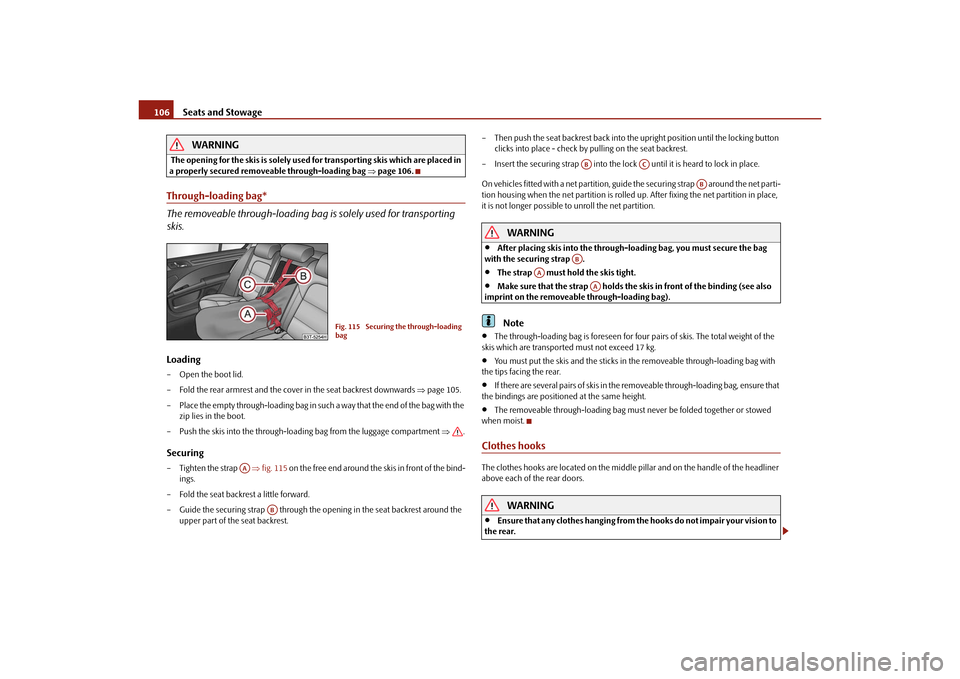
ÔÇô Push the skis into the through-loading bag from the luggage compartment ´â×.SecuringÔÇôTighten the strap ´â×fig. 115 on the free end around the skis in front of the bind-
ings.
ÔÇô Fold the seat backrest a little forward.
ÔÇô Guide the securing strap through the op ening in the seat backrest around the
upper part of the seat backrest. ÔÇô Then push the seat backrest back into th
e upright position until the locking button
clicks into place - check by pulling on the seat backrest.
ÔÇô Insert the securing strap into the lock until it is heard to lock in place.
On vehicles fitted with a net partition, gu ide the securing strap around the net parti-
tion housing when the net partition is rolled up. After fixing the net partition in place,
it is not longer possible to unroll the net partition.
WARNING
´éĚ
After placing skis into the through-loading bag, you must secure the bag
with the securing strap .
´éĚ
The strap must hold the skis tight.
´éĚ
Make sure that the strap holds the sk is in front of the binding (see also
imprint on the removeable through-loading bag).Note
´éĚ
The through-loading bag is foreseen for four pairs of skis. The total weight of the
skis which are transported must not exceed 17 kg.
´éĚ
You must put the skis and the sticks in the removeable through-loading bag with
the tips facing the rear.
´éĚ
If there are several pairs of skis in the removeable through-loading bag, ensure that
the bindings are positioned at the same height.
´éĚ
The removeable through-loading bag must never be folded together or stowed
when moist.
Clothes hooksThe clothes hooks are located on the middle pi llar and on the handle of the headliner
above each of the rear doors.
WARNING
´éĚ
Ensure that any clothes hanging from the hooks do not impair your vision to
the rear.
Fig. 115 Securing the through-loading
bag
AA
AB
AB
AC
AB
AB
AA
AA
s3fg.2.book Page 106 Friday, April 30, 2010 12:17 PM
Page 110 of 287
Air conditioning system109
Using the system
Safety
Driving Tips
General Maintenance
Breakdown assistance
Technical Data
Air conditioning systemIntroductionDescription and informationIf the cooling system is switched on, the temperature and air humidity drops in the
vehicle. The wellbeing of the occupants of the car is enhanced as a result of this partic-
ularly at high outside temperatures and a high air humidity. The system prevents the
windows misting up during th e cold season of the year.
The heating effect is dependent upon the c oolant temperature, thus full heat output
only occurs when the engine has reached its operating temperature.
It is possible to briefly activate recirculat ed air mode in order to enhance the cooling
effect - Climatic ´â×page 113, Climatronic ´â×page 116.
The air inlet in front of the windscreen must be free of ice, snow or leaves in order to
ensure that the heating and cooling systems operate properly.
After switching on the cooling Condensation from the evaporator of the air condi-
tioning may drip down and form a puddle be low the vehicle. This is quite normal and
not an indication of a leak!
WARNING
´éĚ
For your own safety and that of other road users, ensure that all the
windows are free of ice, snow and mistin g. Please familiarize yourself about
how to correctly operate th e heating and ventilation systems, how to demist
and defrost the windows, as well as with the cooling mode.
´éĚ
You should not leave recirculated air mode on over a longer period of time,
as ÔÇťstaleÔÇŁ air may result in fatigue in the driver and occupants, divert your
attention and also cause the windows to mist up. The risk of having an accident
increases. Switch recirculated air mode off as soon as the windows begin
misting up.
Note
´éĚ
The used air streams out through the air removal openings in the luggage compart-
ment.
´éĚ
If the cooling system has not been switched on for a lengthy period, odours may
be produced at the evaporator because of deposits. Switch the cooling system on at
least once a month for approximately 5 minu tes at the highest blower stage - also
during the cold season of the year - in order to avoid such odours. Also open a window
for a short time.
´éĚ
We recommend that you do not smoke in the vehicle when the recirculating air
mode is operating since the smoke which is drawn at the evaporator from the interior
of the vehicle forms deposits in the evapor ator of the air conditioning system. This
produces a permanent odour when the air conditioning system is operating which can
only be eliminated through considerable effort and expense (replacement of
compressor).
´éĚ
Please refer to the information regarding the recirculated air mode for Climatic
´â× page 113 or for Climatronic ´â×page 116.
Using the air conditioning system economicallyThe compressor on the air conditioning syst em uses power from the engine when in
cooling mode which will effect the fuel consumption.
It recommended to open the windows or the doors of a vehicle for which the interior
has been strongly heated through the effect of direct sunlight in order to allow the
heated air to escape.
The cooling system should not be switched on while travelling when the window is
open.
The desired interior temperature can also be achieved without switching in the cooling
system just by switching to fresh air mode.
For the sake of the environment
When you economize on fuel, you also reduce pollutant emissions.
s3fg.2.book Page 109 Friday, April 30, 2010 12:17 PM
Page 111 of 287
Air conditioning system
110
Operational malfunctionsIf the cooling system does not operate at outside temperatures higher than +5 ┬░C,
there is a problem in the system. The reasons for this may be:´éĚ
The fuse on the air conditioning system has blown. Check the fuse, replace it if
necessary ´â×page 246.
´éĚ
The cooling system has switched off automatically for a short time because the
coolant temperature of the engine is too hot ´â×page 16.
If you are not able to rectify the operational problem yourself, or if the cooling capacity
decreases, switch the cooling system off. Contact a specialist garage.
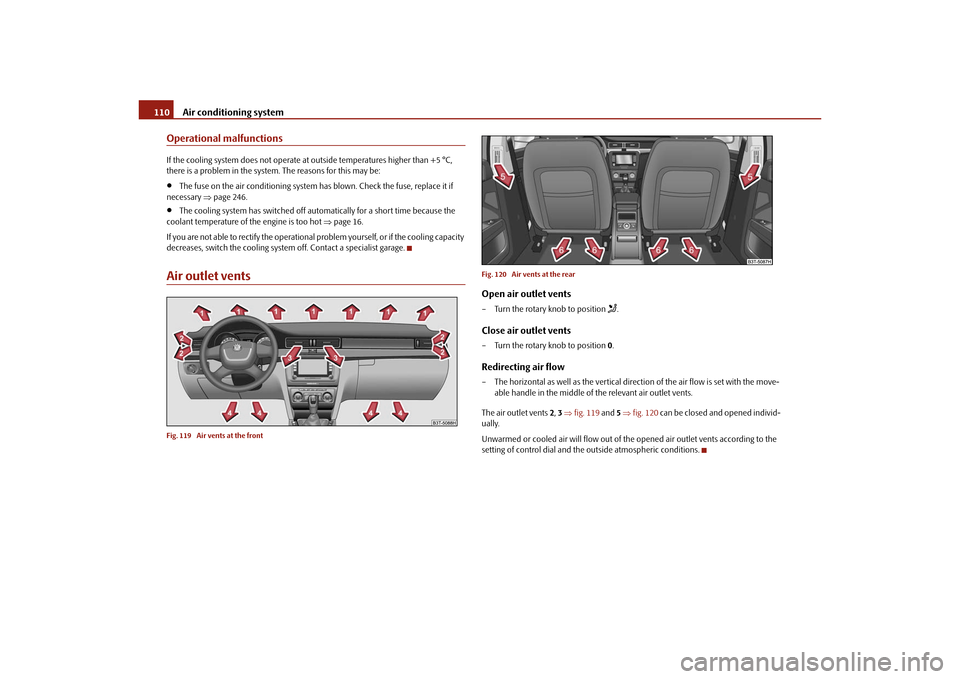
Air outlet ventsFig. 119 Air vents at the front Fig. 120 Air vents at the rear
Open air outlet ventsÔÇô Turn the rotary knob to position
´ü░.
Close air outlet ventsÔÇô Turn the rotary knob to position
0.Redirecting air flowÔÇô The horizontal as well as the vertical dire ction of the air flow is set with the move-
able handle in the middle of the relevant air outlet vents.
The air outlet vents 2, 3 ´â× fig. 119 and 5 ´â× fig. 120 can be closed and opened individ-
ually.
Unwarmed or cooled air will flow out of the opened air outlet vents according to the
setting of control dial and the outside atmospheric conditions.
s3fg.2.book Page 110 Friday, April 30, 2010 12:17 PM
Page 118 of 287
Air conditioning system117
Using the system
Safety
Driving Tips
General Maintenance
Breakdown assistance
Technical Data
Defrosting windscreenDefrosting windscreen - switching onÔÇô Press the button ´â×page 114, fig. 122.Defrosting windscreen - switching offÔÇô Once again press the button or the button .
The temperature control is controlled automatically. More air flows out of the air outlet
vents 1.Auxiliary heating (auxiliary heating and ventilation)*Description and important information
The auxiliary heating (auxiliary heating and ventilation) heats or
supplies the interior of the vehicl e with fresh air independent of the
engine.Auxiliary heating (auxiliary heating)
The auxiliary heating (auxiliary heating) functions in connection with the Climatic or
Climatronic.
It can be used when stationary, when engi ne is switched off for preheating of the
vehicle as well as while driving (e.g. during the heating phase of the engine).
The engine is also preheated when the vehicle is stationary and the engine is switched
off, if the auxiliary heating is switched on. This is not valid for the engines 3.6 ltr./191 kW
FSI and 1.9 ltr./77 kW TDI.
The auxiliary heating (auxiliary heating) wa rms up the coolant during the combustion
of fuel from the vehicle tank. The coolant warms up the air, which (if the blower speed
is not set to zero) flows in to the occupant compartment.
Auxiliary ve ntilation
The auxiliary ventilation enables fresh air to flow into the vehicle interior by switching
off the engine, whereby the interior temperature is effectively decreased (e.g. with the
vehicle parked in the sun).
WARNING
´éĚ
The auxiliary heating must never be operated in closed rooms - risk of
poisoning!
´éĚ
The auxiliary heating must not be running during refueling - risk of fire.
´éĚ
The exhaust pipe of the auxiliary heatin g is located on the underside of the
vehicle. Therefore do not place the vehicle, if you wish to operate the auxiliary
heating, in such a way that the exhaust gases of the auxiliary heating can come
easily into contact with inflammable mate rials (e.g. dry grass) or easily inflam-
mable substances (e .g. fuel run out).Note
´éĚ
If the auxiliary heating runs, the fuel consumption comes from the vehicle tank.
Therefore the auxiliary heating should not be operated, if there is very little fuel in the
tank.
´éĚ
The exhaust pipe of the auxiliary heating, which is located on the underside of the
vehicle, must not be clogged and th e exhaust flow must not be blocked.
´éĚ
If the auxiliary heating and ventilation is running, the vehicle battery discharges. If
the auxiliary heating and ventilation has been operated several times over a longer
period, the vehicle must be driven a few ki lometers in order to recharge the vehicle
battery.
´éĚ
The auxiliary heating only switches the bl ower on, if it has achieved a coolant
temperature of approx. 50 ┬░C.
´éĚ
At low outside temperatures, this can result in a formation of water vapour in the
area of the engine compartment. This is qu ite normal and is not an operating problem.
´éĚ
After switching off the auxiliary heating, the coolant pump runs for a short period.
´éĚ
The auxiliary heating and ventilation does not switch on or comes on, if the vehicle
battery indicates a low loading state.
´éĚ
The auxiliary heating (auxiliary heating) does not switch on, if the following was
shown in the information display or before switching off the ignition: Please refuel!
´éĚ
The air inlet in front of the windscreen must be free of ice, snow or leaves in order
to ensure that the auxiliary heating operates properly.
´Ç║
´Ç║
AUTO
s3fg.2.book Page 117 Friday, April 30, 2010 12:17 PM
Page 130 of 287

Starting-off and Driving129
Using the system
Safety
Driving Tips
General Maintenance
Breakdown assistance
Technical Data
Note
´éĚ
The parking aid does not operate if you are towing a trailer (applies to models
which feature a factory-fitted towing device*).
´éĚ
If a warning signal sounds for about 3 seconds after switching the ignition on and
engaging reverse gear, and there is no obstac le close to your vehicle, this indicates a
system fault. Have the fault rectified by a specialist workshop.
´éĚ
The sensors must be kept clean and free of ice to enable the parking aid to operate
properly.
Front and rear parking aid*
The parking aid provides a warning of obstacles in front and behind the
vehicle.Fig. 132 Activating the parkin g aid / parking aid: Detection range of the front sensorsThe audible parking aid determines the distance between the front or rear bumper and
an obstacle with the aid of ultrasound sens ors. The sensors are integrated in the front
and rear bumper. The signal tones for the fr ont parking aid sound higher as standard
than for the rear parking aid. The tones of the parking aid can be adapted in the menu
of the information display* ´â×page 25.
Range of sensors
The distance warning begins at a distance of about 120 cm from the obstacle in front
of the vehicle (area ´â×fig. 132 ) and about 160 cm from the obstacle behind the
vehicle (area ´â× fig. 132). The interval between the warning signals becomes
shorter as the clearance is reduced. A continuous tone sounds from
a distance of approx. 30 cm (area ) - danger area.
From this moment on do not continue driving! If the vehicle is equipped with a
factory-fitted towing device*, the border of the danger area starts - continuous tone -
5 cm further behind the vehicle. The vehi cle can be extended through an installed
detachable towing device.
On vehicles equipped with a factory-fitted radio* or navigation system*, the distance
to the obstruction is shown graphically in the display. On vehicles with a factory-fitted
towing device, the rear sensors are deactivated when towing a trailer. The driver is
informed about this by a graphic display (vehic le towing a trailer) in the radio* or the
navigation* display. The factory-fitted radio* or navigation system* can be set so that
the play function volume decreases when activating the parking aid, see Owner's
Manual radio* or navigation system*. This improves the audibility of the parking aid.
Activating
The parking aid is activated when the reverse gear is engaged and the ignition is
turned on or by pressing the button ´â×fig. 132 - the symbol
´üŹ lights up in the button.
The activation is confirmed by a brief acknowledgement signal.
Deactivating
The parking aid is deactivated after pressing the button┬░
´üŹ ´â× fig. 132 or at a speed of
more than 10 km/h - the symbol
´üŹ in the button is no longer illuminated.
WARNING
´éĚ
The parking aid is not a substitute for the driver paying proper attention and
it is always the driver's re sponsibility to take care when reversing the vehicle or
carrying out similar manoeuvres.
´éĚ
You should therefore satisfy yourself, before reversing, that there is no small
obstacle, such as a rock, thin post, trailer drawbar etc., in front or behind your
vehicle. Such an obstacle might not be within the range detected by the sensors.
´éĚ
Under certain circumstances, surfaces of certain objects and types of
clothing cannot reflect the signal of the parking aid. Thus, these objects or
people who wear such clothing are not recognised by the sensors of the parking
aid.
AA
AA
AB
s3fg.2.book Page 129 Friday, April 30, 2010 12:17 PM
Page 131 of 287

Starting-off and Driving
130Note
´éĚ
Only the front parking aid operates if yo u are towing a trailer (applies only to
models which feature a factory-fitted towing device*).
´éĚ
If a warning signal sounds for about 3 seco nds after activating the system and there
is no obstacle close to your vehicle, this indicates a system fault. The fault is confirmed
additionally when the symbol
´üŹ flashes in the button ´â×page 129, fig. 132 . Have the
fault rectified by a specialist workshop.
´éĚ
The sensors must be kept clean and free of ice to enable the parking aid to operate
properly.
´éĚ
If the parking aid is activated and the sele ctor lever of the automatic gearbox is in
the position , warning signal indicates interruption (vehicle can no longer move).
Park Assist*Description and important informationThe park assist assists you when parking in a suitable parallel parking space between
two vehicles or behind a vehicle.
The park assist automatically searches for suitable parking spaces after switching on
the ignition and when driving up to 30 km/h.
During the parking procedure the park assist only takes over the steering movements,
the pedals continue to be operated by the driver.
Function of the system is based on:´éĚ
Length and depth measurement of the parking spaces when driving
´éĚ
Evaluation of the size of the parking space
´éĚ
Definition of the correct position of the vehicle for parking
´éĚ
Calculating the line on which the vehicle drives backwards into the parking space
´éĚ
Actuation of the steering force assistance, automatic spinning of the wheels of the
front axle when parking.
WARNING
The park assist does not take away th e responsability from the driver when
parking.´éĚ
Pay particular attention to small children and animals as they would not be
recognised by the sensors of the parking aid.
´éĚ
Under certain circumstances, surfaces of certain objects and types of
clothing cannot reflect the signal of the park assist or the parking aid. Thus,
these objects or people who wear such clothing are not recognised by the
sensors of the parking aid.
´éĚ
The external sound source of the park assist and the parking aid can be
disruptively influenced and under unfavourable conditions, objects or people
cannot be recognised by the sensors of the parking aid.Caution
´éĚ
If other vehicles are parked behind or on the kurb, the park assist guides your
v ehicl e beyond the kurb or onto it. Make sure that the wheels or the wheel rims of your
vehicle are not damaged and if necessary intervene in time.
´éĚ
You should satisfy yourself before parking th at there is no small obstacle, such as a
rock, thin post, trailer drawbar etc., in front or behind your vehicle. Such an obstacle
might not be within the range detected by the sensors.
´éĚ
Under certain circumstances, surfaces or structures of certain objects such as wire
mesh fences, powder snow etc..., ca nnot be recognised by the system.
´éĚ
The evaluation of the parking place and the parking procedure depends on the
circumference of the wheels. The system does not function correctly if your vehicle is
mounted with wheels of no n-permissible size, snow chains or a temporary spare
wheel (in order to reach the nearest workshop). If the tyres other than those excepted
by the manufacturer are mounted, the resultin g position of the vehicle in the parking
space can differ slightly. This can be avoide d through new calibration of the system in
a specialist garage.
´éĚ
The accuracy of the evaluation for the parking space can be influenced by the
incorrectly determined outside temperature if the later is influenced by the thermal
radiation of the engine i.e for stop and go in a traffic jam.
AP
s3fg.2.book Page 130 Friday, April 30, 2010 12:17 PM
Page 132 of 287

Starting-off and Driving131
Using the system
Safety
Driving Tips
General Maintenance
Breakdown assistance
Technical Data
´éĚ
In order to avoid damaging th e sensors while cleaning with high-pressure cleaners
or steam jets, the sensors must only be directly sprayed for short periods while a
minimum distance of 10 cm must be observed.Note
´éĚ
A component of the park assist is the front and rear parking aid*.
´éĚ
The electronic stability programme (ESP) must always be switched on for the
parking procedure.
´éĚ
Only the front parking aid operates if yo u are towing a trailer (applies only to
models which feature a factory-fitted towing device*). This is why it is not possible to
park backwards with the help of the park assist when towing a trailer.
´éĚ
The sensors must be kept clean and free of ice to enable the parking aid to operate
properly.
Switch on display of the park as sist in the information display*Fig. 133 Switch on display of the park assist in the information display / information display:
Finding a suitable parking spaceSwitch on display of the park assist in the information display*ÔÇô Press the button ´â×fig. 133 .
ÔÇô Drive past the parking row up to maximum 30 km/h and with a distance of 0.5 m to 1.5 m ´â× fig. 133. Operate the turn signal for the driver's side if you wish to park on this side of the road.
In the information display* the search area
for the parking space is indicated on the
driver's side.
If the button is pressed above a speed of 30 km/h, the display appears in the display of
the instrument cluster as soon as you drive slower than 30 km/h.
Note
´éĚ
If the park assist is switched on, a yello w warning light lights up in the button.
´éĚ
The search for suitable parking spaces is automatic after switching on the ignition
at speeds of more than 30 km/h. Searchin g for a parking space is performed at the
same time on the driver and front passenger side.
´éĚ
If the sensors find a suitable parking space, they store its parameters until another
suitable parking space has been found or until a distance of 10 m had been driven after
finding the parking space. This is why it is possible to switch on the park assist after
driving past the parking space, the information on whether this parking space is suit-
able for parking appears in the information display*.
Parking with the help of the park assist and concluding the parking procedureFig. 134 Information display: the determined pa rking space with the information to drive on
and for engaging the reverse gear AA
AB
s3fg.2.book Page 131 Friday, April 30, 2010 12:17 PM