seat memory SKODA SUPERB 2010 2.G / (B6/3T) Owner's Manual
[x] Cancel search | Manufacturer: SKODA, Model Year: 2010, Model line: SUPERB, Model: SKODA SUPERB 2010 2.G / (B6/3T)Pages: 287, PDF Size: 16.59 MB
Page 49 of 287
Unlocking and locking
48
– Hold the inner button pressed for appr ox. 3 seconds. An audible signal sounds
and the height which was originally set is deleted from the memory of the control
unit, while the basic position of the top lid position is again set.
Note
The lid always opens at the height which was last stored in the memory of the
control unit.
The top position which is reached when the lid opens automatically, is always
lower than the maximum top position which can be reached when the lid is opened
manually.
Operational malfunctionsIf the battery is disconnected and reconnected while the boot lid is open, it is neces-
sary to activate the system of the electric b oot lid. Activating means the initialisation of
the control unit by manually closing the lid. Thus, the end position of the lid is stored
under fully closed in secured lock.
Possible malfunctions of the electric boot lid:
Examples of operational malfunctions
Note
Contact your specialist garage if there is a malfunction of the electric boot lid.
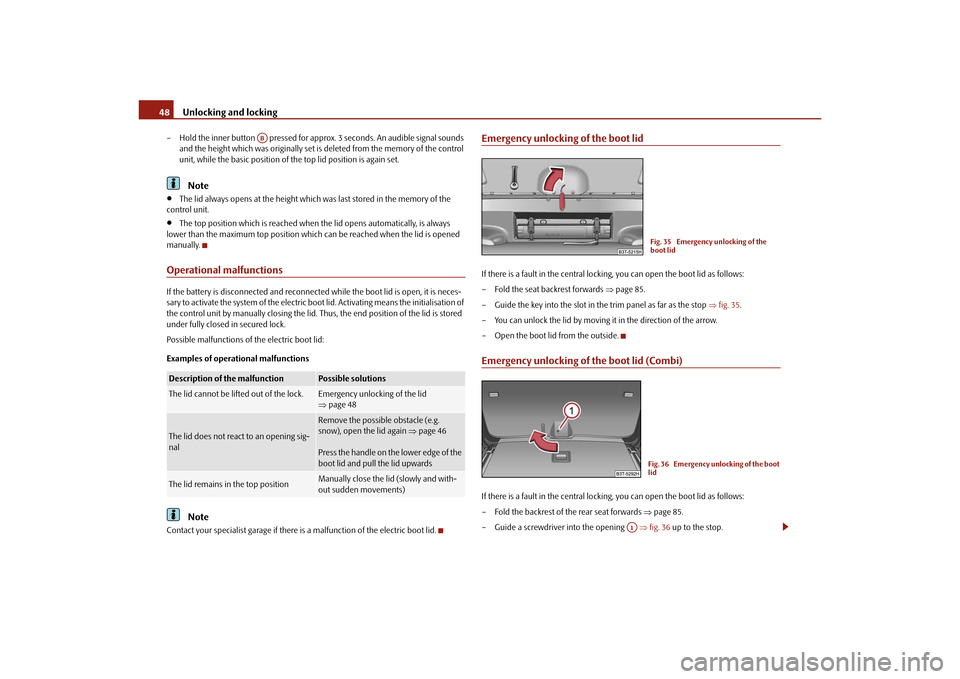
Emergency unlocking of the boot lidIf there is a fault in the central locking, you can open the boot lid as follows:
– Fold the seat backrest forwards page 85.
– Guide the key into the slot in th e trim panel as far as the stop fig. 35 .
– You can unlock the lid by moving it in the direction of the arrow.
– Open the boot lid from the outside.Emergency unlocking of the boot lid (Combi)If there is a fault in the central locking, you can open the boot lid as follows:
– Fold the backrest of the rear seat forwards page 85.
– Guide a screwdriver into the opening fig. 36 up to the stop.
Description of the malfunction
Possible solutions
The lid cannot be lifted out of the lock.
Emergency unlocking of the lid
page 48
The lid does not react to an opening sig-
nal
Remove the possible obstacle (e.g.
snow), open the lid again page 46
Press the handle on the lower edge of the
boot lid and pull the lid upwards
The lid remains in the top position
Manually close the lid (slowly and with-
out sudden movements)
AB
Fig. 35 Emergency unlocking of the
boot lidFig. 36 Emergency unlocking of the boot
lid
A1
s3fg.2.book Page 48 Friday, April 30, 2010 12:17 PM
Page 79 of 287
Lights and Visibility
78
Heating of the external mirror
– Turn the rotary knob to position
page 77, fig. 67 .
Adjusting left and right exterior mirrors simultaneously– Turn the rotary knob to position
. The movement of the mirror surface is identical
to the movement of the rotary knob.
The adjustment of both mirrors simultaneously or each individual mirror is possible in
the information display table on page 26 in the menu point Mirror adjust.
Adjusting the right-hand exterior mirror– Turn the rotary knob to position
. The movement of the mirror surface is identical
to the movement of the rotary knob.
Switching off operating control– Turn the rotary knob to position
.
Folding in both exterior mirrors*– Turn the rotary knob to position
.
Folding exterior mirrors* using the key with radio remote control– If all the windows are clos ed, press the unlock button page 49, fig. 37 on the
radio remote control for approx. 2 seconds.
Tilting surface of front passenger exterior mirror*
When the rotary knob is in position
page 77, fig. 67 and the reverse gear is
engaged, the surface of the mirror tilts down slightly. This provides an aid in seeing the
kerb of the pavement when parking the car.
The mirror returns into its initial position, after the rotary knob is moved out of the
position
and put into another position or if the speed is more than 15 km/h.
Memory for exterior mirrors*
On vehicles fitted with a memory for the driver seat, the relevant setting of the exterior
mirror is also stored automatically when the seat position is stored.
WARNING
Convex (curved outward) or spherical (differently curved) exterior mirrors
increase the vision field. They do, however, make objects appear smaller in the
mirror. These mirrors are only of limited use, therefore, for estimating distances
to the following vehicles.
Use whenever possible the interior rear mirror, for estimating the distances
to the following vehicles.Note
Do not touch the surfaces of the exterior mirrors if the exterior mirror heater is
switched on.
You can set the exterior mirrors by hand, if the power setting function fails at any
time by pressing on the edge of the mirror surface.
Contact your specialist garage if a fault exists with the power setting of the exterior
mirrors.
Exterior mirror with entry lighting*The lighting is positioned on the bo ttom edge of the exterior mirror.The light beam is aimed at the entry area of the front doors after the car is unlocked.
The light comes on after the doors have been locked or on opening the front door. The
lighting goes out about 30 seconds after th e doors are closed or if the ignition is
switched on.
If the doors remain open, the lighting go es out automatically after about 10 minutes
provided the ignition is not switched on.Automatic dimming exterior mirror*The exterior mirrors are dimmed together with the interior mirror. If the automatic
dimming is switched on, the mirror dims automatically depending on the light
striking the mirror from the rear.
A3
s3fg.2.book Page 78 Friday, April 30, 2010 12:17 PM
Page 83 of 287
Seats and Stowage
82
The seat backrests must not be angled too far back when driving otherwise
this will affect proper operation of the se at belts and of the airbag system - risk
of injury!Note
If the movement of the seat is inadvertently interrupted during an adjustment, once
again press the switch in the appropriate di rection and continue with the adjustment
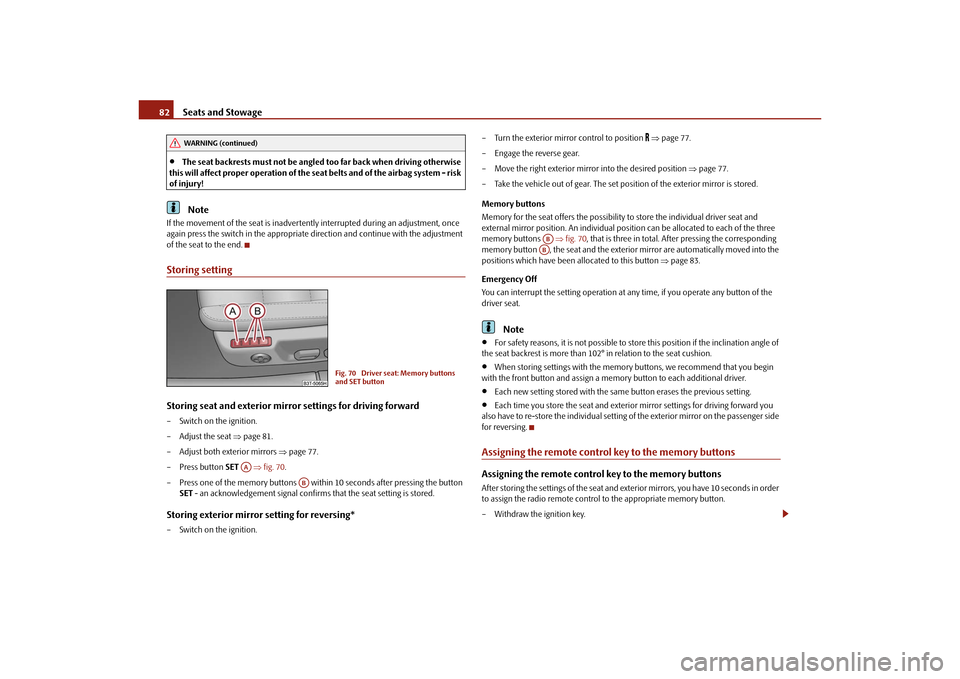
of the seat to the end.Storing settingStoring seat and exterior mirror settings for driving forward– Switch on the ignition.
– Adjust the seat page 81.
– Adjust both exterior mirrors page 77.
– Press button SET fig. 70 .
– Press one of the memory buttons within 10 seconds after pressing the button SET - an acknowledgement signal confirms that the seat setting is stored.Storing exterior mirror setting for reversing*– Switch on the ignition. – Turn the exterior mirror control to position
page 77.
– Engage the reverse gear.
– Move the right exterior mirror into the desired position page 77.
– Take the vehicle out of gear. The set position of the exterior mirror is stored.
Memory buttons
Memory for the seat offers the possibility to store the individual driver seat and
external mirror position. An individual posi tion can be allocated to each of the three
memory buttons fig. 70 , that is three in total. Af ter pressing the corresponding
memory button , the seat and the exterior mirror are automatically moved into the
positions which have been allocated to this button page 83.
Emergency Off
You can interrupt the setting operation at any time, if you operate any button of the
driver seat.
Note
For safety reasons, it is not possible to store this position if the inclination angle of
the seat backrest is more than 102 ° in relation to the seat cushion.
When storing settings with the memory buttons, we recommend that you begin
with the front button and assign a memory button to each additional driver.
Each new setting stored with the same button erases the previous setting.
Each time you store the seat and exterior mirror settings for driving forward you
also have to re-store the individual setting of the exterior mirror on the passenger side
for reversing.
Assigning the remote contro l key to the memory buttonsAssigning the remote control key to the memory buttonsAfter storing the settings of the seat and exterior mirrors, you have 10 seconds in order
to assign the radio remote control to the appropriate memory button.
– Withdraw the ignition key.
WARNING (continued)
Fig. 70 Driver seat: Memory buttons
and SET button
AA
AB
ABAB
s3fg.2.book Page 82 Friday, April 30, 2010 12:17 PM
Page 84 of 287
Seats and Stowage83
Using the system
Safety
Driving Tips
General Maintenance
Breakdown assistance
Technical Data
– Press the unlock button
page 49, after the successful assignment an audible
signal will sound. The setting is stored with the memory button which you have
selected.
Assigning the remote control key to the memory buttons on the KESSY*
systemOn vehicles which are equipped with the KESSY* system, the following procedure for
assigning the remote control key to the memory buttons exists for electrically adjust-
able front seats and mirrors*.
– Switch the ignition off within 10 seconds after storing the setting.
– Open the driver door.
– Press the unlock button on the remo te control key within 10 seconds.
If you wish to be able to retrieve the settings which are stored in the memory by also
using the radio remote control, you have to assign the radio remote control to a
memory button in each case.
If you wish, you can obtain an additional remote control key from an authorised Škoda
Service partner and then assign the remote control key to another memory button.
Note
If the radio remote control had previously been assigned to another memory
button, this setting is then erased by the new assignment.
If you assign the radio remote control to a memory button which has already been
assigned to a radio remote control, the ol d assignment is also replaced by a new
assignment in this case.
The assignment of the radio remote co ntrol to a memory button is retained,
however, after reassigning the seats and exterior mirrors.
After the successful assignment, the turn si gnal lights flash and an audible signal
will sound as a confirmation. The setting is stored with the memory button which you
have selected.
Retrieving settings of the seat and mirrors
You can retrieve the stored settings either with the memory buttons or
with the remote control*.Retrieving settings with memory buttons– In order to retrieve the stored setting, you have two possibilities:
– One-touch automatic memory: briefly press the desired memory button
page 82, fig. 70 . The seat and exterior mirror are moved automatically into the
stored positions (this applies only if the ignition is switched on and the speed is less
than 5 km/h).
– Memory keying : Press and hold the desired memory button pressed long
enough until the seat and the exterior mi rror are moved into the stored positions.Retrieving settings with remote control– If the driver door is closed and the ignition is switched off, briefly press the unlock
button of the radio remote control page 49 and then open the driver door.
– The seat and exterior mirrors now move automatically into the stored positions.Retrieving setting of exterior mirror for reversing*– Turn the rotary knob for the exterior mirror setting into the position
page 77
before engaging the reverse gear.
The mirror returns into its initial position, after the rotary knob is moved out of the
position
and put into another position or if the speed is more than 15 km/h.
Emergency Off
You can interrupt the setting operation at any time, if you operate any button of the
driver seat.
AB
AB
s3fg.2.book Page 83 Friday, April 30, 2010 12:17 PM
Page 160 of 287

Communication159
Using the system
Safety
Driving Tips
General Maintenance
Breakdown assistance
Technical Data
In order to enable the music playback via Bluetooth
®, it is necessary to first connect
the device to be connected with the hands-free system in the menu Phone -
Bluetooth - Media player .
The music playback process is performed on the connected device.
Note
The device to be connected must support the Bluetooth
® profile A2DP, see Owner's
manual of the device to be connected.
MultimediaInputs AUX-IN* and MDI*The input AUX-IN is located below the armrest* of the front seats and is marked with
.
The input MDI is located in the storage compartment on the front passenger side.
The inputs AUX-IN and MDI connect the ex ternal audio sources (e.g. iPod or MP3
player) and play back music fr om these devices via your radio* or navigation system*
installed in the factory.
The description of the operation can be found in the relevant Owner's Manual of your
radio* or your navigation*.Note
The loudspeakers in the vehicle are matched to a power output of the radio and
navigation system of 4x 20°W.
For the equipment sound system*, the loudspeakers are matched to a power
output of the amplifier of 4x40°W + 6x20 W.
CD changer*The CD changer for the radio and navigation system is located in the right side
compartment of the luggage compartment.Loading a CD– Touch the button fig. 146 and guide the CD (compact disc) into the CD-case
. The CD is automatically loaded onto the next free position in the CD-changer.
The LED in the correspondin g button stops flashing.Loading all CDs– Hold the button pressed and guide all CDs one after the other into the CD-case
. The LEDs in the buttons are no longer flashing.Loading a CD to one definite position– Briefly touch the button . The LEDs in the buttons light up at the memory spaces, which are already assigned and flash in the case of free memory spaces.
– Touch the desired button and guide the CD into the CD-case .Ejecting a CD– Briefly touch the button , in order to eject a CD. For assigned memory spaces, now the LEDs light up in the buttons .
– Touch the corresponding button . The CD is ejected.
Fig. 146 The CD changer
AC
AB
AD
AC
AB
AD
AC
AD
AD
AB
AA
AD
AD
s3fg.2.book Page 159 Friday, April 30, 2010 12:17 PM
Page 278 of 287
Index277
Using the system
Safety
Driving Tips
General Maintenance
Breakdown assistance
Technical Data
Index
AAbroad . . . . . . . . . . . . . . . . . . . . . . . . . . . . . . . . . . . . . . 200
ABS . . . . . . . . . . . . . . . . . . . . . . . . . . . . . . . . . . . . . . . . . 191
Warning light . . . . . . . . . . . . . . . . . . . . . . . . . . . . . 34
Accessories . . . . . . . . . . . . . . . . . . . . . . . . . . . . . . . . . . 234
Active driver-steering recommendation . . . . . . . 189
Adaptive headlights . . . . . . . . . . . . . . . . . . . . . . . . . . . 63 Warning light . . . . . . . . . . . . . . . . . . . . . . . . . . . . . 29
Adjusting seats . . . . . . . . . . . . . . . . . . . . . . . . . . 80, 162 electrically . . . . . . . . . . . . . . . . . . . . . . . . . . . . . . . . 81
Adjusting the steering wheel . . . . . . . . . . . . . . . . . . 121
AHL . . . . . . . . . . . . . . . . . . . . . . . . . . . . . . . . . . . . . . . . . . 63
Air conditioning system . . . . . . . . . . . . . . . . . . . . . . 111 Recirculated air mode . . . . . . . . . . . . . . . . . . . . 113
Airbag . . . . . . . . . . . . . . . . . . . . . . . . . . . . . . . . . . . . . . 170 Deployment . . . . . . . . . . . . . . . . . . . . . . . . . . . . . 171
Front airbag . . . . . . . . . . . . . . . . . . . . . . . . . . . . . . 171
Head airbag . . . . . . . . . . . . . . . . . . . . . . . . . . . . . . 176
Knee airbag . . . . . . . . . . . . . . . . . . . . . . . . . . . . . . 173
Side airbag . . . . . . . . . . . . . . . . . . . . . . . . . . . . . . . 174
Warning light . . . . . . . . . . . . . . . . . . . . . . . . . . . . . 30
Airbag system . . . . . . . . . . . . . . . . . . . . . . . . . . . . . . . 170 Warning light . . . . . . . . . . . . . . . . . . . . . . . . . . . . . 30
Alarm . . . . . . . . . . . . . . . . . . . . . . . . . . . . . . . . . . . . . . . . 50
Alternator Warning light . . . . . . . . . . . . . . . . . . . . . . . . . . . . . 36
Antilock brake system . . . . . . . . . . . . . . . . . . . . . . . . 191
Antilock brake system (ABS) Warning light . . . . . . . . . . . . . . . . . . . . . . . . . . . . . 34 Anti-theft alarm system . . . . . . . . . . . . . . . . . . . . . . . . 50
Ashtray . . . . . . . . . . . . . . . . . . . . . . . . . . . . . . . . . . . . . . . 99
Assigning the remote control key to the memory buttons
82
Auto Check Control . . . . . . . . . . . . . . . . . . . . . . . . . . . 24
Auto Computer . . . . . . . . . . . . . . . . . . . . . . . . . . . . . . . 19
Automatic driving lamp control . . . . . . . . . . . . . . . . 61
Automatic gearbox Emergency programme . . . . . . . . . . . . . . . . . . . 140
Automatic gearbox DSG . . . . . . . . . . . . . . . . . . . . . . 136 Kickdown . . . . . . . . . . . . . . . . . . . . . . . . . . . . . . . . 138
Selector lever-emergency unlocking . . . . . . . 140
Tiptronic . . . . . . . . . . . . . . . . . . . . . . . . . . . . . . . . . 139
Automatic rear window wiper (Combi) . . . . . . . . . . 75
Automatic seat adjustment . . . . . . . . . . . . . . . . . . . . 82
Automatic vehicle wash systems . . . . . . . . . . . . . . 205
Automatic wiper/washer system . . . . . . . . . . . . . . . 73
AUX-IN . . . . . . . . . . . . . . . . . . . . . . . . . . . . . . . . . . . . . . 159
Avoiding damage to your vehicle . . . . . . . . . . . . . . 200
BBattery . . . . . . . . . . . . . . . . . . . . . . . . . . . . . . . . . . 36, 222 change . . . . . . . . . . . . . . . . . . . . . . . . . . . . . . . . . . 226
Charge . . . . . . . . . . . . . . . . . . . . . . . . . . . . . . . . . . . 225
Inspecting the electrolyte level . . . . . . . . . . . . . 225
Operation in winter . . . . . . . . . . . . . . . . . . . . . . . 225
Before setting off . . . . . . . . . . . . . . . . . . . . . . . . . . . . . 161
Belt Warning light . . . . . . . . . . . . . . . . . . . . . . . . . . . . . . 35 Belt tensioners . . . . . . . . . . . . . . . . . . . . . . . . . . . . . . 168
Belts . . . . . . . . . . . . . . . . . . . . . . . . . . . . . . . . . . . . . . . 165
Bonnet . . . . . . . . . . . . . . . . . . . . . . . . . . . . . . . . . . 13, 215
Warning light . . . . . . . . . . . . . . . . . . . . . . . . . . . . . . 34
Boot lid . . . . . . . . . . . . . . . . . . . . . . . . . . . . . . . . . . . . . . . 44 Lighting . . . . . . . . . . . . . . . . . . . . . . . . . . . . . . . . . . . 69
Warning light . . . . . . . . . . . . . . . . . . . . . . . . . . . . . . 35
Brake Handbrake . . . . . . . . . . . . . . . . . . . . . . . . . . . . . . 124
Warning light . . . . . . . . . . . . . . . . . . . . . . . . . . . . . . 35
Brake Assist . . . . . . . . . . . . . . . . . . . . . . . . . . . . . . . . . 191
Brake booster . . . . . . . . . . . . . . . . . . . . . . . . . . . . . . . 190
Brake fluid . . . . . . . . . . . . . . . . . . . . . . . . . . . . . . . . . . 221
Brake pads Warning light . . . . . . . . . . . . . . . . . . . . . . . . . . . . . . 35
Brakes . . . . . . . . . . . . . . . . . . . . . . . . . . . . . . . . . . . . . . 189
Bulbs Warning light . . . . . . . . . . . . . . . . . . . . . . . . . . . . . . 29
Button for the central locking system . . . . . . . . . . . 42
Button in the driver's door Power windows . . . . . . . . . . . . . . . . . . . . . . . . . . . 52
CCar state . . . . . . . . . . . . . . . . . . . . . . . . . . . . . . . . . . . . . . 24
Catalytic converter . . . . . . . . . . . . . . . . . . . . . . . . . . 196
CD changer . . . . . . . . . . . . . . . . . . . . . . . . . . . . . . . . . 159
Central locking system . . . . . . . . . . . . . . . . . . . . . . . . . 38
Changing a wheel . . . . . . . . . . . . . . . . . . . . . . . . . . . 237
Changing bulbs . . . . . . . . . . . . . . . . . . . . . . . . . . . . . 251
s3fg.2.book Page 277 Friday, April 30, 2010 12:17 PM