window SKODA SUPERB 2010 2.G / (B6/3T) Owner's Manual
[x] Cancel search | Manufacturer: SKODA, Model Year: 2010, Model line: SUPERB, Model: SKODA SUPERB 2010 2.G / (B6/3T)Pages: 287, PDF Size: 16.59 MB
Page 4 of 287
Contents3
Using the system
Safety
Driving Tips
General Maintenance
Breakdown assistance
Technical Data
ContentsLayout of this Owner's Manual
(explanations)
. . . . . . . . . . . . . . . . . . . . . . . . . .
Using the system
. . . . . . . . . . . . . . . . . . . . . .
Cockpit
. . . . . . . . . . . . . . . . . . . . . . . . . . . . . . . . . . . . . . . .
Overview . . . . . . . . . . . . . . . . . . . . . . . . . . . . . . . . . . . .
The brief instruction
. . . . . . . . . . . . . . . . . . . . . . . . . .
Basic functions and important information . . . . .
Instruments and warning lights
. . . . . . . . . . . . . . .
Overview of the instrument cluster . . . . . . . . . . . . .
Engine revolutions counter . . . . . . . . . . . . . . . . . . . .
Speedometer . . . . . . . . . . . . . . . . . . . . . . . . . . . . . . . .
Coolant temperature gauge . . . . . . . . . . . . . . . . . . .
Fuel gauge . . . . . . . . . . . . . . . . . . . . . . . . . . . . . . . . . . .
Counter for distance driven . . . . . . . . . . . . . . . . . . .
Service Interval Display . . . . . . . . . . . . . . . . . . . . . . .
Digital clock . . . . . . . . . . . . . . . . . . . . . . . . . . . . . . . . . .
Shift recommendation for changing gears* . . . . .
Multi-functional indicator (onboard computer)*
Information display* . . . . . . . . . . . . . . . . . . . . . . . . . .
Auto Check Control* . . . . . . . . . . . . . . . . . . . . . . . . . .
Warning lights . . . . . . . . . . . . . . . . . . . . . . . . . . . . . . . .
Unlocking and locking
. . . . . . . . . . . . . . . . . . . . . . . .
Key . . . . . . . . . . . . . . . . . . . . . . . . . . . . . . . . . . . . . . . . . .
Changing the battery in the remote control key .
Electronic immobiliser . . . . . . . . . . . . . . . . . . . . . . . .
Child safety lock . . . . . . . . . . . . . . . . . . . . . . . . . . . . . .
Central locking system . . . . . . . . . . . . . . . . . . . . . . . .
Remote control . . . . . . . . . . . . . . . . . . . . . . . . . . . . . . .
Description . . . . . . . . . . . . . . . . . . . . . . . . . . . . . . . . . .
Unlocking and locking car . . . . . . . . . . . . . . . . . . . . .
Synchronisation of the remote control . . . . . . . . . .
Anti-theft alarm system* . . . . . . . . . . . . . . . . . . . . . . Power windows . . . . . . . . . . . . . . . . . . . . . . . . . . . . . . .
Electric sliding/tilting roof* . . . . . . . . . . . . . . . . . . . . .
Panoramic sliding roof* (Combi) . . . . . . . . . . . . . . .
Lights and Visibility
. . . . . . . . . . . . . . . . . . . . . . . . . . . .
Lights . . . . . . . . . . . . . . . . . . . . . . . . . . . . . . . . . . . . . . . .
Interior lighting . . . . . . . . . . . . . . . . . . . . . . . . . . . . . . .
Luggage compartment light (Combi) . . . . . . . . . . . .
Visibility . . . . . . . . . . . . . . . . . . . . . . . . . . . . . . . . . . . . . .
Windshield wiper and wash system . . . . . . . . . . . . .
Rear-view mirror . . . . . . . . . . . . . . . . . . . . . . . . . . . . . .
Exterior mirror . . . . . . . . . . . . . . . . . . . . . . . . . . . . . . . .
Exterior mirror with entry lighting* . . . . . . . . . . . . .
Automatic dimming exterior mirror* . . . . . . . . . . . .
Seats and Stowage
. . . . . . . . . . . . . . . . . . . . . . . . . . . . .
Front seats . . . . . . . . . . . . . . . . . . . . . . . . . . . . . . . . . . . .
Adjusting front seats electrically* . . . . . . . . . . . . . . .
Head restraints . . . . . . . . . . . . . . . . . . . . . . . . . . . . . . . .
Middle rear head restraint . . . . . . . . . . . . . . . . . . . . .
Rear seats . . . . . . . . . . . . . . . . . . . . . . . . . . . . . . . . . . . .
luggage compartment . . . . . . . . . . . . . . . . . . . . . . . . .
Variable loading floor in the luggage compartment*
(Combi) . . . . . . . . . . . . . . . . . . . . . . . . . . . . . . . . . . . . . .
Net partition* (Combi) . . . . . . . . . . . . . . . . . . . . . . . .
The roof rack* . . . . . . . . . . . . . . . . . . . . . . . . . . . . . . . .
Cup holder . . . . . . . . . . . . . . . . . . . . . . . . . . . . . . . . . . .
Ashtray . . . . . . . . . . . . . . . . . . . . . . . . . . . . . . . . . . . . . . .
Cigarette lighter*, power sockets . . . . . . . . . . . . . . .
Storage compartments . . . . . . . . . . . . . . . . . . . . . . . .
Air conditioning system
. . . . . . . . . . . . . . . . . . . . . . .
Introduction . . . . . . . . . . . . . . . . . . . . . . . . . . . . . . . . . .
Air outlet vents . . . . . . . . . . . . . . . . . . . . . . . . . . . . . . . .
Climatic (semi-automatic air conditioning system)
Climatronic* (automatic air conditioning) . . . . . . .
Auxiliary heating (auxiliary heating and ventilation)*
Starting-off and Driving
. . . . . . . . . . . . . . . . . . . . . . .
Setting steering wheel position . . . . . . . . . . . . . . . .
Ignition lock . . . . . . . . . . . . . . . . . . . . . . . . . . . . . . . . . .
Starting the engine . . . . . . . . . . . . . . . . . . . . . . . . . . . .
KESSY system* . . . . . . . . . . . . . . . . . . . . . . . . . . . . . . .
Parking aid* . . . . . . . . . . . . . . . . . . . . . . . . . . . . . . . . . .
Park Assist* . . . . . . . . . . . . . . . . . . . . . . . . . . . . . . . . . .
Cruise control system (CCS)* . . . . . . . . . . . . . . . . . .
Automatic gearbox DSG*
. . . . . . . . . . . . . . . . . . . . .
Automatic gearbox DSG* . . . . . . . . . . . . . . . . . . . . . .
Communication
. . . . . . . . . . . . . . . . . . . . . . . . . . . . . . .
Multifunction steering wheel* . . . . . . . . . . . . . . . . .
Mobile phones and two-way radio systems . . . . .
Universal telephone preinstallation GSM II* . . . . .
Voice control . . . . . . . . . . . . . . . . . . . . . . . . . . . . . . . . .
Music playback via Bluetooth® . . . . . . . . . . . . . . . .
Universal telephone preinstallation GSM IIl* . . . .
Voice control . . . . . . . . . . . . . . . . . . . . . . . . . . . . . . . . .
Connection to the internet . . . . . . . . . . . . . . . . . . . .
Music playback via Bluetooth® . . . . . . . . . . . . . . . .
Multimedia . . . . . . . . . . . . . . . . . . . . . . . . . . . . . . . . . .
Safety
. . . . . . . . . . . . . . . . . . . . . . . . . . . . . . . . . . . . . . .
Passive Safety
. . . . . . . . . . . . . . . . . . . . . . . . . . . . . . . . .
Basic information . . . . . . . . . . . . . . . . . . . . . . . . . . . . .
Correct seated position . . . . . . . . . . . . . . . . . . . . . . .
Seat belts
. . . . . . . . . . . . . . . . . . . . . . . . . . . . . . . . . . . . . .
Why seat belts? . . . . . . . . . . . . . . . . . . . . . . . . . . . . . . .
The physical principle of a frontal collision . . . . . .
Important safety information regarding the use of seat
belts . . . . . . . . . . . . . . . . . . . . . . . . . . . . . . . . . . . . . . . . .
How are seat belts correctly fastened? . . . . . . . . . .
6799101015151516161617171819192324273737373838384949495050
52555760606770717377777878808081848485879295979899100100109109110111114117
121121121122125128130133136136142142145145150151152157158158159161161161162165165165166167
s3fg.2.book Page 3 Friday, April 30, 2010 12:17 PM
Page 10 of 287
Cockpit9
Using the system
Safety
Driving Tips
General Maintenance
Breakdown assistance
Technical Data
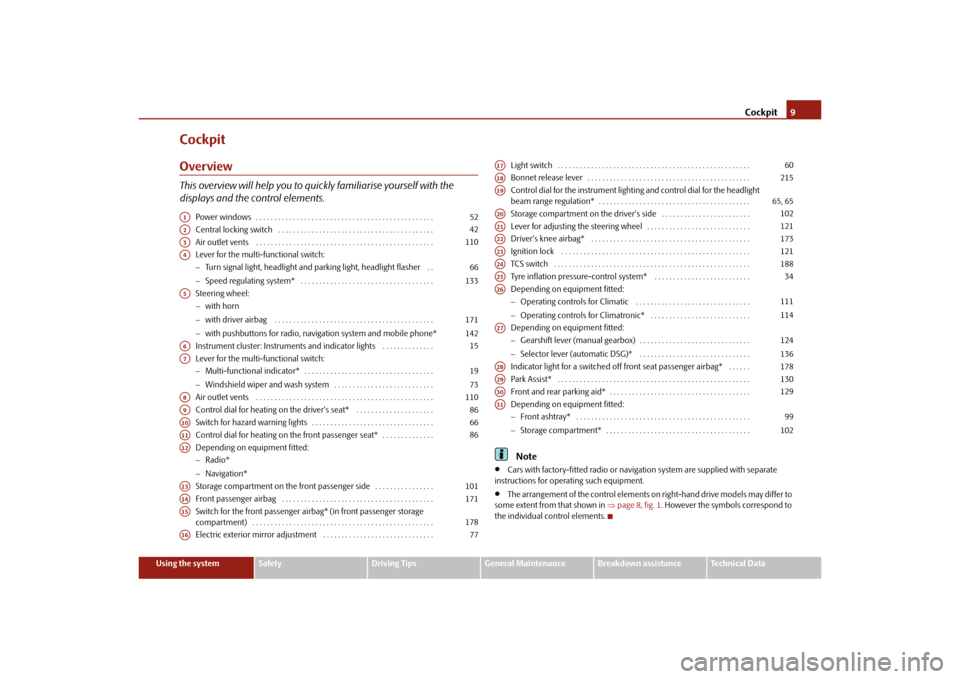
CockpitOverviewThis overview will help you to quic kly familiarise yourself with the
displays and the control elements.
Power windows . . . . . . . . . . . . . . . . . . . . . . . . . . . . . . . . . . . . . . . . . . . . . . . .
Central locking switch . . . . . . . . . . . . . . . . . . . . . . . . . . . . . . . . . . . . . . . . . .
Air outlet vents . . . . . . . . . . . . . . . . . . . . . . . . . . . . . . . . . . . . . . . . . . . . . . . .
Lever for the multi-functional switch:
Turn signal light, headlight and parking light, headlight flasher . .
Speed regulating system* . . . . . . . . . . . . . . . . . . . . . . . . . . . . . . . . . . . .
Steering wheel:
with horn
with driver airbag . . . . . . . . . . . . . . . . . . . . . . . . . . . . . . . . . . . . . . . . . . .
with pushbuttons for radio, navi gation system and mobile phone*
Instrument cluster: Instruments and indicator lights . . . . . . . . . . . . . .
Lever for the multi-functional switch:
Multi-functional indicator* . . . . . . . . . . . . . . . . . . . . . . . . . . . . . . . . . . .
Windshield wiper and wash system . . . . . . . . . . . . . . . . . . . . . . . . . . .
Air outlet vents . . . . . . . . . . . . . . . . . . . . . . . . . . . . . . . . . . . . . . . . . . . . . . . .
Control dial for heating on the driver's seat* . . . . . . . . . . . . . . . . . . . . .
Switch for hazard warning lights . . . . . . . . . . . . . . . . . . . . . . . . . . . . . . . . .
Control dial for heating on the front passenger seat* . . . . . . . . . . . . . .
Depending on equipment fitted:
Radio*
Navigation*
Storage compartment on the front passenger side . . . . . . . . . . . . . . . .
Front passenger airbag . . . . . . . . . . . . . . . . . . . . . . . . . . . . . . . . . . . . . . . . .
Switch for the front passenger ai rbag* (in front passenger storage
compartment) . . . . . . . . . . . . . . . . . . . . . . . . . . . . . . . . . . . . . . . . . . . . . . . . .
Electric exterior mirror adjustment . . . . . . . . . . . . . . . . . . . . . . . . . . . . . . Light switch . . . . . . . . . . . . . . . . . . . . . . . . . . . . . . . . . . . . . . . . . . . . . . . . . . . .
Bonnet release lever . . . . . . . . . . . . . . . . . . . . . . . . . . . . . . . . . . . . . . . . . . . .
Control dial for the instrument lighting and control dial for the headlight
beam range regulation* . . . . . . . . . . . . . . . . . . . . . . . . . . . . . . . . . . . . . . . . .
Storage compartment on the driver's side . . . . . . . . . . . . . . . . . . . . . . . .
Lever for adjusting the steering wheel . . . . . . . . . . . . . . . . . . . . . . . . . . . .
Driver's knee airbag* . . . . . . . . . . . . . . . . . . . . . . . . . . . . . . . . . . . . . . . . . . .
Ignition lock . . . . . . . . . . . . . . . . . . . . . . . . . . . . . . . . . . . . . . . . . . . . . . . . . . .
TCS switch . . . . . . . . . . . . . . . . . . . . . . . . . . . . . . . . . . . . . . . . . . . . . . . . . . . . .
Tyre inflation pressure-control system* . . . . . . . . . . . . . . . . . . . . . . . . . .
Depending on equipment fitted:
Operating controls for Climatic . . . . . . . . . . . . . . . . . . . . . . . . . . . . . . .
Operating controls for Climatronic* . . . . . . . . . . . . . . . . . . . . . . . . . . .
Depending on equipment fitted:
Gearshift lever (manual gearbox) . . . . . . . . . . . . . . . . . . . . . . . . . . . . . .
Selector lever (automatic DSG)* . . . . . . . . . . . . . . . . . . . . . . . . . . . . . .
Indicator light for a switched off front seat passenger airbag* . . . . . .
Park Assist* . . . . . . . . . . . . . . . . . . . . . . . . . . . . . . . . . . . . . . . . . . . . . . . . . . . .
Front and rear parking aid* . . . . . . . . . . . . . . . . . . . . . . . . . . . . . . . . . . . . . .
Depending on equipment fitted:
Front ashtray* . . . . . . . . . . . . . . . . . . . . . . . . . . . . . . . . . . . . . . . . . . . . . . .
Storage compartment* . . . . . . . . . . . . . . . . . . . . . . . . . . . . . . . . . . . . . . .
Note
Cars with factory-fitted radio or naviga tion system are supplied with separate
instructions for operating such equipment.
The arrangement of the control elements on right-hand drive models may differ to
some extent from that shown in page 8, fig. 1 . However the symbols correspond to
the individual control elements.
A1
52
A2
42
A3
110
A4
66133
A5
171142
A6
15
A7
1973
A8
110
A9
86
A10
66
A11
86
A12A13
101
A14
171
A15
178
A16
77
A17
60
A18
215
A19
65, 65
A20
102
A21
121
A22
173
A23
121
A24
188
A25
34
A26
111114
A27
124136
A28
178
A29
130
A30
129
A31
99102
s3fg.2.book Page 9 Friday, April 30, 2010 12:17 PM
Page 14 of 287
The brief instruction13
Using the system
Safety
Driving Tips
General Maintenance
Breakdown assistance
Technical Data
Slow wipe
Fast wipe
one time wipe
Automatic wipe/wash
Rear window wiper Intermittent wipe - every 6 seconds
Automatic wipe/wash
Further information page 73, “Windshield wiper and wash system”.
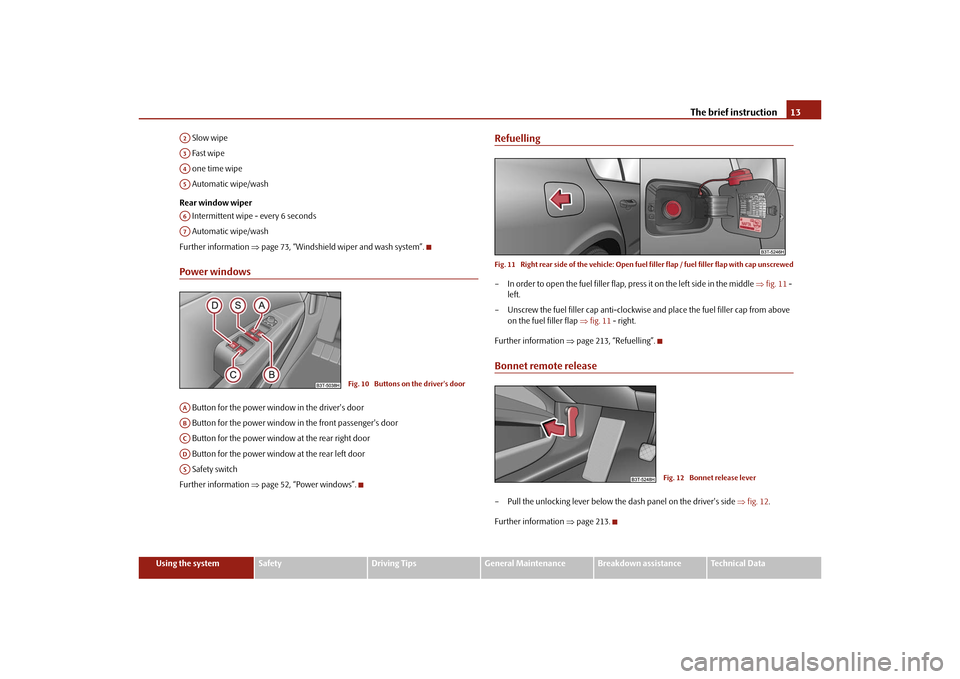
Power windows Button for the power window in the driver's door
Button for the power window in the front passenger's door
Button for the power window at the rear right door
Button for the power window at the rear left door
Safety switch
Further information page 52, “Power windows”.
RefuellingFig. 11 Right rear side of the ve hicle: Open fuel filler flap / fuel filler flap with cap unscrewed– In order to open the fuel filler flap, press it on the left side in the middle fig. 11 -
left.
– Unscrew the fuel filler ca p anti-clockwise and place the fuel filler cap from above
on the fuel filler flap fig. 11 - right.
Further information page 213, “Refuelling”.Bonnet remote release– Pull the unlocking lever below the dash panel on the driver's side fig. 12 .
Further information page 213.
A2A3A4A5A6A7
Fig. 10 Buttons on the driver's door
AAABACADAS
Fig. 12 Bonnet release lever
s3fg.2.book Page 13 Friday, April 30, 2010 12:17 PM
Page 27 of 287
Instruments and warning lights
26
Lights and Visibility
Here you can set how long the light should stay on for the function Coming/Leaving
Home. Furthermore you can here switch on or off the functions daylight driving lights,
automatic rear window wiper, conven ience turn signal and travel mode.
After selecting the menu Fa c t o r y s e t t i n g the factory setting is established again.
After selecting the menu point travel mode, you can activate / deactivate the mode
“tourist light”. This mode makes it possible to drive in countries with opposing traffic system, driving on the left/right, without dazzling the oncoming vehicles. Further infor-
mation
page 64, “Tourist light”.
Time
Here you can set the time, the time format (12 or 24 hour indicator) and the time
change summer/winter time.
Winter tyres
Here you can set at which speed a warning signal should sound. This function is used
for e.g winter tyres with the permissible maximum speed less than the maximum
speed of the vehicle.
When exceeding the speed, the following is displayed on the information display*:
Winter tyres max. speed ... km/h
Measures
Here you can set the units for temperat ure, consumption and distance driven.
Assistant
Here you can adjust the tones of the acoustic signals of the parking aid*.
Second speed
Here you can switch on the display of the second speed in mph or in km/h
2).
Service
Here you can have the kilometers still to be driven and the days until the following
service interval shown and the Service Interval Display reset.
Factory Setting
After selecting the menu Factory Setting the factory setting of the information display
is established again.
Rain closing
On vehicles with rain sensor you can switch on or off the
function for automatic closing of the windows and the
sliding/tilting roof in case of ra in and locked vehicle. If it is
not raining and the function is set, the windows including
the sliding/tilting roof are closed automatically after
approx. 12 hours.
Door open
Here you can switch on or off the functions for opening a
single door and automatic closin g, this also applies to the
KESSY system*.
ATA c o n fi r m
Here you can set if a signal to ne should sound additionally
when activating or deactivating the anti-theft alarm system
.
Window op.
Here you can set the convenience mode only for the driver
window or for all the windows.
Mirror down
Here you can switch on or off the function for mirror low-
ering on the front passenger side when engaging the
reverse gear
a).
a)This function is only available on vehicles with an electrically adjustable driver seat.Mirror adjust.
Here you can switch on or off the function for left and right
exterior mirror adjustment simultaneously.
Fa cto r y se tt ing
After selecting this menu the convenience setting is reset
to factory setting. The following is displayed in the infor-
mation display:
Factory setting for convenience is set
2)Valid for countries where the values ar e indicated in British measuring units.
s3fg.2.book Page 26 Friday, April 30, 2010 12:17 PM
Page 38 of 287
Unlocking and locking37
Using the system
Safety
Driving Tips
General Maintenance
Breakdown assistance
Technical Data
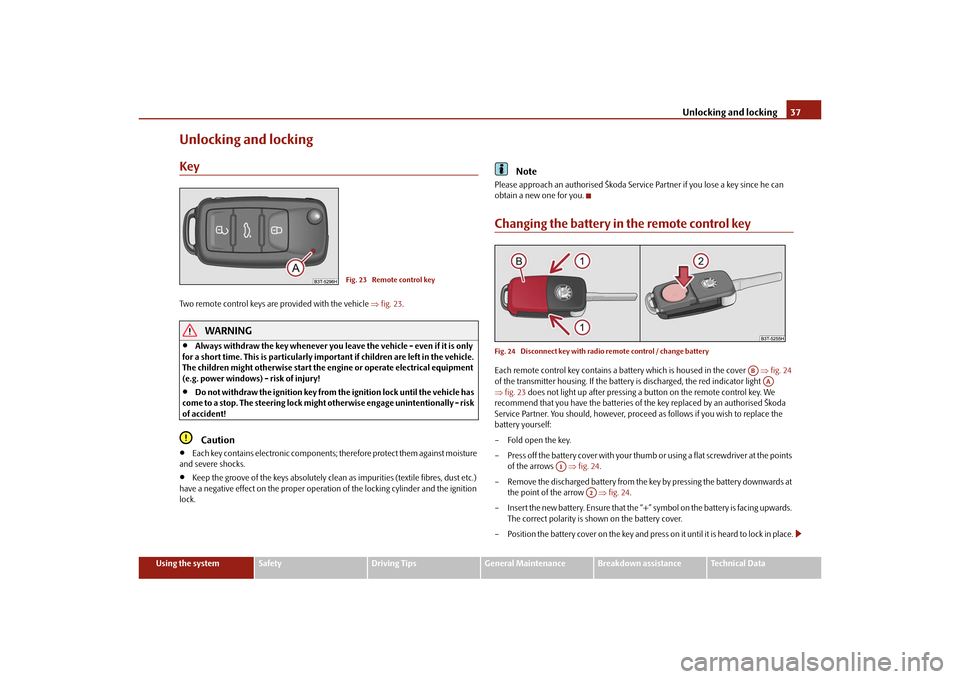
Unlocking and lockingKeyTwo remote control keys are provided with the vehicle fig. 23 .
WARNING
Always withdraw the key whenever you leave the vehicle - even if it is only
for a short time. This is particularly important if children are left in the vehicle.
The children might otherwise start the en gine or operate electrical equipment
(e.g. power windows) - risk of injury!
Do not withdraw the ignition key from the ignition lock until the vehicle has
come to a stop. The steerin g lock might otherwise enga ge unintentionally - risk
of accident!Caution
Each key contains electronic components; therefore protect them against moisture
and severe shocks.
Keep the groove of the keys absolutely clean as impurities (textile fibres, dust etc.)
have a negative effect on the proper operation of the locking cylinder and the ignition
lock.
Note
Please approach an authorised Škoda Servic e Partner if you lose a key since he can
obtain a new one for you.Changing the battery in the remote control keyFig. 24 Disconnect key with radio remote control / change batteryEach remote control key contains a ba ttery which is housed in the cover fig. 24
of the transmitter housing. If the battery is discharged, the red indicator light
fig. 23 does not light up after pressing a button on the remote control key. We
recommend that you have the batteries of the key replaced by an authorised Škoda
Service Partner. You should, however, proceed as follows if you wish to replace the
battery yourself:
– Fold open the key.
– Press off the battery cover with your thumb or using a flat screwdriver at the points
of the arrows fig. 24 .
– Remove the discharged battery from the key by pressing the battery downwards at the point of the arrow fig. 24 .
– Insert the new battery. Ensure that the “+” symbol on the battery is facing upwards.
The correct polarity is shown on the battery cover.
– Position the battery cover on the key and press on it until it is heard to lock in place.
Fig. 23 Remote control key
AB
AA
A1
A2
s3fg.2.book Page 37 Friday, April 30, 2010 12:17 PM
Page 40 of 287
Unlocking and locking39
Using the system
Safety
Driving Tips
General Maintenance
Breakdown assistance
Technical Data
unlocked when opening. Afterwards you can open the boot lid by pressing the handle
on the lower edge of the boot lid
page 44.
Operation of the central locking system is possible:
with a remote control key page 49,
using the buttons for the central locking system page 42,
from the outside using the vehicle key page 43, “Emergency unlocking and
locking of the driver's door”.
Indicator light in the driver's door
After locking the vehicle the indicator light fl ashes for 2 seconds fast, then more slowly.
If the vehicle is locked and the safe securing system page 42 is not operating, the
indicator light in the driver door flashes for about 2 seconds fast, goes out and starts to
flash slowly after about 30 seconds.
If the indicator light first of all flashes fast for about 2 seconds, afterwards lights up for
about 30 seconds without interruption and th en flashes slowly, there is a fault in the
system of the central locking or in the inte rior monitor and in the towing protection
monitoring* page 51. Visit a specialist garage to obtain assistance.
Convenience operatio n of the windows
One can open and close the windows when opening and closing the vehicle
page 54.
Opening a single door*
This function makes it possible to only unlock the driver's door. The other doors and
the fuel filler flap remain locked and ar e only unlocked after repetitive unlocking.
You can have the function opening a single door activated by an authorised Škoda
Service Partner on request or you can activate it yourself with the aid of the Informa-
tion display* page 25.
Unlocking a vehicle side door*
This selection function enables to unlock both doors on the driver's side. The other
doors and the fuel filler flap remain locked and are only unlocked after repetitive
unlocking. You can have the function opening a single
door activated by an authorised Škoda
Service Partner on request or you can activate it yourself with the aid of the Informa-
tion display* page 25.
Unlocking the vehicle with the KESSY system*
This selection function enables to unlock all th e doors, individual doors, both doors on
the left and right vehicle side or to unlock the driver and front passenger door at the
same time. The other doors and the fuel fille r flap remain locked and are only unlocked
after repetitive unlocking using the unlock button on the remote control page 37,
fig. 23 or the button for the central locking system page 42, fig. 27 .
You can have the function opening a single door activated by an authorised Škoda
Service Partner on request or you can activate it yourself with the aid of the Informa-
tion display* page 25.
Automatic locking and unlocking*
All the doors and the boot lid are locked au tomatically once the car reaches a speed of
about 15 km/h.
If the ignition key is withdrawn, the car is then automatically unlocked again. In addi-
tion, it is possible for the driver or front pa ssenger to unlock the vehicle by pressing the
central locking button
page 42 or by pulling the door opening lever on one of the
front doors.
You can have the function of the automatic lo cking activated by a specialist garage on
request or you can also activate it yourself with the aid of the Information display*
page 25.
WARNING
Locking the doors prevents involuntary op ening in an exceptional situation (an
accident). Locked doors prevent unwanted entry into the vehicle from outside,
for example at road crossings. Locked do ors do, however, make it more difficult
for rescuers to get into the vehicle in an emergency - danger to life!
Note
In the event of an accident in which the airbags are deployed, the locked doors are
automatically unlocked in order to enable rescuers to gain access to the vehicle.
s3fg.2.book Page 39 Friday, April 30, 2010 12:17 PM
Page 42 of 287
Unlocking and locking41
Using the system
Safety
Driving Tips
General Maintenance
Breakdown assistance
Technical Data
Caution
After leaving the vehicle, it does not lock automatically, this is why you should pay
attention to the procedure for locking the vehicle page 40.
Note
If the vehicle battery or the battery in the remote control key is weak or discharged,
perhaps the vehicle cannot be unlocked or locked via KESSY. In such a case, use the
emergency unlocking or locking of the driver's door, see Owner's Manual.Further possibilites of lockingProtection against inadvertently locking the key in the vehicle
If the key, which was used to lock the vehicle, remains in the vehicle in the area
page 40, fig. 26 after locking and closing all of the doors including the boot lid, the
protection against inadvertently locking the key in the vehicle is activated and the
vehicle unlocks itself again.
You are informed about the activation of the protection against inadvertently locking
the key in the vehicle by the turn signal lights flashing and the message Key in vehicle
which appears in the information display* or Key in vehicle which appears in the
display of the instrument cluster. Additiona lly, on vehicles which are fitted with the
anti-theft alarm system*, an audible signal sounds.Messages in the instrument clusterA few warning and information texts of the KESSY system in the information display*
or in the display of the instrument cluster:
Key not found or No Key
This message is displayed when the engine is started and the system cannot detect a
valid key in the vehicle. This can occur if the key is outside the vehicle, the battery in the
key is discharged, the key is defective or the electromagnetic field is strongly disturbed.
This message is also displayed when the ignition is switched on or the engine is
running and the system cannot detect a valid key in the vehicle. Keyless defective or Check Keyless
There is a fault in the KESSY system, contact your specialist garage.
Renew key battery! or Key Battery
Low voltage is present in the battery of th
e remote control key, change the battery.
Parking the vehicleIf the vehicle is not unlocked within 60 hours, the sensors page 40, fig. 26 and
in the handle of the front passenger's d oor are automatically deactivated. For reac-
tivation, one of the following conditions must be met:
Unlocking the driver's door with the aid of the sensor page 40, fig. 26 ,
pressing the handle of the boot lid,
unlocking the vehicle using the button on the remote control key,
emergency unlocking of the driver 's door (see Owner's Manual).
If the vehicle is not unlocked within 90 hour s, the sensors and in the handle of
the driver's door are also automatically deactivated page 40, fig. 26. For reactiva-
tion, one of the following conditions must be met:
unlocking the vehicle using the button on the remote control key,
emergency unlocking of the driver 's door (see Owner's Manual).
Convenience operation of the windowsIf you hold your finger on the sensor page 40, fig. 26 for more than 2 seconds
while locking the vehicle, the opened windows and the panoramic sliding roof are
closed. If you lift your finger off the sens or , the closing process is interrupted. If you
touch the sensor again, the closing process of the windows and the panoramic
sliding roof continues.
If you immediately touch the sensor or pull on the handle during the closing
process of the windows and the panoramic sliding roof initiated by sensor , all of the
windows and the panoramic sliding roof are opened again.
AD
A1
A2
A2A1
A2
A1
A1
A1
A2
A1
s3fg.2.book Page 41 Friday, April 30, 2010 12:17 PM
Page 43 of 287
Unlocking and locking
42
Safe securingThe central locking system is equipped with a safe securing
6) system. Locking the
vehicle from the outside causes the door locks to be automatically blocked. It is not
possible to open the doors with the door handle either from the inside or from the
outside. This acts as an effective deterrent for attempts to break into your vehicle.
You can deactivate the safe securing system by locking twice within 2 seconds.
If the safe securing system is not operating:
the indicator light in the driver door flas hes for about 2 seconds fast, goes out and
starts to flash slowly after about 30 seconds,
is the filler flap locked.
The safe securing system is again activated the next time the vehicle is unlocked and
locked again.
If the vehicle is locked and the safe securing system is deactivated, you can open the
vehicle from the inside by pulling on the door opening lever.
WARNING
If the vehicle is locked from the outside and the safe securing system is acti-
vated, there must not be any person and animals in the vehicle as it is then not
possible to open either a door or a window from the inside. The locked doors
make it more difficult for rescuers to get into the vehicle in an emergency -
hazard!
Note
The anti-theft alarm system* is also activated with the deactivated safe securing
system when locking the vehicle. The interior monitor* is however not activated.
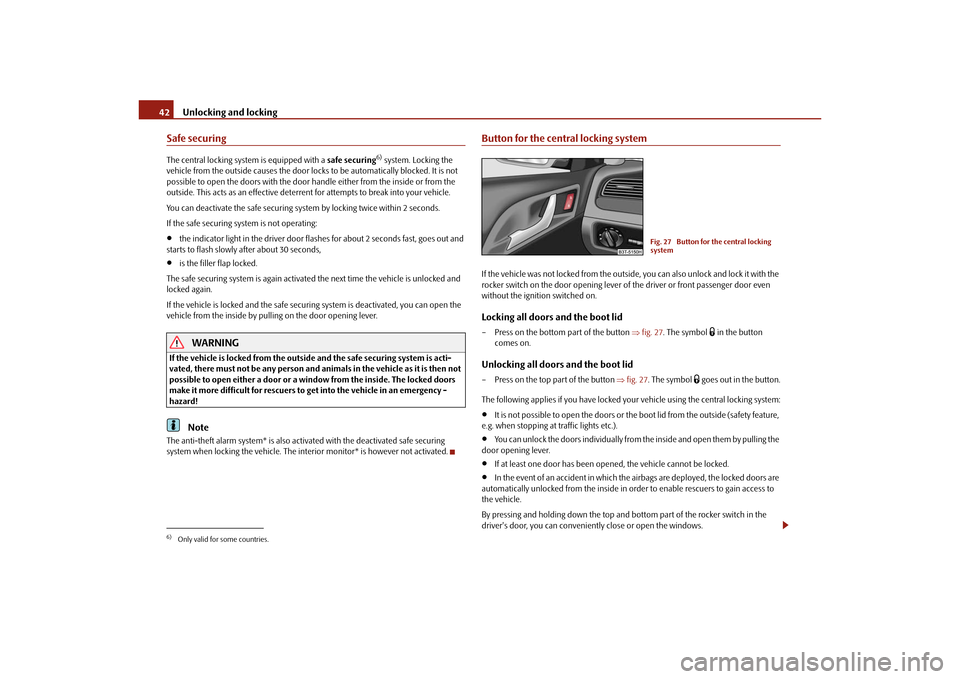
Button for the central locking systemIf the vehicle was not locked from the outside, you can also unlock and lock it with the
rocker switch on the door opening lever of the driver or front passenger door even
without the ignition switched on.Locking all doors and the boot lid– Press on the bottom part of the button fig. 27 . The symbol
in the button
comes on.
Unlocking all doors and the boot lid– Press on the top part of the button fig. 27 . The symbol
goes out in the button.
The following applies if you have locked yo ur vehicle using the central locking system:
It is not possible to open the doors or the boot lid from the outside (safety feature,
e.g. when stopping at traffic lights etc.).
You can unlock the doors individually from the inside and open them by pulling the
door opening lever.
If at least one door has been open ed, the vehicle cannot be locked.
In the event of an accident in which the airbags are deployed, the locked doors are
automatically unlocked from the inside in orde r to enable rescuers to gain access to
the vehicle.
By pressing and holding down the top and bottom part of the rocker switch in the
driver's door, you can conveniently close or open the windows.
6)Only valid for some countries.
Fig. 27 Button for the central locking
system
s3fg.2.book Page 42 Friday, April 30, 2010 12:17 PM
Page 45 of 287
Unlocking and locking
44
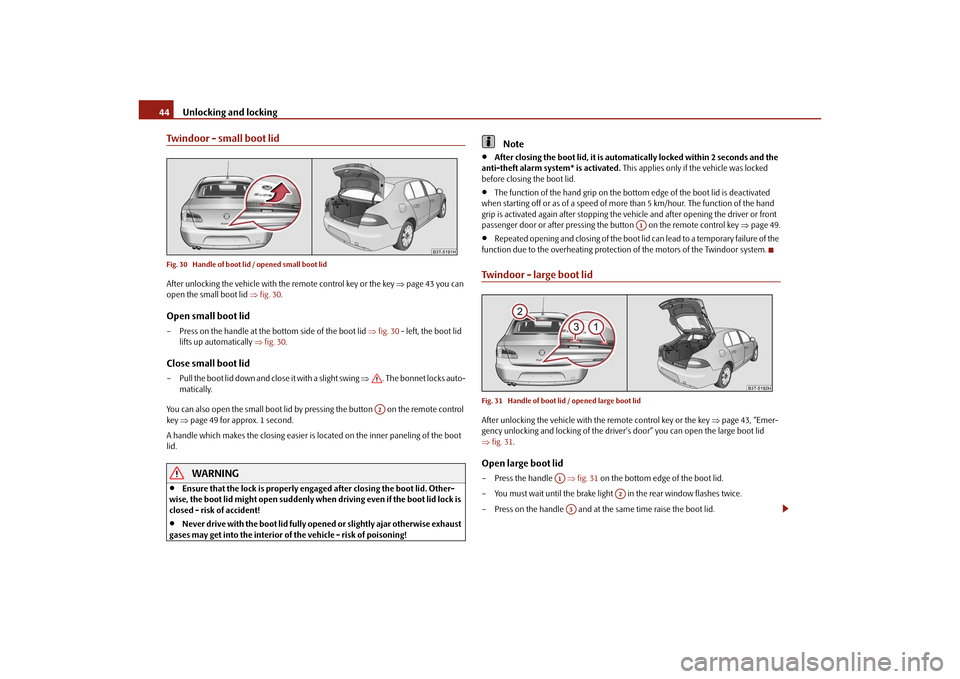
Twindoor - small boot lidFig. 30 Handle of boot lid / opened small boot lidAfter unlocking the vehicle with the remote control key or the key page 43 you can
open the small boot lid fig. 30 .Open small boot lid– Press on the handle at the bottom side of the boot lid fig. 30 - left, the boot lid
lifts up automatically fig. 30 .Close small boot lid– Pull the boot lid down and close it with a slight swing . The bonnet locks auto-
matically.
You can also open the small boot lid by pressing the button on the remote control
key page 49 for approx. 1 second.
A handle which makes the closing easier is located on the inner paneling of the boot
lid.
WARNING
Ensure that the lock is properly enga ged after closing the boot lid. Other-
wise, the boot lid might open suddenly when driving even if the boot lid lock is
closed - risk of accident!
Never drive with the boot lid fully open ed or slightly ajar otherwise exhaust
gases may get into the interior of the vehicle - risk of poisoning!
Note
After closing the boot lid, it is automatically locked within 2 seconds and the
anti-theft alarm system* is activated. This applies only if the vehicle was locked
before closing the boot lid.
The function of the hand grip on the bottom edge of the boot lid is deactivated
when starting off or as of a speed of more than 5 km/hour. The function of the hand
grip is activated again after stopping the ve hicle and after opening the driver or front
passenger door or after pressing the button on the remote control key page 49.
Repeated opening and closing of the boot li d can lead to a temporary failure of the
function due to the overheating protection of the motors of the Twindoor system.
Twindoor - large boot lidFig. 31 Handle of boot lid / opened large boot lidAfter unlocking the vehicle with th e remote control key or the key page 43, “Emer-
gency unlocking and locking of the driver's door” you can open the large boot lid
fig. 31 .Open large boot lid– Press the handle fig. 31 on the bottom edge of the boot lid.
– You must wait until the brake light in the rear window flashes twice.
– Press on the handle and at the same time raise the boot lid.
A2
A1
A1
A2
A3
s3fg.2.book Page 44 Friday, April 30, 2010 12:17 PM
Page 50 of 287
Unlocking and locking49
Using the system
Safety
Driving Tips
General Maintenance
Breakdown assistance
Technical Data
– You can unlock the lid by moving it in the direction of the arrow.
– Open the boot lid from the outside.
Caution
In an emergency, you can unlock the boot li
d with the vehicle key, however only in a
critical situation - risk of damaging the key.Remote controlDescriptionYou can use the remote control key:
to unlock and lock the car,
unlock or open the boot lid,
Opening and closing window.
The transmitter with the battery is housed in the handle of the remote control key. The
receiver is located in the interior of the car. The operating range of the remote control
key is approx. 30 m. But this range of the remote control can be reduced if the batteries
are weak.
The key has a fold-open key bit which can be used for unlocking and locking the car
manually and also for starting the engine.
If a lost key is replaced or if the receiver unit has been repaired or a new unit installed,
it is then necessary for an authorised Škoda Service Partner to initialise the system.
Only after this is it possible to again use the remote control key.Note
The remote control is automatically deactivated when the ignition is switched on.
The operation of the remote control may temporarily be affected by interference
from transmitters close to th e car and which operate in the same frequency range (e.g.
mobile phone, TV transmitter).
The battery must be replaced, ideally by an authorised Škoda Service Partner, if the
central locking or anti-theft alarm system does react to the remote control at less than
3 metres away.
If the driver door is opened, the vehi cle cannot be locked using the remote
control.
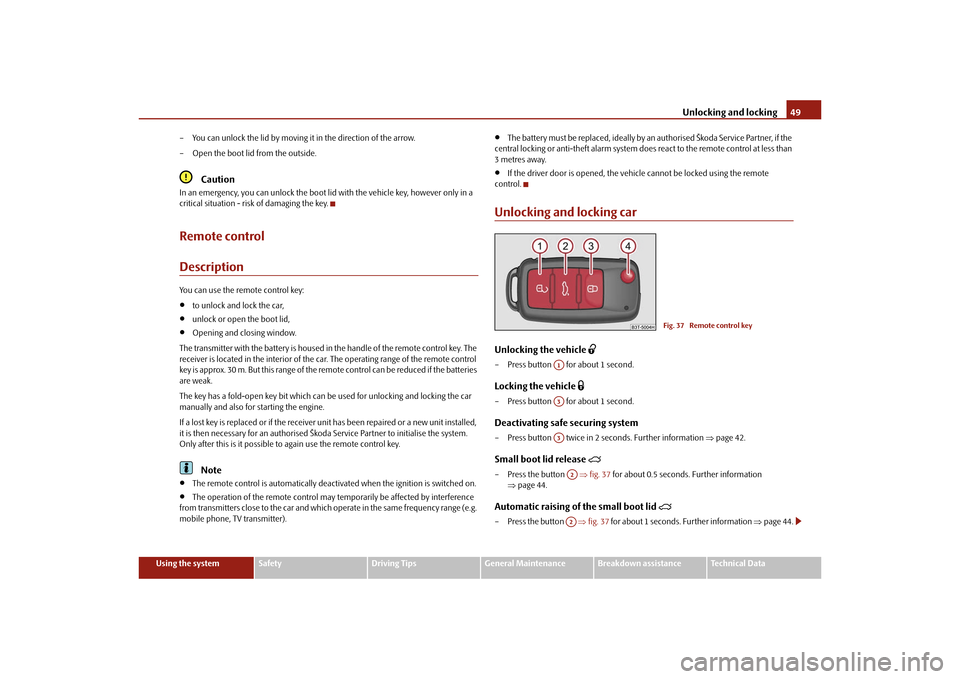
Unlocking and locking carUnlocking the vehicle
– Press button for about 1 second.Locking the vehicle
– Press button for about 1 second.Deactivating safe securing system– Press button twice in 2 seconds. Further information page 42.Small boot lid release
– Press the button fig. 37 for about 0.5 seconds. Further information
page 44.Automatic raising of the small boot lid
– Press the button fig. 37 for about 1 seconds. Further information page 44.
Fig. 37 Remote control key
A1A3A3A2A2
s3fg.2.book Page 49 Friday, April 30, 2010 12:17 PM