boot SKODA SUPERB 2014 2.G / (B6/3T) User Guide
[x] Cancel search | Manufacturer: SKODA, Model Year: 2014, Model line: SUPERB, Model: SKODA SUPERB 2014 2.G / (B6/3T)Pages: 246, PDF Size: 17.16 MB
Page 53 of 246
Information messageRead and observe
on page 48 first.
Key in the vehicle
The protection against inadvertently locking the key in the vehicle unlocks the
vehicle automatically if the following conditions are met.
The vehicle, including the boot lit, has been locked.
The key with which the vehicle has been locked remains in the vehicle in
the zone
D
» Fig. 32 on page 50 .
The turn signal lights flash four times as confirmation that the vehicle has
been unlocked again.
The following message is shown in the information cluster display. Key in vehicle.
KEY IN VEHICLE
Additionally, on vehicles which are fitted with the anti-theft alarm system, an audible signal sounds.
The system has not found a key
If the system has not found a key in the vehicle, the following message ap-
pears in the display of the instrument cluster.
Key not found.
NO KEY
This can occur if the key is outside the vehicle, the battery in the key is dis-
charged, the key is defective or the electromagnetic field is strongly disturbed.
Fault in KESSY system
If there is a fault in the KESSY system, the following message will appear in
the display of the instrument cluster.
Keyless access system faulty.
CHECK KEYLESS
Low voltage of the key battery
If the voltage of the battery in the remote control key is too low, the following
message appears in the display of the instrument cluster.
Change the key battery!
KEY BATTERY
Change the key battery » page 211!
Parking the vehicle
Read and observe
on page 48 first.
If the vehicle is not unlocked within 60 or 90 hours, the sensors in the handle
of the driver or front passenger's door are deactivated automatically » Fig. 32
on page 50 .
Activation after 60 hours
›
Unlock the driver's door using the sensor
2
» Fig. 32 on page 50 .
›
Press the handle of the boot lid.
›
Unlock the vehicle using the symbol button
on the remote control key.
›
Unlocking the driver's door in an emergency » page 212.
Activation after 90 hours
›
Unlock the vehicle using the symbol button on the remote control key.
›
Unlocking the driver's door in an emergency
» page 212.
Safe securing
Read and observe
on page 48 first.
The door locks are blocked automatically if the vehicle is locked from the out-side. Afterwards, it is not possible to open the doors with the door handle ei-
ther from the inside or from the outside.
This fact is pointed out by the following message on the display of the instru-
ment cluster after switching out the ignition.
Check SAFELOCK! Log book!
CHECK SAFELOCK
Switching off
The safe lock can be switched off in one of the following ways.
›
By locking twice within 2 seconds.
›
By disabling the interior monitoring » page 54, Interior monitor and towing
protection .
If the vehicle is locked and the safe securing system is switched off, the door can be opened separately from the inside by a single pull on opening lever.
Switching on
The safelock switches on automatically the next time the vehicle is locked and
unlocked.
51Unlocking and opening
Page 54 of 246
Switch-on display
The indicator light flashes for around 2 seconds in quick succession, after-
wards it begins to flash evenly at longer intervals.
Switch-off display
The indicator light in the driver door flashes for about 2 seconds fast, goes out
and starts to flash at longer intervals after about 30 seconds.WARNINGIf the car is locked and the safe securing system activated, no people must
remain in the car as it will then not be possible to either unlock a door or
open a window from the inside. The locked doors make it more difficult for
rescuers to get into the vehicle in an emergency – risk to life!
Note
This function is only enabled in certain countries.
Individual settings
Read and observe
on page 48 first.
The following central locking functions can be set via the MAXI DOT dis-
play » page 45 , Settings .
Opening a single door
This function makes it possible to only unlock the driver's door. The other
doors and the boot lid remain locked and are only unlocked after being opened
again.
Unlocking doors on one side of a vehicle
This function enables you to unlock both doors on the driver's side. The other doors and the boot lid remain locked and are only unlocked after being opened
again.
Unlocking the vehicle with the KESSY system
This function enables you to unlock all the doors, individual doors, both doors
on the left or right vehicle side. The other doors and the boot lid remain locked
and are only unlocked after being opened again.
Automatic locking/unlocking
All doors are locked from a speed of around 15 km/h. The button in the handle
of the boot lid is deactivated.
If the ignition key is withdrawn, the car is then automatically unlocked again.
In addition, it is possible for the driver or front passenger to unlock the car by
pressing the central locking button
.
The vehicle doors can be unlocked and opened at any time by pulling once on
the door opening lever.WARNINGLocked doors prevent unwanted entry into the vehicle from outside, for ex-
ample at road crossings.
Locking/unlocking the vehicle from the inside
Fig. 33
Central locking button
Read and observe on page 48 first.
If the vehicle was not locked from the outside, it can also be unlocked and
locked with the rocker switch on the door opening lever of the driver or front
passenger door » Fig. 33 even without the ignition switched on. While a door is
opened, the vehicle cannot be locked.
Locking
›
Press the button
/ » Fig. 33 press.
The symbol
in the button lights up.
Unlocking
›
Press the button
/ » Fig. 33 press.
The symbol
in the button goes out.
52Operation
Page 55 of 246
The following applies if your vehicle has been locked using the central locking
button.
› It is not possible to open the doors or the boot lid from the outside (safety
feature, e.g. when stopping at traffic lights etc.).
› The doors can be unlocked and opened from the inside by a single pull on the
opening lever of the respective door.
› In the event of an accident in which the airbags are deployed, the locked
doors are automatically unlocked in order to enable rescuers to gain access
to the vehicle.WARNING■ Doors locked from the inside make it difficult for rescuers to get into the
vehicle in an emergency – risk to life!■
If the safelock system is switched on » page 51, the door opening lever
and the central locking buttons do not operate.
Child safety lock
Fig. 34
Parental Control: Left rear door
Read and observe on page 48 first.
The child safety lock prevents the rear door from being opened from the in- side. The door can only be opened from the outside.
You can switch the child safety lock on and off using the vehicle key.
Switching on
›
Turn the slot of the safety lock in the direction of the arrow » Fig. 34 (the
other way around on the right-hand door).
Switching off
›
Turn the slot of the safety lock in the opposite direction to the ar-
row » Fig. 34 (the other way around on the right-hand door).
Opening/closing a doorFig. 35
Door handle/door opening lever:
Read and observe
on page 48 first.
Opening from the outside
›
Unlock the vehicle and pull the door handle
A
» Fig. 35 on the door you wish
to open.
Opening from the inside
›
Pull on door opening lever
B
of the respective door and push the door away
from you.
Closing from the inside
›
Grasp pull handle
C
and close the door.
WARNING■ Make sure that the door has closed correctly as it can open suddenly
while driving – risk of death!■
Only open and close the door when there is no one in the opening/closing
range – risk of injury!
■
An opened door can close automatically if there is a strong wind or the
vehicle is on an incline – risk of injury!
■
Never drive with the doors open - there is a risk of death!
53Unlocking and opening
Page 56 of 246
Anti-theft alarm system
Introduction
This chapter contains information on the following subjects:
Activating/deactivating
54
Interior monitor and towing protection
54
The anti-theft alarm system (hereinafter referred to only as alarm system) in-
creases protection against break-in attempts into the vehicle.
The alarm system triggers audible and visual signals if an attempt is made to
break into the vehicle (hereafter referred to only as alarm).
An alarm is triggered when the following monitored areas of the vehicle have a fault.
› Bonnet.
› Boot lid.
› Doors.
› Ignition lock.
› Vehicle inclination
» page 54.
› Interior of car
» page 54.
› A drop in voltage of the on-board power supply.
› Socket of the factory-fitted towing device
» page 163, Towing a trailer .
An alarm is immediately triggered if either of the two battery terminals is dis-
connected while the anti-theft alarm system is activated.
The alarm is switched off by unlocking the vehicle or switching on the ignition.
CAUTION
Before leaving the vehicle, it must be checked that all of the windows, doors
and the sliding/tilting roof are locked in order to ensure the full functionality of
the anti-theft alarm system.
Note
The working life of the alarm siren is 5 years.Activating/deactivating
Read and observe
on page 54 first.
Activating
The anti-theft alarm system is activated automatically approximately 30 sec-
onds after the vehicle is locked.
If you unlock the vehicle and do not open a door or the boot lid within the next
30 seconds, the vehicle will lock again automatically and the safelock system
or anti-theft alarm system will be switched on. This function is intended to
prevent the car being unlocked unintentionally.
Deactivating
The anti-theft alarm system is deactivated automatically after the vehicle is
unlocked. If the vehicle is not opened within 30 seconds, the anti-theft alarm
system is automatically activated again.
The alarm system is also deactivated if you unlock the driver door using the
key within 45 seconds of locking the vehicle.
Note
■ If the car is unlocked with the key in the driver door, insert the key into the
ignition and switch the ignition to deactivate the alarm system.■
You can switch the audible signalling of the activation of the warning system
on and off in the Maxi DOT display in the menu item ATA confirm » page 45 .
Interior monitor and towing protection
Fig. 36
Button for interior monitor and
towing protection
Read and observe on page 54 first.
The interior monitor detects movements inside the car and then triggers the
alarm.
54Operation
Page 57 of 246
The tow-away protection triggers the alarm if a vehicle is registered as being
on an inclination.
Activating
The interior monitor and the towing protection are activated automatically af-
ter the vehicle is locked.
Deactivating›
Switch off the ignition.
›
Open the driver door.
›
Press
» Fig. 36 on the B-column on the driver's side. The symbol lighting in
the button changes
from red to orange.
›
Lock the vehicle within 30 seconds.
Deactivate the interior monitor and the towing protection if there is a possibili-
ty of the alarm being triggered by movements (e.g. by children or animals)
within the vehicle interior or if the vehicle has to be transported (e.g. by train
or ship) or towed.
CAUTION
■ The opened glasses storage compartment reduces the effectiveness of the
interior monitor. To ensure the full functionality of the interior monitor, the
glasses storage compartment must always be closed before locking the vehi-
cle.■
The anti-theft alarm system is activated when the vehicle is locked even if
the safe securing system is deactivated. The interior monitor is however not
activated.
Luggage compartment lid
Introduction
This chapter contains information on the following subjects:
Twindoor - open/close small boot lid
55
TwinDoor - open / close large boot
56
Open / close (Superb Combi)
56
Delayed locking of the boot lid
56WARNING■ Ensure that the lock is properly engaged after closing the boot lid. Other-
wise, the lid might open suddenly while the vehicle is moving, even if the
lid was locked – risk of accident!■
Never drive with the boot lid open or ajar, as otherwise exhaust gases
may get into the interior of the vehicle – risk of poisoning!
■
Do not press on the rear window when closing the luggage compartment
lid, as otherwise this could crack – risk of injury!
CAUTION
If the vehicle was locked before the boot lid was closed, the lid is immediately
locked automatically when closed » page 56.
Note
■
The function of the button in the grip above the licence plate is deactivated
when starting off or at a speed of 5 km/hour or more for vehicles with central
locking. The function is restored after the vehicle stops and the door is
opened.■
Repeated opening and closing of the boot lid can lead to a temporary failure
of the function due to the overheating protection of the motors of the Twin-
door system.
Twindoor - open/close small boot lid
Fig. 37
Handle of boot lid/opened small boot lid
Read and observe
and on page 55 first.
After unlocking the vehicle, the boot lid can be opened with the button in the
handle above the number plate.
55Unlocking and opening
Page 58 of 246
Opening›Press the button in the handle at the lower edge of the boot lid 1 » Fig. 37
and lift the boot lid.
Closing›
Pull down and strike the lid with the handle
2
» Fig. 37 .
The small boot lid can also be opened by pressing the symbol
button on the
remote control key » page 49.
TwinDoor - open / close large boot
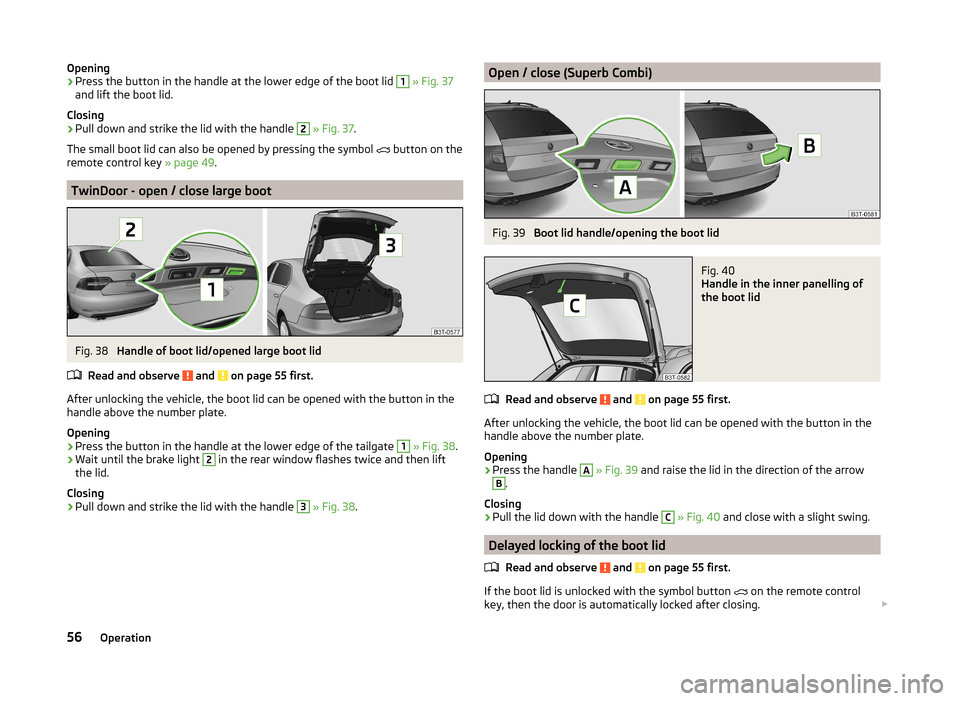
Fig. 38
Handle of boot lid/opened large boot lid
Read and observe
and on page 55 first.
After unlocking the vehicle, the boot lid can be opened with the button in the
handle above the number plate.
Opening
›
Press the button in the handle at the lower edge of the tailgate
1
» Fig. 38 .
›
Wait until the brake light
2
in the rear window flashes twice and then lift
the lid.
Closing
›
Pull down and strike the lid with the handle
3
» Fig. 38 .
Open / close (Superb Combi)Fig. 39
Boot lid handle/opening the boot lid
Fig. 40
Handle in the inner panelling of
the boot lid
Read and observe and on page 55 first.
After unlocking the vehicle, the boot lid can be opened with the button in the
handle above the number plate.
Opening
›
Press the handle
A
» Fig. 39 and raise the lid in the direction of the arrow
B
.
Closing
›
Pull the lid down with the handle
C
» Fig. 40 and close with a slight swing.
Delayed locking of the boot lid
Read and observe
and on page 55 first.
If the boot lid is unlocked with the symbol button on the remote control
key, then the door is automatically locked after closing.
56Operation
Page 59 of 246
The period after which the boot lid is locked automatically can be extended by
a specialist garage.
After activation of delayed locking, the boot lid can be opened again after clos-
ing within a limited period.
Delayed locking can be deactivated by a specialist garage at any time.
CAUTION
There is a risk of unwanted entry into the vehicle before the boot lid is locked
automatically. We therefore recommend locking the vehicle with the symbol
button
on the remote control key.
Electric boot lid (Superb Combi)
Introduction
This chapter contains information on the following subjects:
Operating description
57
Acoustic signals
59
Adjusting/deleting the top lid position
59
Malfunctions
59
Force limiter
The electric luggage compartment lid (hereinafter referred to only as a lid) is
equipped with a force limiter. If the lid hits an obstacle when closing, it stops
and an audible signal sounds.
If you rapidly enter the vehicle during the opening or closing process of the
boot lid, the whole vehicle may jerk and as a result the movement of the lid
can be interrupted.
Manual operation
Manually opening and closing the lid is only possible in exceptional cases. It
must be completed slowly and without sudden movements as close to the
centre of the lid as possible »
.
WARNING■
Ensure that the lock is properly engaged after closing the lid. Otherwise,
the lid might open suddenly while the vehicle is moving, even if the lid was
locked – risk of accident!■
Never drive with the lid open or unlatched, as otherwise exhaust gases
may get into the interior of the vehicle – risk of poisoning!
CAUTION■ The movement of the lid can be stopped by applying an abrupt and quick
force against the lid.■
Do not try to close the lid manually during the electrical closing process.
Damage can occur to the system of the electric boot lid.
■
If the lid is closed manually, it must be ensured that when moving the lid into
the lock, pressure is applied to the centre edge of the lid above the ŠKODA
logo. Handling the sides of the lid can damage the electric lid.
CAUTION
■ Before opening or closing the lid, check if there are any objects in the open-
ing or closing range which could obstruct the movement (e.g. a load on the
roof rack or on the trailer, etc.) – risk of causing damage to the lid!■
Ensure that there is at least 10 cm of clearance above the opened lid (e.g. dis-
tance from the garage ceiling). Otherwise, it may happen that the clearance
above the opened lid is no longer sufficient after relieving the vehicle of a load
(e.g. after unloading) – risk of causing damage to the lid.
■
In certain circumstances, if the lid is loaded (e.g by a thick layer of snow), the
opening process of the lid can be interrupted. Remove the load on the lid to re-
enable the electrical operation.
■
If the lid closes automatically (e.g. under load of snow), you will hear an inter-
mittent beep.
Operating description
Fig. 41
Operation of the lid
57Unlocking and opening
Page 61 of 246
Acoustic signalsRead and observe
and on page 57 first.
The acoustic signals serve as a safety function and provide information about
the success of a performed action.
SignalsStatus
Interrupted tone
Open (using the button on the remote control key
or the button C
» Fig. 42 on page 58 )
Automatic closing of the lid » page 57,
in section In-
troduction
1 continuous toneForce limiter3 rising tonesConfirmation of the storage of the lid position3 identical tonesfault
Adjusting/deleting the top lid position
Read and observe
and on page 57 first.
Adjusting
›
Stop the lid in the desired position (electrically or manually).
›
Press and hold the button
B
» Fig. 41 on page 57 for longer than 3 seconds.
Storing the new position is confirmed with an audible signal.
Delete
›
Carefully lift up the lid manually to the maximum opening position.
›
Press and hold the button
B
» Fig. 41 on page 57 for longer than 3 seconds.
An audible signal sounds and the height which was originally set is deleted
from the memory, while the basic position of the top lid position is again set.
The top lid position is adjusted, for example, in the following situations.
› When the space for opening the lid is limited (e.g. garage height).
› For a more convenient operation, such as by a person's height.
The top position which is reached when the lid opens automatically, is always
lower than the maximum top position which can be reached when the lid is
opened manually.
The lid always opens to the height which was last stored.
Malfunctions
Read and observe
and on page 57 first.
If the battery is disconnected and reconnected while the lid is open, it is nec-
essary to activate the system of the electric boot lid. Activation means closing
the lid by hand. Thus, the end position of the lid is stored under fully closed in
secured lock.
Examples of operational malfunctions
Description of the malfunc-
tionPossible solutionsThe lid cannot be lifted out
of the lock.Emergency unlocking of the lid » page 212The lid does not react to an
opening signalRemoving a possible obstacle (e.g. snow), re-
opening the lid » page 57
Press handle A
and pull the lid upwards
The lid remains in the top
positionManual closing of the lid
Electric power windows
Introduction
This chapter contains information on the following subjects:
Opening/closing the window from the driver seat
60
Opening the windows in the front passenger door and in the rear doors
61
Force limit
61
Window convenience operation
61
Operational faults
62
59Unlocking and opening
Page 68 of 246
WARNING (Continued)■The automatic driving lamp control only operates as a support and
does not release the driver from his responsibility to check the light and, if
necessary, to switch on the light depending on the given light conditions.
The light sensor cannot, for example, detect rain or snow. Under these con-
ditions we recommend switching on the low beam or fog lights!■
Never drive with only the side lights on! The side lights are not bright
enough to light up the road sufficiently in front of you or to be seen by oth-
er oncoming traffic. Therefore always switch on the low beam when it is
dark or if visibility is poor.
Note
The headlights may mist up temporarily. When the driving lights are switched
on, the light outlet surfaces are free from mist after a short period, although
the headlight lenses may still be misted up in the peripheral areas. This mist
has no influence on the life of the lighting system.
Parking and low beam lights
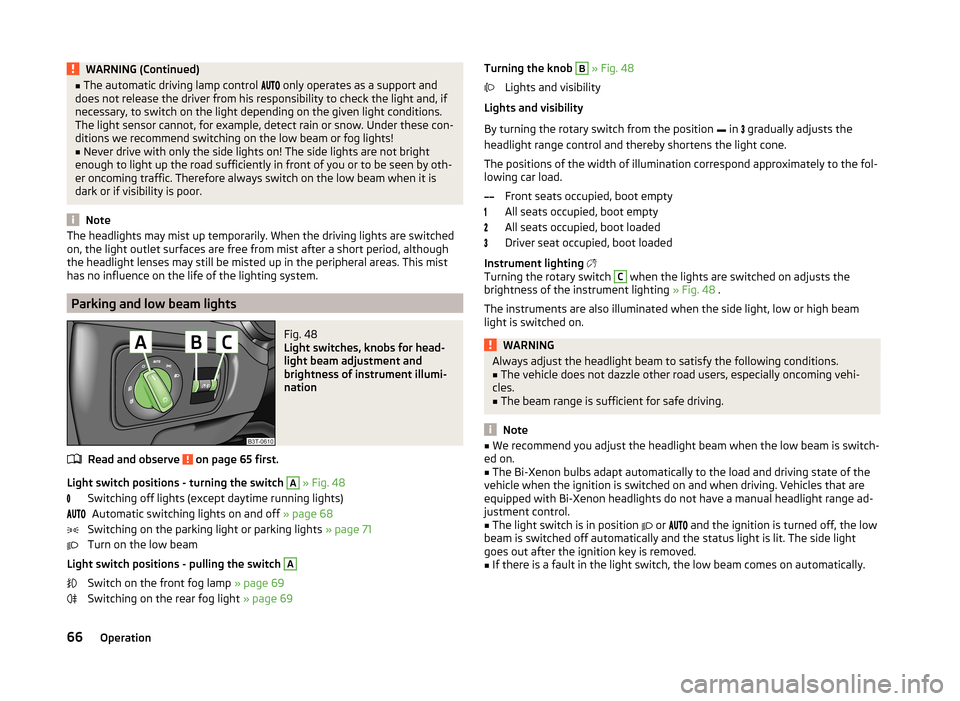
Fig. 48
Light switches, knobs for head-
light beam adjustment and
brightness of instrument illumi-
nation
Read and observe on page 65 first.
Light switch positions - turning the switch
A
» Fig. 48
Switching off lights (except daytime running lights) Automatic switching lights on and off » page 68
Switching on the parking light or parking lights » page 71
Turn on the low beam
Light switch positions - pulling the switch
A
Switch on the front fog lamp » page 69
Switching on the rear fog light » page 69
Turning the knob B » Fig. 48
Lights and visibility
Lights and visibility
By turning the rotary switch from the position in
gradually adjusts the
headlight range control and thereby shortens the light cone.
The positions of the width of illumination correspond approximately to the fol-
lowing car load.
Front seats occupied, boot empty
All seats occupied, boot empty
All seats occupied, boot loaded
Driver seat occupied, boot loaded
Instrument lighting
Turning the rotary switch C
when the lights are switched on adjusts the
brightness of the instrument lighting » Fig. 48 .
The instruments are also illuminated when the side light, low or high beam
light is switched on.
WARNINGAlways adjust the headlight beam to satisfy the following conditions.■The vehicle does not dazzle other road users, especially oncoming vehi-
cles.■
The beam range is sufficient for safe driving.
Note
■ We recommend you adjust the headlight beam when the low beam is switch-
ed on.■
The Bi-Xenon bulbs adapt automatically to the load and driving state of the
vehicle when the ignition is switched on and when driving. Vehicles that are
equipped with Bi-Xenon headlights do not have a manual headlight range ad-
justment control.
■
The light switch is in position
or
and the ignition is turned off, the low
beam is switched off automatically and the status light is lit. The side light
goes out after the ignition key is removed.
■
If there is a fault in the light switch, the low beam comes on automatically.
66Operation
Page 72 of 246
The rear fog light is switched off in the reverse order.
The warning light
lights up in the instrument cluster when the rear fog light
is switched on » page 32.
When in reverse gear only the rear fog lamp illuminates on the driver's side.
Only the rear fog light on the trailer lights up if the vehicle has a factory-fitted
towing device or a towing device from ŠKODA original accessories and it is
driven with a trailer.
COMING HOME / LEAVING HOME
Read and observe
on page 65 first.
COMING HOME/LEAVING HOME (hereafter referred to only as function)
switches on the lights for a short time after leaving the vehicle or when ap-
proaching the vehicle.
The daytime running lights are switched on automatically if the following
conditions are met:
The light switch is in the position » Fig. 50
on page 68 .
The visibility in the vehicle environment is reduced.
The ignition is switched off.
The parking aid is activated.
The function switches on the following light, depending on the equipment
fitted.
› Parking lights
› Low beam
› Entry lighting in the exterior mirrors
› Licence plate light
The light is controlled on the basis of information that is collected from the
holder mounted in the rear-view mirror sensor » page 68 .
COMING HOME
The light turns on automatically when you open the driver's door on (within 60
seconds of turning off the ignition).
The light turns off 10 seconds after closing all the doors and the boot lid or af-
ter the pre-set time has expired.
If a door or the boot lid remains open, the light goes out after 60 seconds.
LEAVING HOME
The light turns on automatically after the vehicle is unlocked with the remote
control.
The light turns off after 10 seconds or after a pre-set time or after the vehicle
is locked.
Activate/deactivate the function
The functions and settings of the illumination time can be activated/deactiva- ted via the MAXI DOT display in the menu items Coming Home or Leaving
Home » page 45 .
CAUTION
■
Do not attach any stickers or similar objects in front of the light sensor on
the windscreen to avoid impairing the function or its reliability.■
If this function is activated constantly, the battery will be heavily discharged
particularly in short-haul traffic.
Hazard warning light system
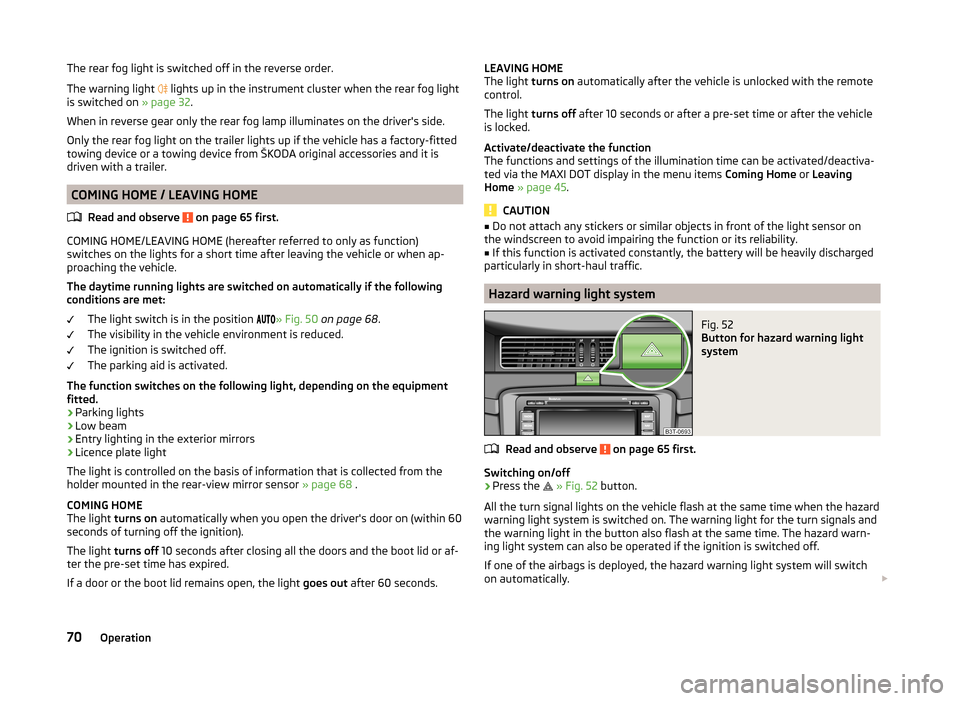
Fig. 52
Button for hazard warning light
system
Read and observe on page 65 first.
Switching on/off
›
Press the
» Fig. 52 button.
All the turn signal lights on the vehicle flash at the same time when the hazard
warning light system is switched on. The warning light for the turn signals and
the warning light in the button also flash at the same time. The hazard warn-
ing light system can also be operated if the ignition is switched off.
If one of the airbags is deployed, the hazard warning light system will switch
on automatically.
70Operation