boot SKODA SUPERB 2014 2.G / (B6/3T) Owner's Guide
[x] Cancel search | Manufacturer: SKODA, Model Year: 2014, Model line: SUPERB, Model: SKODA SUPERB 2014 2.G / (B6/3T)Pages: 246, PDF Size: 17.16 MB
Page 76 of 246
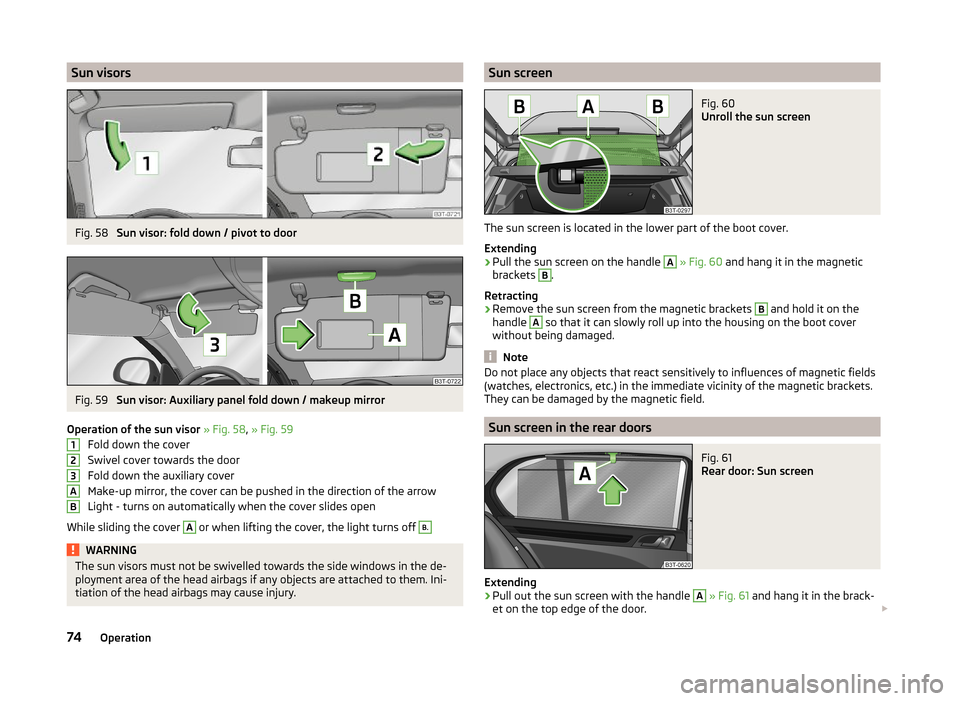
Sun visorsFig. 58
Sun visor: fold down / pivot to door
Fig. 59
Sun visor: Auxiliary panel fold down / makeup mirror
Operation of the sun visor » Fig. 58 , » Fig. 59
Fold down the cover
Swivel cover towards the door
Fold down the auxiliary cover
Make-up mirror, the cover can be pushed in the direction of the arrow
Light - turns on automatically when the cover slides open
While sliding the cover
A
or when lifting the cover, the light turns off
B.WARNINGThe sun visors must not be swivelled towards the side windows in the de-
ployment area of the head airbags if any objects are attached to them. Ini-
tiation of the head airbags may cause injury.123ABSun screenFig. 60
Unroll the sun screen
The sun screen is located in the lower part of the boot cover.
Extending
›
Pull the sun screen on the handle
A
» Fig. 60 and hang it in the magnetic
brackets
B
.
Retracting
›
Remove the sun screen from the magnetic brackets
B
and hold it on the
handle
A
so that it can slowly roll up into the housing on the boot cover
without being damaged.
Note
Do not place any objects that react sensitively to influences of magnetic fields
(watches, electronics, etc.) in the immediate vicinity of the magnetic brackets.
They can be damaged by the magnetic field.
Sun screen in the rear doors
Fig. 61
Rear door: Sun screen
Extending
›
Pull out the sun screen with the handle
A
» Fig. 61 and hang it in the brack-
et on the top edge of the door.
74Operation
Page 77 of 246
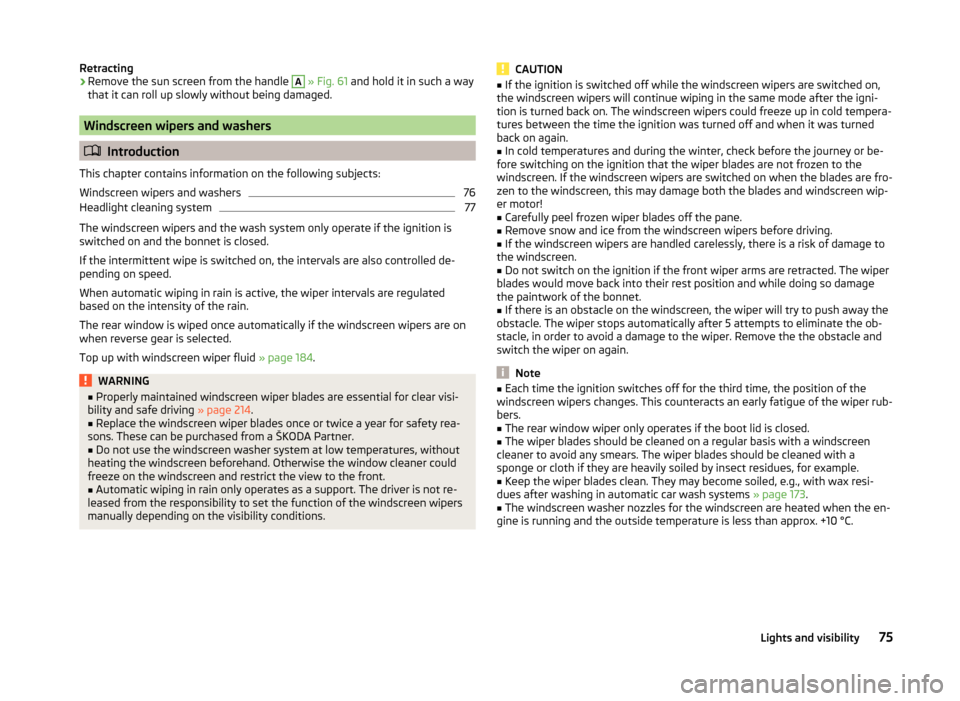
Retracting›Remove the sun screen from the handle A » Fig. 61 and hold it in such a way
that it can roll up slowly without being damaged.
Windscreen wipers and washers
Introduction
This chapter contains information on the following subjects:
Windscreen wipers and washers
76
Headlight cleaning system
77
The windscreen wipers and the wash system only operate if the ignition is
switched on and the bonnet is closed.
If the intermittent wipe is switched on, the intervals are also controlled de-
pending on speed.
When automatic wiping in rain is active, the wiper intervals are regulated
based on the intensity of the rain.
The rear window is wiped once automatically if the windscreen wipers are on
when reverse gear is selected.
Top up with windscreen wiper fluid » page 184.
WARNING■
Properly maintained windscreen wiper blades are essential for clear visi-
bility and safe driving » page 214.■
Replace the windscreen wiper blades once or twice a year for safety rea-
sons. These can be purchased from a ŠKODA Partner.
■
Do not use the windscreen washer system at low temperatures, without
heating the windscreen beforehand. Otherwise the window cleaner could
freeze on the windscreen and restrict the view to the front.
■
Automatic wiping in rain only operates as a support. The driver is not re-
leased from the responsibility to set the function of the windscreen wipers
manually depending on the visibility conditions.
CAUTION■ If the ignition is switched off while the windscreen wipers are switched on,
the windscreen wipers will continue wiping in the same mode after the igni-
tion is turned back on. The windscreen wipers could freeze up in cold tempera-
tures between the time the ignition was turned off and when it was turned
back on again.■
In cold temperatures and during the winter, check before the journey or be-
fore switching on the ignition that the wiper blades are not frozen to the
windscreen. If the windscreen wipers are switched on when the blades are fro-
zen to the windscreen, this may damage both the blades and windscreen wip-
er motor!
■
Carefully peel frozen wiper blades off the pane.
■
Remove snow and ice from the windscreen wipers before driving.
■
If the windscreen wipers are handled carelessly, there is a risk of damage to
the windscreen.
■
Do not switch on the ignition if the front wiper arms are retracted. The wiper
blades would move back into their rest position and while doing so damage
the paintwork of the bonnet.
■
If there is an obstacle on the windscreen, the wiper will try to push away the
obstacle. The wiper stops automatically after 5 attempts to eliminate the ob-
stacle, in order to avoid a damage to the wiper. Remove the the obstacle and
switch the wiper on again.
Note
■ Each time the ignition switches off for the third time, the position of the
windscreen wipers changes. This counteracts an early fatigue of the wiper rub-
bers.■
The rear window wiper only operates if the boot lid is closed.
■
The wiper blades should be cleaned on a regular basis with a windscreen
cleaner to avoid any smears. The wiper blades should be cleaned with a
sponge or cloth if they are heavily soiled by insect residues, for example.
■
Keep the wiper blades clean. They may become soiled, e.g., with wax resi-
dues after washing in automatic car wash systems » page 173.
■
The windscreen washer nozzles for the windscreen are heated when the en-
gine is running and the outside temperature is less than approx. +10 °C.
75Lights and visibility
Page 92 of 246
›Grasp the ashtray insert B
» Fig. 85 in the area marked with the arrows and
remove it in the direction of the arrow 2.
Insertion takes place in reverse order.WARNINGNever place flammable objects in the ashtray – risk of fire!
Note
The ashtrays are fitted with an interior light which lights up when the parking
light is on.
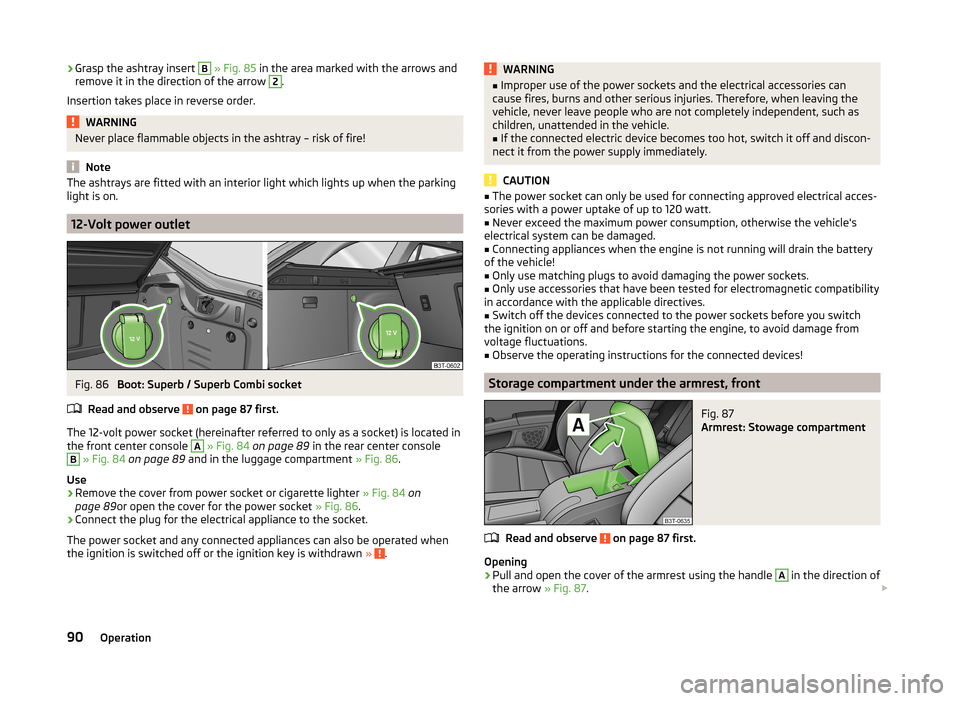
12-Volt power outlet
Fig. 86
Boot: Superb / Superb Combi socket
Read and observe
on page 87 first.
The 12-volt power socket (hereinafter referred to only as a socket) is located in
the front center console
A
» Fig. 84 on page 89 in the rear center console
B
» Fig. 84 on page 89 and in the luggage compartment » Fig. 86.
Use
›
Remove the cover from power socket or cigarette lighter » Fig. 84 on
page 89 or open the cover for the power socket » Fig. 86.
›
Connect the plug for the electrical appliance to the socket.
The power socket and any connected appliances can also be operated when
the ignition is switched off or the ignition key is withdrawn »
.
WARNING■
Improper use of the power sockets and the electrical accessories can
cause fires, burns and other serious injuries. Therefore, when leaving the
vehicle, never leave people who are not completely independent, such as
children, unattended in the vehicle.■
If the connected electric device becomes too hot, switch it off and discon-
nect it from the power supply immediately.
CAUTION
■ The power socket can only be used for connecting approved electrical acces-
sories with a power uptake of up to 120 watt.■
Never exceed the maximum power consumption, otherwise the vehicle's
electrical system can be damaged.
■
Connecting appliances when the engine is not running will drain the battery
of the vehicle!
■
Only use matching plugs to avoid damaging the power sockets.
■
Only use accessories that have been tested for electromagnetic compatibility
in accordance with the applicable directives.
■
Switch off the devices connected to the power sockets before you switch
the ignition on or off and before starting the engine, to avoid damage from
voltage fluctuations.
■
Observe the operating instructions for the connected devices!
Storage compartment under the armrest, front
Fig. 87
Armrest: Stowage compartment
Read and observe on page 87 first.
Opening
›
Pull and open the cover of the armrest using the handle
A
in the direction of
the arrow » Fig. 87.
90Operation
Page 96 of 246
WARNINGThe storage compartment is not a substitute for the ashtray and must also
not be used for such purposes – risk of fire!
Storage compartment in the rear armrest
Fig. 95
Opening the storage compart-
ment
Read and observe on page 87 first.
Opening
›
Lift button
A
on the front of the armrest and lift the storage compartment
cover in the direction of the arrow » Fig. 95.
Closing
›
Fold back the storage compartment lid in the opposite direction to that of
the arrow » Fig. 95 until it clicks.
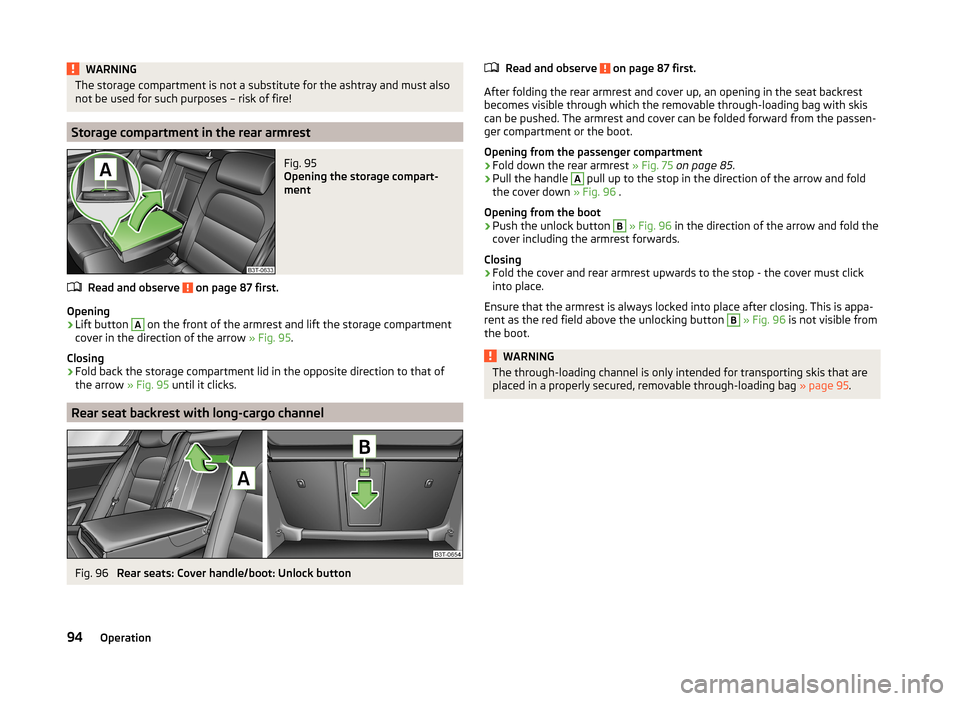
Rear seat backrest with long-cargo channel
Fig. 96
Rear seats: Cover handle/boot: Unlock button
Read and observe on page 87 first.
After folding the rear armrest and cover up, an opening in the seat backrest
becomes visible through which the removable through-loading bag with skis
can be pushed. The armrest and cover can be folded forward from the passen-
ger compartment or the boot.
Opening from the passenger compartment
›
Fold down the rear armrest » Fig. 75 on page 85 .
›
Pull the handle
A
pull up to the stop in the direction of the arrow and fold
the cover down » Fig. 96 .
Opening from the boot
›
Push the unlock button
B
» Fig. 96 in the direction of the arrow and fold the
cover including the armrest forwards.
Closing
›
Fold the cover and rear armrest upwards to the stop - the cover must click
into place.
Ensure that the armrest is always locked into place after closing. This is appa- rent as the red field above the unlocking button
B
» Fig. 96 is not visible from
the boot.
WARNINGThe through-loading channel is only intended for transporting skis that are
placed in a properly secured, removable through-loading bag » page 95.94Operation
Page 97 of 246
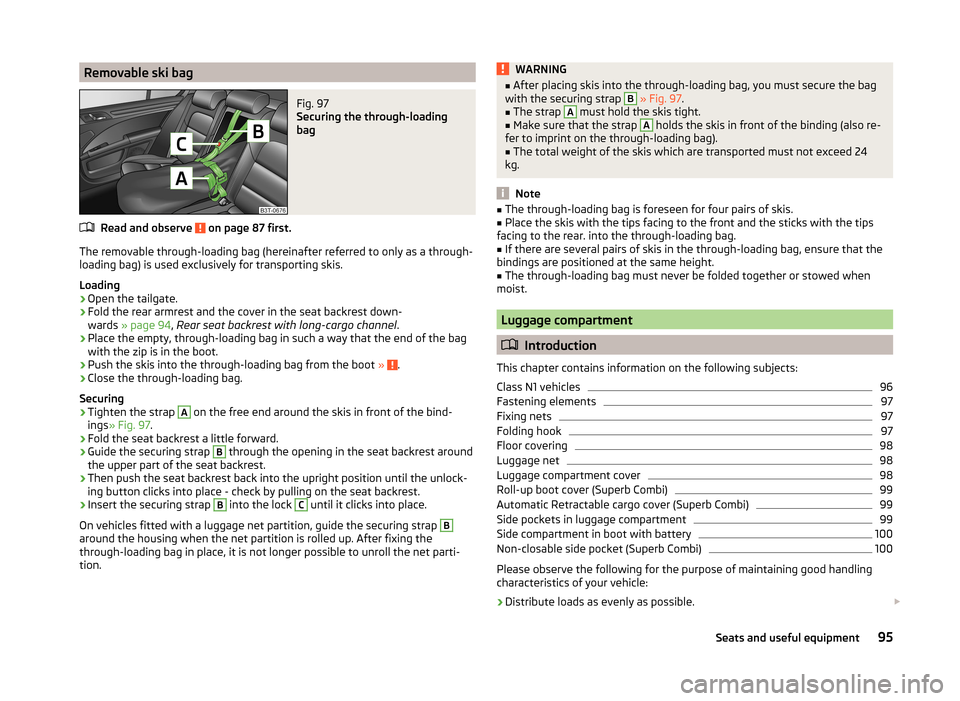
Removable ski bagFig. 97
Securing the through-loading
bag
Read and observe on page 87 first.
The removable through-loading bag (hereinafter referred to only as a through-
loading bag) is used exclusively for transporting skis.
Loading
›
Open the tailgate.
›
Fold the rear armrest and the cover in the seat backrest down-
wards » page 94 , Rear seat backrest with long-cargo channel .
›
Place the empty, through-loading bag in such a way that the end of the bag
with the zip is in the boot.
›
Push the skis into the through-loading bag from the boot » .
›
Close the through-loading bag.
Securing
›
Tighten the strap
A
on the free end around the skis in front of the bind-
ings » Fig. 97 .
›
Fold the seat backrest a little forward.
›
Guide the securing strap
B
through the opening in the seat backrest around
the upper part of the seat backrest.
›
Then push the seat backrest back into the upright position until the unlock-
ing button clicks into place - check by pulling on the seat backrest.
›
Insert the securing strap
B
into the lock
C
until it clicks into place.
On vehicles fitted with a luggage net partition, guide the securing strap
B
around the housing when the net partition is rolled up. After fixing the
through-loading bag in place, it is not longer possible to unroll the net parti-
tion.
WARNING■ After placing skis into the through-loading bag, you must secure the bag
with the securing strap B » Fig. 97 .■
The strap
A
must hold the skis tight.
■
Make sure that the strap
A
holds the skis in front of the binding (also re-
fer to imprint on the through-loading bag).
■
The total weight of the skis which are transported must not exceed 24
kg.
Note
■ The through-loading bag is foreseen for four pairs of skis.■Place the skis with the tips facing to the front and the sticks with the tips
facing to the rear. into the through-loading bag.■
If there are several pairs of skis in the through-loading bag, ensure that the
bindings are positioned at the same height.
■
The through-loading bag must never be folded together or stowed when
moist.
Luggage compartment
Introduction
This chapter contains information on the following subjects:
Class N1 vehicles
96
Fastening elements
97
Fixing nets
97
Folding hook
97
Floor covering
98
Luggage net
98
Luggage compartment cover
98
Roll-up boot cover (Superb Combi)
99
Automatic Retractable cargo cover (Superb Combi)
99
Side pockets in luggage compartment
99
Side compartment in boot with battery
100
Non-closable side pocket (Superb Combi)
100
Please observe the following for the purpose of maintaining good handling
characteristics of your vehicle:
›
Distribute loads as evenly as possible.
95Seats and useful equipment
Page 98 of 246
›Place heavy objects as far forward as possible.›Attach the items of luggage to the lashing eyes or using the
nets » page 97 .
In the event of an accident, even small and light objects gain so much kinetic
energy that they can cause severe injuries.
The magnitude of the kinetic energy is dependent on the speed at which the
vehicle is travelling and the weight of the object.
Example: In the event of a frontal collision at a speed of 50 km/h, an object
with a weight of 4.5 kg produces an energy, which corresponds to 20 times its
own weight. This means that it results in a weight of approx. 90 kg “ ”.
Luggage compartment light
The light switches on/off when the luggage compartment lid is opened or
closed.
If the boot lid is open and the ignition switched off, the light will extinguish
automatically after around 10 minutes.
Boot light for Superb Combi vehicles » page 101.WARNING■
Store the objects in the boot and attach them to the lashing eyes.■Loose objects can be thrown forward during a sudden manoeuvre or in
case of an accident and can injure the occupants or other road users.■
Loose objects could hit a deployed airbag and injure occupants – danger
of death!
■
Please note that transporting heavy objects alters the handling proper-
ties of the vehicle due to the displacement of the centre of gravity – risk of
accident! The speed and style of driving must be adjusted accordingly.
■
If the items of luggage or objects are attached to the lashing eyes with
unsuitable or damaged lashing straps, injuries can occur in the event of
braking manoeuvres or accidents. To prevent items of luggage from moving
around, always use suitable lashing straps which must be firmly attached
to the lashing eyes.
■
The transported items must be stowed in such a way that no objects are
able to slip forward on sudden driving or braking manoeuvres – risk of in-
jury!
■
When transporting objects in the luggage compartment that has been en-
larged by folding the rear seats forward, ensure the safety of the passen-
gers transported on the other rear seats » page 9.
WARNING (Continued)■
If the rear seat next to the folded forward seat is occupied, ensure maxi-
mum safety, e.g. by placing the goods to be transported in such a way that
the seat is prevented from folding back in case of a rear collision.■
Do not drive with the luggage compartment lid fully opened or slightly
ajar otherwise exhaust gases may get into the interior of the vehicle – risk
of poisoning!
■
Do not exceed the permissible axle loads and permissible gross weight of
the vehicle – risk of accident!
■
Do not transport people in the boot!
CAUTION
Make sure that transported objects with sharp edges do not damage the fol-
lowing:■
heating elements in the rear window;
■
elements of the aerial integrated in the rear window;
■
Aerial filaments integrated in the rear side windows (Superb Combi).
Note
Tyre pressure must be adjusted to the load » page 194.
Class N1 vehicles
Read and observe
and on page 96 first.
On class N1 vehicles, which are not fitted with a protective grille, a lashing set
which complies with the standard EN 12195 (1 - 4) must be used for fastening
the load.
The proper functioning of the electrical system is essential for the safe opera-
tion of the vehicle. It is important to ensure that it is not damaged during mod-
ifications or when loading or unloading the luggage compartment.
96Operation
Page 99 of 246
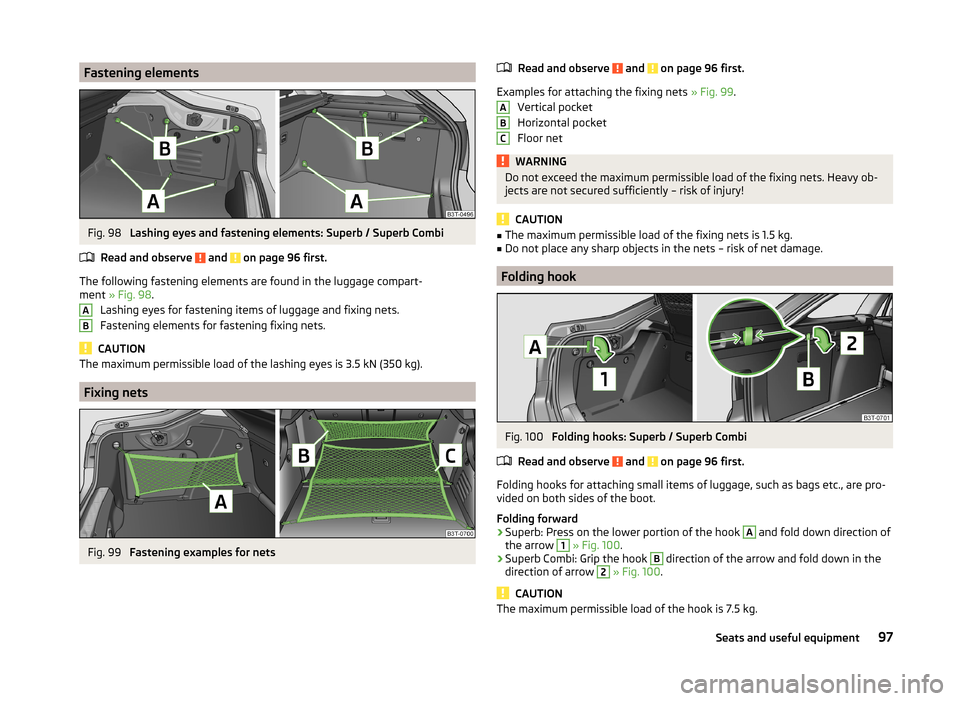
Fastening elementsFig. 98
Lashing eyes and fastening elements: Superb / Superb Combi
Read and observe
and on page 96 first.
The following fastening elements are found in the luggage compart-
ment » Fig. 98 .
Lashing eyes for fastening items of luggage and fixing nets.
Fastening elements for fastening fixing nets.
CAUTION
The maximum permissible load of the lashing eyes is 3.5 kN (350 kg).
Fixing nets
Fig. 99
Fastening examples for nets
ABRead and observe and on page 96 first.
Examples for attaching the fixing nets » Fig. 99.
Vertical pocket
Horizontal pocket
Floor net
WARNINGDo not exceed the maximum permissible load of the fixing nets. Heavy ob-
jects are not secured sufficiently – risk of injury!
CAUTION
■ The maximum permissible load of the fixing nets is 1.5 kg.■Do not place any sharp objects in the nets – risk of net damage.
Folding hook
Fig. 100
Folding hooks: Superb / Superb Combi
Read and observe
and on page 96 first.
Folding hooks for attaching small items of luggage, such as bags etc., are pro-
vided on both sides of the boot.
Folding forward
›
Superb: Press on the lower portion of the hook
A
and fold down direction of
the arrow
1
» Fig. 100 .
›
Superb Combi: Grip the hook
B
direction of the arrow and fold down in the
direction of arrow
2
» Fig. 100 .
CAUTION
The maximum permissible load of the hook is 7.5 kg.ABC97Seats and useful equipment
Page 100 of 246
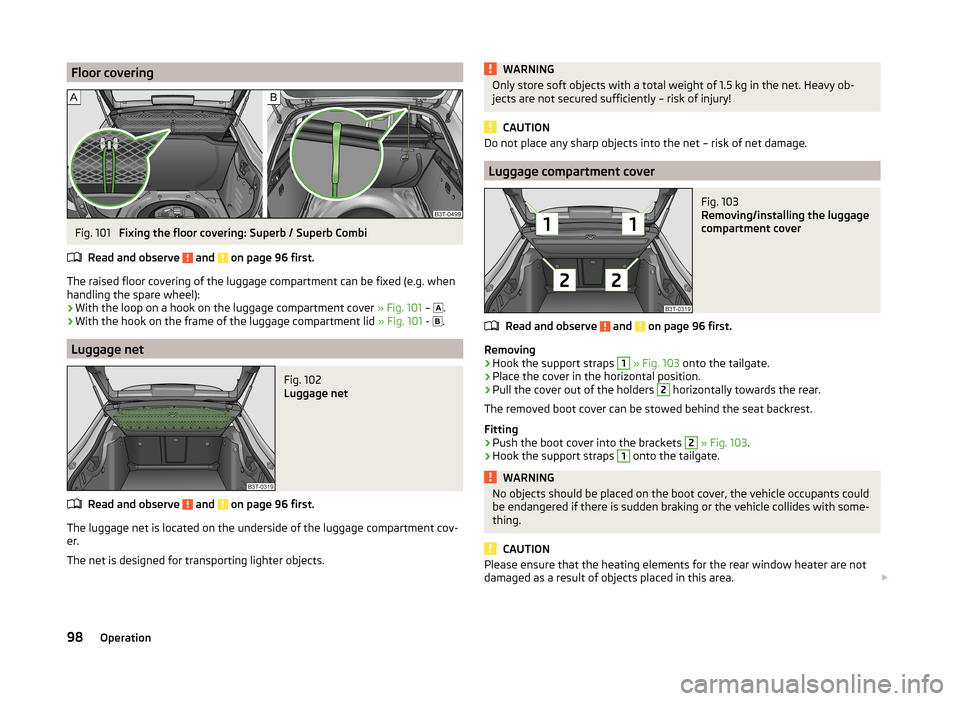
Floor coveringFig. 101
Fixing the floor covering: Superb / Superb Combi
Read and observe
and on page 96 first.
The raised floor covering of the luggage compartment can be fixed (e.g. when
handling the spare wheel):
› With the loop on a hook on the luggage compartment cover
» Fig. 101 –
.
› With the hook on the frame of the luggage compartment lid
» Fig. 101 -
.
Luggage net
Fig. 102
Luggage net
Read and observe and on page 96 first.
The luggage net is located on the underside of the luggage compartment cov-
er.
The net is designed for transporting lighter objects.
WARNINGOnly store soft objects with a total weight of 1.5 kg in the net. Heavy ob-
jects are not secured sufficiently – risk of injury!
CAUTION
Do not place any sharp objects into the net – risk of net damage.
Luggage compartment cover
Fig. 103
Removing/installing the luggage
compartment cover
Read and observe and on page 96 first.
Removing
›
Hook the support straps
1
» Fig. 103 onto the tailgate.
›
Place the cover in the horizontal position.
›
Pull the cover out of the holders
2
horizontally towards the rear.
The removed boot cover can be stowed behind the seat backrest.
Fitting
›
Push the boot cover into the brackets
2
» Fig. 103 .
›
Hook the support straps
1
onto the tailgate.
WARNINGNo objects should be placed on the boot cover, the vehicle occupants could
be endangered if there is sudden braking or the vehicle collides with some-
thing.
CAUTION
Please ensure that the heating elements for the rear window heater are not
damaged as a result of objects placed in this area. 98Operation
Page 101 of 246
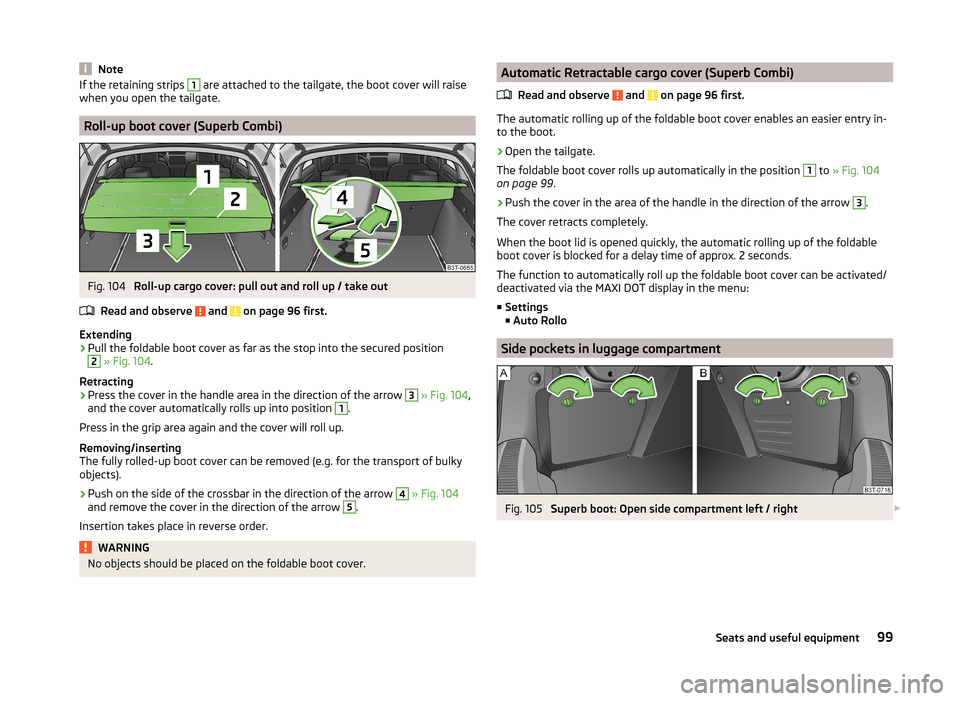
NoteIf the retaining strips 1 are attached to the tailgate, the boot cover will raise
when you open the tailgate.
Roll-up boot cover (Superb Combi)
Fig. 104
Roll-up cargo cover: pull out and roll up / take out
Read and observe
and on page 96 first.
Extending
›
Pull the foldable boot cover as far as the stop into the secured position
2
» Fig. 104 .
Retracting
›
Press the cover in the handle area in the direction of the arrow
3
» Fig. 104 ,
and the cover automatically rolls up into position
1
.
Press in the grip area again and the cover will roll up.
Removing/inserting
The fully rolled-up boot cover can be removed (e.g. for the transport of bulky objects).
›
Push on the side of the crossbar in the direction of the arrow
4
» Fig. 104
and remove the cover in the direction of the arrow
5
.
Insertion takes place in reverse order.
WARNINGNo objects should be placed on the foldable boot cover.Automatic Retractable cargo cover (Superb Combi)
Read and observe
and on page 96 first.
The automatic rolling up of the foldable boot cover enables an easier entry in-to the boot.
›
Open the tailgate.
The foldable boot cover rolls up automatically in the position
1
to » Fig. 104
on page 99 .
›
Push the cover in the area of the handle in the direction of the arrow
3
.
The cover retracts completely.
When the boot lid is opened quickly, the automatic rolling up of the foldable
boot cover is blocked for a delay time of approx. 2 seconds.
The function to automatically roll up the foldable boot cover can be activated/
deactivated via the MAXI DOT display in the menu:
■ Settings
■ Auto Rollo
Side pockets in luggage compartment
Fig. 105
Superb boot: Open side compartment left / right
99Seats and useful equipment
Page 102 of 246
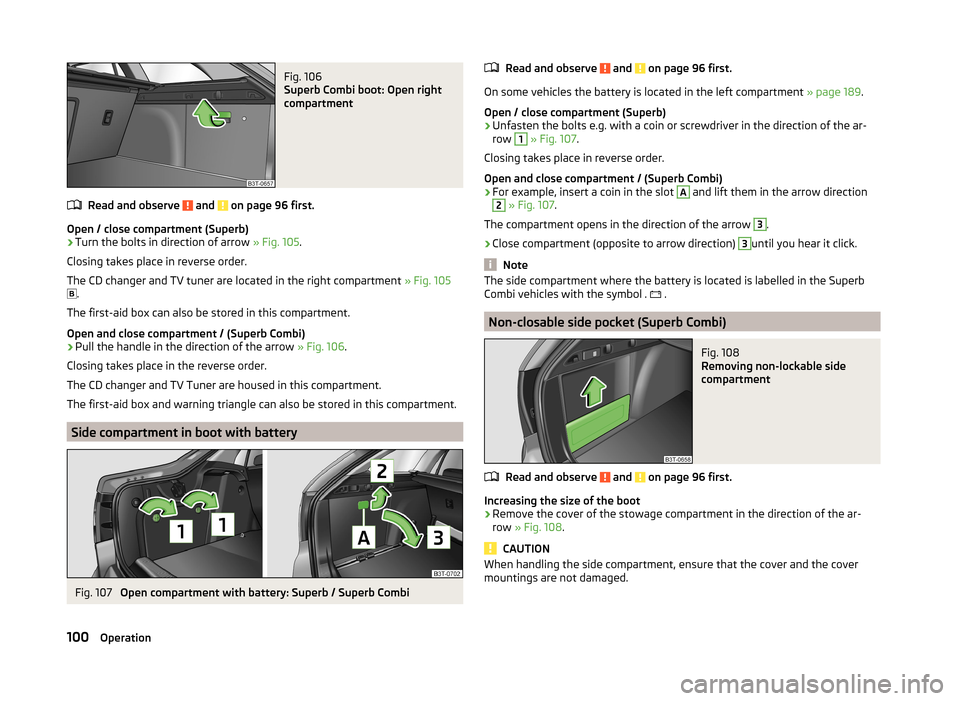
Fig. 106
Superb Combi boot: Open right
compartment
Read and observe and on page 96 first.
Open / close compartment (Superb)
›
Turn the bolts in direction of arrow » Fig. 105.
Closing takes place in reverse order.
The CD changer and TV tuner are located in the right compartment » Fig. 105
.
The first-aid box can also be stored in this compartment.
Open and close compartment / (Superb Combi)
›
Pull the handle in the direction of the arrow » Fig. 106.
Closing takes place in the reverse order.
The CD changer and TV Tuner are housed in this compartment.
The first-aid box and warning triangle can also be stored in this compartment.
Side compartment in boot with battery
Fig. 107
Open compartment with battery: Superb / Superb Combi
Read and observe and on page 96 first.
On some vehicles the battery is located in the left compartment » page 189.
Open / close compartment (Superb)
›
Unfasten the bolts e.g. with a coin or screwdriver in the direction of the ar-
row
1
» Fig. 107 .
Closing takes place in reverse order.
Open and close compartment / (Superb Combi)
›
For example, insert a coin in the slot
A
and lift them in the arrow direction
2
» Fig. 107 .
The compartment opens in the direction of the arrow
3
.
›
Close compartment (opposite to arrow direction)
3
until you hear it click.
Note
The side compartment where the battery is located is labelled in the Superb
Combi vehicles with the symbol . .
Non-closable side pocket (Superb Combi)
Fig. 108
Removing non-lockable side
compartment
Read and observe and on page 96 first.
Increasing the size of the boot
›
Remove the cover of the stowage compartment in the direction of the ar-
row » Fig. 108 .
CAUTION
When handling the side compartment, ensure that the cover and the cover
mountings are not damaged.100Operation