mirror SKODA SUPERB 2014 2.G / (B6/3T) User Guide
[x] Cancel search | Manufacturer: SKODA, Model Year: 2014, Model line: SUPERB, Model: SKODA SUPERB 2014 2.G / (B6/3T)Pages: 246, PDF Size: 17.16 MB
Page 79 of 246
Headlight cleaning systemRead and observe
and on page 75 first.
After the ignition is switched on, the headlights are always cleaned at the first
and after every tenth spray of the windscreen (setting
5
» Fig. 62 on
page 76 ), when the low beam or main beam is switched on.
You should remove stubborn dirt (such as insect residues) from the headlight
lenses at regular intervals, for example when refuelling. The following guide-
lines must be observed » page 175, Headlight lenses .
To ensure the proper operation of the cleaning system during the winter, any snow should be removed from the washer nozzle fixtures and ice should be
cleared with a de-icing spray.
CAUTION
Never remove the nozzles from the headlight cleaning system by hand – risk of
damage!
Rear mirror
Introduction
This chapter contains information on the following subjects:
Interior mirror
77
Exterior mirrors
78WARNING■ Make sure that the mirror is not covered by ice, snow, mist or other ob-
jects.■
Convex (curved outward) or aspheric exterior mirrors increase the field of
vision. They do, however, make objects appear smaller in the mirror. These
mirrors are therefore only of limited use for estimating distances to the fol-
lowing vehicles.
■
Whenever possible use the interior mirror for estimating the distances to
the following vehicles.
■
The illuminated display of an external navigation unit can lead to opera-
tional faults to the automatic dimming interior mirror – risk of accident.
WARNINGThe mirrors with automatic dimming contain an electrolyte liquid which can
escape if mirror glass is broken.■
The leaking electrolytic fluid can irritate the skin, eyes and breath appara-
tus. Immediately seek out fresh air and leave the vehicle. If this is not pos-
sible, at least open the window.
■
If you swallow electrolytic fluid, seek medical assistance immediately.
■
If your eyes or skin come into contact with the electrolytic fluid, immedi-
ately wash the affected area for a few minutes long with a lot of water.
Then consult a doctor immediately.
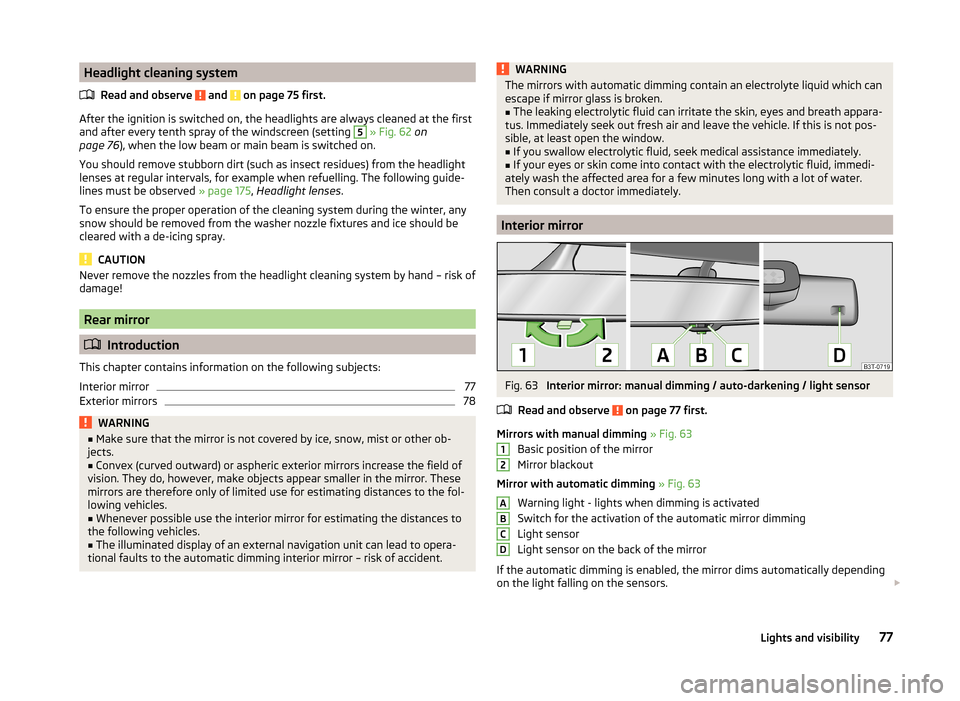
Interior mirror
Fig. 63
Interior mirror: manual dimming / auto-darkening / light sensor
Read and observe
on page 77 first.
Mirrors with manual dimming » Fig. 63
Basic position of the mirror
Mirror blackout
Mirror with automatic dimming » Fig. 63
Warning light - lights when dimming is activated
Switch for the activation of the automatic mirror dimming
Light sensor
Light sensor on the back of the mirror
If the automatic dimming is enabled, the mirror dims automatically depending
on the light falling on the sensors.
12ABCD77Lights and visibility
Page 80 of 246
When the interior lights are switched on or the reverse gear is engaged, the
mirror always moves back into the basic position (not dimmed).
Do not attach external navigation devices on to the windscreen or in the vicini-
ty of the automatic dimming mirror » page 77,
in section Introduction .
Note
■
The automatic dimming mirror only functions smoothly if the light falling on
the sensors is not compromised (e.g. by the sun screen back).■
If the automatic interior mirror dimming is switched off, the exterior mirror
dimming is also switched off.
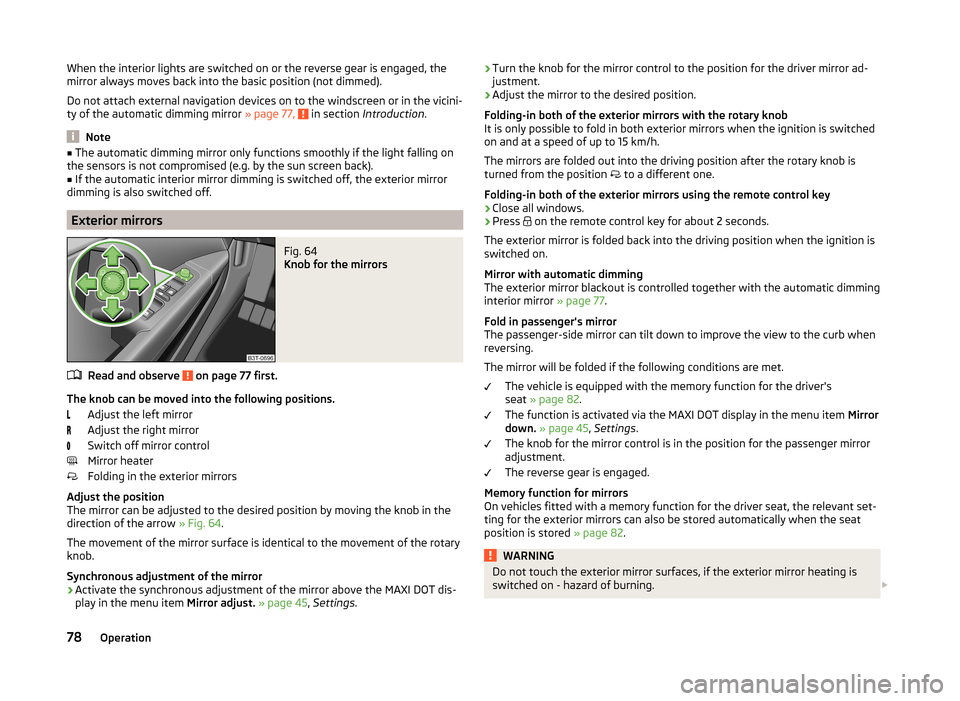
Exterior mirrors
Fig. 64
Knob for the mirrors
Read and observe on page 77 first.
The knob can be moved into the following positions.
Adjust the left mirror
Adjust the right mirror
Switch off mirror control
Mirror heater
Folding in the exterior mirrors
Adjust the position
The mirror can be adjusted to the desired position by moving the knob in the
direction of the arrow » Fig. 64.
The movement of the mirror surface is identical to the movement of the rotary
knob.
Synchronous adjustment of the mirror
›
Activate the synchronous adjustment of the mirror above the MAXI DOT dis- play in the menu item Mirror adjust. » page 45 , Settings .
›Turn the knob for the mirror control to the position for the driver mirror ad-
justment.›
Adjust the mirror to the desired position.
Folding-in both of the exterior mirrors with the rotary knob
It is only possible to fold in both exterior mirrors when the ignition is switched
on and at a speed of up to 15 km/h.
The mirrors are folded out into the driving position after the rotary knob is
turned from the position
to a different one.
Folding-in both of the exterior mirrors using the remote control key
›
Close all windows.
›
Press on the remote control key for about 2 seconds.
The exterior mirror is folded back into the driving position when the ignition is
switched on.
Mirror with automatic dimming
The exterior mirror blackout is controlled together with the automatic dimming
interior mirror » page 77.
Fold in passenger's mirror
The passenger-side mirror can tilt down to improve the view to the curb when
reversing.
The mirror will be folded if the following conditions are met. The vehicle is equipped with the memory function for the driver's
seat » page 82 .
The function is activated via the MAXI DOT display in the menu item Mirror
down. » page 45 , Settings .
The knob for the mirror control is in the position for the passenger mirror
adjustment.
The reverse gear is engaged.
Memory function for mirrors
On vehicles fitted with a memory function for the driver seat, the relevant set-
ting for the exterior mirrors can also be stored automatically when the seat
position is stored » page 82.
WARNINGDo not touch the exterior mirror surfaces, if the exterior mirror heating is
switched on - hazard of burning. 78Operation
Page 81 of 246
CAUTION■The exterior mirrors with fold-in function never mechanically fold by hand
- there is a risk of damaging the electric mirror actuator!■
When the mirror is swung by external influences (due to impact during ma-
noeuvring, for example), then first fold-in the mirror by turning the knob and
wait for a loud clapping noise.
Note
■ The mirror heater only operates when the engine is running and up to an
outside temperature of +35 ℃.■
If the electrical mirror setting fails at any time, the mirrors can be adjusted by
hand by pressing on the edge of the mirror surface.
Seats and useful equipment
Adjusting the seats
Introduction
This chapter contains information on the following subjects:
Manually adjusting the front seats
80
Electric front seat adjustment
80
Head restraints
81
Memory function of the electrically adjustable seat
82
Memory function of the remote control key
82
The driver's seat should be adjusted in such a way that the pedals can be fully
pressed to the floor with slightly bent legs.
The seat backrest on the driver's seat should be adjusted in such a way that the upper point of the steering wheel can be easily reached with slightly bent
arms.
Correct adjustment of the seats is particularly important for the following rea-
sons.
› Reaching the controls safely and quickly.
› A relaxed and fatigue-free body position.
› Achieving the maximum protection offered by the seat belts and the airbag
system.
WARNING■ Only adjust the driver's seat when the vehicle is stationary – risk of acci-
dent!■
Caution when adjusting the seat! You may suffer injuries or bruises as a
result of adjusting the seat without paying proper attention.
■
The electric front seat adjustment is still functional if the ignition is
switched off (even with the ignition key removed). Therefore, when leaving
the vehicle, never leave people who are not completely independent, such
as children, unattended in the vehicle - there is a danger of injury!
■
Never carry more people than the number of seats in the vehicle.
■
Do not carry any objects on the front passenger seat except objects de-
signed for this purpose (e.g. child seats) – risk of accident!
79Seats and useful equipment
Page 82 of 246
Note■After a certain time, play can develop within the adjustment mechanism of
the backrest angle.■
For safety reasons, it is not possible to store the seat position in the electric
seat memory and remote control key memory if the inclination angle of the
seat backrest is more than 102° in relation to the seat cushion.
■
Each time you store the position of the electrically adjustable driver's seat
and exterior mirrors, the existing setting is deleted.
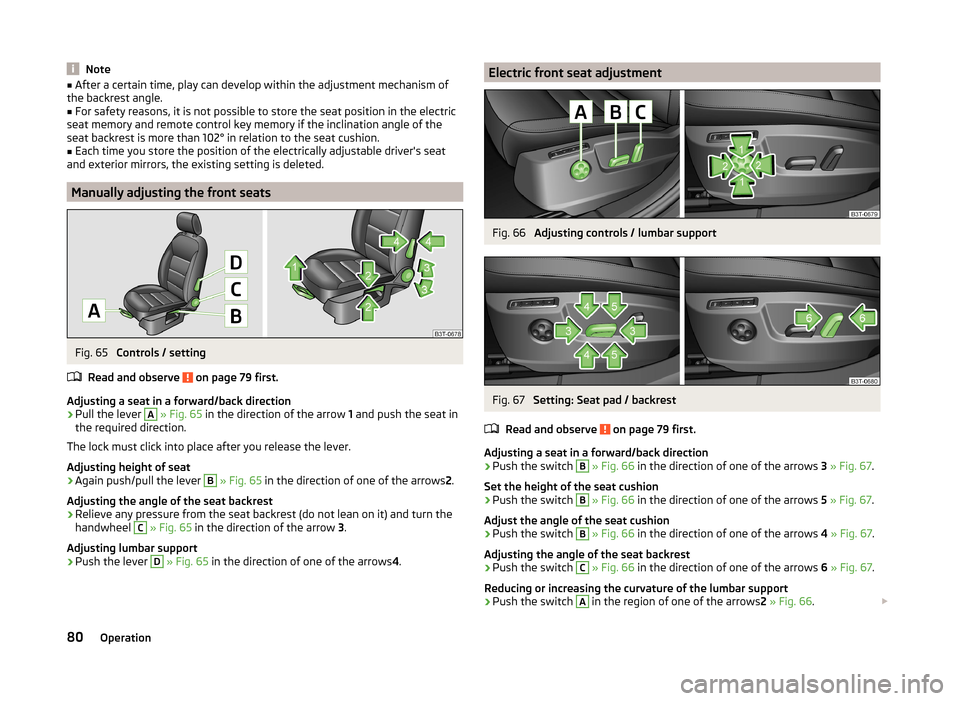
Manually adjusting the front seats
Fig. 65
Controls / setting
Read and observe
on page 79 first.
Adjusting a seat in a forward/back direction
›
Pull the lever
A
» Fig. 65 in the direction of the arrow 1 and push the seat in
the required direction.
The lock must click into place after you release the lever.
Adjusting height of seat
›
Again push/pull the lever
B
» Fig. 65 in the direction of one of the arrows 2.
Adjusting the angle of the seat backrest
›
Relieve any pressure from the seat backrest (do not lean on it) and turn the
handwheel
C
» Fig. 65 in the direction of the arrow 3.
Adjusting lumbar support
›
Push the lever
D
» Fig. 65 in the direction of one of the arrows 4.
Electric front seat adjustmentFig. 66
Adjusting controls / lumbar support
Fig. 67
Setting: Seat pad / backrest
Read and observe
on page 79 first.
Adjusting a seat in a forward/back direction
›
Push the switch
B
» Fig. 66 in the direction of one of the arrows 3 » Fig. 67 .
Set the height of the seat cushion
›
Push the switch
B
» Fig. 66 in the direction of one of the arrows 5 » Fig. 67 .
Adjust the angle of the seat cushion
›
Push the switch
B
» Fig. 66 in the direction of one of the arrows 4 » Fig. 67 .
Adjusting the angle of the seat backrest
›
Push the switch
C
» Fig. 66 in the direction of one of the arrows 6 » Fig. 67 .
Reducing or increasing the curvature of the lumbar support
›
Push the switch
A
in the region of one of the arrows 2 » Fig. 66 .
80Operation
Page 84 of 246
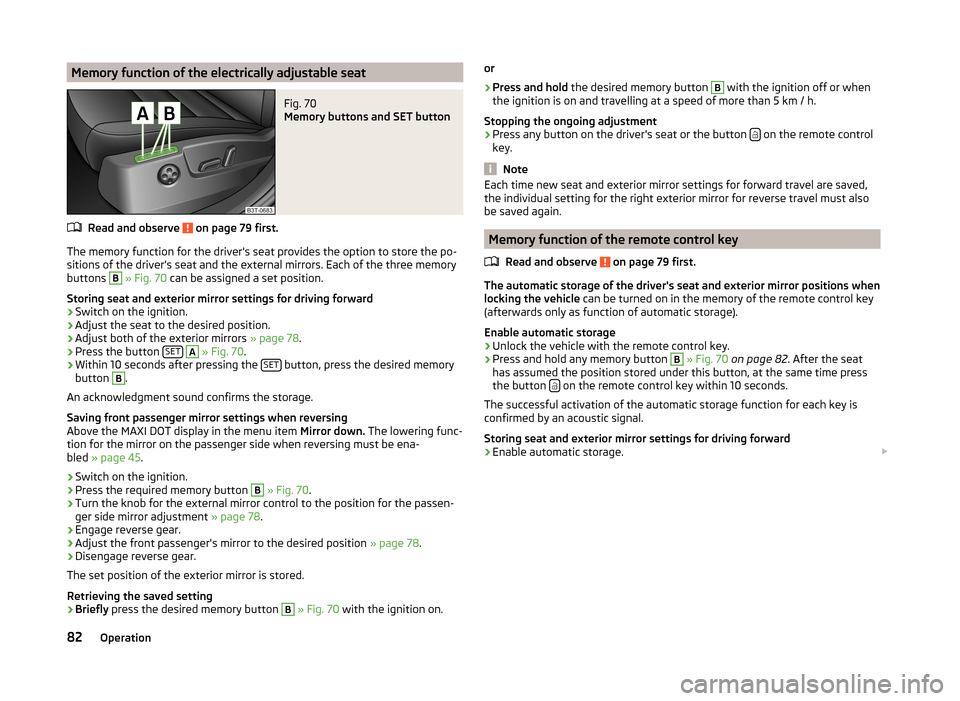
Memory function of the electrically adjustable seatFig. 70
Memory buttons and SET button
Read and observe on page 79 first.
The memory function for the driver's seat provides the option to store the po-
sitions of the driver's seat and the external mirrors. Each of the three memory
buttons
B
» Fig. 70 can be assigned a set position.
Storing seat and exterior mirror settings for driving forward
›
Switch on the ignition.
›
Adjust the seat to the desired position.
›
Adjust both of the exterior mirrors » page 78.
›
Press the button SET
A
» Fig. 70 .
›
Within 10 seconds after pressing the SET button, press the desired memory
button
B
.
An acknowledgment sound confirms the storage.
Saving front passenger mirror settings when reversing
Above the MAXI DOT display in the menu item Mirror down. The lowering func-
tion for the mirror on the passenger side when reversing must be ena-
bled » page 45 .
›
Switch on the ignition.
›
Press the required memory button
B
» Fig. 70 .
›
Turn the knob for the external mirror control to the position for the passen-
ger side mirror adjustment » page 78.
›
Engage reverse gear.
›
Adjust the front passenger's mirror to the desired position » page 78.
›
Disengage reverse gear.
The set position of the exterior mirror is stored.
Retrieving the saved setting
›
Briefly press the desired memory button
B
» Fig. 70 with the ignition on.
or›
Press and hold the desired memory button
B
with the ignition off or when
the ignition is on and travelling at a speed of more than 5 km / h.
Stopping the ongoing adjustment
›
Press any button on the driver's seat or the button on the remote control
key.
Note
Each time new seat and exterior mirror settings for forward travel are saved,
the individual setting for the right exterior mirror for reverse travel must also
be saved again.
Memory function of the remote control key
Read and observe
on page 79 first.
The automatic storage of the driver's seat and exterior mirror positions when
locking the vehicle can be turned on in the memory of the remote control key
(afterwards only as function of automatic storage).
Enable automatic storage
›
Unlock the vehicle with the remote control key.
›
Press and hold any memory button
B
» Fig. 70 on page 82 . After the seat
has assumed the position stored under this button, at the same time press
the button
on the remote control key within 10 seconds.
The successful activation of the automatic storage function for each key is
confirmed by an acoustic signal.
Storing seat and exterior mirror settings for driving forward
›
Enable automatic storage.
82Operation
Page 85 of 246
When automatic storage is activated, the current positions of the driver's seat
and the external mirrors are saved in the memory of the remote control key
each time the vehicle is locked. When the vehicle is next unlocked using the
same key, the driver's seat and the external mirrors assume the positions stor-
ed in the memory of this key 1)
.
Saving front passenger mirror settings when reversing
Above the MAXI DOT display in the menu item Mirror down. The lowering func-
tion for the mirror on the passenger side when reversing must be ena-
bled » page 45 .›
Unlock the vehicle with the remote control key.
›
Switch on the ignition.
›
Turn the knob for the external mirror control to the position for the passen-
ger side mirror adjustment » page 78.
›
Engage reverse gear.
›
Adjust the front passenger's mirror to the desired position » page 78.
›
Disengage reverse gear.
The adjusted position of the exterior mirror is stored in the remote control key
memory.
Disable the function of automatic storage
›
Unlock the vehicle with the remote control key.
›
Press and hold the SET button
A
» Fig. 70 on page 82 . At the same time,
press the button on the remote control key within 10 seconds.
The successful deactivation of the automatic storage function for each key is confirmed by an acoustic signal.
Stopping the ongoing adjustment
›
Press any button on the driver's seat or the button on the remote control
key.
Seat features
Introduction
This chapter contains information on the following subjects:
Seat heaters
83
Ventilated front seats
84Convenience features of passenger seat85Armrest, front85
Armrest rear
85
Seat backrests
85
Rear seat folded forward (Superb Combi)
86
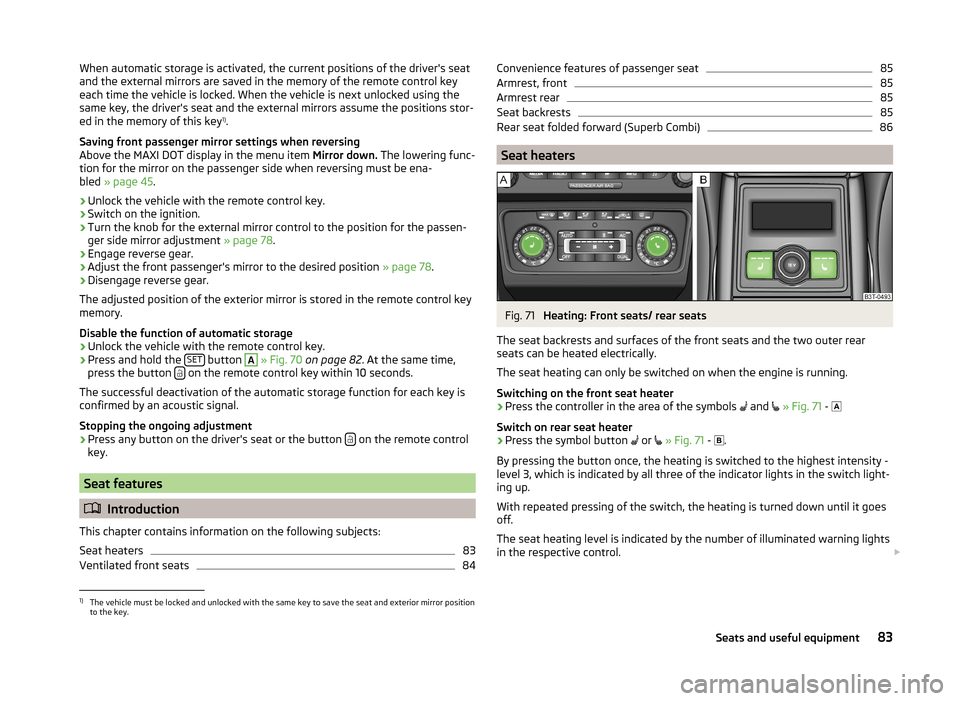
Seat heaters
Fig. 71
Heating: Front seats/ rear seats
The seat backrests and surfaces of the front seats and the two outer rear
seats can be heated electrically.
The seat heating can only be switched on when the engine is running.
Switching on the front seat heater
›
Press the controller in the area of the symbols and
» Fig. 71 -
Switch on rear seat heater
›
Press the symbol button or
» Fig. 71 -
.
By pressing the button once, the heating is switched to the highest intensity -
level 3, which is indicated by all three of the indicator lights in the switch light-
ing up.
With repeated pressing of the switch, the heating is turned down until it goes
off.
The seat heating level is indicated by the number of illuminated warning lights
in the respective control.
1)
The vehicle must be locked and unlocked with the same key to save the seat and exterior mirror position
to the key.
83Seats and useful equipment
Page 169 of 246
WARNING■Do not exceed the maximum permissible axle and drawbar load and the
maximum permissible total or towed weight of the vehicle and the trailer –
risk of accident and serious injury.■
Slipping loads can significantly impair the stability and safety of the vehi-
cle/trailer combination – risk of accident and serious injury.
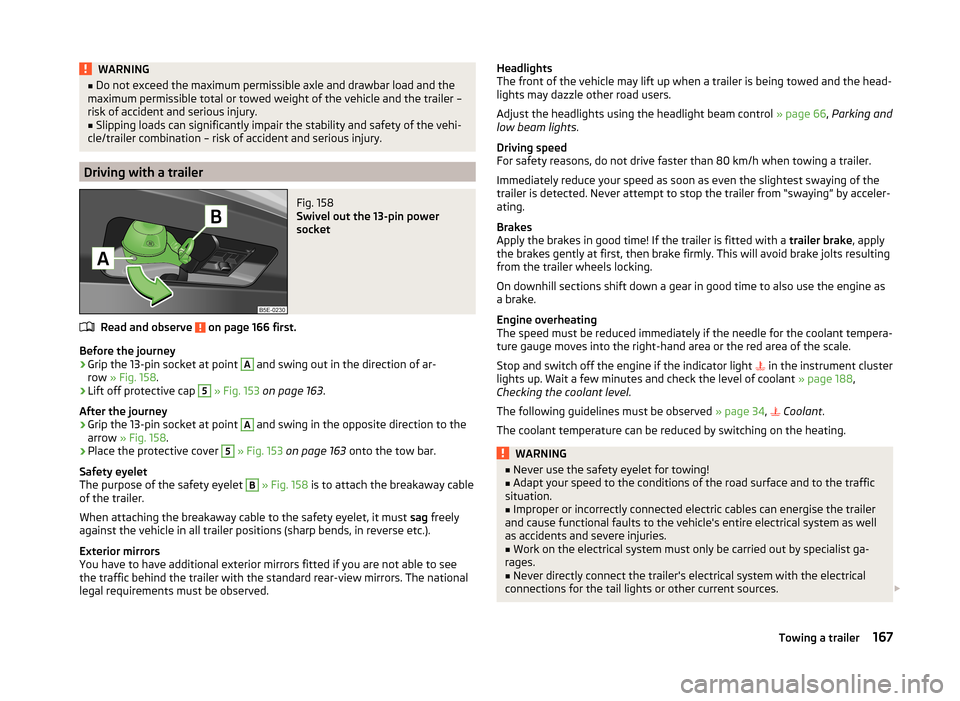
Driving with a trailer
Fig. 158
Swivel out the 13-pin power
socket
Read and observe on page 166 first.
Before the journey
›
Grip the 13-pin socket at point
A
and swing out in the direction of ar-
row » Fig. 158 .
›
Lift off protective cap
5
» Fig. 153 on page 163 .
After the journey
›
Grip the 13-pin socket at point
A
and swing in the opposite direction to the
arrow » Fig. 158 .
›
Place the protective cover
5
» Fig. 153 on page 163 onto the tow bar.
Safety eyelet
The purpose of the safety eyelet
B
» Fig. 158 is to attach the breakaway cable
of the trailer.
When attaching the breakaway cable to the safety eyelet, it must sag freely
against the vehicle in all trailer positions (sharp bends, in reverse etc.).
Exterior mirrors
You have to have additional exterior mirrors fitted if you are not able to see
the traffic behind the trailer with the standard rear-view mirrors. The national
legal requirements must be observed.
Headlights
The front of the vehicle may lift up when a trailer is being towed and the head-
lights may dazzle other road users.
Adjust the headlights using the headlight beam control » page 66, Parking and
low beam lights .
Driving speed
For safety reasons, do not drive faster than 80 km/h when towing a trailer.
Immediately reduce your speed as soon as even the slightest swaying of the
trailer is detected. Never attempt to stop the trailer from “swaying” by acceler-
ating.
Brakes
Apply the brakes in good time! If the trailer is fitted with a trailer brake, apply
the brakes gently at first, then brake firmly. This will avoid brake jolts resulting
from the trailer wheels locking.
On downhill sections shift down a gear in good time to also use the engine as
a brake.
Engine overheating
The speed must be reduced immediately if the needle for the coolant tempera-
ture gauge moves into the right-hand area or the red area of the scale.
Stop and switch off the engine if the indicator light in the instrument cluster
lights up. Wait a few minutes and check the level of coolant » page 188,
Checking the coolant level .
The following guidelines must be observed » page 34,
Coolant
.
The coolant temperature can be reduced by switching on the heating.WARNING■ Never use the safety eyelet for towing!■Adapt your speed to the conditions of the road surface and to the traffic
situation.■
Improper or incorrectly connected electric cables can energise the trailer
and cause functional faults to the vehicle's entire electrical system as well
as accidents and severe injuries.
■
Work on the electrical system must only be carried out by specialist ga-
rages.
■
Never directly connect the trailer's electrical system with the electrical
connections for the tail lights or other current sources.
167Towing a trailer
Page 175 of 246
Automatic car wash systemsRead and observe
and on page 172 first.
The usual precautionary measures must be taken before washing the vehicle
in an automatic car wash system (e.g. closing the windows and the sliding/tilt-
ing roof etc.).
If your vehicle is fitted with any particular attached parts, such as a spoiler,
roof rack system, two-way radio aerial etc., it is best to consult the operator of
the car wash system beforehand.
After an automatic wash with wax treatment, the lips of the wipers should be
cleaned with cleaning agents specially designed for the purpose, and then de-
greased.
WARNINGFold in the exterior mirrors to prevent damage before washing the vehicle
in an automatic car wash system. Never manually fold in electric exterior
mirrors - always use the electric controls.
Washing with a high-pressure cleaner
Read and observe
and on page 172 first.
When washing the vehicle with a high-pressure cleaner, the instructions for
use of the equipment must be observed. This applies in particular to the pres-
sure used and to the spraying distance .
Maintain a sufficiently large distance to the parking aid sensors and soft mate-
rials such as rubber hoses or insulation material.
WARNINGNever use circular spray nozzles or dirt cutters!
CAUTION
■ If washing the vehicle in the winter using a hose or high-pressure cleaner,
ensure that the jet of water is not aimed directly at the locking cylinders or the
door/panel joints – risk of freezing!■
To avoid damaging the parking aid sensors while cleaning with high-pressure
cleaners or steam jets, the sensors must only be directly sprayed for short pe-
riods while a minimum distance of 10 cm must be observed.
■ The temperature of the water used for cleaning must not exceed 60 °C – risk
of damaging the vehicle.■
See also Washing cars with decorative films using a high-pressure clean-
er » page 175 .
Taking care of your vehicle exterior
Introduction
This chapter contains information on the following subjects:
Taking care of your vehicle's paintwork
174
Plastic parts
174
Rubber seals
174
Chrome parts
174
Decorative films
175
Windows and exterior mirrors
175
Headlight lenses
175
Door lock cylinders
175
Cavity protection
176
Wheels
176
Underbody protection
176
Regular and proper care help to retain the efficiency and value of your vehicle.
It may also be one of the requirements for the acceptance of warranty claims
relating to corrosion damage and paint defects on the bodywork.
We recommend using vehicle care products from ŠKODA Original Accessories.
These are available from ŠKODA Partners. The usage instructions on the pack-
age must be observed.
WARNING■ Vehicle care products may be harmful to your health if not used according
to the instructions.■
Always keep the vehicle care products safe from people who are not com-
pletely independent, e.g. children - there is a danger of poisoning!
■
Protect your hands and arms from sharp-edged metal parts when clean-
ing the underfloor, the inside of the wheel housings or the wheel trims –
risk of cuts!
173Car care
Page 177 of 246
CAUTIONDo not polish the chrome parts in a dusty environment - risk of surface
scratches.
Decorative films
Read and observe
and on page 173 first.
Wash the films with a mild soap solution and clean, warm water. Never use
harsh cleaning products or chemical solvents, as this could damage the films.
The following instructions must be followed when washing the vehicle with a
high-pressure cleaner:
› The minimum distance between the nozzle and the vehicle body should be
50 cm.
› Keep jet perpendicular to the film surface.
› The maximum water temperature is 50 °C.
› The maximum water pressure is 80 bar.
CAUTION
In the winter months, do not use an ice scraper to remove ice and snow from
the areas with films. Do not use any other objects to remove frozen layers of
snow or ice – risk of film damage.
Windows and exterior mirrors
Read and observe
and on page 173 first.
Use a plastic ice scraper for removing snow and ice from the windows and mir-
rors.
Regularly clean windows from the inside with clean water.
Dry the glass surfaces with a clean chamois leather or a cloth intended for this
purpose.
When drying the windows after washing the vehicle, do not use window leath-
ers that have been used to polish the bodywork. Residues of preservatives in
the window leather can make the window dirty and reduce visibility.
CAUTION■ The ice scraper should not be moved forward and backward but in one direc-
tion to avoid any damage to the surface of the glass.■
Snow or ice that is contaminated with coarse dirt such as fine gravel, sand or
salt must not be removed from the windows and mirrors – there is a risk of
damage to the surface of the windows and mirrors.
■
Do not remove snow or ice from glass parts using warm or hot water – risk of
cracks forming in the glass.
■
When removing snow or ice from windows and mirror lenses ensure that the
paintwork of the vehicle is not to damage.
■
Do not clean the inside of the windows with sharp-edged objects or corro-
sive and acidic cleaning agents – there is a risk of damaging the heating ele-
ments or window aerial.
Headlight lenses
Read and observe
and on page 173 first.
Clean plastic front headlight lenses using clean, warm water and soap.
CAUTION
■Never wipe headlights with a dry cloth.■Do not use any sharp objects to clean the plastic lenses, as this may damage
the protective paintwork and consequently cause cracks to form on the head-
light lenses.■
Do not use any harsh cleaning products or chemical solvents to clean the
headlights, as this could damage the headlight lenses.
Door lock cylinders
Read and observe
and on page 173 first.
Specific products must be used for de-icing door lock cylinders.
CAUTION
When washing your vehicle, ensure as little water as possible gets into the
locking cylinders.175Car care
Page 214 of 246
Emergency unlocking/locking
Introduction
This chapter contains information on the following subjects:
Unlocking/locking the driver's door
212
Locking a door
212
Unlocking the tailgate
212
Selector lever-emergency unlocking
213
Unlocking/locking the driver's door
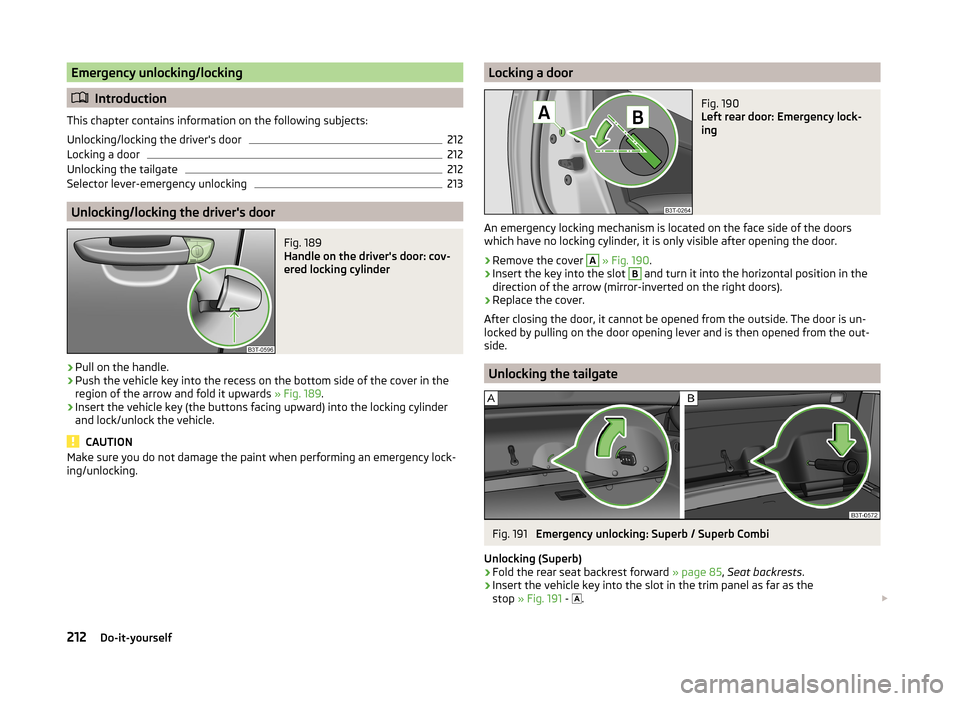
Fig. 189
Handle on the driver's door: cov-
ered locking cylinder
›
Pull on the handle.
›
Push the vehicle key into the recess on the bottom side of the cover in the
region of the arrow and fold it upwards » Fig. 189.
›
Insert the vehicle key (the buttons facing upward) into the locking cylinder
and lock/unlock the vehicle.
CAUTION
Make sure you do not damage the paint when performing an emergency lock-
ing/unlocking.Locking a doorFig. 190
Left rear door: Emergency lock-
ing
An emergency locking mechanism is located on the face side of the doors
which have no locking cylinder, it is only visible after opening the door.
›
Remove the cover
A
» Fig. 190 .
›
Insert the key into the slot
B
and turn it into the horizontal position in the
direction of the arrow (mirror-inverted on the right doors).
›
Replace the cover.
After closing the door, it cannot be opened from the outside. The door is un-
locked by pulling on the door opening lever and is then opened from the out-
side.
Unlocking the tailgate
Fig. 191
Emergency unlocking: Superb / Superb Combi
Unlocking (Superb)
›
Fold the rear seat backrest forward » page 85, Seat backrests .
›
Insert the vehicle key into the slot in the trim panel as far as the
stop » Fig. 191 -
.
212Do-it-yourself