remove seats SKODA SUPERB 2014 2.G / (B6/3T) User Guide
[x] Cancel search | Manufacturer: SKODA, Model Year: 2014, Model line: SUPERB, Model: SKODA SUPERB 2014 2.G / (B6/3T)Pages: 246, PDF Size: 17.16 MB
Page 91 of 246
Rear cup holder›Press on the front end of the armrest in the direction of the arrow » Fig. 83 -
, the cup holder comes out.›
To slide the cup holder in again, press the middle part of the cup hold-
er » Fig. 83 -
and slide it into the armrest in the direction of the arrow.
WARNING■
Never put hot beverage containers in the cup holder. If the vehicle moves,
they may spill – risk of scalding!■
Do not use any cups or beakers which are made of brittle material (e.g.
glass, porcelain). This could lead to injuries in the event of an accident.
CAUTION
■ Do not leave open beverage containers in the cup holder during the journey.
There is a risk of spilling e.g. when braking which may cause damage to the
electrical components or seat upholstery.■
Slide in the cup holder before raising the rear armrest.
Cigarette lighter
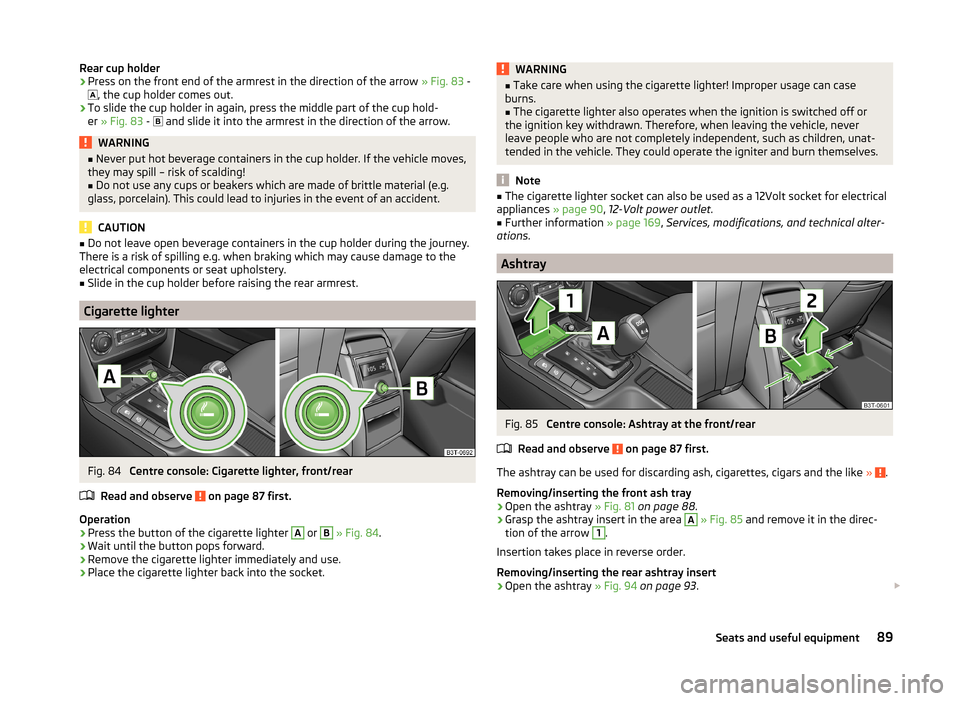
Fig. 84
Centre console: Cigarette lighter, front/rear
Read and observe
on page 87 first.
Operation
›
Press the button of the cigarette lighter
A
or
B
» Fig. 84 .
›
Wait until the button pops forward.
›
Remove the cigarette lighter immediately and use.
›
Place the cigarette lighter back into the socket.
WARNING■
Take care when using the cigarette lighter! Improper usage can case
burns.■
The cigarette lighter also operates when the ignition is switched off or
the ignition key withdrawn. Therefore, when leaving the vehicle, never
leave people who are not completely independent, such as children, unat-
tended in the vehicle. They could operate the igniter and burn themselves.
Note
■ The cigarette lighter socket can also be used as a 12Volt socket for electrical
appliances » page 90, 12-Volt power outlet .■
Further information » page 169, Services, modifications, and technical alter-
ations .
Ashtray
Fig. 85
Centre console: Ashtray at the front/rear
Read and observe
on page 87 first.
The ashtray can be used for discarding ash, cigarettes, cigars and the like » .
Removing/inserting the front ash tray
›
Open the ashtray » Fig. 81 on page 88 .
›
Grasp the ashtray insert in the area
A
» Fig. 85 and remove it in the direc-
tion of the arrow
1
.
Insertion takes place in reverse order.
Removing/inserting the rear ashtray insert
›
Open the ashtray » Fig. 94 on page 93 .
89Seats and useful equipment
Page 101 of 246
NoteIf the retaining strips 1 are attached to the tailgate, the boot cover will raise
when you open the tailgate.
Roll-up boot cover (Superb Combi)
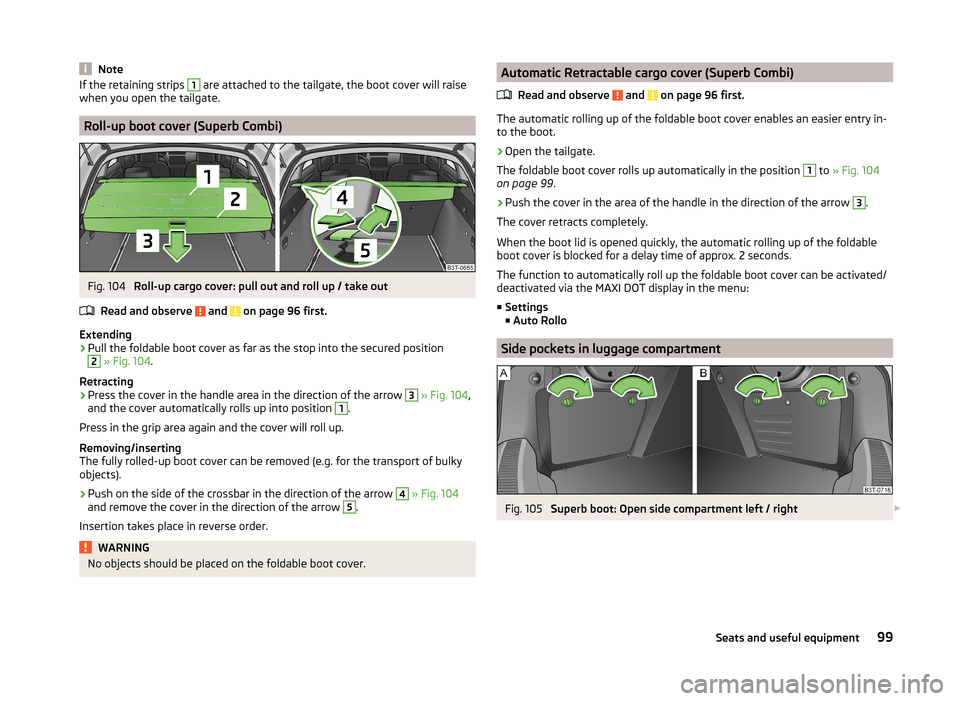
Fig. 104
Roll-up cargo cover: pull out and roll up / take out
Read and observe
and on page 96 first.
Extending
›
Pull the foldable boot cover as far as the stop into the secured position
2
» Fig. 104 .
Retracting
›
Press the cover in the handle area in the direction of the arrow
3
» Fig. 104 ,
and the cover automatically rolls up into position
1
.
Press in the grip area again and the cover will roll up.
Removing/inserting
The fully rolled-up boot cover can be removed (e.g. for the transport of bulky objects).
›
Push on the side of the crossbar in the direction of the arrow
4
» Fig. 104
and remove the cover in the direction of the arrow
5
.
Insertion takes place in reverse order.
WARNINGNo objects should be placed on the foldable boot cover.Automatic Retractable cargo cover (Superb Combi)
Read and observe
and on page 96 first.
The automatic rolling up of the foldable boot cover enables an easier entry in-to the boot.
›
Open the tailgate.
The foldable boot cover rolls up automatically in the position
1
to » Fig. 104
on page 99 .
›
Push the cover in the area of the handle in the direction of the arrow
3
.
The cover retracts completely.
When the boot lid is opened quickly, the automatic rolling up of the foldable
boot cover is blocked for a delay time of approx. 2 seconds.
The function to automatically roll up the foldable boot cover can be activated/
deactivated via the MAXI DOT display in the menu:
■ Settings
■ Auto Rollo
Side pockets in luggage compartment
Fig. 105
Superb boot: Open side compartment left / right
99Seats and useful equipment
Page 103 of 246
Removable light (Superb Combi)
Introduction
This chapter contains information on the following subjects:
Use light
101
Changing rechargeable light batteries
101
A removable lamp is fitted on the left side of the boot. This lamp has two func-
tions.
› Lighting the luggage compartment - part
B
» Fig. 109 on page 101 illumina-
ted (lamp in holder).
› Portable lamp - part
C
illuminated (lamp removed from the holder).
If the lamp is in the holder, it is automatically switched on when the tailgate is
opened and switched off again when the tailgate is closed.
The lamp is supplied by three rechargeable type AAA batteries. The rechargea-
ble batteries are constantly charged when the engine is running. It takes ap-
prox. 3 hours to fully charge the rechargeable batteries.
The lamp is fitted with magnets. Therefore it is possible to attach the lamp, for example on the vehicle body, after removing it.
CAUTION
The removable lamp is not watertight and must therefore be protected against
moisture.
Note
■ If the lamp is not correctly inserted into the holder, it does not light up when
the boot lid is opened and the rechargeable batteries are not charged.■
If the lamp is not switched off and it is correctly inserted in the holder, the
bulbs in the front part
C
» Fig. 109 on page 101 of the lamp are automatically
switched off.
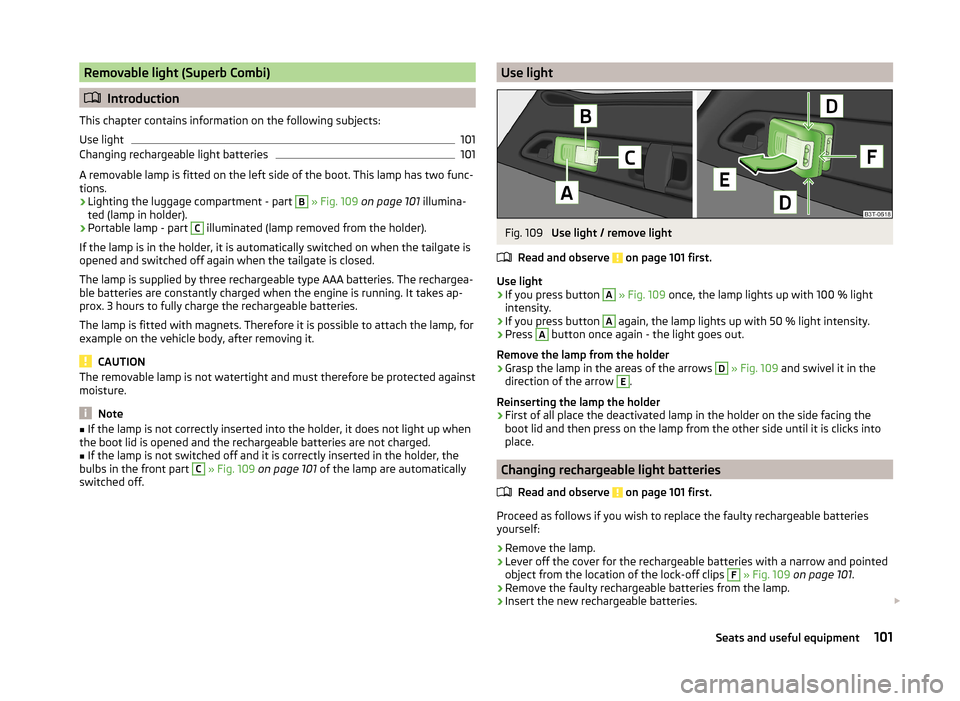
Use lightFig. 109
Use light / remove light
Read and observe
on page 101 first.
Use light
›
If you press button
A
» Fig. 109 once, the lamp lights up with 100 % light
intensity.
›
If you press button
A
again, the lamp lights up with 50 % light intensity.
›
Press
A
button once again - the light goes out.
Remove the lamp from the holder
›
Grasp the lamp in the areas of the arrows
D
» Fig. 109 and swivel it in the
direction of the arrow
E
.
Reinserting the lamp the holder
›
First of all place the deactivated lamp in the holder on the side facing the
boot lid and then press on the lamp from the other side until it is clicks into
place.
Changing rechargeable light batteries
Read and observe
on page 101 first.
Proceed as follows if you wish to replace the faulty rechargeable batteries
yourself:
›
Remove the lamp.
›
Lever off the cover for the rechargeable batteries with a narrow and pointed
object from the location of the lock-off clips
F
» Fig. 109 on page 101 .
›
Remove the faulty rechargeable batteries from the lamp.
›
Insert the new rechargeable batteries.
101Seats and useful equipment
Page 105 of 246
WARNINGEnsure that the carrier rails and variable loading floor are correctly fastened
when installing the variable loading floor. If this is not the case, there is a
risk of injury for the occupants.
Extending variable loading floor with integrated aluminium rails
and faseting elements (Superb Combi)
Introduction
This chapter contains information on the following subjects:
Partial extension of variable load floor
103
Divide boot
103
Fit and remove variable loading floor
104
Fixing set
104
Movable lashing eyes
105
The variable loading floor makes handling of bulky items of luggage easier.
CAUTION
The maximum permissible load of the variable loading floor is 75 kg.
Note
The space below the variable loading floor can be used for stowing objects, for
example the fastening elements, removed foldable boot cover, etc.
Partial extension of variable load floor
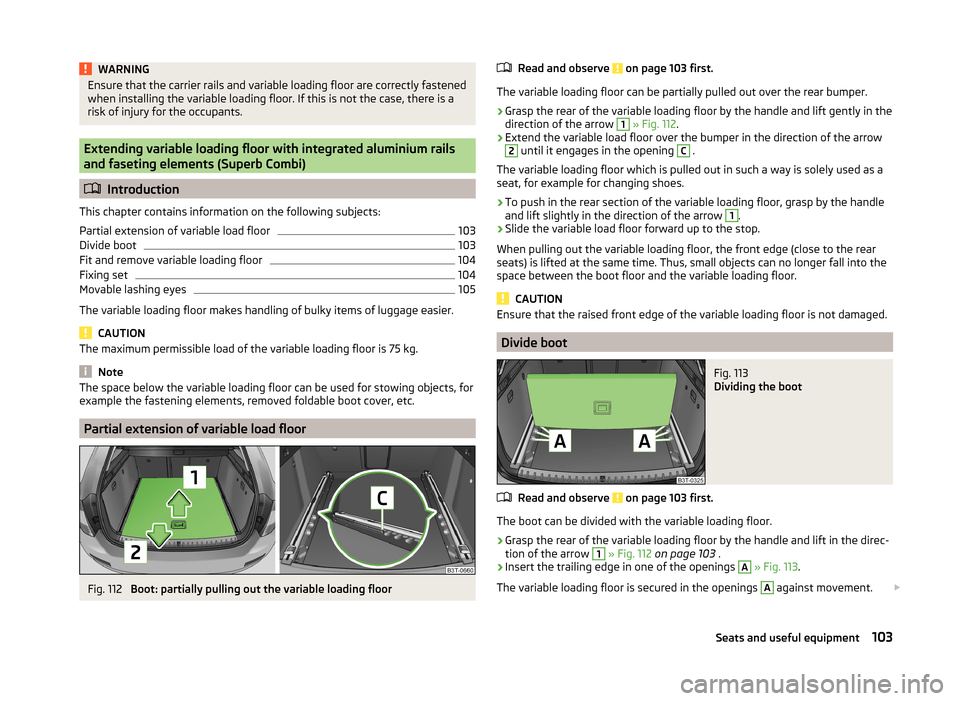
Fig. 112
Boot: partially pulling out the variable loading floor
Read and observe on page 103 first.
The variable loading floor can be partially pulled out over the rear bumper.
›
Grasp the rear of the variable loading floor by the handle and lift gently in the
direction of the arrow
1
» Fig. 112 .
›
Extend the variable load floor over the bumper in the direction of the arrow
2
until it engages in the opening
C
.
The variable loading floor which is pulled out in such a way is solely used as a
seat, for example for changing shoes.
›
To push in the rear section of the variable loading floor, grasp by the handle
and lift slightly in the direction of the arrow
1
.
›
Slide the variable load floor forward up to the stop.
When pulling out the variable loading floor, the front edge (close to the rear
seats) is lifted at the same time. Thus, small objects can no longer fall into the
space between the boot floor and the variable loading floor.
CAUTION
Ensure that the raised front edge of the variable loading floor is not damaged.
Divide boot
Fig. 113
Dividing the boot
Read and observe on page 103 first.
The boot can be divided with the variable loading floor.
›
Grasp the rear of the variable loading floor by the handle and lift in the direc-
tion of the arrow
1
» Fig. 112 on page 103 .
›
Insert the trailing edge in one of the openings
A
» Fig. 113 .
The variable loading floor is secured in the openings
A
against movement.
103Seats and useful equipment
Page 106 of 246
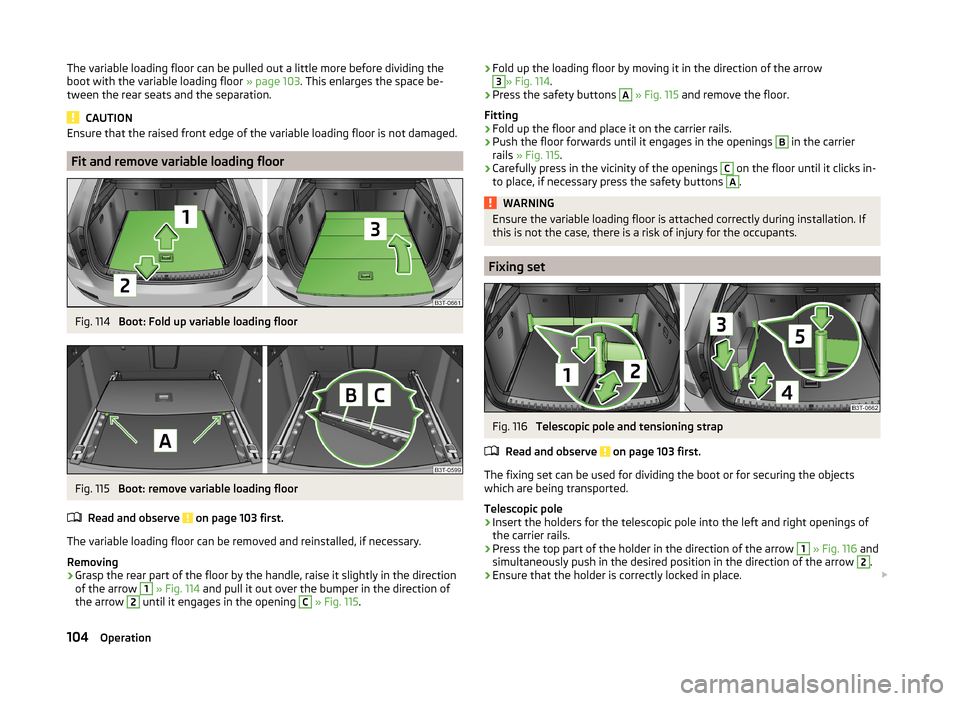
The variable loading floor can be pulled out a little more before dividing the
boot with the variable loading floor » page 103. This enlarges the space be-
tween the rear seats and the separation.
CAUTION
Ensure that the raised front edge of the variable loading floor is not damaged.
Fit and remove variable loading floor
Fig. 114
Boot: Fold up variable loading floor
Fig. 115
Boot: remove variable loading floor
Read and observe
on page 103 first.
The variable loading floor can be removed and reinstalled, if necessary.
Removing
›
Grasp the rear part of the floor by the handle, raise it slightly in the direction
of the arrow
1
» Fig. 114 and pull it out over the bumper in the direction of
the arrow
2
until it engages in the opening
C
» Fig. 115 .
›Fold up the loading floor by moving it in the direction of the arrow3» Fig. 114
.›
Press the safety buttons
A
» Fig. 115 and remove the floor.
Fitting
›
Fold up the floor and place it on the carrier rails.
›
Push the floor forwards until it engages in the openings
B
in the carrier
rails » Fig. 115 .
›
Carefully press in the vicinity of the openings
C
on the floor until it clicks in-
to place, if necessary press the safety buttons
A
.
WARNINGEnsure the variable loading floor is attached correctly during installation. If
this is not the case, there is a risk of injury for the occupants.
Fixing set
Fig. 116
Telescopic pole and tensioning strap
Read and observe
on page 103 first.
The fixing set can be used for dividing the boot or for securing the objects
which are being transported.
Telescopic pole
›
Insert the holders for the telescopic pole into the left and right openings of
the carrier rails.
›
Press the top part of the holder in the direction of the arrow
1
» Fig. 116 and
simultaneously push in the desired position in the direction of the arrow
2
.
›
Ensure that the holder is correctly locked in place.
104Operation
Page 108 of 246
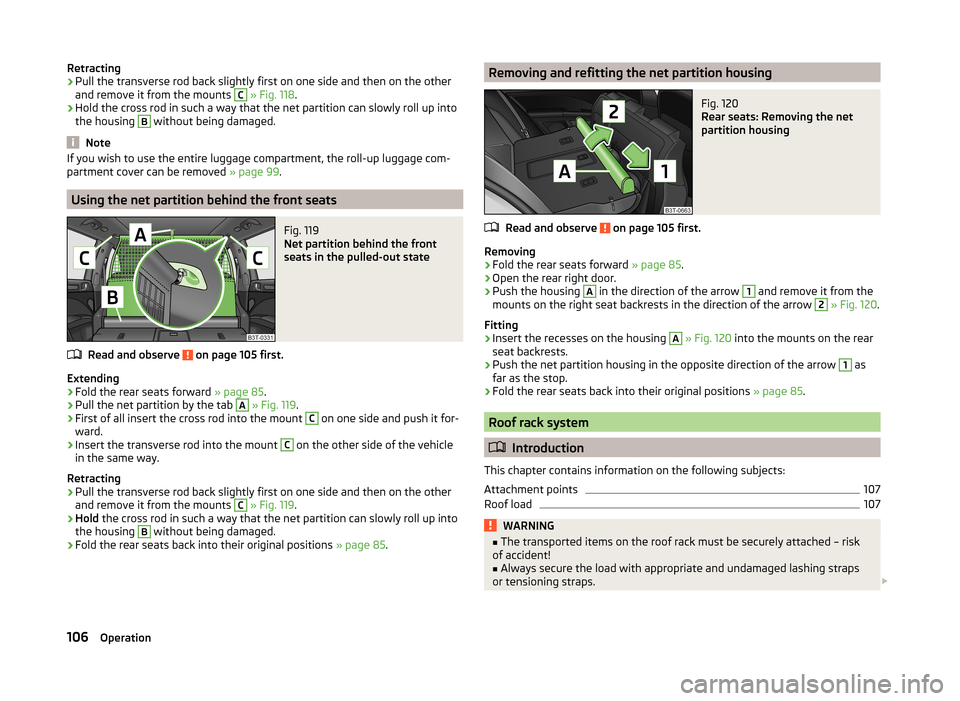
Retracting›Pull the transverse rod back slightly first on one side and then on the other
and remove it from the mounts C
» Fig. 118 .
›
Hold the cross rod in such a way that the net partition can slowly roll up into
the housing
B
without being damaged.
Note
If you wish to use the entire luggage compartment, the roll-up luggage com-
partment cover can be removed » page 99.
Using the net partition behind the front seats
Fig. 119
Net partition behind the front
seats in the pulled-out state
Read and observe on page 105 first.
Extending
›
Fold the rear seats forward » page 85.
›
Pull the net partition by the tab
A
» Fig. 119 .
›
First of all insert the cross rod into the mount
C
on one side and push it for-
ward.
›
Insert the transverse rod into the mount
C
on the other side of the vehicle
in the same way.
Retracting
›
Pull the transverse rod back slightly first on one side and then on the other
and remove it from the mounts
C
» Fig. 119 .
›
Hold the cross rod in such a way that the net partition can slowly roll up into
the housing
B
without being damaged.
›
Fold the rear seats back into their original positions » page 85.
Removing and refitting the net partition housingFig. 120
Rear seats: Removing the net
partition housing
Read and observe on page 105 first.
Removing
›
Fold the rear seats forward » page 85.
›
Open the rear right door.
›
Push the housing
A
in the direction of the arrow
1
and remove it from the
mounts on the right seat backrests in the direction of the arrow
2
» Fig. 120 .
Fitting
›
Insert the recesses on the housing
A
» Fig. 120 into the mounts on the rear
seat backrests.
›
Push the net partition housing in the opposite direction of the arrow
1
as
far as the stop.
›
Fold the rear seats back into their original positions » page 85.
Roof rack system
Introduction
This chapter contains information on the following subjects:
Attachment points
107
Roof load
107WARNING■ The transported items on the roof rack must be securely attached – risk
of accident!■
Always secure the load with appropriate and undamaged lashing straps
or tensioning straps.
106Operation
Page 109 of 246
WARNING (Continued)■Distribute the load evenly over the roof rack system.■When transporting heavy objects or objects which take up a large area on
the roof rack system, the handling of the car may change as a result of the
displacement of the centre of gravity. The style of driving and speed must
therefore be adapted to the current circumstances.■
Avoid abrupt and sudden driving/braking manoeuvres.
■
Adjust the speed and driving style to the visibility, weather, road and traf-
fic conditions.
■
The permissible roof load, permissible axle loads and permissible total ve-
hicle weight must not be exceeded under any circumstances – risk of acci-
dent!
CAUTION
■ Only roof racks from the ŠKODA Original Accessories range should be used.■When dealing with roof racks, the installation instructions supplied with the
roof luggage rack system must be observed.■
On models fitted with a power sliding/tilting roof or a panoramic sliding roof,
ensure that the opened sliding/tilting roof or the panoramic sliding roof does
not strike any items of luggage transported on the roof.
■
Ensure that the boot lid does not hit the roof load when opened.
■
The height of the vehicle changes after mounting a roof luggage rack system
and the load that is secured to it. Compare the vehicle height with available
clearances, such as underpasses and garage doors.
■
Always remove the roof luggage rack system before entering an automated
car wash.
■
Ensure the roof aerial is not impaired by the secured load.
For the sake of the environment
The increased aerodynamic drag results in a higher fuel consumption.Attachment points
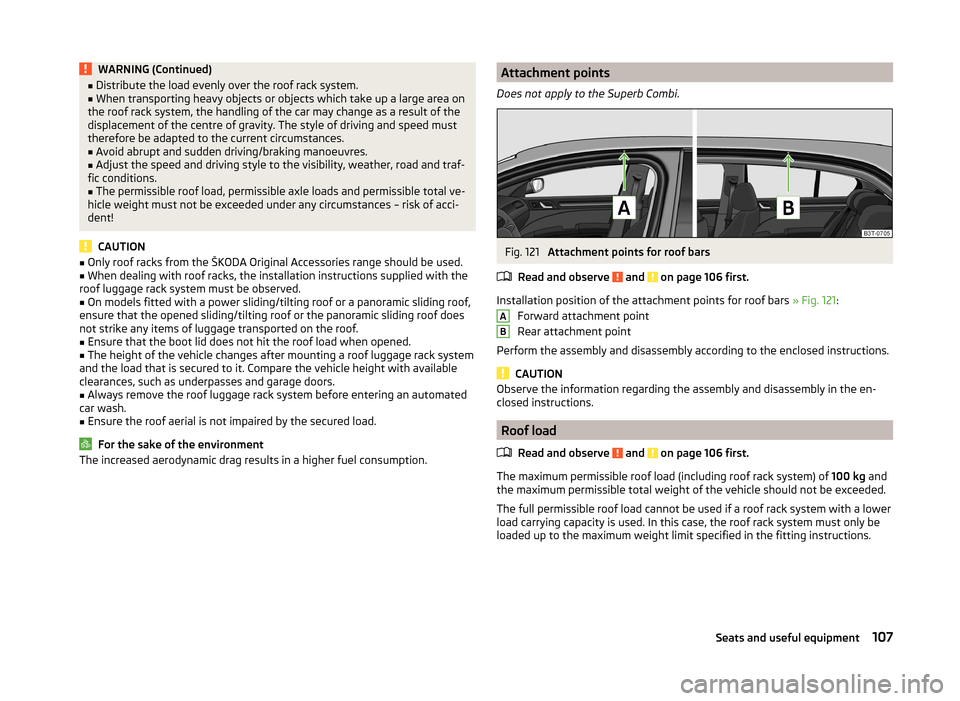
Does not apply to the Superb Combi.Fig. 121
Attachment points for roof bars
Read and observe
and on page 106 first.
Installation position of the attachment points for roof bars » Fig. 121:
Forward attachment point
Rear attachment point
Perform the assembly and disassembly according to the enclosed instructions.
CAUTION
Observe the information regarding the assembly and disassembly in the en-
closed instructions.
Roof load
Read and observe
and on page 106 first.
The maximum permissible roof load (including roof rack system) of 100 kg and
the maximum permissible total weight of the vehicle should not be exceeded.
The full permissible roof load cannot be used if a roof rack system with a lower
load carrying capacity is used. In this case, the roof rack system must only be
loaded up to the maximum weight limit specified in the fitting instructions.
AB107Seats and useful equipment
Page 136 of 246
Ejecting all CDs›Press and hold the button A » Fig. 131 for more than 2 seconds. All CDs in
the CD-changer are ejected consecutively.
Note
■ Insert a CD, with the labelled side facing up, into the CD slot B » Fig. 131 until
it is automatically drawn in. The play function will start automatically.■
After loading a CD into the CD changer, wait until the indicator light of the
corresponding button
D
is illuminated. Then the CD case
B
is free to load the
next CD.
■
If a position is selected, on which a CD is already located, this CD is ejected.
Remove the ejected CD and load the desired CD.
DVD-preinstallation
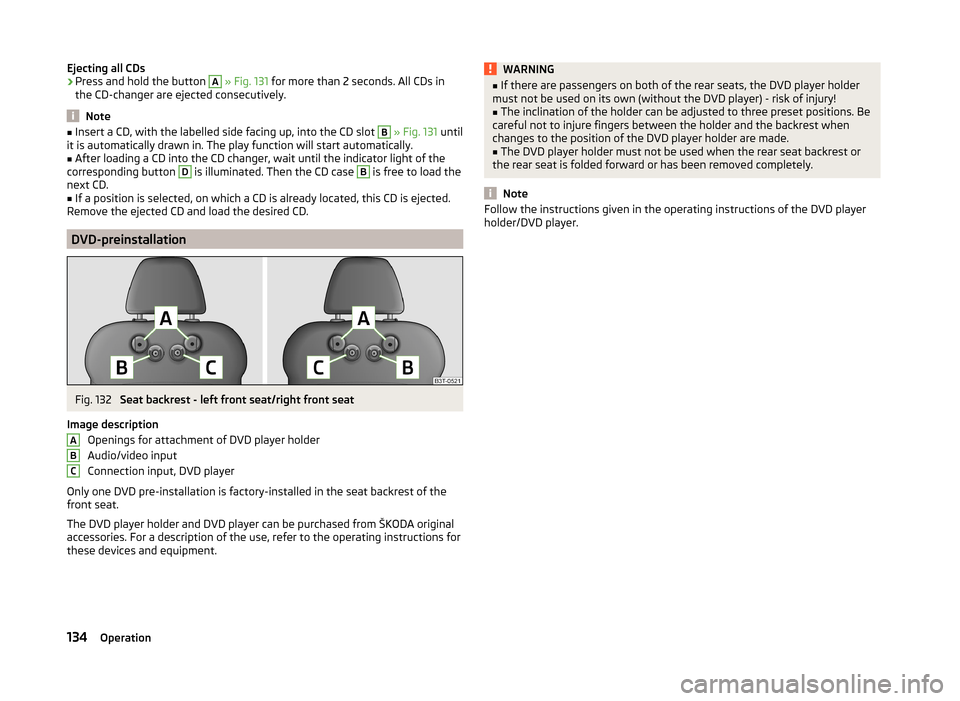
Fig. 132
Seat backrest - left front seat/right front seat
Image description Openings for attachment of DVD player holder
Audio/video input
Connection input, DVD player
Only one DVD pre-installation is factory-installed in the seat backrest of the
front seat.
The DVD player holder and DVD player can be purchased from ŠKODA original
accessories. For a description of the use, refer to the operating instructions for
these devices and equipment.
ABCWARNING■ If there are passengers on both of the rear seats, the DVD player holder
must not be used on its own (without the DVD player) - risk of injury!■
The inclination of the holder can be adjusted to three preset positions. Be
careful not to injure fingers between the holder and the backrest when
changes to the position of the DVD player holder are made.
■
The DVD player holder must not be used when the rear seat backrest or
the rear seat is folded forward or has been removed completely.
Note
Follow the instructions given in the operating instructions of the DVD player
holder/DVD player.134Operation
Page 173 of 246
ŠKODA service partners are liable for any ŠKODA Genuine Part defects for aperiod of 2 years after installation or delivery in accordance with the materials
defect liability, provided that nothing else was agreed in the purchase contract
or in any other agreements. You should keep the approved warranty certificate
and the bill for these components for this period of time, so that commence-
ment of the term may be verified.
In addition, ŠKODA Service Partners also stock a range of suitable car care
products as well as those parts which are subject to natural wear-and-tear,
such as tyres, batteries, bulbs and wiper blades.
Note
The accessories authorized by the company ŠKODA AUTO a.s. will be offered
by the ŠKODA partners in all countries where the company ŠKODA AUTO a.s.
has a sales and service network. This will usually be in the form of a printed
catalogue of Original ŠKODA Accessories, in the form of separate printed bro-
chures or in the form of offers for ŠKODA Genuine Accessories on the ŠKODA
partner web pages.
Spoiler
Read and observe
on page 169 first.
If your new vehicle is fitted with a spoiler on the front bumper in combination
with the spoiler on the luggage compartment lid, the following instructions
must be adhered to.
› For safety reasons, the vehicle must only be fitted with a spoiler on the front
bumper in combination with the associated spoiler on the luggage compart-
ment lid.
› This kind of spoiler cannot be left on the front bumper either on its own, in
combination with another spoiler not on the luggage compartment lid or in
combination with an unsuitable spoiler on the luggage compartment lid.
› We recommend that you consult the ŠKODA Service Partner for any repairs
to or replacement, addition or removal of spoilers.
WARNINGIf work on your vehicle's spoilers is not carried out properly, this can lead to
operational faults - risk of accident and serious injuries.Airbags
Read and observe
on page 169 first.
The system components of the airbag system can be situated in the front
bumper, doors, front seats, roof lining or body.
WARNINGAny work on the airbag system including the installation and removal of
system components due to other repair work (e.g. removal of the steering
wheel) must only be carried out by a specialist garage.■
Modifications, repairs and technical alterations that have been carried out
unprofessionally can cause damage and operational faults, and can also se-
riously impair the effectiveness of the airbag system – risk of accident and
fatal injury!
■
The airbag system must then be replaced if the airbag has been deployed.
Airbag modules cannot be repaired.
WARNINGInformation on the use of the airbag system■It is prohibited to manipulate individual parts of the airbag system, as this
might result in the airbag being deployed.■
Never install any airbag parts into the vehicle that have been removed
from old cars or have been recycled.
■
Never install damaged airbag parts in the vehicle. The airbags may then
not be deployed properly or even at all in the event of an accident.
■
No modifications of any kind must be made to parts of the airbag system.
WARNING■ A change to the vehicle's wheel suspension, including the use of non-ap-
proved wheels and tire combinations, can alter the functioning of the air-
bag system - risk of accident and fatal injury!■
Never make any changes to the front bumper or the bodywork.
171Car care
Page 180 of 246
Artificial leather, cloths and Alcantara®
Read and observe
and on page 176 first.
Artificial leather
Clean artificial leather with a damp cloth.
If this method does not completely clean the artificial leather, use a mild soap
solution or cleaning products specially designed for this purpose.
Fabric
Clean upholstery cover materials and cloth trims on doors, boot cover, etc. us-
ing specific cleaning agents, e.g., dry foam.
Use a soft sponge, brush, or commercially available microfibre cloth.
Use a cloth and special detergent to clean the roof trim.
Remove any lumps on the cover fabric and any fabric residue using a brush.
Remove stubborn hair using a “cleaning glove”.
Alcantara ®
Dust and fine dirt particles in pores, creases and seams may chafe and damage
the surface.
If you leave your vehicle parked in the open for lengthy periods, protect the Al-
cantara ®
seat covers from the direct rays of the sun to prevent fading.
Minor changes in colour caused by use are normal.
CAUTION
■ Do not use any leather cleaners on Alcantara ®
seat covers.■For Alcantara ®
seat covers do not use any solvents, floor wax, shoe cream,
stain remover, or similar agents.■
Avoid leaving the vehicle in bright sunlight for long periods of time in order
to stop the fabric from bleaching. If the vehicle is parked outside for long peri-
ods of time, cover the fabric to protect it from direct sunlight.
■
Some clothing materials, e.g. dark denim, do not have sufficient colour fast-
ness. This can cause damage or clearly visible discolouration to seat covers,
even when used correctly. This applies particularly to light-coloured seat cov-
ers. This does not relate to a fault in the seat cover, but rather to poor colour
fastness of the clothing textiles.
Seat covers
Read and observe
and on page 176 first.
Electrically heated seats
Do not clean the covers by moistening, as this can damage the seat heating
system.
Use a specific cleaning agent such as dry foam or similar to clean the covers.
Seats without seat heating
Thoroughly vacuum the seat covers with a vacuum cleaner before cleaning.
Clean the seat covers with a damp cloth or cleaning products specially de-
signed for this purpose.
Indented points arising on the fabrics by everyday use, can be removed by
brushing against the direction of hair with a damp brush.
Always clean all parts of the covers, so that there are no visible edges. Then
allow the seat to dry completely.
CAUTION
■ Regularly remove dust from the seat covers using a vacuum cleaner.■Electrically heated seats must not be dried after cleaning by switching on the
heater.■
Do not sit on wet seats - risk of seat deformation.
■
Always clean the seats “from seam to seam”.
Seat belts
Read and observe
and on page 176 first.
The belt webbing must always be kept clean.
Wash dirty seat belts with mild soapy water.
Remove coarse dirt with a soft brush.
Dirty belt webbing may impair the correct functioning of the inertia reel.
WARNING■ The seat belts must not be removed for cleaning.■Never clean the seat belts chemically as chemical cleaning products could
destroy the fabric. 178General Maintenance