lights SKODA SUPERB 2014 2.G / (B6/3T) Workshop Manual
[x] Cancel search | Manufacturer: SKODA, Model Year: 2014, Model line: SUPERB, Model: SKODA SUPERB 2014 2.G / (B6/3T)Pages: 246, PDF Size: 17.16 MB
Page 122 of 246
WARNING (Continued)■Never leave a mobile phone on a seat, on the dash panel or in any area
from where it becomes a projectile during a sudden braking manoeuvre, an
accident or a collision — risk of injury.■
Before transport of the vehicle by air, the Bluetooth ®
function must be
switched off by a specialist company.
Universal telephone preinstallation (hands free)
The universal telephone preinstallation (“hands-free system”) includes a con- venience mode for the mobile phone via voice control, the multifunction steer-
ing wheel, the radio or navigation system.
WARNING■ Concentrate fully at all times on your driving! As the driver, you are fully
responsible for the operation of your vehicle.■
Only use the device in such a way that you are in full control of your vehi-
cle in every traffic situation – there is the risk of accidents!
■
The national regulations for using a mobile phone in a vehicle must be
observed.
Note■ We recommend that the installation of mobile phones and two-way radio
systems in a vehicle be carried out by a specialist firm.■
Not all mobile phones that enable Bluetooth ®
communication are compatible
with the universal telephone preinstallation GSM II or GSM III. Ask a ŠKODA Partner whether your phone is compatible with the universal telephone prepa-
ration GSM II or GSM III.
■
The range of the Bluetooth ®
connection to the hands-free system is restric-
ted to the vehicle interior. The range is dependent on local factors, e.g. obsta-
cles between the devices and mutual interferences with other devices. If your
mobile phone is in a jacket pocket, for example, this can lead to difficulties
when establishing a connection with the hands-free-system or transferring
data.
Operating the phone on the multifunction steering wheel
Fig. 128
Multifunction steering wheel: Control buttons for the telephone
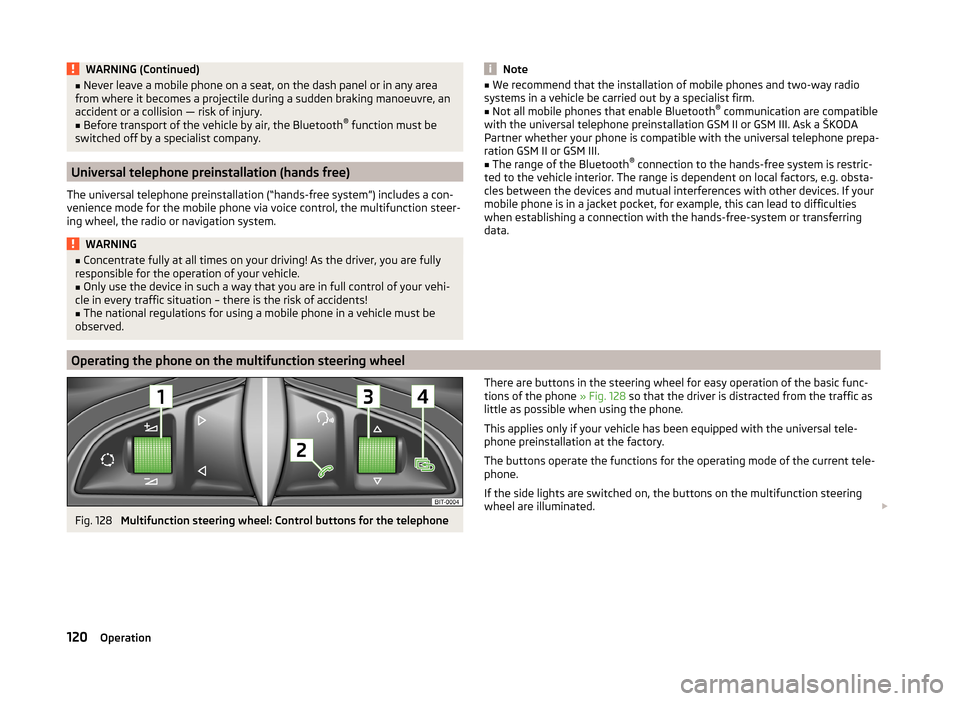
There are buttons in the steering wheel for easy operation of the basic func-
tions of the phone » Fig. 128 so that the driver is distracted from the traffic as
little as possible when using the phone.
This applies only if your vehicle has been equipped with the universal tele-
phone preinstallation at the factory.
The buttons operate the functions for the operating mode of the current tele-
phone.
If the side lights are switched on, the buttons on the multifunction steering
wheel are illuminated. 120Operation
Page 134 of 246
Operating the radio and navigation system on the multifunction steering wheelFig. 130
Multifunction steering wheel: control buttons
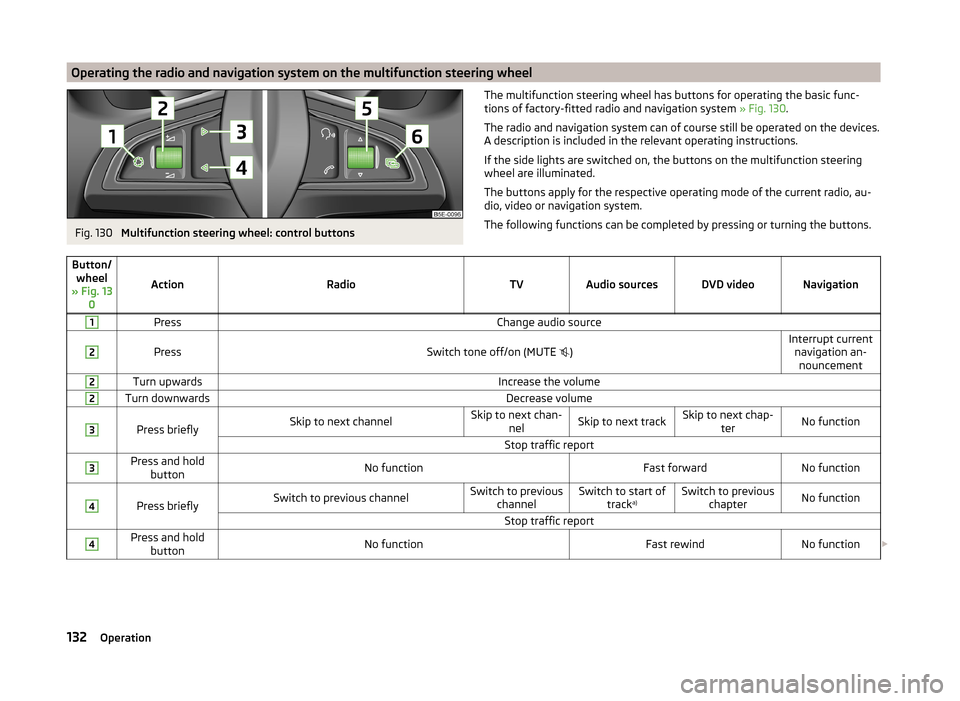
The multifunction steering wheel has buttons for operating the basic func-
tions of factory-fitted radio and navigation system » Fig. 130.
The radio and navigation system can of course still be operated on the devices.
A description is included in the relevant operating instructions.
If the side lights are switched on, the buttons on the multifunction steering wheel are illuminated.
The buttons apply for the respective operating mode of the current radio, au-
dio, video or navigation system.
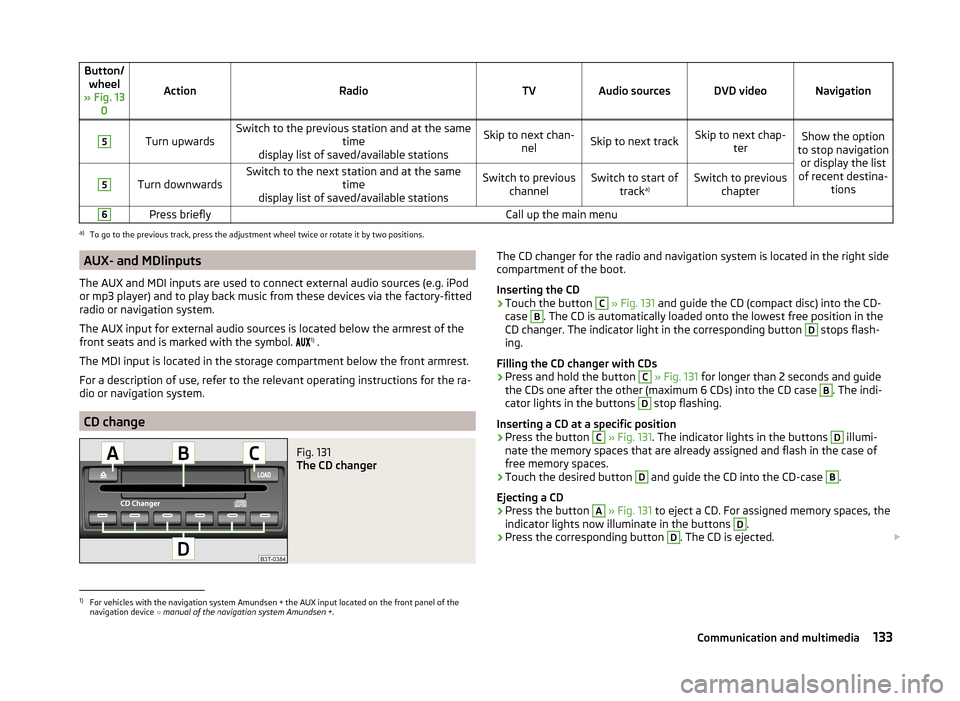
The following functions can be completed by pressing or turning the buttons.Button/ wheel
» Fig. 13 0
ActionRadioTVAudio sourcesDVD videoNavigation
1PressChange audio source2
PressSwitch tone off/on (MUTE
)Interrupt current
navigation an-nouncement2Turn upwardsIncrease the volume2Turn downwardsDecrease volume3
Press brieflySkip to next channelSkip to next chan- nelSkip to next trackSkip to next chap- terNo functionStop traffic report3Press and holdbuttonNo functionFast forwardNo function4
Press brieflySwitch to previous channelSwitch to previous channelSwitch to start of tracka)Switch to previous
chapterNo functionStop traffic report4Press and holdbuttonNo functionFast rewindNo function 132Operation
Page 135 of 246
Button/wheel
» Fig. 13 0
ActionRadioTVAudio sourcesDVD videoNavigation
5
Turn upwardsSwitch to the previous station and at the same time
display list of saved/available stationsSkip to next chan- nelSkip to next trackSkip to next chap- terShow the option
to stop navigation or display the list
of recent destina- tions5
Turn downwardsSwitch to the next station and at the same time
display list of saved/available stationsSwitch to previous channelSwitch to start of tracka)Switch to previous
chapter6Press brieflyCall up the main menua)
To go to the previous track, press the adjustment wheel twice or rotate it by two positions.
AUX- and MDIinputs
The AUX and MDI inputs are used to connect external audio sources (e.g. iPod
or mp3 player) and to play back music from these devices via the factory-fitted
radio or navigation system.
The AUX input for external audio sources is located below the armrest of the
front seats and is marked with the symbol. 1)
.
The MDI input is located in the storage compartment below the front armrest.
For a description of use, refer to the relevant operating instructions for the ra-
dio or navigation system.
CD change
Fig. 131
The CD changer
The CD changer for the radio and navigation system is located in the right side
compartment of the boot.
Inserting the CD›
Touch the button
C
» Fig. 131 and guide the CD (compact disc) into the CD-
case
B
. The CD is automatically loaded onto the lowest free position in the
CD changer. The indicator light in the corresponding button
D
stops flash-
ing.
Filling the CD changer with CDs
›
Press and hold the button
C
» Fig. 131 for longer than 2 seconds and guide
the CDs one after the other (maximum 6 CDs) into the CD case
B
. The indi-
cator lights in the buttons
D
stop flashing.
Inserting a CD at a specific position
›
Press the button
C
» Fig. 131 . The indicator lights in the buttons
D
illumi-
nate the memory spaces that are already assigned and flash in the case of
free memory spaces.
›
Touch the desired button
D
and guide the CD into the CD-case
B
.
Ejecting a CD
›
Press the button
A
» Fig. 131 to eject a CD. For assigned memory spaces, the
indicator lights now illuminate in the buttons
D
.
›
Press the corresponding button
D
. The CD is ejected.
1)
For vehicles with the navigation system Amundsen + the AUX input located on the front panel of the
navigation device » manual of the navigation system Amundsen + .
133Communication and multimedia
Page 138 of 246
Electronic immobilizerRead and observe
and on page 135 first.
An electronic chip is integrated in the head of the key. The immobiliser is deac-
tivated with the aid of this chip when the key is inserted in the ignition lock.
The electronic immobiliser is automatically activated when the ignition key is
withdrawn from the lock.
The engine will not start if a non-authorized ignition key is used.
The following message is shown in the information cluster display. Immobilizer active.
IMMOBILISER
Ignition Switch
Fig. 133
Positions of the vehicle key in
the ignition lock
Read and observe and on page 135 first.
Petrol engines » Fig. 133
Ignition switched off, engine off, the steering can be locked
Ignition switched on
Starting engine
Diesel engines » Fig. 133
Fuel supply interrupted, ignition switched off, engine switched off, the
steering can be locked.
Heating glow plugs on, ignition switched on
Starting engine
To lock the steering , with the ignition key withdrawn, turn the steering wheel
until the steering locking pin engages audibly.
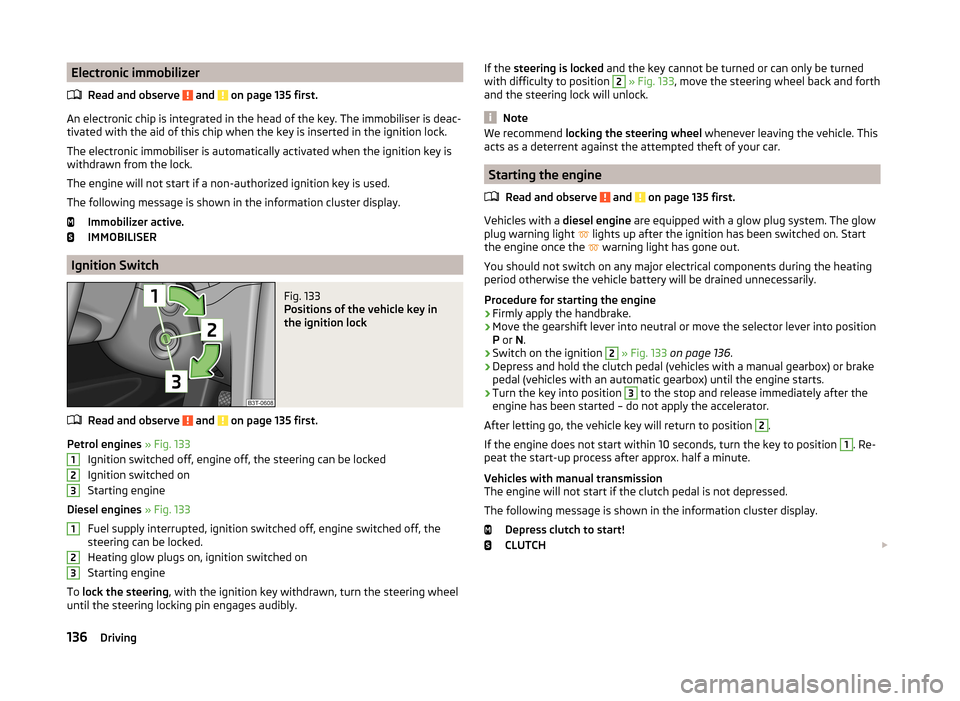
123123If the steering is locked and the key cannot be turned or can only be turned
with difficulty to position 2 » Fig. 133 , move the steering wheel back and forth
and the steering lock will unlock.
Note
We recommend locking the steering wheel whenever leaving the vehicle. This
acts as a deterrent against the attempted theft of your car.
Starting the engine
Read and observe
and on page 135 first.
Vehicles with a diesel engine are equipped with a glow plug system. The glow
plug warning light lights up after the ignition has been switched on. Start
the engine once the warning light has gone out.
You should not switch on any major electrical components during the heating
period otherwise the vehicle battery will be drained unnecessarily.
Procedure for starting the engine
›
Firmly apply the handbrake.
›
Move the gearshift lever into neutral or move the selector lever into position
P or N.
›
Switch on the ignition
2
» Fig. 133 on page 136 .
›
Depress and hold the clutch pedal (vehicles with a manual gearbox) or brake
pedal (vehicles with an automatic gearbox) until the engine starts.
›
Turn the key into position
3
to the stop and release immediately after the
engine has been started – do not apply the accelerator.
After letting go, the vehicle key will return to position
2
.
If the engine does not start within 10 seconds, turn the key to position
1
. Re-
peat the start-up process after approx. half a minute.
Vehicles with manual transmission
The engine will not start if the clutch pedal is not depressed.
The following message is shown in the information cluster display. Depress clutch to start!
CLUTCH
136Driving
Page 141 of 246
If the driver's door is opened while the igition is on, an audible signal sounds
and the following message appears in the instrument cluster display.
Ignition on!
IGNITION ON
When leaving the vehicle always switch off the ignition.
Note
The ignition is switched on when indicated by the lighting up of certain indica-
tor lamps in the instrument cluster.
Starting the engine
Read and observe
and on page 137 first.
Vehicles with a diesel engine are equipped with a glow plug system. The glow
plug warning light lights up after the ignition has been switched on. Start
the engine once the warning light has gone out.
You should not switch on any major electrical components during the heating
period otherwise the vehicle battery will be drained unnecessarily.
Procedure for starting the engine
›
Firmly apply the handbrake.
›
Move the gearshift lever into neutral or move the selector lever into position
P or N.
›
Depress and hold the clutch pedal (vehicles with a manual gearbox) or brake
pedal (vehicles with an automatic gearbox) until the engine starts.
›
Press and hold » Fig. 134 on page 138 1)
the starter button until the engine
starts.
CAUTION
■ If the engine does not start up after a second attempt, one of the following
fuses may be defective. ■ Petrol engine - fuse for the electric fuel pump.
■ Diesel engine - fuse for the control unit for glow plugs or glow plug relay
and fuel pump.■
Check the fuse and replace if necessary » page 215, or seek assistance from
a specialist garage.
Switching off the engine
Read and observe
and on page 137 first.
›
Stop the vehicle.
›
Press the starter button » Fig. 134 on page 138 briefly.
The engine and the ignition are switched off simultaneously.
The engine can be switched off up to a speed of 2 km/h.
Emergency start-up of the engine
Fig. 135
Emergency start-up of engine
Read and observe and on page 137 first.
If the authorisation check for the key fails, the following message appears in
the instrument cluster display.
Key not found.
NO KEY
The emergency start-up must be completed.
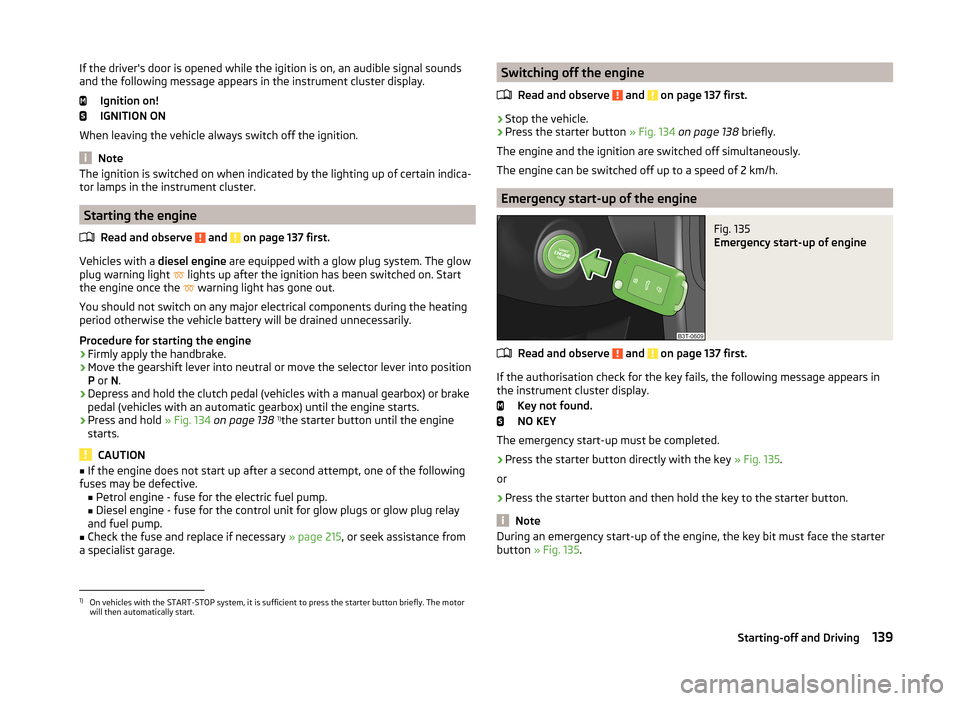
› Press the starter button directly with the key
» Fig. 135.
or
› Press the starter button and then hold the key to the starter button.
Note
During an emergency start-up of the engine, the key bit must face the starter
button » Fig. 135 .1)
On vehicles with the START-STOP system, it is sufficient to press the starter button briefly. The motor
will then automatically start.
139Starting-off and Driving
Page 143 of 246
Low brake fluid level
An insufficient level of brake fluid may result in problems in the brake system.
The level of the brake fluid is monitored electronically » page 33,
Brake sys-
tem .
Brake booster
The brake booster increases the pressure generated with the brake pedal. The
brake booster only operates when the engine is running.
Handbrake
Fig. 136
Handbrake
Read and observe and on page 140 first.
Apply
›
Pull the handbrake lever firmly upwards.
Releasing
›
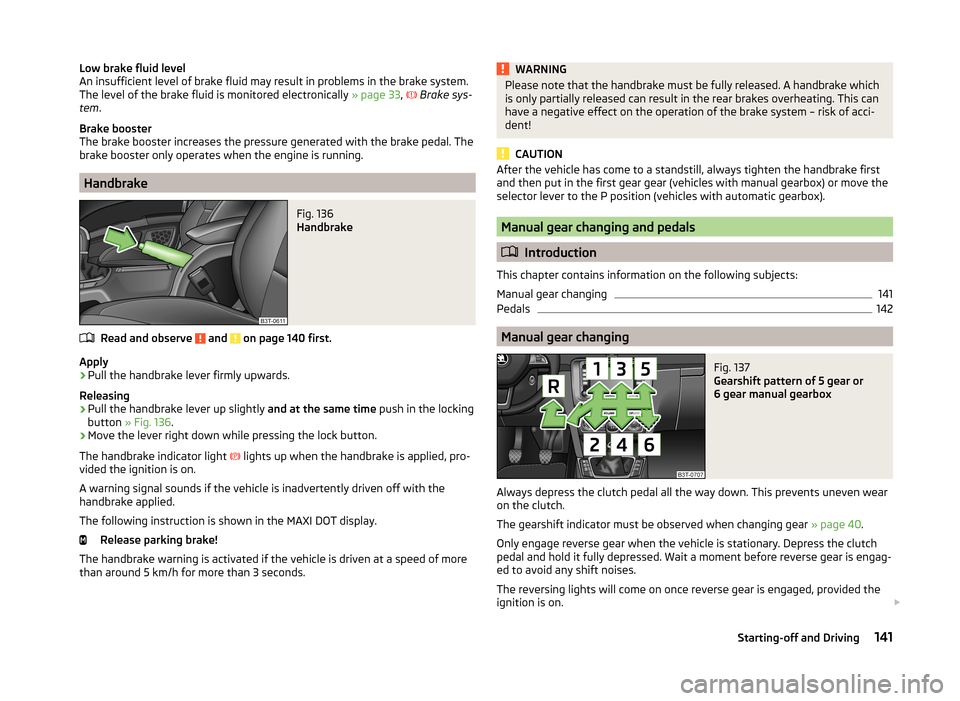
Pull the handbrake lever up slightly and at the same time push in the locking
button » Fig. 136 .
›
Move the lever right down while pressing the lock button.
The handbrake indicator light lights up when the handbrake is applied, pro-
vided the ignition is on.
A warning signal sounds if the vehicle is inadvertently driven off with the
handbrake applied.
The following instruction is shown in the MAXI DOT display. Release parking brake!
The handbrake warning is activated if the vehicle is driven at a speed of more
than around 5 km/h for more than 3 seconds.
WARNINGPlease note that the handbrake must be fully released. A handbrake which
is only partially released can result in the rear brakes overheating. This can
have a negative effect on the operation of the brake system – risk of acci-
dent!
CAUTION
After the vehicle has come to a standstill, always tighten the handbrake first
and then put in the first gear gear (vehicles with manual gearbox) or move the
selector lever to the P position (vehicles with automatic gearbox).
Manual gear changing and pedals
Introduction
This chapter contains information on the following subjects:
Manual gear changing
141
Pedals
142
Manual gear changing
Fig. 137
Gearshift pattern of 5 gear or
6 gear manual gearbox
Always depress the clutch pedal all the way down. This prevents uneven wear on the clutch.
The gearshift indicator must be observed when changing gear » page 40.
Only engage reverse gear when the vehicle is stationary. Depress the clutch
pedal and hold it fully depressed. Wait a moment before reverse gear is engag-
ed to avoid any shift noises.
The reversing lights will come on once reverse gear is engaged, provided the
ignition is on.
141Starting-off and Driving
Page 148 of 246
Economical driving and environmental sustainability
Introduction
This chapter contains information on the following subjects:
Looking ahead
146
Economical gear changing
146
Avoiding full throttle
147
Reducing idling
147
Avoiding short distances
147
Checking tyre inflation pressure
147
Avoiding unnecessary ballast
147
Regular maintenance
148
Saving electrical energy
148
Environmental compatibility
148
The technical requirements for low fuel usage and economic efficiency of the
vehicle have already been built into the vehicle at the works. ŠKODA places a
particular emphasis on minimising negative effects on the environment.
It is necessary to take note of the guidelines given in this chapter in order to make best use of these characteristics and to maintain their effectiveness.
Fuel consumption, environmental pollution and the wear to the engine, brakes
and tyres depend essentially on the following three factors:
› your personal driving style
› operating conditions
› technical requirements
The fuel economy by can be improved by 10 -15 % by always looking ahead and
driving in an economical way.
Fuel consumption is also be influenced by external factors which are beyond
the driver's control. Consumption increases during the winter or under difficult
conditions, on poor roads, etc.
Fuel consumption can vary considerably from the manufacturer's data, as a re-
sult of outside temperatures, the weather and driving style.
The optimal engine speed should be obtained when accelerating, in order to
avoid a high fuel consumption and resonance of the vehicle.
CAUTIONAll the speed and engine revolution figures apply only when the engine is at
its normal operating temperature.
Looking ahead
Read and observe
on page 146 first.
A vehicle's highest fuel consumption occurs when accelerating, therefore un-necessary accelerating and braking should be avoided. If looking ahead when
driving, less braking and consequently less accelerating are required.
If possible, let your vehicle coast to a stop, or use the engine brake, if you can see that the next set of traffic lights is on red, for example.
Economical gear changing
Fig. 141
Principle sketch: Fuel consump-
tion in litres/100 km depending
on the selected gear
Read and observe on page 146 first.
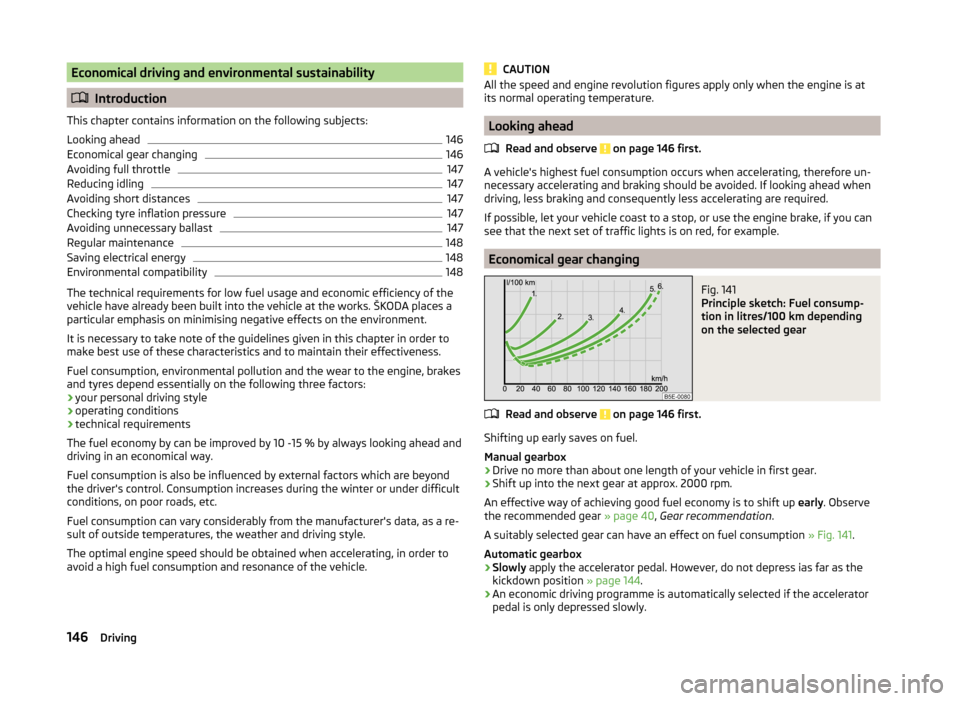
Shifting up early saves on fuel.
Manual gearbox › Drive no more than about one length of your vehicle in first gear.
› Shift up into the next gear at approx. 2000 rpm.
An effective way of achieving good fuel economy is to shift up early. Observe
the recommended gear » page 40, Gear recommendation .
A suitably selected gear can have an effect on fuel consumption » Fig. 141.
Automatic gearbox
› Slowly
apply the accelerator pedal. However, do not depress ias far as the
kickdown position » page 144.
› An economic driving programme is automatically selected if the accelerator
pedal is only depressed slowly.
146Driving
Page 149 of 246
Avoiding full throttleFig. 142
Principle sketch: Fuel consump-
tion in litres/100 km. and speed
in km/h.
Read and observe on page 146 first.
Driving more slowly saves fuel.
Sensitive use of the accelerator will not only significantly reduce fuel con-
sumption but also positively influence environmental pollution and wear of
your vehicle.
The maximum speed of your vehicle should, as far possible, never be used.
Fuel consumption, pollutant emissions and vehicle noises increase dispropor-
tionally at high speeds.
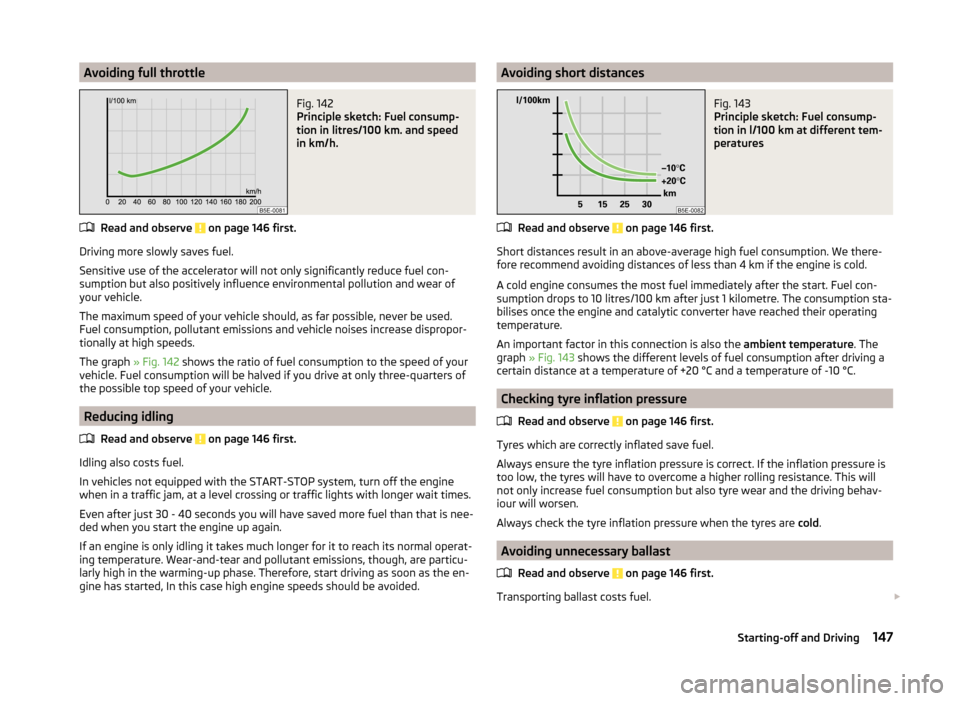
The graph » Fig. 142 shows the ratio of fuel consumption to the speed of your
vehicle. Fuel consumption will be halved if you drive at only three-quarters of
the possible top speed of your vehicle.
Reducing idling
Read and observe
on page 146 first.
Idling also costs fuel.
In vehicles not equipped with the START-STOP system, turn off the engine when in a traffic jam, at a level crossing or traffic lights with longer wait times.
Even after just 30 - 40 seconds you will have saved more fuel than that is nee-
ded when you start the engine up again.
If an engine is only idling it takes much longer for it to reach its normal operat-
ing temperature. Wear-and-tear and pollutant emissions, though, are particu-
larly high in the warming-up phase. Therefore, start driving as soon as the en-
gine has started, In this case high engine speeds should be avoided.
Avoiding short distancesFig. 143
Principle sketch: Fuel consump-
tion in l/100 km at different tem-
peratures
Read and observe on page 146 first.
Short distances result in an above-average high fuel consumption. We there- fore recommend avoiding distances of less than 4 km if the engine is cold.
A cold engine consumes the most fuel immediately after the start. Fuel con-
sumption drops to 10 litres/100 km after just 1 kilometre. The consumption sta-
bilises once the engine and catalytic converter have reached their operating
temperature.
An important factor in this connection is also the ambient temperature. The
graph » Fig. 143 shows the different levels of fuel consumption after driving a
certain distance at a temperature of +20 °C and a temperature of -10 °C.
Checking tyre inflation pressure
Read and observe
on page 146 first.
Tyres which are correctly inflated save fuel.
Always ensure the tyre inflation pressure is correct. If the inflation pressure is
too low, the tyres will have to overcome a higher rolling resistance. This will
not only increase fuel consumption but also tyre wear and the driving behav-
iour will worsen.
Always check the tyre inflation pressure when the tyres are cold.
Avoiding unnecessary ballast
Read and observe
on page 146 first.
Transporting ballast costs fuel.
147Starting-off and Driving
Page 152 of 246
■Potholes, mud or rocks can be hidden under the water making it difficult or
impossible to drive through the body of water.■
Do not drive through salt water. The salt can lead to corrosion. Any vehicle
parts that have come into contact with salt water must be rinsed immediately
with fresh water.
Note
After driving through water, we recommend having the vehicle checked by a
specialist garage.
Driving abroad
Introduction
This chapter contains information on the following subjects:
Unleaded petrol
150
Headlights
150
In certain countries, it may be possible that the ŠKODA Partner network is limi-
ted or has not been established. This is the reason why procuring certain spare
parts may be somewhat complicated and specialist garages may only be able
to make limited repairs.
Unleaded petrol
A vehicle fitted with a petrol engine must always be refuelled with unleaded
petrol » page 180 , Unleaded petrol . Information regarding the locations of fill-
ing stations that offer unleaded petrol is, for example, provided by the auto-
mobile associations.
Headlights
The low beam of your headlights is set asymmetrically. It illuminates the side
of the road on which the vehicle is being driven to a greater extent.
When driving in countries in which the traffic drives on the other side of the
road than in your home country, the asymmetrical low beam may dazzle on-
coming drivers. In order to avoid this, the headlights must be adjusted at a
specialist garage.
Headlights with Xenon lights can be adjusted in the menu of the MAXI DOT
display » page 69 .
NoteYou can find out more information on adjusting the headlights at a specialist
garage.150Driving
Page 154 of 246
The warning light lights up in the instrument cluster when the ASR is deacti-
vated.
Antilock brake system (ABS)
Read and observe
and on page 151 first.
ABS prevents the wheels locking when braking. Thus helping the driver to
maintain control of the vehicle.
The intervention of the ABS is noticeable from the pulsating movements of
the brake pedal which is accompanied by noises.
When the ABS system is active, do not brake periodically or reduce the pres- sure on the brake pedal.
Traction Control System (TCS)
Fig. 146
TCS button
Read and observe and on page 151 first.
If the wheels are slipping, the TCS adapts the engine speed to the conditions
of the road surface. The TCS makes it much easier to start off, accelerate and
climb steep hills even if the conditions of the road surface are unfavourable.
The TCS function is activated automatically each time the ignition is switched
on.
If your vehicle is fitted with the ESC system, the ASR is integrated into the ESC
system » page 151 .
During an intervention of the system, the TCS indicator light flashes in the
instrument cluster.
The TCS should normally always be enabled. The system should be deactivated
only in the following situations, for example.
› When driving with snow chains.
› When driving in deep snow or on a very loose surface.
› When “rocking a car free” when it has become stuck.
The ASR can be deactivated via the
» Fig. 146 symbol button.
The warning light
lights up in the instrument cluster when the ASR is deacti-
vated.
Ensure the TCS is activated again afterwards.
Electronic Differential Lock (EDL)
Read and observe
and on page 151 first.
If one of the wheels starts to spin, the EDL system brakes the spinning wheel
and transfers the driving force to the other wheels. This ensures the stability
of the vehicle and a quick journey.
The EDL switches off automatically in order to avoid excessive heat generation
in the disc brake of the wheel being braked. The vehicle can continue to be
driven and has the same characteristics as a vehicle not fitted with EDL. The
EDL switches on again automatically as soon as the brake has cooled down.
Driver Steering Recommendation (DSR)
Read and observe
and on page 151 first.
In critical situations, the DSR provides the driver with a steering recommenda-
tion in order to stabilise the vehicle. The DSR is activated, for example, on the
right and left vehicle side when braking sharply on different road surfaces.
Hydraulic Brake Assist (HBA)
Read and observe
and on page 151 first.
The HBA increases the braking effect and helps to reduce the braking dis-
tance.
The HBA is activated by very quick operation of the brake pedal. In order to
achieve the shortest possible braking distance, the brake pedal must be ap-
plied firmly until the vehicle has come to a standstill.
152Driving