186 SKODA SUPERB 2014 2.G / (B6/3T) Owner's Manual
[x] Cancel search | Manufacturer: SKODA, Model Year: 2014, Model line: SUPERB, Model: SKODA SUPERB 2014 2.G / (B6/3T)Pages: 246, PDF Size: 17.16 MB
Page 36 of 246
Door openRead and observe
on page 33 first.
The indicator light
illuminates if one or several doors are opened.
Engine oil pressure
Read and observe
on page 33 first.
When the warning light is flashing
, the engine oil pressure is too low.
The following message is shown in the MAXI DOT display. Oil pressure: Log book!
›
Stop the vehicle, switch off the engine, and check the engine oil lev-
el » page 186 .
If the warning light flashes,
do not drive any further , even if the oil level is
correct! Also do not leave the engine running at an idling speed.
Seek help from a specialist garage.
Coolant
Read and observe
on page 33 first.
If the warning light
lights up or flashes , either the coolant temperature is
too high or the coolant level is too low.
The following message is shown in the MAXI DOT display. Check coolant! Log book!
›
Stop the vehicle, switch off the engine, and check the coolant lev-
el » page 188 .
›
If the coolant level is too low, add coolant to the reservoir » page 188.
If the indicator light
does not illuminate after adding coolant and switching
on the ignition, you may continue your journey.
If the coolant level is within the specified range and the indicator light is still
illuminated, then there may be a malfunction of the cooling fan.
›
Check the fuse for the radiator fan, replace if necessary » page 217, Fuses in
the engine compartment .
If the coolant level and fan fuse are both OK but the indicator light is still
illuminated , do not continue your journey!
Seek help from a specialist garage.WARNING■ Carefully open the coolant expansion bottle. If the engine is hot, the cool-
ing system is pressurized - risk of scalding! It is therefore best to allow the
engine to cool down before removing the cap.■
Do not touch the radiator fan. The radiator fan may switch itself on auto-
matically even if the ignition is off.
CAUTION
■ Additional headlights and other attached components in front of the air inlet
impair the cooling efficiency of the coolant.■
Never cover the radiator - there is a risk of the engine overheating.
Bonnet
Read and observe
on page 33 first.
The indicator light
illuminates if the bonnet is unlocked.
Boot lid
Read and observe
on page 33 first.
The indicator light
illuminates if the boot lid is opened.
Power steering / steering lock (system KESSY)
Read and observe
on page 33 first.
Power steering
If the indicator light
illuminates , this indicates a partial failure of the power
steering and the steering forces can be greater.
If the indicator light
illuminates , this indicates a complete failure of the
power steering and the steering assist has failed (significantly higher steering
forces).
›
Stop the car, turn the ignition off and on again.
The powered steering is fully functional again if the
or
warning light does
not illuminate after you switch the engine back on.
34Operation
Page 37 of 246
If the warning light or illuminates again, then immediately obtain help
from an authorised dealer.
Steering lock (KESSY system)
As long as the warning light
is flashing , the steering lock cannot be re-
leased.
If the warning light
flashes , a signal tone sounds, and the following mes-
sage appears in the MAXI DOT- display steering column lock. If Workshop! ap-
pears the electrical steering lock is faulty. Seek assistance from a specialist ga-
rage immediately.
If the warning light
flashes , a beep sounds and in the MAXI DOT display the
message Steering lock defective appears, then the electric steering lock is
broken. Park the car,
do not continue the journey . After switching off the
ignition, it is then no longer possible to lock the steering, to activate the elec-
trical components (e.g. radio, navigation system), to switch on the ignition
again and to start the engine. Seek help from a specialist garage.
Note
The warning light illuminates after the ignition is switched on if the vehi-
cle's battery has been disconnected and reconnected. If the warning light
does not go out after moving a short distance, this means there is an error in
the system. Seek assistance from a specialist garage immediately.
Engine oil level
Read and observe
on page 33 first.
The indicator light lights up (oil quantity too low)
The following message is shown in the MAXI DOT display.
Check oil level!
› Stop the vehicle, switch off the engine, and check the engine oil lev-
el » page 186 .
The warning light will go out if the bonnet is left open for more than 30 sec-
onds. If no engine oil has been replenished, the warning light will come on
again after driving about 100 km.
The indicator light flashes (engine oil level sensor faulty)
The following message is shown in the MAXI DOT display.
Oil sensor: Workshop!
If the engine oil level sensor is faulty, the warning light flashes several
times and an audible signal sounds when the ignition is turned on.
Seek assistance from a specialist garage immediately.
Traction Control System (ASR)
Read and observe
on page 33 first.
The warning light
flashes to show that the ASR is currently operating.
If the warning light
illuminates , there is a fault in the ASR.
The following message is shown in the MAXI DOT display. Error: Traction control (ASR)
Seek assistance from a specialist garage immediately.
If the warning light
illuminates immediately after you start the engine, the
ASR might be switched off due to technical reasons.
›
Switch the ignition off and on again.
The ASR is fully functional again if the warning light
no longer illuminates
after you switch the engine back on.
Further information » page 152.
Note
The warning light illuminates after the ignition is switched on if the vehi-
cle's battery has been disconnected and reconnected. If the warning light
does not go out after moving a short distance, this means there is an error in
the system. Seek assistance from a specialist garage immediately.
Electronic Stability Control (ESC)
Read and observe
on page 33 first.
The warning light
flashes to show that the ESC is currently operating.
If the warning light
illuminates , there is a fault in the ESC.
The following message is shown in the MAXI DOT display. Error: Electronic Stability Control (ESC)
Seek assistance from a specialist garage immediately.
35Instruments and Indicator Lights
Page 186 of 246
Engine compartment overviewFig. 161
Principle sketch: Engine compartment
Read and observe
and on page 182 first.
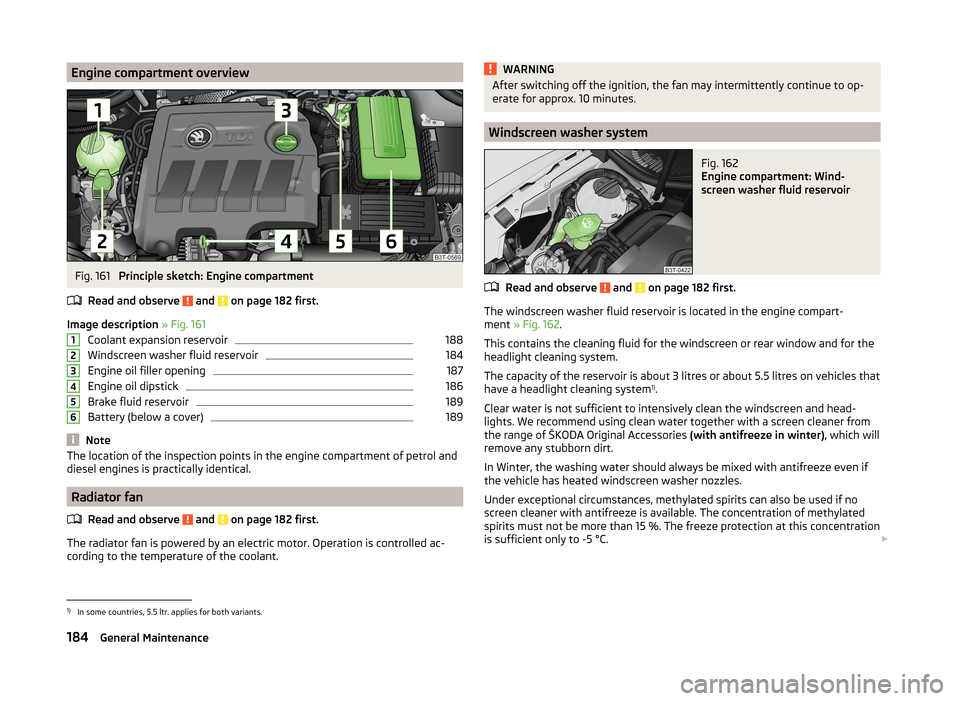
Image description » Fig. 161
Coolant expansion reservoir
188
Windscreen washer fluid reservoir
184
Engine oil filler opening
187
Engine oil dipstick
186
Brake fluid reservoir
189
Battery (below a cover)
189
Note
The location of the inspection points in the engine compartment of petrol and
diesel engines is practically identical.
Radiator fan
Read and observe
and on page 182 first.
The radiator fan is powered by an electric motor. Operation is controlled ac-
cording to the temperature of the coolant.
123456WARNINGAfter switching off the ignition, the fan may intermittently continue to op-
erate for approx. 10 minutes.
Windscreen washer system
Fig. 162
Engine compartment: Wind-
screen washer fluid reservoir
Read and observe and on page 182 first.
The windscreen washer fluid reservoir is located in the engine compart-
ment » Fig. 162 .
This contains the cleaning fluid for the windscreen or rear window and for the
headlight cleaning system.
The capacity of the reservoir is about 3 litres or about 5.5 litres on vehicles that
have a headlight cleaning system 1)
.
Clear water is not sufficient to intensively clean the windscreen and head-
lights. We recommend using clean water together with a screen cleaner from
the range of ŠKODA Original Accessories (with antifreeze in winter), which will
remove any stubborn dirt.
In Winter, the washing water should always be mixed with antifreeze even if
the vehicle has heated windscreen washer nozzles.
Under exceptional circumstances, methylated spirits can also be used if no
screen cleaner with antifreeze is available. The concentration of methylated
spirits must not be more than 15 %. The freeze protection at this concentration
is sufficient only to -5 °C.
1)
In some countries, 5.5 ltr. applies for both variants.
184General Maintenance
Page 187 of 246
CAUTION■Under no circumstances must radiator antifreeze or other additives be added
to the windscreen washer fluid.■
If the vehicle is fitted with a headlight cleaning system, only cleaning prod-
ucts which do not attack the polycarbonate coating of the headlights must be
added to the windscreen washer fluid.
■
Do not remove the filter from the windscreen washer fluid reservoir when re-
filling, as this may cause contamination of the liquid transportation system,
leading in turn to a windscreen washer system malfunction.
Engine oil
Introduction
This chapter contains information on the following subjects:
Specifications and capacity
185
Checking the oil level
186
Replenishing
187
Changing
187
The engine has been factory-filled with a high-grade oil that can be use
throughout the year - except in extreme climate zones.
The engine oils are undergoing continuous further development. Thus the in- formation stated in this Owner's Manual is only correct at the time of publica-
tion.
ŠKODA Service Partners are informed about the latest changes by the manu-
facturer. We therefore recommend that the oil change be completed by a
ŠKODA Service Partner.
The specifications (VW standards) stated in the following can be indicated sep-
arately or together with other specifications on the bottle.
The oil capacities include oil filter change. Check the oil level when filling; do
not over fill. The oil level must be between the markings » page 186.
WARNING■
The engine compartment of your car is a hazardous area. The following
warning instructions must be followed at all times when working in the en-
gine compartment » page 182.■
Do not continue your journey if for some reason it is not possible to top
up the engine oil
. Switch off the engine and seek assistance from a spe-
cialist garage.
■
Do not drive on if the oil level is above range
A
» Fig. 163 on page 186
. Switch off the engine and seek assistance from a specialist garage.
CAUTION
Do not pour any additives into the engine oil – risk of serious damage to the
engine parts!
Note
■ Before a long drive we recommend that you purchase and carry with you en-
gine oil which complies with the specification for your vehicle.■
We recommend that you use oils from ŠKODA Original Accessories.
■
If your skin has come into contact with oil, it must be washed thoroughly.
Specifications and capacity
Read and observe
and on page 185 first.
Specifications and capacity (in l) for vehicles with flexible service intervals
Petrol enginesSpecificationCapacity1.4 ltr./92 kW TSIVW 503 00, VW 504 003.61.8 l/112, 118 kW TSIVW 504 004.62.0 ltr./147 kW TSIVW 504 004.63.6 l/191 kW FSIVW 504 005.5Diesel engines a)SpecificationCapacity1.6 ltr./77 kW TDI CRVW 507 004.32.0 ltr/103 kW TDI CR DPFVW 507 004.32.0 ltr/125 kW TDI CR DPFVW 507 004.3a)
Engine oil VW 505 01 can optionally be used in diesel engines
without a DPF.
185Inspecting and replenishing
Page 188 of 246
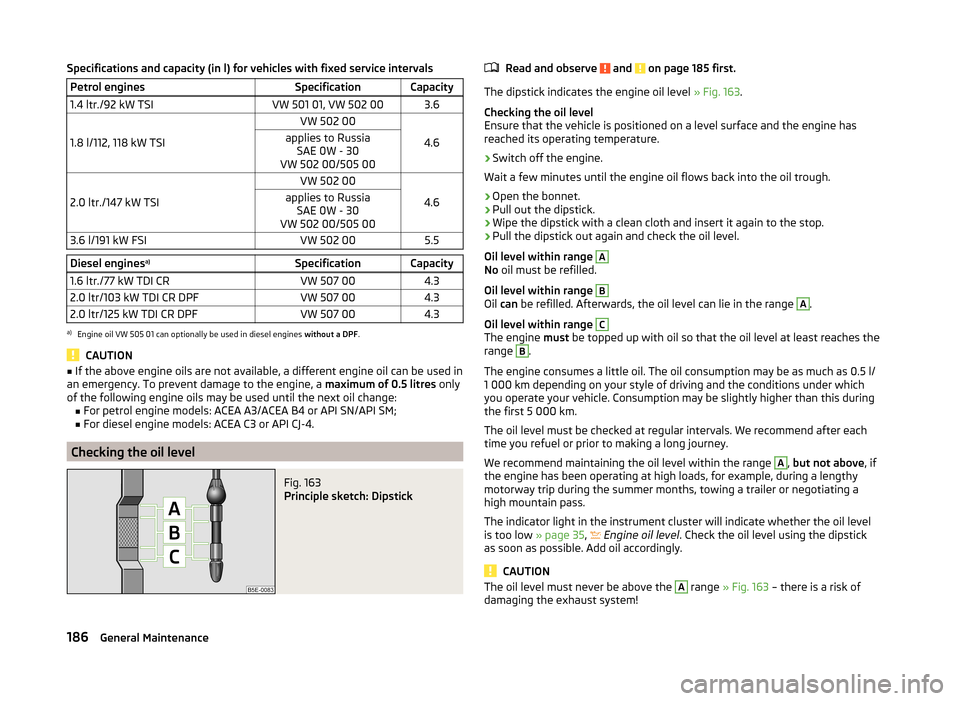
Specifications and capacity (in l) for vehicles with fixed service intervalsPetrol enginesSpecificationCapacity1.4 ltr./92 kW TSIVW 501 01, VW 502 003.6
1.8 l/112, 118 kW TSI
VW 502 00
4.6
applies to RussiaSAE 0W - 30
VW 502 00/505 00
2.0 ltr./147 kW TSI
VW 502 00
4.6
applies to Russia SAE 0W - 30
VW 502 00/505 003.6 l/191 kW FSIVW 502 005.5Diesel engines a)SpecificationCapacity1.6 ltr./77 kW TDI CRVW 507 004.32.0 ltr/103 kW TDI CR DPFVW 507 004.32.0 ltr/125 kW TDI CR DPFVW 507 004.3a)
Engine oil VW 505 01 can optionally be used in diesel engines
without a DPF.
CAUTION
■
If the above engine oils are not available, a different engine oil can be used in
an emergency. To prevent damage to the engine, a maximum of 0.5 litres only
of the following engine oils may be used until the next oil change: ■ For petrol engine models: ACEA A3/ACEA B4 or API SN/API SM;
■ For diesel engine models: ACEA C3 or API CJ-4.
Checking the oil level
Fig. 163
Principle sketch: Dipstick
Read and observe and on page 185 first.
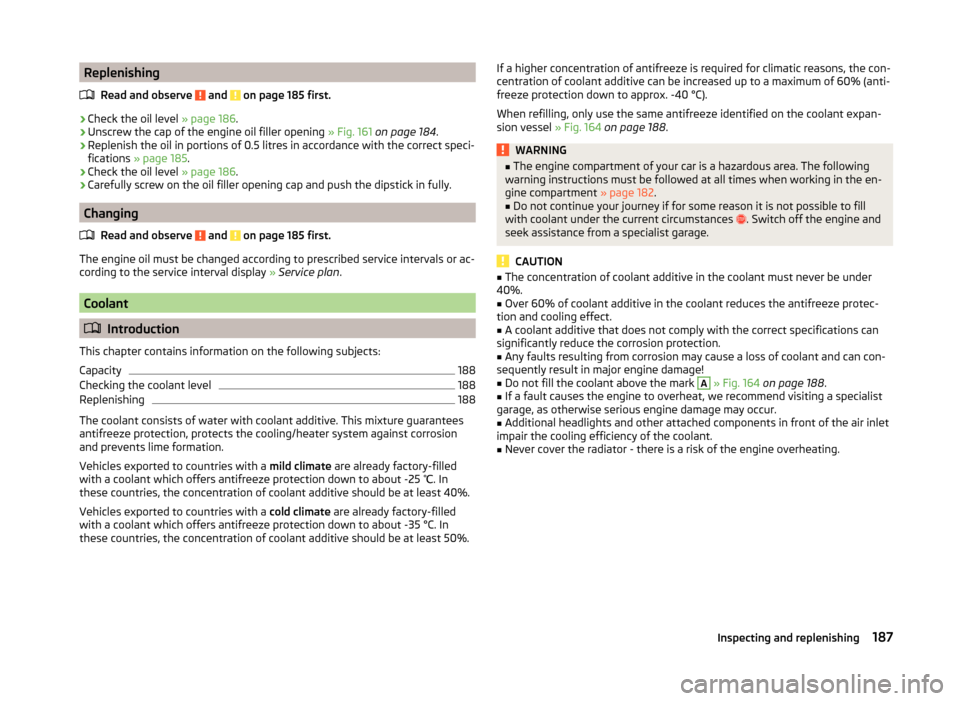
The dipstick indicates the engine oil level » Fig. 163.
Checking the oil level
Ensure that the vehicle is positioned on a level surface and the engine has
reached its operating temperature.
›
Switch off the engine.
Wait a few minutes until the engine oil flows back into the oil trough.
›
Open the bonnet.
›
Pull out the dipstick.
›
Wipe the dipstick with a clean cloth and insert it again to the stop.
›
Pull the dipstick out again and check the oil level.
Oil level within range
A
No oil must be refilled.
Oil level within range
B
Oil can be refilled. Afterwards, the oil level can lie in the range
A
.
Oil level within range
C
The engine must be topped up with oil so that the oil level at least reaches the
range
B
.
The engine consumes a little oil. The oil consumption may be as much as 0.5 l/
1 000 km depending on your style of driving and the conditions under which
you operate your vehicle. Consumption may be slightly higher than this during
the first 5 000 km.
The oil level must be checked at regular intervals. We recommend after each
time you refuel or prior to making a long journey.
We recommend maintaining the oil level within the range
A
, but not above , if
the engine has been operating at high loads, for example, during a lengthy
motorway trip during the summer months, towing a trailer or negotiating a
high mountain pass.
The indicator light in the instrument cluster will indicate whether the oil level
is too low » page 35,
Engine oil level
. Check the oil level using the dipstick
as soon as possible. Add oil accordingly.
CAUTION
The oil level must never be above the A range » Fig. 163 – there is a risk of
damaging the exhaust system!186General Maintenance
Page 189 of 246
ReplenishingRead and observe
and on page 185 first.
›
Check the oil level » page 186.
›
Unscrew the cap of the engine oil filler opening » Fig. 161 on page 184 .
›
Replenish the oil in portions of 0.5 litres in accordance with the correct speci-
fications » page 185 .
›
Check the oil level » page 186.
›
Carefully screw on the oil filler opening cap and push the dipstick in fully.
Changing
Read and observe
and on page 185 first.
The engine oil must be changed according to prescribed service intervals or ac-
cording to the service interval display » Service plan .
Coolant
Introduction
This chapter contains information on the following subjects:
Capacity
188
Checking the coolant level
188
Replenishing
188
The coolant consists of water with coolant additive. This mixture guarantees
antifreeze protection, protects the cooling/heater system against corrosion
and prevents lime formation.
Vehicles exported to countries with a mild climate are already factory-filled
with a coolant which offers antifreeze protection down to about -25 ℃. In
these countries, the concentration of coolant additive should be at least 40%.
Vehicles exported to countries with a cold climate are already factory-filled
with a coolant which offers antifreeze protection down to about -35 °C. In
these countries, the concentration of coolant additive should be at least 50%.
If a higher concentration of antifreeze is required for climatic reasons, the con-
centration of coolant additive can be increased up to a maximum of 60% (anti-
freeze protection down to approx. -40 °C).
When refilling, only use the same antifreeze identified on the coolant expan-
sion vessel » Fig. 164 on page 188 .WARNING■
The engine compartment of your car is a hazardous area. The following
warning instructions must be followed at all times when working in the en-
gine compartment » page 182.■
Do not continue your journey if for some reason it is not possible to fill
with coolant under the current circumstances
. Switch off the engine and
seek assistance from a specialist garage.
CAUTION
■ The concentration of coolant additive in the coolant must never be under
40%.■
Over 60% of coolant additive in the coolant reduces the antifreeze protec-
tion and cooling effect.
■
A coolant additive that does not comply with the correct specifications can
significantly reduce the corrosion protection.
■
Any faults resulting from corrosion may cause a loss of coolant and can con-
sequently result in major engine damage!
■
Do not fill the coolant above the mark
A
» Fig. 164 on page 188 .
■
If a fault causes the engine to overheat, we recommend visiting a specialist
garage, as otherwise serious engine damage may occur.
■
Additional headlights and other attached components in front of the air inlet
impair the cooling efficiency of the coolant.
■
Never cover the radiator - there is a risk of the engine overheating.
187Inspecting and replenishing
Page 212 of 246
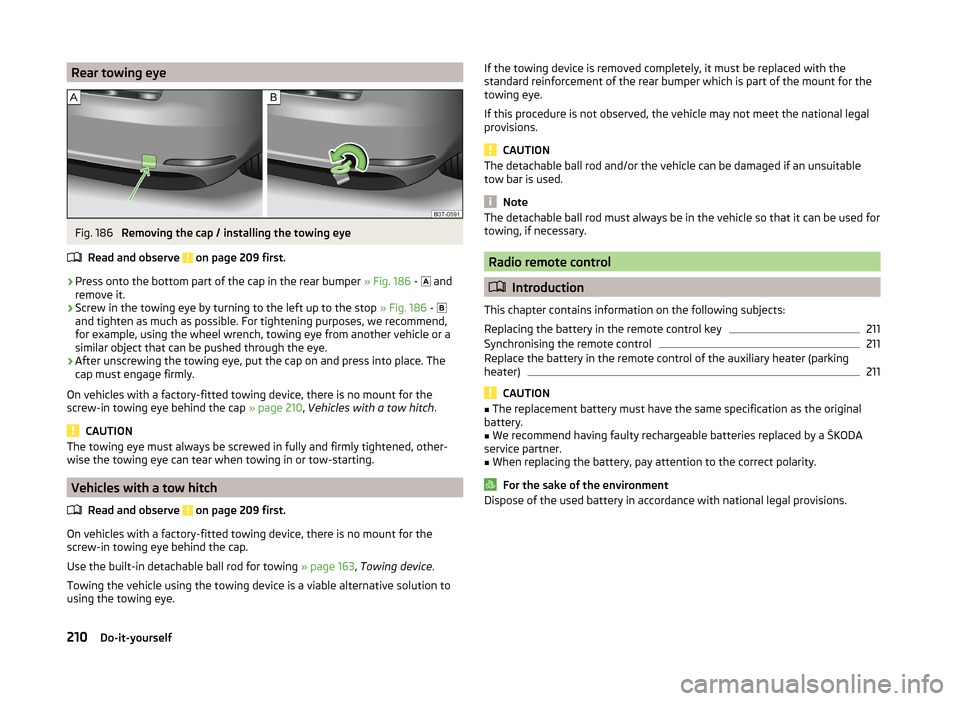
Rear towing eyeFig. 186
Removing the cap / installing the towing eye
Read and observe
on page 209 first.
›
Press onto the bottom part of the cap in the rear bumper » Fig. 186 -
and
remove it.
›
Screw in the towing eye by turning to the left up to the stop » Fig. 186 -
and tighten as much as possible. For tightening purposes, we recommend,
for example, using the wheel wrench, towing eye from another vehicle or a
similar object that can be pushed through the eye.
›
After unscrewing the towing eye, put the cap on and press into place. The
cap must engage firmly.
On vehicles with a factory-fitted towing device, there is no mount for the
screw-in towing eye behind the cap » page 210, Vehicles with a tow hitch .
CAUTION
The towing eye must always be screwed in fully and firmly tightened, other-
wise the towing eye can tear when towing in or tow-starting.
Vehicles with a tow hitch
Read and observe
on page 209 first.
On vehicles with a factory-fitted towing device, there is no mount for the
screw-in towing eye behind the cap.
Use the built-in detachable ball rod for towing » page 163, Towing device .
Towing the vehicle using the towing device is a viable alternative solution to
using the towing eye.
If the towing device is removed completely, it must be replaced with the
standard reinforcement of the rear bumper which is part of the mount for the
towing eye.
If this procedure is not observed, the vehicle may not meet the national legal
provisions.
CAUTION
The detachable ball rod and/or the vehicle can be damaged if an unsuitable
tow bar is used.
Note
The detachable ball rod must always be in the vehicle so that it can be used for
towing, if necessary.
Radio remote control
Introduction
This chapter contains information on the following subjects:
Replacing the battery in the remote control key
211
Synchronising the remote control
211
Replace the battery in the remote control of the auxiliary heater (parking
heater)
211
CAUTION
■ The replacement battery must have the same specification as the original
battery.■
We recommend having faulty rechargeable batteries replaced by a ŠKODA
service partner.
■
When replacing the battery, pay attention to the correct polarity.
For the sake of the environment
Dispose of the used battery in accordance with national legal provisions.210Do-it-yourself
Page 235 of 246
Folding hook97
Non-closable side pocket (Superb Combi)100
Removable Light (Superb Combi)101
Roll-up boot cover (Superb Combi)99
Side compartment with battery100
Boot cover (Superb Combi)99
Boot lid55
automatic locking56
Warning light34
(Superb Combi)56
Brake Information messages
33
Warning light33
Brake booster141
Brake fluid189
Changing189
Checking189
Information messages33
Brake pads warning light
38
Brakes Brake assist systems
151
Brake booster141
Brake fluid189
Handbrake141
Running in145
Braking Information on braking
140
Breakdown kit205
Break recommendation See Fatigue detection
162
Bulbs Replacing
219
Button in the driver's door Electric power windows
59
C
Car care
169
Car computer See multifunction display
41
Car park ticket holder87
Carrier106
Cavity protection176
CD changer133
Central locking48
Central locking button52
Changing Brake fluid
189
Engine oil187
Wheels201
Changing a wheel Follow-up work
202
Preliminary work202
Remove and attaching a wheel202
Charging a vehicle battery192
Check Fit ball head properly
165
Checking Battery electrolyte level
191
Brake fluid189
Coolant188
Engine oil186
Oil level186
Windscreen washer fluid184
Children and safety21
Child safety Side airbag
22
Child safety lock53
Child seat Classification
23
ISOFIX23
on the front passenger seat21
TOP TETHER24
Use of child seats23
Use of ISOFIX child seats24
Chrome parts refer to Taking care of your vehicle
174
Cigarette lighter89
Cleaning169
Alcantara178
Artificial leather178
cloths178
Covers of electrically heated seats178
Headlight lenses175
Natural leather177
Plastic parts174
Wheels176
Climatronic113
Air recirculation115
automatic mode114
Control elements113
Controlling blower116
Cooling system114
Defrosting windscreen116
Setting the temperature114
Clothes hook92
Cockpit 12-Volt power outlet
90
Ashtray89
Cigarette lighter89
General view27
Lighting71
Practical equipment86
Storage compartments86
Comfort control window
61
COMING HOME70
Compartments86
Computer See multifunction display
41
Convenience operation sliding / tilting roof
63
sliding / tilting roof (Superb Estate)65
convenience turn signal67
Coolant187
Checking188
Information messages34
Replenishing188
233Index
Page 236 of 246
Temperature gauge29
Warning light34
CORNER See Fog lights with CORNER function
69
Correct seated position7
Driver7
Front passenger8
Instructions9
Rear seats9
Counter for distance driven30
Cruise control system Activating/deactivating
158
Changing the stored speed159
Storing and maintaining speed159
Switching off temporarily159
Warning light39
Cruise Control System158
Cup holders88
D
DAY LIGHT see Daylight running lights
67
Daylight running lights67
De-icing the windscreen and rear window73
Deactivating an airbag19
Decorative films175
Delayed locking of the boot lid see boot lid
56
Diesel refer to Fuel
181
diesel - particulate filter
37
Diesel fuel Operation in winter
181
Diesel particulate filter warning light
37
Digital Clock Time
30
Dipstick186
Display29
Compass points46
Coolant temperature29
Fuel supply30
Gear changes40
Service intervals46
Display a low temperature40
Display of the second speed31
Distance driven30
Door Child safety lock
53
Closing53
Emergency locking the driver's door212
Opening53
Warning light door open34
Door locking Emergency
212
Door open Warning light
34
Doors Emergency locking
212
Driver Steering Recommendation (DSR)152
Driving Abroad
150
Driving through water on streets149
Emissions225
Fuel consumption225
Driving economically Economical gear changing
146
Driving through water149
DSR152
DVD-preinstallation134
E
Economical and environmentally friendly driv- ing
146
Economical driving Ballast
147
Driving at full throttle147
Idling147
Looking ahead146
Regular maintenance148
Saving energy148
Short distances147
Tyre inflation pressure147
EDL Operation
152
Electrical power windows61
Button in the driver's door59, 60
Button in the rear doors61
Operational faults62
Electric boot lid Force limit
57
Manual operation57
Electric luggage compartment lid Acoustic signals
59
Adjusting the top lid position59
Deleting the top lid position59
Malfunctions59
Operating57
Electric sliding/tilting roof62
Electronic Differential Lock (EDL)152
Electronic immobilizer136
Electronic Stability Control (ESC)151
Emergency Activation of the sliding/tilting roof
214
Changing a wheel201
Door locking212
Hazard warning light system70
jump-starting207
Jump-starting207
Locking the driver's door212
Selector lever-unlocking213
Sliding/tilting roof213
Start engine - KESSY139
Switching off the ignition –KESSY140
Towing the using the tow hitch210
Towing the vehicle208
Tyre repair204
234Index
Page 237 of 246
Unlocking the driver's door212
Unlocking the tailgate212
Emergency equipment Fire extinguisher
200
First aid kit200
Jack201
Vehicle tool kit201
Warning triangle200
Emissions225
Engine Running in
145
Engine compartment182
Brake fluid189
Coolant188
Overview184
Vehicle battery189
Engine number224
Engine oil185
Capacity185
Changing187
Checking186
Information message34
Replenishing187
Specifications185
Engine oil level Warning light
35
Engine oil pressure Warning light
34
Entry lighting73
Environment146
Environmental compatibility148
Environmentally friendly driving146
EPC Warning light
37
ESC Function
151
Warning light35
Exhaust inspection system Warning light
36
Extending variable loading flooPartial extension103
Extending variable loading floor103
Divide boot103
Movable lashing eyes105
Extrending variable loading floor Fixing set
104
F
Fastening elements
97
Fatigue detection162
Function162
Information messages162
Films175
Fire extinguisher200
First aid kit200
Floor covering Fixing
98
Fog lights69
Warning light39
Fog lights with CORNER function69
Folding hook97
Fold in passenger's mirror78
Footmats142
see footmats142
Force limit Electric boot lid (Superb Combi)
57
Power windows61
Sliding/tilting roof62
Sliding/tilting roof (Superb Combi)64
Front airbag15
Front door warning light72
Front interior light71
Fuel179
Diesel181
Fuel gauge30
refer to Fuel179
Refuelling180
Unleaded petrol180
Fuel consumption146, 225
Fuel reserve Warning light
37
Fuses Assignment
215
Colour coding215
Fuse assignment in the engine compartment218
Replacing215
G
Gearbox Warning messages
31
Gear change Gear recommendation
40
Information on the selected gear40
Gear changing Gear stick
141
General view Cockpit
27
Generator Indicator light
33
Glasses storage box91
Glow plug system Warning light
36
GSM122, 124
H
Handbrake
141
Warning light33
Hands-free system Voice control
129
Hazard warning light system70
HBA152
Head airbag18
Headlight cleaning system Headlight cleaning system
77
235Index