wiper blades SKODA SUPERB 2014 2.G / (B6/3T) Owner's Manual
[x] Cancel search | Manufacturer: SKODA, Model Year: 2014, Model line: SUPERB, Model: SKODA SUPERB 2014 2.G / (B6/3T)Pages: 246, PDF Size: 17.16 MB
Page 6 of 246
Inspecting and replenishing179Fuel179
Engine compartment
182
Engine oil
185
Coolant
187
Brake fluid
189
Vehicle battery
189
Wheels
193
Tyres and wheel rims
193
Winter operation
198
Do-it-yourself
Emergency equipment and self-help
200
Emergency equipment
200
Changing a wheel
201
Tyre repair
204
Jump-starting
207
Towing the vehicle
208
Radio remote control
210
Emergency unlocking/locking
212
Emergency operation of the sliding/tilting
roof
213
Replacing windscreen wiper blades
214
Fuses and light bulbs
215
Fuses
215
Bulbs
219
Technical data
Technical data
224
Vehicle data
224
Index
4Table of Contents
Page 8 of 246
Safety
Passive Safety
General information
Introduction
This chapter contains information on the following subjects:
Before setting off
6
Driving safety
6
Safety equipment
6
In this section you will find important information, tips and notes on the sub-
ject of passive safety in your vehicle.
We have combined everything here which you should be familiar with, for ex-
ample, regarding seat belts, airbags, child seats and safety of children.
WARNING■ This chapter contains important information on how to use the vehicle for
the driver and his occupants.■
You can find further information on safety concerning you and those trav-
elling with you in the following chapters of this owner's manual.
■
The complete on-board literature should always be in the vehicle. This
applies in particular, if you rent out or sell the vehicle.
Before setting off
Read and observe
on page 6 first.
For your own safety and the safety of the people travelling with you, please
pay attention to the following points before setting off.
Ensure that the lighting and the turn signal system are functioning proper-
ly.
Ensure that the function of the wiper and the condition of the wiper
blades are free of any defects.
Ensure that all of the windows offer good visibility to the outside.
Adjust the rear-view mirror so that vision to the rear is guaranteed.
Ensure that the mirrors are not covered.
Check the tyre inflation pressure.
Check the engine oil, brake fluid and coolant level.
Secure all items of luggage.
Do not exceed the permissible axle loads and permissible gross weight of
the vehicle.
Close all doors as well as the bonnet and boot lid.
Ensure that no objects can obstruct the pedals.
Protect children in suitable child seats with correctly fastened seat
belts » page 21 , Transporting children safely .
Adopt the correct seated position » page 7, Correct and safe seated
position . Tell your passengers to assume the correct seated position.
Driving safety
Read and observe
on page 6 first.
The driver is fully responsible for himself and his occupants. If your driving
safety is effected, you place yourself and the oncoming traffic at risk.
The following guidelines must therefore be observed. Do not become distracted from concentrating on the traffic situation, e.g.
by your passengers or mobile phone calls.
Never drive when your driving ability is impaired, e.g. due to medication, al-
cohol or drugs.
Keep to the traffic regulations and the permissible speed limit.
Always adjust the driving speed to the road, traffic and weather condi-
tions.
Take regular breaks on long journeys – at least every two hours.
Safety equipment
Read and observe
on page 6 first.
The following list contains only part of the safety equipment in your vehicle.
› Three-point seat belts for all the seats.
› Belt force limiter for front and outer rear seats.
› Belt tensioner for front and outer rear seats.
› Seat belt height adjusters for the front seats.
› Front airbag for the driver and the front passenger.
› Driver’s knee airbag.
6Safety
Page 77 of 246
Retracting›Remove the sun screen from the handle A » Fig. 61 and hold it in such a way
that it can roll up slowly without being damaged.
Windscreen wipers and washers
Introduction
This chapter contains information on the following subjects:
Windscreen wipers and washers
76
Headlight cleaning system
77
The windscreen wipers and the wash system only operate if the ignition is
switched on and the bonnet is closed.
If the intermittent wipe is switched on, the intervals are also controlled de-
pending on speed.
When automatic wiping in rain is active, the wiper intervals are regulated
based on the intensity of the rain.
The rear window is wiped once automatically if the windscreen wipers are on
when reverse gear is selected.
Top up with windscreen wiper fluid » page 184.
WARNING■
Properly maintained windscreen wiper blades are essential for clear visi-
bility and safe driving » page 214.■
Replace the windscreen wiper blades once or twice a year for safety rea-
sons. These can be purchased from a ŠKODA Partner.
■
Do not use the windscreen washer system at low temperatures, without
heating the windscreen beforehand. Otherwise the window cleaner could
freeze on the windscreen and restrict the view to the front.
■
Automatic wiping in rain only operates as a support. The driver is not re-
leased from the responsibility to set the function of the windscreen wipers
manually depending on the visibility conditions.
CAUTION■ If the ignition is switched off while the windscreen wipers are switched on,
the windscreen wipers will continue wiping in the same mode after the igni-
tion is turned back on. The windscreen wipers could freeze up in cold tempera-
tures between the time the ignition was turned off and when it was turned
back on again.■
In cold temperatures and during the winter, check before the journey or be-
fore switching on the ignition that the wiper blades are not frozen to the
windscreen. If the windscreen wipers are switched on when the blades are fro-
zen to the windscreen, this may damage both the blades and windscreen wip-
er motor!
■
Carefully peel frozen wiper blades off the pane.
■
Remove snow and ice from the windscreen wipers before driving.
■
If the windscreen wipers are handled carelessly, there is a risk of damage to
the windscreen.
■
Do not switch on the ignition if the front wiper arms are retracted. The wiper
blades would move back into their rest position and while doing so damage
the paintwork of the bonnet.
■
If there is an obstacle on the windscreen, the wiper will try to push away the
obstacle. The wiper stops automatically after 5 attempts to eliminate the ob-
stacle, in order to avoid a damage to the wiper. Remove the the obstacle and
switch the wiper on again.
Note
■ Each time the ignition switches off for the third time, the position of the
windscreen wipers changes. This counteracts an early fatigue of the wiper rub-
bers.■
The rear window wiper only operates if the boot lid is closed.
■
The wiper blades should be cleaned on a regular basis with a windscreen
cleaner to avoid any smears. The wiper blades should be cleaned with a
sponge or cloth if they are heavily soiled by insect residues, for example.
■
Keep the wiper blades clean. They may become soiled, e.g., with wax resi-
dues after washing in automatic car wash systems » page 173.
■
The windscreen washer nozzles for the windscreen are heated when the en-
gine is running and the outside temperature is less than approx. +10 °C.
75Lights and visibility
Page 173 of 246
ŠKODA service partners are liable for any ŠKODA Genuine Part defects for aperiod of 2 years after installation or delivery in accordance with the materials
defect liability, provided that nothing else was agreed in the purchase contract
or in any other agreements. You should keep the approved warranty certificate
and the bill for these components for this period of time, so that commence-
ment of the term may be verified.
In addition, ŠKODA Service Partners also stock a range of suitable car care
products as well as those parts which are subject to natural wear-and-tear,
such as tyres, batteries, bulbs and wiper blades.
Note
The accessories authorized by the company ŠKODA AUTO a.s. will be offered
by the ŠKODA partners in all countries where the company ŠKODA AUTO a.s.
has a sales and service network. This will usually be in the form of a printed
catalogue of Original ŠKODA Accessories, in the form of separate printed bro-
chures or in the form of offers for ŠKODA Genuine Accessories on the ŠKODA
partner web pages.
Spoiler
Read and observe
on page 169 first.
If your new vehicle is fitted with a spoiler on the front bumper in combination
with the spoiler on the luggage compartment lid, the following instructions
must be adhered to.
› For safety reasons, the vehicle must only be fitted with a spoiler on the front
bumper in combination with the associated spoiler on the luggage compart-
ment lid.
› This kind of spoiler cannot be left on the front bumper either on its own, in
combination with another spoiler not on the luggage compartment lid or in
combination with an unsuitable spoiler on the luggage compartment lid.
› We recommend that you consult the ŠKODA Service Partner for any repairs
to or replacement, addition or removal of spoilers.
WARNINGIf work on your vehicle's spoilers is not carried out properly, this can lead to
operational faults - risk of accident and serious injuries.Airbags
Read and observe
on page 169 first.
The system components of the airbag system can be situated in the front
bumper, doors, front seats, roof lining or body.
WARNINGAny work on the airbag system including the installation and removal of
system components due to other repair work (e.g. removal of the steering
wheel) must only be carried out by a specialist garage.■
Modifications, repairs and technical alterations that have been carried out
unprofessionally can cause damage and operational faults, and can also se-
riously impair the effectiveness of the airbag system – risk of accident and
fatal injury!
■
The airbag system must then be replaced if the airbag has been deployed.
Airbag modules cannot be repaired.
WARNINGInformation on the use of the airbag system■It is prohibited to manipulate individual parts of the airbag system, as this
might result in the airbag being deployed.■
Never install any airbag parts into the vehicle that have been removed
from old cars or have been recycled.
■
Never install damaged airbag parts in the vehicle. The airbags may then
not be deployed properly or even at all in the event of an accident.
■
No modifications of any kind must be made to parts of the airbag system.
WARNING■ A change to the vehicle's wheel suspension, including the use of non-ap-
proved wheels and tire combinations, can alter the functioning of the air-
bag system - risk of accident and fatal injury!■
Never make any changes to the front bumper or the bodywork.
171Car care
Page 216 of 246
Note■It is necessary after each emergency operation to move the sliding/tilting
roof into the basic position. 1)
This is why the rotary switch must be set to posi-
tion A
» Fig. 45 on page 62 and pressed forwards for about 10 seconds.
■
After each emergency operation, it is necessary to activate the
roof 2)
» page 214 .
Activation after un-clamping and re-clamping the battery
The panoramic sliding/tilting roof (referred to form now on as just the sliding/
tiling roof) and the sun screen must be activated after disconnecting and re-
connecting the battery.
To activate the sliding/tilting roof, press the notch on the control dial down-
wards and forwards for approx. 10 seconds.
To activate the sun screen, press and hold the switch
G
» Fig. 47 on
page 64 for approx. 10 seconds.
If the sliding/tilting roof or sun screen is not fully closed or pushed shut when
disconnecting and reconnecting the battery, they must first be closed or push-
ed shut » page 64 , Opening/closing the sun screen » page 64 , Operation . Only
then is it possible to perform the activation.
Replacing windscreen wiper blades
Introduction
This chapter contains information on the following subjects:
Replacing the windscreen wiper blades
214
Replacing the rear window wiper blade
215WARNINGReplace the windscreen wiper blades once or twice a year for safety rea-
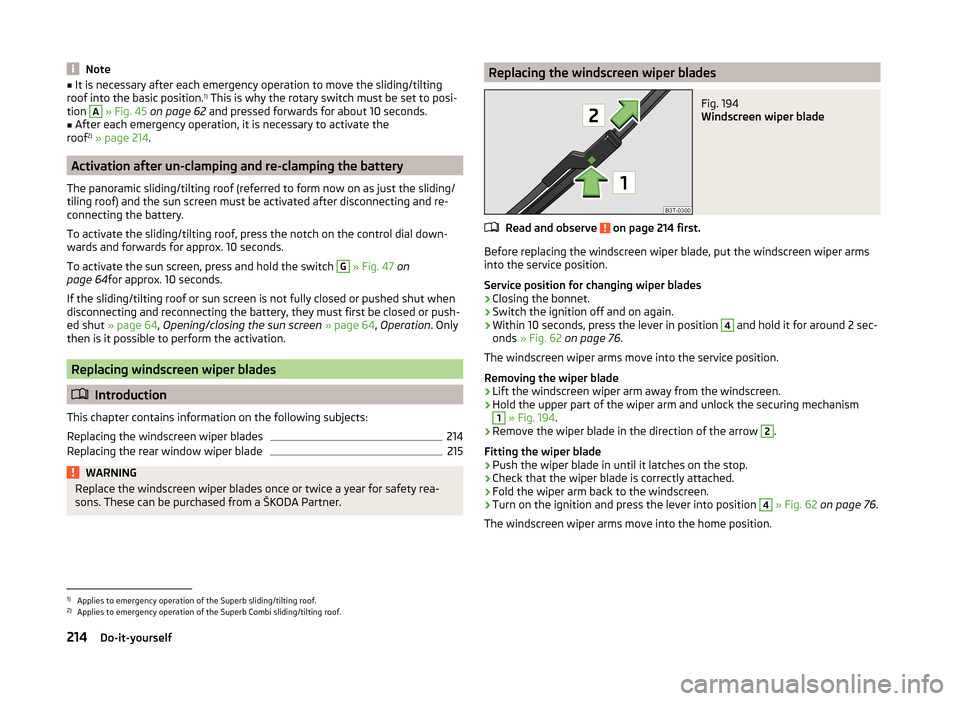
sons. These can be purchased from a ŠKODA Partner.Replacing the windscreen wiper bladesFig. 194
Windscreen wiper blade
Read and observe on page 214 first.
Before replacing the windscreen wiper blade, put the windscreen wiper arms
into the service position.
Service position for changing wiper blades
›
Closing the bonnet.
›
Switch the ignition off and on again.
›
Within 10 seconds, press the lever in position
4
and hold it for around 2 sec-
onds » Fig. 62 on page 76 .
The windscreen wiper arms move into the service position.
Removing the wiper blade
›
Lift the windscreen wiper arm away from the windscreen.
›
Hold the upper part of the wiper arm and unlock the securing mechanism
1
» Fig. 194 .
›
Remove the wiper blade in the direction of the arrow
2
.
Fitting the wiper blade
›
Push the wiper blade in until it latches on the stop.
›
Check that the wiper blade is correctly attached.
›
Fold the wiper arm back to the windscreen.
›
Turn on the ignition and press the lever into position
4
» Fig. 62 on page 76 .
The windscreen wiper arms move into the home position.
1)
Applies to emergency operation of the Superb sliding/tilting roof.
2)
Applies to emergency operation of the Superb Combi sliding/tilting roof.
214Do-it-yourself
Page 240 of 246
Passive safetyBefore setting off6
Driving safety6
Safety equipment6
Passive Safety6
Payload224
Pedals142
Footmats142
Petrol refer to Fuel
180
Polishing the paintwork See Taking care of your vehicle
174
Power outlet 12 V
90
Power Steering / steering lock (KESSY system) warning light
34
Power windows Button in the front passenger door
61
Practical features86
12-Volt power outlet90
Storage compartment for umbrella93
Storage compartment in rear centre console93
Storage compartment on the passenger side92
Storage compartment under the armrest, front 90
Storage compartment under the passenger seat
92
Storage net in the front centre console91
Storage pockets on the front seats93
R
Radiator fan
184
Radio reception See windows
175
Radio remote control Auxiliary heating
118
Raise vehicle203
Rear-view mirror Exterior mirrors78
Fold in passenger mirror78
Synchronous adjustment of the rear-view mir- ror
78
Rear fog light69
Warning light36
Rear interior light72
Rear mirror77
Interior mirror77
Rear seats Seat folded forward Combi
86
Rear window - heater73
Recirculated air mode Manual air conditioning
112
Refuelling180
Fuel180
Remote control lock
49
Replacing the battery211
Synchronisation process211
unlock49
Remote control key Replacing the battery
211
Removable lights (Superb Combi) Changing rechargeable light batteries
101
Removable Light (Superb Combi) Remove light
101
Removable ski bag95
Removable variable loading floor Fit and remove
104
Repairs and technical alterations169
Replace Vehicle battery
192
Replacing Bulb for main beam
221
Bulb for main beam and daytime running lights 220
Bulb for the fog light
221
Bulb for the licence plate light222
Bulb in rear light (Superb Combi)223
Bulbs219
Fuses215
Fuses in the dash panel216
Fuses in the engine compartment217
Low beam bulb220
Wiper blades214
Replenishing Coolant
188
Engine oil187
Windscreen washer fluid184
Revolutions counter29
Roof luggage rack Attachment points
107
Roof rack system106
Roof load107
Running-in The first 1500 km
145
Running in Brake pads
145
Engine145
Tyres145
S
SAFE see Safe securing
51
SAFELOCK see Safe securing
51
Safe securing51
Safety6
Child safety21
Child safety seats21
Correct seated position7
Head restraints81
ISOFIX23
TOP TETHER24
Saving electrical energy146
Screens see Sun screen in the rear doors
74
Seals Taking care of your vehicle
174
238Index
Page 243 of 246
Vehicle data sticker224
Vehicle dimensions226
Vehicle height226
Vehicle Identification Number (VIN)224
Vehicle key lock
49
unlock49
Vehicle length226
Vehicle tool kit201
Vehicle width226
Visibility73
Visors see Sun screen
74
see Sun visors74
W
Warning at excessive speeds
43
Warning lights32
warning messages Diesel particulate filter
37
Warning symbols see Warning lights
32
Warning triangle200
Washing169
Automatic car wash system173
by hand172
Chrome parts174
High-pressure cleaner173
Water Driving through
149
Wax treatment See Taking care of your vehicle
174
Weights Maximum permissible weights
224
Wheel bolts Anti-theft wheel bolt
204
Caps198
Loosening and tightening203
Wheel rims193
Wheels Bolts198
Changing201
Full trim198
General information193
Load index196
Replacing wheels194
Service life of tyres194
Snow chains199
Spare wheel197
Speed symbol196
Storing wheels194
Temporary spare wheel197
Tyre pressure194
Tyre sizes194
Tyre wear indicator194
Unidirectional tyres196
Winter tyres199
Wi-Fi127
Windows175
Deicing175
See electric power windows59
Windscreen Deicing
175
Heater73
Windscreen washer fluid Checking
184
Replenishing184
Warning light38
Winter184
Windscreen washers Windscreen washers
76
Windscreen washer system184
Windscreen wiper Replacing the rear window wiper blade
215
Windscreen wipers Operating
76
Replacing the windscreen wiper blades214
Windscreen washer fluid184
Windscreen wipers and washers75
Winter Deicing windows175
Winter operation198
Snow chains199
Winter tyres199
Winter tyres See Wheels
199
WLAN127
MAXI DOT128
Network connection128
Switching off128
Switching on128
241Index