lumbar support SKODA SUPERB 2014 2.G / (B6/3T) Owner's Manual
[x] Cancel search | Manufacturer: SKODA, Model Year: 2014, Model line: SUPERB, Model: SKODA SUPERB 2014 2.G / (B6/3T)Pages: 246, PDF Size: 17.16 MB
Page 82 of 246

Note■After a certain time, play can develop within the adjustment mechanism of
the backrest angle.■
For safety reasons, it is not possible to store the seat position in the electric
seat memory and remote control key memory if the inclination angle of the
seat backrest is more than 102° in relation to the seat cushion.
■
Each time you store the position of the electrically adjustable driver's seat
and exterior mirrors, the existing setting is deleted.
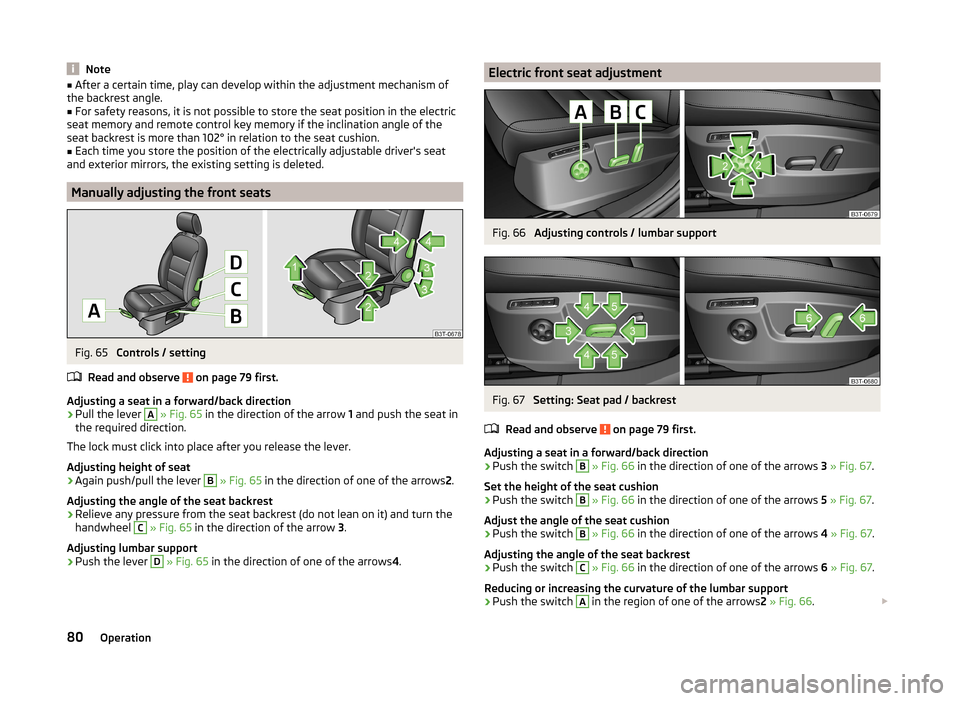
Manually adjusting the front seats
Fig. 65
Controls / setting
Read and observe
on page 79 first.
Adjusting a seat in a forward/back direction
›
Pull the lever
A
» Fig. 65 in the direction of the arrow 1 and push the seat in
the required direction.
The lock must click into place after you release the lever.
Adjusting height of seat
›
Again push/pull the lever
B
» Fig. 65 in the direction of one of the arrows 2.
Adjusting the angle of the seat backrest
›
Relieve any pressure from the seat backrest (do not lean on it) and turn the
handwheel
C
» Fig. 65 in the direction of the arrow 3.
Adjusting lumbar support
›
Push the lever
D
» Fig. 65 in the direction of one of the arrows 4.
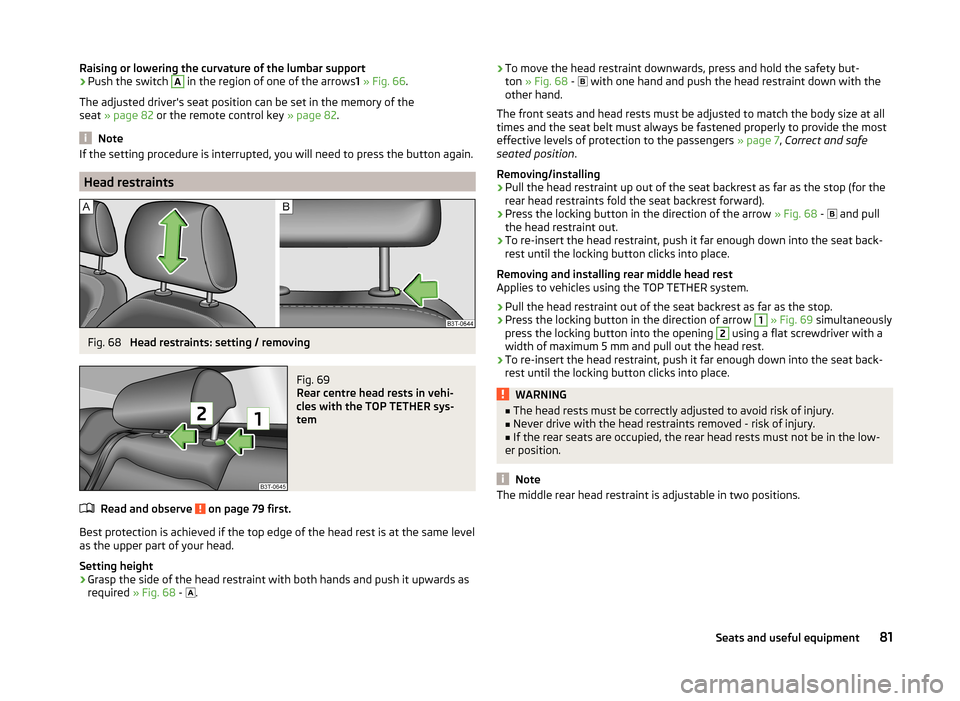
Electric front seat adjustmentFig. 66
Adjusting controls / lumbar support
Fig. 67
Setting: Seat pad / backrest
Read and observe
on page 79 first.
Adjusting a seat in a forward/back direction
›
Push the switch
B
» Fig. 66 in the direction of one of the arrows 3 » Fig. 67 .
Set the height of the seat cushion
›
Push the switch
B
» Fig. 66 in the direction of one of the arrows 5 » Fig. 67 .
Adjust the angle of the seat cushion
›
Push the switch
B
» Fig. 66 in the direction of one of the arrows 4 » Fig. 67 .
Adjusting the angle of the seat backrest
›
Push the switch
C
» Fig. 66 in the direction of one of the arrows 6 » Fig. 67 .
Reducing or increasing the curvature of the lumbar support
›
Push the switch
A
in the region of one of the arrows 2 » Fig. 66 .
80Operation
Page 83 of 246

Raising or lowering the curvature of the lumbar support›Push the switch A in the region of one of the arrows1 » Fig. 66 .
The adjusted driver's seat position can be set in the memory of the
seat » page 82 or the remote control key » page 82.
Note
If the setting procedure is interrupted, you will need to press the button again.
Head restraints
Fig. 68
Head restraints: setting / removing
Fig. 69
Rear centre head rests in vehi-
cles with the TOP TETHER sys-
tem
Read and observe on page 79 first.
Best protection is achieved if the top edge of the head rest is at the same level
as the upper part of your head.
Setting height
›
Grasp the side of the head restraint with both hands and push it upwards as
required » Fig. 68 -
.
›To move the head restraint downwards, press and hold the safety but-
ton » Fig. 68 - with one hand and push the head restraint down with the
other hand.
The front seats and head rests must be adjusted to match the body size at all
times and the seat belt must always be fastened properly to provide the most
effective levels of protection to the passengers » page 7, Correct and safe
seated position .
Removing/installing›
Pull the head restraint up out of the seat backrest as far as the stop (for the
rear head restraints fold the seat backrest forward).
›
Press the locking button in the direction of the arrow » Fig. 68 -
and pull
the head restraint out.
›
To re-insert the head restraint, push it far enough down into the seat back-
rest until the locking button clicks into place.
Removing and installing rear middle head rest
Applies to vehicles using the TOP TETHER system.
›
Pull the head restraint out of the seat backrest as far as the stop.
›
Press the locking button in the direction of arrow
1
» Fig. 69 simultaneously
press the locking button into the opening
2
using a flat screwdriver with a
width of maximum 5 mm and pull out the head rest.
›
To re-insert the head restraint, push it far enough down into the seat back-
rest until the locking button clicks into place.
WARNING■ The head rests must be correctly adjusted to avoid risk of injury.■Never drive with the head restraints removed - risk of injury.■
If the rear seats are occupied, the rear head rests must not be in the low-
er position.
Note
The middle rear head restraint is adjustable in two positions.81Seats and useful equipment